> ## Documentation Index
> Fetch the complete documentation index at: https://moengage.com/docs/llms.txt
> Use this file to discover all available pages before exploring further.
# Personalize Content Using Auxiliary Data
> Import auxiliary data files to personalize MoEngage campaigns without storing sensitive user information, ideal for banking and finance use cases.
# Overview
Before starting your journey with auxiliary data, you must configure an auxiliary data file. For more information, refer to [Auxiliary Data](/user-guide/data/imports/file-based-imports/auxiliary-data).
You can personalize your campaign content using auxiliary data by selecting the auxiliary data attributes in the personalization editor.
# Channels That Support Personalization Using Auxiliary Data
| Channel | Supports Personalization? |
| ------------------- | ------------------------- |
| Push | Yes |
| Email | Yes |
| SMS | Yes |
| In-app Messaging | Yes |
| On-site Messaging | Yes |
| Cards | Yes |
| Connector | Yes |
| WhatsApp | Yes |
| Facebook Audience | No |
| Google Ads Audience | No |
Auxiliary data is supported for all editors of MoEngage campaigns. This article uses the Email campaign as an example to explain how to personalize content using auxiliary data.
# Example of Personalized Content with Auxiliary Data
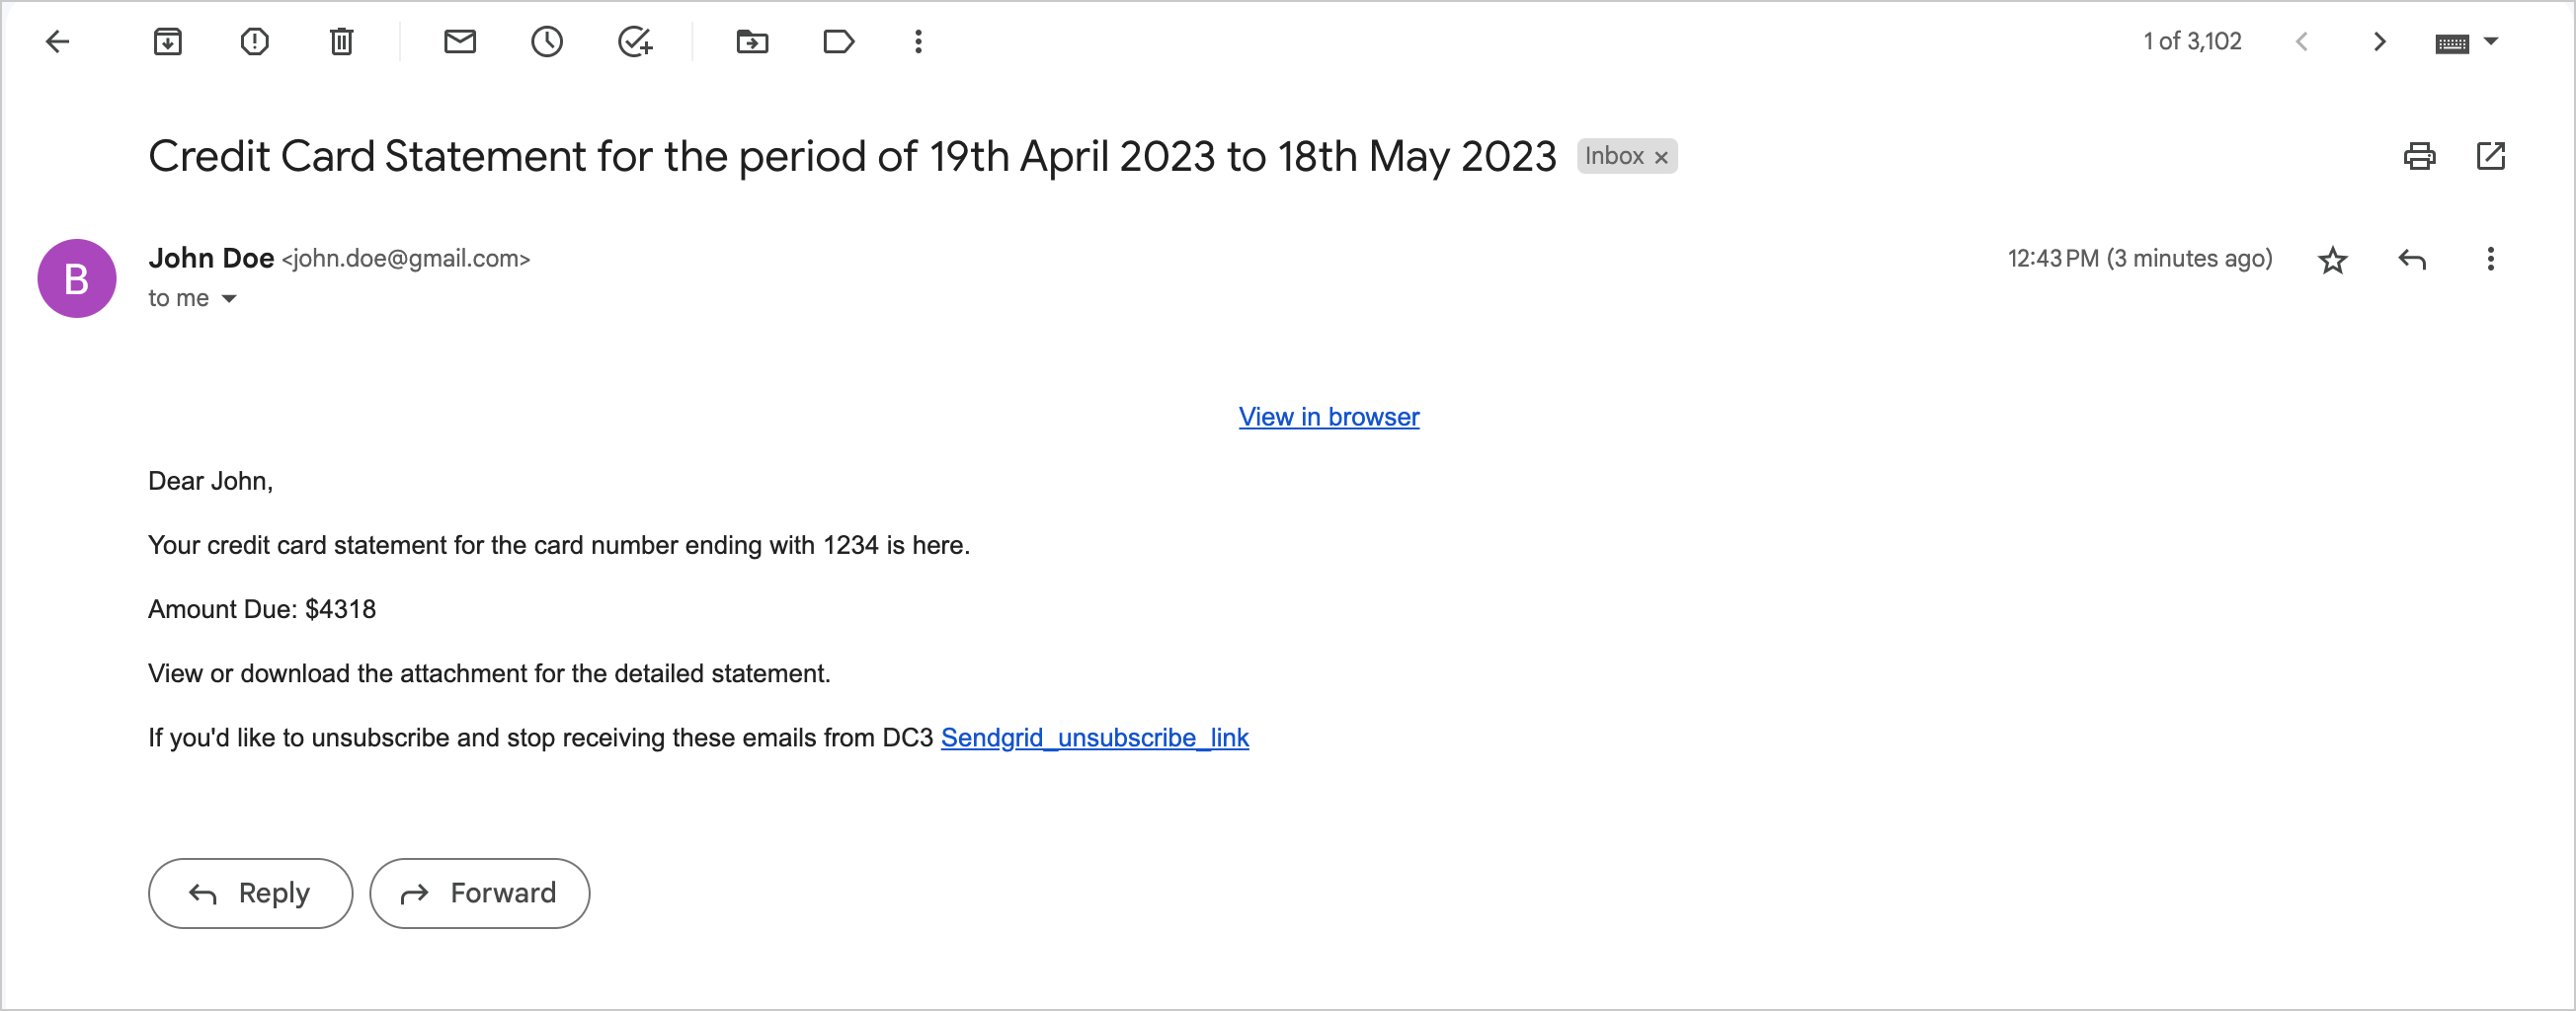
Banks often send emails to their customers about credit card statements and the amount due for the billing cycle. With the *Auxiliary Data* feature, banks need not store sensitive customer information in MoEngage. They can import an auxiliary data file with the user name, ID, first name, last four digits of the credit card number, and the amount due and send campaigns to customers.
The following example shows the preview of a personalized email with auxiliary data the bank sent to a user:
 # Sample Import File
**File Name: aux\_data\_cc\_due\_info\_list**
| | | | | |
| -------- | ----------- | ---------- | ----------------------- | ----------- |
| User\_ID | First\_Name | Last\_Name | Last\_4\_Digits\_of\_CC | Amount\_Due |
| JohnDoe | John | Doe | 1234 | 4318 |
| JaneDoe | Jane | Doe | 5678 | 5617 |
# Personalize Campaign Content Using Auxiliary Data
This section describes how you can personalize campaign content with this auxiliary data using the example of an Email campaign:
1. Import the auxiliary data file into MoEngage. For example, the name of the sample import file is **aux\_data\_cc\_due\_info\_list**. For more information, refer to [Importing Auxiliary Data](/user-guide/data/imports/file-based-imports/auxiliary-data).
2. After importing the file, create an Email campaign. For more information, refer to [Create Email Campaign](/user-guide/campaigns-and-channels/email/create/create-an-email-campaign).
3. In Step 1, "Target users," configure the campaign with the desired campaign name, control group, and target audience.
4. In Step 2, "Content," click the **Custom HTML editor** tab and select a template.
5. In the **Sender Details** section, configure the **Sender Name**, **Preview Text**, **From email address**, **Reply-to mail address**, and **Subject** fields. Add CC and Bcc as desired.
6. Personalize the **Subject** and **Sender Name** fields if required.
7. In the **Template editor** box, add the campaign's content as required.
8. To add an attribute from the imported auxiliary data file, type *@*.
9. On the Email Personalization pop-up window, click the **Aux Data** tab.
10. In the **Aux data** list, click the required auxiliary data file. In this example, click the imported auxiliary data file **aux\_data\_cc\_due\_info\_list**.
11. In the **Lookup value** list, search and select the unique user identifier that was mapped during the import. In this example, *ID* would be the unique identifier that maps to the *User\_ID* field in the import file.
12. In the **Attribute** list, click the auxiliary data attribute to be used for personalization. For example, to personalize the Amount Due for each user, select the *Amount\_Due* attribute.
13. Click **Done**. The auxiliary data JINJA will get added to the field or the editor as shown below:
# Sample Import File
**File Name: aux\_data\_cc\_due\_info\_list**
| | | | | |
| -------- | ----------- | ---------- | ----------------------- | ----------- |
| User\_ID | First\_Name | Last\_Name | Last\_4\_Digits\_of\_CC | Amount\_Due |
| JohnDoe | John | Doe | 1234 | 4318 |
| JaneDoe | Jane | Doe | 5678 | 5617 |
# Personalize Campaign Content Using Auxiliary Data
This section describes how you can personalize campaign content with this auxiliary data using the example of an Email campaign:
1. Import the auxiliary data file into MoEngage. For example, the name of the sample import file is **aux\_data\_cc\_due\_info\_list**. For more information, refer to [Importing Auxiliary Data](/user-guide/data/imports/file-based-imports/auxiliary-data).
2. After importing the file, create an Email campaign. For more information, refer to [Create Email Campaign](/user-guide/campaigns-and-channels/email/create/create-an-email-campaign).
3. In Step 1, "Target users," configure the campaign with the desired campaign name, control group, and target audience.
4. In Step 2, "Content," click the **Custom HTML editor** tab and select a template.
5. In the **Sender Details** section, configure the **Sender Name**, **Preview Text**, **From email address**, **Reply-to mail address**, and **Subject** fields. Add CC and Bcc as desired.
6. Personalize the **Subject** and **Sender Name** fields if required.
7. In the **Template editor** box, add the campaign's content as required.
8. To add an attribute from the imported auxiliary data file, type *@*.
9. On the Email Personalization pop-up window, click the **Aux Data** tab.
10. In the **Aux data** list, click the required auxiliary data file. In this example, click the imported auxiliary data file **aux\_data\_cc\_due\_info\_list**.
11. In the **Lookup value** list, search and select the unique user identifier that was mapped during the import. In this example, *ID* would be the unique identifier that maps to the *User\_ID* field in the import file.
12. In the **Attribute** list, click the auxiliary data attribute to be used for personalization. For example, to personalize the Amount Due for each user, select the *Amount\_Due* attribute.
13. Click **Done**. The auxiliary data JINJA will get added to the field or the editor as shown below:
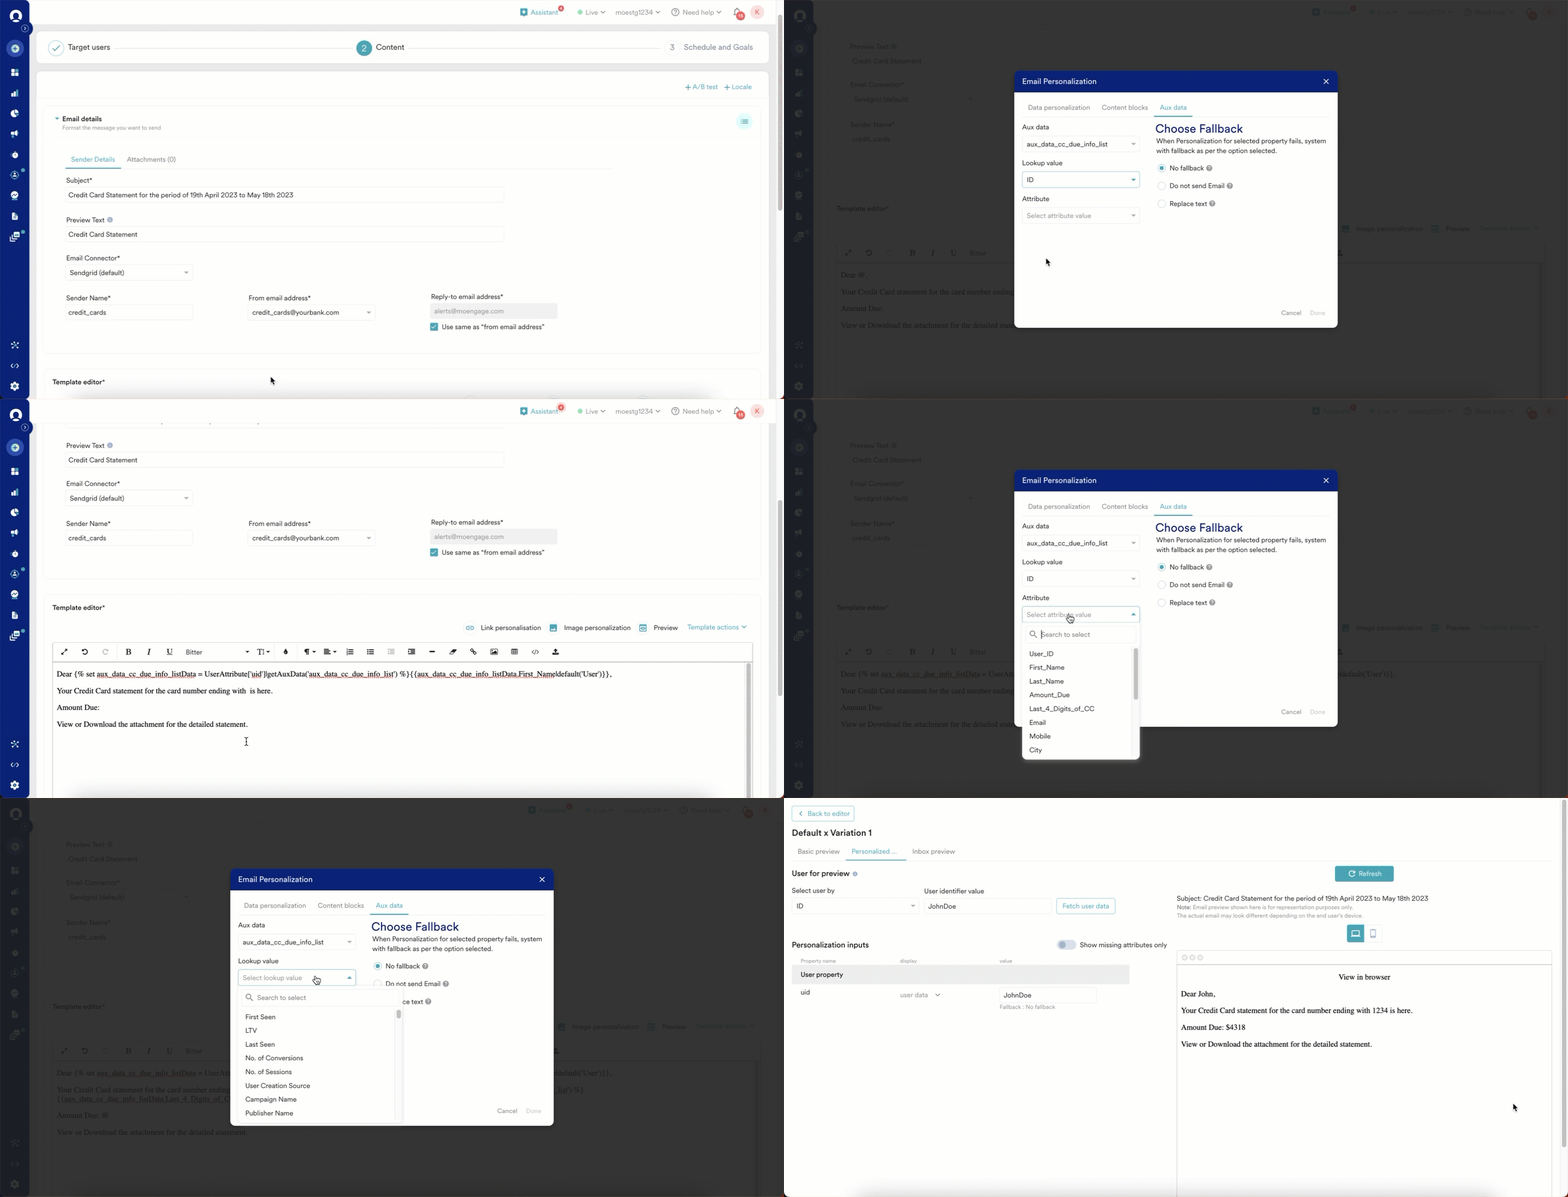 The following is a sample email content:\
Dear `{% set aux\_data\_cc\_due\_info\_listData = UserAttribute['uid']|getAuxData('aux\_data\_cc\_due\_info\_list') %}``{{aux\_data\_cc\_due\_info\_listData.First\_Name|default('User')}}`,
Your credit card statement for the card number ending with `{% set aux\_data\_cc\_due\_info\_listData = UserAttribute['uid']|getAuxData('aux\_data\_cc\_due\_info\_list') %}``{{aux\_data\_cc\_due\_info\_listData.Last\_4\_Digits\_of\_CC}}` is here.
Amount Due: `{% set aux\_data\_cc\_due\_info\_listData = UserAttribute['uid']|getAuxData('aux\_data\_cc\_due\_info\_list') %}``{{aux\_data\_cc\_due\_info\_listData.Amount\_Due}}`
View or download the attachment for the detailed statement.
14. If you want to check how your personalized message looks for a specific user, you can preview it.
1. In the upper-right section of the **Template editor**, click **Preview**. The preview screen appears as shown below:
The following is a sample email content:\
Dear `{% set aux\_data\_cc\_due\_info\_listData = UserAttribute['uid']|getAuxData('aux\_data\_cc\_due\_info\_list') %}``{{aux\_data\_cc\_due\_info\_listData.First\_Name|default('User')}}`,
Your credit card statement for the card number ending with `{% set aux\_data\_cc\_due\_info\_listData = UserAttribute['uid']|getAuxData('aux\_data\_cc\_due\_info\_list') %}``{{aux\_data\_cc\_due\_info\_listData.Last\_4\_Digits\_of\_CC}}` is here.
Amount Due: `{% set aux\_data\_cc\_due\_info\_listData = UserAttribute['uid']|getAuxData('aux\_data\_cc\_due\_info\_list') %}``{{aux\_data\_cc\_due\_info\_listData.Amount\_Due}}`
View or download the attachment for the detailed statement.
14. If you want to check how your personalized message looks for a specific user, you can preview it.
1. In the upper-right section of the **Template editor**, click **Preview**. The preview screen appears as shown below:
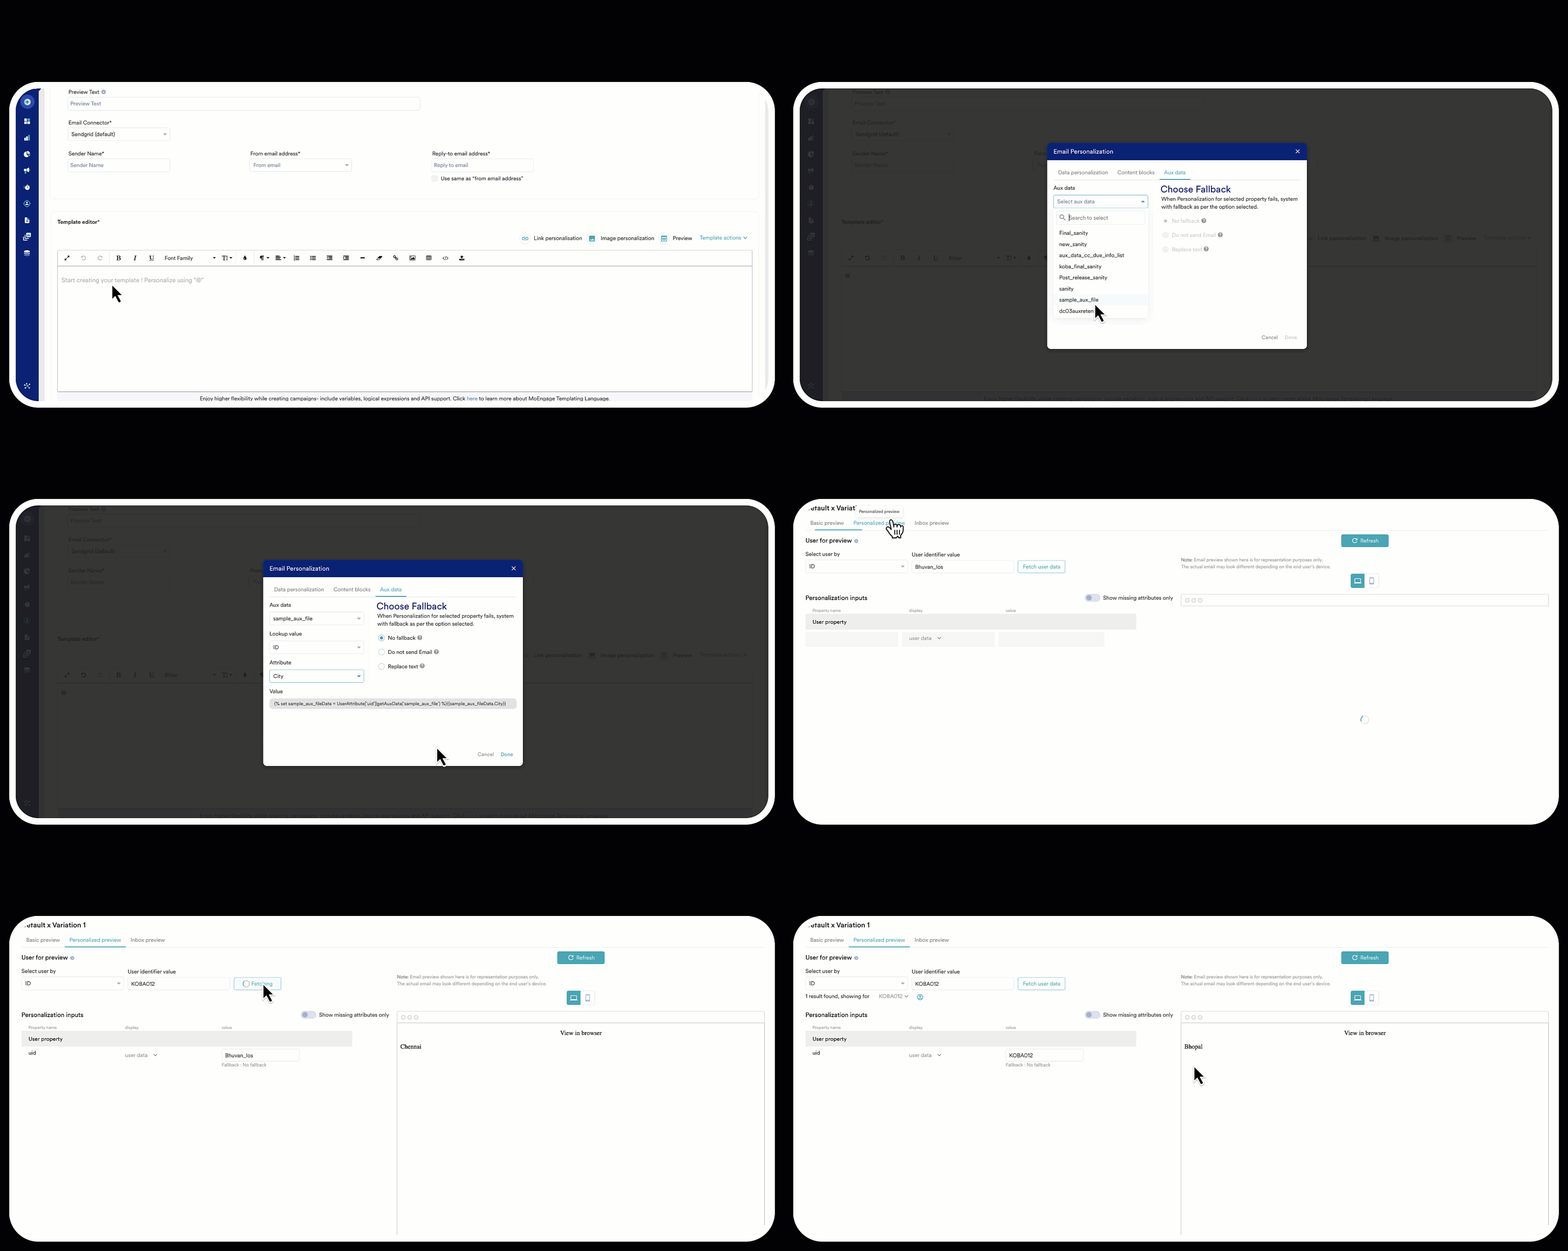 2. Click the **Personalized preview** tab.
3. In the **Select user by** list, click a filter for users. For example, ID.
4. In the **User identifier value** box, type the unique identification of the user.
5. Click **Fetch user data** and then click **Refresh**. You can see the preview of the personalized message.
15. After you have customized and personalized the content, in Step 3, "Schedule and goals," add the campaign's delivery schedule information and click **Publish** to send the campaign to the target segment.
2. Click the **Personalized preview** tab.
3. In the **Select user by** list, click a filter for users. For example, ID.
4. In the **User identifier value** box, type the unique identification of the user.
5. Click **Fetch user data** and then click **Refresh**. You can see the preview of the personalized message.
15. After you have customized and personalized the content, in Step 3, "Schedule and goals," add the campaign's delivery schedule information and click **Publish** to send the campaign to the target segment.