> ## Documentation Index
> Fetch the complete documentation index at: https://moengage.com/docs/llms.txt
> Use this file to discover all available pages before exploring further.
# Templates
> Manage campaign templates across all MoEngage channels from a central hub. Create, edit, duplicate, and share templates to streamline workflows.
# Introduction
The *Templates* feature of MoEngage streamlines content creation and management by providing effective tools. Managing templates ensures consistency in branding, saves time and effort in organizing them, and helps in team collaboration.
This *Templates* page is a central hub for all your template dependencies where you can collectively organize and manage all your templates for multiple channels in one place and retrieve them without any hassle.
This feature facilitates you to perform the following:
* Create templates for different channels.
* Edit templates to your requirements using the **Drag and drop** editor or **Custom HTML editor**.
* Manage templates in folders and share folders across teams.
* Share templates individually across teams.
* Preview templates before sending them to users.
* Duplicate and customize templates for personalized communications.
* View and sort templates based on your preferences.
* Check the version history of your template.
# Manage Templates
## Create Template
You can create templates for different channels and manage them in one place.
The **Template** feature is supported only for Email and On-site channels.
1. On the left navigation of your MoEngage dashboard, select **Content > Templates**.
2. Click the **+** **Create template** button in the upper right corner of the window. You can create templates for **Email** and **On-site.** Select the channel for which you want to create a template.  Create templates for Email Create templates for On-site Messaging
1. **Choose Template:** You can choose a template from the pre-built templates or from saved templates based on the following editors: [**Drag and drop**](/user-guide/campaigns-and-channels/email/create/create-content-with-the-drag-and-drop-editor) editor or [**Custom HTML editor**](/user-guide/campaigns-and-channels/email/create/create-content-with-custom-html-editor).
2. **Template details:** Provide the following **Template details**.
1. **Name:** Enter the name of your template.
2. **Tag:** In the **Tags** list, you can select the tags to add to your template.
3. **Message Type:** Select the message type as **Promotional/Marketing** or **Transactional** based on which you want to send to your users.
4. **Team:** Select the teams that can access this template.
5. **Destination to save:** Select the destination to save this template. You can save it within folders or save it directly without folders.
6. **Communication Type:** Select the communication type, **Engage** or **Inform.**
3. **Email details:** Provide the following **Email details**.
4. **Sender Details:** Provide the following sender's details of the email.
1. **Preview text:** You can enter the preview text, which must appear in your user's inbox.
2. **Sender Name:** Enter the sender's name.
3. **From email address:** In the **From email address list,** select the email ID\*\*.\*\* This address is fetched from the default connector, which is used only for testing purposes.
Create templates for Email Create templates for On-site Messaging
1. **Choose Template:** You can choose a template from the pre-built templates or from saved templates based on the following editors: [**Drag and drop**](/user-guide/campaigns-and-channels/email/create/create-content-with-the-drag-and-drop-editor) editor or [**Custom HTML editor**](/user-guide/campaigns-and-channels/email/create/create-content-with-custom-html-editor).
2. **Template details:** Provide the following **Template details**.
1. **Name:** Enter the name of your template.
2. **Tag:** In the **Tags** list, you can select the tags to add to your template.
3. **Message Type:** Select the message type as **Promotional/Marketing** or **Transactional** based on which you want to send to your users.
4. **Team:** Select the teams that can access this template.
5. **Destination to save:** Select the destination to save this template. You can save it within folders or save it directly without folders.
6. **Communication Type:** Select the communication type, **Engage** or **Inform.**
3. **Email details:** Provide the following **Email details**.
4. **Sender Details:** Provide the following sender's details of the email.
1. **Preview text:** You can enter the preview text, which must appear in your user's inbox.
2. **Sender Name:** Enter the sender's name.
3. **From email address:** In the **From email address list,** select the email ID\*\*.\*\* This address is fetched from the default connector, which is used only for testing purposes. 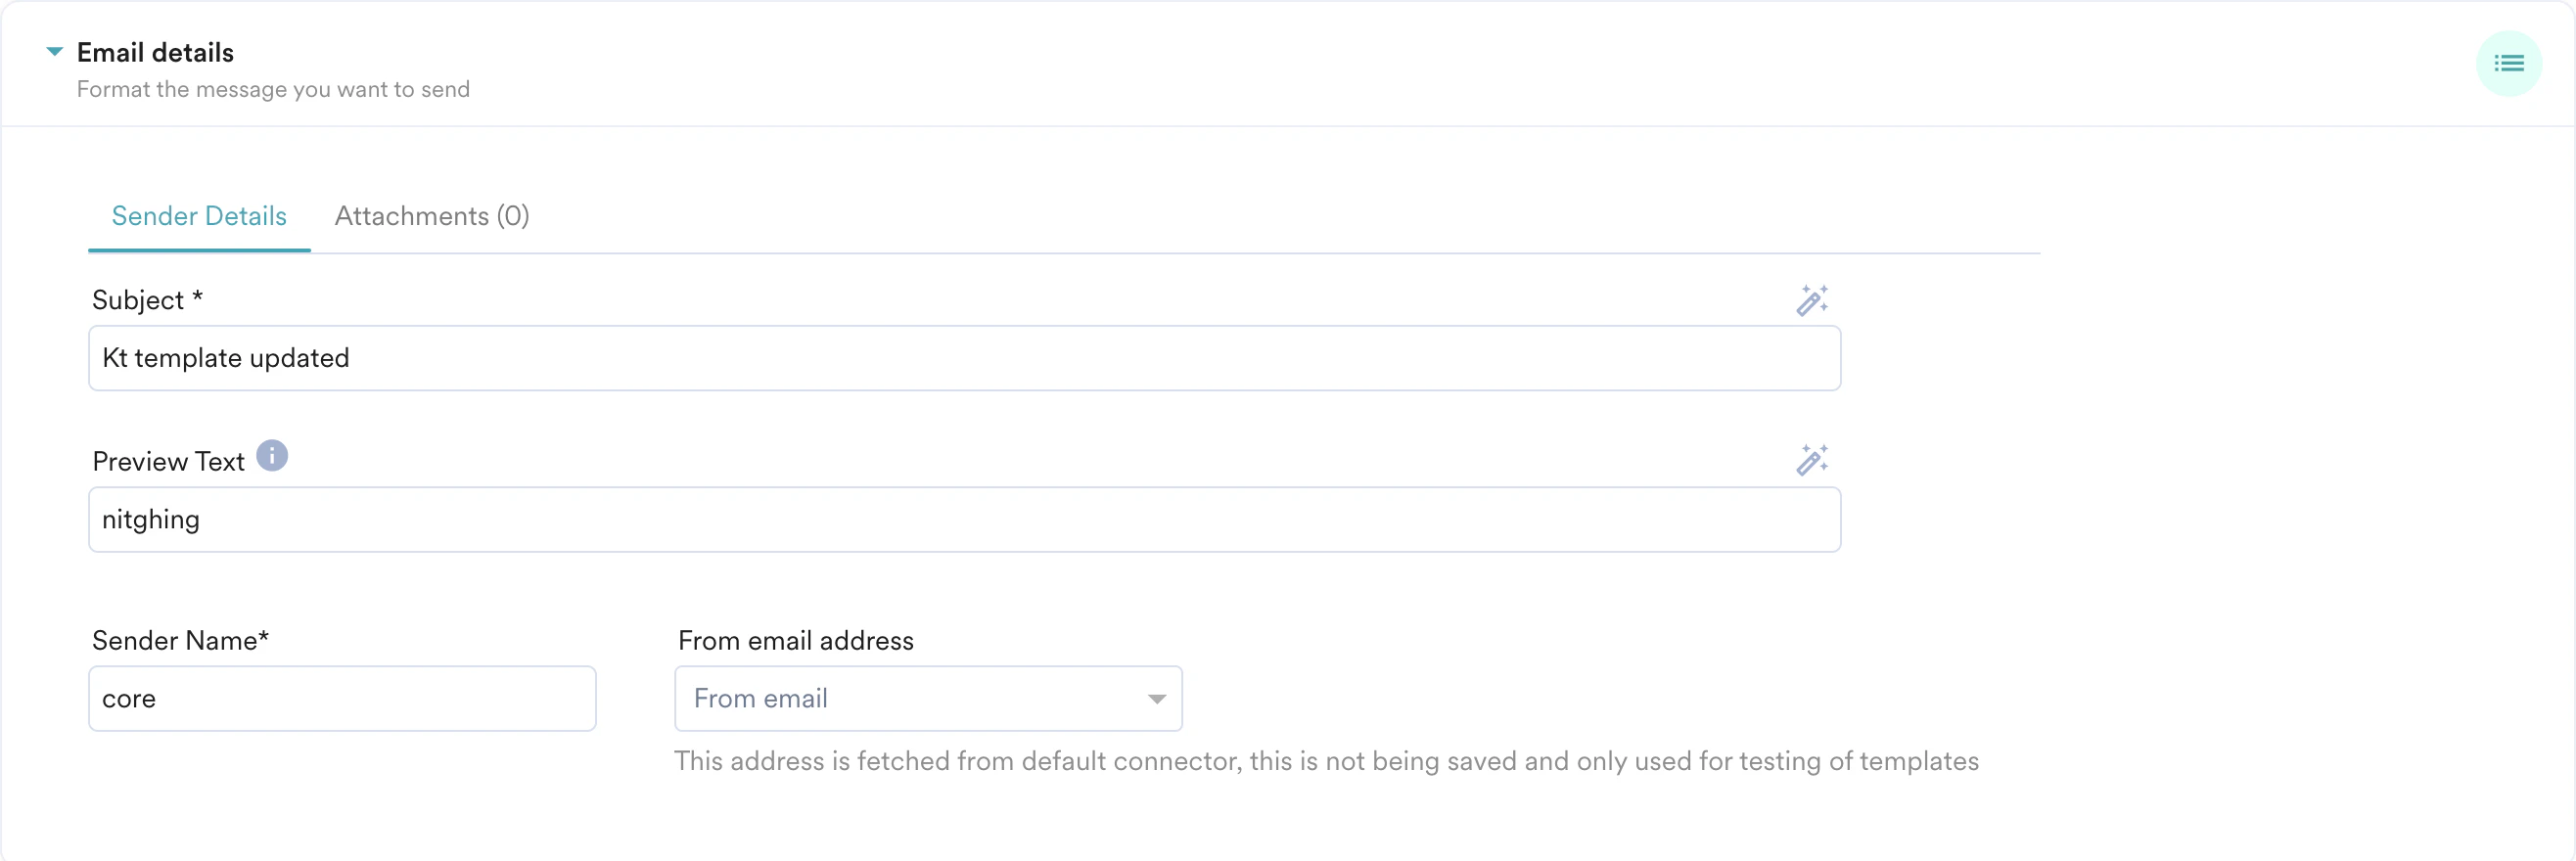 5. **Attachments:** You can add attachments from **Local file**, **URL** of your attachments, or add **Personalized attachments**. For more information, refer [here.](/user-guide/campaigns-and-channels/email/create/personalize-email-content) You can hide the email details by clicking this
  icon.
icon.  6. **Template Editor:** Configure your template using the provided tools. For more information, refer [here](/user-guide/campaigns-and-channels/email/create/create-content-with-the-drag-and-drop-editor).
  7. Click **Preview** in the upper right corner of the template editor window to preview your template and its personalization. For more information, refer [here](/user-guide/campaigns-and-channels/getting-started/message-personalization/personalized-preview).
  8. **Test Campaigns:** You can test your campaigns to ensure the templates are displayed as you configured them before sending them to your users.
  1. Test the campaign you created by selecting **Custom Segment** or by entering multiple email addresses separated by a comma.
2. To test whether the personalized data is rendering correctly for users, you must test the template with the custom segment.
Test campaigns with any custom segment will target a maximum of 50 users from the chosen custom segment.
3. To use the sample data you personalized in your template for testing, turn the **Use sample data from the personalized preview for the text** toggle on. **
1. Test the campaign you created by selecting **Custom Segment** or by entering multiple email addresses separated by a comma.
2. To test whether the personalized data is rendering correctly for users, you must test the template with the custom segment.
Test campaigns with any custom segment will target a maximum of 50 users from the chosen custom segment.
3. To use the sample data you personalized in your template for testing, turn the **Use sample data from the personalized preview for the text** toggle on. ** **
9. Click **Save and Publish** to use this template in campaigns, or click **Save as draft** to continue editing later.
Templates that are in drafts cannot be used in campaigns
When selecting On-site, you will be prompted to choose Web, Mobile Web, or both as your preferred platform.
**
9. Click **Save and Publish** to use this template in campaigns, or click **Save as draft** to continue editing later.
Templates that are in drafts cannot be used in campaigns
When selecting On-site, you will be prompted to choose Web, Mobile Web, or both as your preferred platform.  1. **Choose Template:** You can create a template from scratch or modify the existing template.
2. Provide the following **Template details**.
1. **Name:** Enter the name of your template.
2. **Tags:** You can add **Tags** to your template if needed.
3. **Platforms:** Select the targeted platforms of your template. The available platforms are the Web, Mobile Web, and TV.
If the TV platform is unavailable in your dashboard, contact your MoEngage Customer Success Manager (CSM) or the Support team.
4. **Team:** Select the teams that can access this template.
5. **Destination to save:** You can choose the destination folder to which your template should be saved.
1. **Choose Template:** You can create a template from scratch or modify the existing template.
2. Provide the following **Template details**.
1. **Name:** Enter the name of your template.
2. **Tags:** You can add **Tags** to your template if needed.
3. **Platforms:** Select the targeted platforms of your template. The available platforms are the Web, Mobile Web, and TV.
If the TV platform is unavailable in your dashboard, contact your MoEngage Customer Success Manager (CSM) or the Support team.
4. **Team:** Select the teams that can access this template.
5. **Destination to save:** You can choose the destination folder to which your template should be saved. 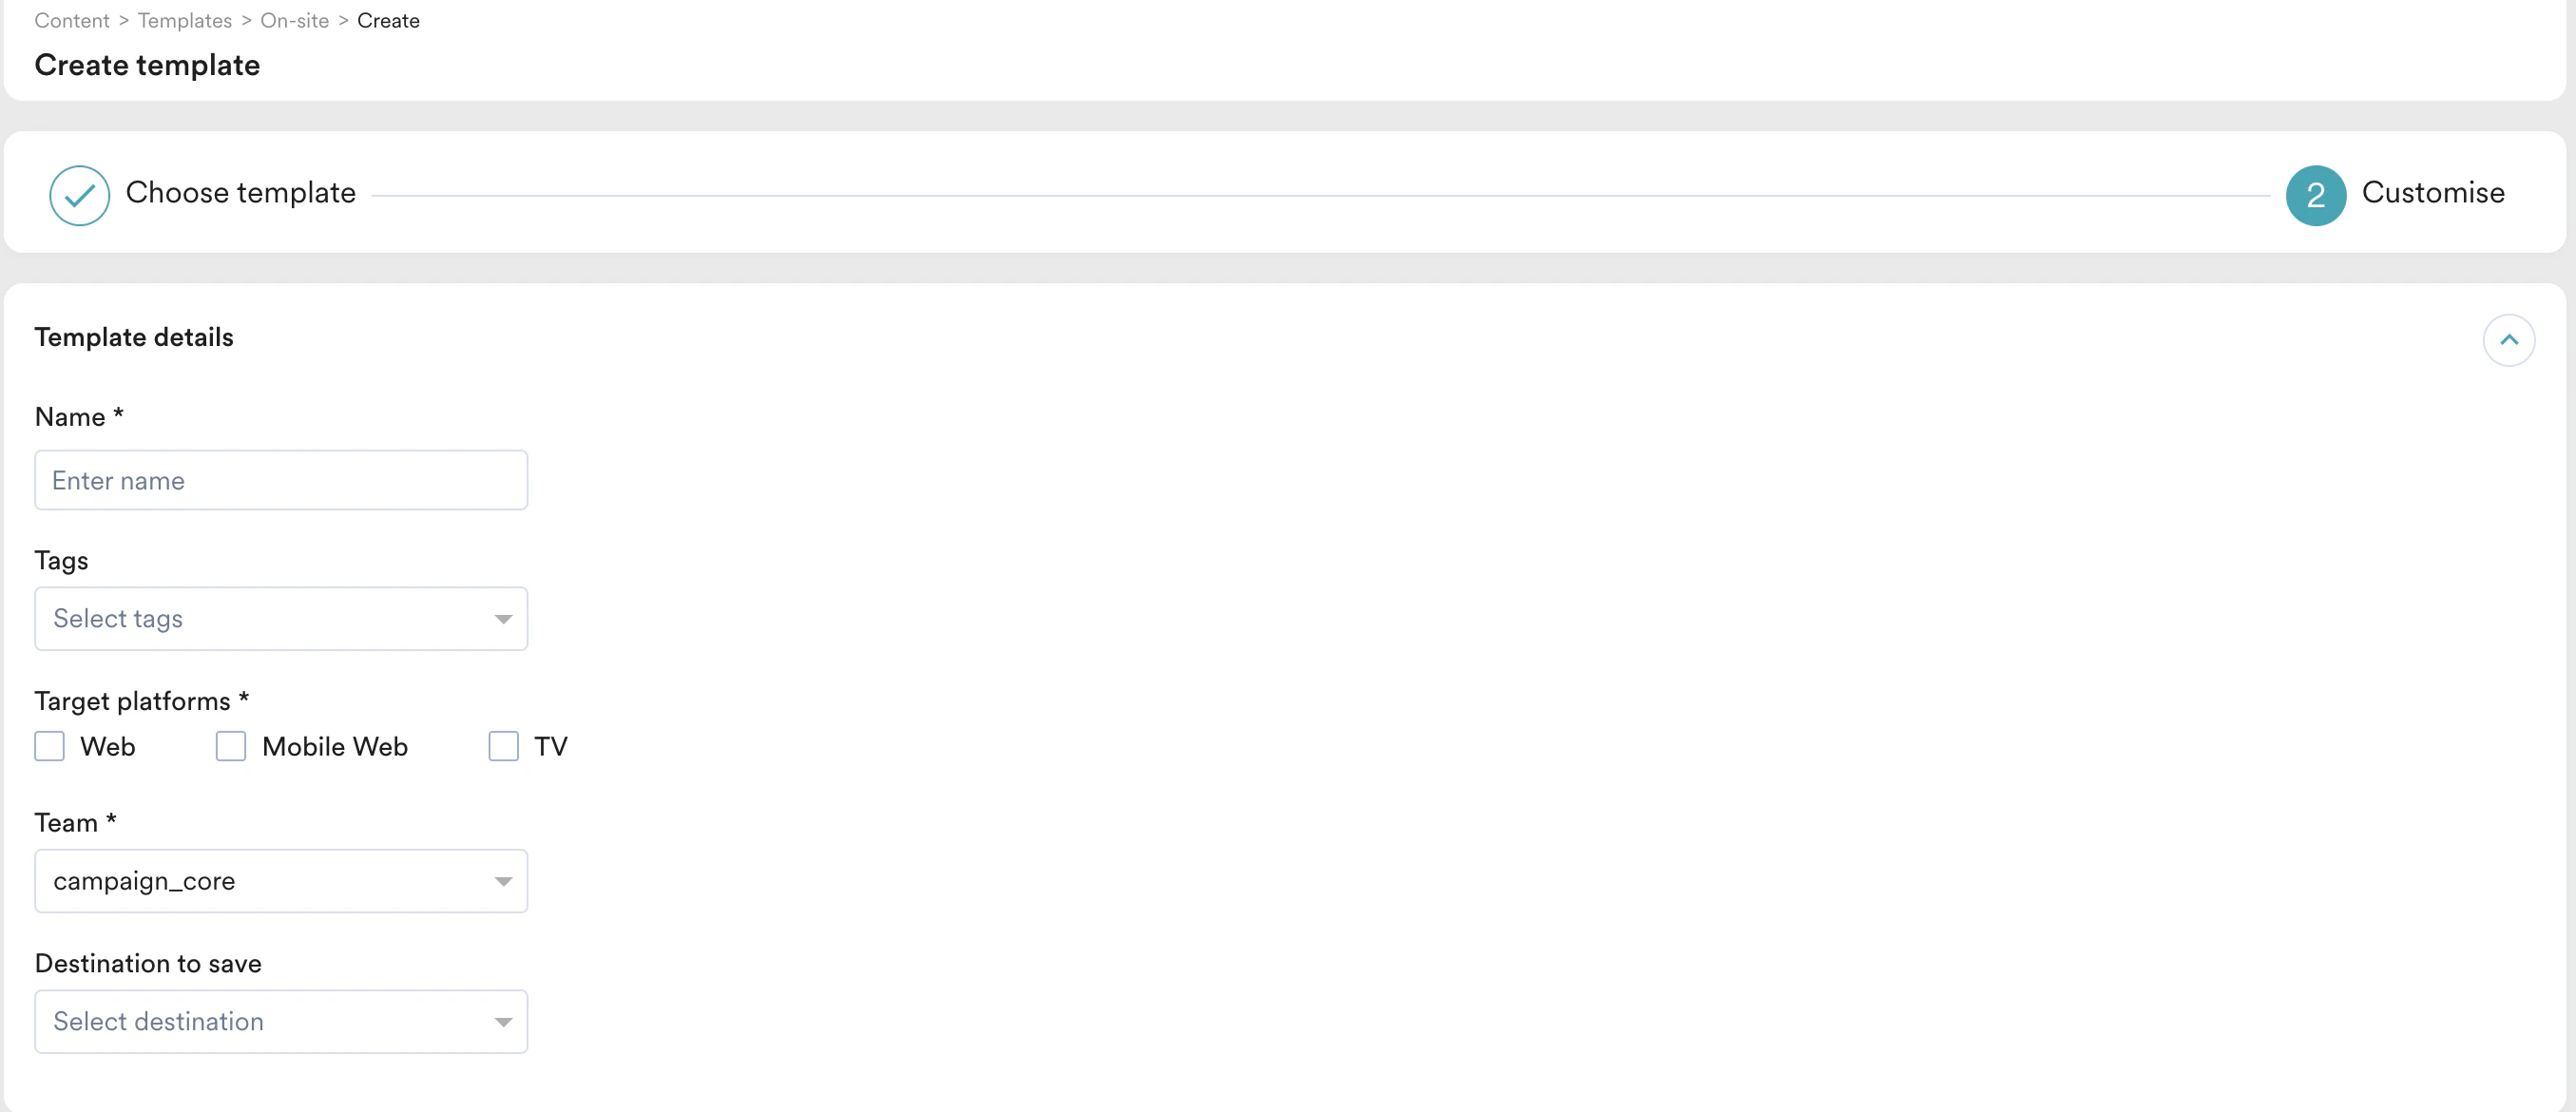 3. ****Template Editor:**** You can create a template using the **Drag & drop editor** or **Custom** **HTML editor**. For more information, refer here.
  4. **Display Settings:** This option allows you to configure the display settings for your campaign.
  Setting options may vary based on the template type, and the description for each setting is explained in the following table.
| Display Setting | Template Type | Description |
| ------------------------------------------------------------------------------ | --------------------------- | ----------------------------------------------------------------------------------------------------------------------------------------------------------------------------------------------------------------------------------------------------------- |
| **Show this message if another campaign is already displayed on the webpage.** | Popups, Nudges, and Banners | Selecting this checkbox allows you to show this OSM campaign even if another OSM has already been displayed on the page. Note: For this to work, the campaign events that trigger the OSMs should be different. |
| **Keep this message in place on scroll.** | Banner | Selecting this checkbox allows you to keep the Banner static. |
| **This message will push the contents of the page down.** | Banner | Selecting this checkbox allows the banner to occupy the space at the top of the website without overlapping with the website's content. For this to work, the banner chosen should be positioned at the top, and the website's headers shouldn't be sticky. |
5. Click **Save and Publish** to use this template in campaigns, or click **Save as a draft** to continue editing later.
Templates that are in drafts cannot be used in campaigns.
## Sort Templates
You can sort and view templates based on your requirements. The templates will be displayed based on your selection from the following:
* **All:** Shows all the available templates regardless of the channels.
* **Email:** Shows the templates created for Email.
* **On-site:** Shows the templates created for On-site.
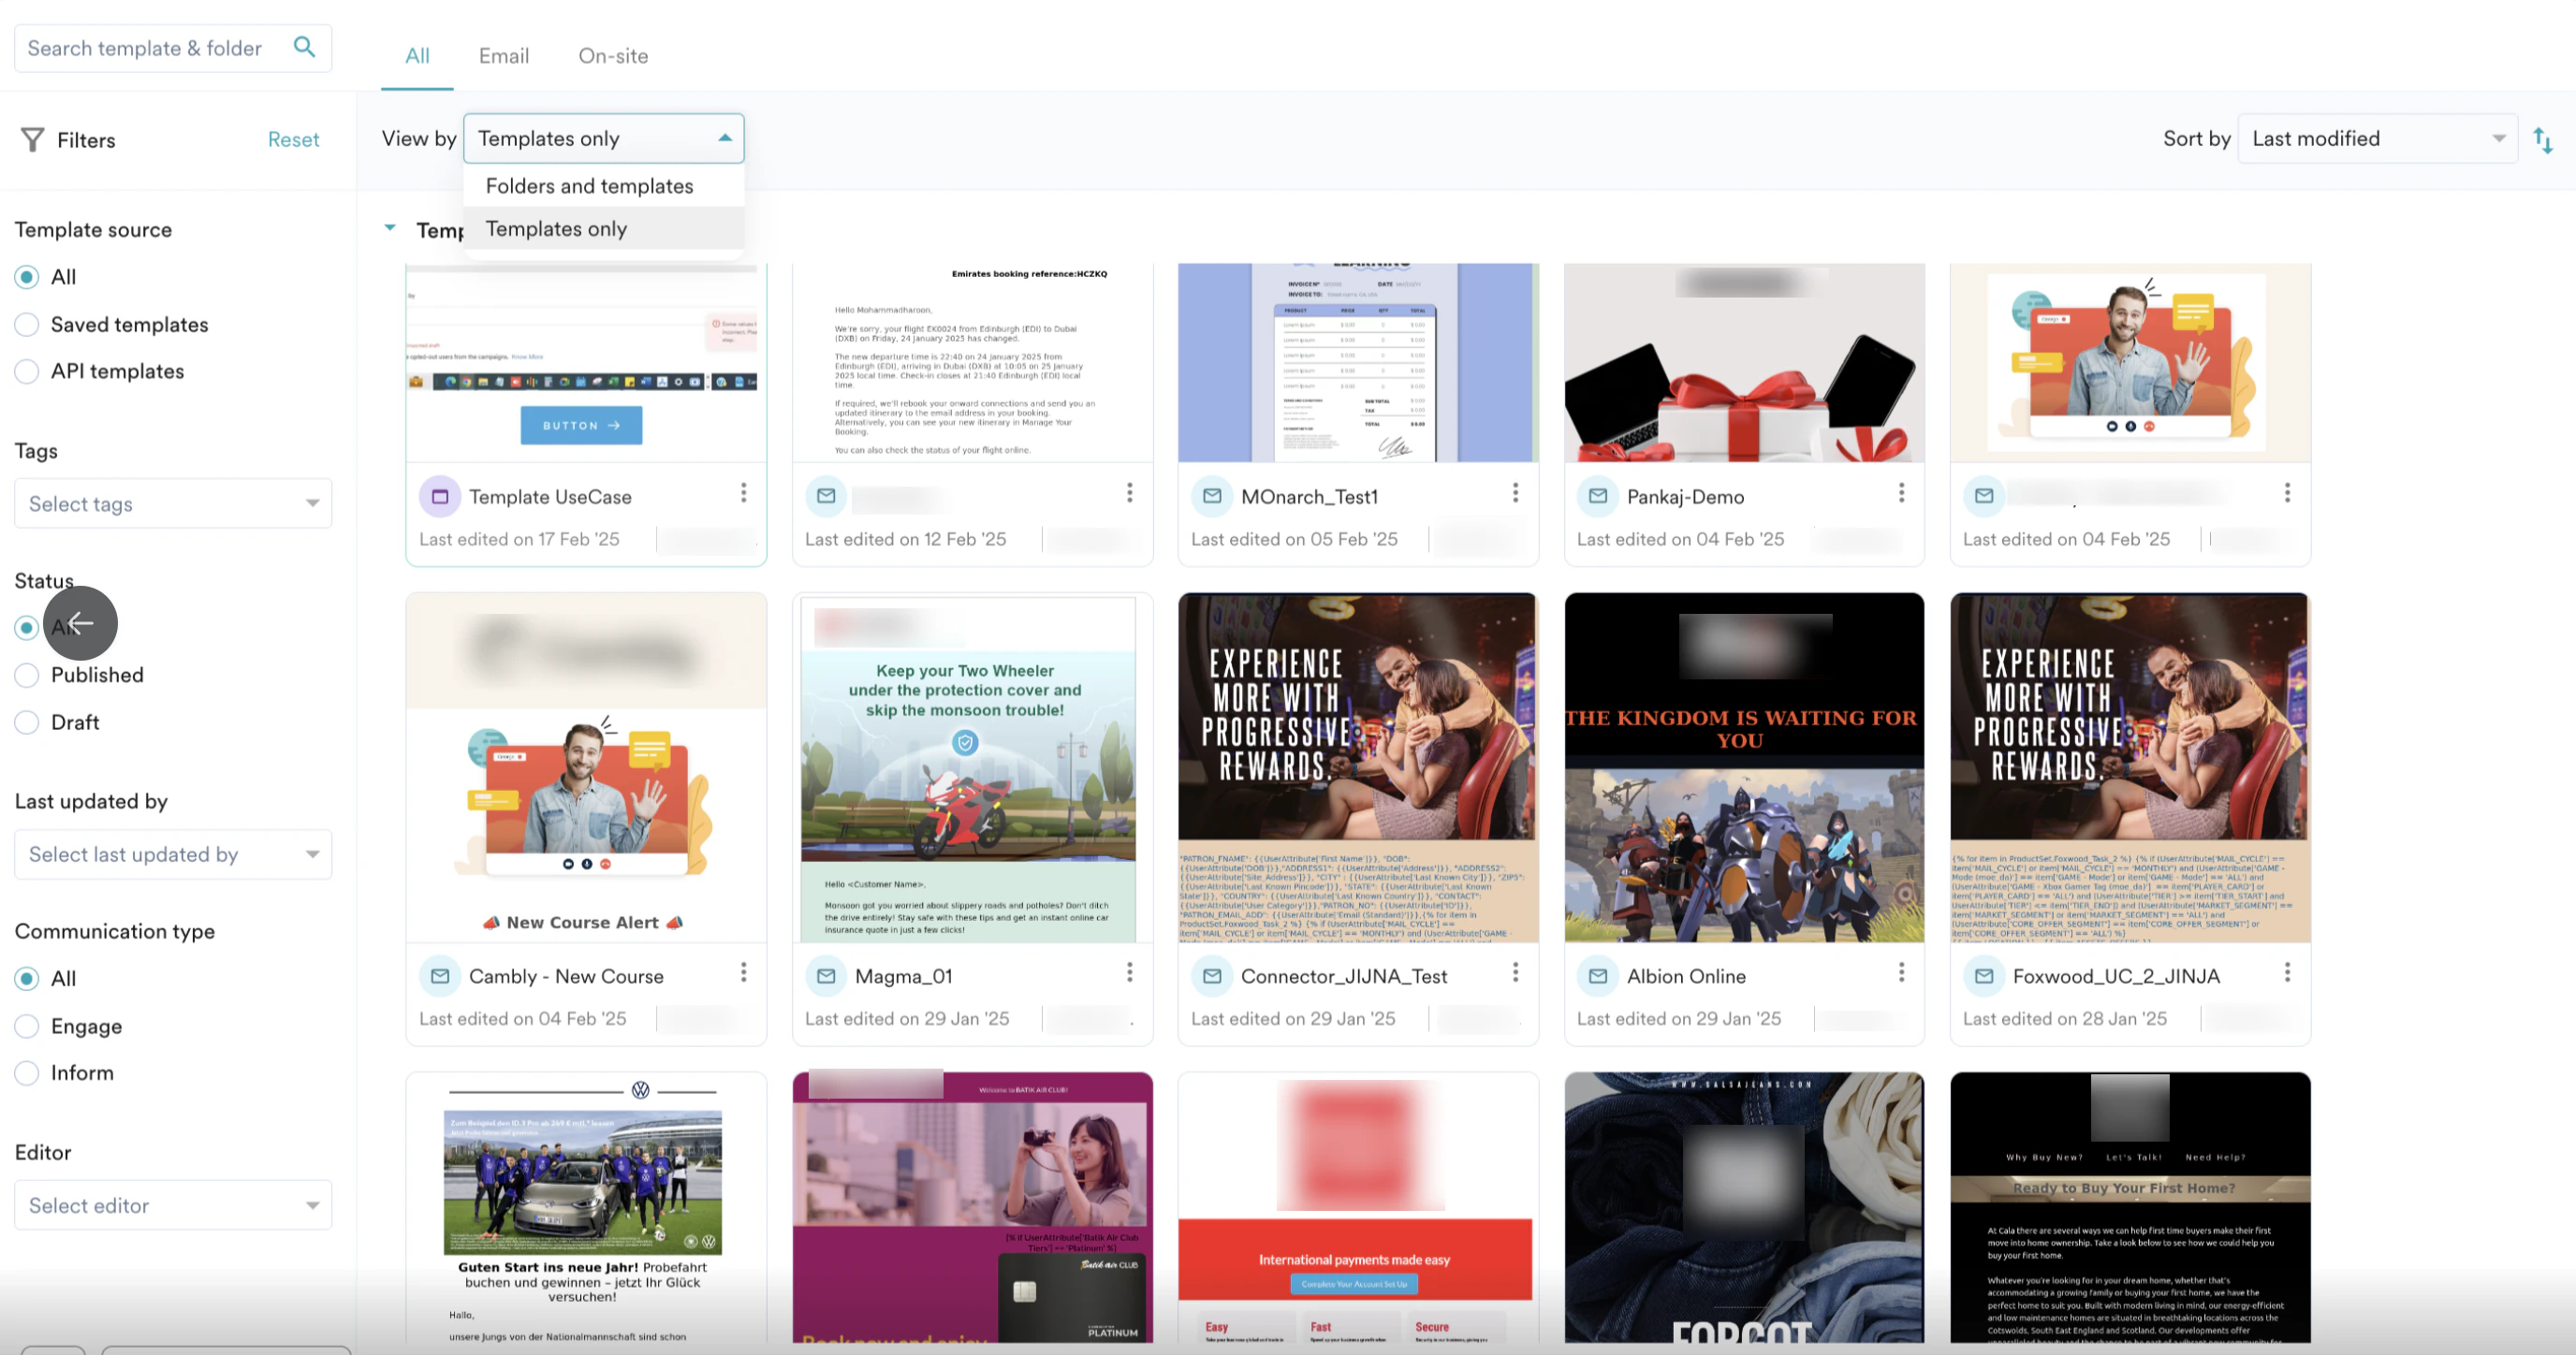
1. **View by:** You can view templates by **Folders and templates** or **Templates only**.
* **Folders and templates:** This option allows you to view templates that are in folders and templates that are not in folders.
Setting options may vary based on the template type, and the description for each setting is explained in the following table.
| Display Setting | Template Type | Description |
| ------------------------------------------------------------------------------ | --------------------------- | ----------------------------------------------------------------------------------------------------------------------------------------------------------------------------------------------------------------------------------------------------------- |
| **Show this message if another campaign is already displayed on the webpage.** | Popups, Nudges, and Banners | Selecting this checkbox allows you to show this OSM campaign even if another OSM has already been displayed on the page. Note: For this to work, the campaign events that trigger the OSMs should be different. |
| **Keep this message in place on scroll.** | Banner | Selecting this checkbox allows you to keep the Banner static. |
| **This message will push the contents of the page down.** | Banner | Selecting this checkbox allows the banner to occupy the space at the top of the website without overlapping with the website's content. For this to work, the banner chosen should be positioned at the top, and the website's headers shouldn't be sticky. |
5. Click **Save and Publish** to use this template in campaigns, or click **Save as a draft** to continue editing later.
Templates that are in drafts cannot be used in campaigns.
## Sort Templates
You can sort and view templates based on your requirements. The templates will be displayed based on your selection from the following:
* **All:** Shows all the available templates regardless of the channels.
* **Email:** Shows the templates created for Email.
* **On-site:** Shows the templates created for On-site.
1. **View by:** You can view templates by **Folders and templates** or **Templates only**.
* **Folders and templates:** This option allows you to view templates that are in folders and templates that are not in folders. 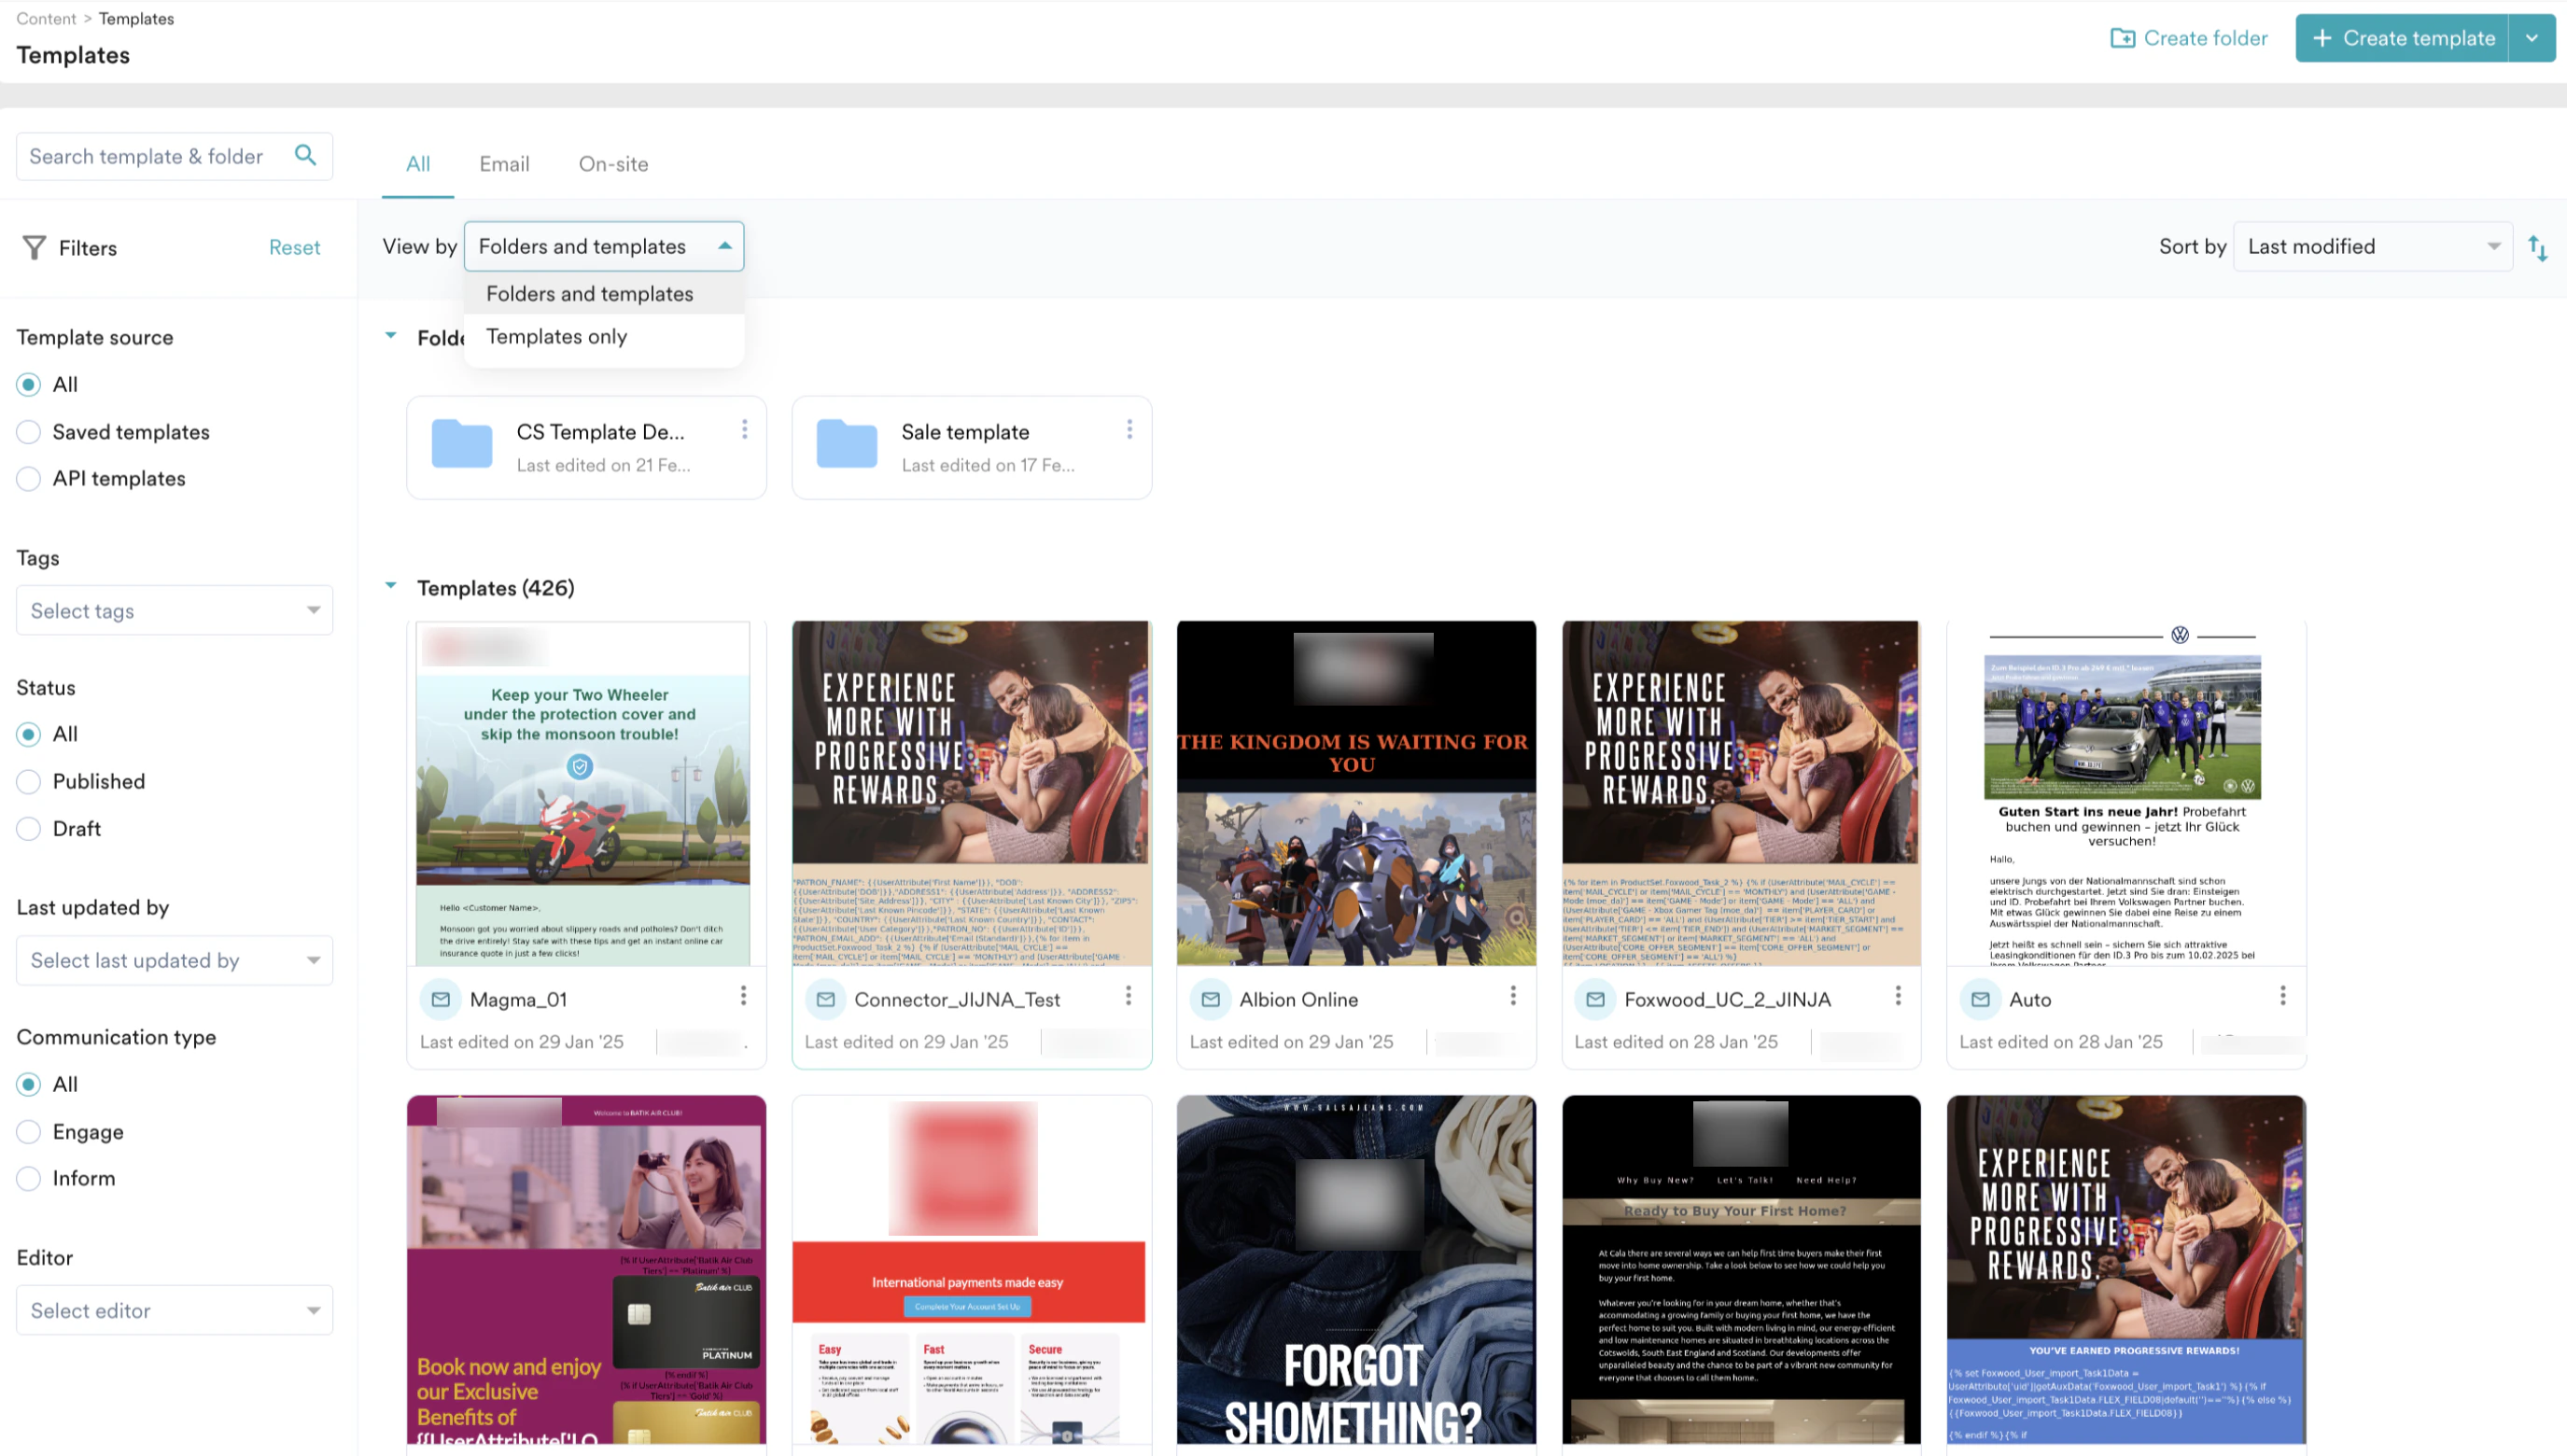 * **Templates only:** This option allows you to view all the templates regardless of the folders.
  2. **Sort by:** You can sort templates by **Name** and **Last modified**.
* **Name:** This option aligns the template by template names in alphabetic order. Using this
2. **Sort by:** You can sort templates by **Name** and **Last modified**.
* **Name:** This option aligns the template by template names in alphabetic order. Using this  icon, you can choose ascending (A->Z) or descending (Z->A).
* **Ascending (A->Z):** This sorting option shows your templates in ascending order based on the template names.
* **Descending (Z->A):** This sorting option shows your templates in descending order based on the template names.
icon, you can choose ascending (A->Z) or descending (Z->A).
* **Ascending (A->Z):** This sorting option shows your templates in ascending order based on the template names.
* **Descending (Z->A):** This sorting option shows your templates in descending order based on the template names.  * **Last Modified:** This option aligns the template based on the recent modification made to any template. Using this icon, you can choose the modifications from Old to New or New to Old to sort the templates.
* \*\*Old to New:\*\*This sorting option shows the templates based on the changes made in the past (Old) to recent changes (New).
* **New to Old:** This sorting option shows the templates based on the changes made recently (New) to the changes made in the past (Old).
* **Last Modified:** This option aligns the template based on the recent modification made to any template. Using this icon, you can choose the modifications from Old to New or New to Old to sort the templates.
* \*\*Old to New:\*\*This sorting option shows the templates based on the changes made in the past (Old) to recent changes (New).
* **New to Old:** This sorting option shows the templates based on the changes made recently (New) to the changes made in the past (Old).  ## Filters
You can segregate templates as required using the following filters:
## Filters
You can segregate templates as required using the following filters:  1. **Template source:** You can select the template source from which you want to filter templates. You can filter templates from All templates, Saved templates, and API templates.
2. **Tags:** You can select the tags associated with the template you want to filter.
3. **Message Type (Only for Email):** You can filter templates based on the message type.
4. **Status:** You can select the status of the template which you want to filter.
5. **Last updated by:** You can fetch the template based on users who updated it recently.
6. **Team:** You can filter templates based on the team that has access to the template.
7. **Communication type:** You can filter communication from the following options: **All, Engage,** and **Inform.**
8. **Editor:** You can filter templates based on the editor in which your template has been created.
9. **Platform (only for On-site):** You can filter templates based on platforms such as **Web, Mobile,** and **TV.**
10. **Content (only for On-site):** You can filter templates based on their content, such as Timers, carousels, etc.
11. **Template type (only for On-site):** You can filter templates based on the template type, such as Banner, pop-up, etc.
12. **Use case (only for On-site):** You can filter templates based on the use cases with which they are associated.
13. **Show shared items only:** Enabling this option allows you to filter the templates and folders shared with other teams.
##
## Template actions
You can perform the following actions in templates by clicking this
1. **Template source:** You can select the template source from which you want to filter templates. You can filter templates from All templates, Saved templates, and API templates.
2. **Tags:** You can select the tags associated with the template you want to filter.
3. **Message Type (Only for Email):** You can filter templates based on the message type.
4. **Status:** You can select the status of the template which you want to filter.
5. **Last updated by:** You can fetch the template based on users who updated it recently.
6. **Team:** You can filter templates based on the team that has access to the template.
7. **Communication type:** You can filter communication from the following options: **All, Engage,** and **Inform.**
8. **Editor:** You can filter templates based on the editor in which your template has been created.
9. **Platform (only for On-site):** You can filter templates based on platforms such as **Web, Mobile,** and **TV.**
10. **Content (only for On-site):** You can filter templates based on their content, such as Timers, carousels, etc.
11. **Template type (only for On-site):** You can filter templates based on the template type, such as Banner, pop-up, etc.
12. **Use case (only for On-site):** You can filter templates based on the use cases with which they are associated.
13. **Show shared items only:** Enabling this option allows you to filter the templates and folders shared with other teams.
##
## Template actions
You can perform the following actions in templates by clicking this  icon in the folder.
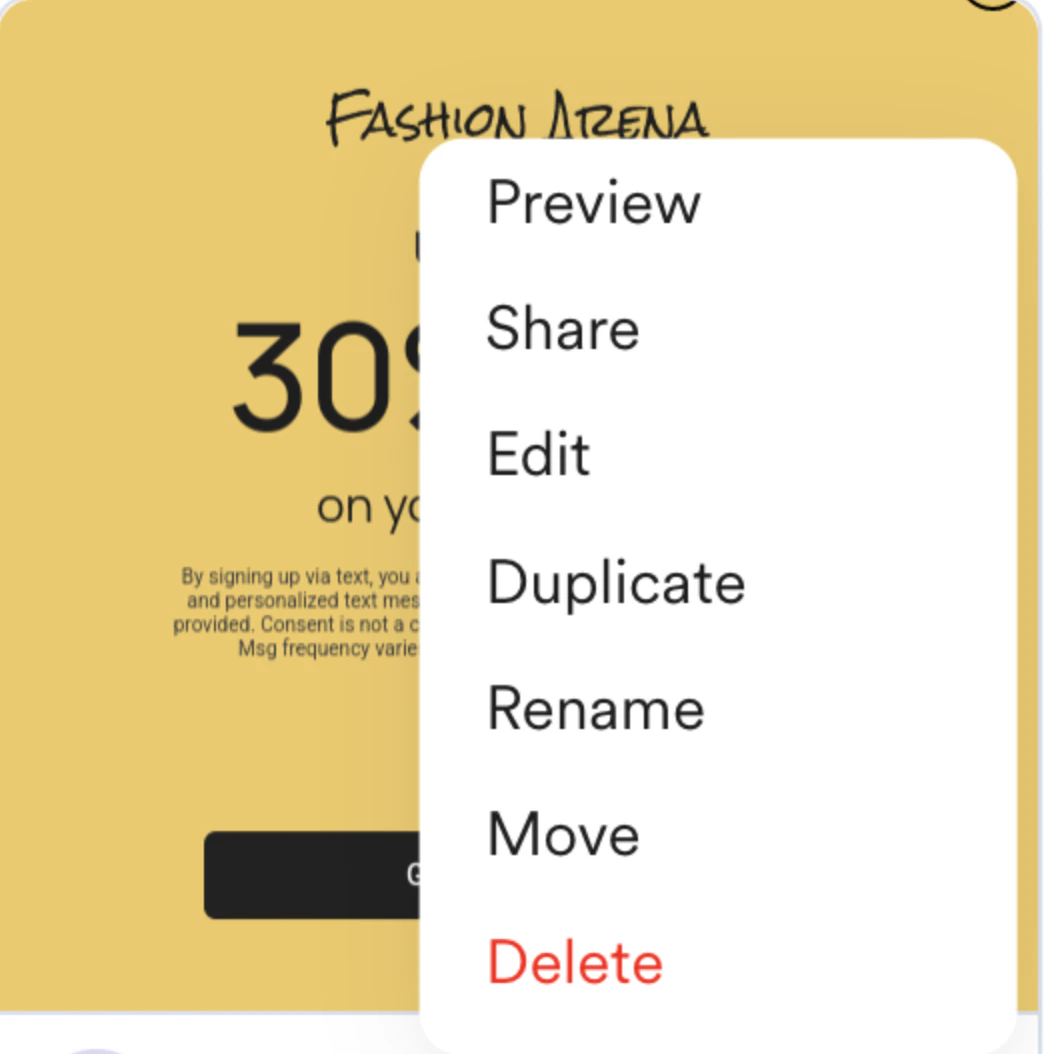 Click this icon in the template. The following actions will be populated.
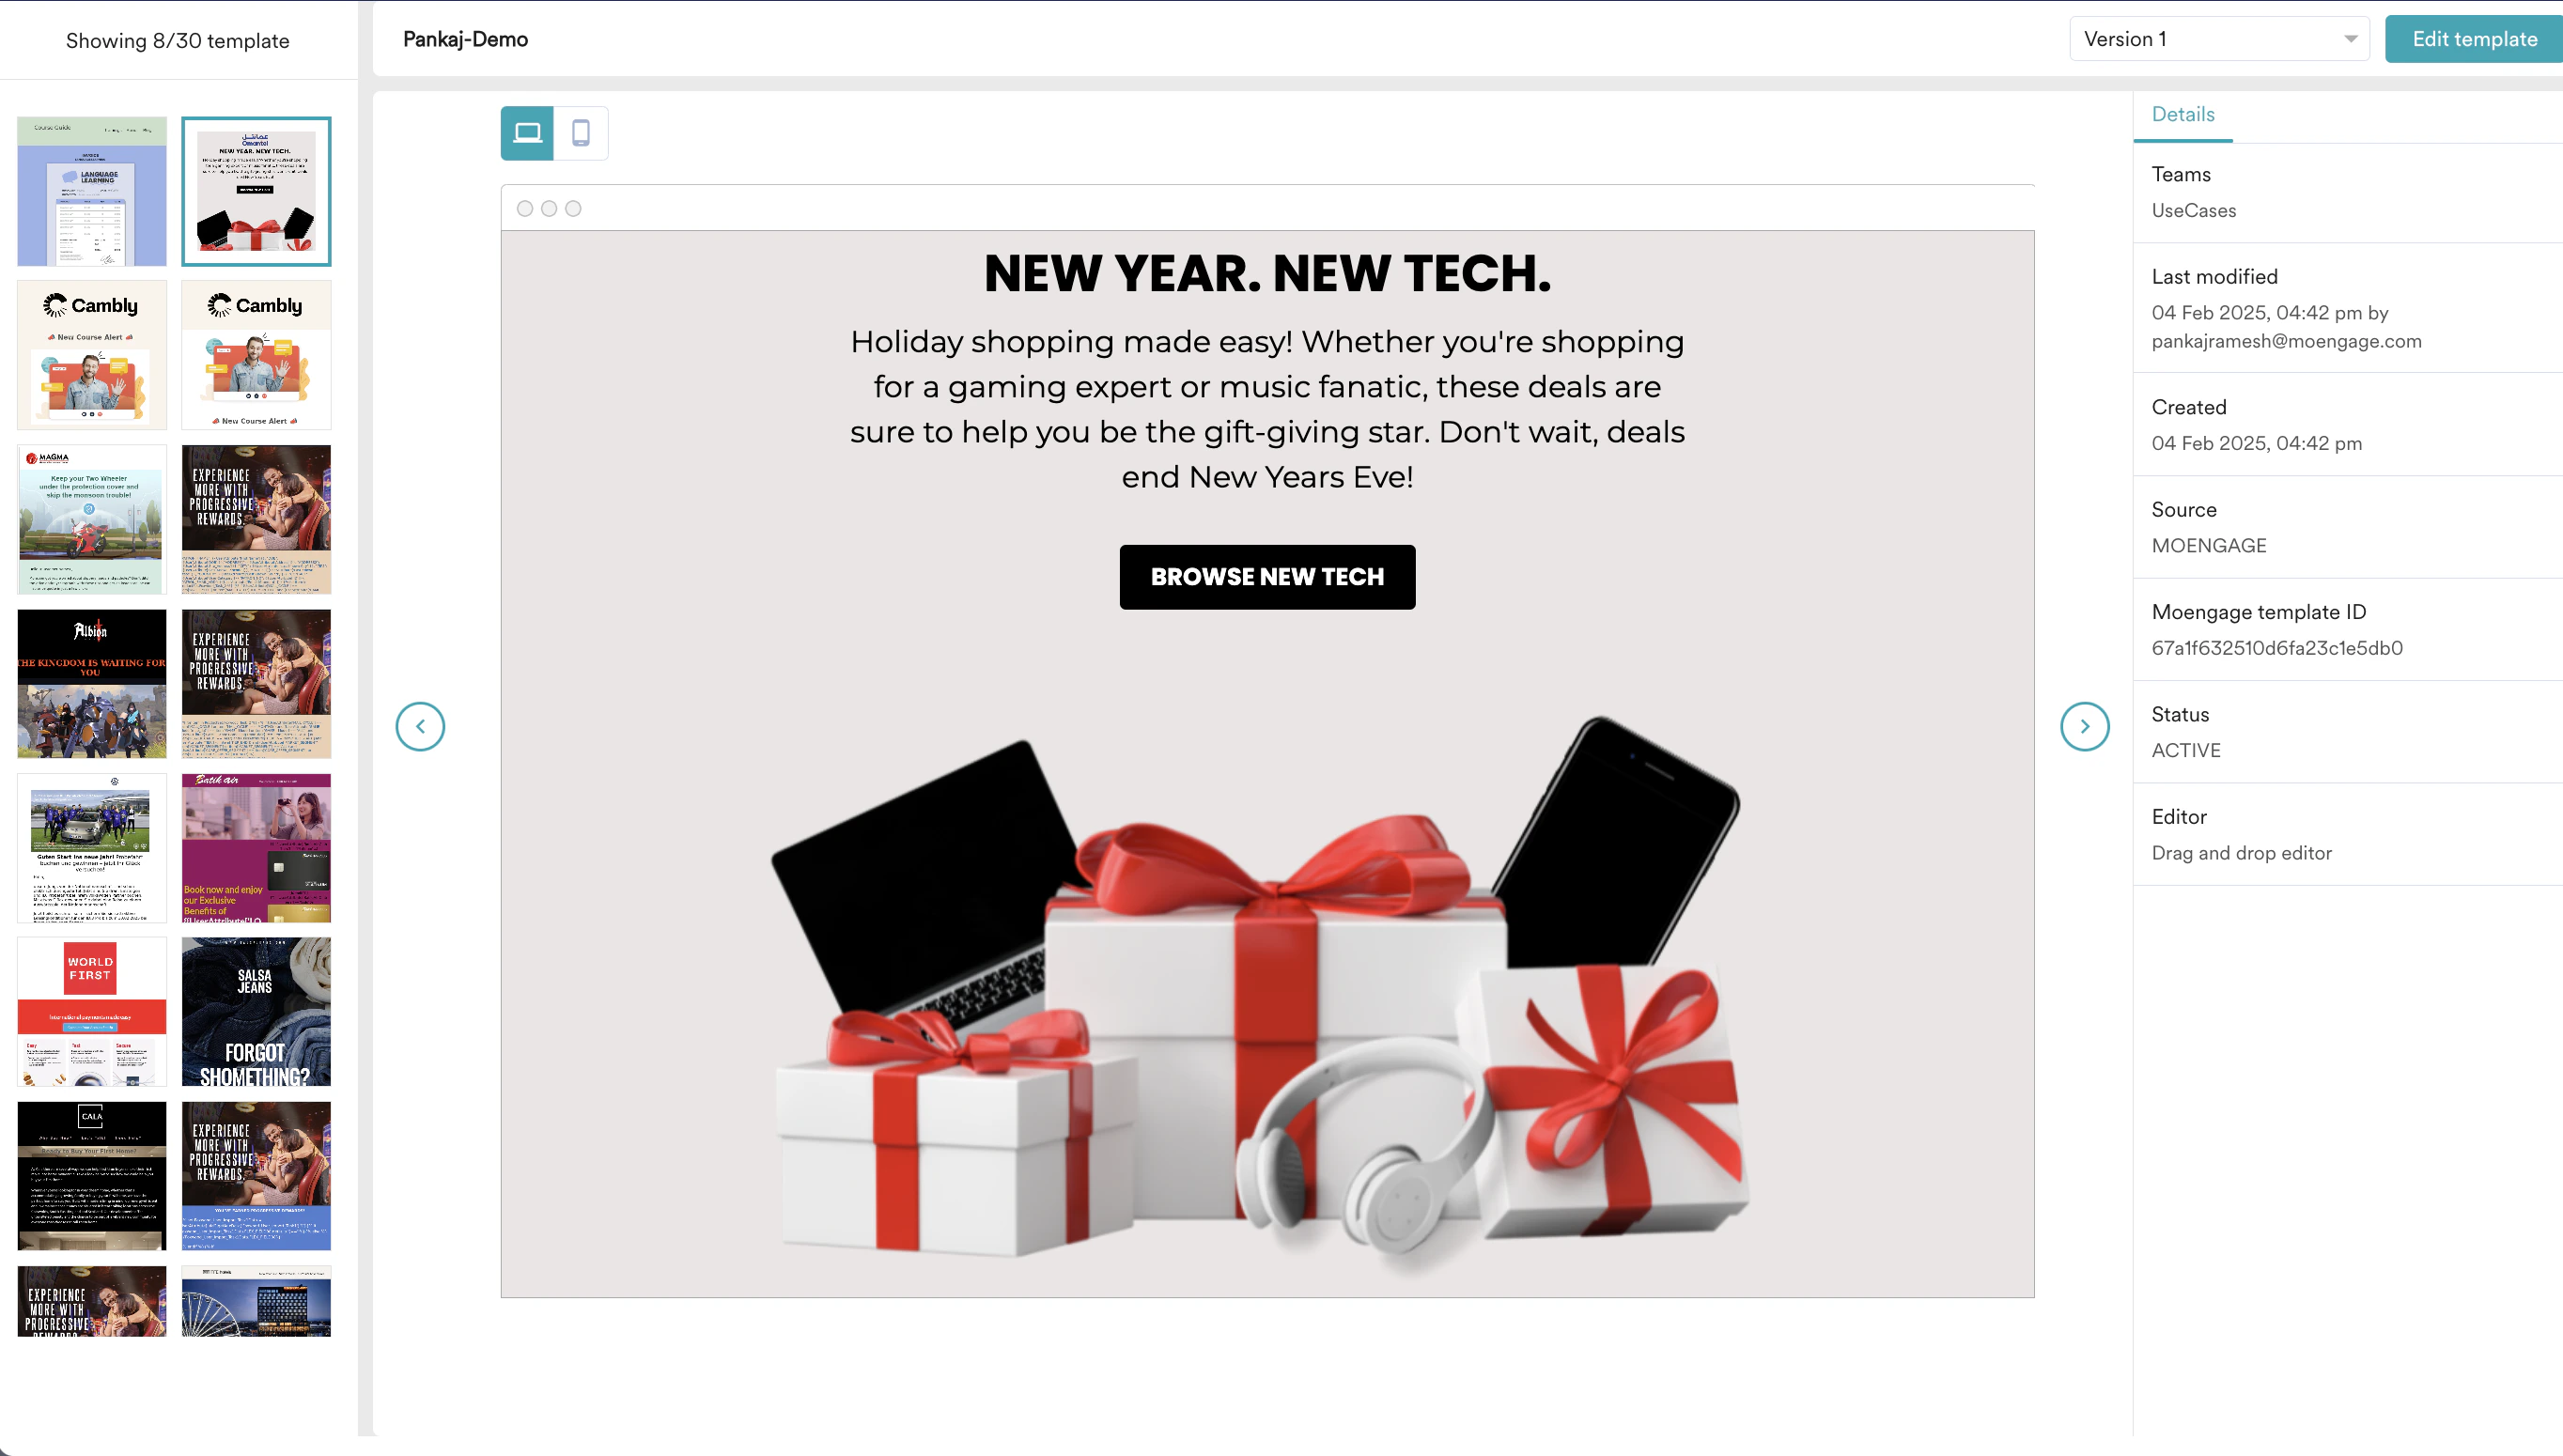
1. **Preview:** When you select the preview action, the left window pane lists an array of templates, which you can preview by selecting one. You can change the template by clicking the arrow
Click this icon in the template. The following actions will be populated.
1. **Preview:** When you select the preview action, the left window pane lists an array of templates, which you can preview by selecting one. You can change the template by clicking the arrow  icon beside it. On the right side of the window, you can check details like version history, creator details, and so on. You can also preview templates by directly clicking on the existing templates displayed on the main screen.
  2. **Share:** This option allows you to share templates with multiple teams. Sharing folders/templates with multiple teams will allow them to access and use your templates and duplicate them to edit further for their requirements. While sharing your templates with other teams, the team members will receive an email regarding your template being shared.
3. **Edit:** You can edit templates by choosing the existing templates you created or from the pre-built templates available.
1. Select a template that you want to edit. You can edit the template details, such as Name, Tags, Teams, Destination, and Platform.
2. If it is an email template, edit the email details, such as **Sender details** and **Attachments.** For more information, refer [here](/user-guide/campaigns-and-channels/email/create/create-an-email-campaign).
2. **Share:** This option allows you to share templates with multiple teams. Sharing folders/templates with multiple teams will allow them to access and use your templates and duplicate them to edit further for their requirements. While sharing your templates with other teams, the team members will receive an email regarding your template being shared.
3. **Edit:** You can edit templates by choosing the existing templates you created or from the pre-built templates available.
1. Select a template that you want to edit. You can edit the template details, such as Name, Tags, Teams, Destination, and Platform.
2. If it is an email template, edit the email details, such as **Sender details** and **Attachments.** For more information, refer [here](/user-guide/campaigns-and-channels/email/create/create-an-email-campaign).  3. If it is an On-site template, you can edit it using the tools provided. For more information, refer [here](/user-guide/campaigns-and-channels/on-site-message/create/osm-editor).
  4. Click **Save as new and Publish** to save it as a new template, or click **Update and Publish** to update the template with your changes.
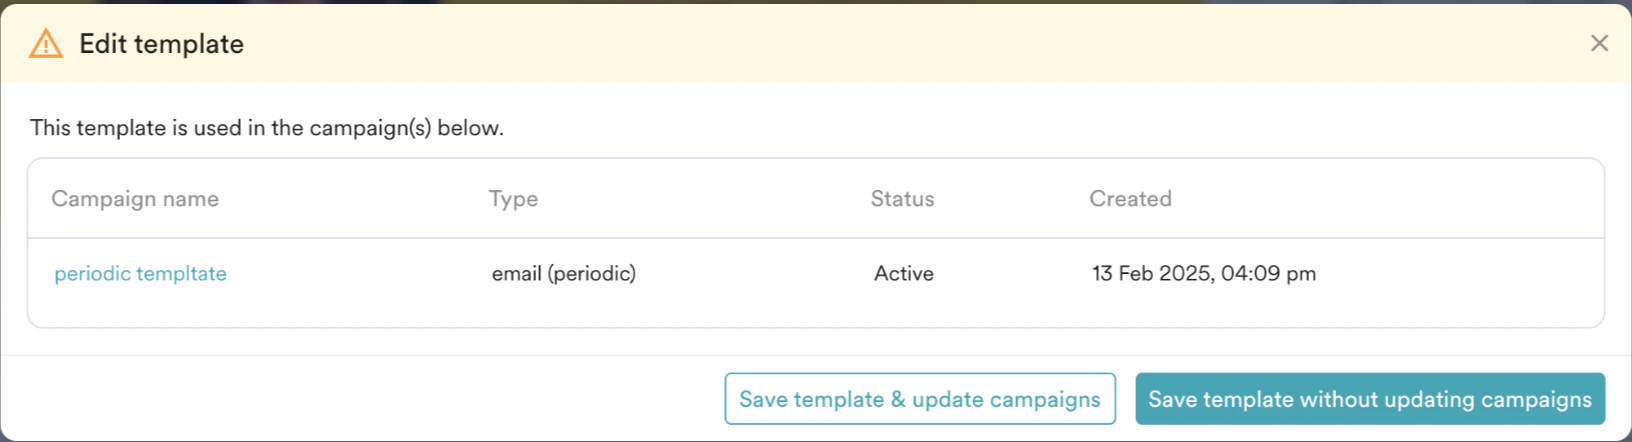
5. **Editing templates associated with campaigns:** While editing templates, if its apart of any active or scheduled campaign it will prompt the details of the campaign where the templates are associated. You can **Save template & update campaign** (which updates the template associated with the email campaign) or to **Save template** ****without updating campaigns.****
In On-site messaging, you cannot edit templates associated with any active or scheduled campaigns
4. Click **Save as new and Publish** to save it as a new template, or click **Update and Publish** to update the template with your changes.
5. **Editing templates associated with campaigns:** While editing templates, if its apart of any active or scheduled campaign it will prompt the details of the campaign where the templates are associated. You can **Save template & update campaign** (which updates the template associated with the email campaign) or to **Save template** ****without updating campaigns.****
In On-site messaging, you cannot edit templates associated with any active or scheduled campaigns
 4. **Duplicate:** This option allows you to duplicate templates and make further edits. You can manage multiple versions of your current template. For example, you can manage multiple versions of the same template to target customers based on their region, with their local languages and occasional themes.
5. **Rename:** This option allows you to rename the template.
6. **Move:** This option allows you to move the template to a folder and between folders.
7. **Delete:** This option allows you to delete templates. If you delete templates that are not part of any active campaigns, your folder gets deleted directly.
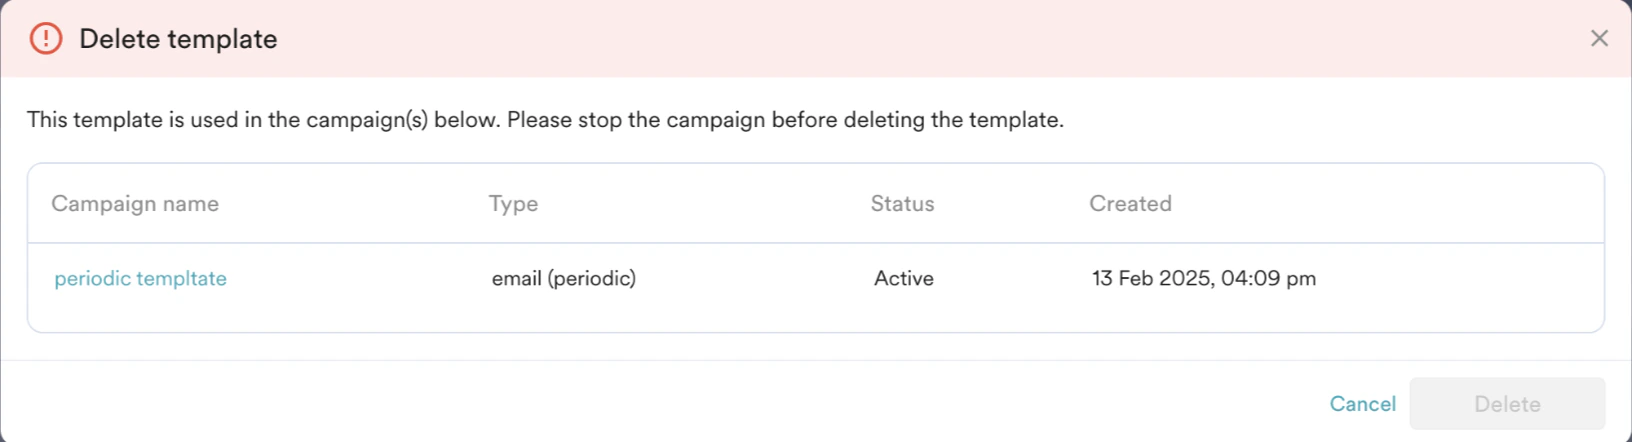
* **Delete templates associated with the email campaigns:** If you try to delete templates associated with any active and scheduled campaign, a prompt will appear with details of the campaign and ask you to stop the corresponding template before deleting it.
In On-site messaging, you cannot delete templates that are associated with any active or scheduled campaigns.
4. **Duplicate:** This option allows you to duplicate templates and make further edits. You can manage multiple versions of your current template. For example, you can manage multiple versions of the same template to target customers based on their region, with their local languages and occasional themes.
5. **Rename:** This option allows you to rename the template.
6. **Move:** This option allows you to move the template to a folder and between folders.
7. **Delete:** This option allows you to delete templates. If you delete templates that are not part of any active campaigns, your folder gets deleted directly.
* **Delete templates associated with the email campaigns:** If you try to delete templates associated with any active and scheduled campaign, a prompt will appear with details of the campaign and ask you to stop the corresponding template before deleting it.
In On-site messaging, you cannot delete templates that are associated with any active or scheduled campaigns.
 # Manage Folders
You can create folders to manage templates for separate campaigns and channels and share them across teams. For example, to send promotional messages from an email campaign, you can choose promotions as a message type, create templates, and manage them under a folder named *email*. You can also manage another subfolder for transactional templates.
You can manage only one level of subfolder in a folder
1. Click **Create folder** from the title bar.
# Manage Folders
You can create folders to manage templates for separate campaigns and channels and share them across teams. For example, to send promotional messages from an email campaign, you can choose promotions as a message type, create templates, and manage them under a folder named *email*. You can also manage another subfolder for transactional templates.
You can manage only one level of subfolder in a folder
1. Click **Create folder** from the title bar.  2. Provide the following details in the **Create folder** dialog box:
1. Enter the name of your folder.
2. In the **Teams list,** select your teams.
3. In the **Tag(s)** list, select tags for your folder and click **Create**\*\*\*\*\*\*.\*\*\*\*\*\* **
2. Provide the following details in the **Create folder** dialog box:
1. Enter the name of your folder.
2. In the **Teams list,** select your teams.
3. In the **Tag(s)** list, select tags for your folder and click **Create**\*\*\*\*\*\*.\*\*\*\*\*\* **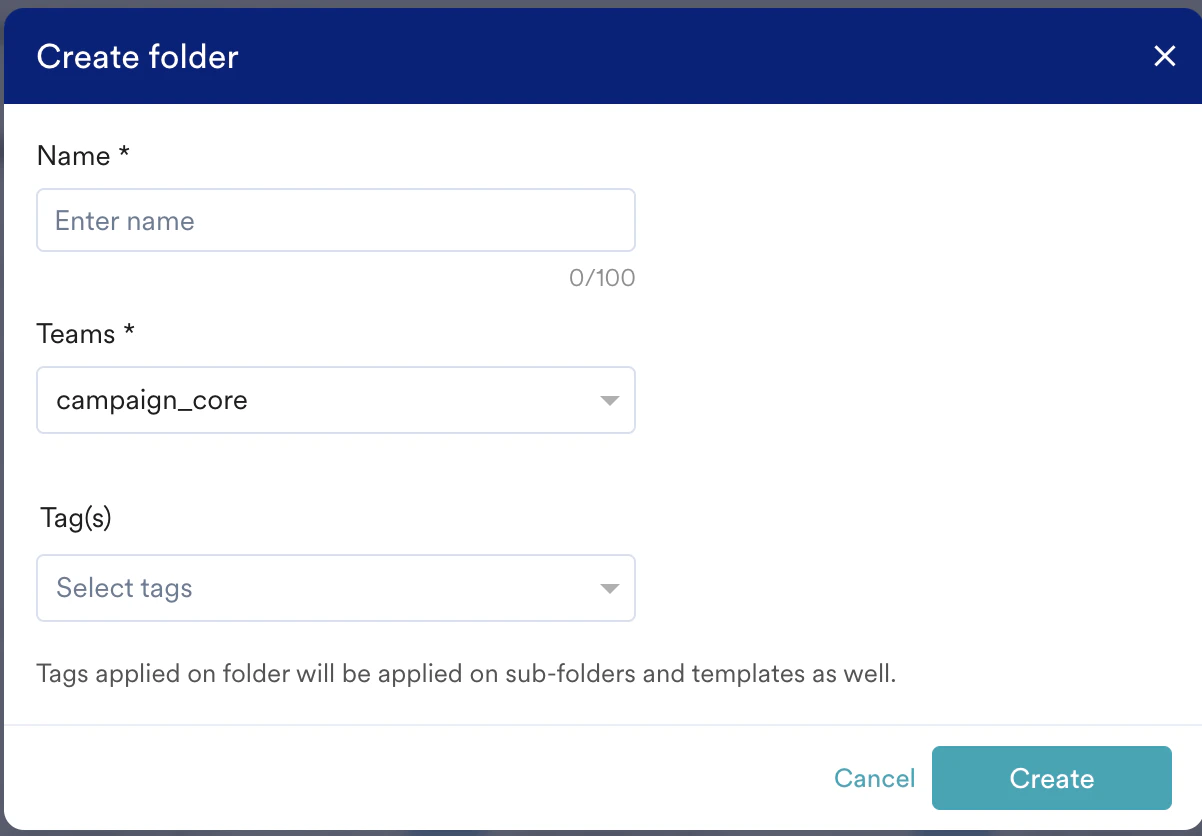 **
## Folder Actions
You can perform the following actions in folders by clicking this icon in the folder.
**
## Folder Actions
You can perform the following actions in folders by clicking this icon in the folder.  1. **Share:** This option allows you to share the folder with multiple teams. Sharing folders with multiple teams will allow them to access the folders of your templates and duplicate them to edit further for their requirements. When you share any folder with other teams, the members of the team will get an email notification regarding the folder.
2. **Edit:** This option allows you to edit the folder name and tags associated with the folder.
3. **Move:** This option allows you to move the current folder to another folder.
4. **View details:** This option allows you to check the details of the folder.
5. **Delete:** This option allows you to delete the folder. When you delete any folders that are not part of any active campaigns, your folder gets deleted directly.
* **Deleting folders associated with email campaigns:** If any template you attempt to delete is part of any active or scheduled campaign, it will prompt the campaign's details and ask you to stop the campaign before deleting. You can remove templates associated with any active or scheduled campaigns from the folder and manage them under **Templates** by selecting the **Move above templates outside and delete folder** check box.
In On-site messaging, you cannot delete a folder associated with any active or scheduled campaigns.
# Use of Templates in Campaign Creation
The **Templates** feature serves a significant purpose with its template creation and management capabilities while creating campaigns. For more information, refer [here](/user-guide/campaigns-and-channels/email/create/create-an-email-campaign).
1. **Share:** This option allows you to share the folder with multiple teams. Sharing folders with multiple teams will allow them to access the folders of your templates and duplicate them to edit further for their requirements. When you share any folder with other teams, the members of the team will get an email notification regarding the folder.
2. **Edit:** This option allows you to edit the folder name and tags associated with the folder.
3. **Move:** This option allows you to move the current folder to another folder.
4. **View details:** This option allows you to check the details of the folder.
5. **Delete:** This option allows you to delete the folder. When you delete any folders that are not part of any active campaigns, your folder gets deleted directly.
* **Deleting folders associated with email campaigns:** If any template you attempt to delete is part of any active or scheduled campaign, it will prompt the campaign's details and ask you to stop the campaign before deleting. You can remove templates associated with any active or scheduled campaigns from the folder and manage them under **Templates** by selecting the **Move above templates outside and delete folder** check box.
In On-site messaging, you cannot delete a folder associated with any active or scheduled campaigns.
# Use of Templates in Campaign Creation
The **Templates** feature serves a significant purpose with its template creation and management capabilities while creating campaigns. For more information, refer [here](/user-guide/campaigns-and-channels/email/create/create-an-email-campaign).  * The templates you have created for that respective channel will be shown while creating campaigns. It also shows the templates that have the tags you add to your campaign. For example, If you add the tag, *New customer* while creating an email campaign, it will show the email templates with the tag, *New customer*.
* You can filter templates based on the available options for your respective channels.
* While creating campaigns, you can select the templates based on the editor in which they were created.
* The **Templates** feature also manages the templates you have created while creating a campaign. You can fetch and edit the templates created via the campaign creation flow from the **Templates.**
The permissions to edit, delete, save, and publish templates are determined based on the role. For more information, refer [here](/user-guide/settings/account/team-management/access-roles).
* The templates you have created for that respective channel will be shown while creating campaigns. It also shows the templates that have the tags you add to your campaign. For example, If you add the tag, *New customer* while creating an email campaign, it will show the email templates with the tag, *New customer*.
* You can filter templates based on the available options for your respective channels.
* While creating campaigns, you can select the templates based on the editor in which they were created.
* The **Templates** feature also manages the templates you have created while creating a campaign. You can fetch and edit the templates created via the campaign creation flow from the **Templates.**
The permissions to edit, delete, save, and publish templates are determined based on the role. For more information, refer [here](/user-guide/settings/account/team-management/access-roles).