> ## Documentation Index
> Fetch the complete documentation index at: https://moengage.com/docs/llms.txt
> Use this file to discover all available pages before exploring further.
# Personalize Push Campaigns
> Add personalization to your MoEngage push campaigns using user attributes, event data, and dynamic content to drive better engagement rates.
Personalization can add that differentiation to your marketing campaign and re-create that missing connection in message broadcasts for the customer. Personalized messages are read and received well.
* Before running this, please check how you save names/other attribute values with MoEngage. Validate your saved data before using personalization. Also, note that personalized push notifications are not sent to iOS Inbox as of now.
* Ensure that custom attributes do not have the same names as MoEngage's standard attributes. If a custom attribute and a standard attribute having the same name are used for personalization, it could result in incorrect personalization.
This article describes personalization for Push Campaigns (One-time, Periodic, Event Triggered, Business Event Triggered, Device Triggered, and Location Triggered).
# Push Personalization
One can personalize one or multiple attributes in the same message. To insert personalization in any field value, enter *"@"* and select the user attribute\*.\* We support personalization in:
1. **Message fields**- message title, body, summary,
2. **Rich content** - Images & Coupon Codes
3. **Click Actions** - Deep-link URI & value items for Key-Value pairs for both platforms - Android and iOS.
When you create a personalization condition or logic, it appears as a chip. To know more about Chip Actions, refer [here](/user-guide/campaigns-and-channels/getting-started/message-personalization/dynamic-content-personalization).
# Examples
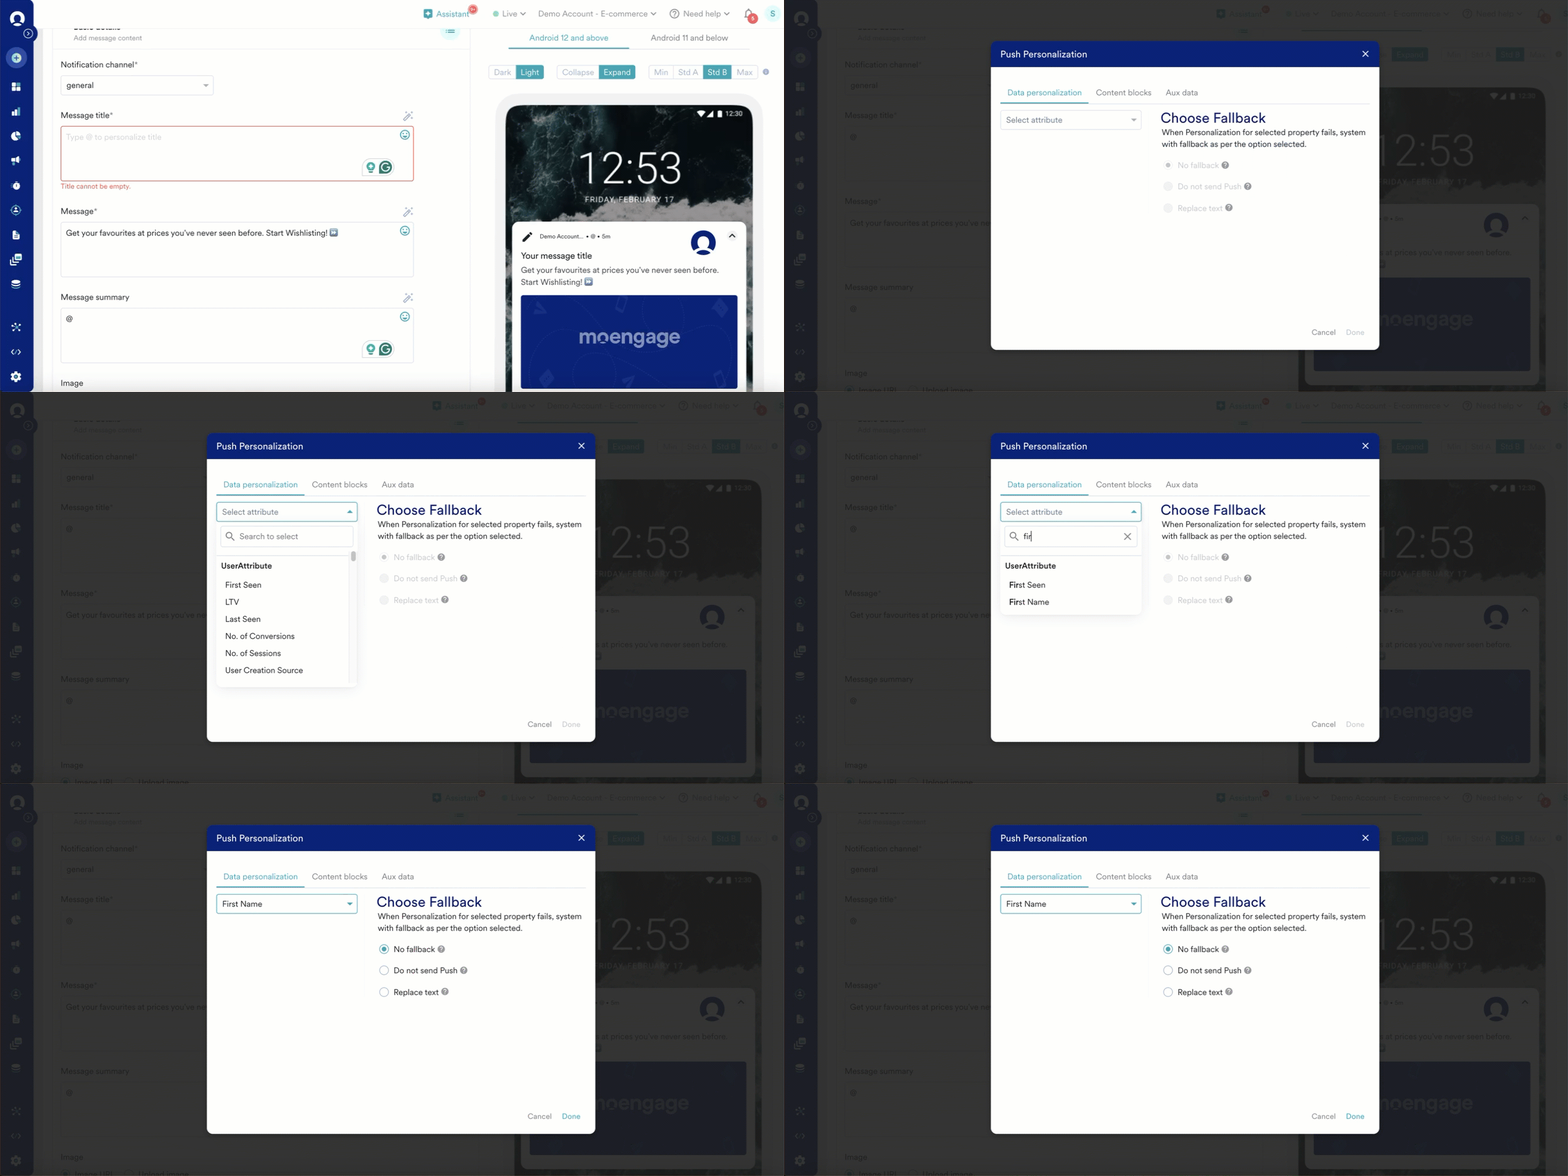
## Name Personalization
To address users by their first name, remind them of their last activity (viewed product, purchased product)
 ## Image Personalization
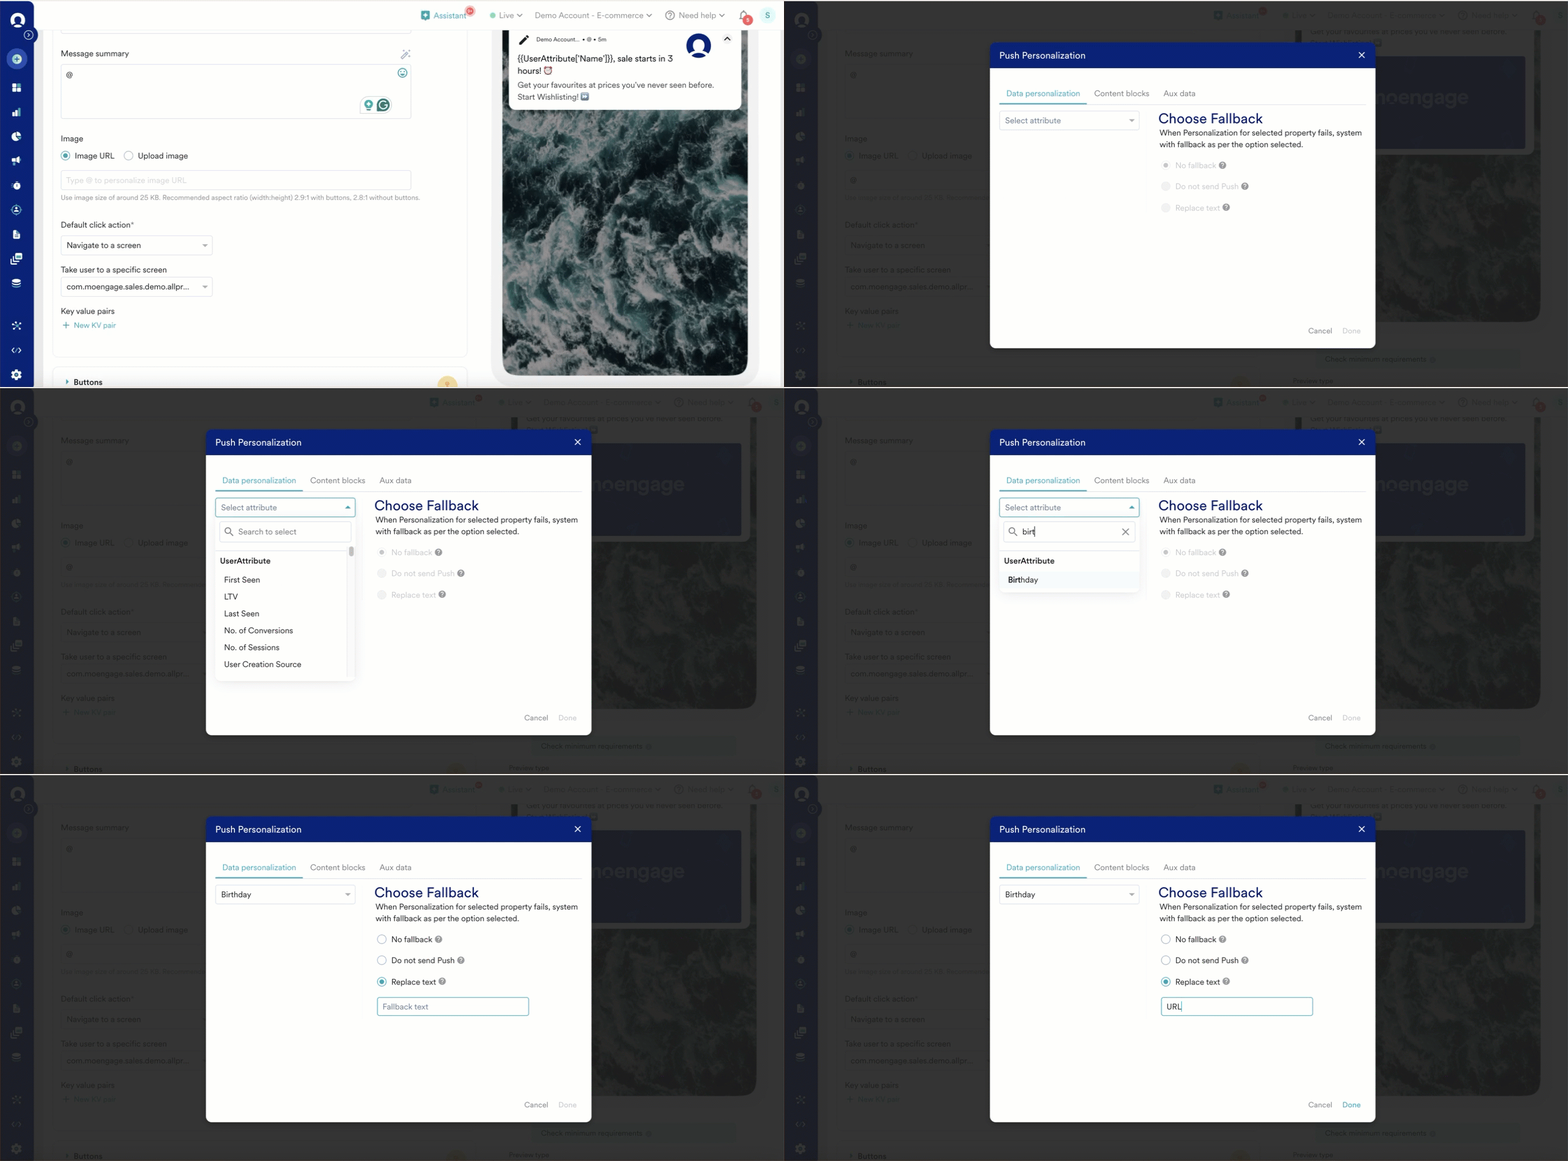
To send a personalized Image to the user for products viewed but not bought by the customer.
## Image Personalization
To send a personalized Image to the user for products viewed but not bought by the customer.
 ## Coupon Code Personalization
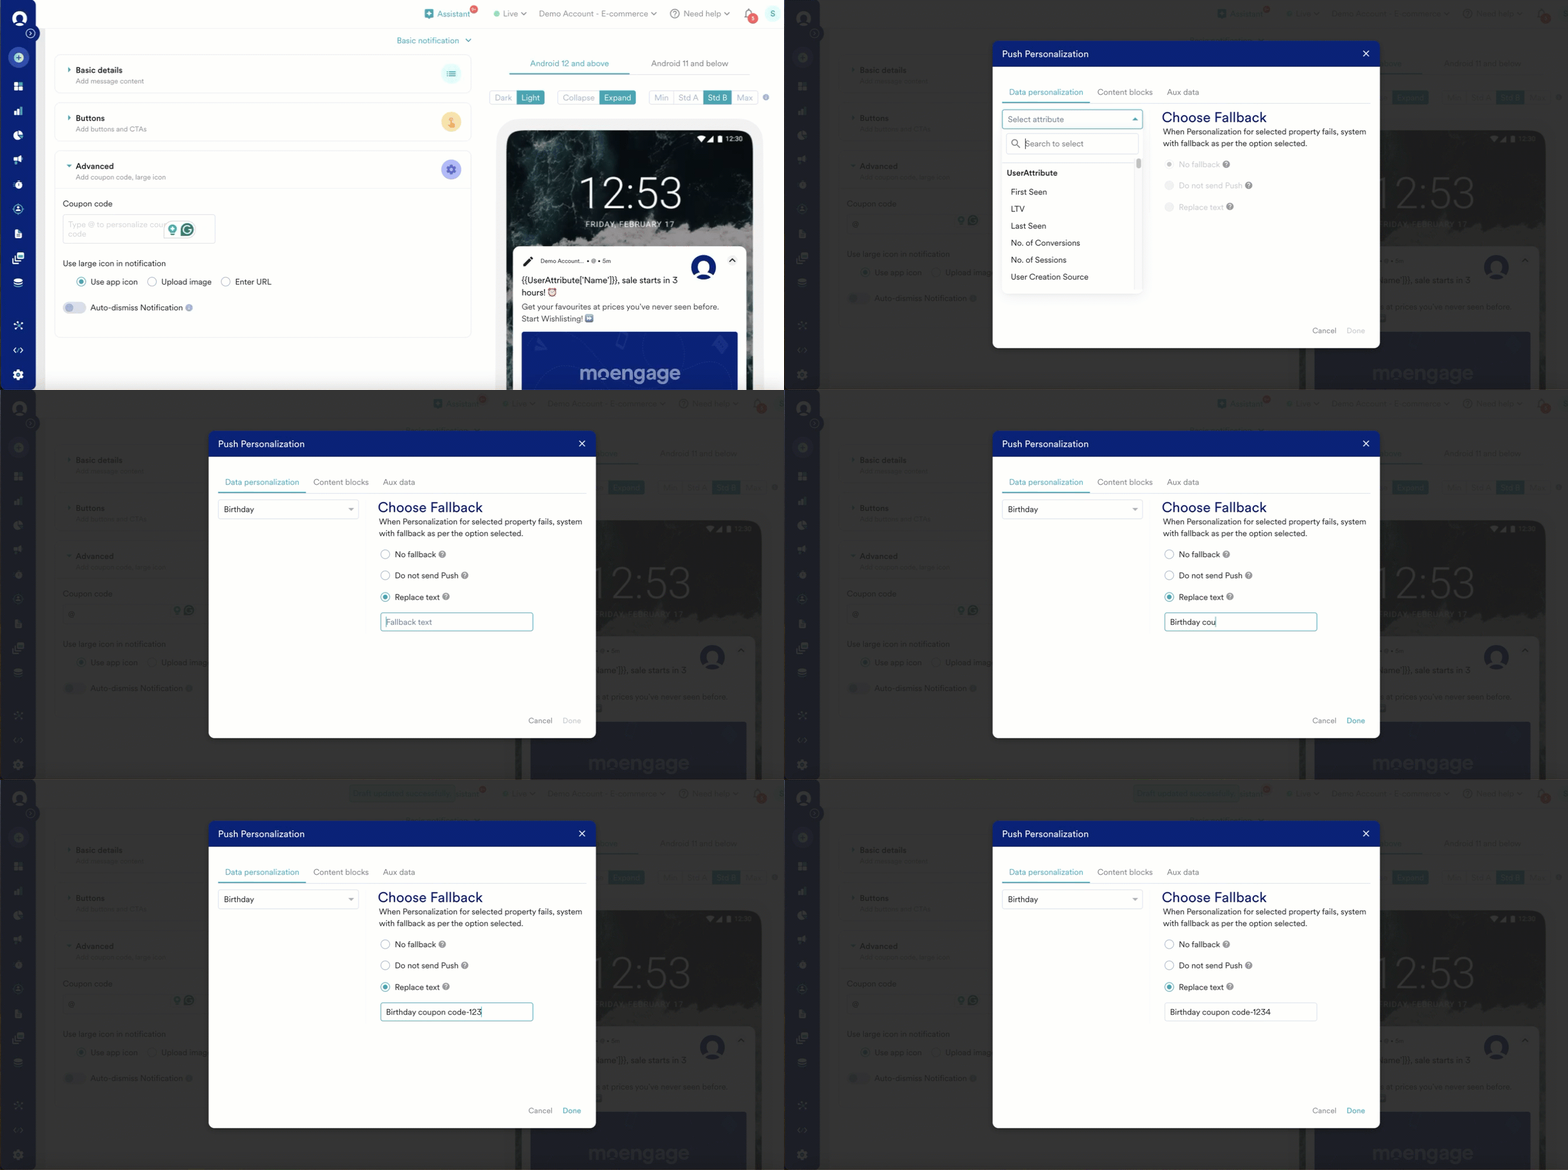
To send a unique coupon code to every user. You need to save the User Level Coupon as a custom attribute and use it here. In the example, we have saved User-specific unique coupon code in an attribute named: Promo Code
## Coupon Code Personalization
To send a unique coupon code to every user. You need to save the User Level Coupon as a custom attribute and use it here. In the example, we have saved User-specific unique coupon code in an attribute named: Promo Code
 ## Key-Value Pair Personalization
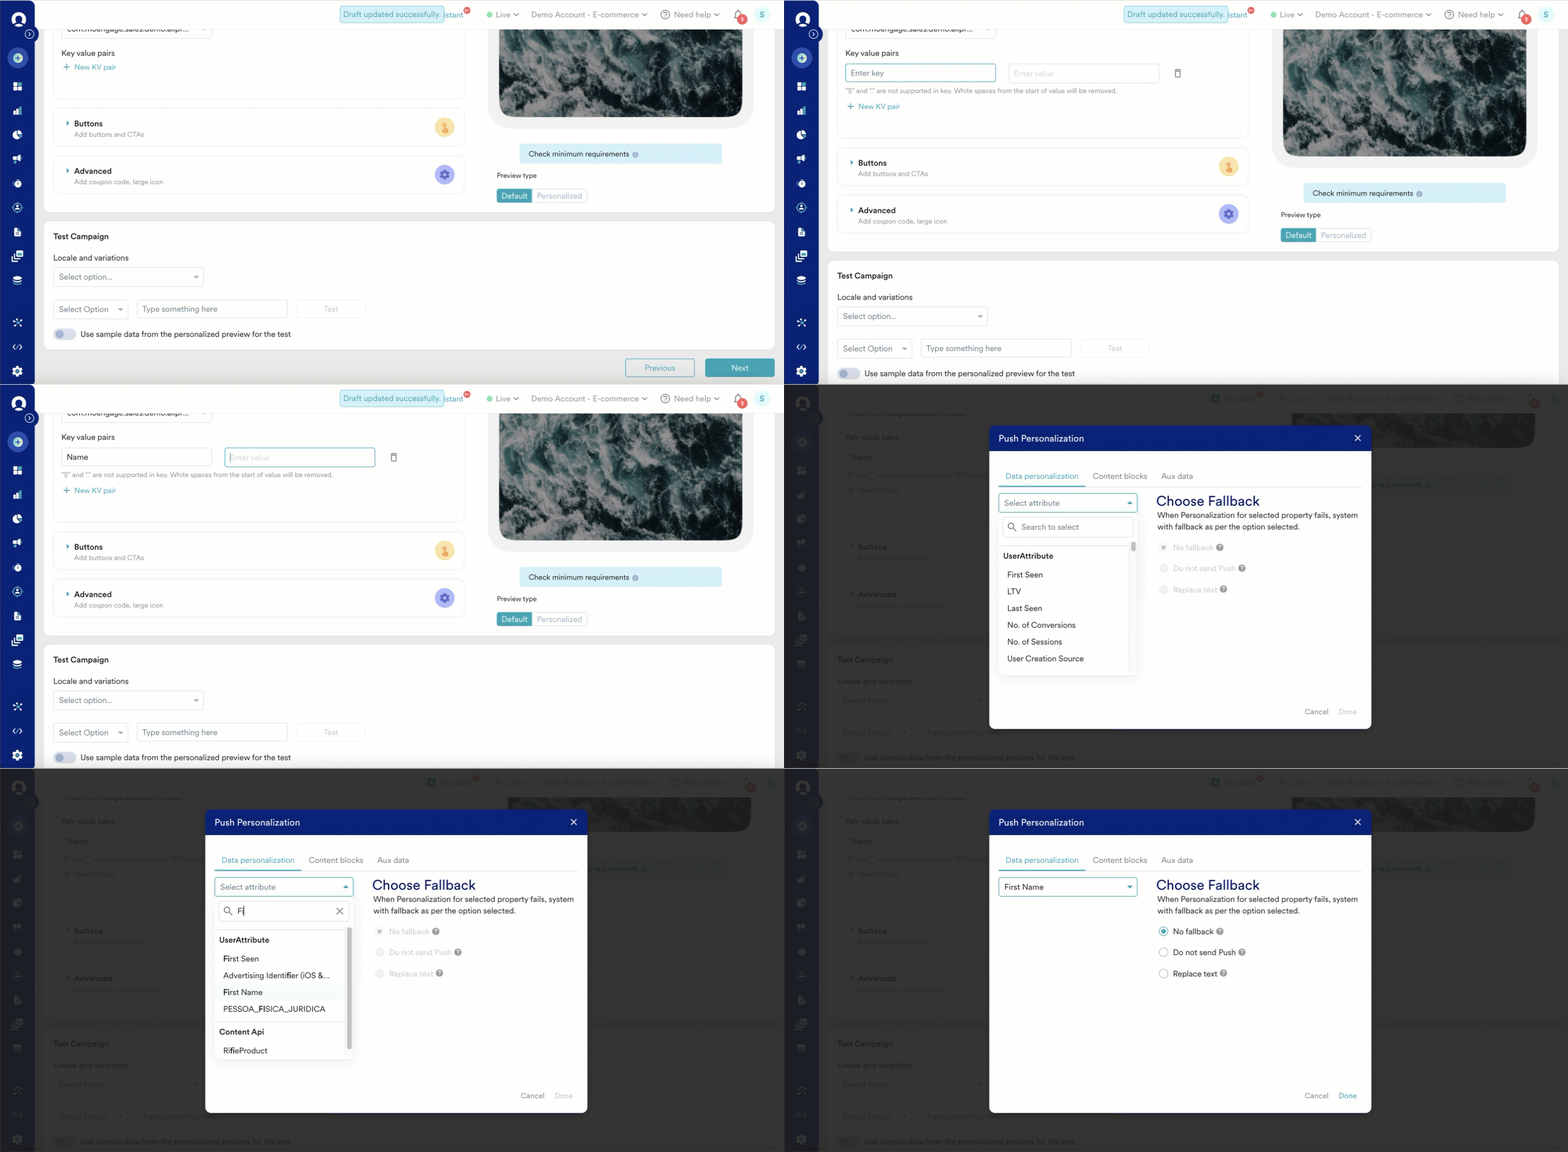
When you want to pass Unique User Attribute to the app and make a decision on basis of that. It can be used to pre-fill feedback forms or user surveys etc.
## Key-Value Pair Personalization
When you want to pass Unique User Attribute to the app and make a decision on basis of that. It can be used to pre-fill feedback forms or user surveys etc.
 The examples have referred to sample attribute names. These names are not standard and depend on how you have saved them with MoEngage.
## Personalization using Content APIs
Type '@' in the Message section and add the call to the Content API. The Push Personalization screen opens up when you type @. Choose the relevant Content API as shown below.
The examples have referred to sample attribute names. These names are not standard and depend on how you have saved them with MoEngage.
## Personalization using Content APIs
Type '@' in the Message section and add the call to the Content API. The Push Personalization screen opens up when you type @. Choose the relevant Content API as shown below.
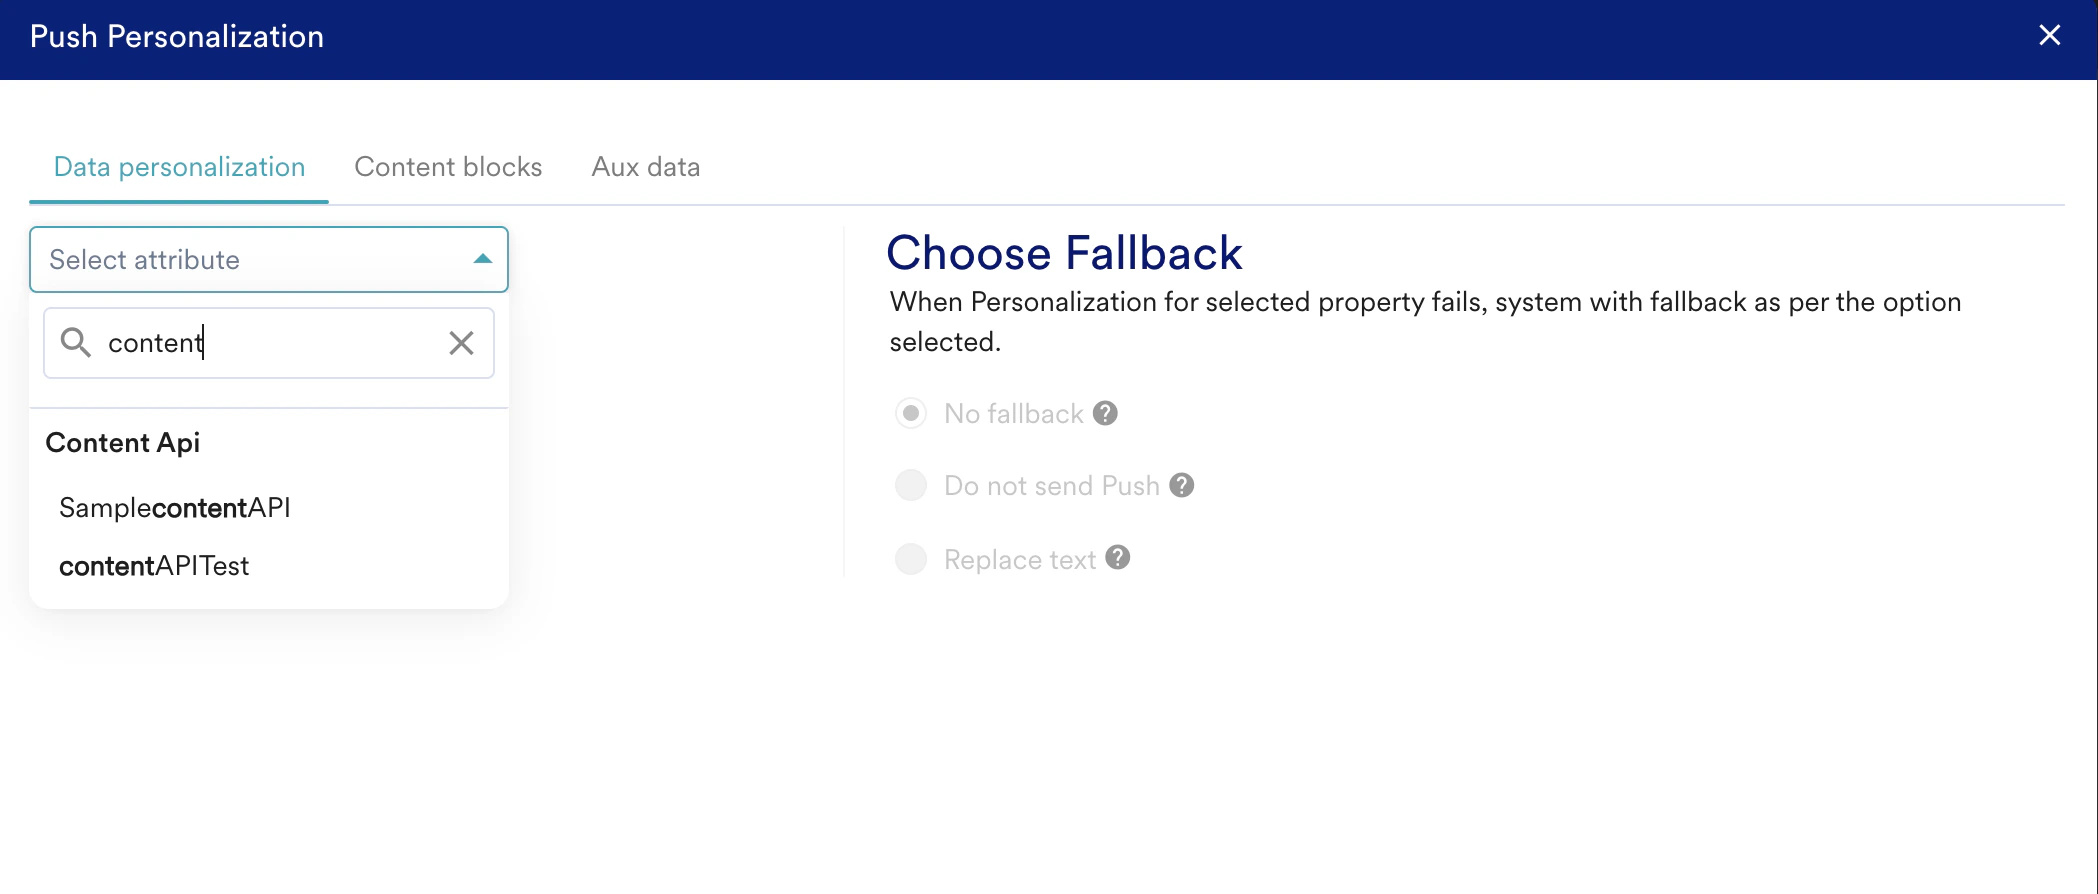 Consider the following example: The brand wishes to target users who have items in their cart but haven't made a purchase yet. Content APIs can be used to send personalized notifications to such users and nudge them to purchase as shown below.
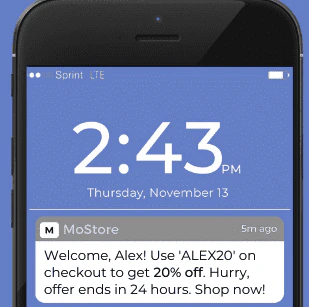
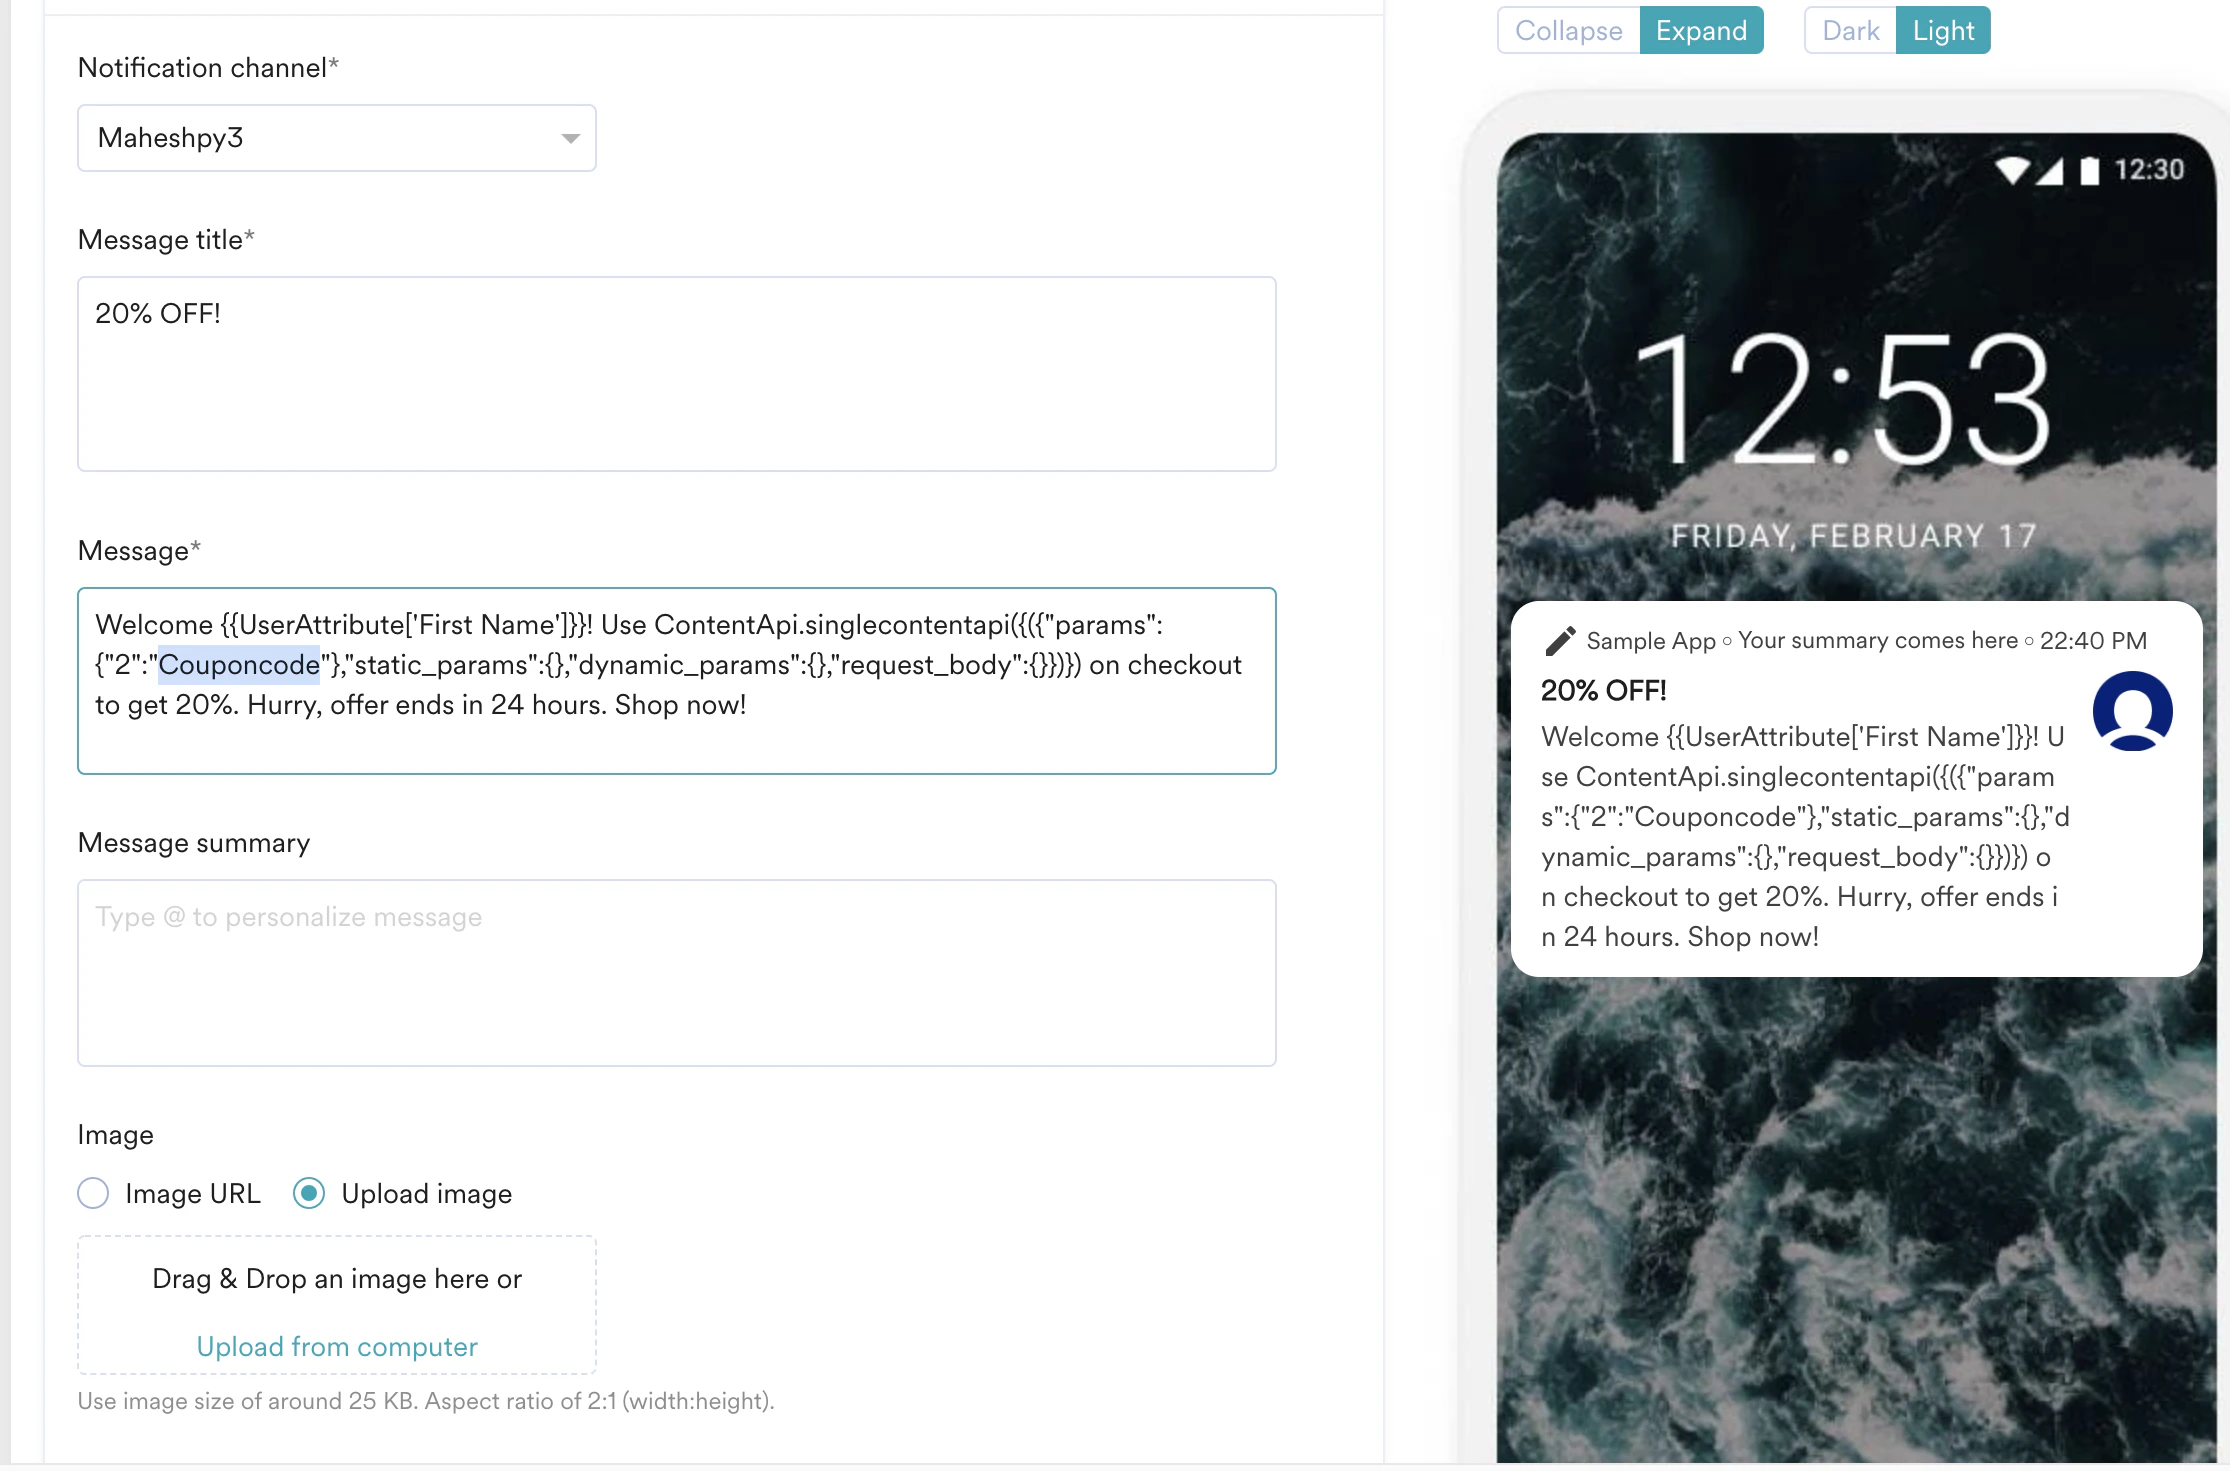 The following screenshot illustrates how the notification might look on the user's mobile device.
 For more information on Content APIs, click [here](/user-guide/campaigns-and-channels/getting-started/campaign-content/content-apis).
## Personalize Content Using Auxiliary Data
You can personalize your Push content using auxiliary data by selecting the auxiliary data attributes in the personalization editor.
To personalize content using Auxiliary Data attributes:
1. Enter @ in the fields such as Message title, Message, Message summary (wherever personalization is supported) to invoke the personalization editor.
2. Select the **Aux Data** tab.
3. In the **Aux data** drop-down list, select the Auxiliary Data file whose attribute you wish to use for personalization.
4. In the **Lookup value** drop-down list, select the primary key specified for the Auxiliary Data during import. This will identify the user for whom the Auxiliary Data is being fetched.
5. In the **Attribute** drop-down list, specify the attribute to be personalized using Auxiliary Data.
6. Click **Done**. The Auxiliary Data JINJA will get added to the field or the editor.
For more information, refer to [Personalize Campaign Content Using Auxiliary Data](/user-guide/campaigns-and-channels/getting-started/message-personalization/personalize-content-using-auxiliary-data).
## Personalization Using Content Blocks
Content Blocks are reusable content that can be used across various campaigns. These are particularly useful for headers, footers, signature blocks, terms and conditions, and so on.
### Adding a Content Block
To add a content block, type @ in the message section and navigate to the content blocks tab in the personalization screen that pops up.
For more information on Content APIs, click [here](/user-guide/campaigns-and-channels/getting-started/campaign-content/content-apis).
## Personalize Content Using Auxiliary Data
You can personalize your Push content using auxiliary data by selecting the auxiliary data attributes in the personalization editor.
To personalize content using Auxiliary Data attributes:
1. Enter @ in the fields such as Message title, Message, Message summary (wherever personalization is supported) to invoke the personalization editor.
2. Select the **Aux Data** tab.
3. In the **Aux data** drop-down list, select the Auxiliary Data file whose attribute you wish to use for personalization.
4. In the **Lookup value** drop-down list, select the primary key specified for the Auxiliary Data during import. This will identify the user for whom the Auxiliary Data is being fetched.
5. In the **Attribute** drop-down list, specify the attribute to be personalized using Auxiliary Data.
6. Click **Done**. The Auxiliary Data JINJA will get added to the field or the editor.
For more information, refer to [Personalize Campaign Content Using Auxiliary Data](/user-guide/campaigns-and-channels/getting-started/message-personalization/personalize-content-using-auxiliary-data).
## Personalization Using Content Blocks
Content Blocks are reusable content that can be used across various campaigns. These are particularly useful for headers, footers, signature blocks, terms and conditions, and so on.
### Adding a Content Block
To add a content block, type @ in the message section and navigate to the content blocks tab in the personalization screen that pops up.
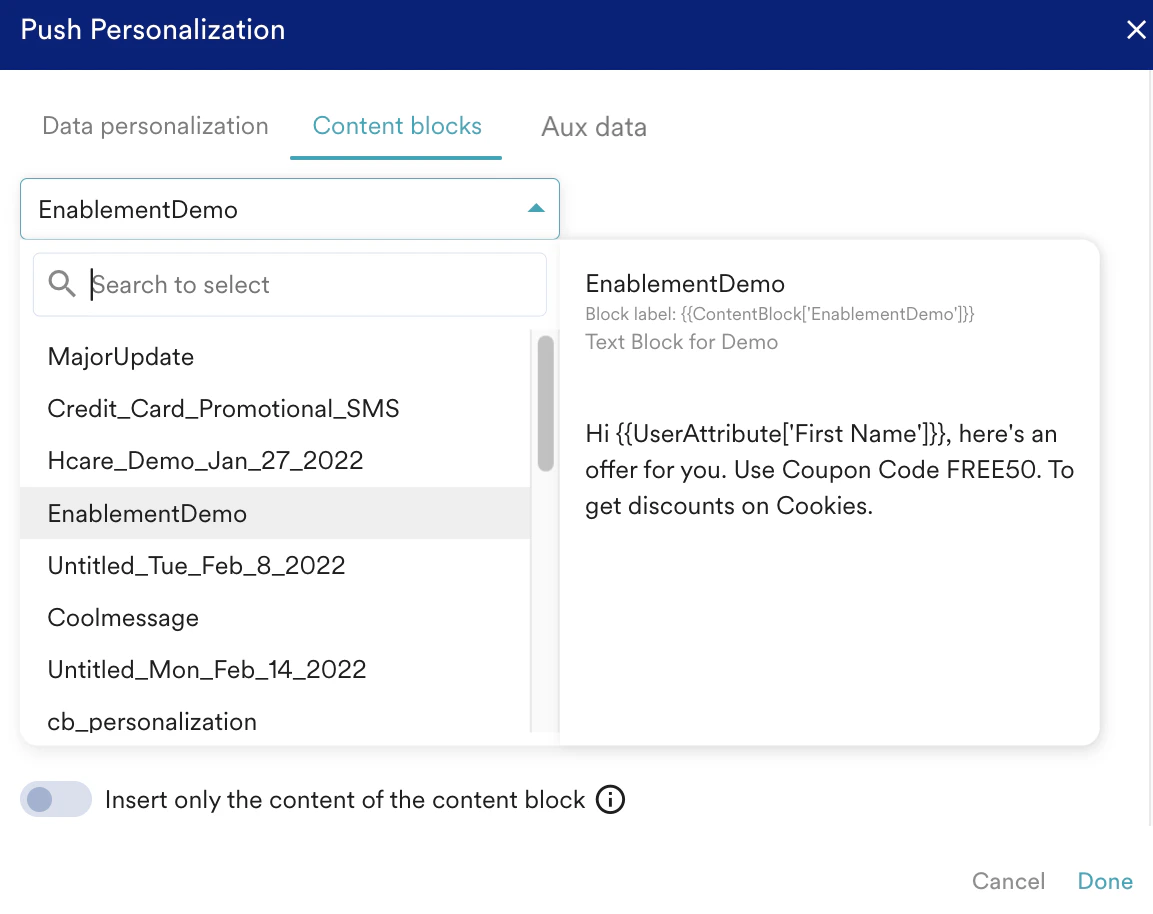 Click on 'Done' to insert the chosen content block. View the added content block in the preview controls section.
### Preview of a message that contains a Content Block
Click on 'Done' to insert the chosen content block. View the added content block in the preview controls section.
### Preview of a message that contains a Content Block
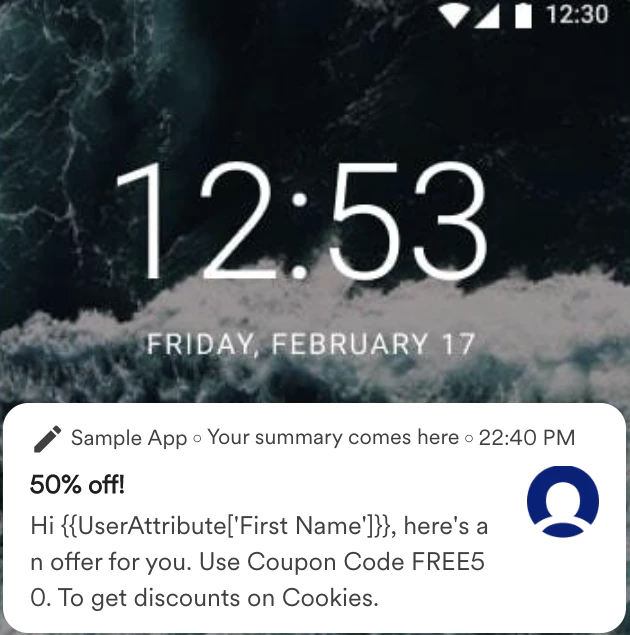 You can also add only the content from the content blocks using the 'Insert only the content of the content block' Toggle as shown below.
 This will insert only the content, and any updates to the content block that happen later won't get reflected in this campaign. For more information on Content Blocks, click [here](/user-guide/content/content-blocks/content-blocks).
# Fallback Messaging
There may be cases where personalization may fail due to untimely resolution of user attributes or other reasons. You can create an alternate (Fallback) to the personalization when there are failures.
* No Fallback\
Choose the option for personalized content. The option results in no alternates when the personalization does not work.
* Do not send Push\
Choose the option where if the personalization does not work, In-App messages are not sent.
* Replace Text\
Type or paste the text used when the personalization does not work.
When a push message Personalization fails and No Fallback message is set then the notification will not be sent to the user. MoEngage in turn generates an error called, *Personalization Failed.*
| **Personalization Successful** | **Fallback Message Set** | **Message** |
| ------------------------------ | ------------------------ | ------------------------------------------------------ |
| No | No | No message will be sent. Error: Personalization Failed |
| Yes | Yes | A personalized message will be sent |
| No | Yes | The fallback message will be sent |
This will insert only the content, and any updates to the content block that happen later won't get reflected in this campaign. For more information on Content Blocks, click [here](/user-guide/content/content-blocks/content-blocks).
# Fallback Messaging
There may be cases where personalization may fail due to untimely resolution of user attributes or other reasons. You can create an alternate (Fallback) to the personalization when there are failures.
* No Fallback\
Choose the option for personalized content. The option results in no alternates when the personalization does not work.
* Do not send Push\
Choose the option where if the personalization does not work, In-App messages are not sent.
* Replace Text\
Type or paste the text used when the personalization does not work.
When a push message Personalization fails and No Fallback message is set then the notification will not be sent to the user. MoEngage in turn generates an error called, *Personalization Failed.*
| **Personalization Successful** | **Fallback Message Set** | **Message** |
| ------------------------------ | ------------------------ | ------------------------------------------------------ |
| No | No | No message will be sent. Error: Personalization Failed |
| Yes | Yes | A personalized message will be sent |
| No | Yes | The fallback message will be sent |
 # Triggered Push Campaigns
In Event Triggered and Device Triggered Push Notification, for personalization, you can additionally use the *event attribute* for the event the "IF" trigger is set upon. Other things remain similar to things mentioned in the [Push Personalization](#push-personalization) section.
In business event-triggered push campaigns, you can use the attribute of the business event that is mapped to the campaign to personalize the campaign. To do so:
* Type '@' in the content creation step to invoke the personalization editor.
* The attributes of the Business Event mapped to the campaign are shown under the Business Event Attribute head, as shown below.
# Triggered Push Campaigns
In Event Triggered and Device Triggered Push Notification, for personalization, you can additionally use the *event attribute* for the event the "IF" trigger is set upon. Other things remain similar to things mentioned in the [Push Personalization](#push-personalization) section.
In business event-triggered push campaigns, you can use the attribute of the business event that is mapped to the campaign to personalize the campaign. To do so:
* Type '@' in the content creation step to invoke the personalization editor.
* The attributes of the Business Event mapped to the campaign are shown under the Business Event Attribute head, as shown below.
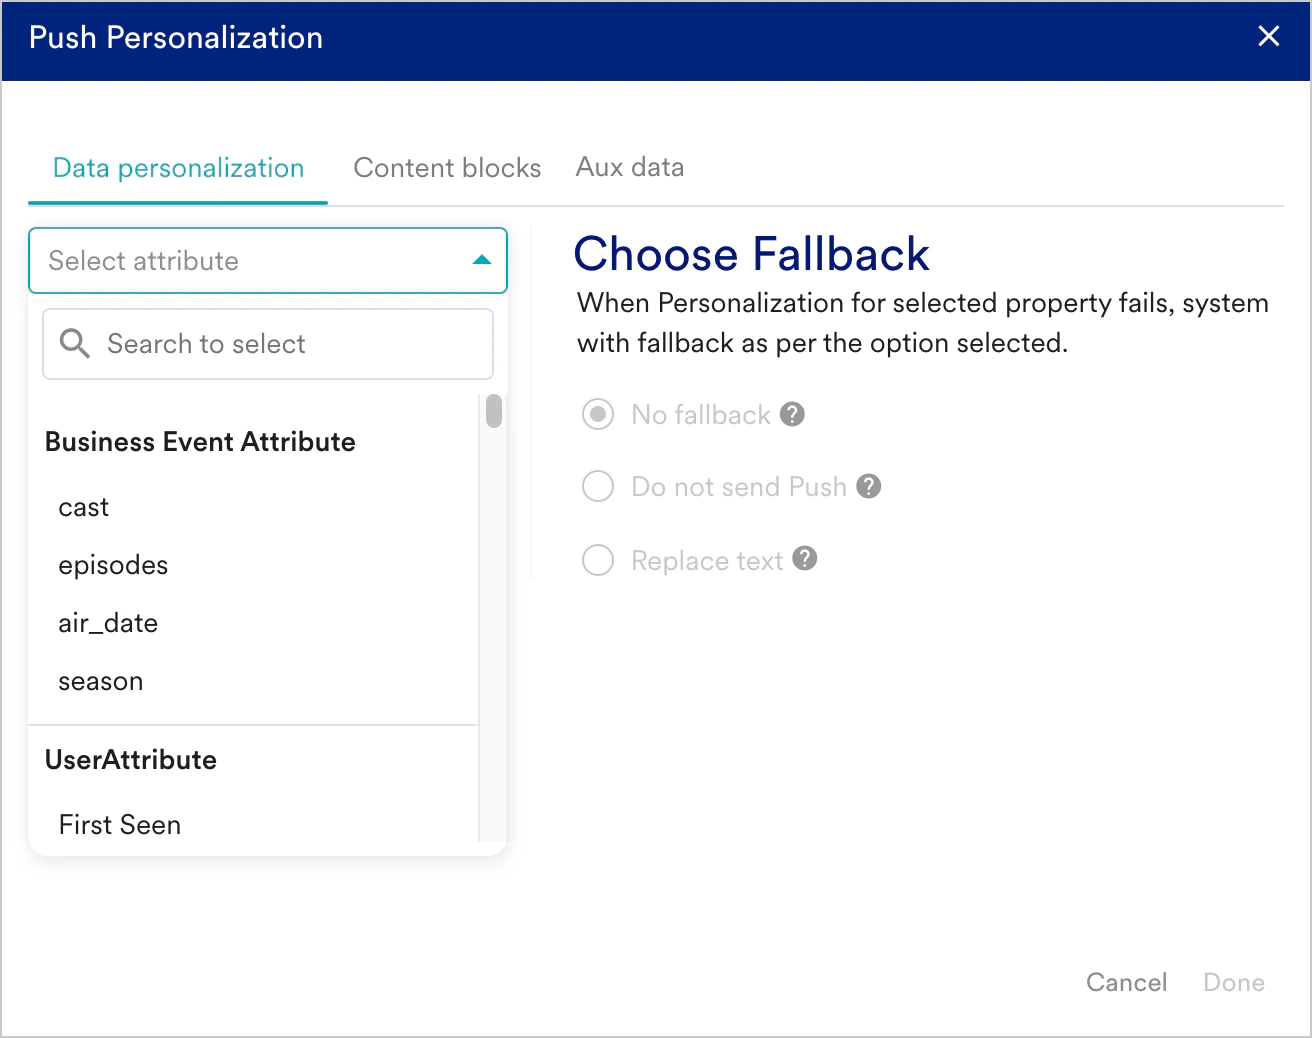 * Choose the attribute to be used for personalization and customize the message.
Personalization with business events can be a huge differentiator in terms of effort and automation, as you can use one template and send multiple campaigns with it. For example, if you have to communicate information about three new web series that are being launched - you can do so with the same campaign. You can use the event attributes to personalize the message for each series by using the series name, image, cast, and air date to send the communication to your dynamic segment (that matches the user interest (say, preferred genre) to that of the genre of the series).
Personalization can create a valuable differentiation for your marketing campaigns and promotional content. For further assistance, please contact your MoEngage Customer Success Manager (CSM) or the Support team.
* Choose the attribute to be used for personalization and customize the message.
Personalization with business events can be a huge differentiator in terms of effort and automation, as you can use one template and send multiple campaigns with it. For example, if you have to communicate information about three new web series that are being launched - you can do so with the same campaign. You can use the event attributes to personalize the message for each series by using the series name, image, cast, and air date to send the communication to your dynamic segment (that matches the user interest (say, preferred genre) to that of the genre of the series).
Personalization can create a valuable differentiation for your marketing campaigns and promotional content. For further assistance, please contact your MoEngage Customer Success Manager (CSM) or the Support team.