> ## Documentation Index
> Fetch the complete documentation index at: https://moengage.com/docs/llms.txt
> Use this file to discover all available pages before exploring further.
# How to Capture and Utilize Responses from a Landing Page
> Capture leads through MoEngage landing page forms and sync responses with your campaigns and third-party tools for nurturing and conversion.
# Introduction
Generating leads is a critical component of business growth. Using the *Landing Pages* feature of MoEngage, we can create personalized web pages to capture user information. We can use the responses collected within MoEngage channels and other third-party platforms to ensure lead data is automatically synced for further nurturing and conversion. This integration is valuable for businesses to streamline lead management and enhance customer engagement.
We will accomplish this use case in three steps:
* [Step 1: Create a landing page](#step-1-create-a-landing-page)
* [Step 2: Configure the form](#step-2-configure-the-form)
* [Step 3: View responses](#step-3-view-responses)
* [Step 4: Utilize responses](#step-4-utilize-responses)
# Expected Result
Users visiting the landing page will encounter a personalized form designed to collect essential contact information, such as email, first name, last name, and phone number. After they submit the form, the data is captured and available in the *Response Submitted* event and automatically sent to your platform, creating a new contact record. We can also utilize it in MoEngage to send SMS or other channels. This ensures that the lead information is readily available for follow-up actions, such as Email campaigns or sales outreach.
* You must have access to the *Landing Pages* feature in MoEngage. If not, enable it for your account by contacting your MoEngage Customer Success Manager (CSM) or the Support team.
* You must have relevant access to the third-party platform where you wish to send the response data. For example, a HubSpot account with API credentials, specifically an API key for authentication. You can obtain it from the platform's developer documentation.
# Step 1: Create a Landing Page
1. On the left navigation menu in the MoEngage dashboard, click **Content**, and then click **Landing pages**.
2. On the **Landing pages** page, click **Create a landing page**. 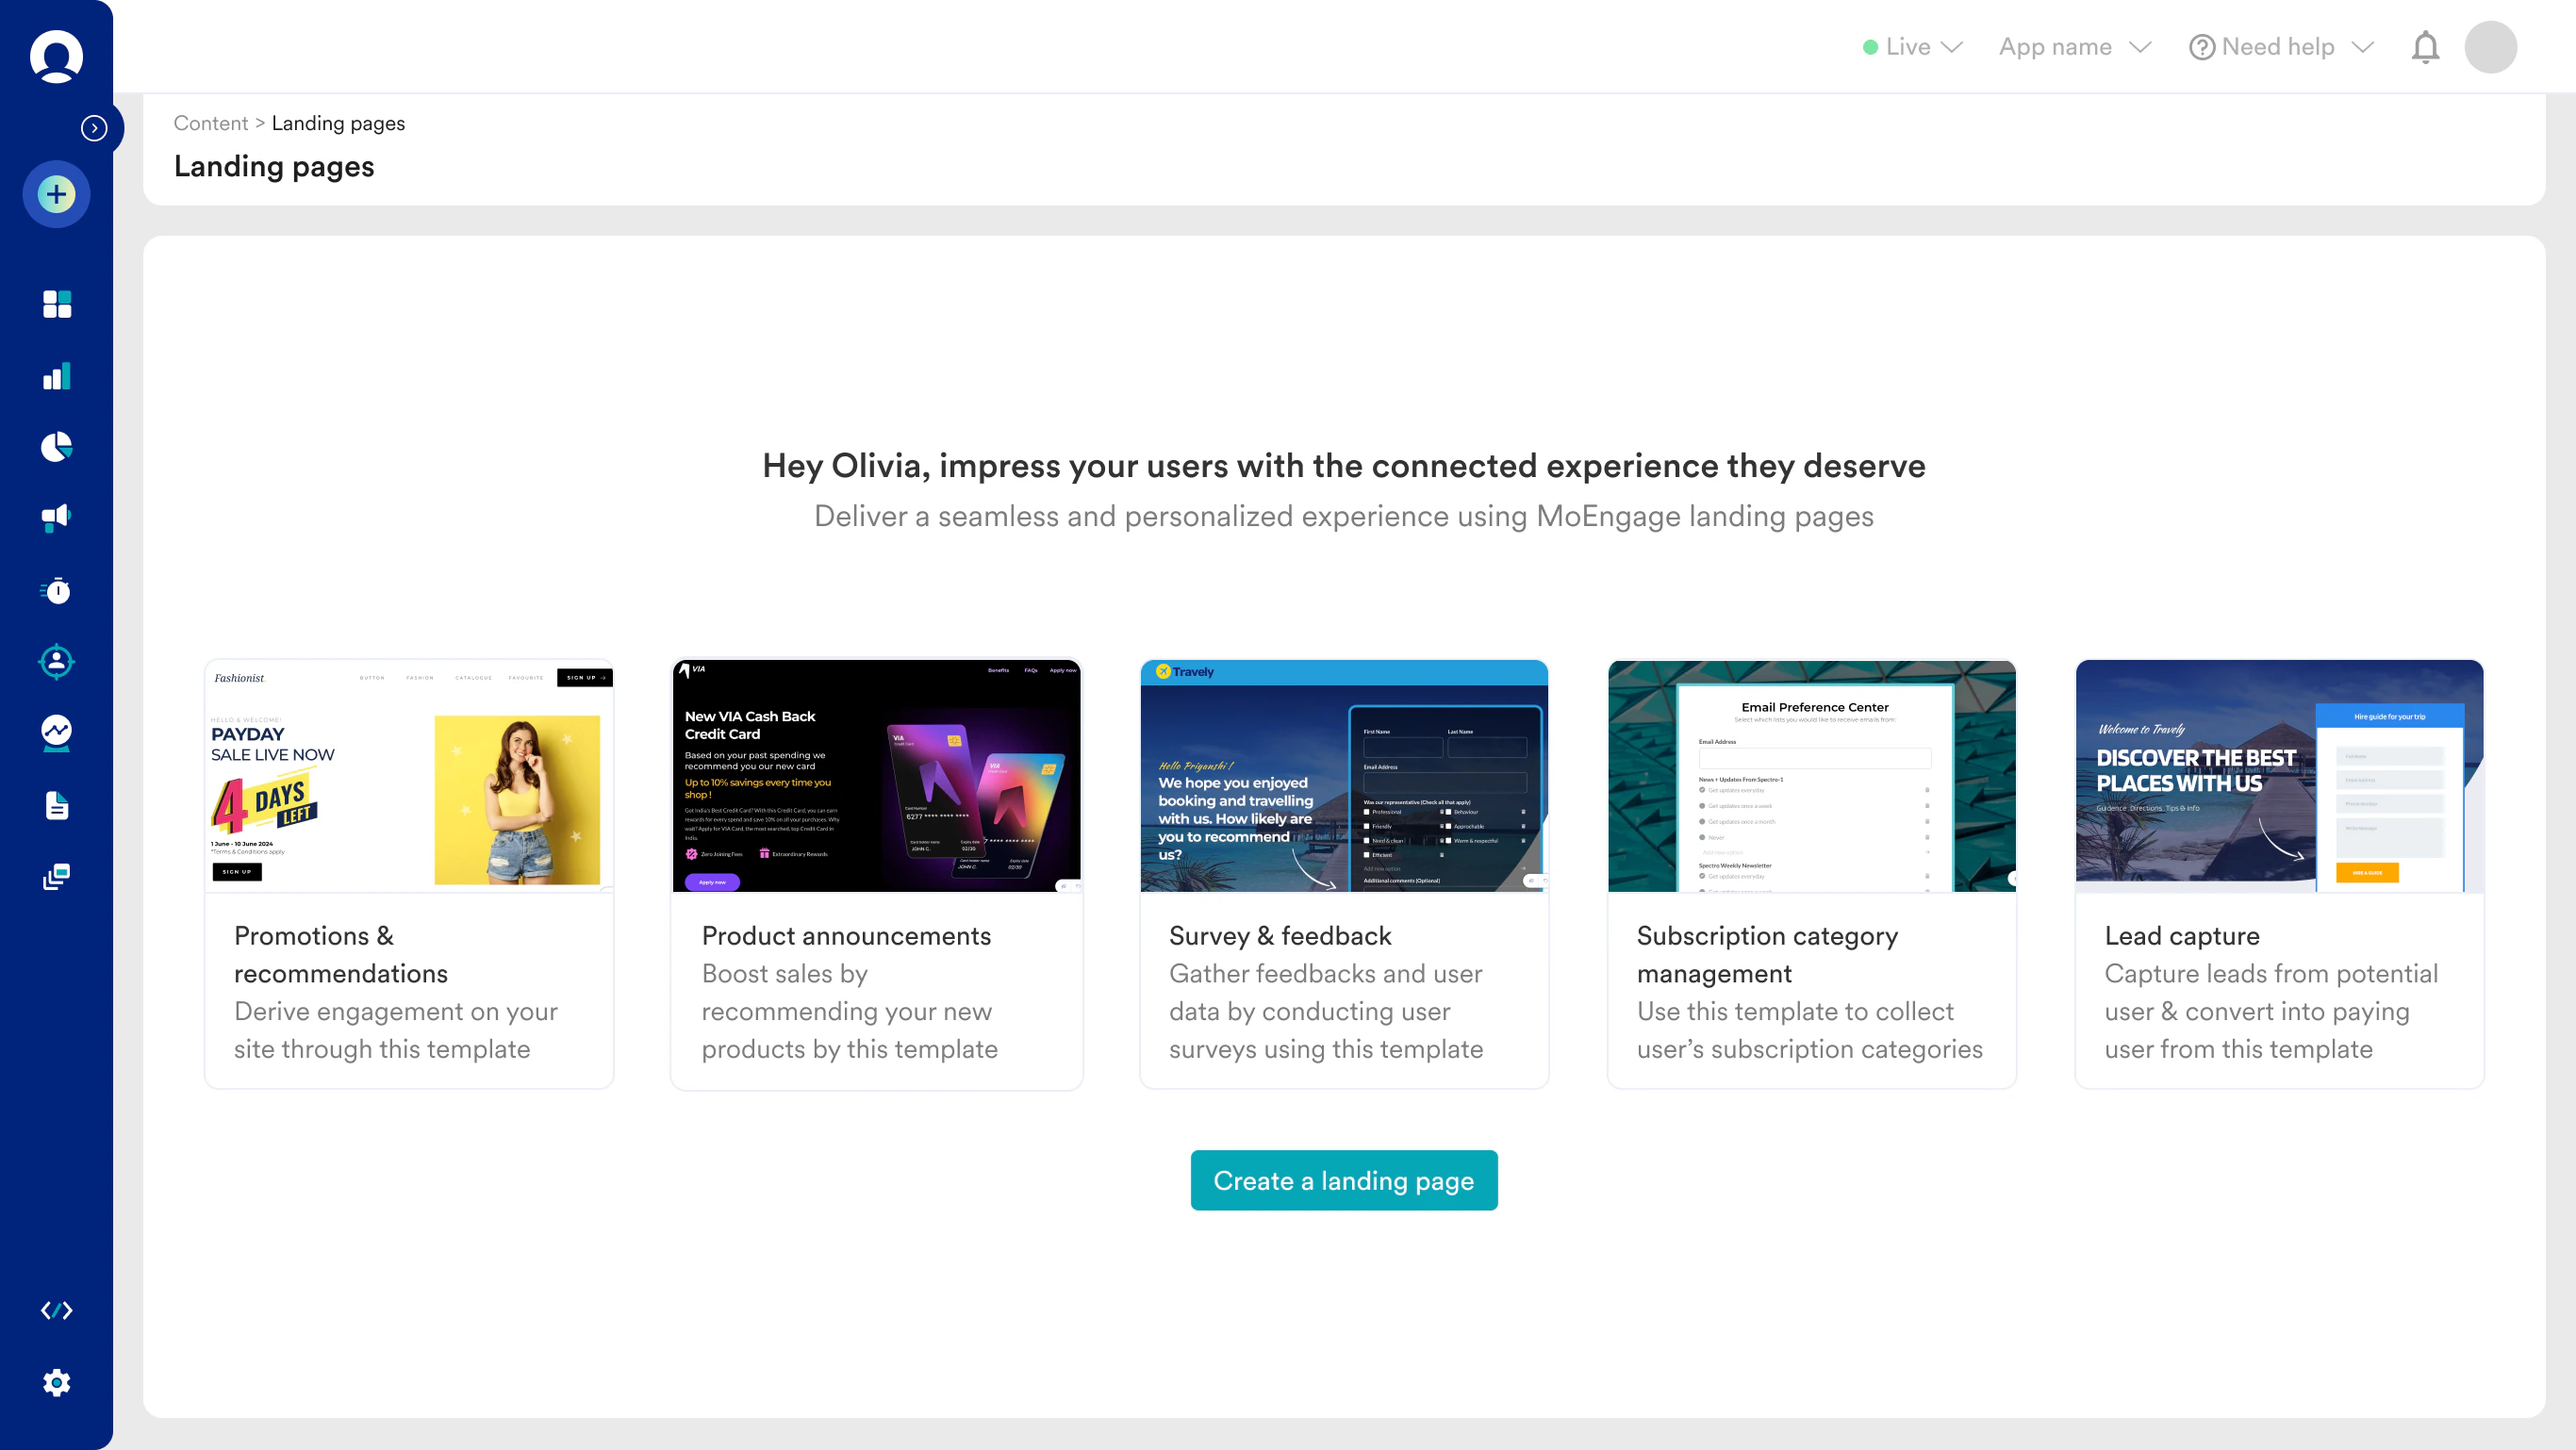 3. Enter a name for the landing page to identify and manage it easily, and select appropriate tags to categorize the page.
4. In the **Content** section, select the **Lead Capture** template from the pre-designed template options. This template is ideal for collecting contact information.
3. Enter a name for the landing page to identify and manage it easily, and select appropriate tags to categorize the page.
4. In the **Content** section, select the **Lead Capture** template from the pre-designed template options. This template is ideal for collecting contact information. 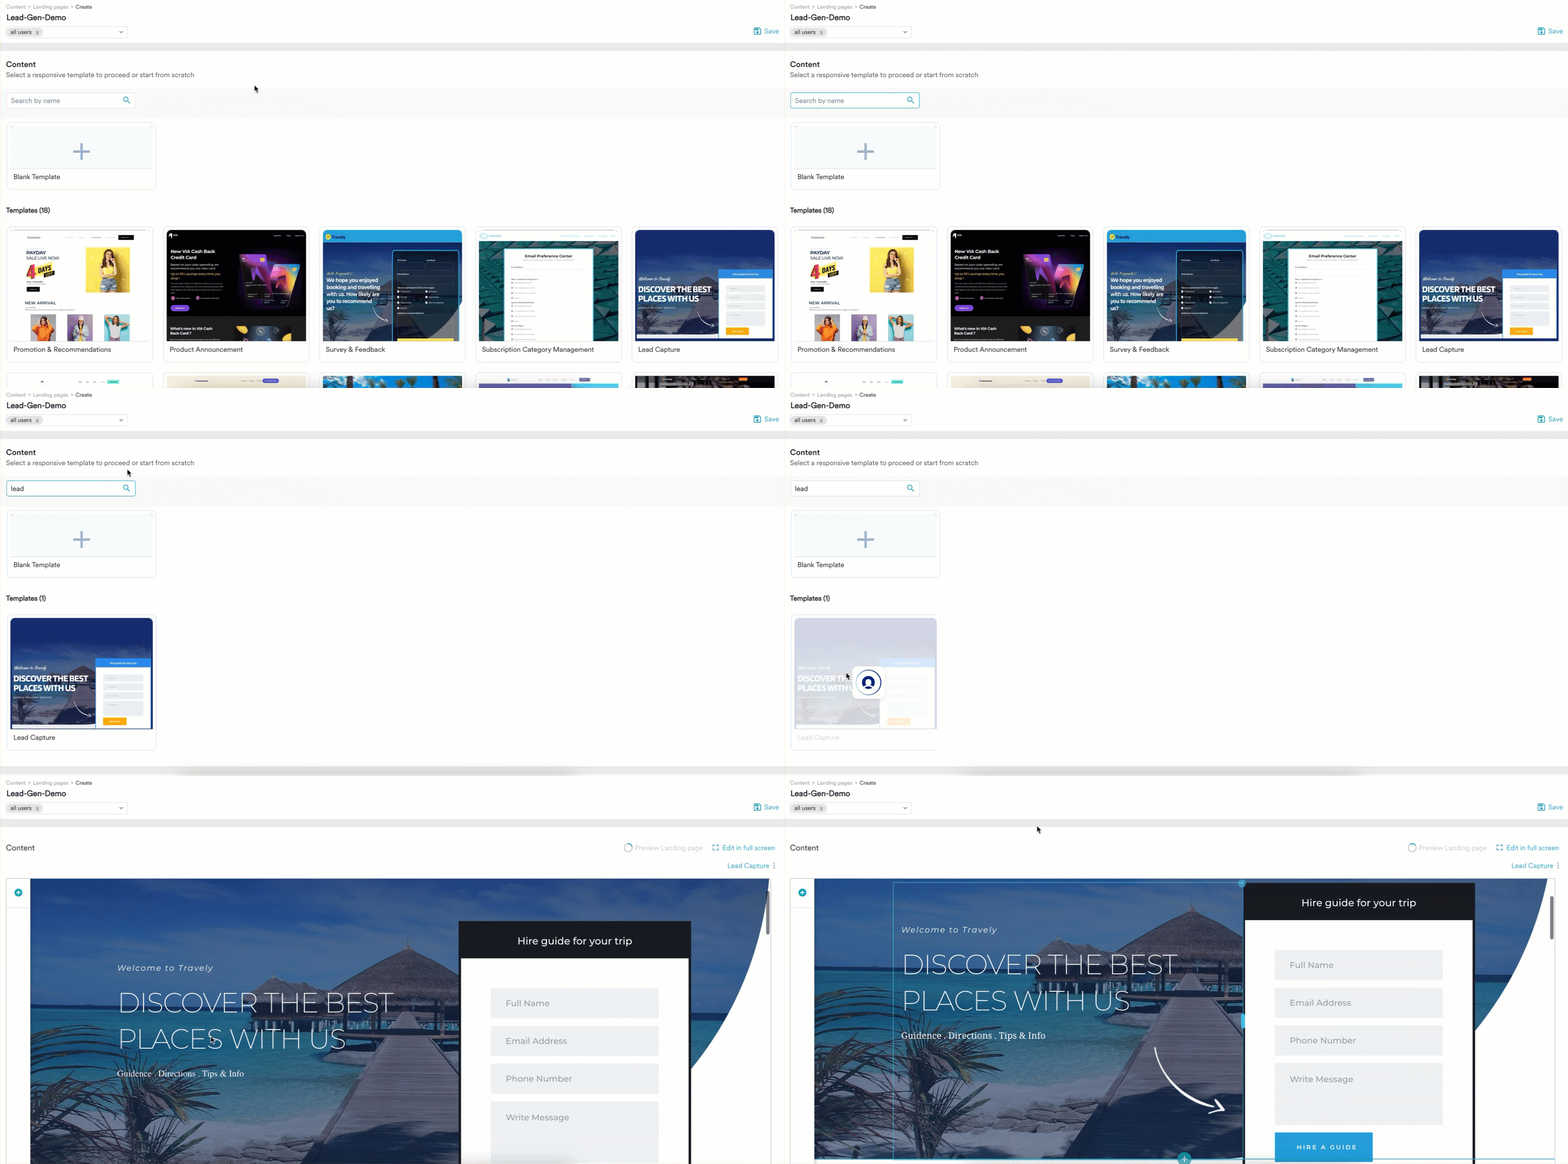 # Step 2: Configure the Form
1. Locate the form elements within the landing page editor. The template includes default fields like Name, Email, and so on. You can add more form elements as desired. For more information on template elements, refer to [Landing Page Editor](/user-guide/content/landing-pages/create/landing-page-editor).
# Step 2: Configure the Form
1. Locate the form elements within the landing page editor. The template includes default fields like Name, Email, and so on. You can add more form elements as desired. For more information on template elements, refer to [Landing Page Editor](/user-guide/content/landing-pages/create/landing-page-editor). 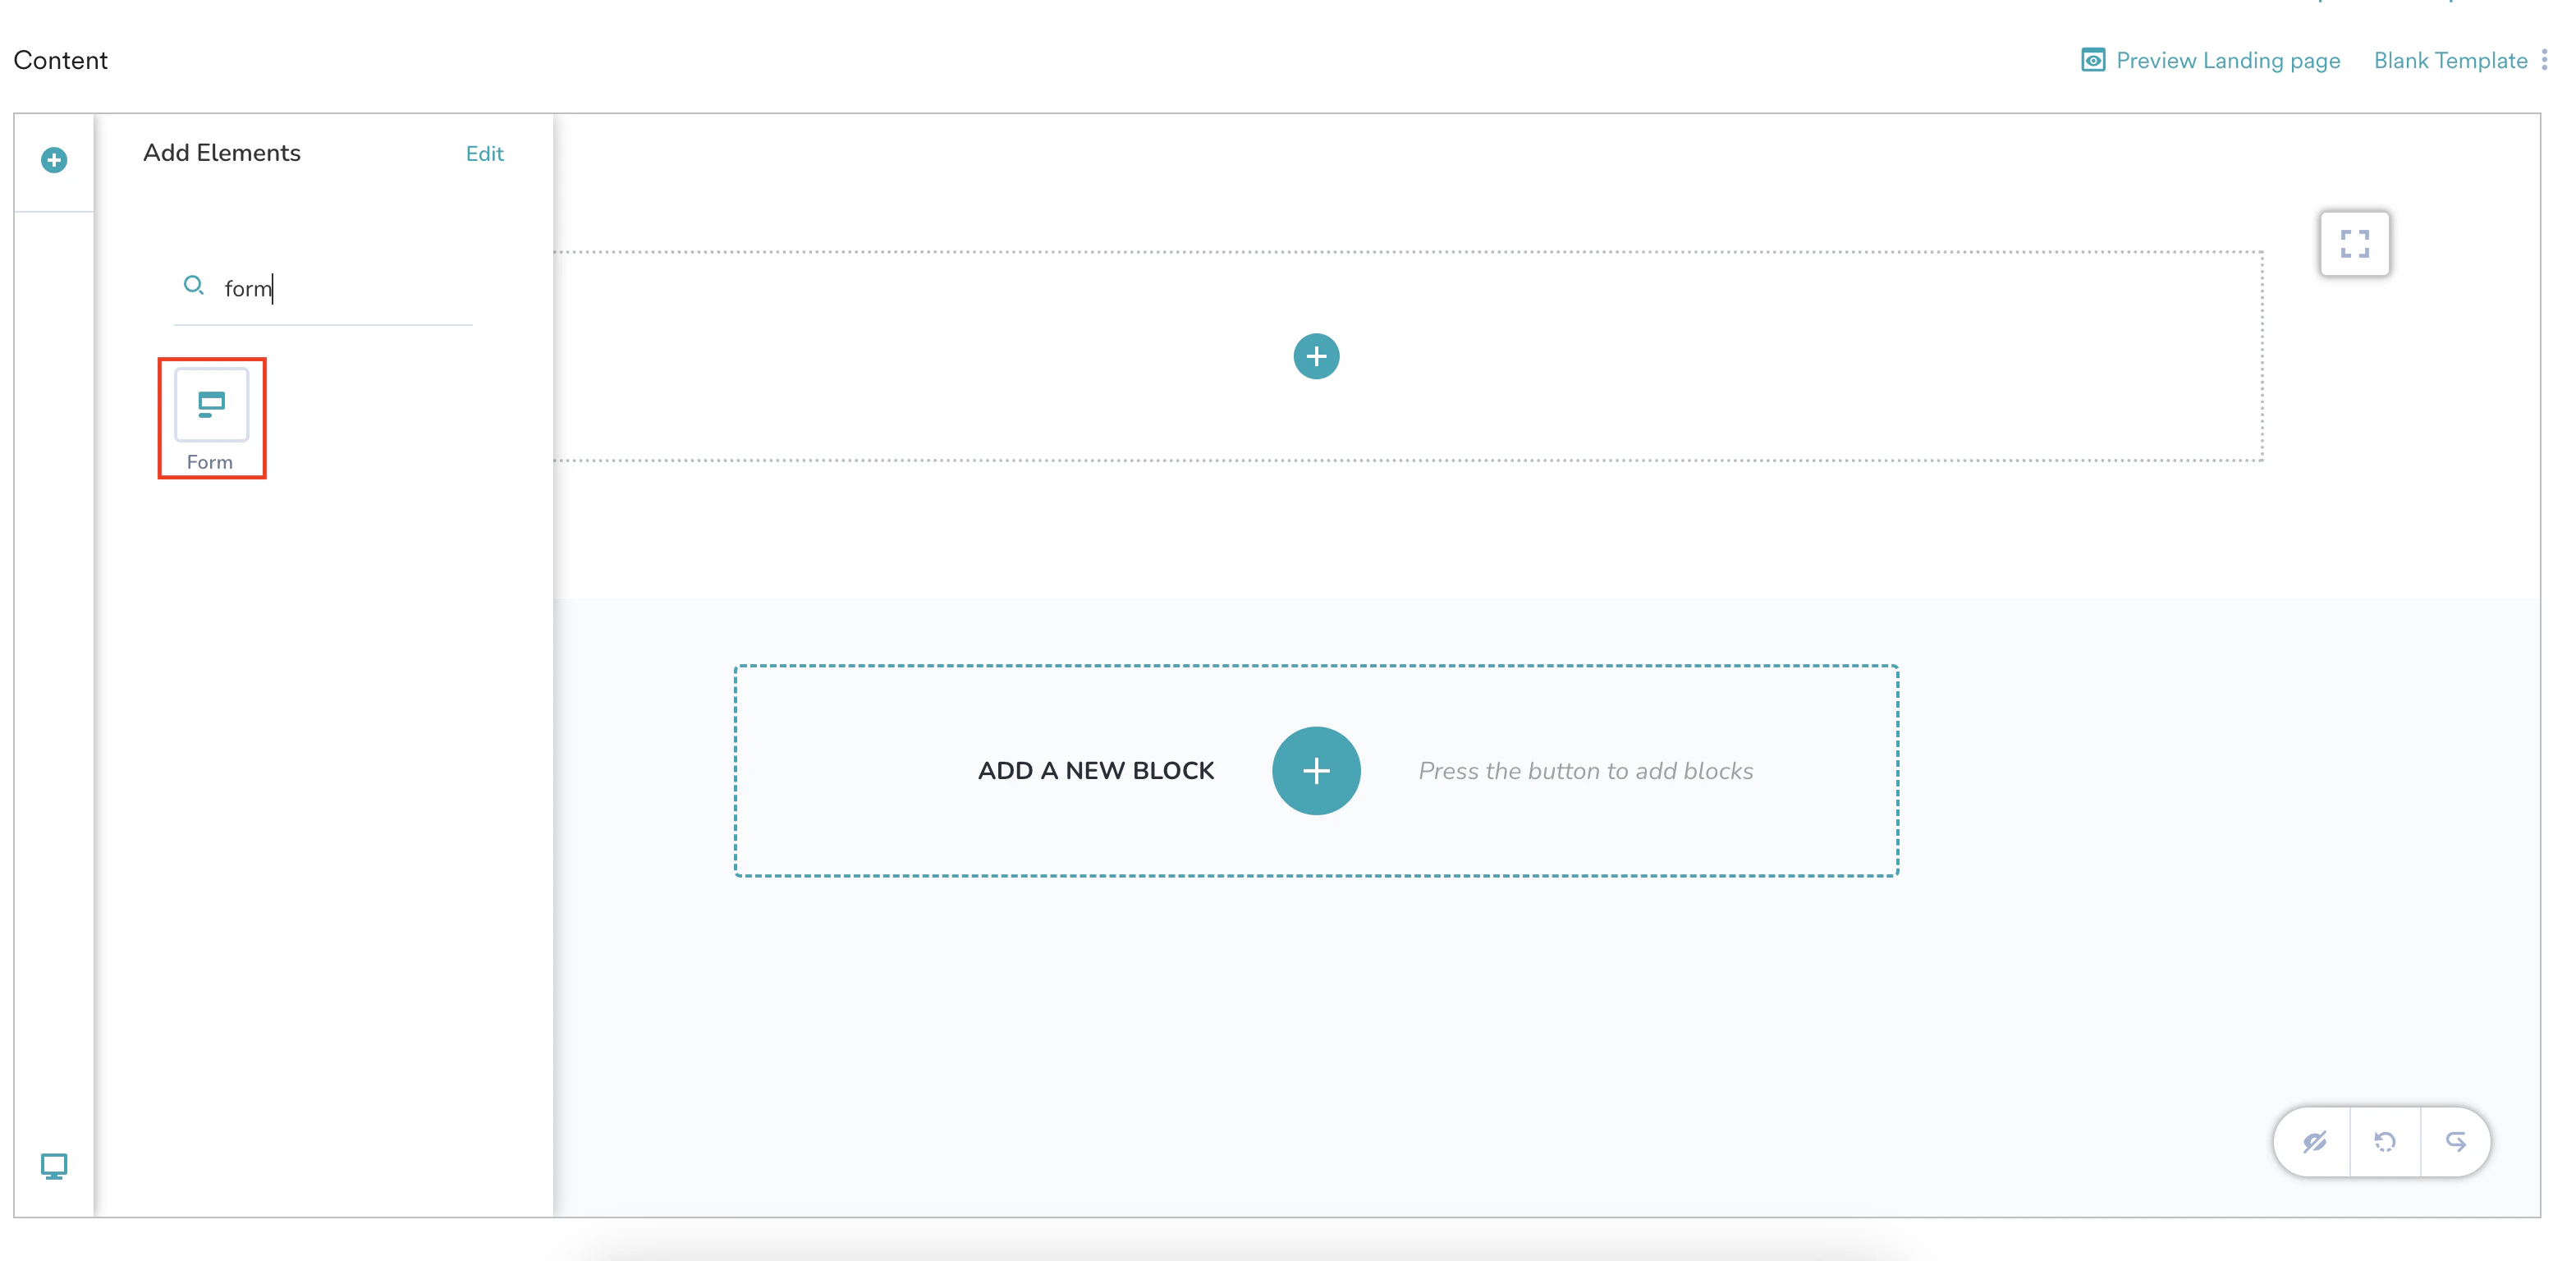 2. For each input field in the form, map it to the corresponding user attribute in MoEngage. For example, map the *Email Address* field to the *Email* user attribute, the *First Name* field to the *FirstName* user attribute, and so on. Doing so ensures that their responses can be stored in these attributes and are readable. To do so:
1. Click the field element and click the
2. For each input field in the form, map it to the corresponding user attribute in MoEngage. For example, map the *Email Address* field to the *Email* user attribute, the *First Name* field to the *FirstName* user attribute, and so on. Doing so ensures that their responses can be stored in these attributes and are readable. To do so:
1. Click the field element and click the  icon.
2. Under **Advanced**, select the appropriate user attribute from the **UserAttribute** list. If you do not select any user attribute, the response will be mapped to the default unique ID, which is a 32-digit attribute.
icon.
2. Under **Advanced**, select the appropriate user attribute from the **UserAttribute** list. If you do not select any user attribute, the response will be mapped to the default unique ID, which is a 32-digit attribute.  To update an existing user's attributes with the form data (or to show personalized content), you **must** use the landing page URL within another MoEngage campaign (such as Email, SMS, or On-Site Messaging). When sent through a campaign, MoEngage automatically resolves the query parameter (`moe_aid={{UserAttribute['aid']}}`). This parameter contains the user's encrypted ID, which allows MoEngage to identify them and update their existing profile. If a user accesses the landing page URL directly (for example, from a browser or a link not sent via MoEngage), this ID parameter will be missing. As a result, MoEngage will not be able to resolve the *aid*, and a new anonymous user profile will be created upon form submission.
3. If a required user attribute does not exist, create a new one by following the steps outlined in [Import User Data Using CSV](/user-guide/data/imports/file-based-imports/import-user-data-using-csv).
Prefilling the form with existing MoEngage attributes is not supported.
4. Configure the URL and settings of your landing page. For more information, refer [here](/user-guide/content/landing-pages/create/create-a-landing-page).
5. Click **Publish** to publish your landing page.
After the user visits the page and submits the filled-out form, the responses are saved in the *Response Submitted* event.
# Step 3: View Responses
To view the responses and download them:
1. On the left navigation menu in the MoEngage dashboard, click **Segment** > **Create segment**.
2. Select the **Filter users by** option and click the **User behavior** tab.
3. Set the filters to *Has* *executed response submitted at least one time in the last 30 days* with the attribute as the *Landing Page ID*, as shown below.
To update an existing user's attributes with the form data (or to show personalized content), you **must** use the landing page URL within another MoEngage campaign (such as Email, SMS, or On-Site Messaging). When sent through a campaign, MoEngage automatically resolves the query parameter (`moe_aid={{UserAttribute['aid']}}`). This parameter contains the user's encrypted ID, which allows MoEngage to identify them and update their existing profile. If a user accesses the landing page URL directly (for example, from a browser or a link not sent via MoEngage), this ID parameter will be missing. As a result, MoEngage will not be able to resolve the *aid*, and a new anonymous user profile will be created upon form submission.
3. If a required user attribute does not exist, create a new one by following the steps outlined in [Import User Data Using CSV](/user-guide/data/imports/file-based-imports/import-user-data-using-csv).
Prefilling the form with existing MoEngage attributes is not supported.
4. Configure the URL and settings of your landing page. For more information, refer [here](/user-guide/content/landing-pages/create/create-a-landing-page).
5. Click **Publish** to publish your landing page.
After the user visits the page and submits the filled-out form, the responses are saved in the *Response Submitted* event.
# Step 3: View Responses
To view the responses and download them:
1. On the left navigation menu in the MoEngage dashboard, click **Segment** > **Create segment**.
2. Select the **Filter users by** option and click the **User behavior** tab.
3. Set the filters to *Has* *executed response submitted at least one time in the last 30 days* with the attribute as the *Landing Page ID*, as shown below. 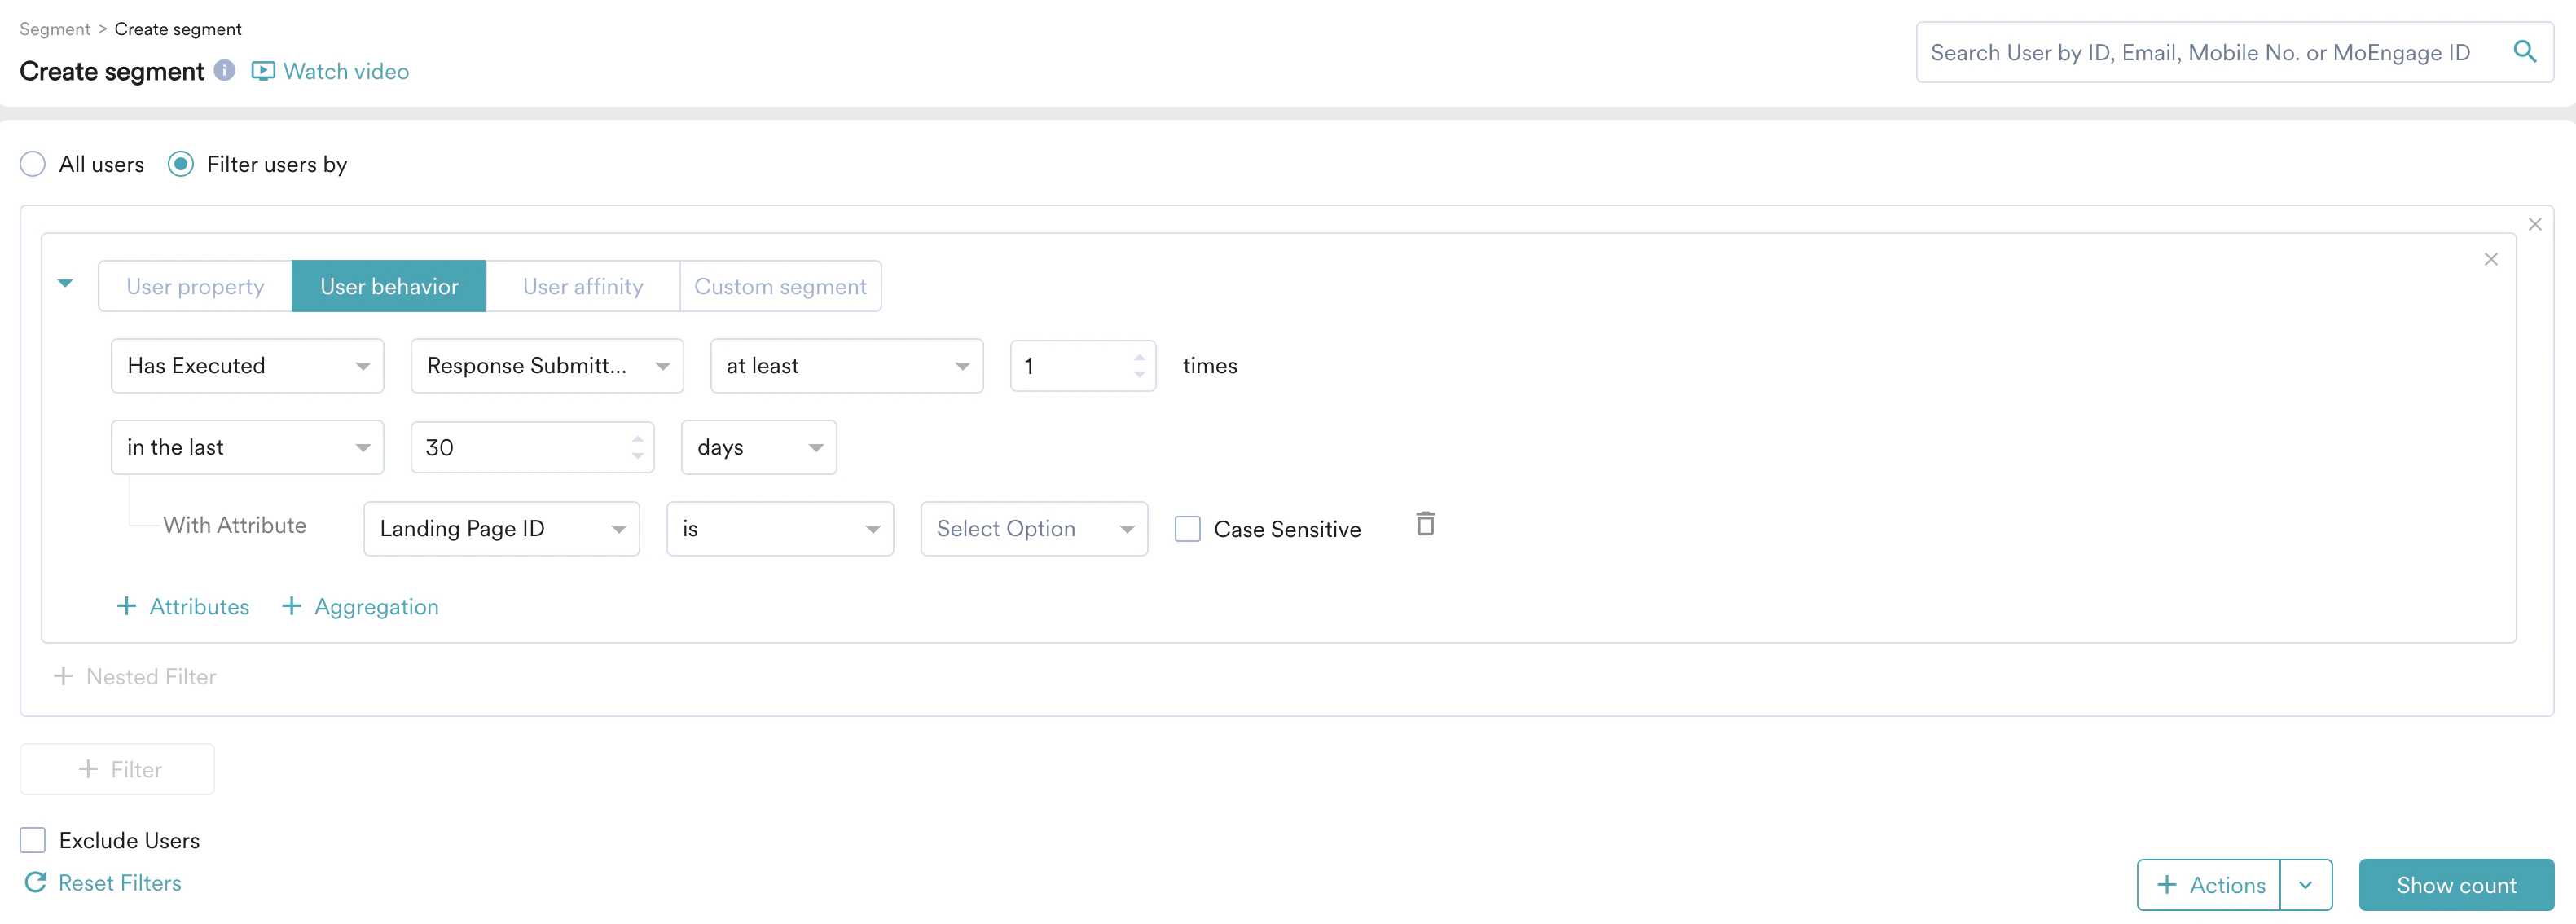 4. Click **Show count** and then click **Export users** from the ellipsis menu against your query.
5. In the **File name** field, enter the desired name for your export.
6. In the **User attribute** list, select the attributes added on the landing page.
7. Click **Export**.
8. Check your email inbox and download the exported CSV file.
4. Click **Show count** and then click **Export users** from the ellipsis menu against your query.
5. In the **File name** field, enter the desired name for your export.
6. In the **User attribute** list, select the attributes added on the landing page.
7. Click **Export**.
8. Check your email inbox and download the exported CSV file. 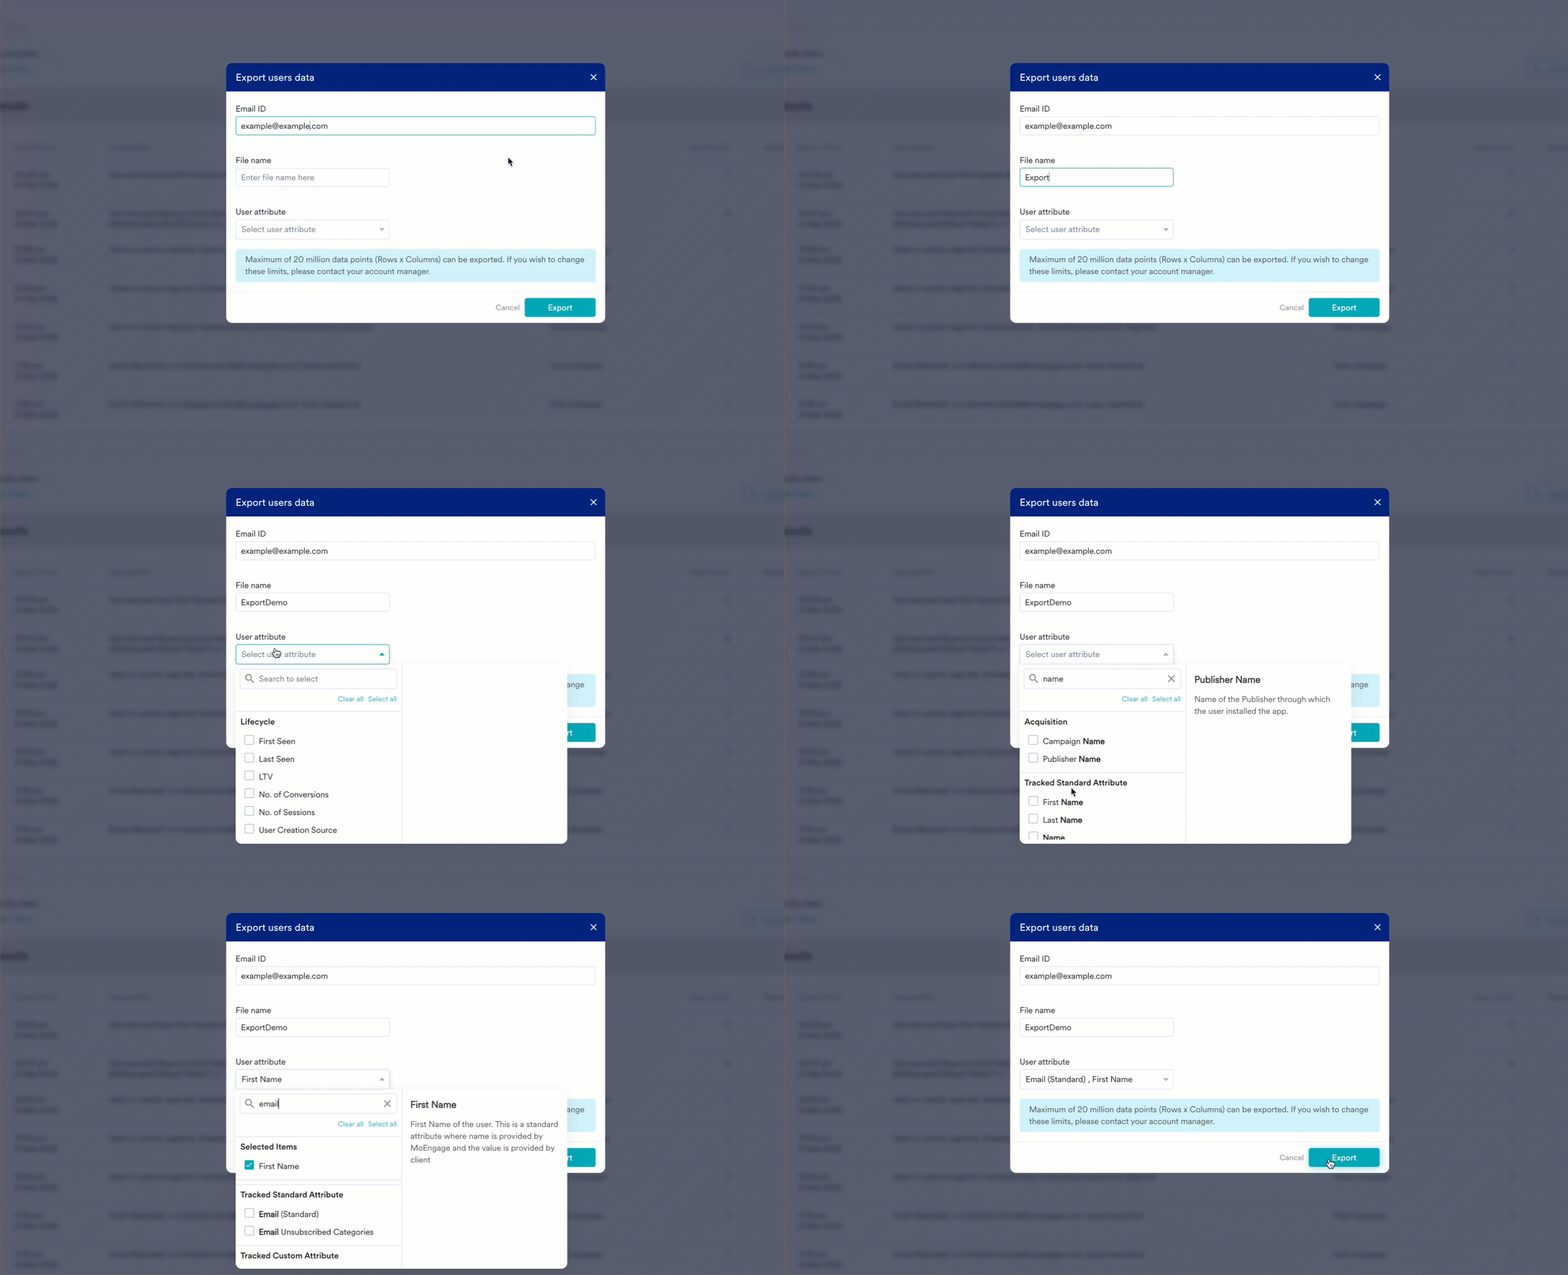 In the next step, we will utilize the responses for further engagement.
# Step 4: Utilize Responses
## Step 4.1: Within MoEngage
We can use the responses collected to send confirmation messages to users with event-triggered campaigns.
1. On the left navigation menu in the MoEngage Dashboard, click **Engage** and click **Campaigns**.
2. On the All campaigns page, click **Create a campaign**.
3. Under **Outbound**, click **SMS** and choose **Event Triggered** as the delivery type.
In the next step, we will utilize the responses for further engagement.
# Step 4: Utilize Responses
## Step 4.1: Within MoEngage
We can use the responses collected to send confirmation messages to users with event-triggered campaigns.
1. On the left navigation menu in the MoEngage Dashboard, click **Engage** and click **Campaigns**.
2. On the All campaigns page, click **Create a campaign**.
3. Under **Outbound**, click **SMS** and choose **Event Triggered** as the delivery type. 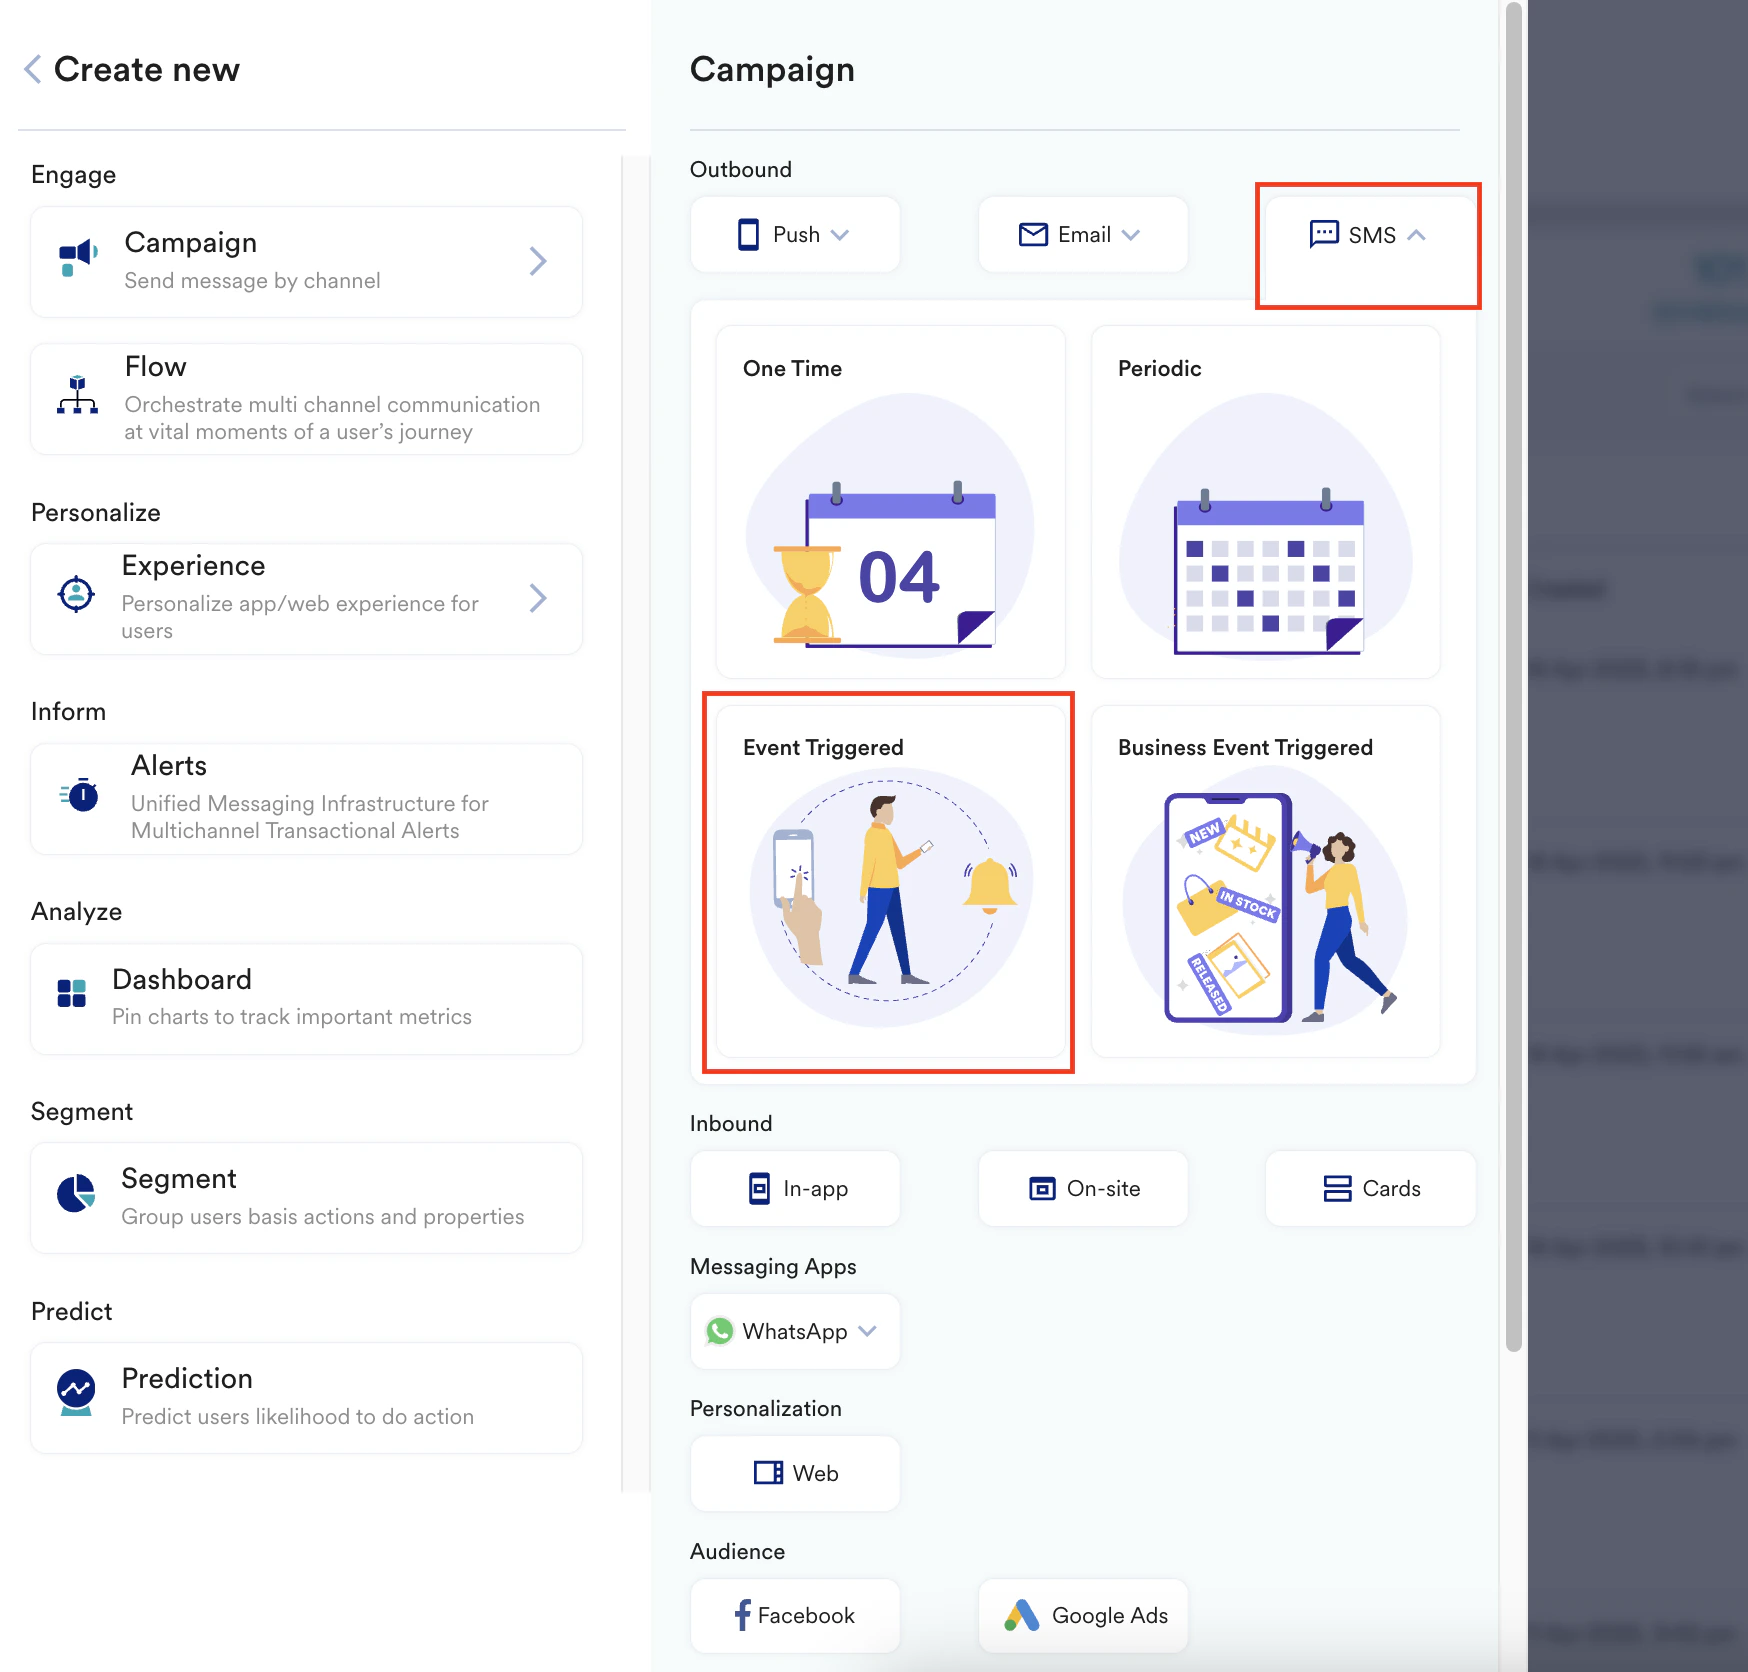 4. Give a name for your campaign and add tags.
5. In the **Trigger criteria** section, select the *Response Submitted* event with the attribute selected as *Landing Page ID*. You can select additional attribute filters based on the configured form in [Step 2](#step-2-configure-the-form).
4. Give a name for your campaign and add tags.
5. In the **Trigger criteria** section, select the *Response Submitted* event with the attribute selected as *Landing Page ID*. You can select additional attribute filters based on the configured form in [Step 2](#step-2-configure-the-form). 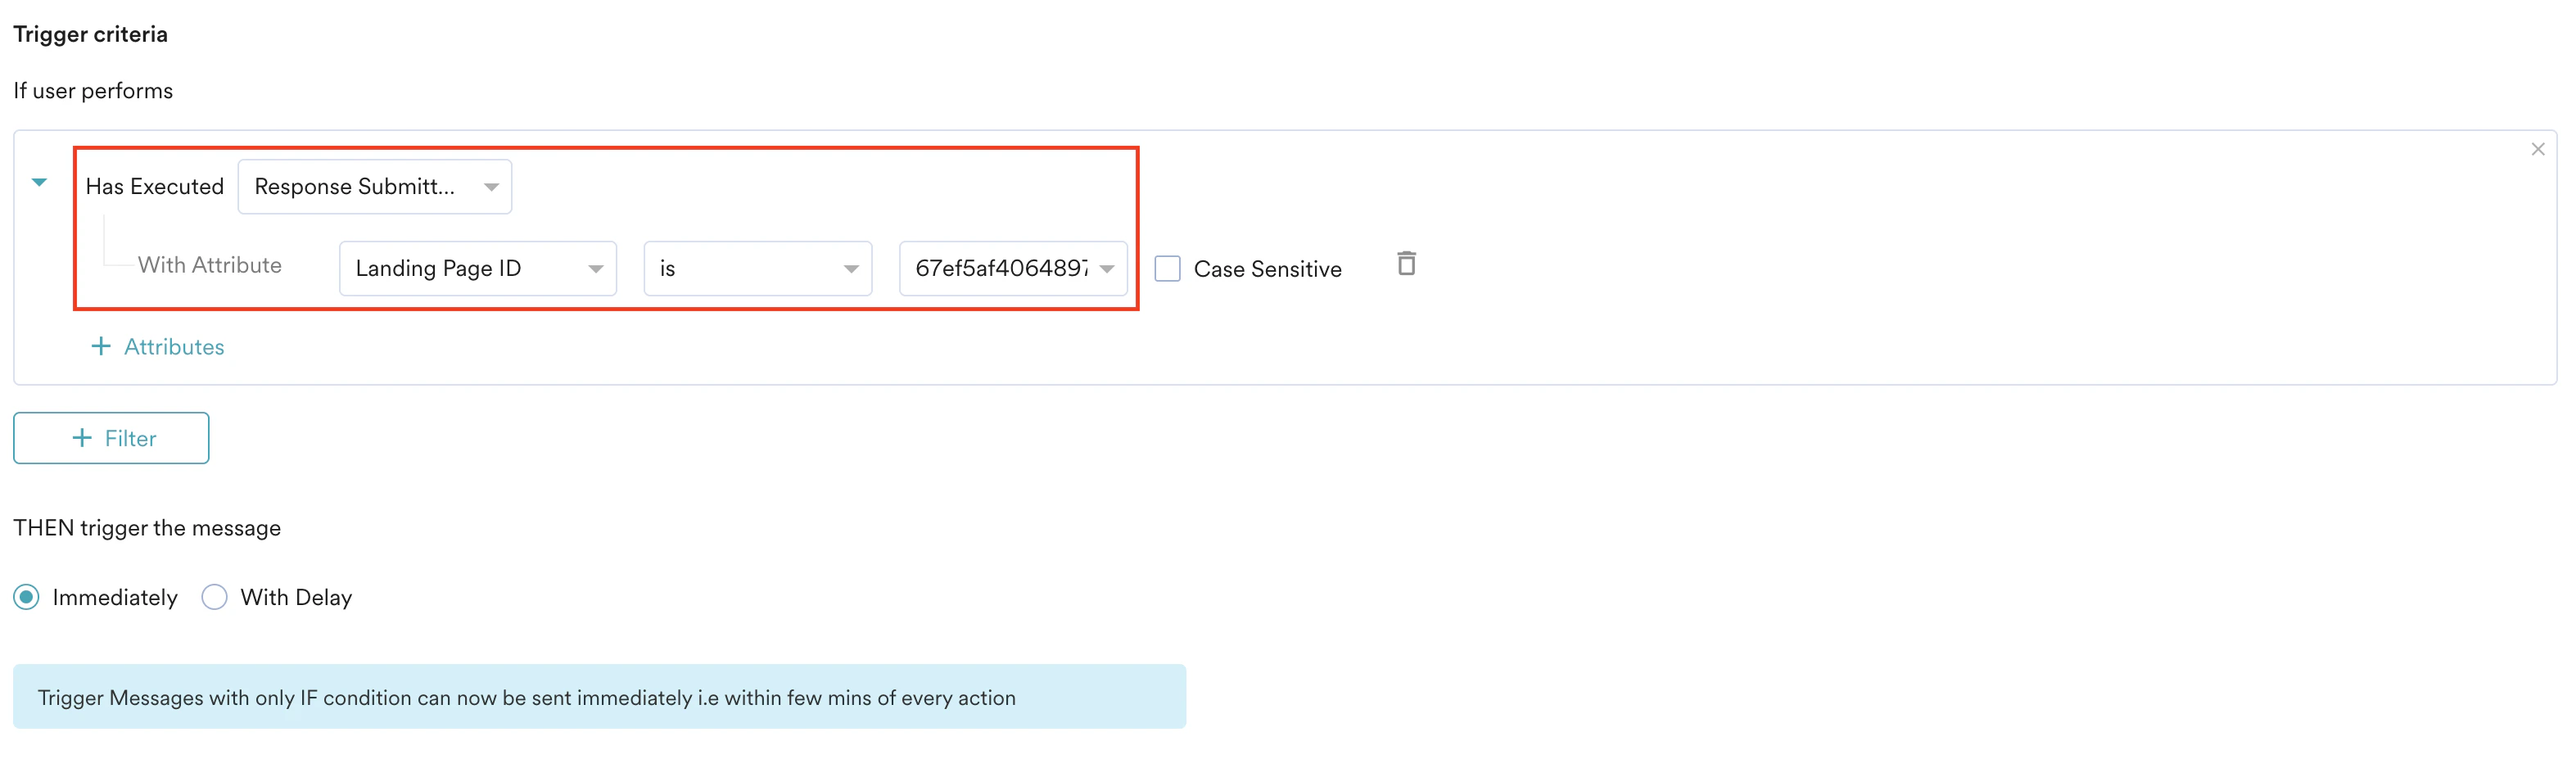 6. In the **Select audience** section, select **All users**.
7. Click **Next** to go to the **Content** section.
8. Type your SMS message in the **Message** section, personalizing it with form data like the user’s name.
6. In the **Select audience** section, select **All users**.
7. Click **Next** to go to the **Content** section.
8. Type your SMS message in the **Message** section, personalizing it with form data like the user’s name. 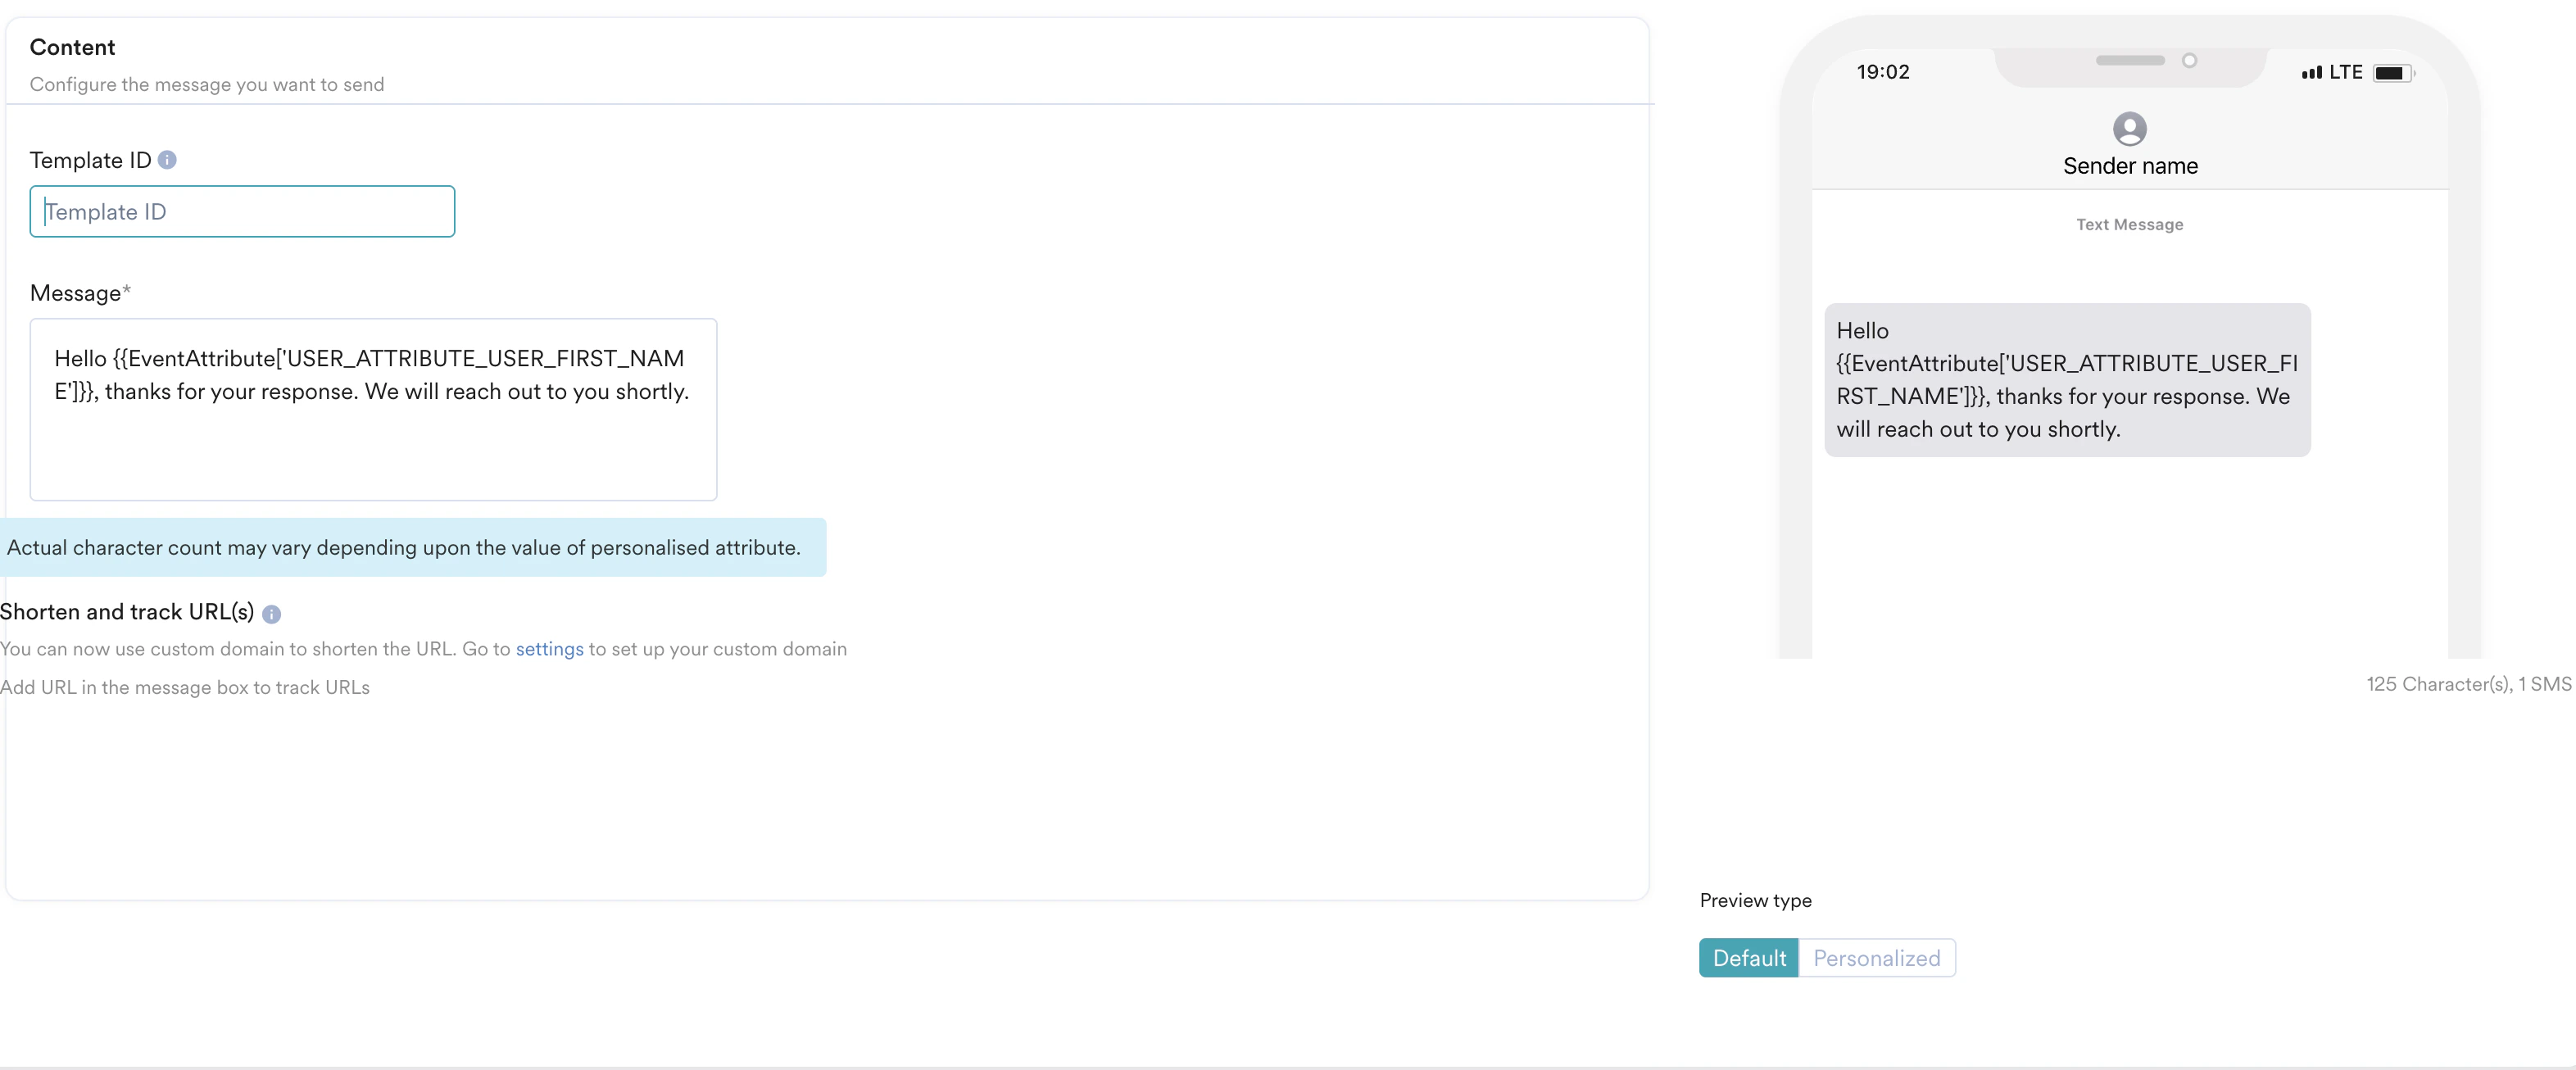 9. Click **Next** and set the desired goals in the **Schedule and Goals** section.
10. Click **Publish** to activate.
For more information, refer to [Create an SMS Campaign](/user-guide/campaigns-and-channels/sms-mms-and-rcs/sms/create-an-sms-campaign).
## Step 4.2: In Third-Party Platforms
We can send the responses collected to third-party platforms. For this example, we will use HubSpot. Perform the following steps to create a connector campaign to send the response data to HubSpot:
1. Navigate to **Engage** > **Campaigns** in the MoEngage dashboard to create a new connector campaign. For more information, refer to [Create a Connector Campaign](/user-guide/campaigns-and-channels/connectors/create/create-a-connector-campaign).
2. On the All campaigns page, click **+ Create campaign**.
3. Under **Connectors**, click **Custom**, and select **Event Triggered**.
9. Click **Next** and set the desired goals in the **Schedule and Goals** section.
10. Click **Publish** to activate.
For more information, refer to [Create an SMS Campaign](/user-guide/campaigns-and-channels/sms-mms-and-rcs/sms/create-an-sms-campaign).
## Step 4.2: In Third-Party Platforms
We can send the responses collected to third-party platforms. For this example, we will use HubSpot. Perform the following steps to create a connector campaign to send the response data to HubSpot:
1. Navigate to **Engage** > **Campaigns** in the MoEngage dashboard to create a new connector campaign. For more information, refer to [Create a Connector Campaign](/user-guide/campaigns-and-channels/connectors/create/create-a-connector-campaign).
2. On the All campaigns page, click **+ Create campaign**.
3. Under **Connectors**, click **Custom**, and select **Event Triggered**. 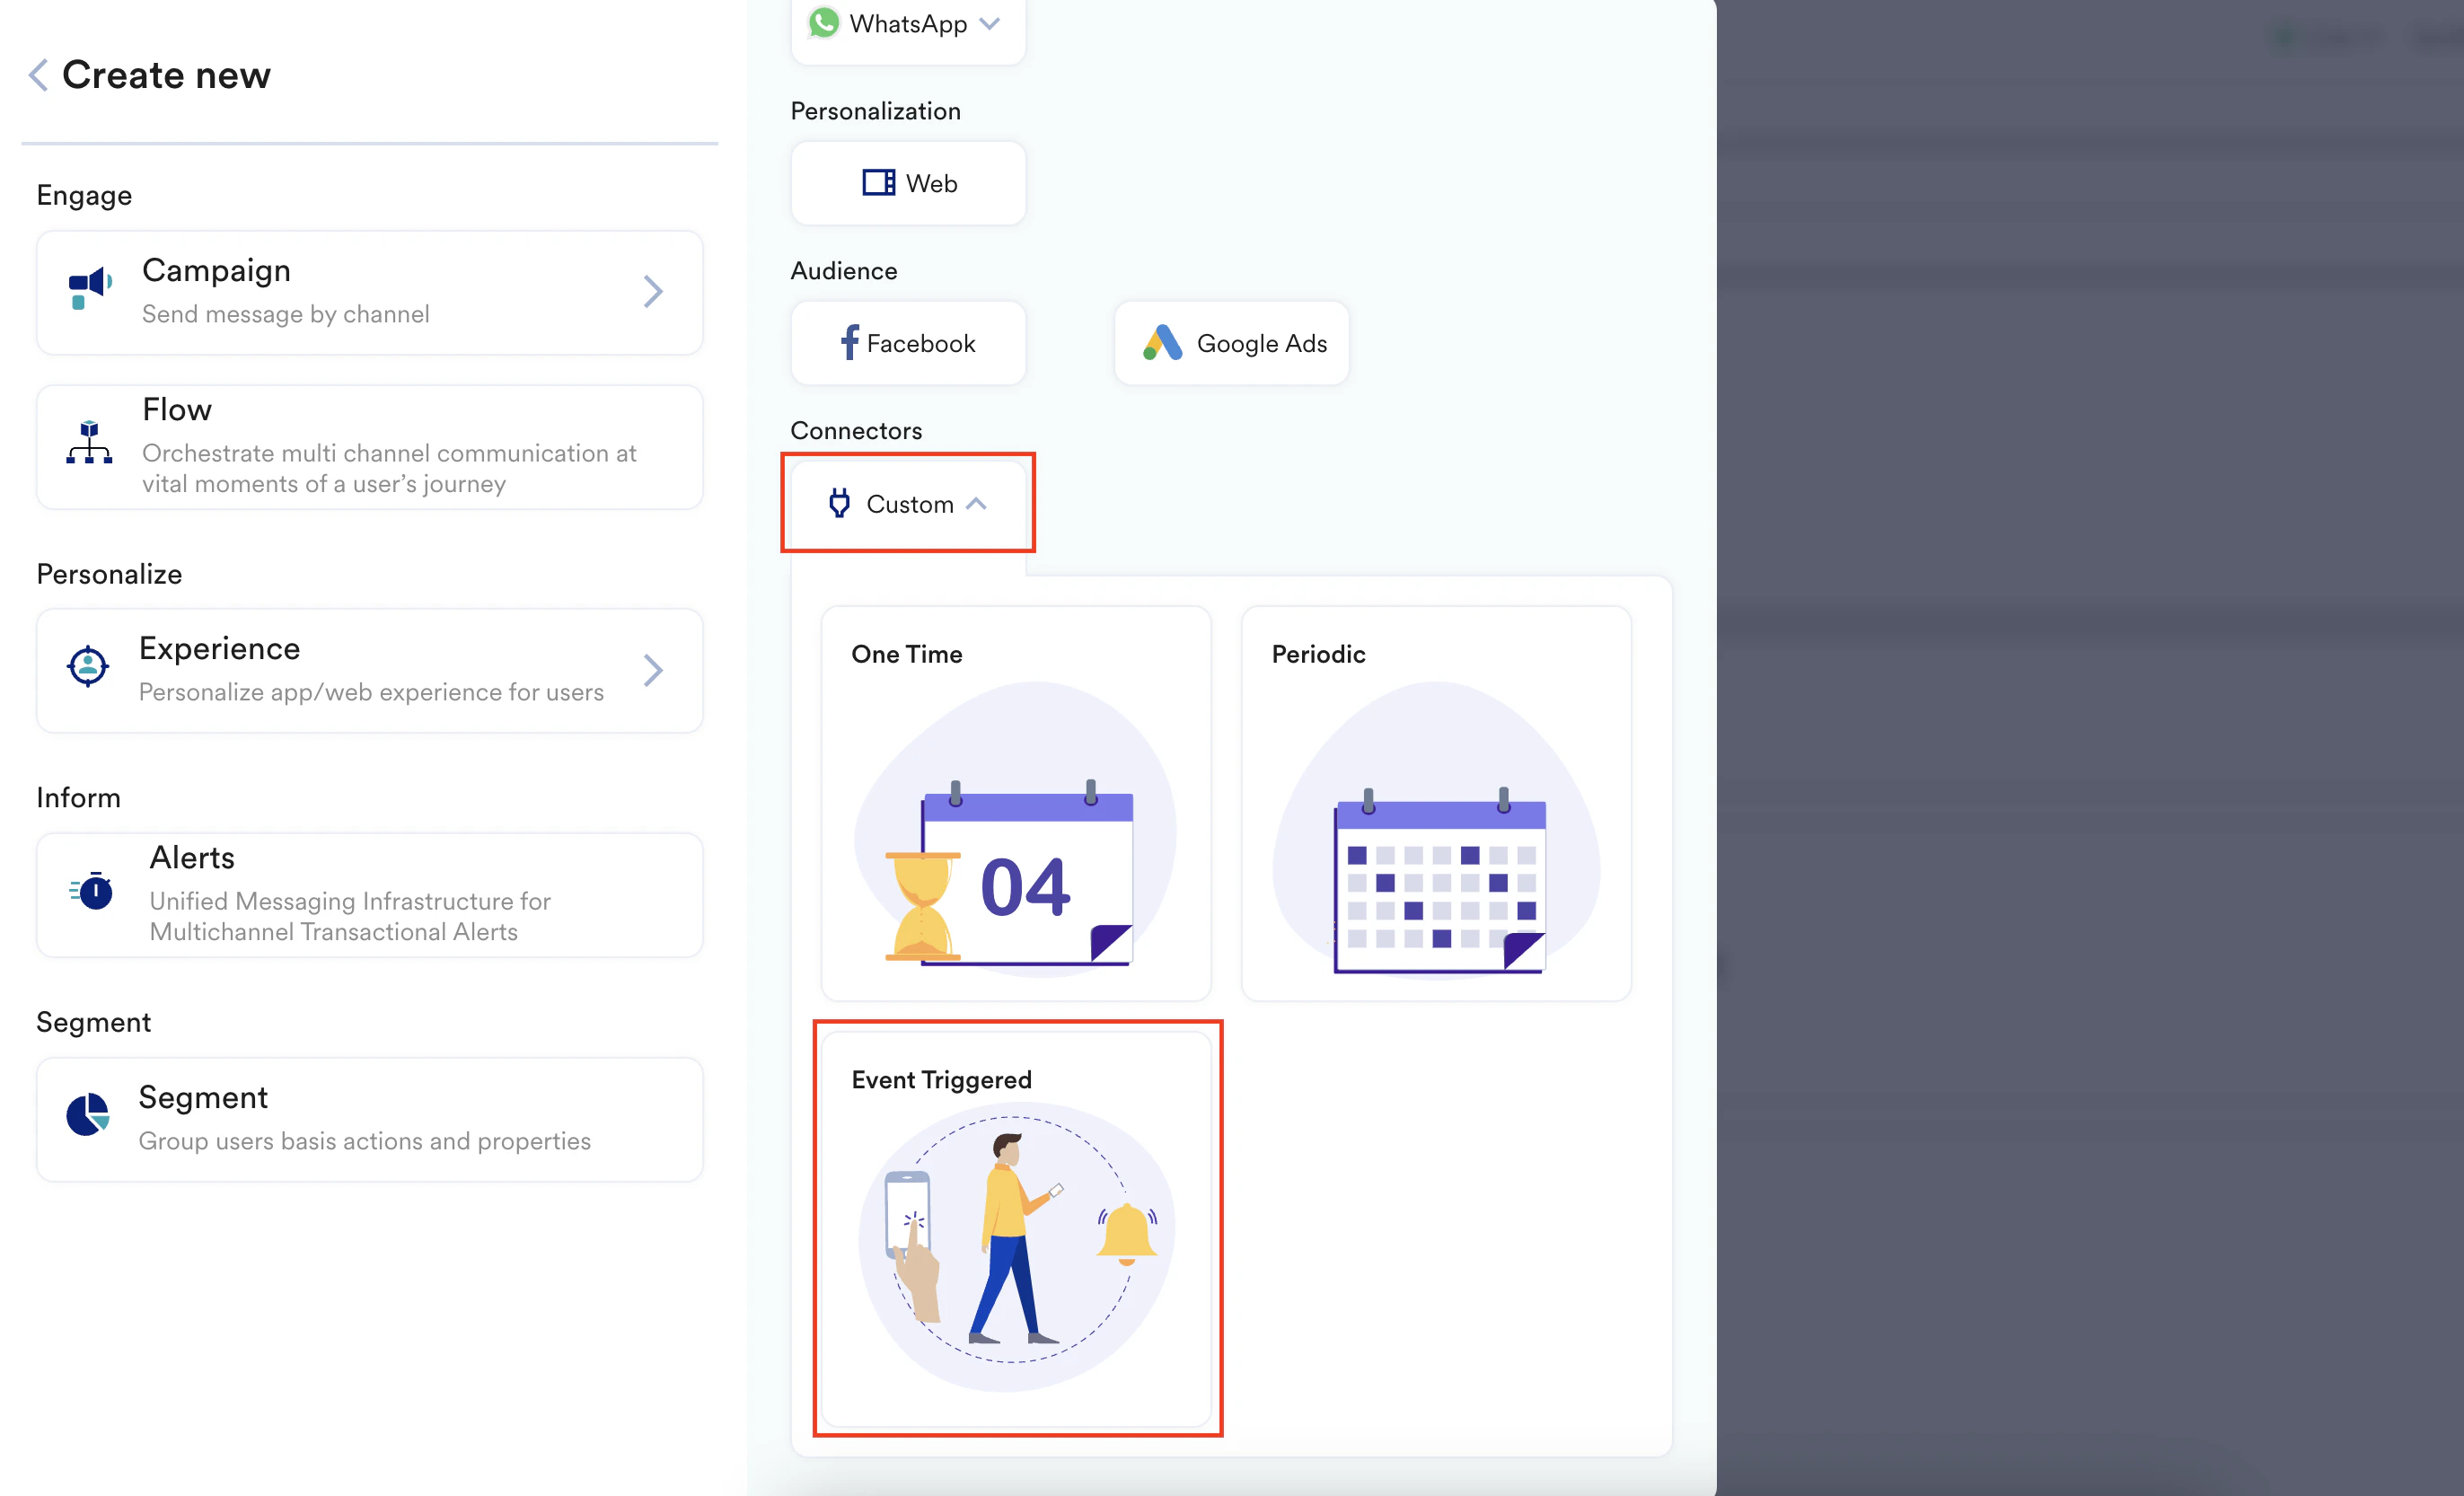 4. Define your campaign with name and tags.
5. In the **Trigger criteria** section, set the condition to *Has executed* and select the *Response submitted* event, with the attribute set to *Landing Page ID* to trigger on form submissions from this specific page.
4. Define your campaign with name and tags.
5. In the **Trigger criteria** section, set the condition to *Has executed* and select the *Response submitted* event, with the attribute set to *Landing Page ID* to trigger on form submissions from this specific page. 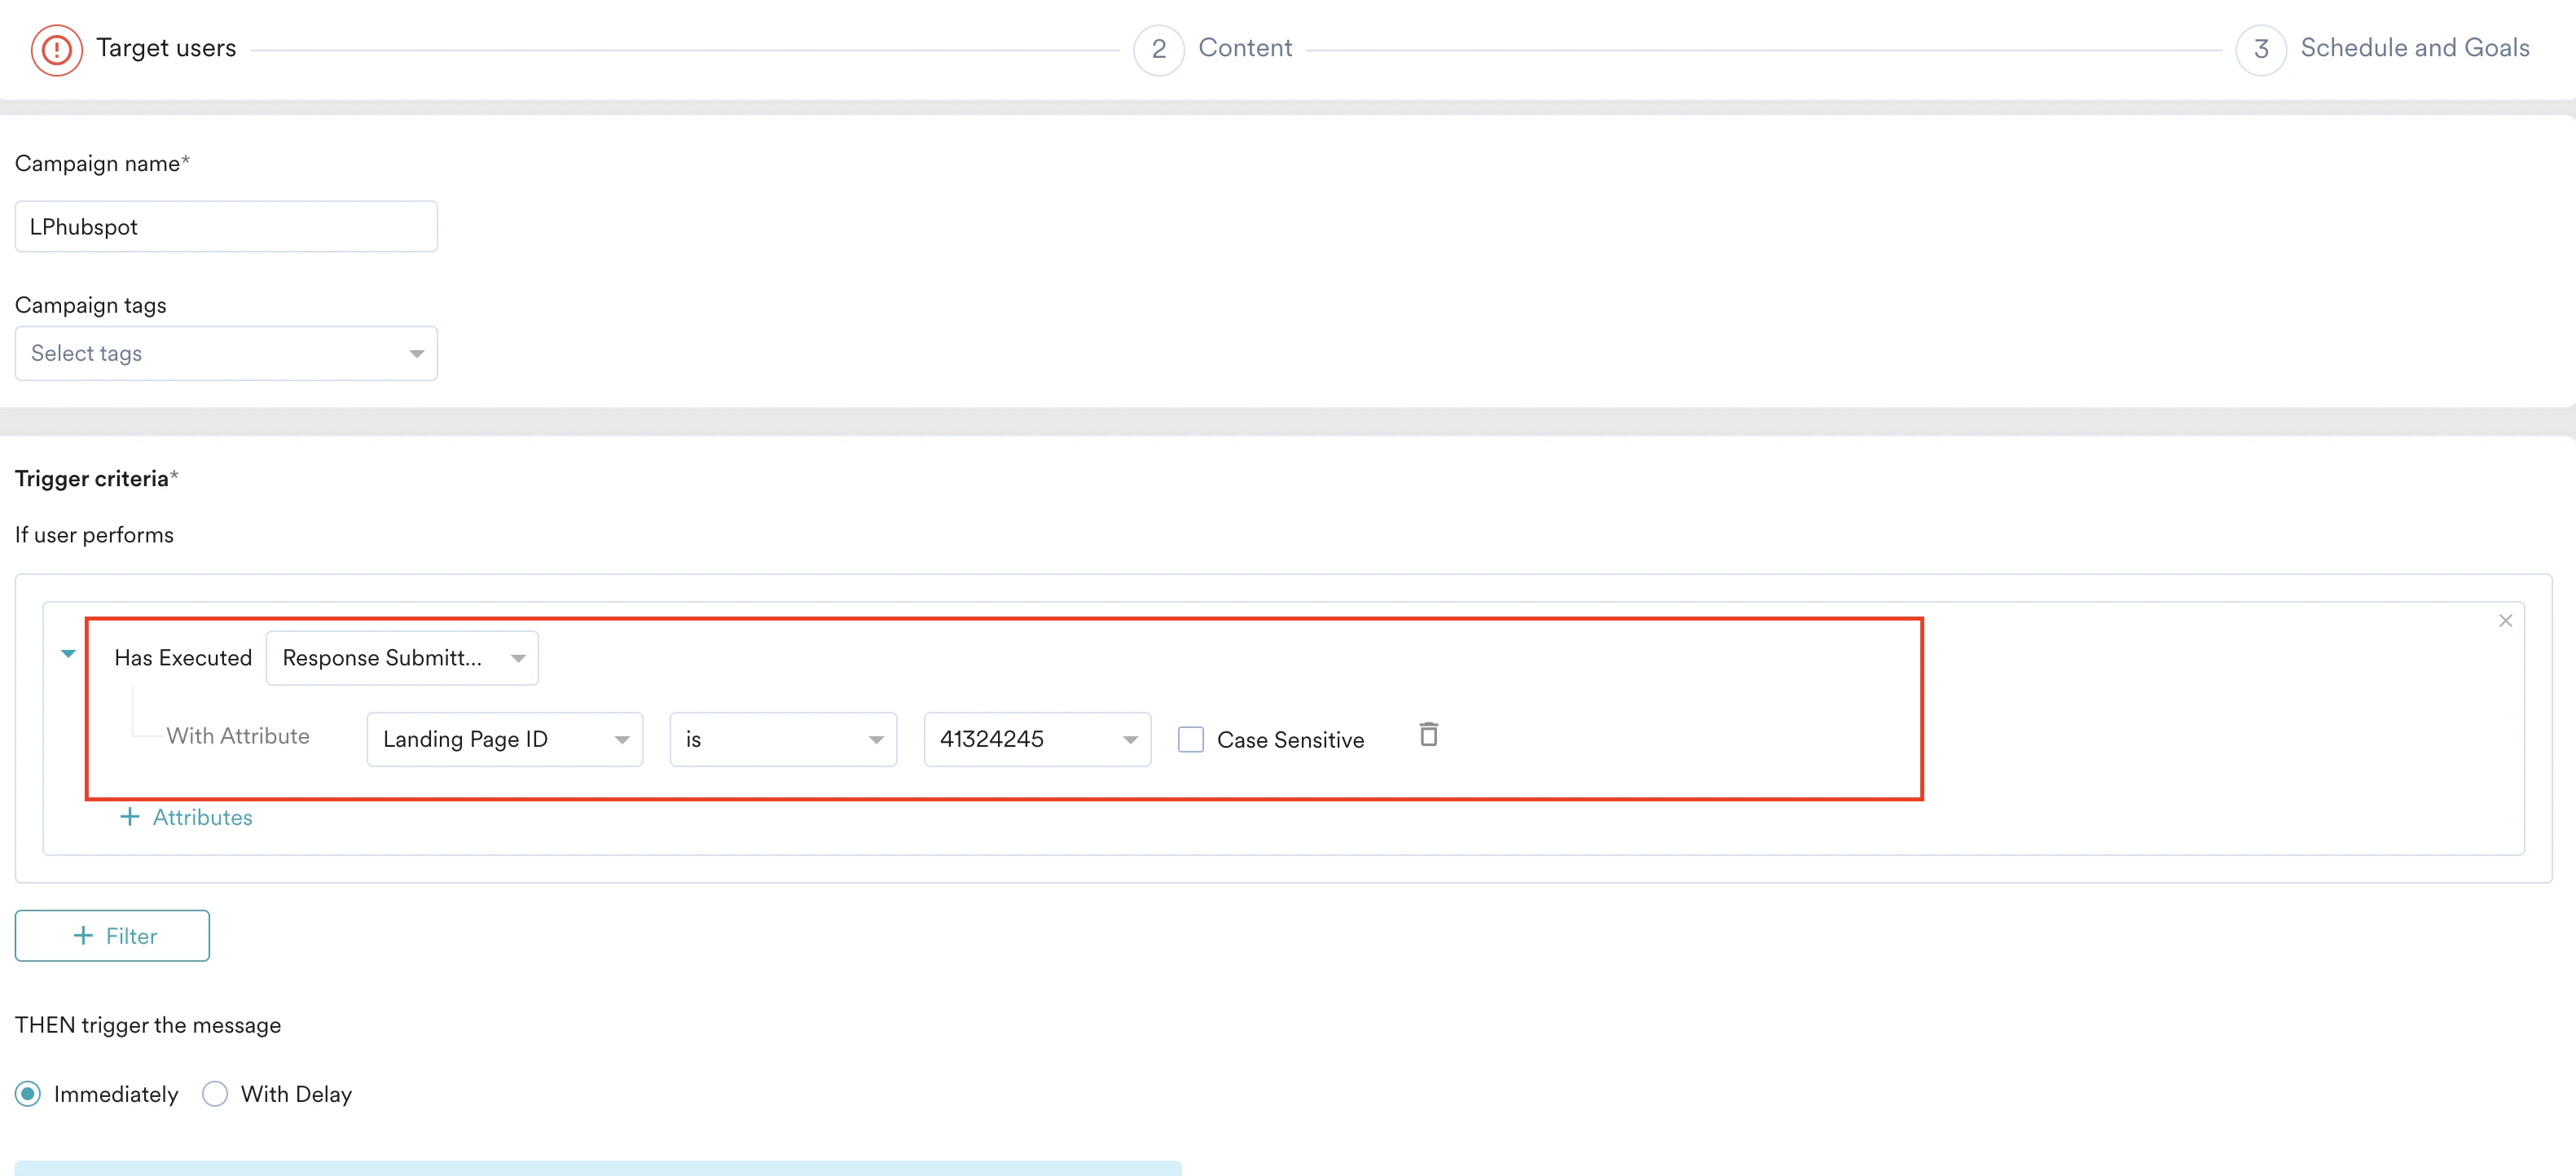 6. In the **Select audience** section, select **All users** and click **Next**.
7. In the **Content** section, follow the below steps:
6. In the **Select audience** section, select **All users** and click **Next**.
7. In the **Content** section, follow the below steps:  1. Under **Method**, select **POST**, as we are creating a new contact in HubSpot.
2. In the **Webhook URL** field, enter your third-party platform's request URL. For HubSpot, we will use [*https://api.hubapi.com/crm/v3/objects/contacts/*](https://api.hubapi.com/crm/v3/objects/contacts/). For more information, refer to the [HubSpot API documentation](https://developers.hubspot.com/docs/reference/api/overview).
3. Enter the **URL Parameters** and **Headers** by referring to your third-party platform's developer documentation.
4. Under **Body type**, select **Raw** and provide the JSON payload to create a contact in HubSpot.
```json JSON theme={null}
{
"properties": {
"email": "{{EventAttribute['Email']}}",
"firstname": "{{EventAttribute['FirstName']}}",
"phone": "{{EventAttribute['Phone']}}"
}
}
```
This uses event attribute personalization to map the captured data to HubSpot properties, ensuring the data is correctly formatted for contact creation.
5. Click **Next**.
8. Define the **Schedule and Goals** of the campaign as desired. For more information, refer [here](/user-guide/campaigns-and-channels/connectors/create/create-a-connector-campaign).
1. Under **Method**, select **POST**, as we are creating a new contact in HubSpot.
2. In the **Webhook URL** field, enter your third-party platform's request URL. For HubSpot, we will use [*https://api.hubapi.com/crm/v3/objects/contacts/*](https://api.hubapi.com/crm/v3/objects/contacts/). For more information, refer to the [HubSpot API documentation](https://developers.hubspot.com/docs/reference/api/overview).
3. Enter the **URL Parameters** and **Headers** by referring to your third-party platform's developer documentation.
4. Under **Body type**, select **Raw** and provide the JSON payload to create a contact in HubSpot.
```json JSON theme={null}
{
"properties": {
"email": "{{EventAttribute['Email']}}",
"firstname": "{{EventAttribute['FirstName']}}",
"phone": "{{EventAttribute['Phone']}}"
}
}
```
This uses event attribute personalization to map the captured data to HubSpot properties, ensuring the data is correctly formatted for contact creation.
5. Click **Next**.
8. Define the **Schedule and Goals** of the campaign as desired. For more information, refer [here](/user-guide/campaigns-and-channels/connectors/create/create-a-connector-campaign). 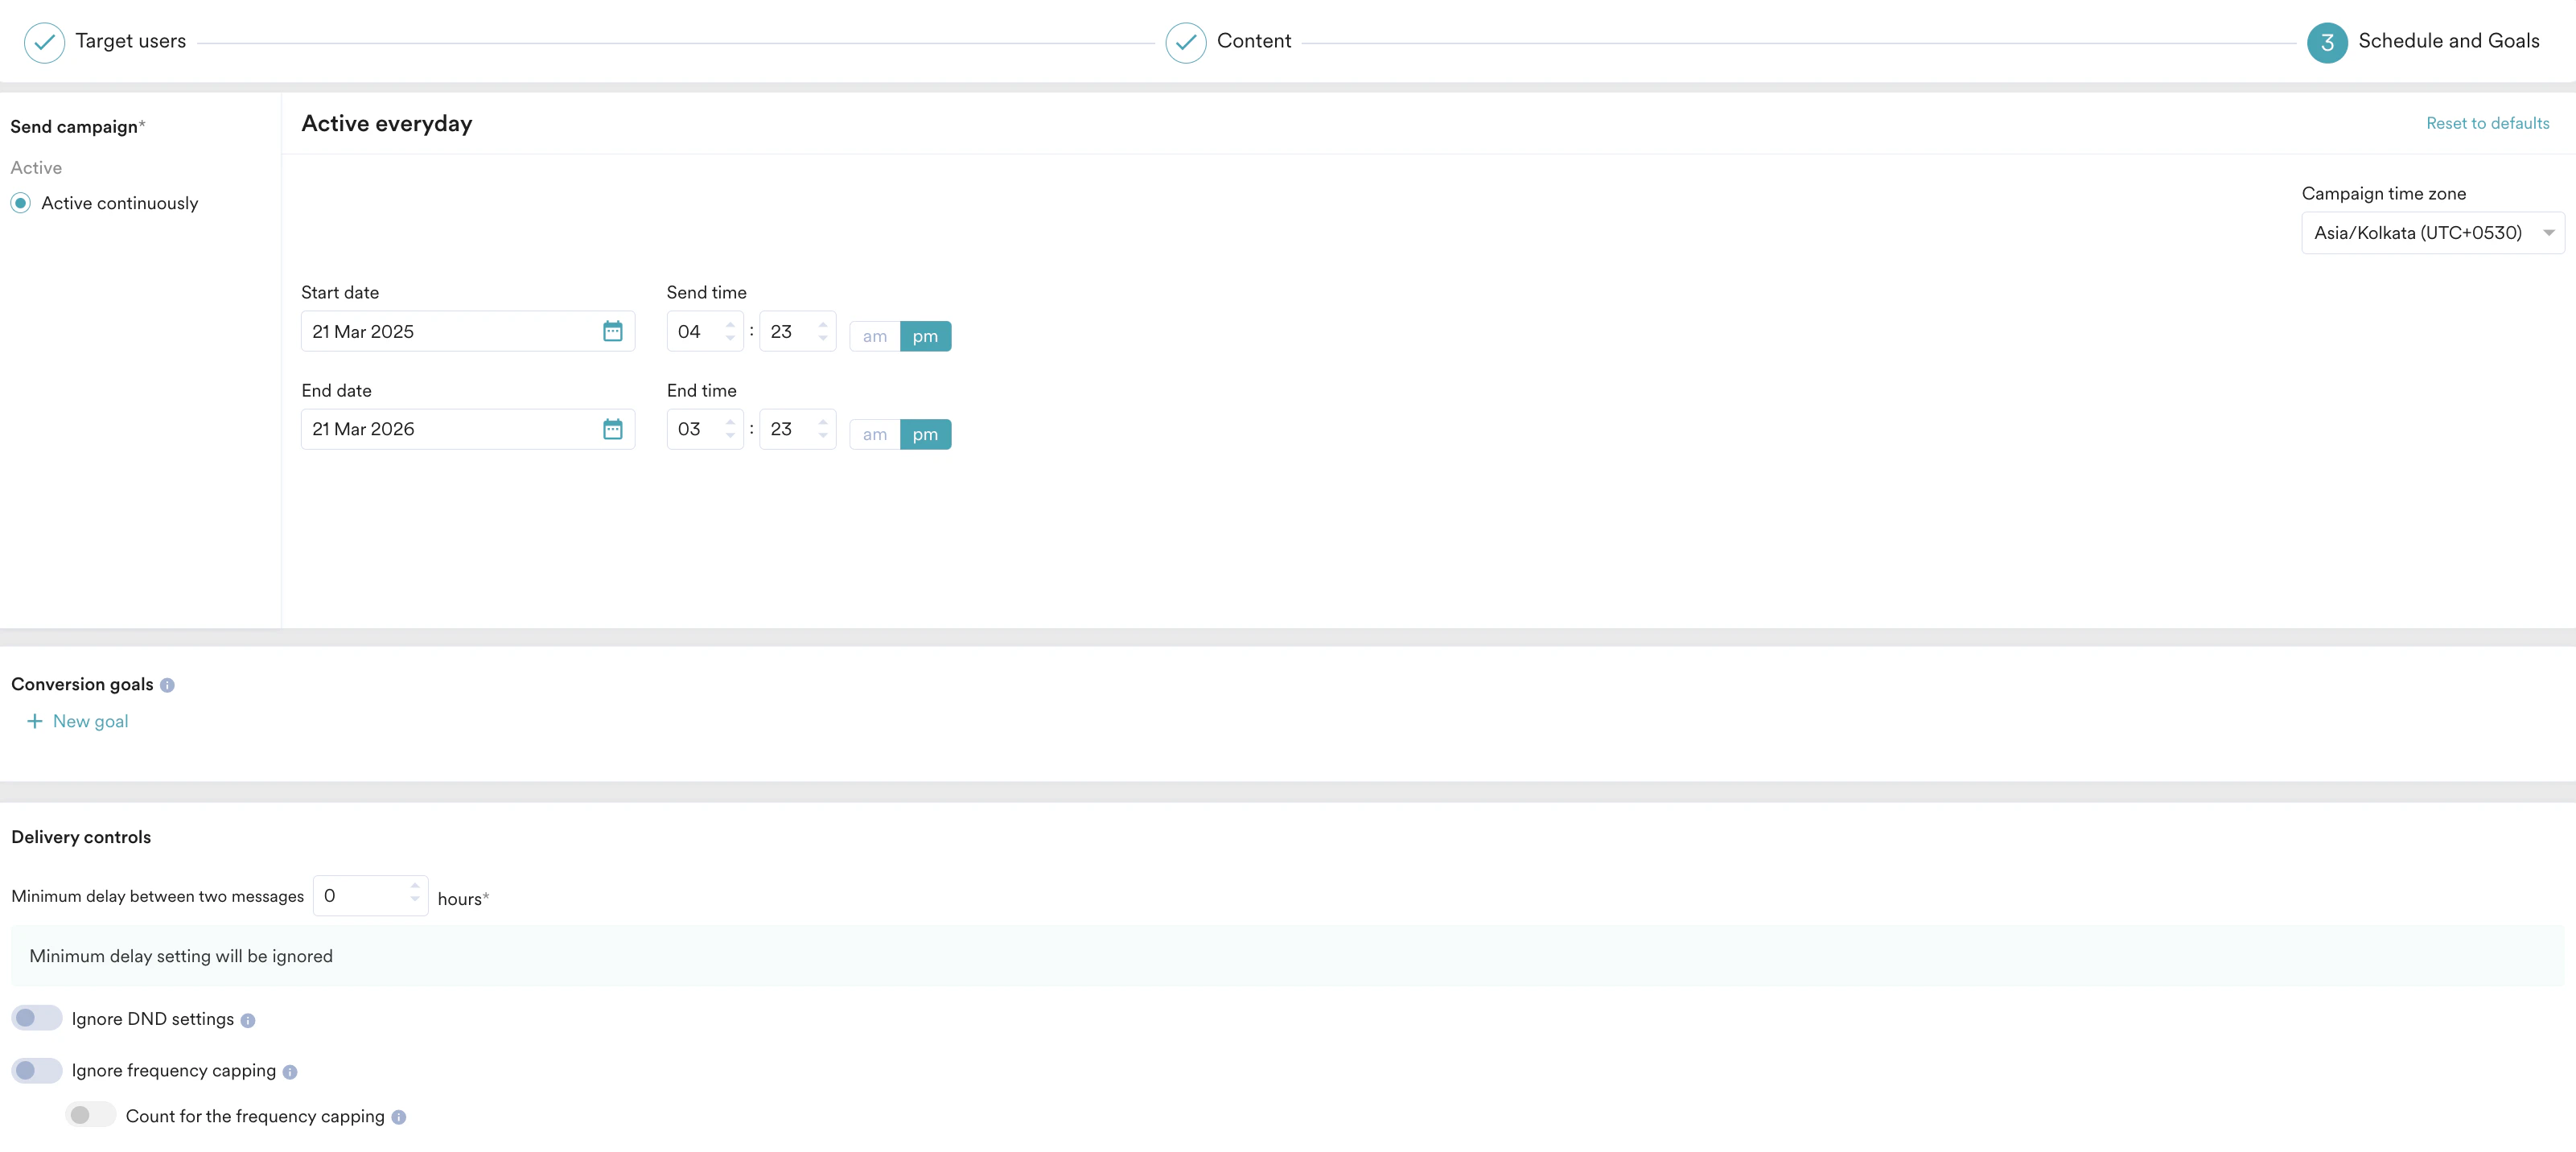 9. Click **Publish** to publish the campaign. This will activate the connector, which will send data to your third-party platform whenever a form is submitted on the landing page.
# Verification
To verify the integration is working:
1. Visit the published landing page and submit the form with test data, such as a unique email address.
2. Check your HubSpot account under the **Contacts** section to ensure a new contact is created with the submitted information, confirming the data sync.
# Conclusion
In this use case, we successfully created a landing page using the Lead Capture template to collect essential user information. We then utilized these responses within the SMS channel in MoEngage. We also configured an Event Triggered Connector campaign to automatically send these responses to HubSpot, streamlining the process of integrating lead data into a CRM system. Businesses can ensure real-time data sync by publishing both the landing page and the connector, reducing manual effort and improving lead-nurturing workflows.
To evaluate the effectiveness of this setup, you can track submission rates and conversion metrics in MoEngage while verifying new contact creation in HubSpot.
9. Click **Publish** to publish the campaign. This will activate the connector, which will send data to your third-party platform whenever a form is submitted on the landing page.
# Verification
To verify the integration is working:
1. Visit the published landing page and submit the form with test data, such as a unique email address.
2. Check your HubSpot account under the **Contacts** section to ensure a new contact is created with the submitted information, confirming the data sync.
# Conclusion
In this use case, we successfully created a landing page using the Lead Capture template to collect essential user information. We then utilized these responses within the SMS channel in MoEngage. We also configured an Event Triggered Connector campaign to automatically send these responses to HubSpot, streamlining the process of integrating lead data into a CRM system. Businesses can ensure real-time data sync by publishing both the landing page and the connector, reducing manual effort and improving lead-nurturing workflows.
To evaluate the effectiveness of this setup, you can track submission rates and conversion metrics in MoEngage while verifying new contact creation in HubSpot.