> ## Documentation Index
> Fetch the complete documentation index at: https://moengage.com/docs/llms.txt
> Use this file to discover all available pages before exploring further.
# Create a Landing Page
> Walk through creating a landing page in MoEngage — set the page name, pick a template or start from scratch, design your content, and go live.
To create a landing page, perform the following steps:
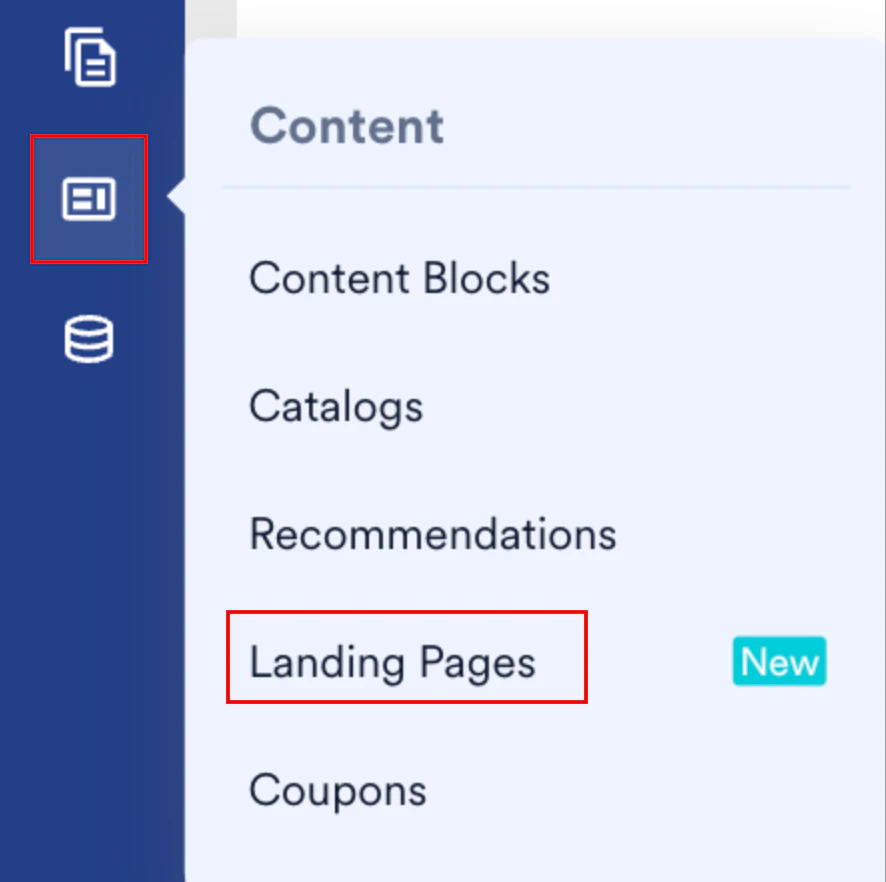
1. On the sidebar menu in MoEngage, hover over the **Content** menu item  . The **Content** menu appears.
2. Click **Landing Pages**.
. The **Content** menu appears.
2. Click **Landing Pages**.
 The Landing pages page appears.
3. Click **Create landing page**.
The Landing pages page appears.
3. Click **Create landing page**.
 **There are three steps to create a landing page**:
# Step 1: Defining a Landing Page
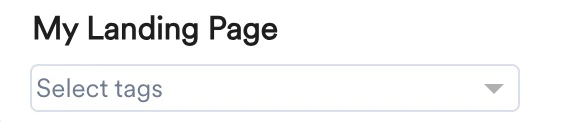
In this step, you will define the landing page using the following fields:
* Landing page name: Type the landing page name to identify and manage the page.
* Landing page tags: Select a suitable tag for your landing page from the tags list.
**There are three steps to create a landing page**:
# Step 1: Defining a Landing Page
In this step, you will define the landing page using the following fields:
* Landing page name: Type the landing page name to identify and manage the page.
* Landing page tags: Select a suitable tag for your landing page from the tags list.
 # Step 2: Content
## Landing Page Content
You can create your landing page using a blank template or choose from the available templates. You can also look up a template using the search option or click the template of your choice.
# Step 2: Content
## Landing Page Content
You can create your landing page using a blank template or choose from the available templates. You can also look up a template using the search option or click the template of your choice.
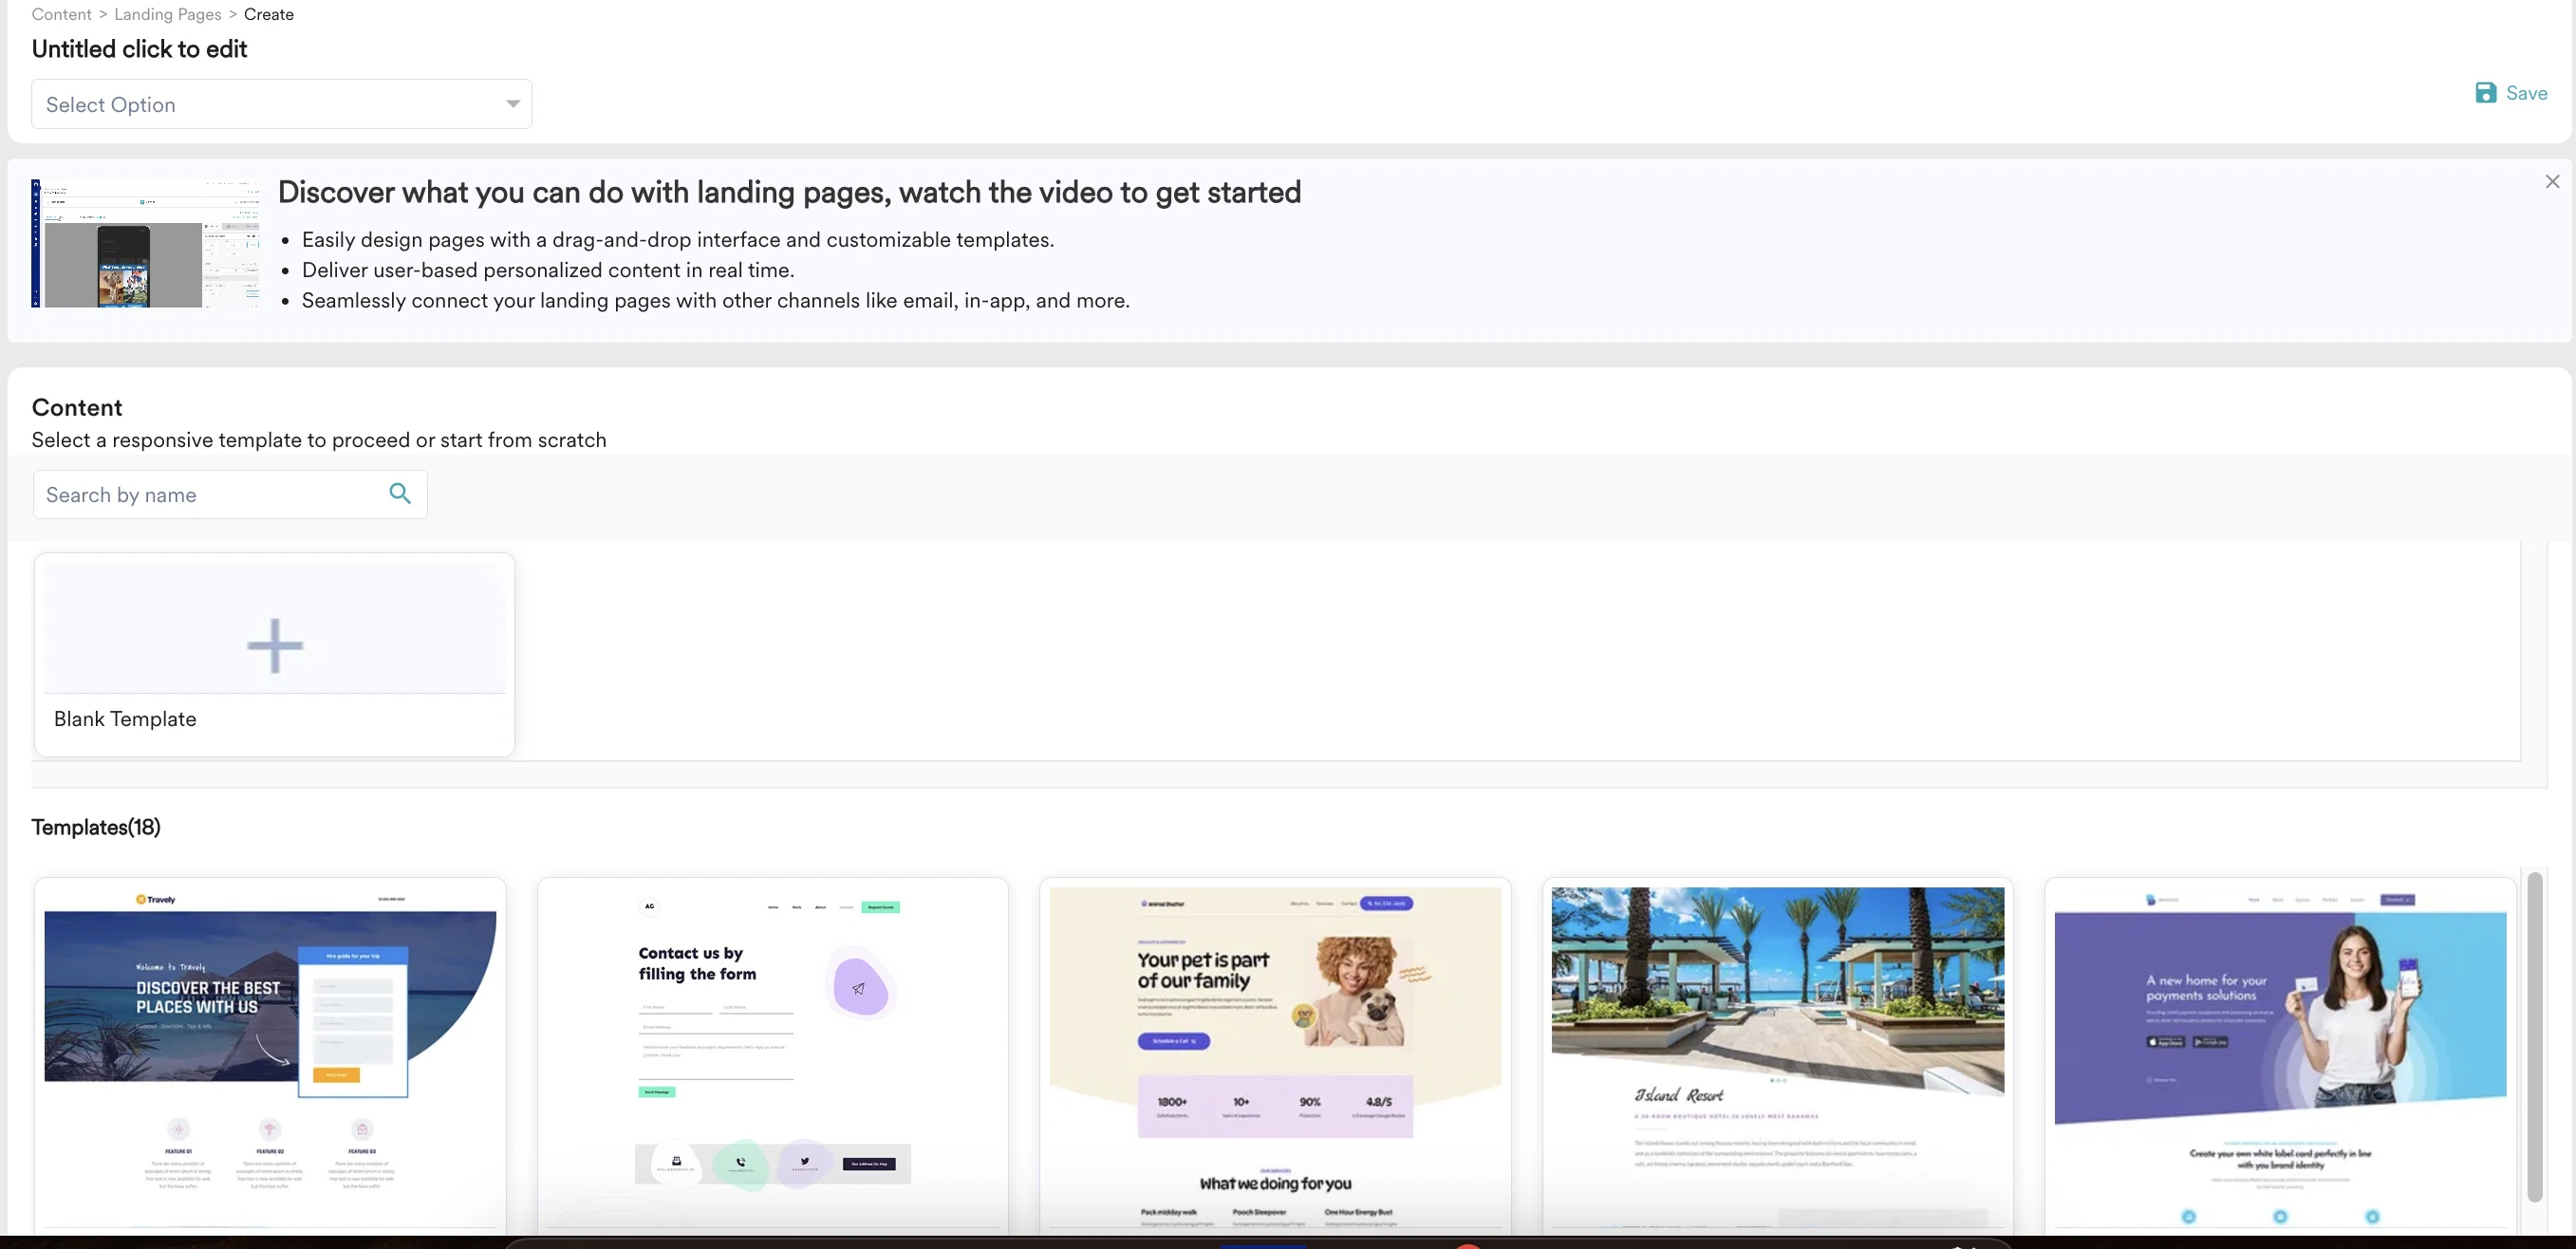 **Blank Template**: Hover over **Blank Template** and click it to create a landing page template from scratch. Click the **+** icon to open the editor and add elements to the template. For more information, refer to the [Landing Page Editor](/user-guide/content/landing-pages/create/landing-page-editor).
**Pre-built Templates**: You can choose from various pre-designed templates that fulfill your requirements.
The following are some of the templates included:
* Lead Capture
* Survey & Feedback
* Product Announcement
* Promotion & Recommendation
* Subscription Category Management
For more information, refer to [Landing Page Templates](/user-guide/content/landing-pages/create/landing-page-templates).
### Drag and Drop Editor
After you've loaded the template of your choice, the template loads in the landing page editor. You can perform the following tasks after the editor is open:
* **Add elements**: You can add elements to the template by clicking the
**Blank Template**: Hover over **Blank Template** and click it to create a landing page template from scratch. Click the **+** icon to open the editor and add elements to the template. For more information, refer to the [Landing Page Editor](/user-guide/content/landing-pages/create/landing-page-editor).
**Pre-built Templates**: You can choose from various pre-designed templates that fulfill your requirements.
The following are some of the templates included:
* Lead Capture
* Survey & Feedback
* Product Announcement
* Promotion & Recommendation
* Subscription Category Management
For more information, refer to [Landing Page Templates](/user-guide/content/landing-pages/create/landing-page-templates).
### Drag and Drop Editor
After you've loaded the template of your choice, the template loads in the landing page editor. You can perform the following tasks after the editor is open:
* **Add elements**: You can add elements to the template by clicking the  icon in the editor's left pane.
* **Add or edit styling options**: Click the
icon in the editor's left pane.
* **Add or edit styling options**: Click the  icon at the upper-right corner of an element to add the desired styling. For more information, refer to [Landing Page Editor](/user-guide/content/landing-pages/create/landing-page-editor).
* **Change the template**: To change to a different template, click the ellipsis
icon at the upper-right corner of an element to add the desired styling. For more information, refer to [Landing Page Editor](/user-guide/content/landing-pages/create/landing-page-editor).
* **Change the template**: To change to a different template, click the ellipsis  icon,\
select **Change template,** and confirm your choice. You can then choose a new template for your landing page.
* **Personalize**: You can add various personalization options to your landing page's content, including personalized text and images.
icon,\
select **Change template,** and confirm your choice. You can then choose a new template for your landing page.
* **Personalize**: You can add various personalization options to your landing page's content, including personalized text and images.
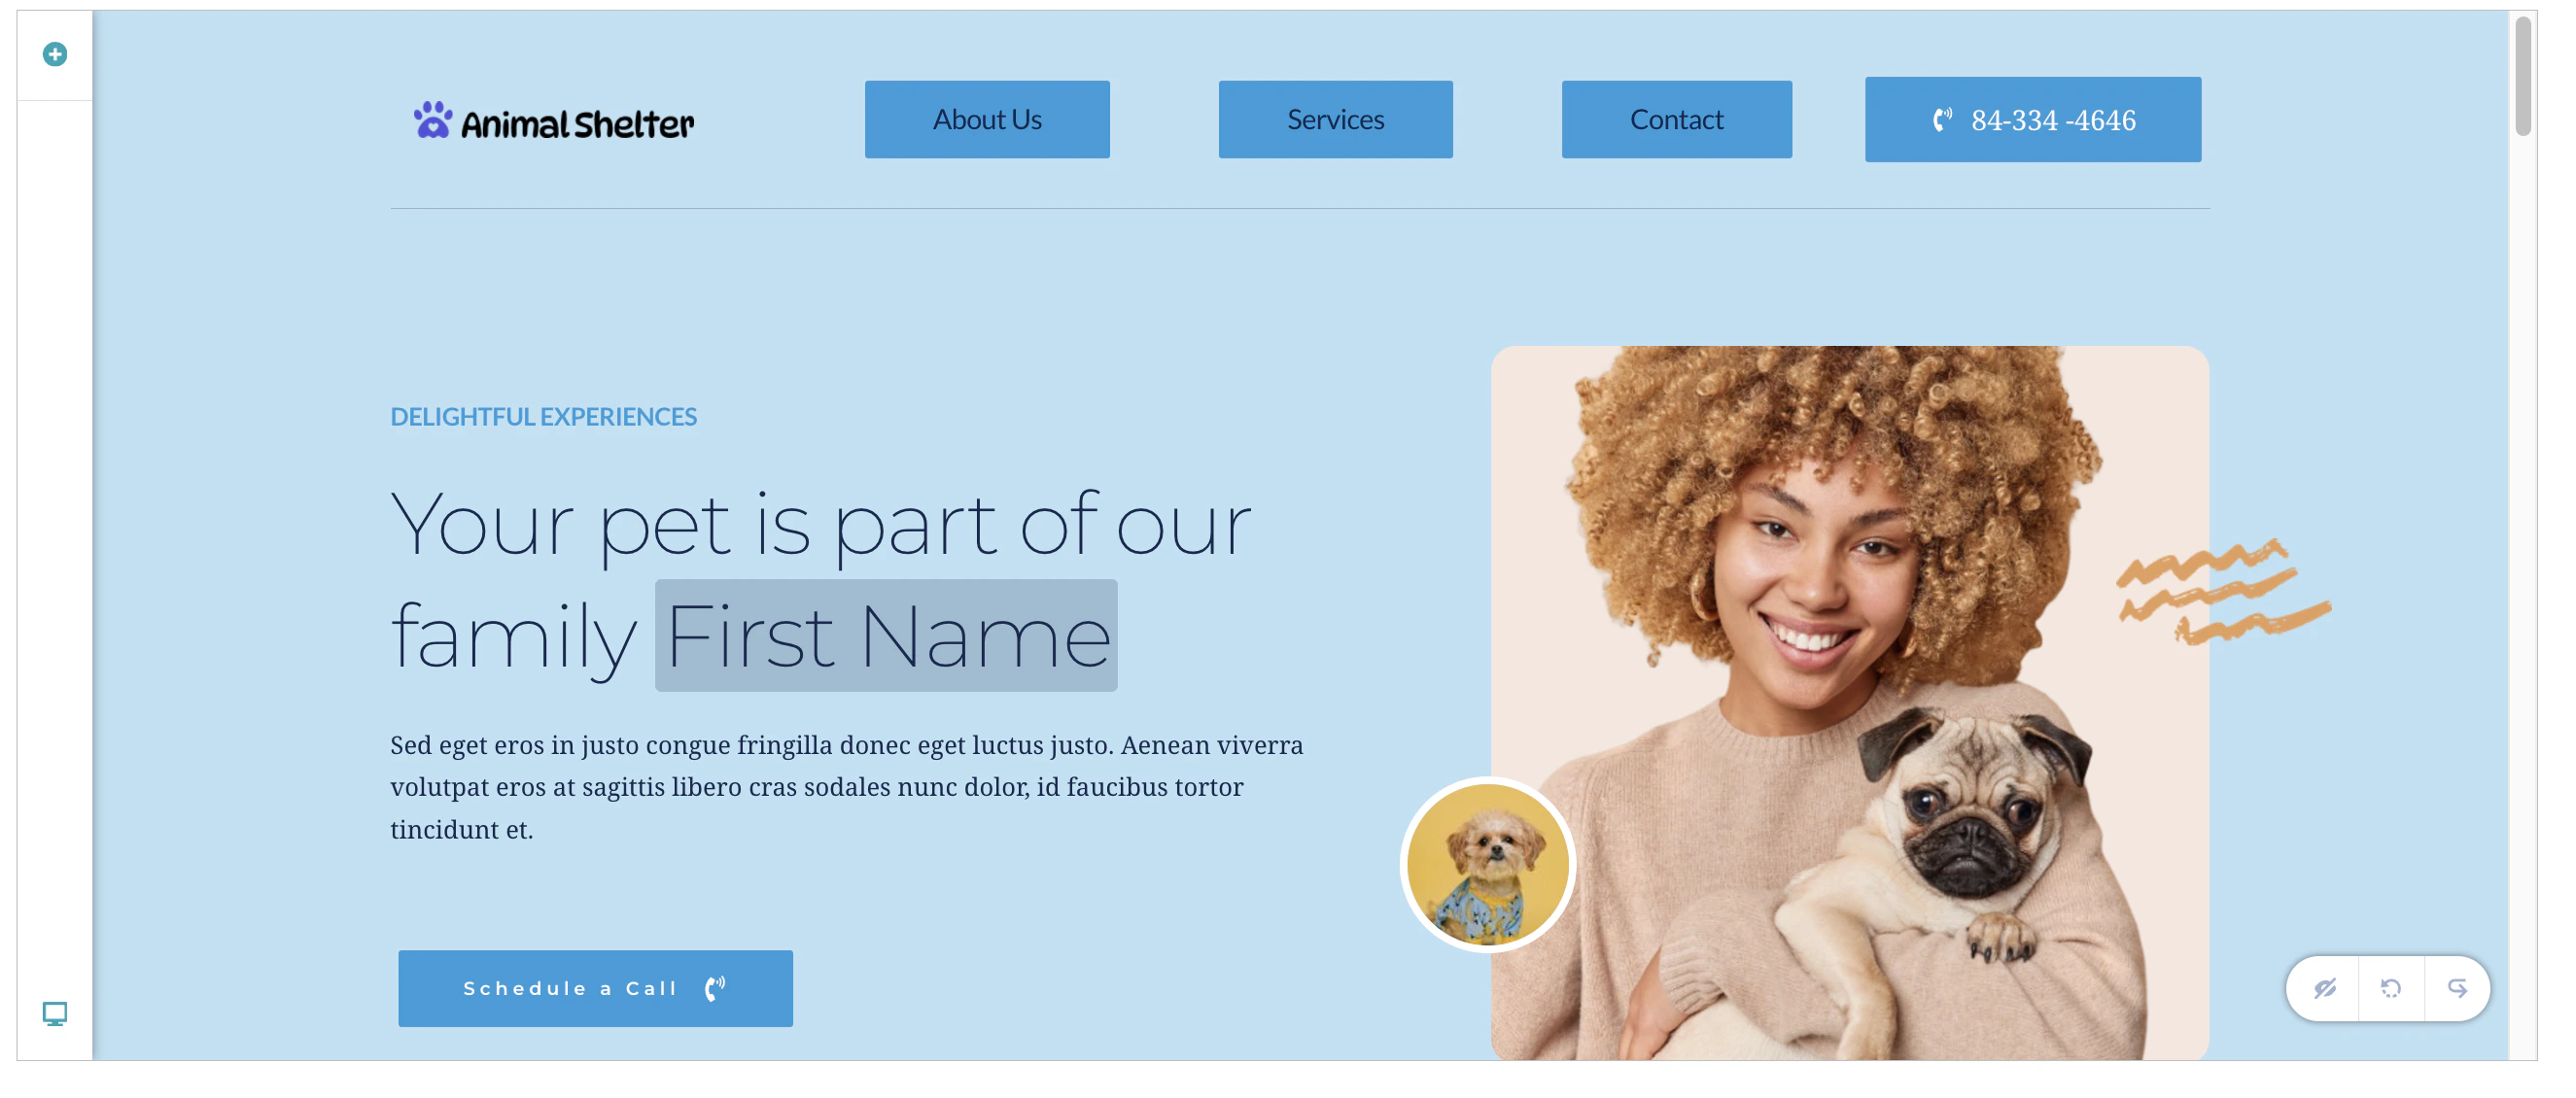 For more information, refer to [Personalize Landing Page](/user-guide/content/landing-pages/create/personalize-a-landing-page).
## A/B Test and Cohorts
### A/B Test
A/B testing is an experimental setup of comparing multiple variations of a landing page against each other by sending it to a set percentage of randomly chosen groups of users. This helps you to know which landing page performs better to drive your engagement metrics. You can create and test multiple variations of an entire landing page and distribute traffic among them to identify the best-performing version. For more information, refer [here](/user-guide/ai-and-intelligence/ab-testing/what-is-ab-or-multivariate-testing/manual-multivariate-experiment).
To create variations, perform the following steps:
1. On the content section, click **+A/B test** in the upper-right corner.
2. Click **New Variation** to create a new variation or click **Copy Variation** to copy the previously created variation. You can create a maximum of five variations.
For more information, refer to [Personalize Landing Page](/user-guide/content/landing-pages/create/personalize-a-landing-page).
## A/B Test and Cohorts
### A/B Test
A/B testing is an experimental setup of comparing multiple variations of a landing page against each other by sending it to a set percentage of randomly chosen groups of users. This helps you to know which landing page performs better to drive your engagement metrics. You can create and test multiple variations of an entire landing page and distribute traffic among them to identify the best-performing version. For more information, refer [here](/user-guide/ai-and-intelligence/ab-testing/what-is-ab-or-multivariate-testing/manual-multivariate-experiment).
To create variations, perform the following steps:
1. On the content section, click **+A/B test** in the upper-right corner.
2. Click **New Variation** to create a new variation or click **Copy Variation** to copy the previously created variation. You can create a maximum of five variations.
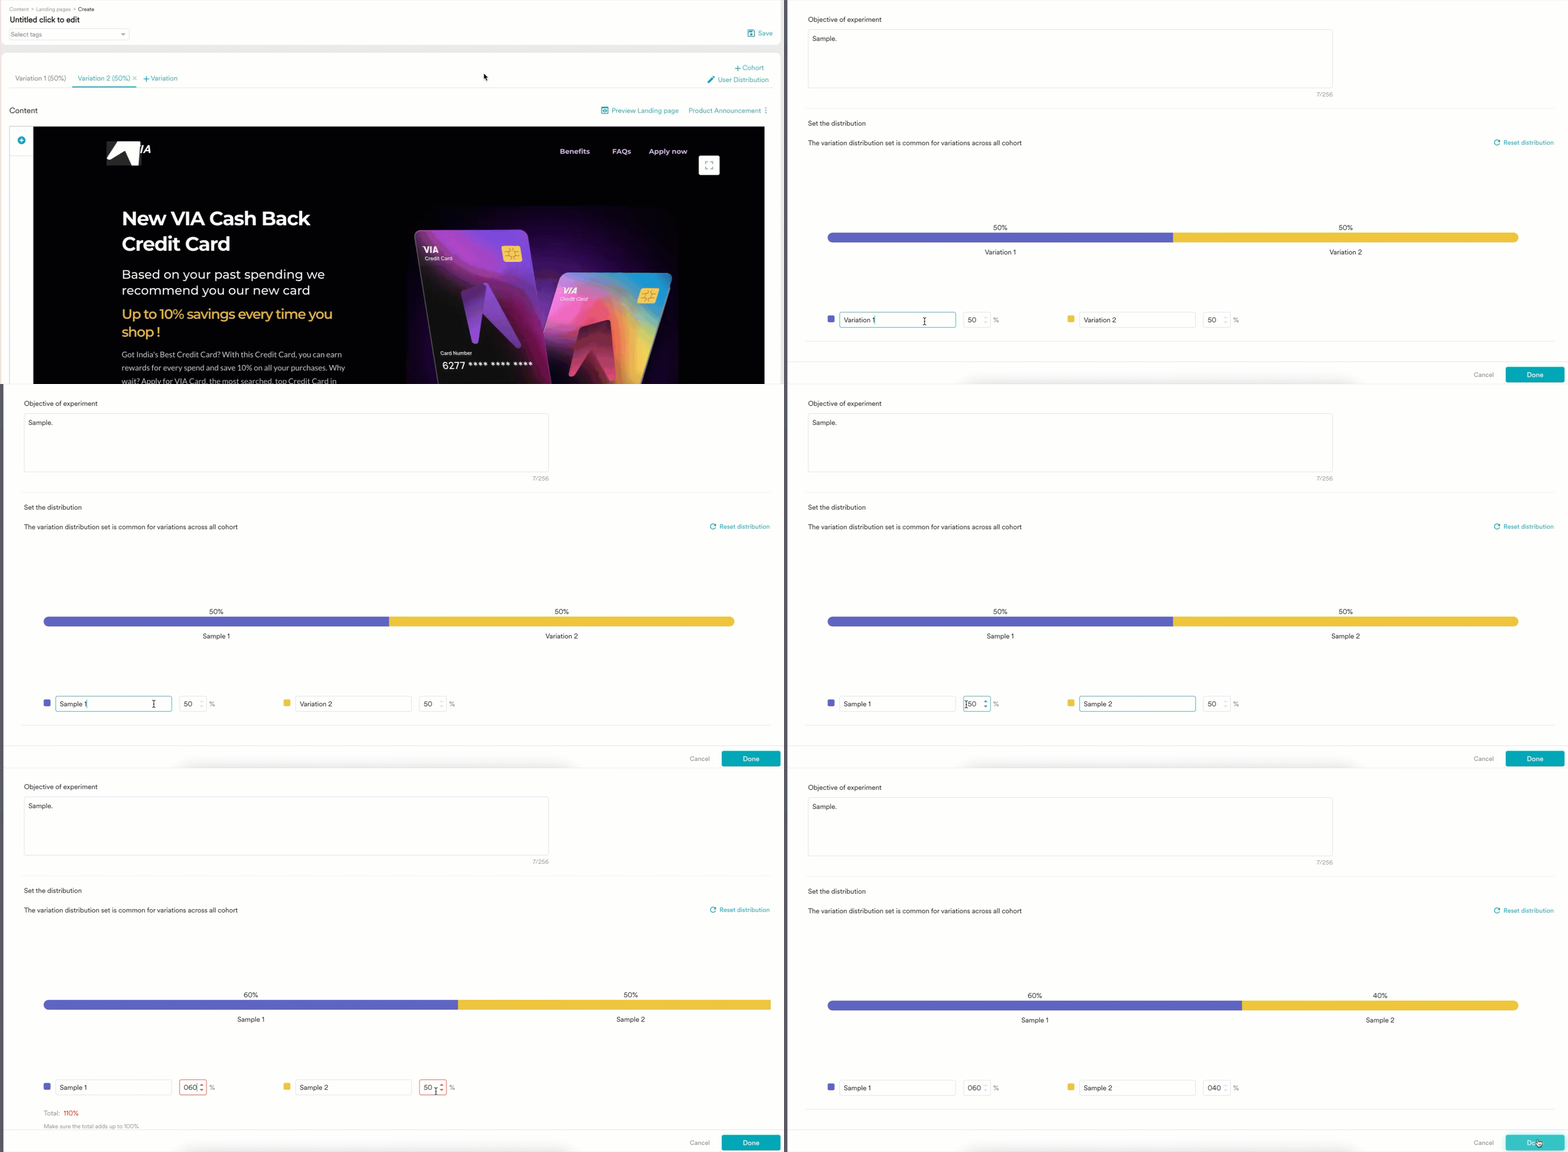
 3. After creating your variations, you should set the user distribution to the variations. To do so, click **User Distribution**. The **User distribution** popup window appears.
 4. In the O**bjective of experiment** field, type the details of the experiment.
5. Modify the variation name and set the percentage of users who will receive the landing page.
4. In the O**bjective of experiment** field, type the details of the experiment.
5. Modify the variation name and set the percentage of users who will receive the landing page.
 For more information on analyzing the landing pages, refer [here](/user-guide/content/landing-pages/analyze/analyze-landing-pages).
### Cohorts
With cohorts, you can create and serve multiple variations of a landing page based on session attributes such as query parameters, day of week, time of day, geolocation, device type, operating system, and browser type. This enables personalized experiences for users, increasing relevancy and conversion.
For example, you can show a landing page based on location, displaying Hindi for India, Mandarin for China, and English by default. Use query parameters like *sport=running* or *sport=boxing* and alter the hero image and featured products, with a generic sports gear display as the default. Attributes like time and day to determine offer promotions and show weekday specials on Monday from 9 AM-5 PM, weekend activities on Saturday/Sunday, and standard offers otherwise.
To create cohorts, perform the following steps:
1. On the content section, click **Cohort**.
For more information on analyzing the landing pages, refer [here](/user-guide/content/landing-pages/analyze/analyze-landing-pages).
### Cohorts
With cohorts, you can create and serve multiple variations of a landing page based on session attributes such as query parameters, day of week, time of day, geolocation, device type, operating system, and browser type. This enables personalized experiences for users, increasing relevancy and conversion.
For example, you can show a landing page based on location, displaying Hindi for India, Mandarin for China, and English by default. Use query parameters like *sport=running* or *sport=boxing* and alter the hero image and featured products, with a generic sports gear display as the default. Attributes like time and day to determine offer promotions and show weekday specials on Monday from 9 AM-5 PM, weekend activities on Saturday/Sunday, and standard offers otherwise.
To create cohorts, perform the following steps:
1. On the content section, click **Cohort**.
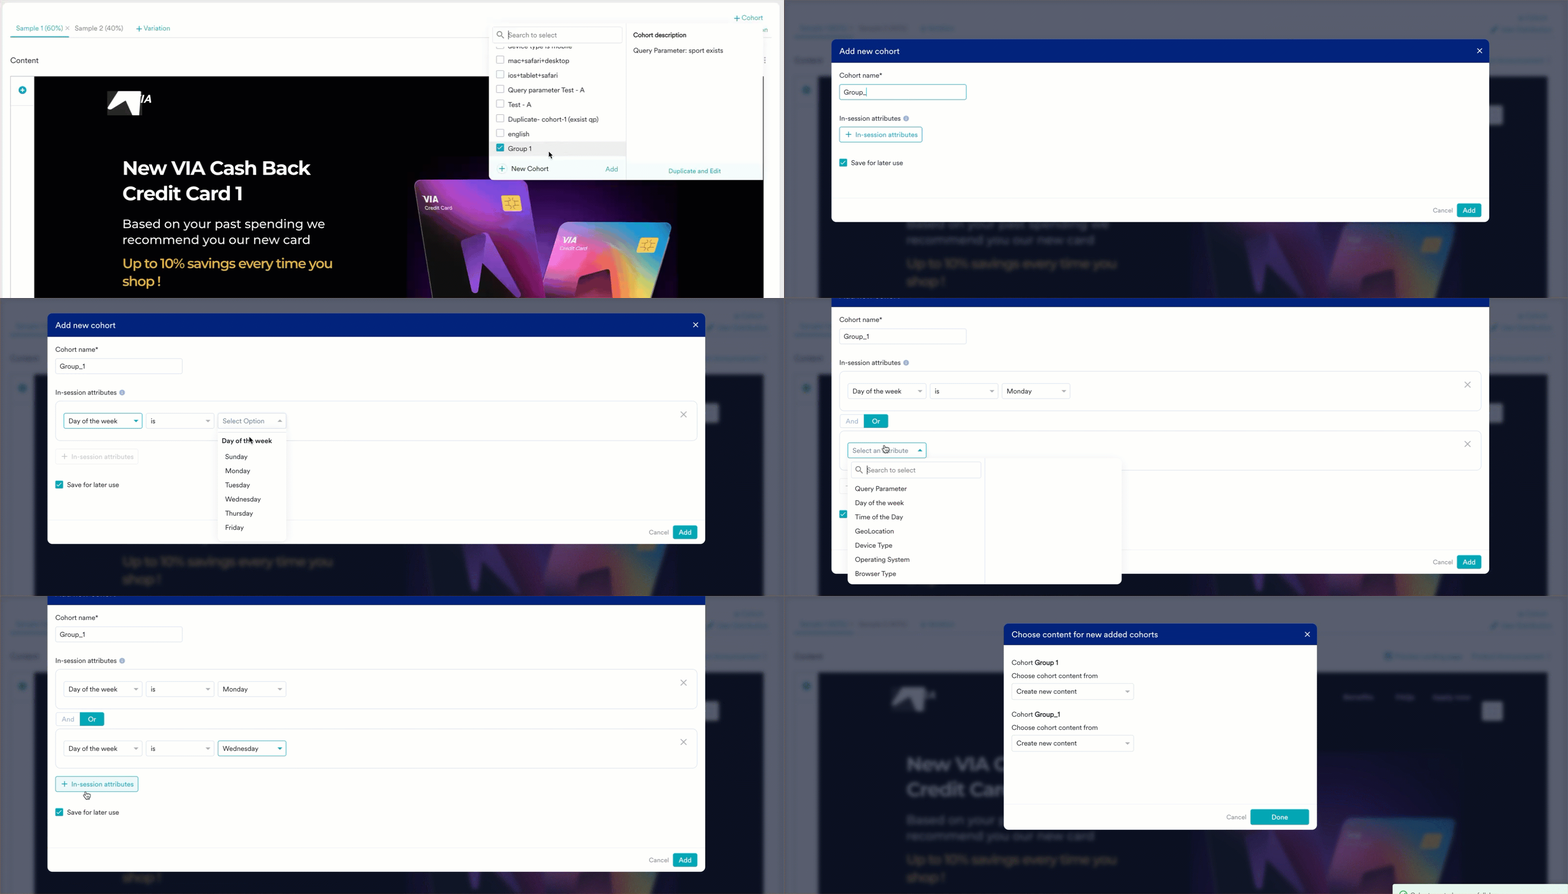
 2. Click **New Cohort**. The **Add new cohort** popup window appears.
 3. In the **Cohort name** field, type the desired cohort name.
4. In the **In-session attributes** list, select the required attributes. In-session attributes enable you to group and target users based on their actions within the user's current session.
5. Click **+ In-session attributes** to add more attributes. You can combine multiple attributes using **And**/**Or**, as shown below:
3. In the **Cohort name** field, type the desired cohort name.
4. In the **In-session attributes** list, select the required attributes. In-session attributes enable you to group and target users based on their actions within the user's current session.
5. Click **+ In-session attributes** to add more attributes. You can combine multiple attributes using **And**/**Or**, as shown below:
 6. To save the created cohort, select the **Save for later use** checkbox. The saved cohort will be available in the cohorts list for additional edits.
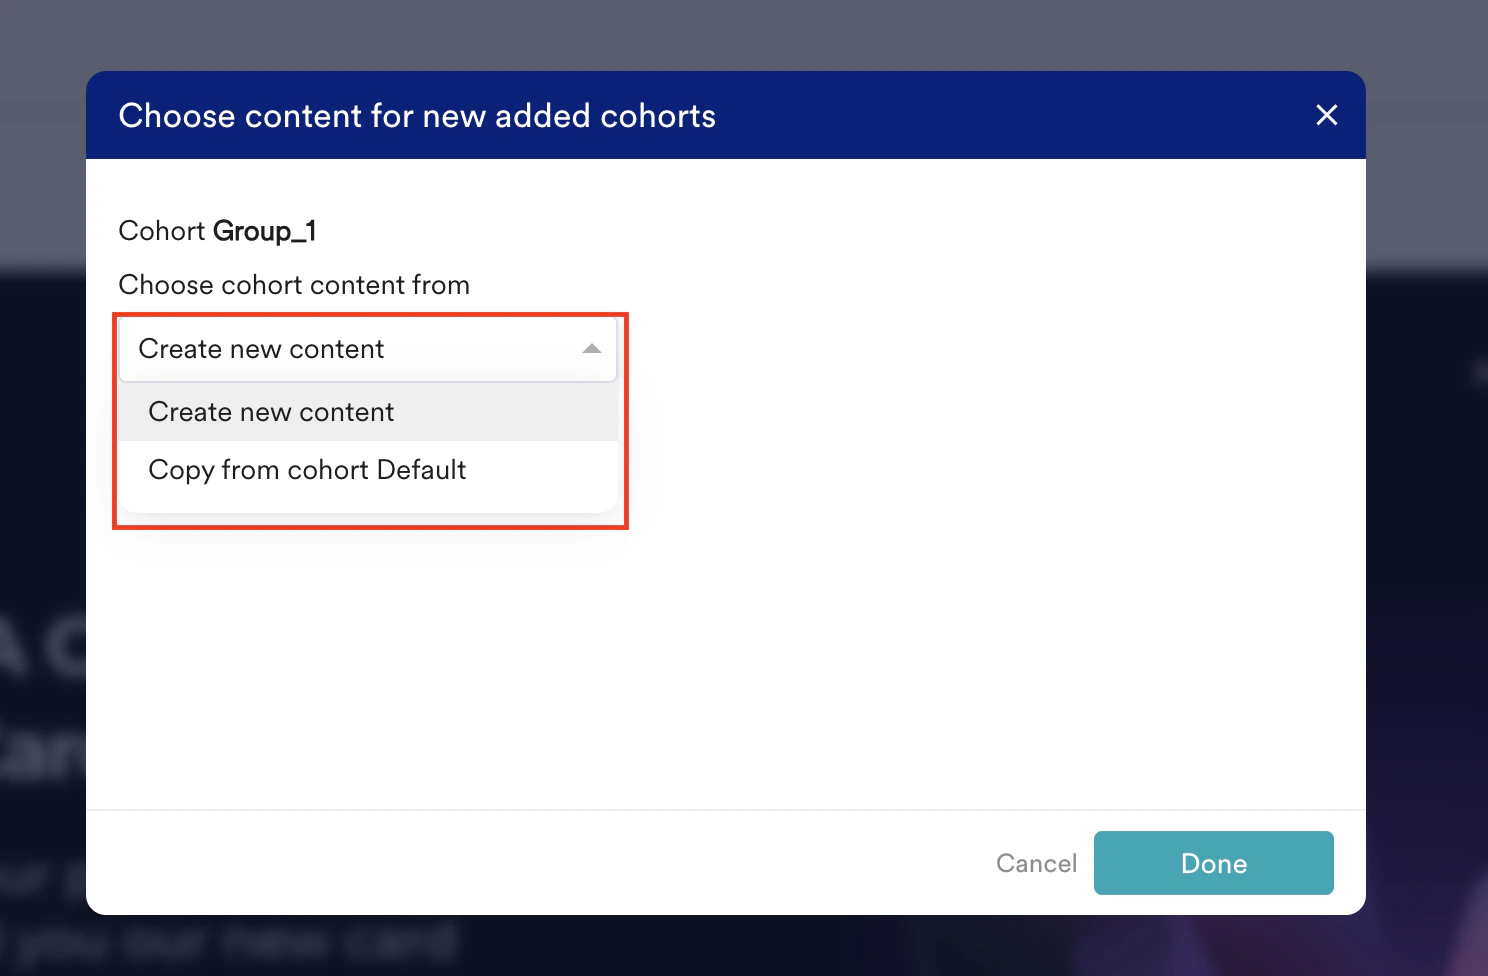
7. After adding your attributes, click **Add**. The **Choose content for new added cohorts** popup window appears.
8. In the **Choose cohort content from** list, select one of the following options:
1. **Create new content**: You can either create new landing page content for your cohort.
2. **Copy from cohort Default**: Copy the existing content to your cohort.
6. To save the created cohort, select the **Save for later use** checkbox. The saved cohort will be available in the cohorts list for additional edits.
7. After adding your attributes, click **Add**. The **Choose content for new added cohorts** popup window appears.
8. In the **Choose cohort content from** list, select one of the following options:
1. **Create new content**: You can either create new landing page content for your cohort.
2. **Copy from cohort Default**: Copy the existing content to your cohort.
 9. Click **Done**. Your cohort will now be visible on the header of the content section.
 10. To access the created cohort or to add more cohorts, click **+ Cohort**. You can add a maximum of five cohorts to a landing page.
For more information on tracking the metrics of your landing page variations and cohorts, refer [here](/user-guide/content/landing-pages/analyze/analyze-landing-pages).
## Test and Preview
After adding content to the template, you might want to preview your landing page. You can choose from the following options:
* **Preview the landing page**: Click the **Preview Landing page** icon to preview your landing page. You have the following options:
10. To access the created cohort or to add more cohorts, click **+ Cohort**. You can add a maximum of five cohorts to a landing page.
For more information on tracking the metrics of your landing page variations and cohorts, refer [here](/user-guide/content/landing-pages/analyze/analyze-landing-pages).
## Test and Preview
After adding content to the template, you might want to preview your landing page. You can choose from the following options:
* **Preview the landing page**: Click the **Preview Landing page** icon to preview your landing page. You have the following options:
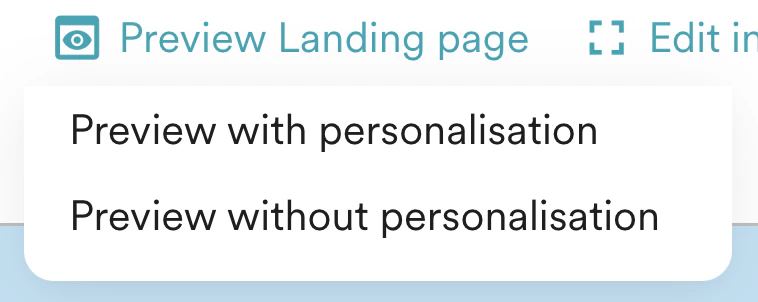 * **Preview with personalization**: This helps you test and display the created landing page.
* **Preview without personalization**: This displays the created landing page without personalized attributes. You can see the generic version of the page, which helps you ensure that all elements are positioned and displayed as intended.
* **Change the platform view**: Click the
* **Preview with personalization**: This helps you test and display the created landing page.
* **Preview without personalization**: This displays the created landing page without personalized attributes. You can see the generic version of the page, which helps you ensure that all elements are positioned and displayed as intended.
* **Change the platform view**: Click the  icon on the left panel to preview the template. You have the following platform options:
* **Desktop**: This option shows you how the landing page template will look when opened in a desktop browser.
* **Tablet**: This option shows you how the landing page template will look when opened in a tablet browser.
* **Mobile**: This option shows you how the landing page template will look when opened in a mobile browser.
* **View in full screen**: You can view and edit the template on the full screen.
# Step 3: URL and Settings
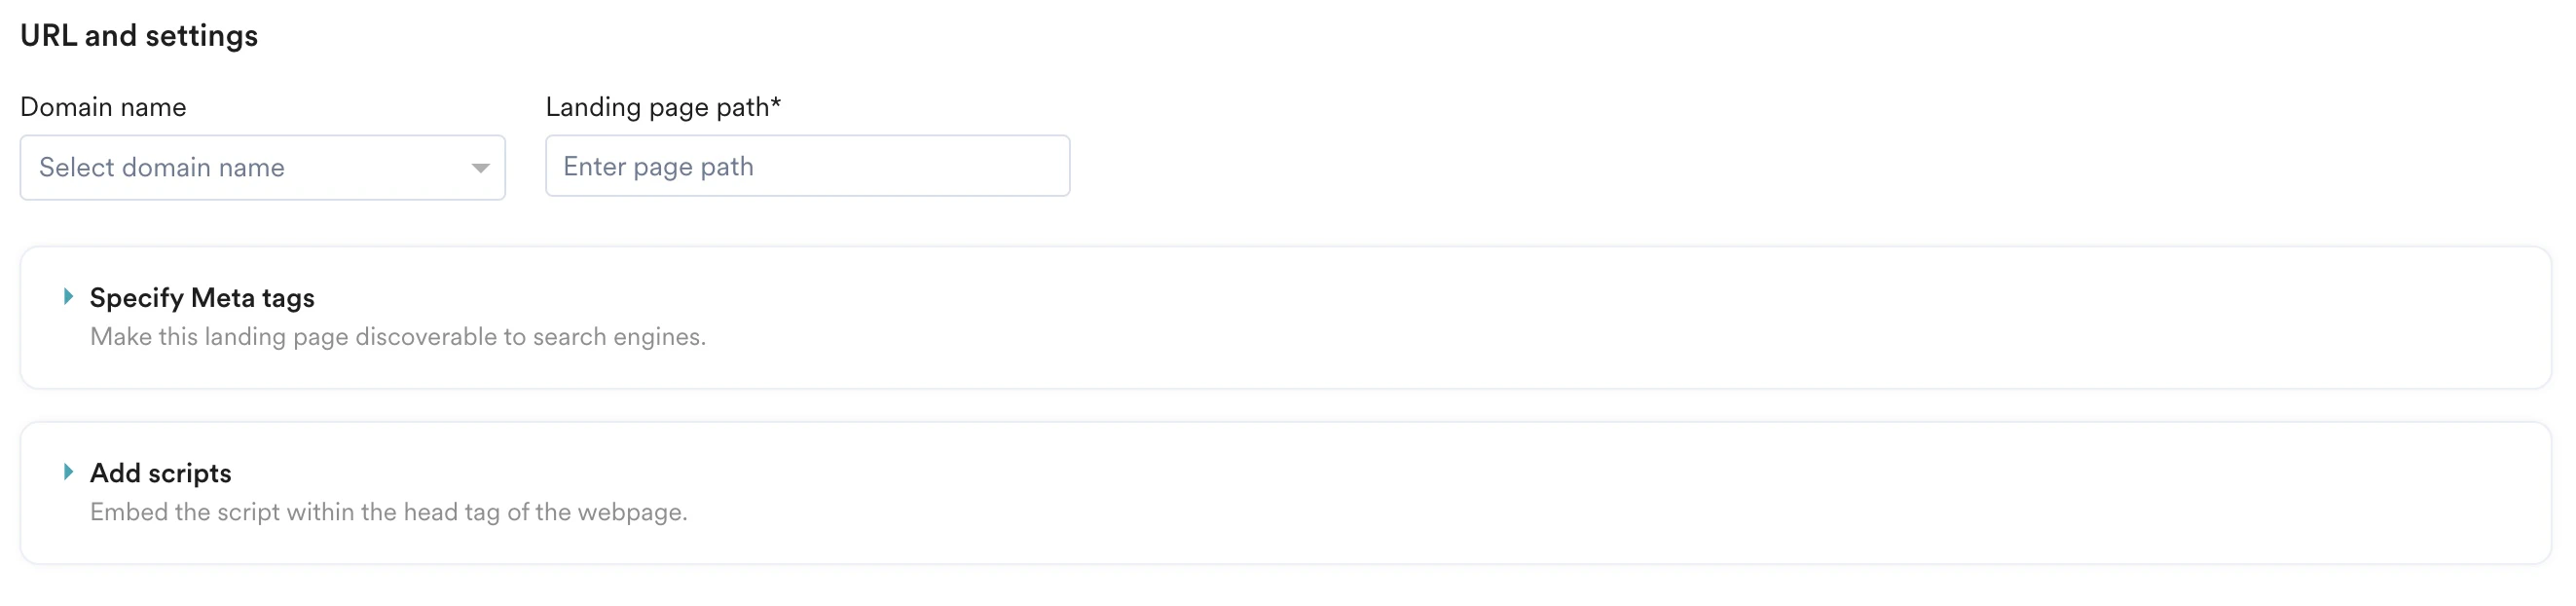
This step has the following sections:
* **URL details**
* **Specify Meta tags**
* **Add scripts**
icon on the left panel to preview the template. You have the following platform options:
* **Desktop**: This option shows you how the landing page template will look when opened in a desktop browser.
* **Tablet**: This option shows you how the landing page template will look when opened in a tablet browser.
* **Mobile**: This option shows you how the landing page template will look when opened in a mobile browser.
* **View in full screen**: You can view and edit the template on the full screen.
# Step 3: URL and Settings
This step has the following sections:
* **URL details**
* **Specify Meta tags**
* **Add scripts**
 ## URL Details
This section has the following fields:
* **Domain name**: Select a domain name for your landing page. You can select a general or custom domain name.
* **Landing page path**: Type your landing page path.
### Domain Name
You can configure the domain name in the following ways:
* **General domain**: You can choose a personalized domain associated with your database name from the MoEngage domain. This is available for you under the **General domain names** in the **Domain name** list. This immediate setup lets you start crafting and launching landing pages quickly without needing to manage domain configurations from the beginning.
* **Custom domain**: You can also add a custom domain when you are ready to use your branded subdomains.
#### Add a Custom Domain
1. Click **+ Add Custom domain** in the **Domain name** list.
## URL Details
This section has the following fields:
* **Domain name**: Select a domain name for your landing page. You can select a general or custom domain name.
* **Landing page path**: Type your landing page path.
### Domain Name
You can configure the domain name in the following ways:
* **General domain**: You can choose a personalized domain associated with your database name from the MoEngage domain. This is available for you under the **General domain names** in the **Domain name** list. This immediate setup lets you start crafting and launching landing pages quickly without needing to manage domain configurations from the beginning.
* **Custom domain**: You can also add a custom domain when you are ready to use your branded subdomains.
#### Add a Custom Domain
1. Click **+ Add Custom domain** in the **Domain name** list.
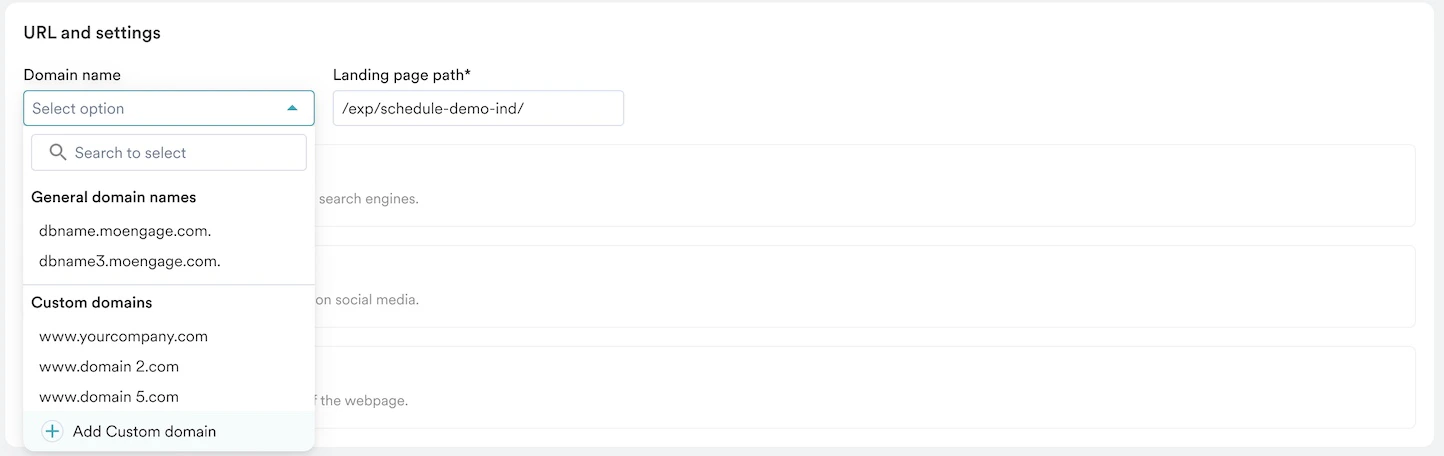 You will be redirected to the **Landing pages** tab on the Custom domain page under **Settings**.
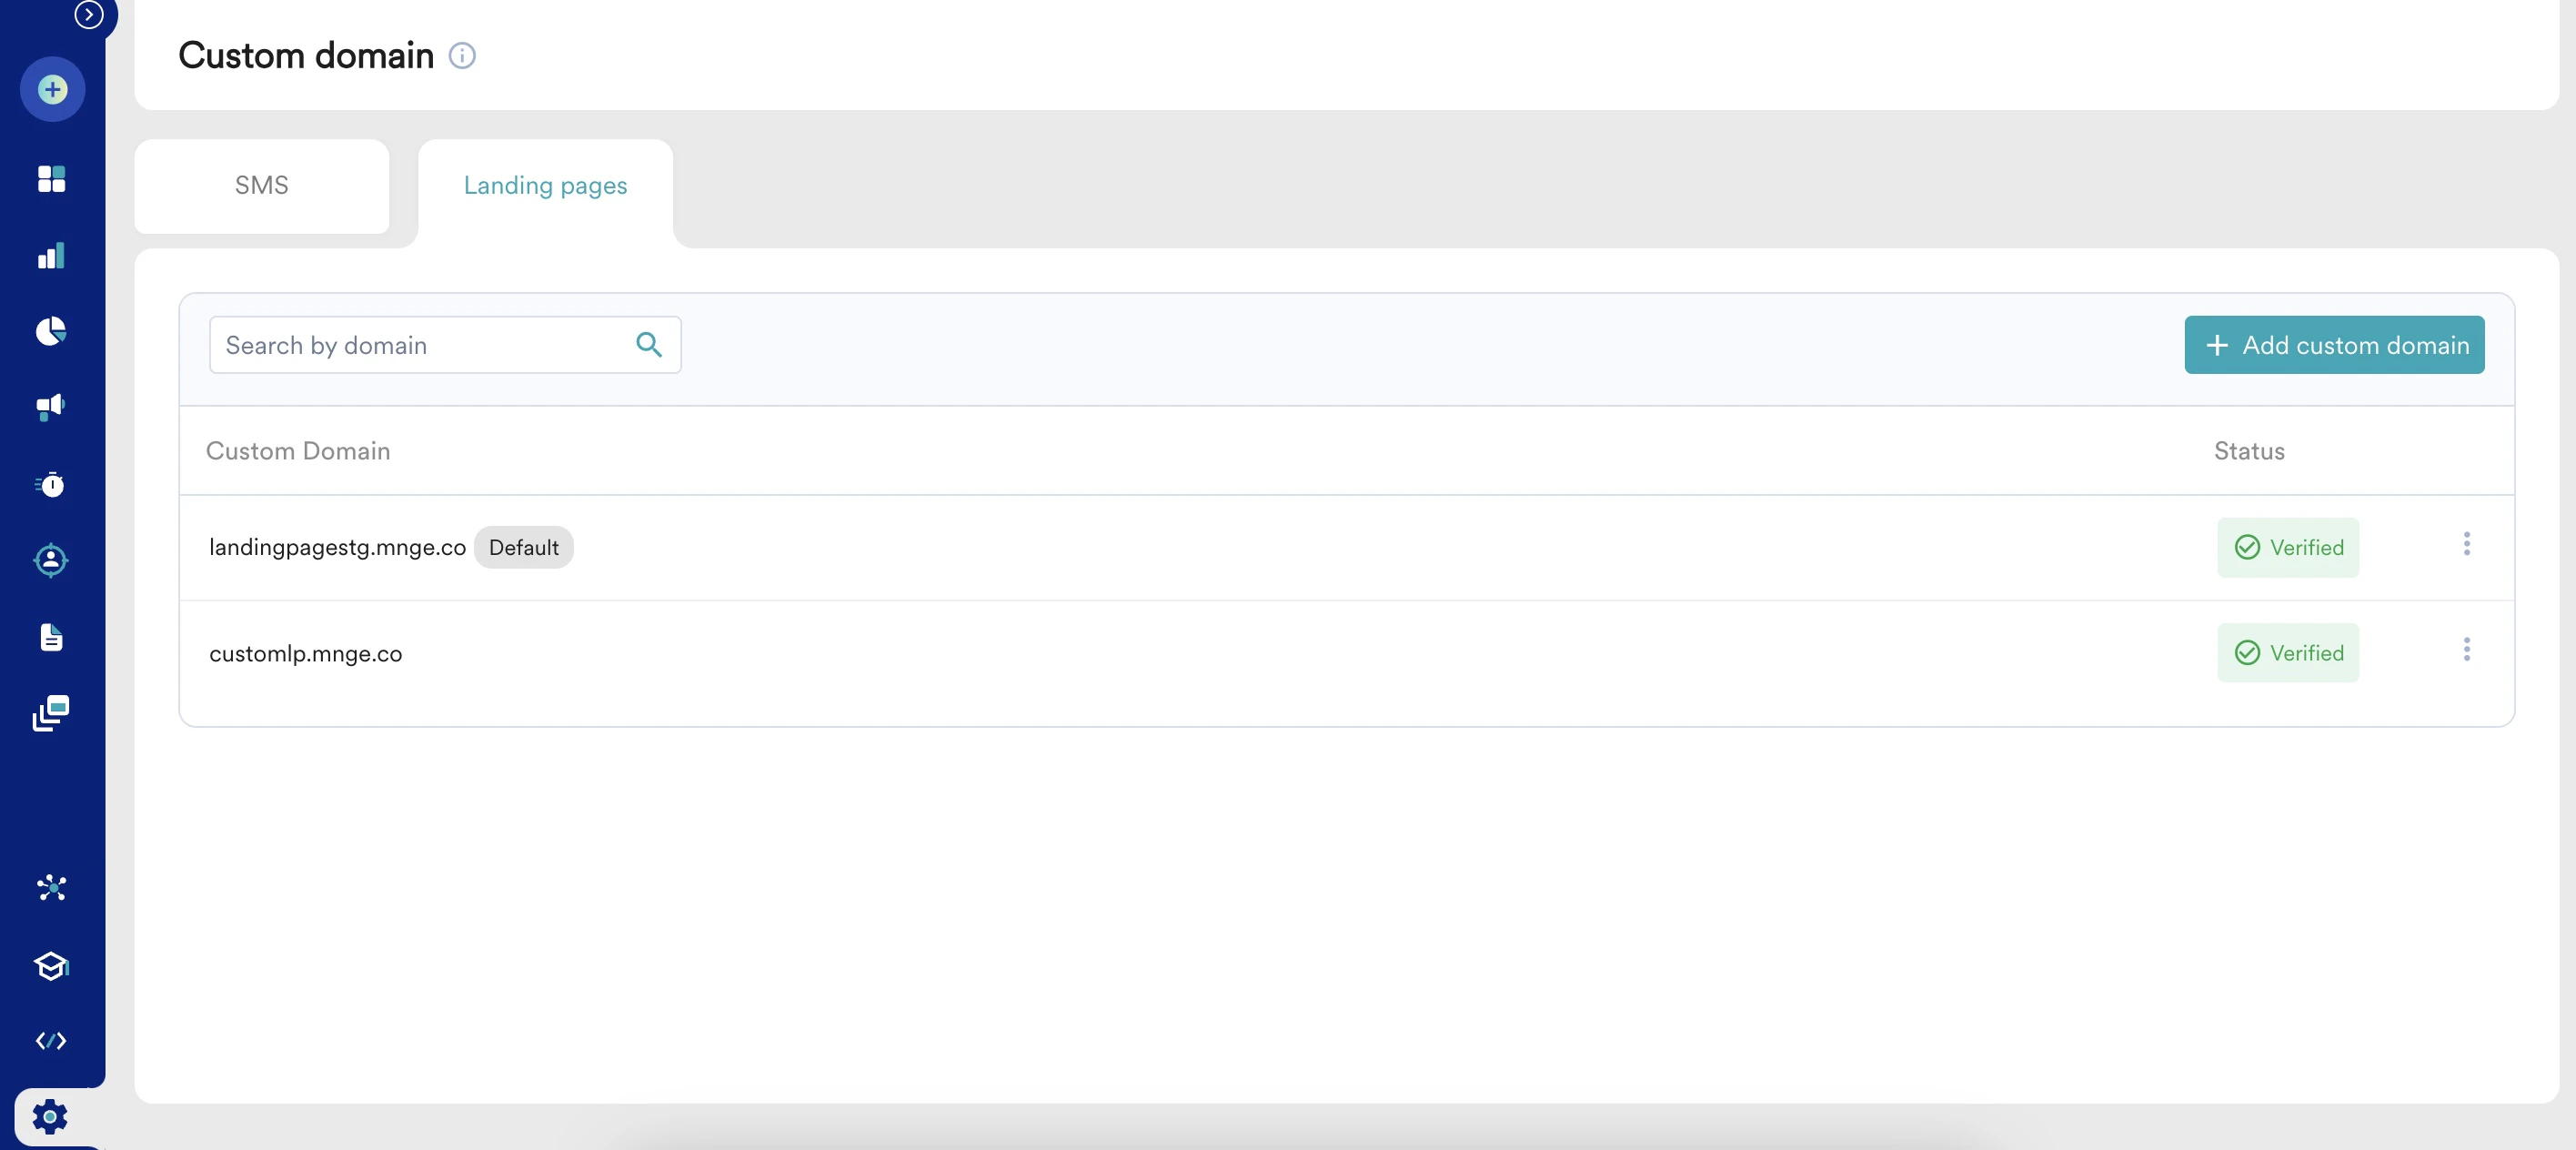 2. You can add multiple custom domains for landing pages. Perform the following steps to configure a custom domain for landing pages:
1. Click **+ Add custom domain**. The Add custom domain dialog box appears.
2. Follow the prerequisites to ensure that your custom domain is verified.
2. You can add multiple custom domains for landing pages. Perform the following steps to configure a custom domain for landing pages:
1. Click **+ Add custom domain**. The Add custom domain dialog box appears.
2. Follow the prerequisites to ensure that your custom domain is verified.
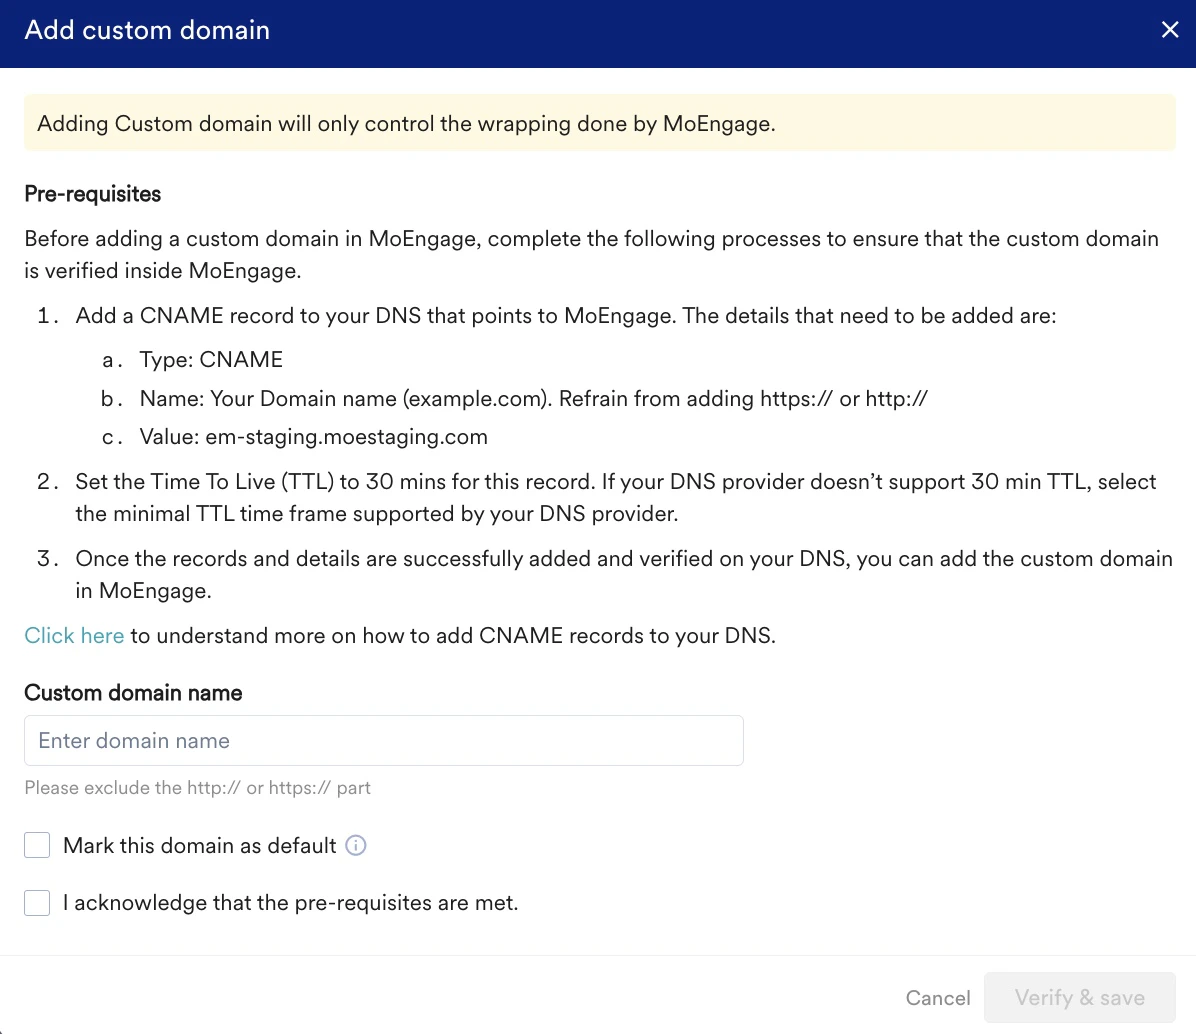 3. In the **Custom domain name** box, type the custom domain name.
4. Select the **Mark this domain as default** check box if you want this domain as your default domain.
5. Select the **I acknowledge that the pre-requisites are met** check box to recognize that the prerequisites are fulfilled.
6. Click **Verify & save** to verify and save your custom domain. Your custom domain is listed under the Custom domain page with a Verified tag against that custom domain.
3. Click the ellipsis icon ( ) next to any of your custom domains to mark it as default or delete it.
When you delete a custom domain, any active page that uses the deleted custom domain falls back to the new default custom domain.
### Landing Page Path
You can customize the URL section beyond the subdomain for a landing page. You can modify it to correspond to a landing page or specific content of the respective page. Ensure the path is unique.
For more information on configuring and troubleshooting custom domains, refer to [Configure Custom Domain](/user-guide/settings/advanced-settings/configure-custom-domain-link-branding).
## Specify Meta Tags
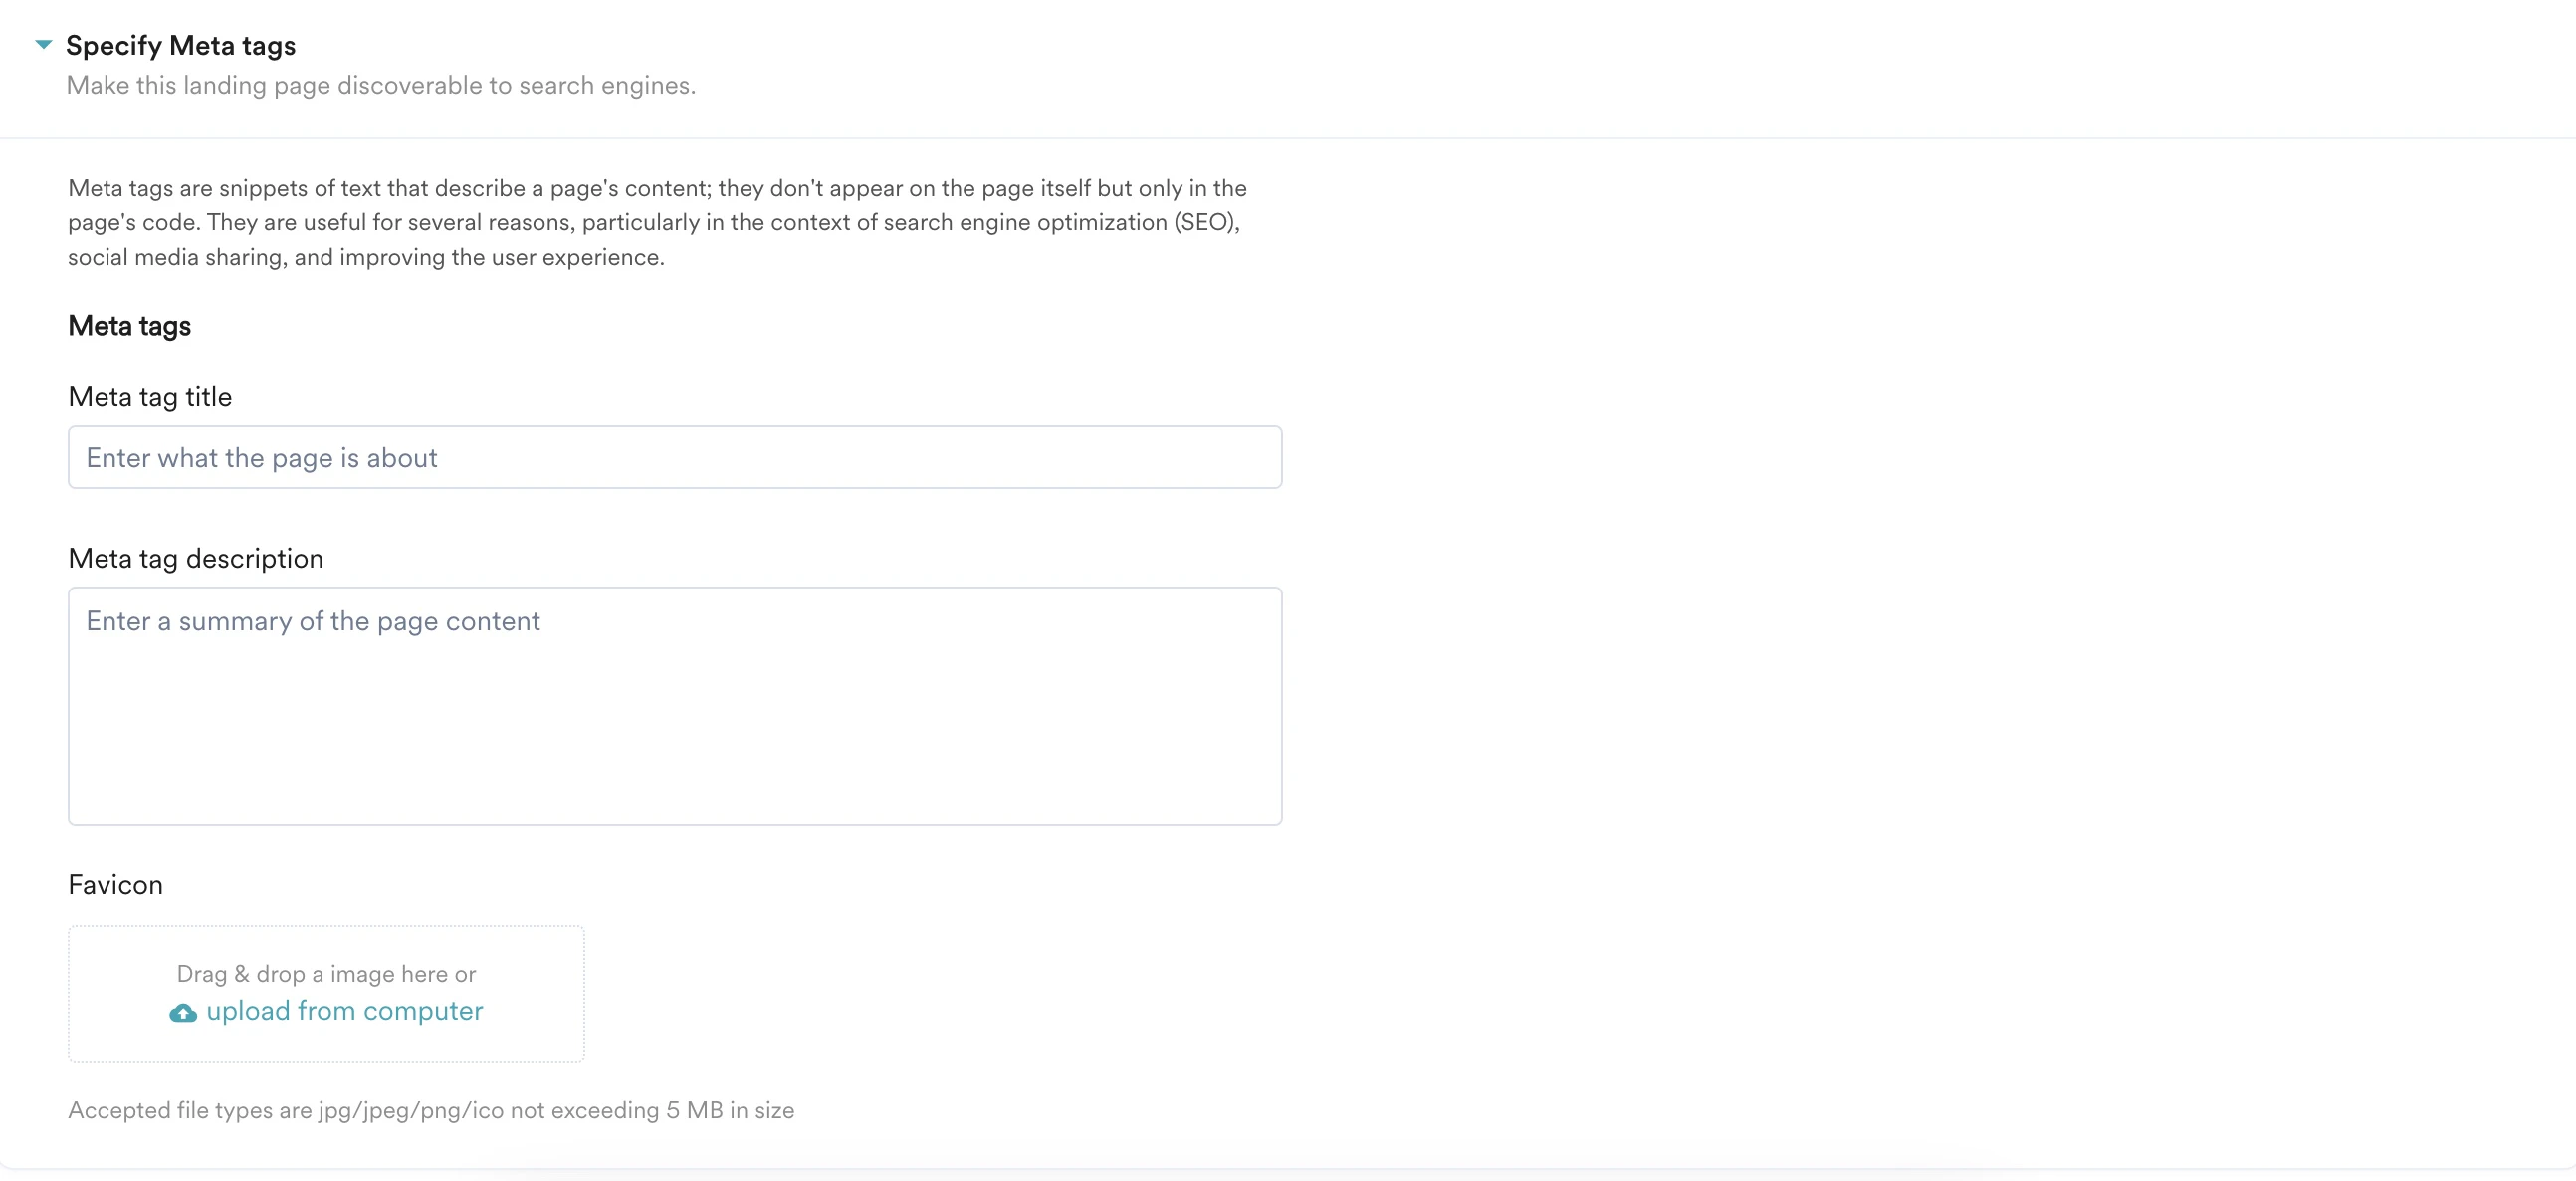
Meta tags are bits of text that provide an overview of a webpage's content. They have numerous uses, especially for search engine optimization (SEO), which optimizes social media sharing and improves the user experience.
Enter the following details in this section:
1. **Meta tag title**: Type the meta tag title. This title acts as the headline for your landing page and appears whenever the link is shared on any platform.
2. **Meta tag description**: Type a brief summary of your landing page, offering a concise outline of its content.
3. **Favicon**: Upload a favicon for your landing page. A favicon is a small icon associated with your landing page that is displayed inside browser tabs. To add a favicon, drag and drop or browse the image from your computer to upload it.
The accepted file formats are JPG, JPEG, PNG, and ICO, with a maximum size limit of 5 MB.
3. In the **Custom domain name** box, type the custom domain name.
4. Select the **Mark this domain as default** check box if you want this domain as your default domain.
5. Select the **I acknowledge that the pre-requisites are met** check box to recognize that the prerequisites are fulfilled.
6. Click **Verify & save** to verify and save your custom domain. Your custom domain is listed under the Custom domain page with a Verified tag against that custom domain.
3. Click the ellipsis icon ( ) next to any of your custom domains to mark it as default or delete it.
When you delete a custom domain, any active page that uses the deleted custom domain falls back to the new default custom domain.
### Landing Page Path
You can customize the URL section beyond the subdomain for a landing page. You can modify it to correspond to a landing page or specific content of the respective page. Ensure the path is unique.
For more information on configuring and troubleshooting custom domains, refer to [Configure Custom Domain](/user-guide/settings/advanced-settings/configure-custom-domain-link-branding).
## Specify Meta Tags
Meta tags are bits of text that provide an overview of a webpage's content. They have numerous uses, especially for search engine optimization (SEO), which optimizes social media sharing and improves the user experience.
Enter the following details in this section:
1. **Meta tag title**: Type the meta tag title. This title acts as the headline for your landing page and appears whenever the link is shared on any platform.
2. **Meta tag description**: Type a brief summary of your landing page, offering a concise outline of its content.
3. **Favicon**: Upload a favicon for your landing page. A favicon is a small icon associated with your landing page that is displayed inside browser tabs. To add a favicon, drag and drop or browse the image from your computer to upload it.
The accepted file formats are JPG, JPEG, PNG, and ICO, with a maximum size limit of 5 MB.
 ## Add Scripts
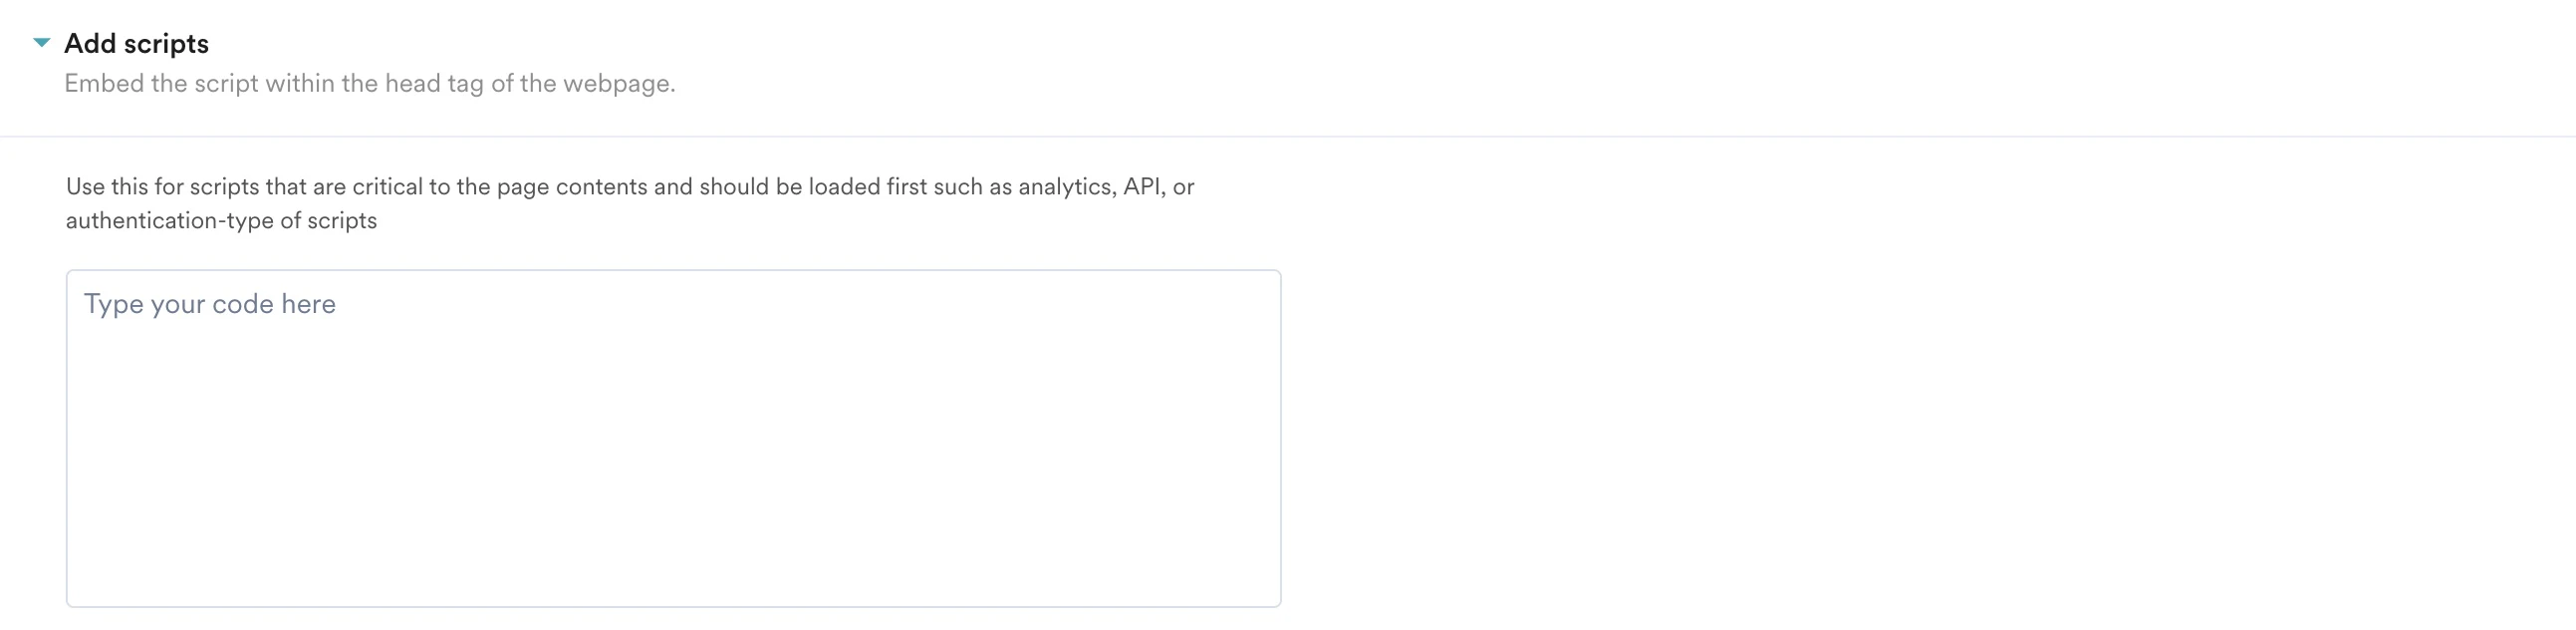
In this section, you can embed scripts that are essential to your landing page's content. These scripts will be part of your page's head tag. For instance, you can embed Google Analytics to measure your landing page's performance.
## Add Scripts
In this section, you can embed scripts that are essential to your landing page's content. These scripts will be part of your page's head tag. For instance, you can embed Google Analytics to measure your landing page's performance.
 Your landing page is now ready to be published. Click **Publish** and confirm in the dialog box to publish the landing page.
You can also save the landing page as a draft and edit it later. To do so, click the **Save** icon in the upper-right corner of the page.
# Access the Landing Page
To access and view the created landing page:
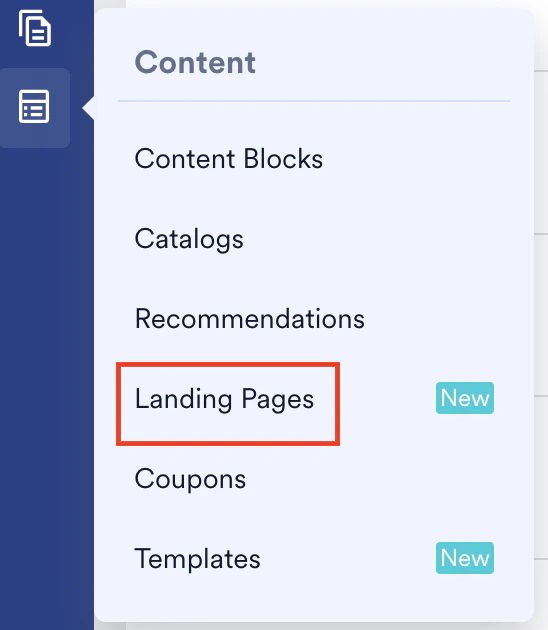
1. On the sidebar menu in MoEngage, hover over the **Content** menu item
Your landing page is now ready to be published. Click **Publish** and confirm in the dialog box to publish the landing page.
You can also save the landing page as a draft and edit it later. To do so, click the **Save** icon in the upper-right corner of the page.
# Access the Landing Page
To access and view the created landing page:
1. On the sidebar menu in MoEngage, hover over the **Content** menu item  . The **Content** menu appears.
2. Click **Landing Pages**.
. The **Content** menu appears.
2. Click **Landing Pages**.
 The Landing pages page appears.
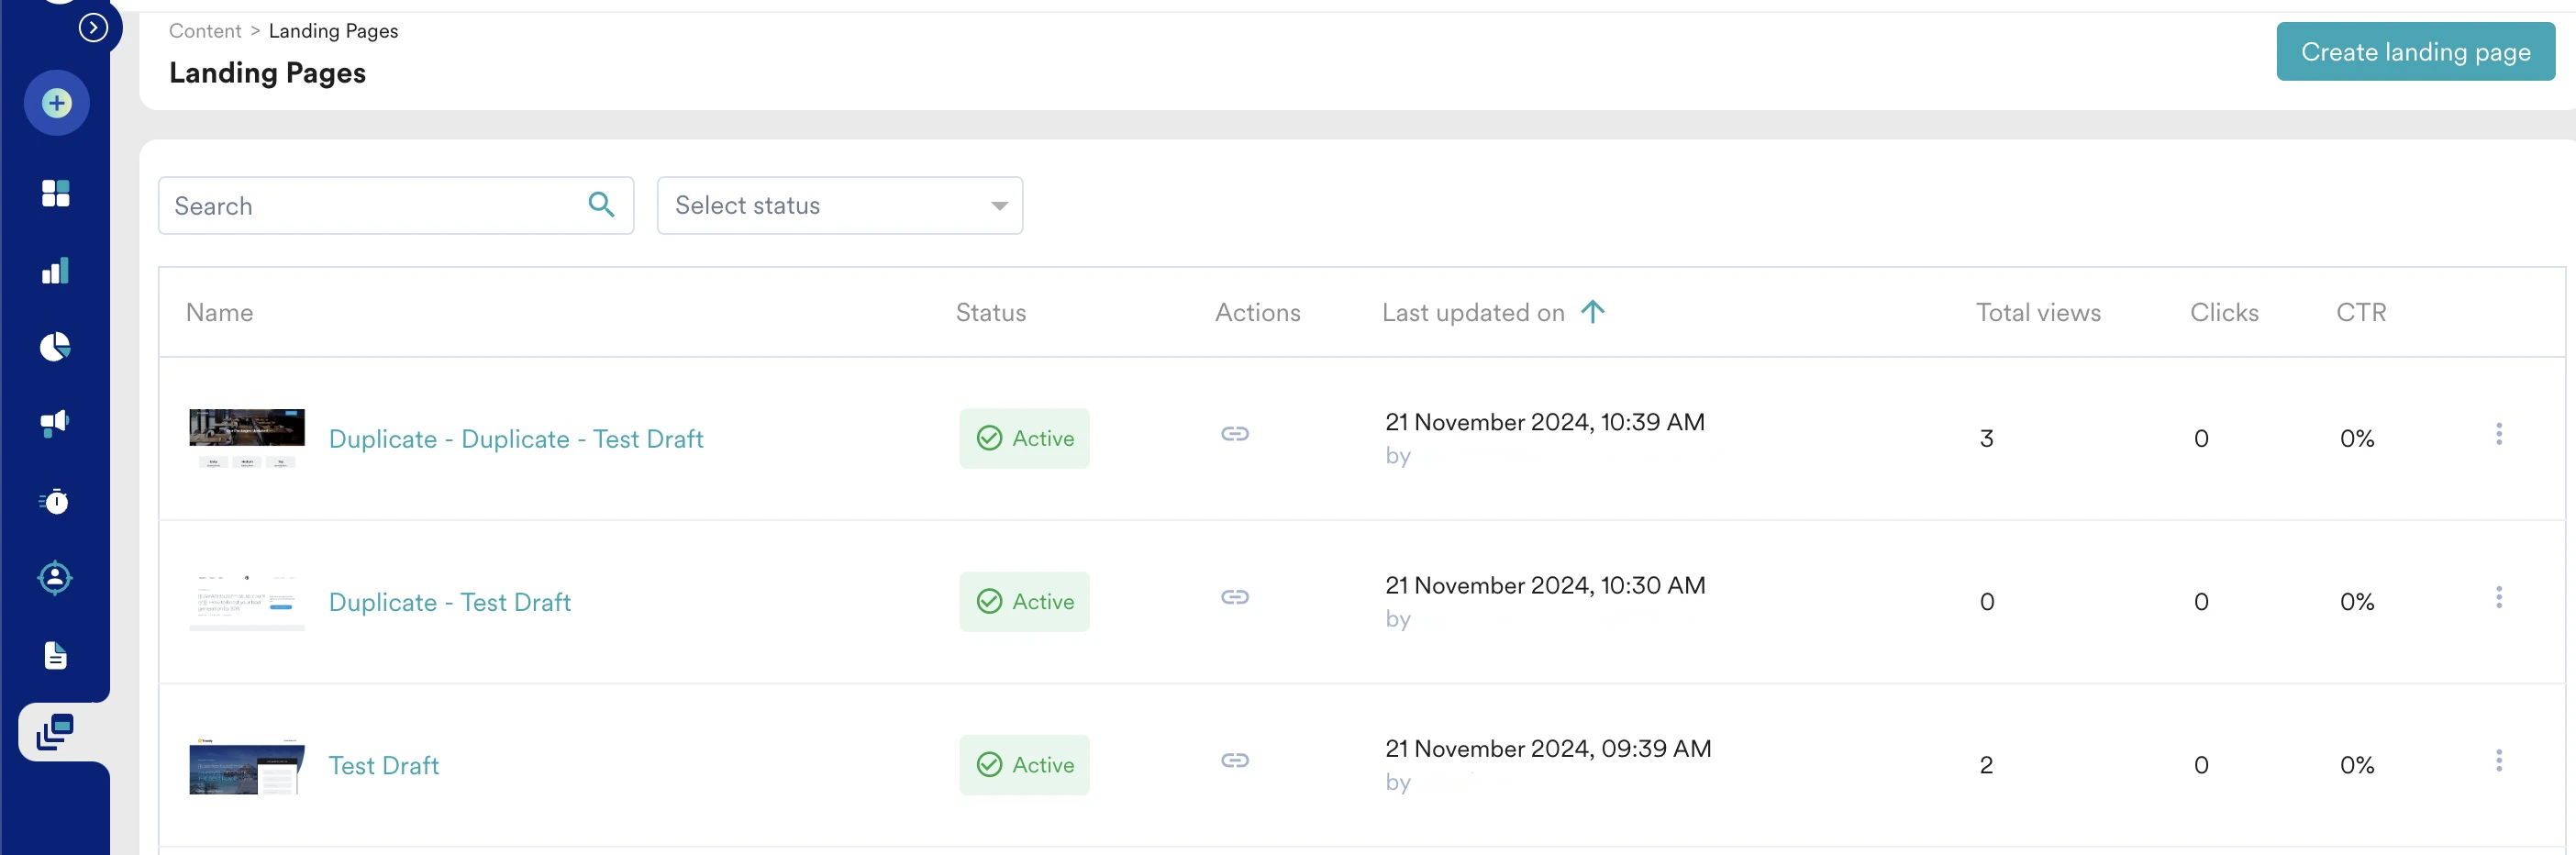 3. On this page, you can perform the following tasks:
* Check the status of your landing page.
* Copy the URL of the page.
* View details such as the page's last updated date.
* Check total views.
* Check the number of clicks.
* Check the click-through rate (CTR).
4. You can also **Edit**, **Duplicate**, or **Archive** the page. You can find these options by clicking the ellipses
3. On this page, you can perform the following tasks:
* Check the status of your landing page.
* Copy the URL of the page.
* View details such as the page's last updated date.
* Check total views.
* Check the number of clicks.
* Check the click-through rate (CTR).
4. You can also **Edit**, **Duplicate**, or **Archive** the page. You can find these options by clicking the ellipses  in the last column of any created landing page. Note that opening an archived page displays a 404 message.
 # Edit the Landing Page
After creating a landing page, you can edit the following:
* Name
* Tags
* Template
* Meta tags
* Scripts
After creating a landing page, you cannot edit the domain name and landing page path.
# Next Steps
* [Landing Page Templates](/user-guide/content/landing-pages/create/landing-page-templates)
* [Landing Page Editor](/user-guide/content/landing-pages/create/landing-page-editor)
# Edit the Landing Page
After creating a landing page, you can edit the following:
* Name
* Tags
* Template
* Meta tags
* Scripts
After creating a landing page, you cannot edit the domain name and landing page path.
# Next Steps
* [Landing Page Templates](/user-guide/content/landing-pages/create/landing-page-templates)
* [Landing Page Editor](/user-guide/content/landing-pages/create/landing-page-editor)