> ## Documentation Index
> Fetch the complete documentation index at: https://moengage.com/docs/llms.txt
> Use this file to discover all available pages before exploring further.
# Using Recommendations in Cards
> Add personalized product recommendations to MoEngage card campaigns using Jinja to show each user a relevant product from your catalog.
By adding recommendations to your card campaigns, you can show each user a product that matches their interests instead of the same message to everyone. In the Cards channel, recommendations are inserted into the card using the [Jinja templating language](/docs/user-guide/campaigns-and-channels/getting-started/message-personalization/jinja-templating-language).
The Cards channel does not use product grids. You add a product set through the personalization menu, in the same way you add any other personalization to the card.
At MoEngage, creating a card campaign is a three-step process.
1. Target users
2. Content
3. Schedule and Goals
You can personalize the campaign with recommendations in the second step 'Content'. Let us create a recommendation personalized card campaign.
Ensure that you have created the desired recommendations. You can use only active recommendations for campaign personalization. Learn how to [create and manage recommendations](/docs/user-guide/content/recommendations).
# Create Card Campaigns with Recommendations
To create a card campaign with recommendations, perform the following steps:
1. On the sidebar menu in MoEngage, hover over the Engage menu item  . The **Engage** menu appears.
2. Click **+ New Campaign**.
3. On the **New Campaign** dialog box, under **INBOUND**, click **Cards**.
4. Click **Periodic** campaign. You can follow the same steps for any other card campaign type. For more information about delivery types, refer to [Delivery Types](/docs/user-guide/campaigns-and-channels/getting-started/introduction/delivery-types-moengage-channels).
5. Enter the basic campaign details, define the audience in step 1 'Target users', and click **Next**.
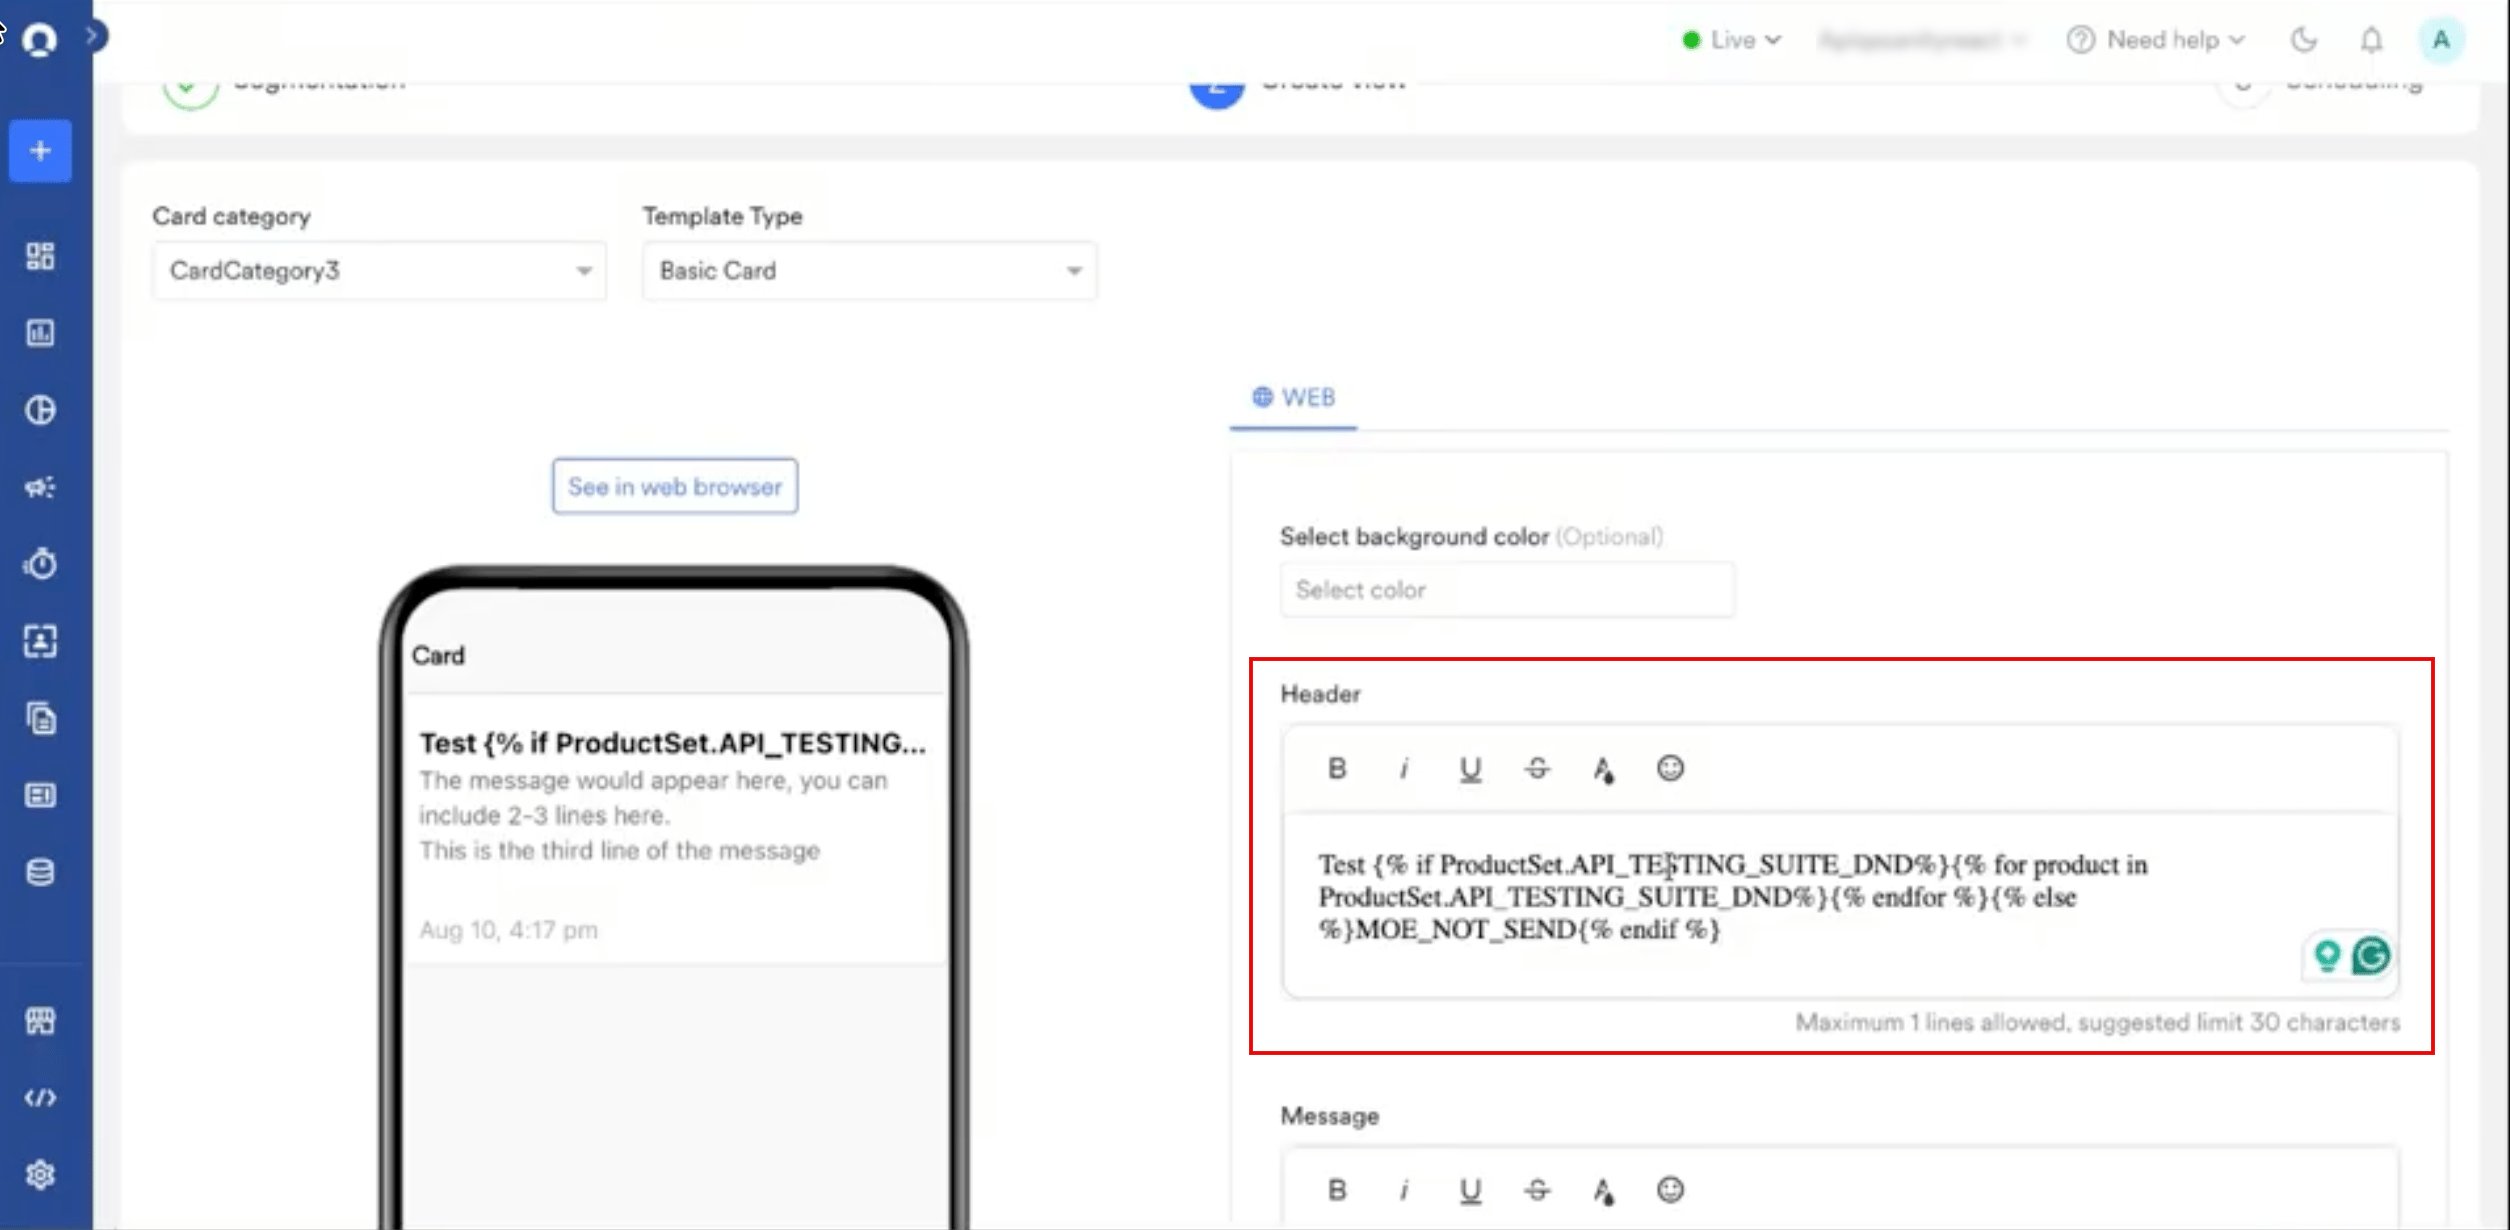
6. In step 2, on the **Content** tab, select the **Card category** and the **Template Type**, such as **Basic Card**.
7. In the **Header** or **Message** field, type **@** where the recommendation should appear. The **Cards Personalization** window opens.
. The **Engage** menu appears.
2. Click **+ New Campaign**.
3. On the **New Campaign** dialog box, under **INBOUND**, click **Cards**.
4. Click **Periodic** campaign. You can follow the same steps for any other card campaign type. For more information about delivery types, refer to [Delivery Types](/docs/user-guide/campaigns-and-channels/getting-started/introduction/delivery-types-moengage-channels).
5. Enter the basic campaign details, define the audience in step 1 'Target users', and click **Next**.
6. In step 2, on the **Content** tab, select the **Card category** and the **Template Type**, such as **Basic Card**.
7. In the **Header** or **Message** field, type **@** where the recommendation should appear. The **Cards Personalization** window opens.
 8. On the **Data personalization** tab, search for your recommendation and click it under **Product sets**.
9. Under **Choose Fallback**, select what happens when personalization fails for a user:
| Option | Behavior |
| - | - |
| **No fallback** | Sends the card without the recommendation. |
| **Do not send Card** | Suppresses the card for that user. |
| **Replace text** | Sends the card with the replacement text you enter. |
8. On the **Data personalization** tab, search for your recommendation and click it under **Product sets**.
9. Under **Choose Fallback**, select what happens when personalization fails for a user:
| Option | Behavior |
| - | - |
| **No fallback** | Sends the card without the recommendation. |
| **Do not send Card** | Suppresses the card for that user. |
| **Replace text** | Sends the card with the replacement text you enter. |
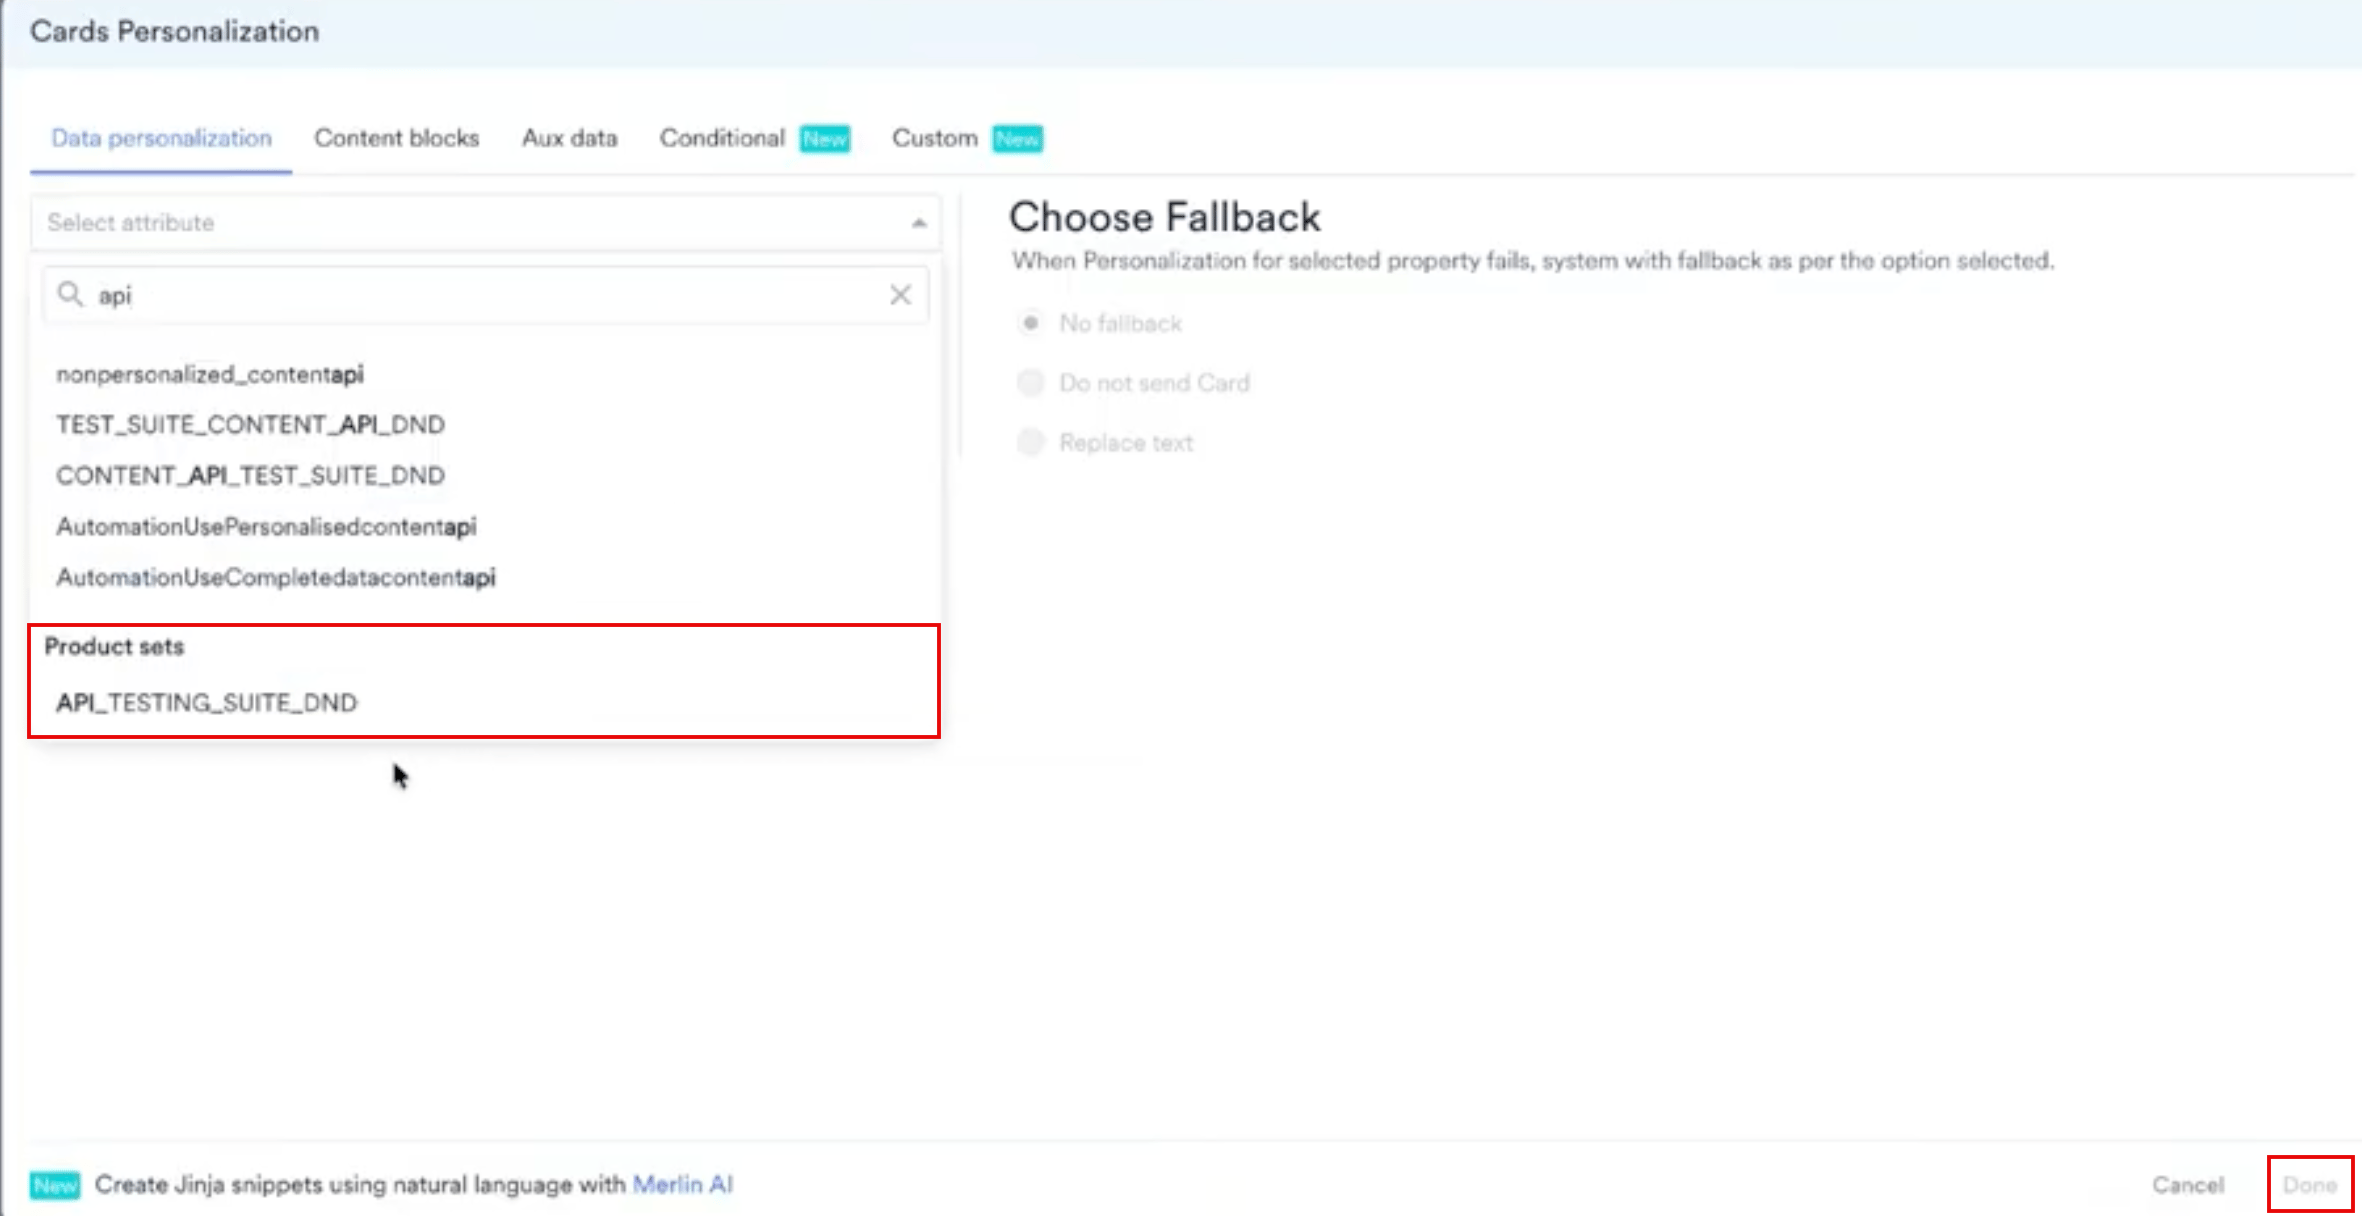 10. Click **Done**.
11. Modify the inserted Jinja code to fetch a single item, as described in the following section.
12. Click **Next** at the bottom to move to 'Schedule and Goals', which is step 3 of campaign setup.
13. Set up the appropriate settings in **Schedule and Goals** and publish the campaign.
**Header** and **Message** are both mandatory, and both accept personalization. The header appears in bold and the message in lighter text, and the card preview on the left updates as you type.
The header allows a maximum of one line, with a suggested limit of 30 characters. A recommendation that resolves to a long product title can overflow it, so fetch a single item and keep the surrounding text short.
The Cards channel does not have a personalized preview. Use **Test campaign** to check how the card renders, and to confirm that the recommendation resolves to a real product rather than a placeholder, before you publish.
# Fetch a Single Recommended Item
Adding a product set on its own inserts every item in the set. To show one product instead, loop through the product set. The following example uses a product set named `ProductSet` with a recommendation named `Recommendations`.
To fetch the title of the first recommended item:
```text JINJA theme={null}
{% if ProductSet.Recommendations %}
{% for product in ProductSet.Recommendations[0:1] %}
{{product.title}}
{% endfor %}
{% else %}
MOE_NOT_SEND
{% endif %}
```
To add the product's image link in the same card:
```text JINJA theme={null}
{% if ProductSet.Recommendations %}
{% for product in ProductSet.Recommendations[0:1] %}
{{product.image_link}}
{% endfor %}
{% else %}
MOE_NOT_SEND
{% endif %}
```
`MOE_NOT_SEND` stops the card from going out when the product set is empty for a user, so no one receives a card with a missing product. To use a different fallback, replace `MOE_NOT_SEND` with the text you want to show, or leave it empty to show nothing.
A product set contains a list of items, each with attributes such as `title`, `description`, `id`, `link`, and `image link`. The attributes available to you come from the catalog that the recommendation uses, so open that catalog to see which ones exist. To fetch an attribute inside the loop, type **@** and select the property from the personalization window.
The Jinja code you build for a card campaign works unchanged in In-App and On-Site Messaging, because these channels read product sets the same way.
# Add UTM Parameters
Add UTM parameters so that traffic from the card is attributed to the campaign that drove it. A parameter value can be personalized in the same way as card content, so one campaign can report per variation or per segment.
Click **+ Create custom parameter** to add your own key-value pair. For the full list of parameters and how account-level defaults apply, refer to [Add UTM Parameters to Campaigns](/docs/user-guide/settings/advanced-settings/add-utm-parameters-to-campaigns).
UTM parameters apply to the links in your card. Turn on the general UTM parameters at **Settings** > **App** > **UTM tracking** before you use them in a campaign.
# Related Articles
* [Create a Card Campaign](/docs/user-guide/campaigns-and-channels/cards/create/create-a-card-campaign)
* [Personalize Content Using Recommendations](/docs/user-guide/campaigns-and-channels/getting-started/message-personalization/personalize-content-using-recommendations)
* [Using Recommendations in In-App](/docs/user-guide/content/recommendations/personalize-campaign-with-recommendations/using-recommendations-in-in-app)
* [Using Recommendations in On-Site Messaging](/docs/user-guide/content/recommendations/personalize-campaign-with-recommendations/using-recommendations-in-on-site-messaging)
This documentation is built and hosted on [Mintlify](https://mintlify.com), a developer documentation platform.
10. Click **Done**.
11. Modify the inserted Jinja code to fetch a single item, as described in the following section.
12. Click **Next** at the bottom to move to 'Schedule and Goals', which is step 3 of campaign setup.
13. Set up the appropriate settings in **Schedule and Goals** and publish the campaign.
**Header** and **Message** are both mandatory, and both accept personalization. The header appears in bold and the message in lighter text, and the card preview on the left updates as you type.
The header allows a maximum of one line, with a suggested limit of 30 characters. A recommendation that resolves to a long product title can overflow it, so fetch a single item and keep the surrounding text short.
The Cards channel does not have a personalized preview. Use **Test campaign** to check how the card renders, and to confirm that the recommendation resolves to a real product rather than a placeholder, before you publish.
# Fetch a Single Recommended Item
Adding a product set on its own inserts every item in the set. To show one product instead, loop through the product set. The following example uses a product set named `ProductSet` with a recommendation named `Recommendations`.
To fetch the title of the first recommended item:
```text JINJA theme={null}
{% if ProductSet.Recommendations %}
{% for product in ProductSet.Recommendations[0:1] %}
{{product.title}}
{% endfor %}
{% else %}
MOE_NOT_SEND
{% endif %}
```
To add the product's image link in the same card:
```text JINJA theme={null}
{% if ProductSet.Recommendations %}
{% for product in ProductSet.Recommendations[0:1] %}
{{product.image_link}}
{% endfor %}
{% else %}
MOE_NOT_SEND
{% endif %}
```
`MOE_NOT_SEND` stops the card from going out when the product set is empty for a user, so no one receives a card with a missing product. To use a different fallback, replace `MOE_NOT_SEND` with the text you want to show, or leave it empty to show nothing.
A product set contains a list of items, each with attributes such as `title`, `description`, `id`, `link`, and `image link`. The attributes available to you come from the catalog that the recommendation uses, so open that catalog to see which ones exist. To fetch an attribute inside the loop, type **@** and select the property from the personalization window.
The Jinja code you build for a card campaign works unchanged in In-App and On-Site Messaging, because these channels read product sets the same way.
# Add UTM Parameters
Add UTM parameters so that traffic from the card is attributed to the campaign that drove it. A parameter value can be personalized in the same way as card content, so one campaign can report per variation or per segment.
Click **+ Create custom parameter** to add your own key-value pair. For the full list of parameters and how account-level defaults apply, refer to [Add UTM Parameters to Campaigns](/docs/user-guide/settings/advanced-settings/add-utm-parameters-to-campaigns).
UTM parameters apply to the links in your card. Turn on the general UTM parameters at **Settings** > **App** > **UTM tracking** before you use them in a campaign.
# Related Articles
* [Create a Card Campaign](/docs/user-guide/campaigns-and-channels/cards/create/create-a-card-campaign)
* [Personalize Content Using Recommendations](/docs/user-guide/campaigns-and-channels/getting-started/message-personalization/personalize-content-using-recommendations)
* [Using Recommendations in In-App](/docs/user-guide/content/recommendations/personalize-campaign-with-recommendations/using-recommendations-in-in-app)
* [Using Recommendations in On-Site Messaging](/docs/user-guide/content/recommendations/personalize-campaign-with-recommendations/using-recommendations-in-on-site-messaging)
This documentation is built and hosted on [Mintlify](https://mintlify.com), a developer documentation platform.