> ## Documentation Index
> Fetch the complete documentation index at: https://moengage.com/docs/llms.txt
> Use this file to discover all available pages before exploring further.
# Using Recommendations in In-App
> Add personalized product recommendations to MoEngage in-app campaigns using Jinja to show each user a relevant product from your catalog.
By adding recommendations to your in-app campaigns, you can show each user a product that matches their interests instead of the same message to everyone. In the in-app channel, recommendations are inserted into the message using the [Jinja templating language](/docs/user-guide/campaigns-and-channels/getting-started/message-personalization/jinja-templating-language).
The in-app channel does not use product grids. You add a product set through the personalization menu, in the same way you add any other personalization to the message.
At MoEngage, creating an in-app campaign is a three-step process.
1. Target users
2. Content
3. Schedule and Goals
You can personalize the campaign with recommendations in the second step 'Content'. Let us create a recommendation personalized in-app campaign.
Ensure that you have created the desired recommendations. You can use only active recommendations for campaign personalization. Learn how to [create and manage recommendations](/docs/user-guide/content/recommendations).
# Create In-App Campaigns with Recommendations
To create an in-app campaign with recommendations, perform the following steps:
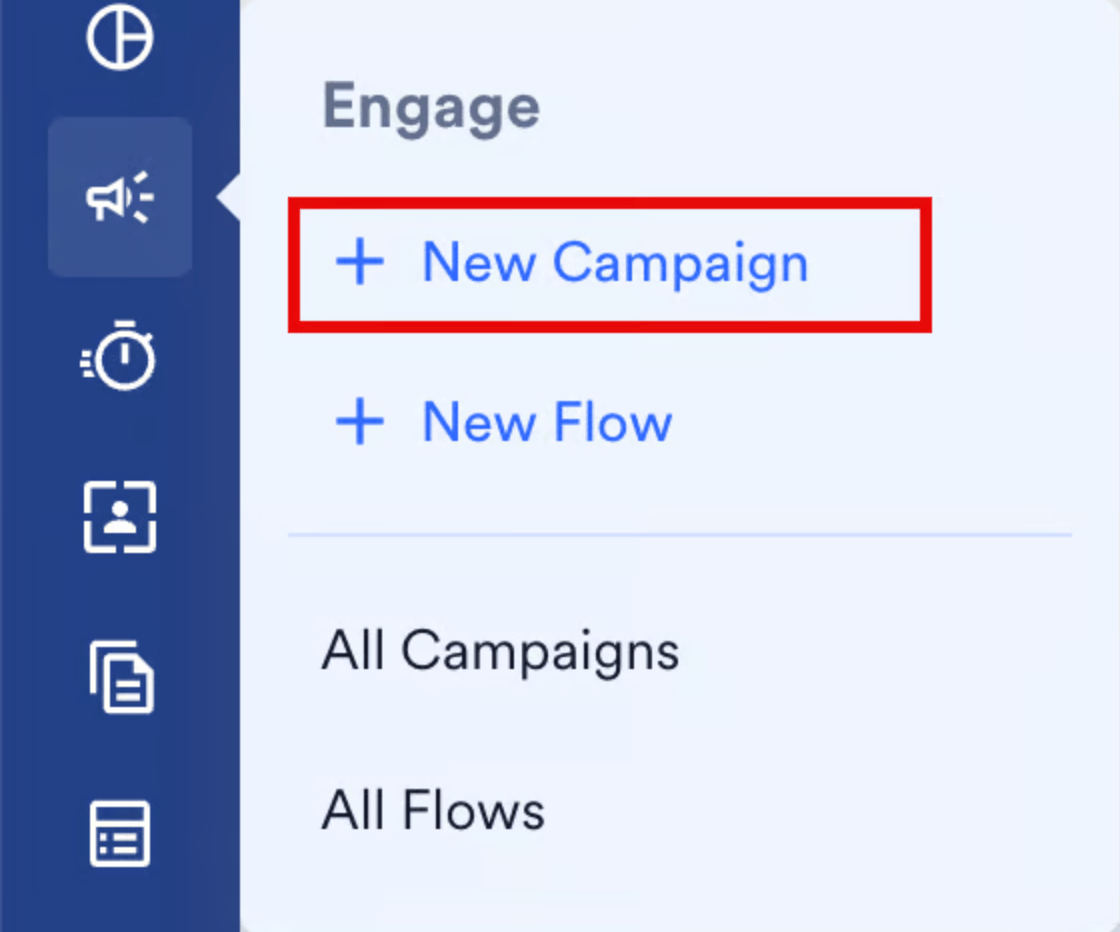
1. On the sidebar menu in MoEngage, hover over the Engage menu item  . The **Engage** menu appears.
2. Click **+ New Campaign**.
. The **Engage** menu appears.
2. Click **+ New Campaign**.
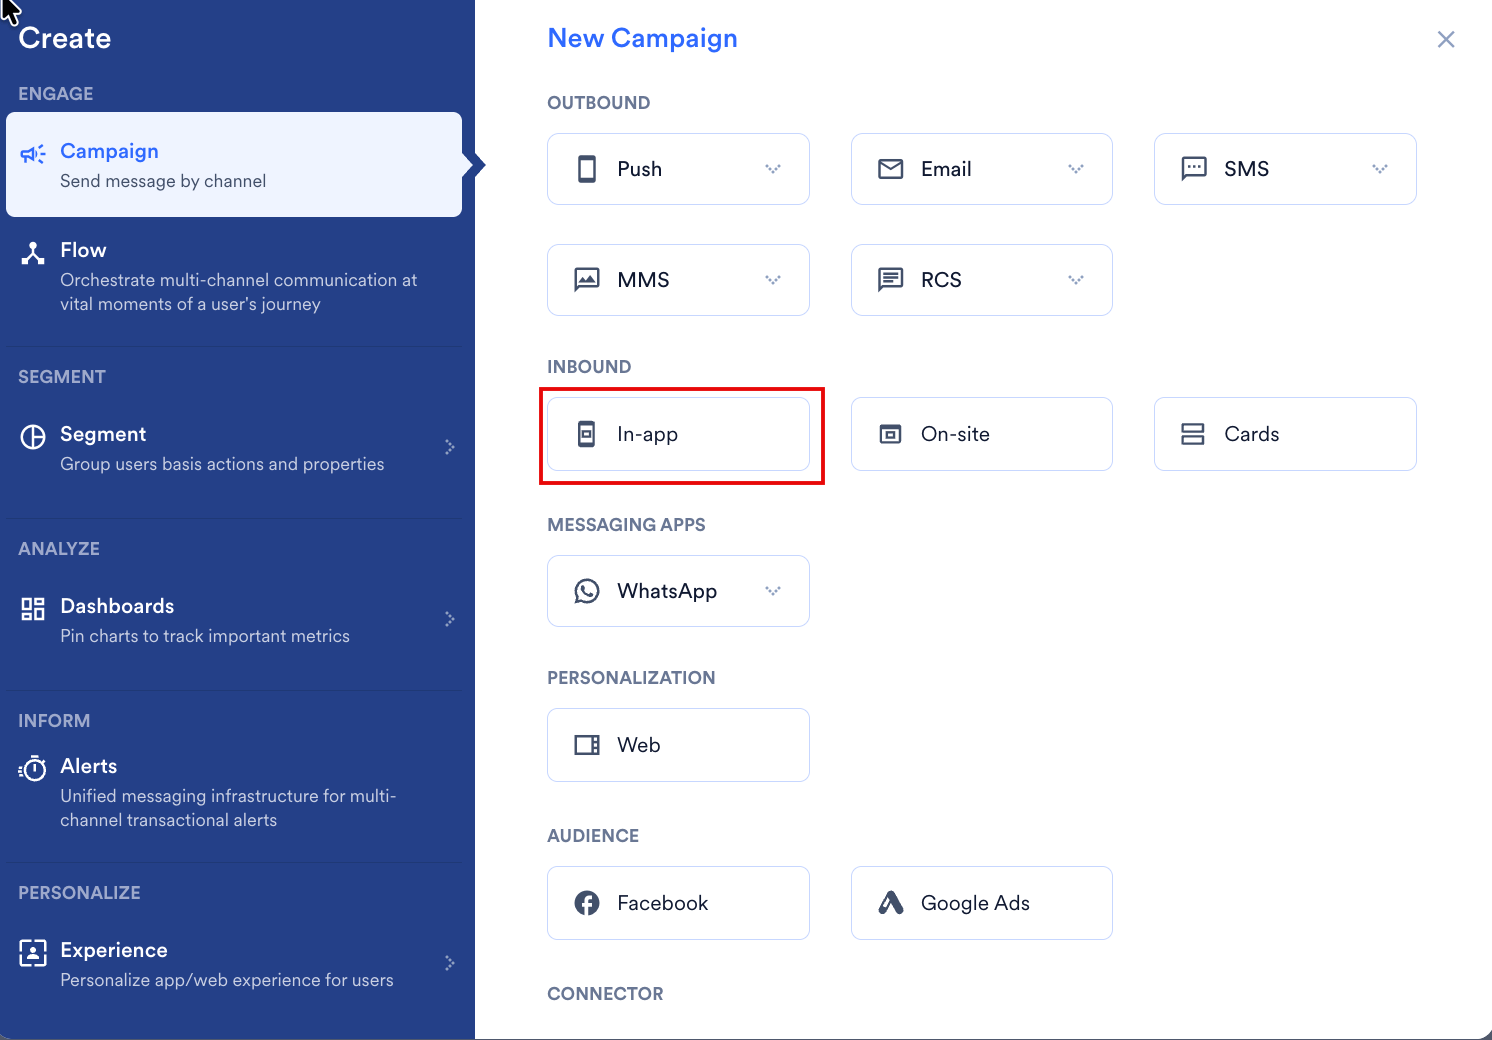
 3. On the **New Campaign** dialog box, under **INBOUND**, click **In-app**.
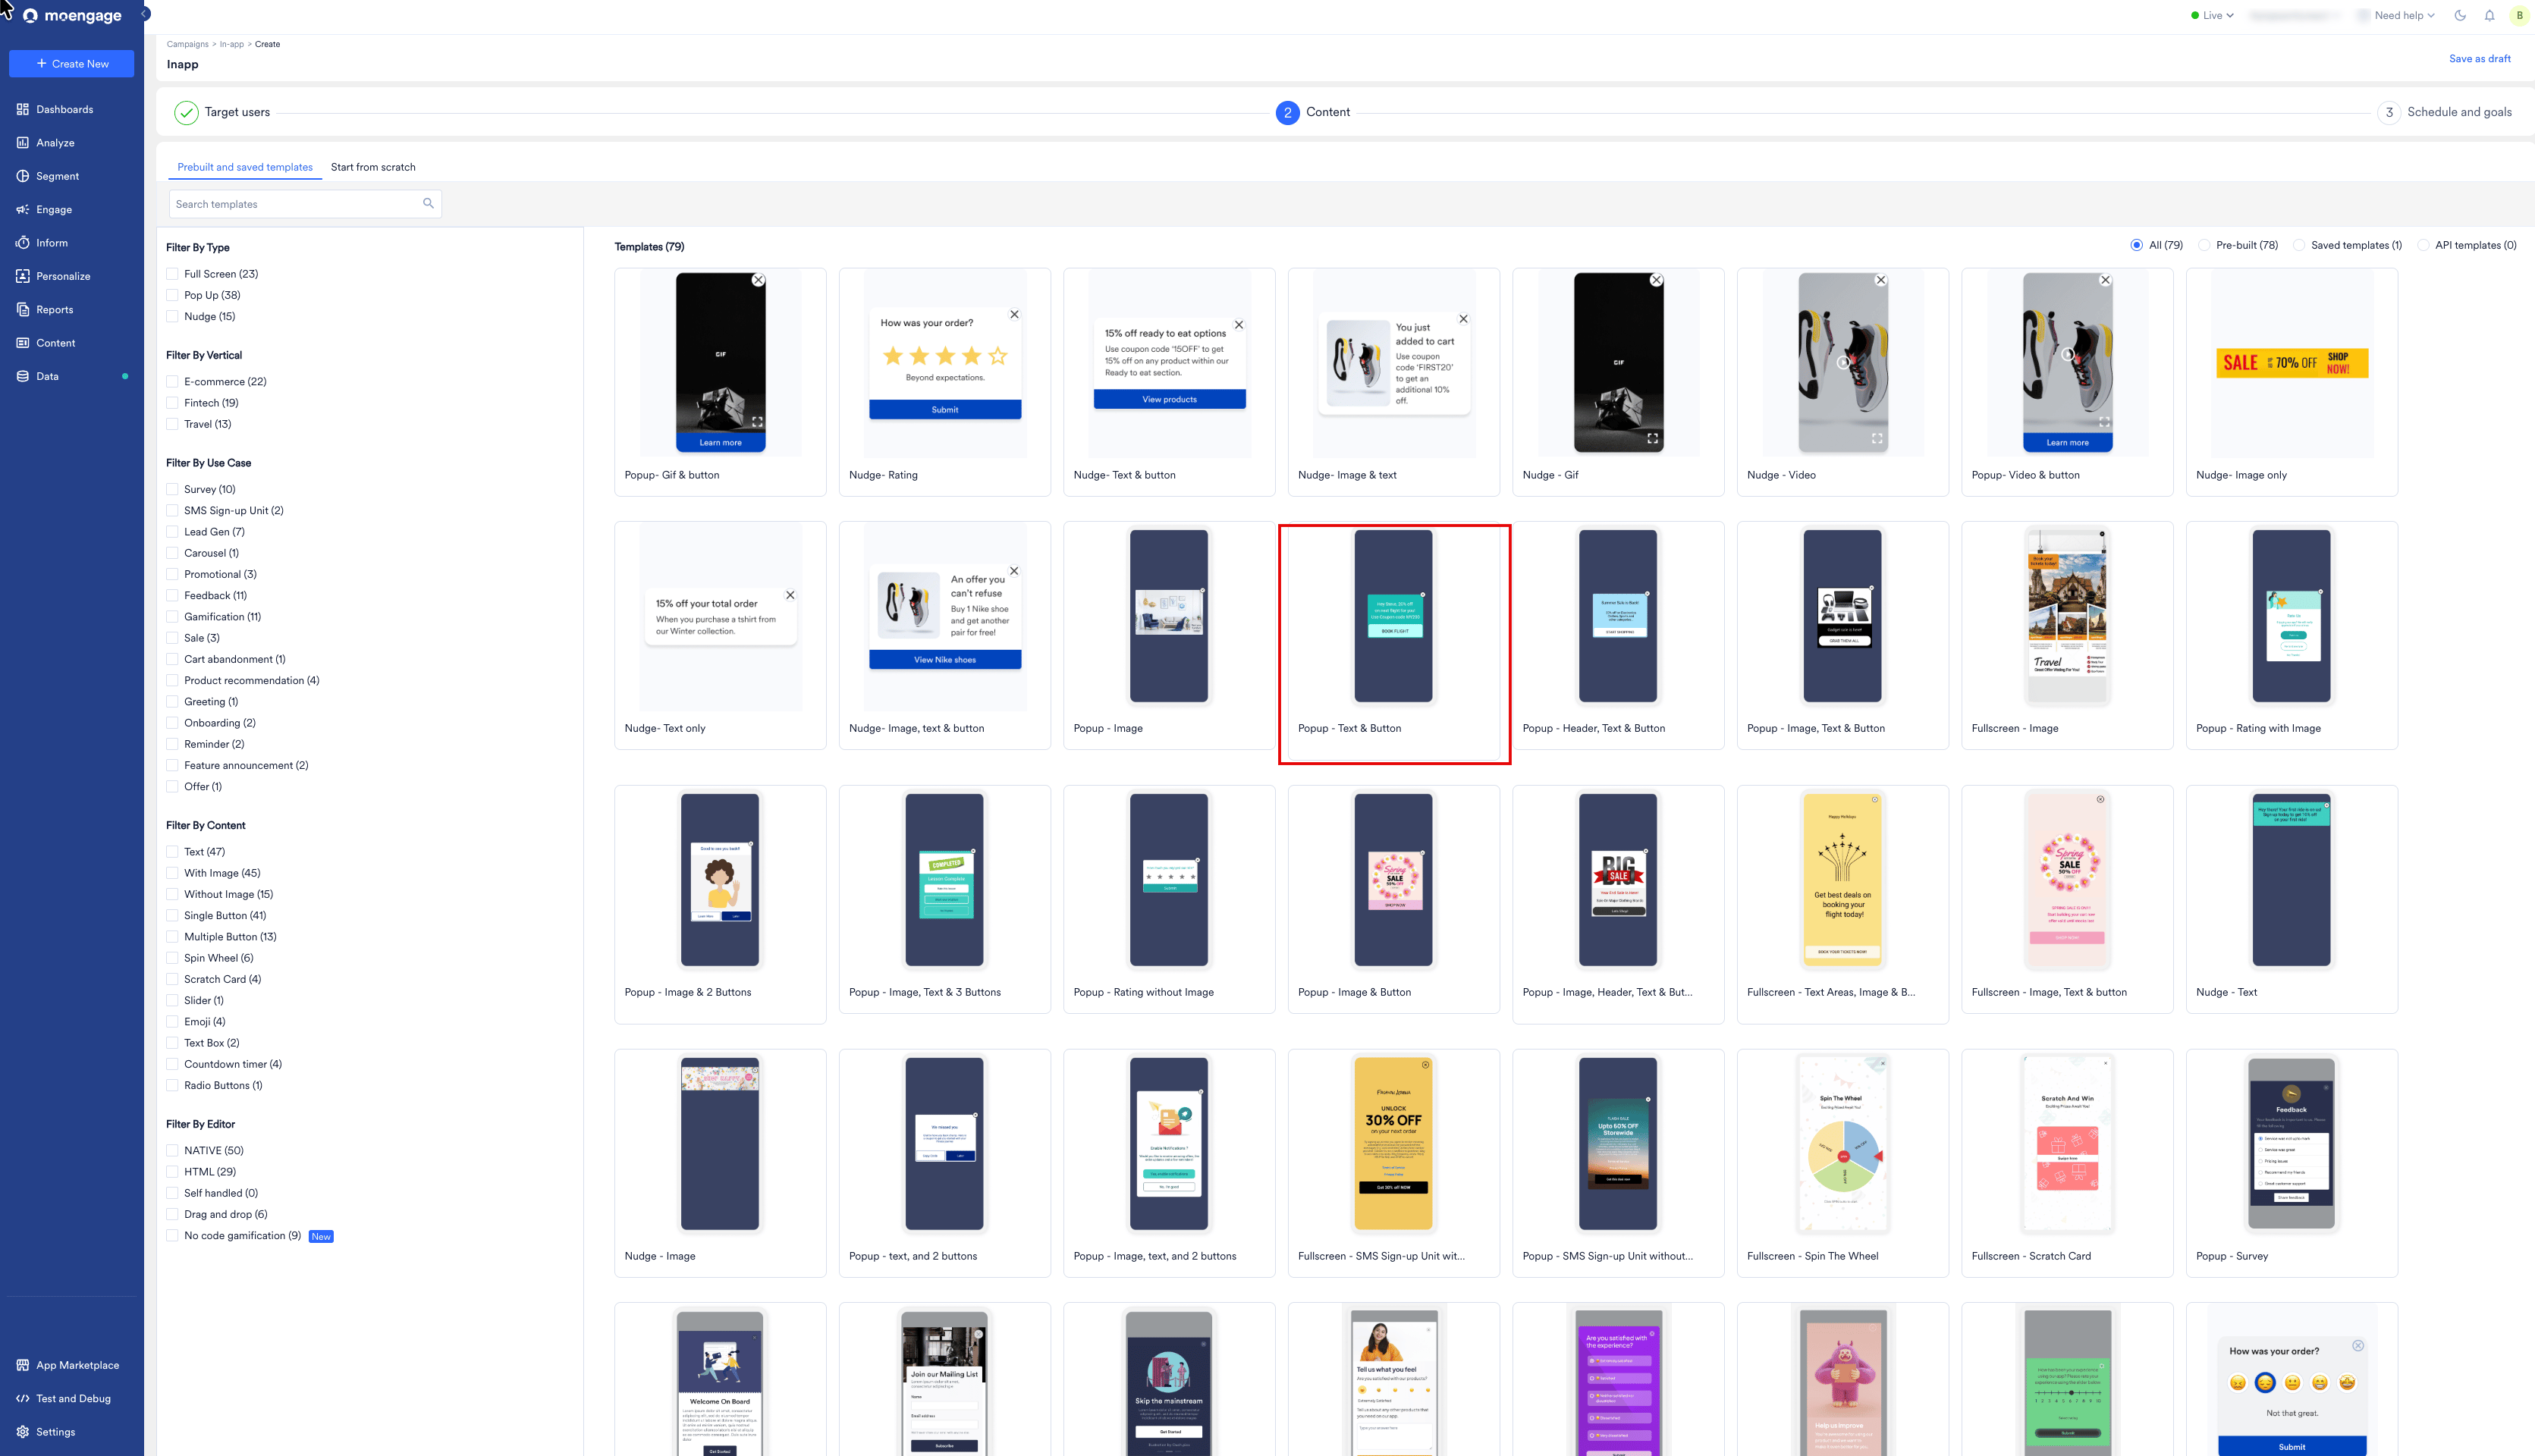
 4. Enter the basic campaign details, define the audience in step 1 'Target users', and click **Next**.
5. In step 2, on the **Content** tab, select a template under **Prebuilt and saved templates**, or click **Start from scratch**. To narrow the list, use the filters on the left, such as **Product recommendation** under **Filter By Use Case**.
4. Enter the basic campaign details, define the audience in step 1 'Target users', and click **Next**.
5. In step 2, on the **Content** tab, select a template under **Prebuilt and saved templates**, or click **Start from scratch**. To narrow the list, use the filters on the left, such as **Product recommendation** under **Filter By Use Case**.
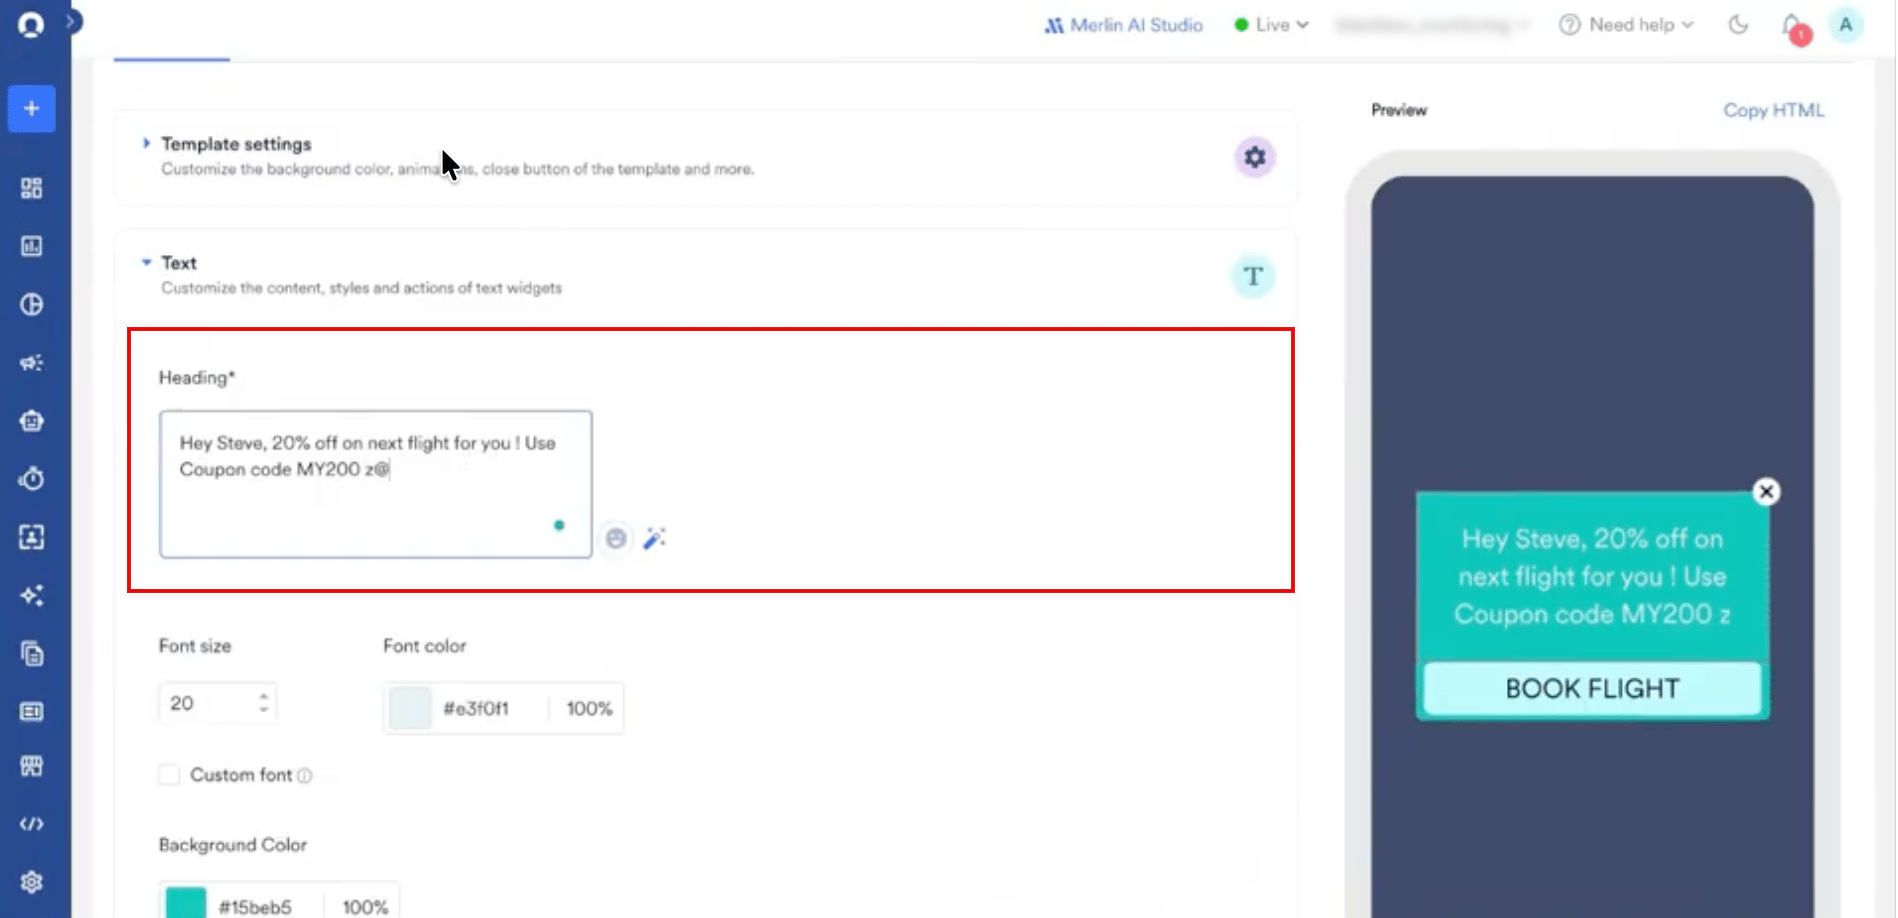
 6. In the **Text** section of the template editor, click the field you want to personalize, such as **Heading**, and type **@** where the recommendation should appear. The **In-App Personalization** window opens.
 7. On the **Data personalization** tab, search for your recommendation and click it under **Product sets**.
8. Under **Choose Fallback**, select what happens when personalization fails for a user:
| Option | Behavior |
| - | - |
| **No fallback** | Sends the in-app message without the recommendation. |
| **Do not send In-App** | Suppresses the message for that user. |
| **Replace text** | Sends the message with the replacement text you enter. |
7. On the **Data personalization** tab, search for your recommendation and click it under **Product sets**.
8. Under **Choose Fallback**, select what happens when personalization fails for a user:
| Option | Behavior |
| - | - |
| **No fallback** | Sends the in-app message without the recommendation. |
| **Do not send In-App** | Suppresses the message for that user. |
| **Replace text** | Sends the message with the replacement text you enter. |
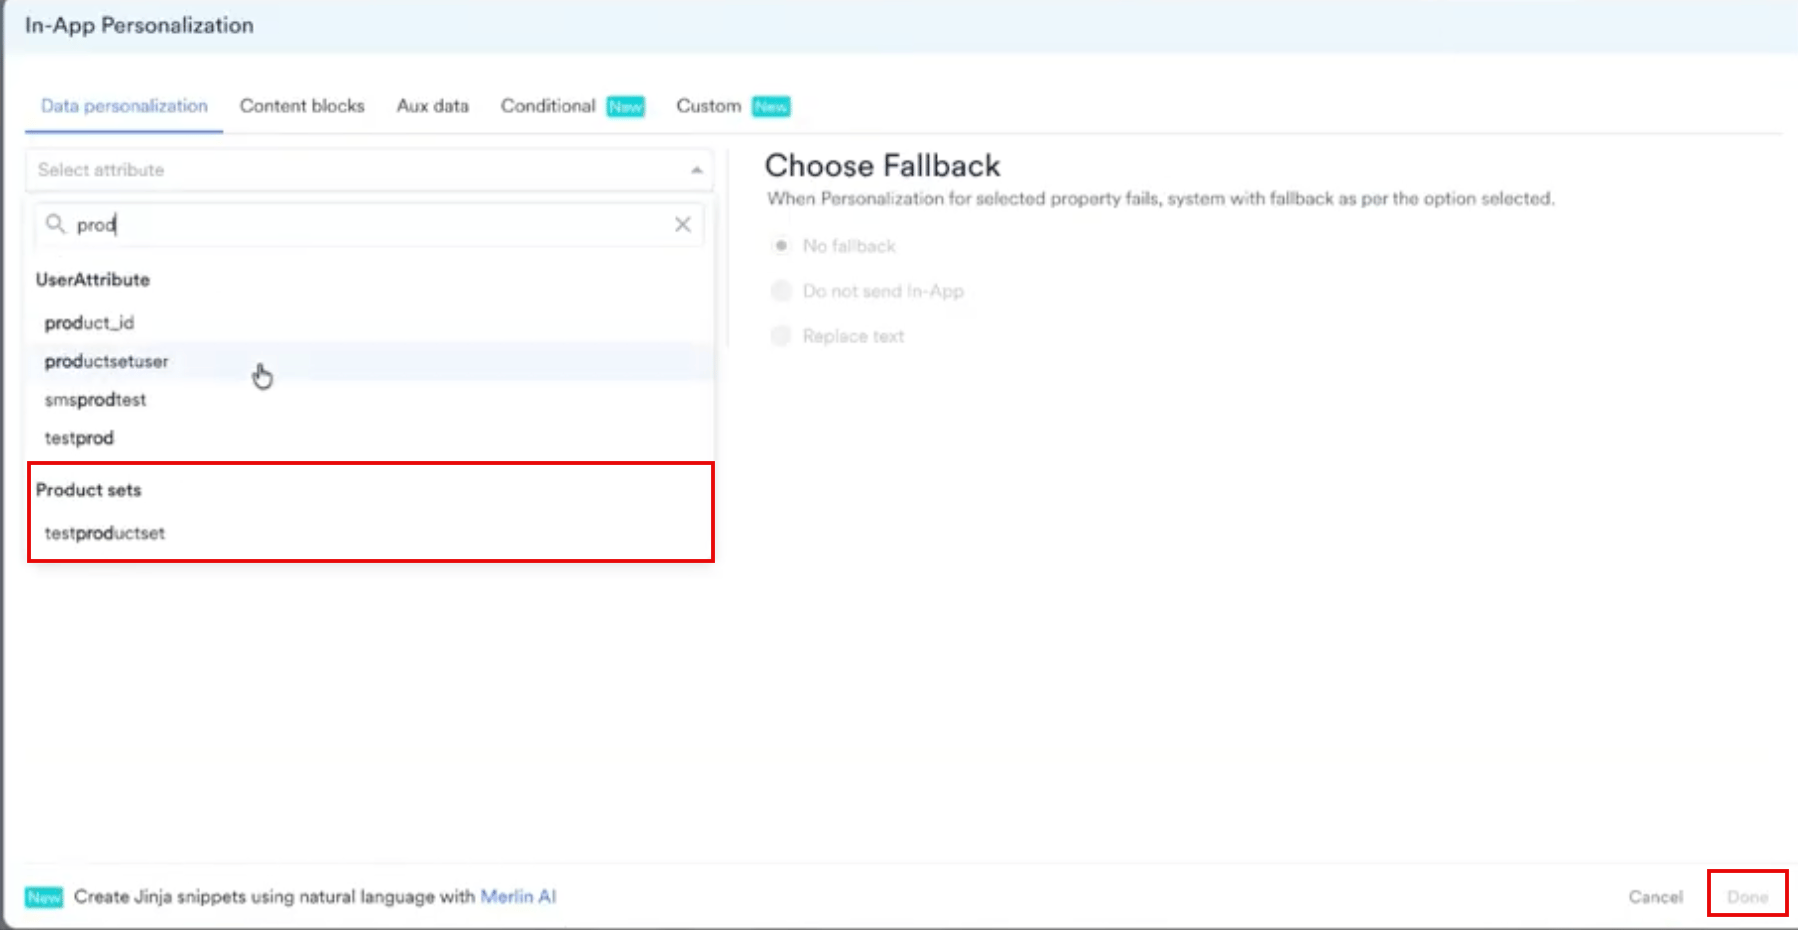 9. Click **Done**.
10. Modify the inserted Jinja code to fetch a single item, as described in the following section.
11. Click **Next** at the bottom to move to 'Schedule and Goals', which is step 3 of campaign setup.
12. Set up the appropriate settings in **Schedule and Goals** and publish the campaign.
# Fetch a Single Recommended Item
Adding a product set on its own inserts every item in the set. To show one product instead, loop through the product set. The following example uses a product set named `ProductSet` with a recommendation named `Recommendations`.
To fetch the title of the first recommended item:
```text JINJA theme={null}
{% if ProductSet.Recommendations %}
{% for product in ProductSet.Recommendations[0:1] %}
{{product.title}}
{% endfor %}
{% else %}
MOE_NOT_SEND
{% endif %}
```
To add the product's image link in the same message:
```text JINJA theme={null}
{% if ProductSet.Recommendations %}
{% for product in ProductSet.Recommendations[0:1] %}
{{product.image_link}}
{% endfor %}
{% else %}
MOE_NOT_SEND
{% endif %}
```
`MOE_NOT_SEND` stops the message from going out when the product set is empty for a user, so no one receives a message with a missing product. To use a different fallback, replace `MOE_NOT_SEND` with the text you want to show, or leave it empty to show nothing.
A product set contains a list of items, each with attributes such as `title`, `description`, `id`, `link`, and `image link`. The attributes available to you come from the catalog that the recommendation uses, so open that catalog to see which ones exist. To fetch an attribute inside the loop, type **@** and select the property from the personalization window.
The Jinja code you build for an in-app campaign works unchanged in Cards and On-Site Messaging, because these channels read product sets the same way.
# Add UTM Parameters
Add UTM parameters so that traffic from the recommendation is attributed to the campaign that drove it. A parameter value can be personalized in the same way as message content, so one campaign can report per variation or per segment.
9. Click **Done**.
10. Modify the inserted Jinja code to fetch a single item, as described in the following section.
11. Click **Next** at the bottom to move to 'Schedule and Goals', which is step 3 of campaign setup.
12. Set up the appropriate settings in **Schedule and Goals** and publish the campaign.
# Fetch a Single Recommended Item
Adding a product set on its own inserts every item in the set. To show one product instead, loop through the product set. The following example uses a product set named `ProductSet` with a recommendation named `Recommendations`.
To fetch the title of the first recommended item:
```text JINJA theme={null}
{% if ProductSet.Recommendations %}
{% for product in ProductSet.Recommendations[0:1] %}
{{product.title}}
{% endfor %}
{% else %}
MOE_NOT_SEND
{% endif %}
```
To add the product's image link in the same message:
```text JINJA theme={null}
{% if ProductSet.Recommendations %}
{% for product in ProductSet.Recommendations[0:1] %}
{{product.image_link}}
{% endfor %}
{% else %}
MOE_NOT_SEND
{% endif %}
```
`MOE_NOT_SEND` stops the message from going out when the product set is empty for a user, so no one receives a message with a missing product. To use a different fallback, replace `MOE_NOT_SEND` with the text you want to show, or leave it empty to show nothing.
A product set contains a list of items, each with attributes such as `title`, `description`, `id`, `link`, and `image link`. The attributes available to you come from the catalog that the recommendation uses, so open that catalog to see which ones exist. To fetch an attribute inside the loop, type **@** and select the property from the personalization window.
The Jinja code you build for an in-app campaign works unchanged in Cards and On-Site Messaging, because these channels read product sets the same way.
# Add UTM Parameters
Add UTM parameters so that traffic from the recommendation is attributed to the campaign that drove it. A parameter value can be personalized in the same way as message content, so one campaign can report per variation or per segment.
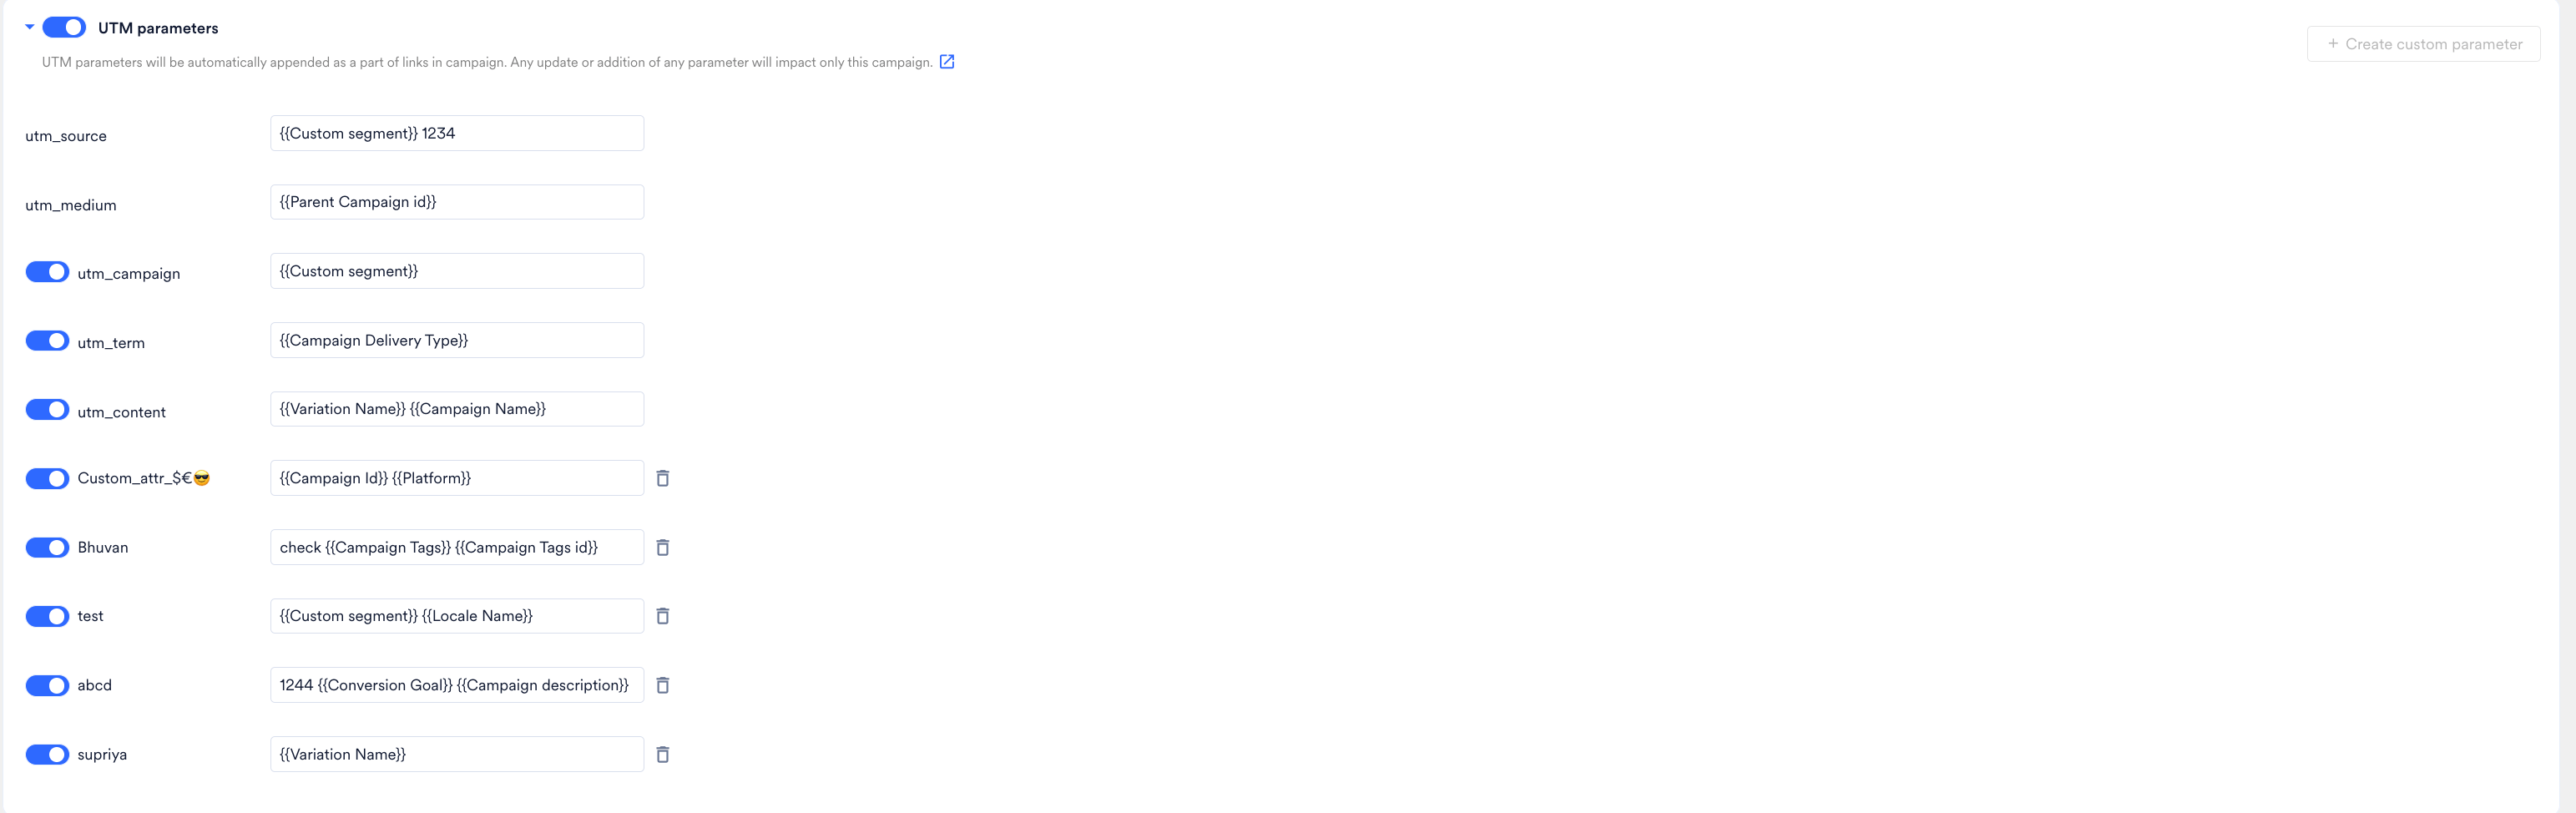 Click **+ Create custom parameter** to add your own key-value pair. For the full list of parameters and how account-level defaults apply, refer to [Add UTM Parameters to Campaigns](/docs/user-guide/settings/advanced-settings/add-utm-parameters-to-campaigns).
# Preview the In-App Message
Use **Preview in-app** to see the message on your own device before you publish.
Click **+ Create custom parameter** to add your own key-value pair. For the full list of parameters and how account-level defaults apply, refer to [Add UTM Parameters to Campaigns](/docs/user-guide/settings/advanced-settings/add-utm-parameters-to-campaigns).
# Preview the In-App Message
Use **Preview in-app** to see the message on your own device before you publish.
 In the **Unique ID** box, enter the ID of your test user and click **Test**. Select **Use sample data from the personalized preview for the test** to confirm that the recommendation resolves to a real product rather than a placeholder.
The preview shows the message itself. To test the campaign trigger conditions, publish the campaign for a test user.
# Related Articles
* [Create an In-App Campaign](/docs/user-guide/campaigns-and-channels/in-app-message/create/create-in-app-campaign)
* [Personalize Content Using Recommendations](/docs/user-guide/campaigns-and-channels/getting-started/message-personalization/personalize-content-using-recommendations)
* [Using Recommendations in Cards](/docs/user-guide/content/recommendations/personalize-campaign-with-recommendations/using-recommendations-in-cards)
* [Using Recommendations in On-Site Messaging](/docs/user-guide/content/recommendations/personalize-campaign-with-recommendations/using-recommendations-in-on-site-messaging)
This documentation is built and hosted on [Mintlify](https://mintlify.com), a developer documentation platform.
In the **Unique ID** box, enter the ID of your test user and click **Test**. Select **Use sample data from the personalized preview for the test** to confirm that the recommendation resolves to a real product rather than a placeholder.
The preview shows the message itself. To test the campaign trigger conditions, publish the campaign for a test user.
# Related Articles
* [Create an In-App Campaign](/docs/user-guide/campaigns-and-channels/in-app-message/create/create-in-app-campaign)
* [Personalize Content Using Recommendations](/docs/user-guide/campaigns-and-channels/getting-started/message-personalization/personalize-content-using-recommendations)
* [Using Recommendations in Cards](/docs/user-guide/content/recommendations/personalize-campaign-with-recommendations/using-recommendations-in-cards)
* [Using Recommendations in On-Site Messaging](/docs/user-guide/content/recommendations/personalize-campaign-with-recommendations/using-recommendations-in-on-site-messaging)
This documentation is built and hosted on [Mintlify](https://mintlify.com), a developer documentation platform.