> ## Documentation Index
> Fetch the complete documentation index at: https://moengage.com/docs/llms.txt
> Use this file to discover all available pages before exploring further.
# Using Recommendations in WhatsApp
> Add personalized product recommendations to MoEngage WhatsApp campaigns using approved templates and Jinja to send relevant products to each user.
By adding recommendations to your WhatsApp campaigns, you can send each user the products most relevant to them instead of the same message to everyone. In the WhatsApp channel, recommendations are inserted into the placeholders of a pre-approved WhatsApp template using the [Jinja templating language](/docs/user-guide/campaigns-and-channels/getting-started/message-personalization/jinja-templating-language).
At MoEngage, creating a WhatsApp campaign is a three-step process.
1. Target users
2. Content
3. Schedule and Goals
You can personalize the campaign with recommendations in the second step 'Content'. Let us create a recommendation personalized WhatsApp campaign.
Ensure that you have created the desired recommendations. You can use only active recommendations for campaign personalization. Learn how to [create and manage recommendations](/docs/user-guide/content/recommendations).
# Prerequisites
Unlike Email and Push, WhatsApp requires an approved template before you can personalize content. Ensure the following:
* A recommendation (product set) is set up and mapped to a user action. Refer to [Map User Actions Settings](/docs/user-guide/content/recommendations/prerequisites/map-user-actions-settings).
* You have a pre-approved WhatsApp template with enough placeholders to hold the recommendation data. For example, to send a user's name plus a recommended product's title and link, get a template approved with three placeholders. Refer to [WhatsApp Templates](/docs/user-guide/campaigns-and-channels/whatsapp/getting-started-with-whatsapp/whatsapp-templates).
# Create WhatsApp Campaigns with Recommendations
To create a WhatsApp campaign with recommendations, perform the following steps:
1. On the sidebar menu in MoEngage, hover over the Engage menu item  . The **Engage** menu appears.
2. Click **+ New Campaign**.
. The **Engage** menu appears.
2. Click **+ New Campaign**. 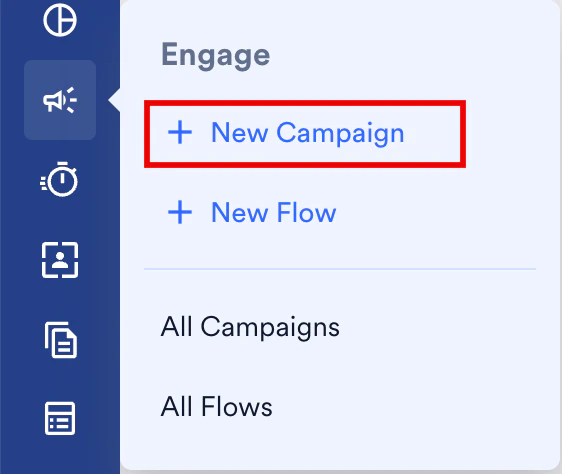 You can also click **All Campaigns** on the **Engage** menu and then click **+ Create campaign** on the All campaigns page.
3. On the **New Campaign** dialog box, under **MESSAGING APPS**, click **WhatsApp**.
4. Click **Periodic** campaign, and you can follow the same steps for any other WhatsApp campaign type. For more information about delivery types, refer to [Delivery Types](/docs/user-guide/campaigns-and-channels/getting-started/introduction/delivery-types-moengage-channels).
You can also click **All Campaigns** on the **Engage** menu and then click **+ Create campaign** on the All campaigns page.
3. On the **New Campaign** dialog box, under **MESSAGING APPS**, click **WhatsApp**.
4. Click **Periodic** campaign, and you can follow the same steps for any other WhatsApp campaign type. For more information about delivery types, refer to [Delivery Types](/docs/user-guide/campaigns-and-channels/getting-started/introduction/delivery-types-moengage-channels). 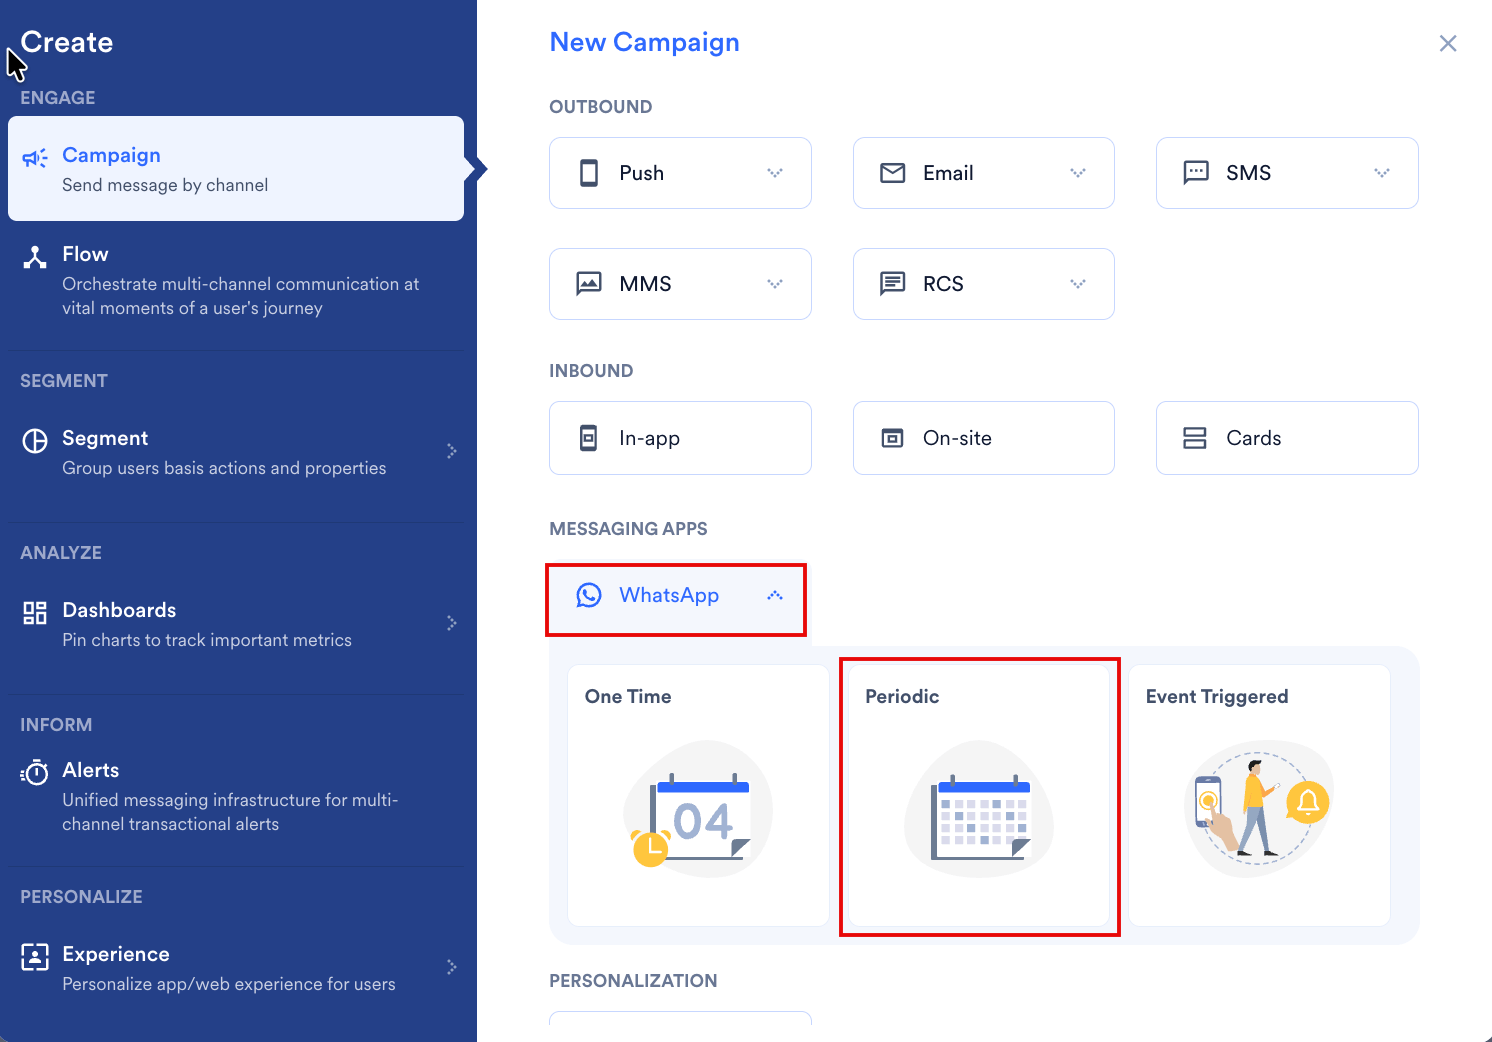 5. Enter the basic campaign details and define the audience in step 1 'Target users' and click **Next**.
6. In step 2, on the **Content** tab, select the sender in the **Select sender** list.
7. Select the approved template in the **Select template** list.
5. Enter the basic campaign details and define the audience in step 1 'Target users' and click **Next**.
6. In step 2, on the **Content** tab, select the sender in the **Select sender** list.
7. Select the approved template in the **Select template** list. 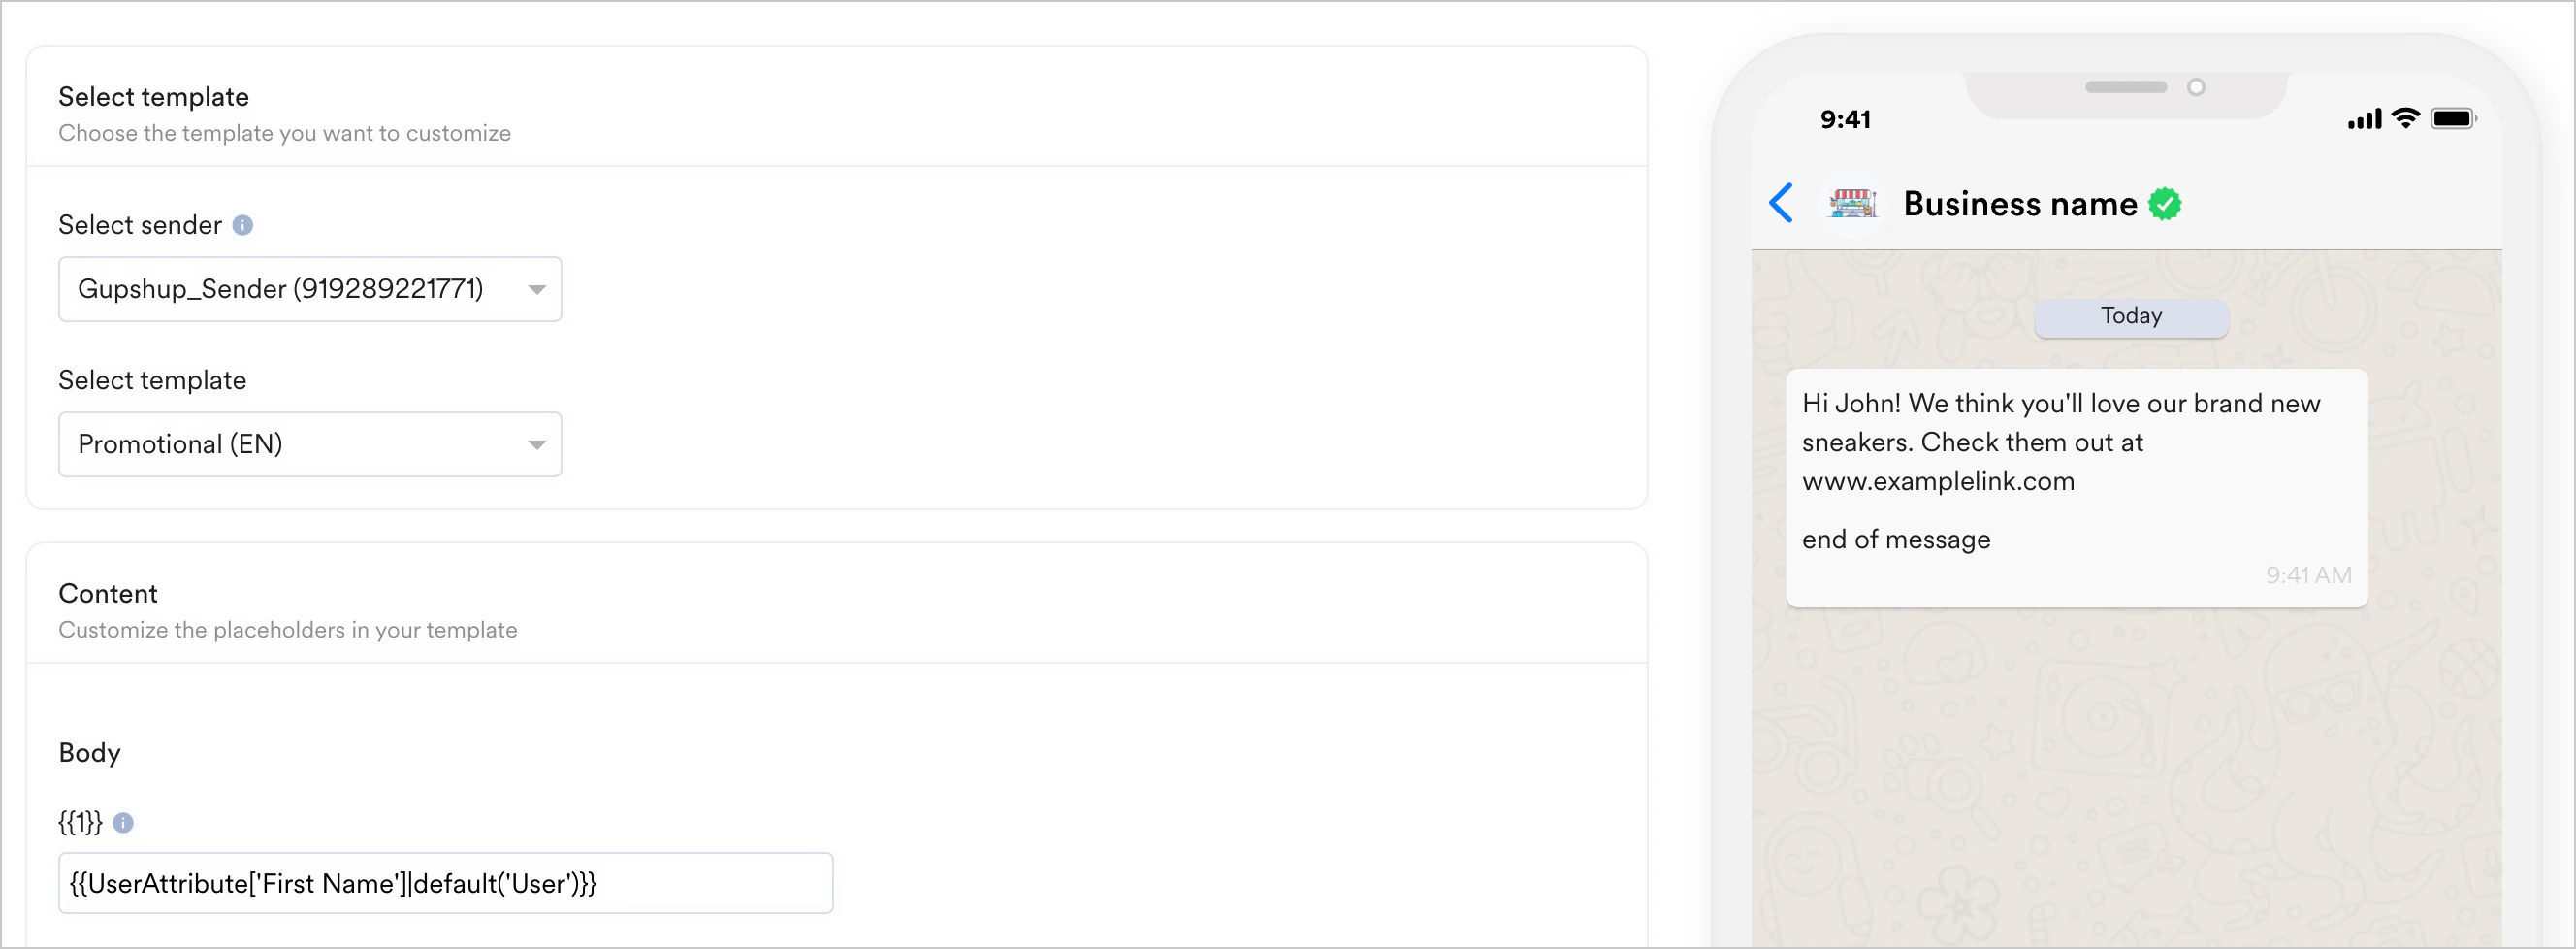 8. In the **Header** or **Body** placeholder field, type '@'. The **WhatsApp Personalization** window opens.
9. On the **Data personalization** tab, in the **Select attribute** list, search for your recommendation and select it under **Product sets**.
8. In the **Header** or **Body** placeholder field, type '@'. The **WhatsApp Personalization** window opens.
9. On the **Data personalization** tab, in the **Select attribute** list, search for your recommendation and select it under **Product sets**. 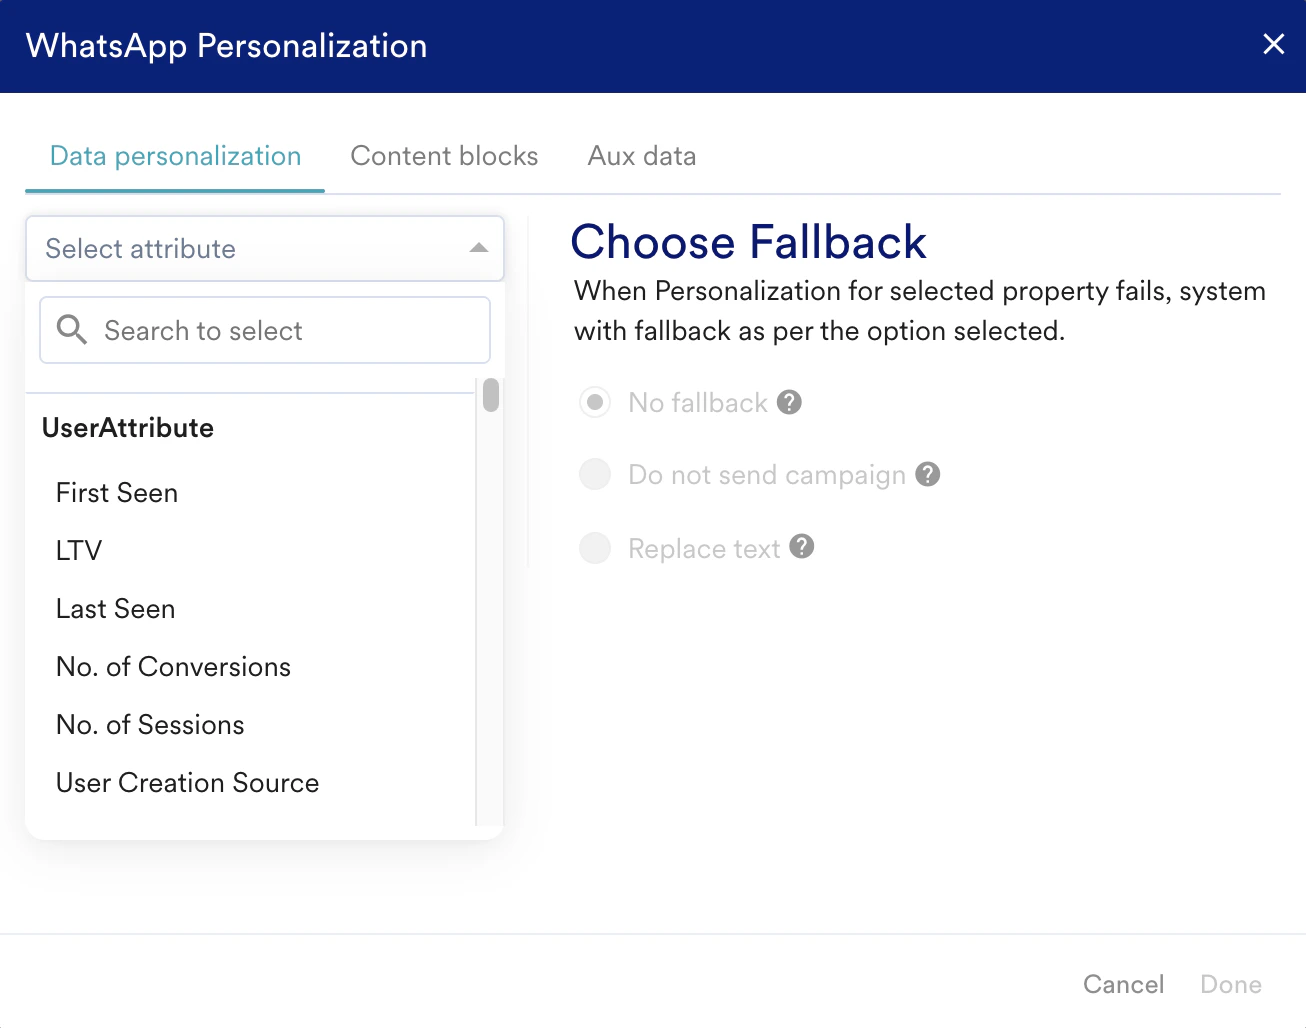 10. Under **Choose Fallback**, select a fallback and click **Done**.
The **Choose Fallback** option controls what a user receives when personalization fails for them:
| Fallback | What happens |
| - | - |
| **No fallback** | The placeholder is replaced with an empty value. |
| **Do not send campaign** | The campaign is not sent to that user. |
| **Replace text** | The placeholder is replaced with the text you enter. |
11. It auto-populates some Jinja code retrieving all available items list from recommendations. You can modify the code for your use case. For example, the following is the modified code to display one item:
```jinja JINJA theme={null}
{% if ProductSet.RealTimeAIRecommendations%}
{% for product in ProductSet.RealTimeAIRecommendations[0:1]%}
{{product.title}}
{% endfor %}
{% else %}
MOE_NOT_SEND
{% endif %}
```
`MOE_NOT_SEND` stops the message from going out when the product set is empty for a user, so no one receives a message with a blank placeholder.
12. To display an item attribute, place the cursor inside the `for` loop, type '@', and select the attribute in the **Select attribute** list. The attribute is inserted inside the loop, for example `{{product['price']}}`.
13. Repeat steps 8 to 12 for each remaining placeholder in the template. You can choose recommendations personalization or static textual content for different placeholders.
14. After you complete the setup, under **Preview type**, click **Personalized**. MoEngage selects a user and renders the message with real values.
15. To preview the message for a specific user, click the edit icon
10. Under **Choose Fallback**, select a fallback and click **Done**.
The **Choose Fallback** option controls what a user receives when personalization fails for them:
| Fallback | What happens |
| - | - |
| **No fallback** | The placeholder is replaced with an empty value. |
| **Do not send campaign** | The campaign is not sent to that user. |
| **Replace text** | The placeholder is replaced with the text you enter. |
11. It auto-populates some Jinja code retrieving all available items list from recommendations. You can modify the code for your use case. For example, the following is the modified code to display one item:
```jinja JINJA theme={null}
{% if ProductSet.RealTimeAIRecommendations%}
{% for product in ProductSet.RealTimeAIRecommendations[0:1]%}
{{product.title}}
{% endfor %}
{% else %}
MOE_NOT_SEND
{% endif %}
```
`MOE_NOT_SEND` stops the message from going out when the product set is empty for a user, so no one receives a message with a blank placeholder.
12. To display an item attribute, place the cursor inside the `for` loop, type '@', and select the attribute in the **Select attribute** list. The attribute is inserted inside the loop, for example `{{product['price']}}`.
13. Repeat steps 8 to 12 for each remaining placeholder in the template. You can choose recommendations personalization or static textual content for different placeholders.
14. After you complete the setup, under **Preview type**, click **Personalized**. MoEngage selects a user and renders the message with real values.
15. To preview the message for a specific user, click the edit icon  . The **Personalized preview** slide-out opens.
16. In the **Select user by** list, select the identifier you want to use.
17. In the **User identifier value** field, type the identifier of the user.
18. Click **Fetch user data**. Under **Personalization inputs**, your product set appears as JSON with the items available for that user.
19. Change the JSON to match what you want to preview. (Optional)
20. Click **Update preview**.
. The **Personalized preview** slide-out opens.
16. In the **Select user by** list, select the identifier you want to use.
17. In the **User identifier value** field, type the identifier of the user.
18. Click **Fetch user data**. Under **Personalization inputs**, your product set appears as JSON with the items available for that user.
19. Change the JSON to match what you want to preview. (Optional)
20. Click **Update preview**.  To enable **Update preview** for your account, contact your MoEngage CSM or the Support team. For more information, refer to [Personalized Preview](/docs/user-guide/campaigns-and-channels/getting-started/message-personalization/personalized-preview).
21. You can also deliver a test campaign to ensure end-to-end delivery before scheduling it for all users.
To enable **Update preview** for your account, contact your MoEngage CSM or the Support team. For more information, refer to [Personalized Preview](/docs/user-guide/campaigns-and-channels/getting-started/message-personalization/personalized-preview).
21. You can also deliver a test campaign to ensure end-to-end delivery before scheduling it for all users.  22. After you complete the content setup with recommendations, click **Next** at the bottom and move to 'Schedule and Goals', which is the step 3 of campaign setup.
23. Set up the appropriate settings in **Schedule and Goals** and publish the campaign.
# Related Articles
* [Personalize WhatsApp Campaign](/docs/user-guide/campaigns-and-channels/whatsapp/create/personalize-whatsapp-campaign)
* [Personalize Content Using Recommendations](/docs/user-guide/campaigns-and-channels/getting-started/message-personalization/personalize-content-using-recommendations)
* [Using Recommendations in Email](/docs/user-guide/content/recommendations/personalize-campaign-with-recommendations/using-recommendations-in-email)
* [Using Recommendations in Push](/docs/user-guide/content/recommendations/personalize-campaign-with-recommendations/using-recommendations-in-push)
This documentation is built and hosted on [Mintlify](https://mintlify.com), a developer documentation platform.
22. After you complete the content setup with recommendations, click **Next** at the bottom and move to 'Schedule and Goals', which is the step 3 of campaign setup.
23. Set up the appropriate settings in **Schedule and Goals** and publish the campaign.
# Related Articles
* [Personalize WhatsApp Campaign](/docs/user-guide/campaigns-and-channels/whatsapp/create/personalize-whatsapp-campaign)
* [Personalize Content Using Recommendations](/docs/user-guide/campaigns-and-channels/getting-started/message-personalization/personalize-content-using-recommendations)
* [Using Recommendations in Email](/docs/user-guide/content/recommendations/personalize-campaign-with-recommendations/using-recommendations-in-email)
* [Using Recommendations in Push](/docs/user-guide/content/recommendations/personalize-campaign-with-recommendations/using-recommendations-in-push)
This documentation is built and hosted on [Mintlify](https://mintlify.com), a developer documentation platform.