> ## Documentation Index
> Fetch the complete documentation index at: https://moengage.com/docs/llms.txt
> Use this file to discover all available pages before exploring further.
# BigQuery Imports
> Import user profiles and event data directly from BigQuery tables into MoEngage. Set up the integration for seamless data warehouse connectivity.
# Overview
MoEngage enables you to import both user profiles and event data directly from tables within your BigQuery databases. This integration streamlines the process of bringing your valuable customer data into MoEngage for enhanced segmentation and engagement.
# Types of Imports
MoEngage supports the following types of data imports from your BigQuery data warehouse:
* **Registered Users**: Users who are already registered on MoEngage.
* **Anonymous Users**: Users who are not yet registered on MoEngage.
* **Events** (standard and user-defined): MoEngage can import standard events like campaign interaction events and your user-defined or custom events.
# Required Access Permissions
For more information, refer to [Grant Permissions to MoEngage](https://partners.moengage.com/hc/en-us/articles/7403404539412-Google-BigQuery#introduction-0-0)
## Import Datetype Attributes
Importing datetype attributes requires additional steps. For more information, refer [here](/docs/user-guide/data/imports/data-warehouses-imports/import-datetime-attributes).
# Set Up Imports from BigQuery
* Ensure you have an existing [BigQuery connection](https://partners.moengage.com/hc/en-us/articles/7403404539412-Google-BigQuery#01JPWDX8MDZQJE6PHNNGND8KMS) set up in the MoEngage App Marketplace with relevant permissions.
* If your security policies require you to whitelist our IPs, you can refer to [here](/docs/user-guide/settings/account/security/ip-whitelisting-in-moengage).
* Support for [Object Data Type](/docs/user-guide/data/key-concepts/support-for-object-data-type) needs to be enabled for your account (optional).
To set up BigQuery Imports, perform the following steps:
1. On the left navigation menu in the MoEngage dashboard, click **Data** > **Data imports**.
2. Click **+ Import** in the upper-right corner and select **Users** or **Events** to create a new import. 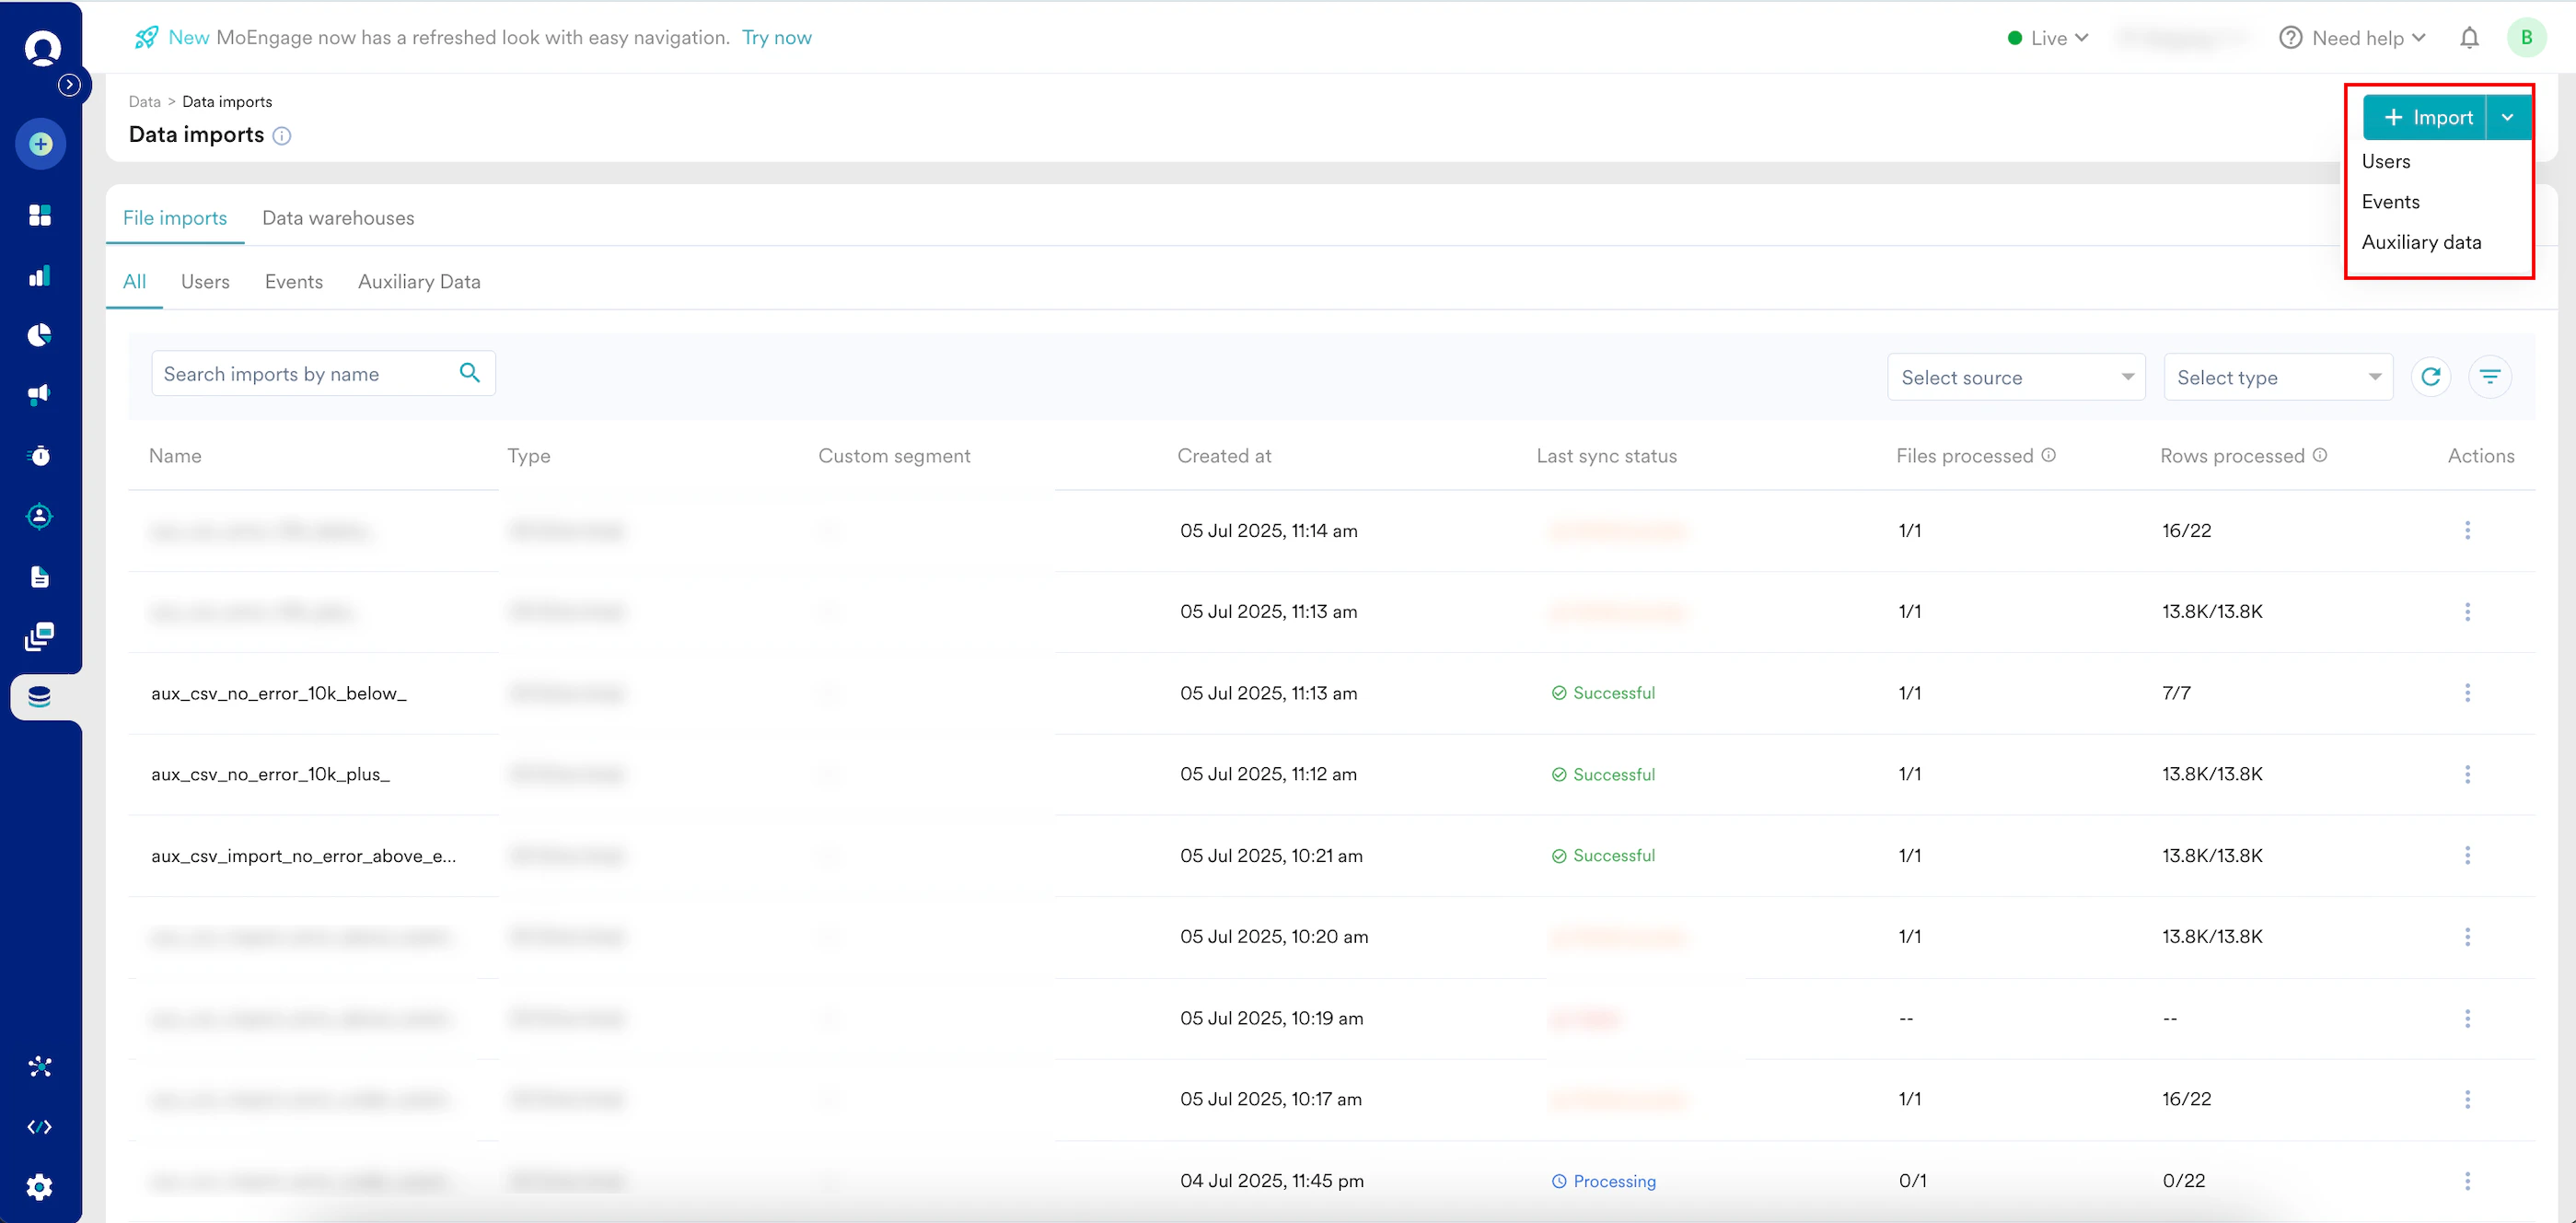 3. Click the **Google** **BigQuery** tile.
4. Click **Continue**.
3. Click the **Google** **BigQuery** tile.
4. Click **Continue**. 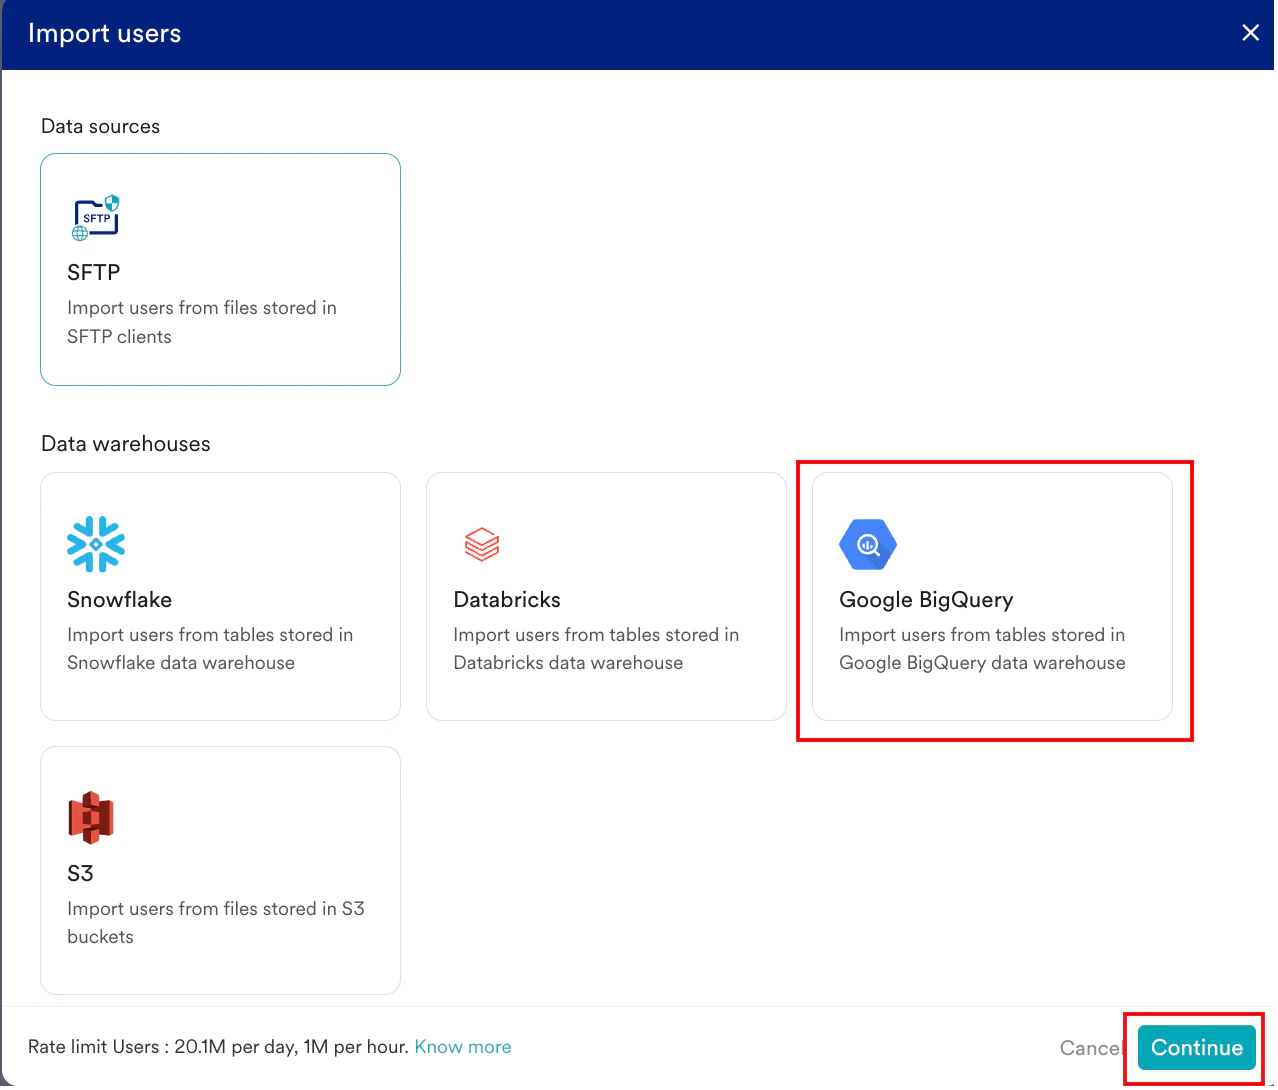 ## Step 1: Source and Format
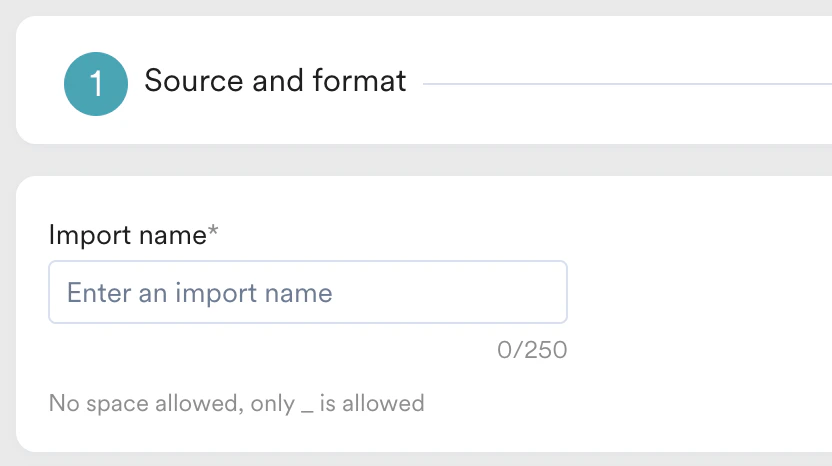
In this step, configure the BigQuery connection and specify the file format. In the **Import name** box, enter a name for this import to easily identify it on the Imports Dashboard.
### Import Name
## Step 1: Source and Format
In this step, configure the BigQuery connection and specify the file format. In the **Import name** box, enter a name for this import to easily identify it on the Imports Dashboard.
### Import Name
 Based on the type of import selected, your next steps might vary:
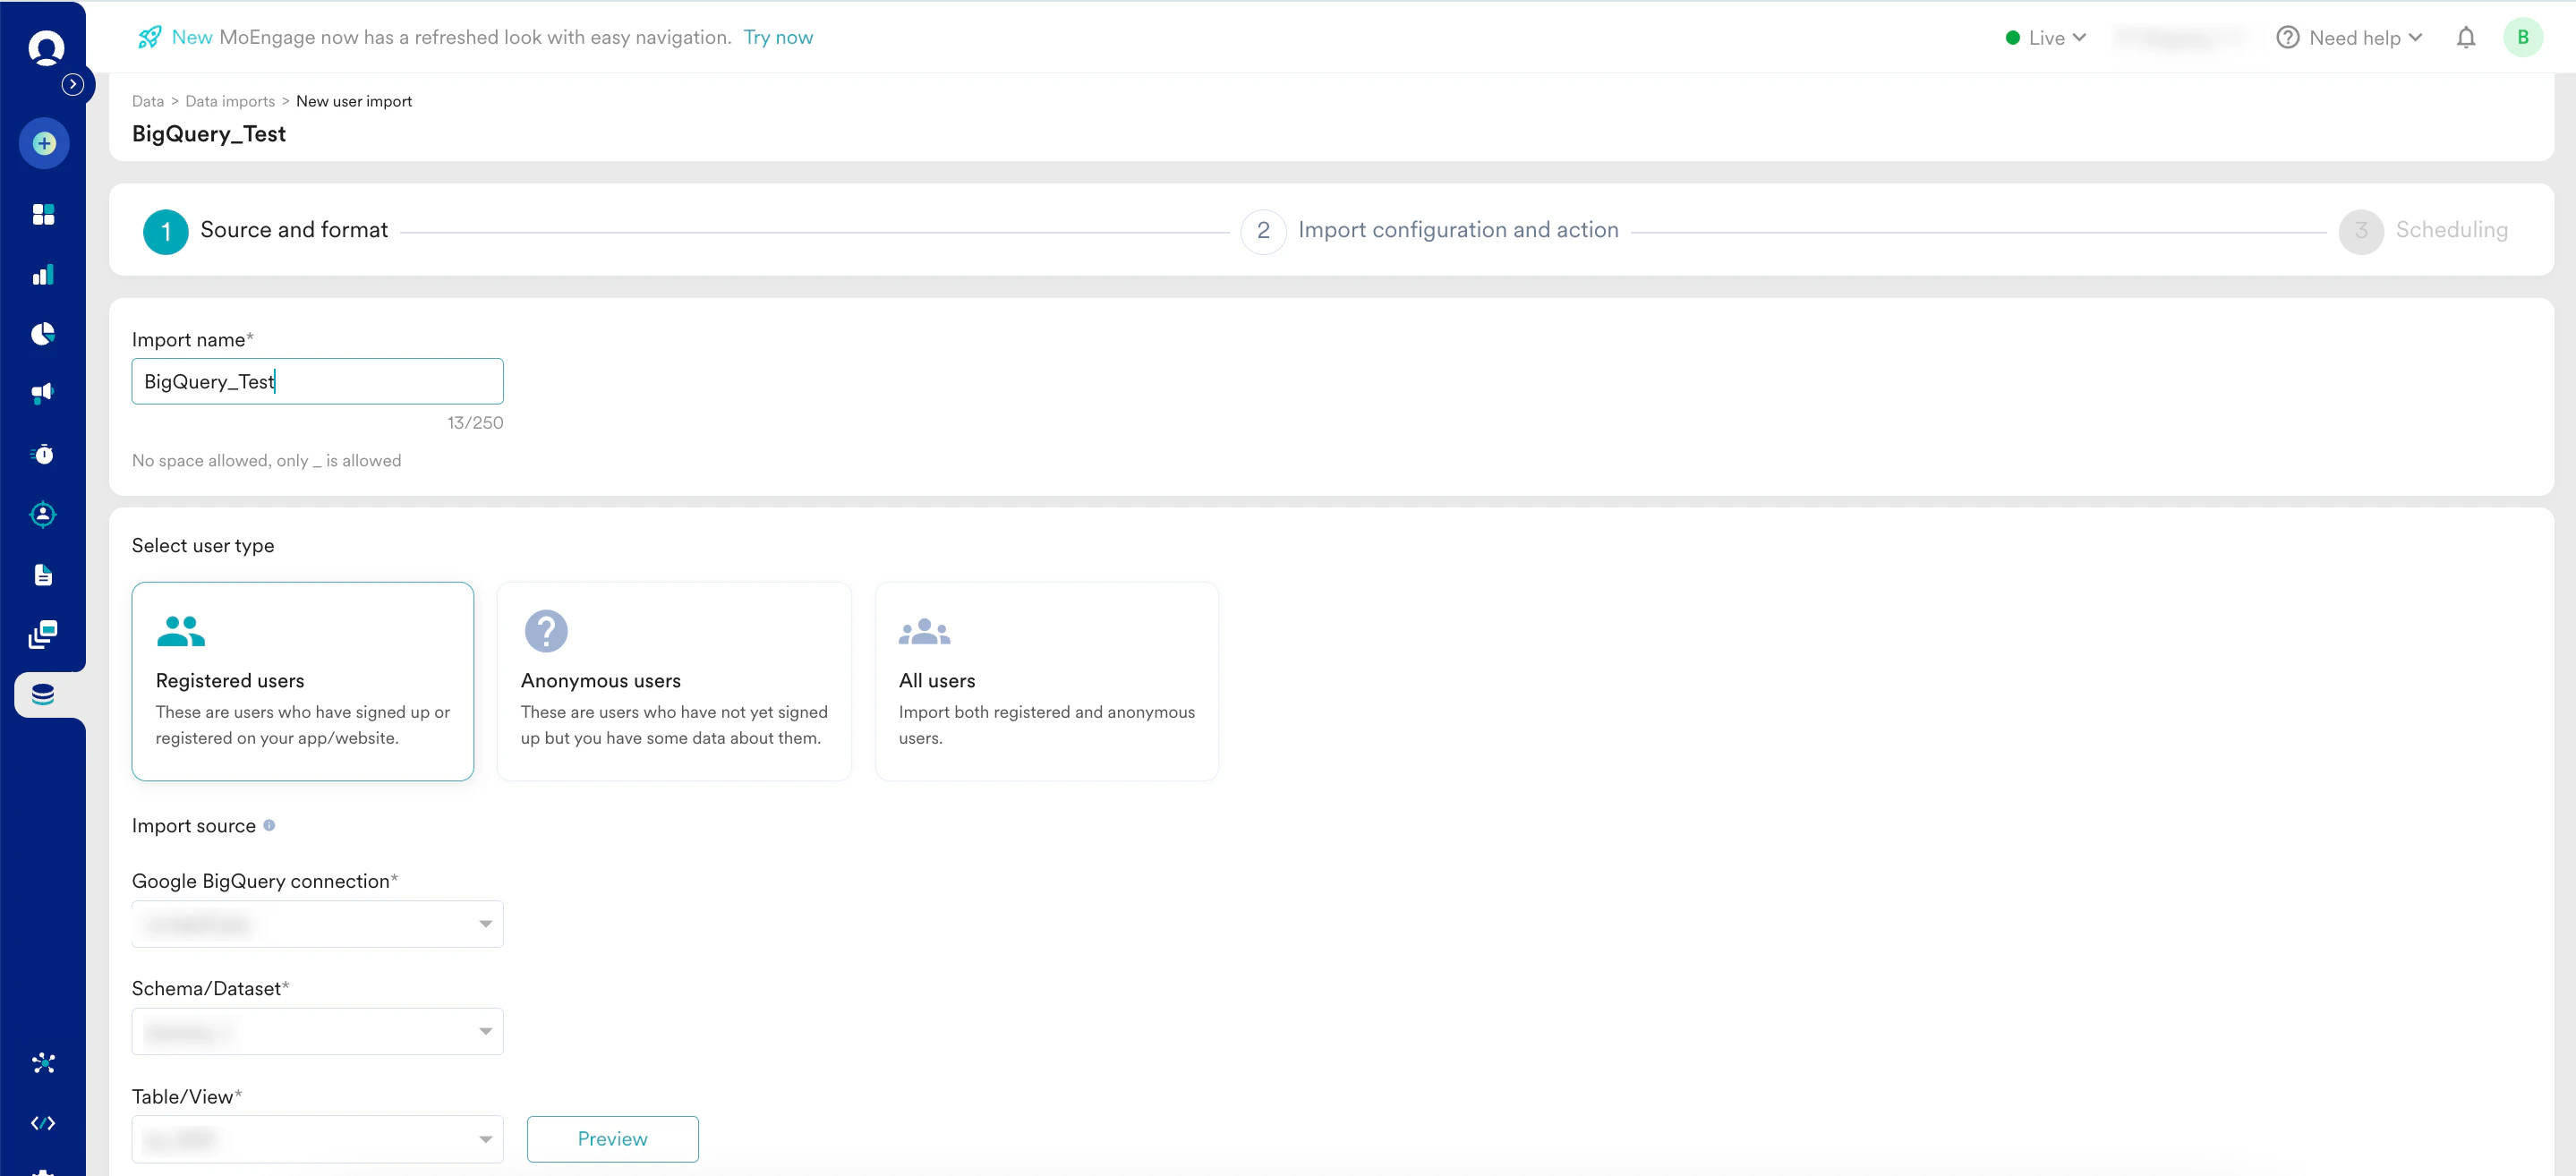
You can select whether to import registered users, anonymous users, or both. In the Select **user type** section, select **Registered users** or **Anonymous users**. Both user types require different file names. For more information, refer to [Naming Conventions](/docs/user-guide/data/imports/overview/overview-imports).
Based on the type of import selected, your next steps might vary:
You can select whether to import registered users, anonymous users, or both. In the Select **user type** section, select **Registered users** or **Anonymous users**. Both user types require different file names. For more information, refer to [Naming Conventions](/docs/user-guide/data/imports/overview/overview-imports).
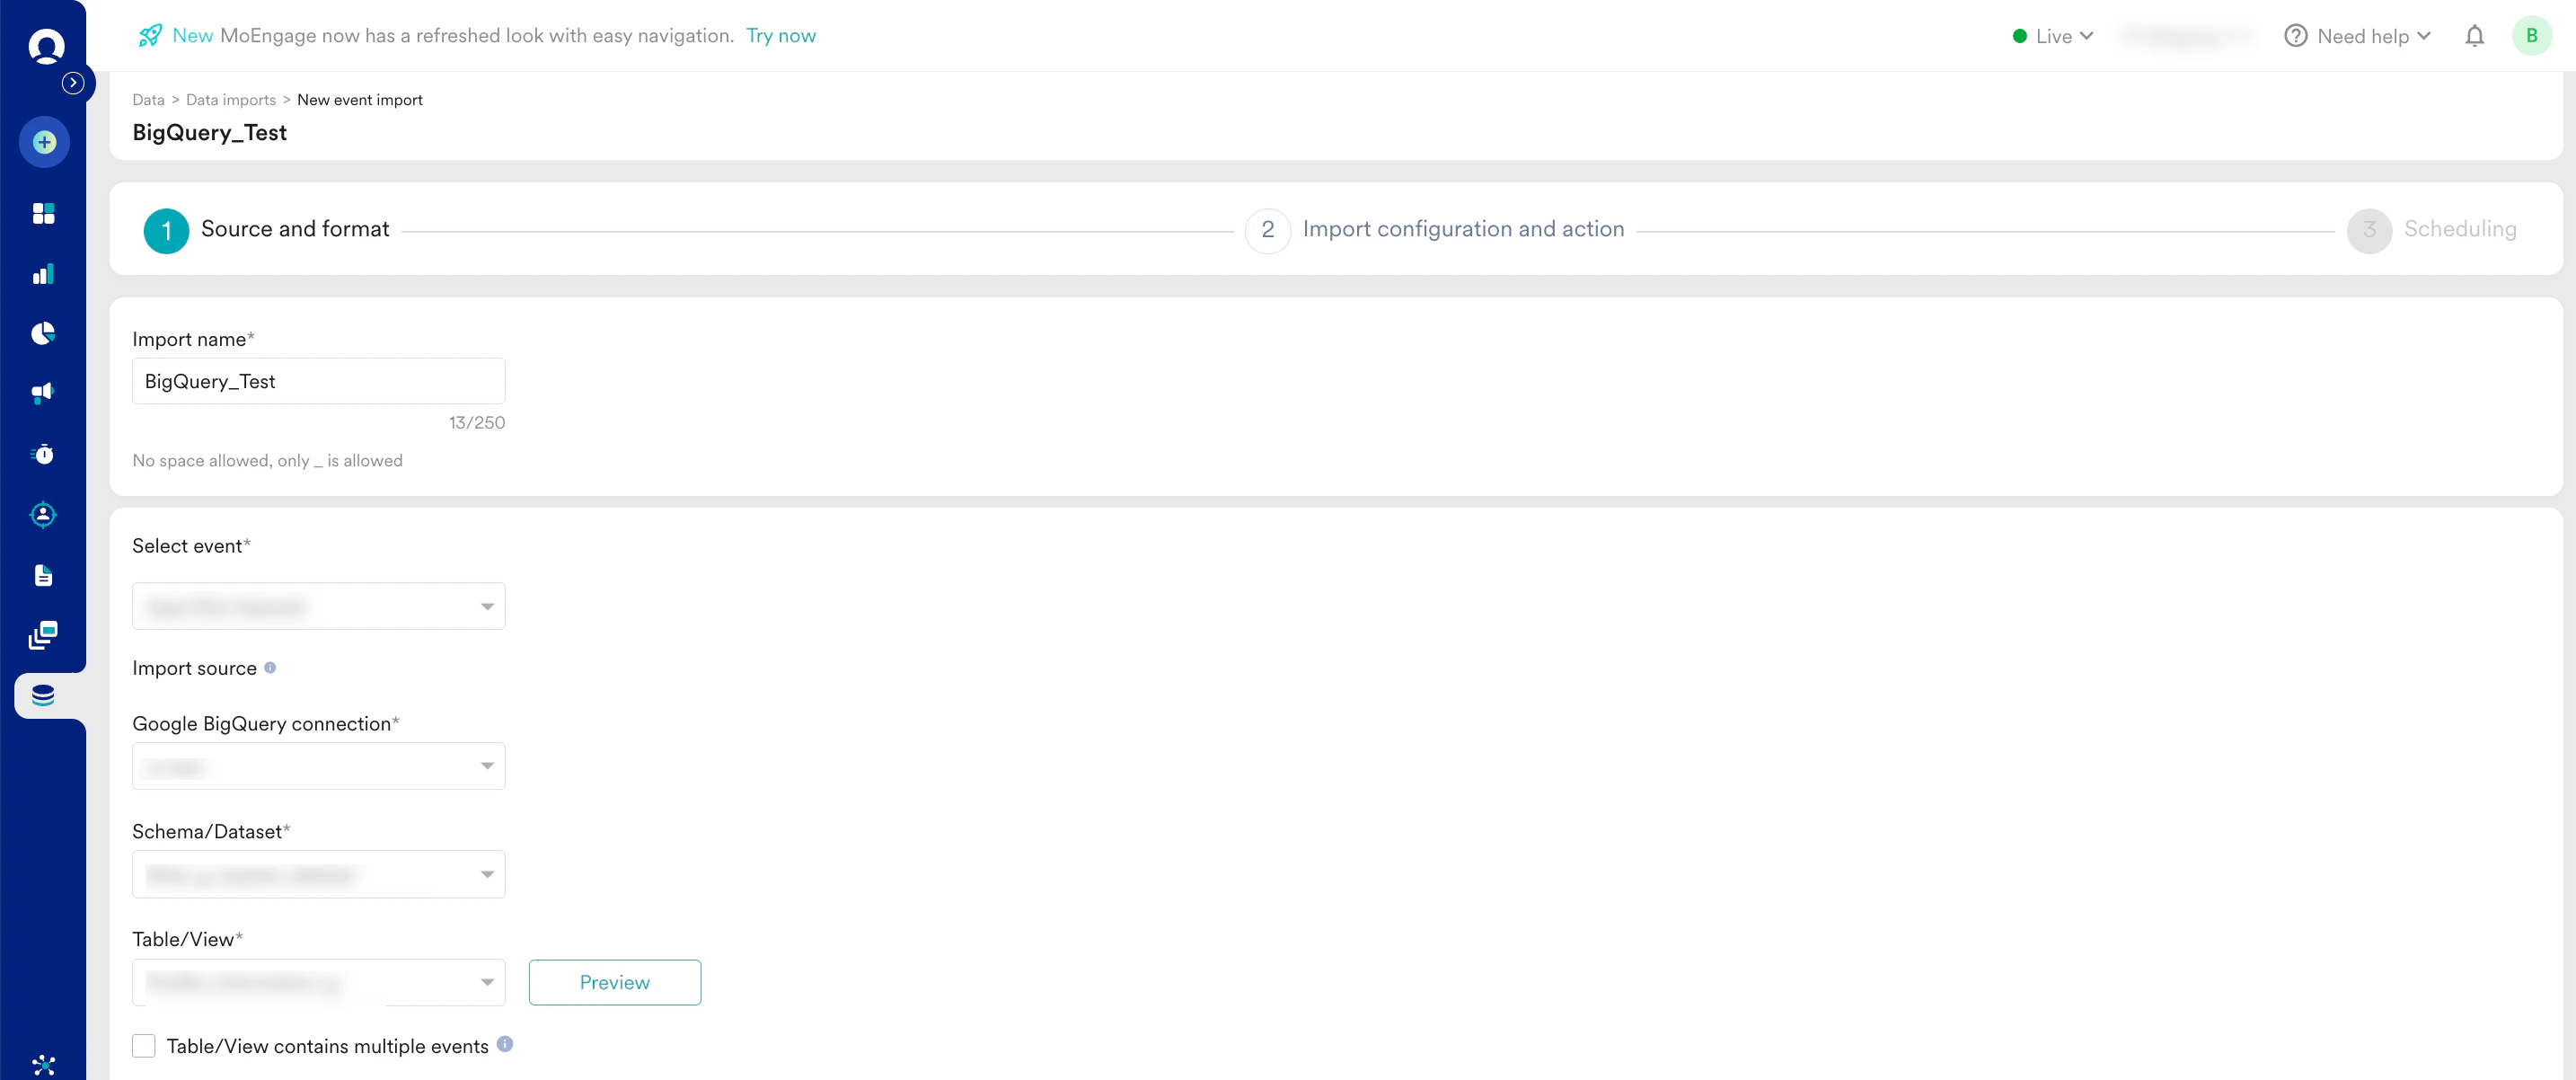
 For Event imports, you can select the event you want to import from the **Select event** list.
  \
Based on the event you pick, your file names will be different. Your file names must begin with the event name of your chosen event. In the **Select event** list, MoEngage displays the names of all the available events for your app. When you hover over an event, MoEngage will show you the file name it expects for that particular event:
\
Based on the event you pick, your file names will be different. Your file names must begin with the event name of your chosen event. In the **Select event** list, MoEngage displays the names of all the available events for your app. When you hover over an event, MoEngage will show you the file name it expects for that particular event:
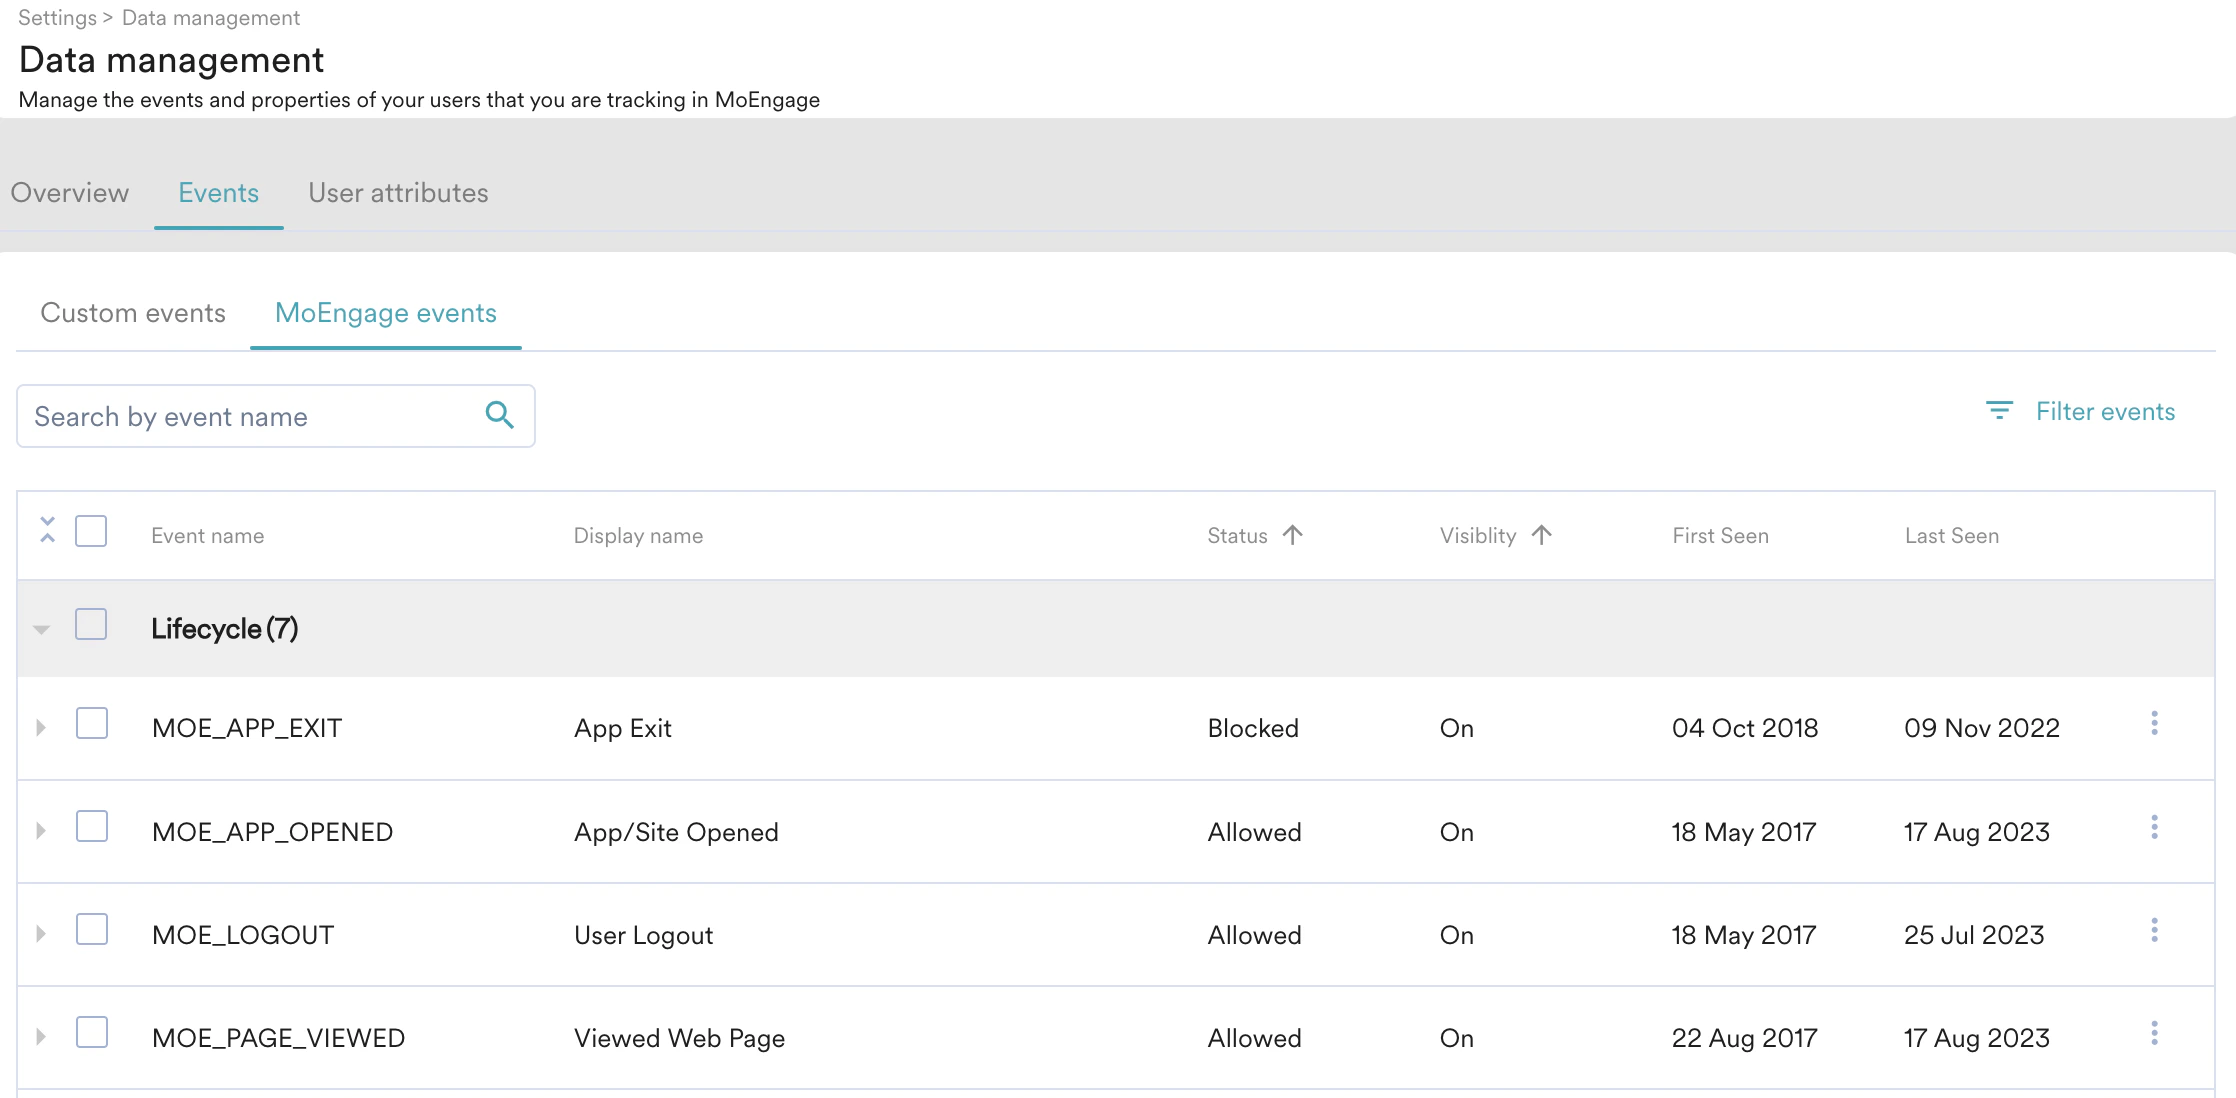
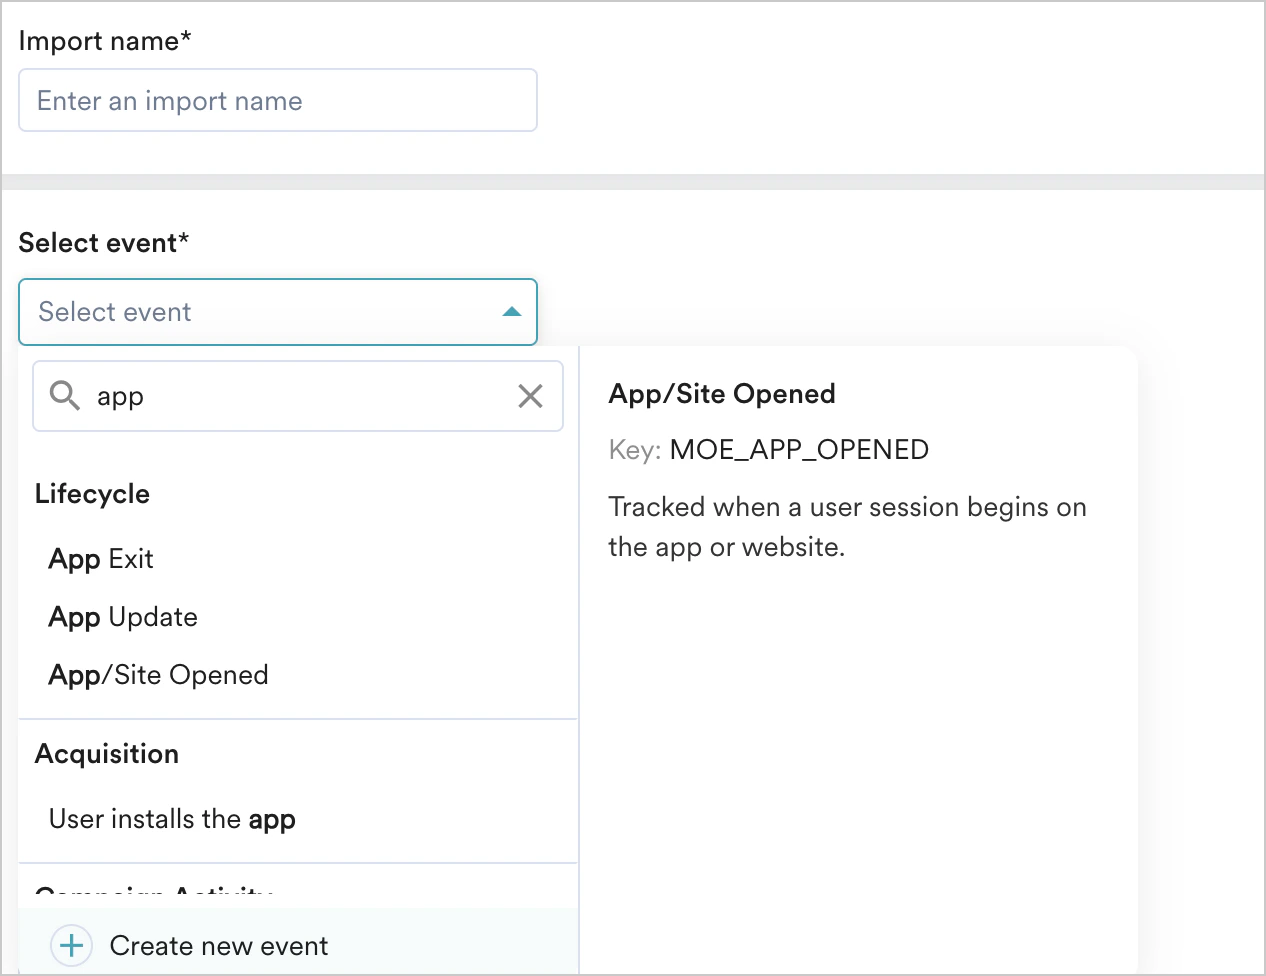 You can either select an existing event or create a new one. If you have multiple events stored in a single table, MoEngage determines matching rows to import based on the **Event Name** column. The value in the **Event name** column depends on the event you select. Some of these events might have different display names and event names. You can always view the event information on the [Data Management](/docs/user-guide/settings/data-management/overview-data-management) page. For example, the event *App/Site Opened* must have the value of the **Event name** column as `MOE_APP_OPENED`:
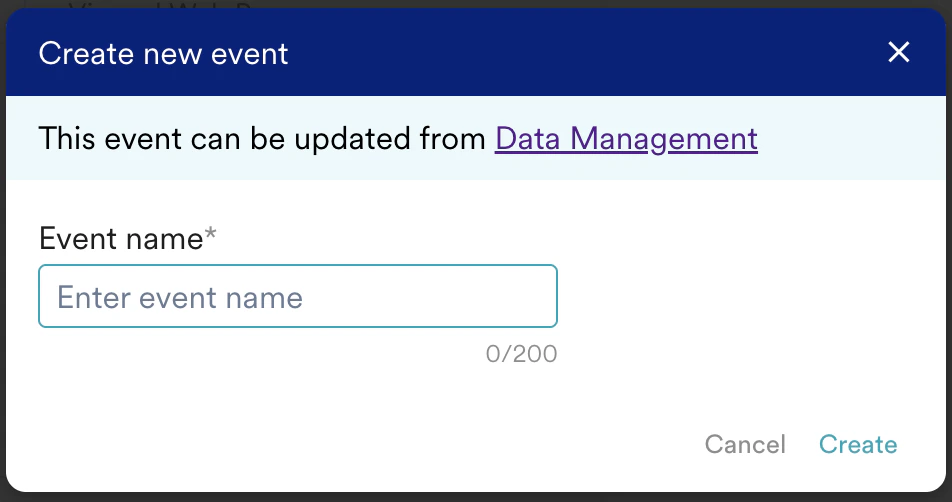
 To create a new event, perform the following steps:
1. Click the **+ Create event** at the end of the **Select event** list. The **Create new event** dialog box is displayed.
2. In the **Event name** box, type a unique name for your event. By default, your display name will be the same as the event name.
To create a new event, perform the following steps:
1. Click the **+ Create event** at the end of the **Select event** list. The **Create new event** dialog box is displayed.
2. In the **Event name** box, type a unique name for your event. By default, your display name will be the same as the event name.
 You can go to the [Data Management](/docs/user-guide/settings/data-management/overview-data-management) page to view or edit this event and your other MoEngage events.
### Import Source
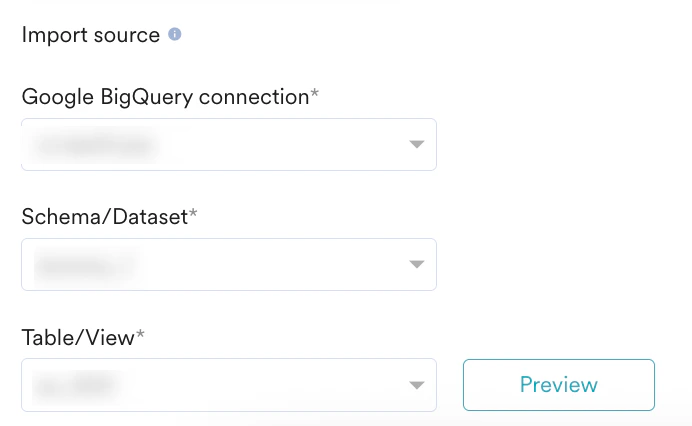
In this first step, **Source and format**, you must specify MoEngage, which BigQuery connection to use, and the table from which to import. To get started, perform the following steps:
1. In the **BigQuery** **connection** list, select a connection to use for this import.\
If you have not already created a BigQuery connection, click **+ Add connection** at the end of the BigQuery connection list, and you will be redirected to the App Marketplace to set it up. You can learn more about connecting your BigQuery warehouse to MoEngage [here](https://partners.moengage.com/hc/en-us/articles/7403404539412-Google-BigQuery#introduction-0-0).
2. After you have selected your BigQuery connection, the **Schema/Dataset** and **Table/View** lists are displayed.
3. In the **Schema/Dataset** list, select the schema/dataset.\
**Note**: If your schemas are loading incorrectly, ensure that you have granted MoEngage the necessary permissions detailed in the Prerequisites.
4. In the **Table/View** list, select the table/view to import data from.
You can go to the [Data Management](/docs/user-guide/settings/data-management/overview-data-management) page to view or edit this event and your other MoEngage events.
### Import Source
In this first step, **Source and format**, you must specify MoEngage, which BigQuery connection to use, and the table from which to import. To get started, perform the following steps:
1. In the **BigQuery** **connection** list, select a connection to use for this import.\
If you have not already created a BigQuery connection, click **+ Add connection** at the end of the BigQuery connection list, and you will be redirected to the App Marketplace to set it up. You can learn more about connecting your BigQuery warehouse to MoEngage [here](https://partners.moengage.com/hc/en-us/articles/7403404539412-Google-BigQuery#introduction-0-0).
2. After you have selected your BigQuery connection, the **Schema/Dataset** and **Table/View** lists are displayed.
3. In the **Schema/Dataset** list, select the schema/dataset.\
**Note**: If your schemas are loading incorrectly, ensure that you have granted MoEngage the necessary permissions detailed in the Prerequisites.
4. In the **Table/View** list, select the table/view to import data from.
 ### Event Imports
In addition to the above steps, MoEngage provides additional support for tables containing multiple events. If your table contains multiple events, you must first preview it and then select the **Table contains multiple events** check box.
### Event Imports
In addition to the above steps, MoEngage provides additional support for tables containing multiple events. If your table contains multiple events, you must first preview it and then select the **Table contains multiple events** check box.
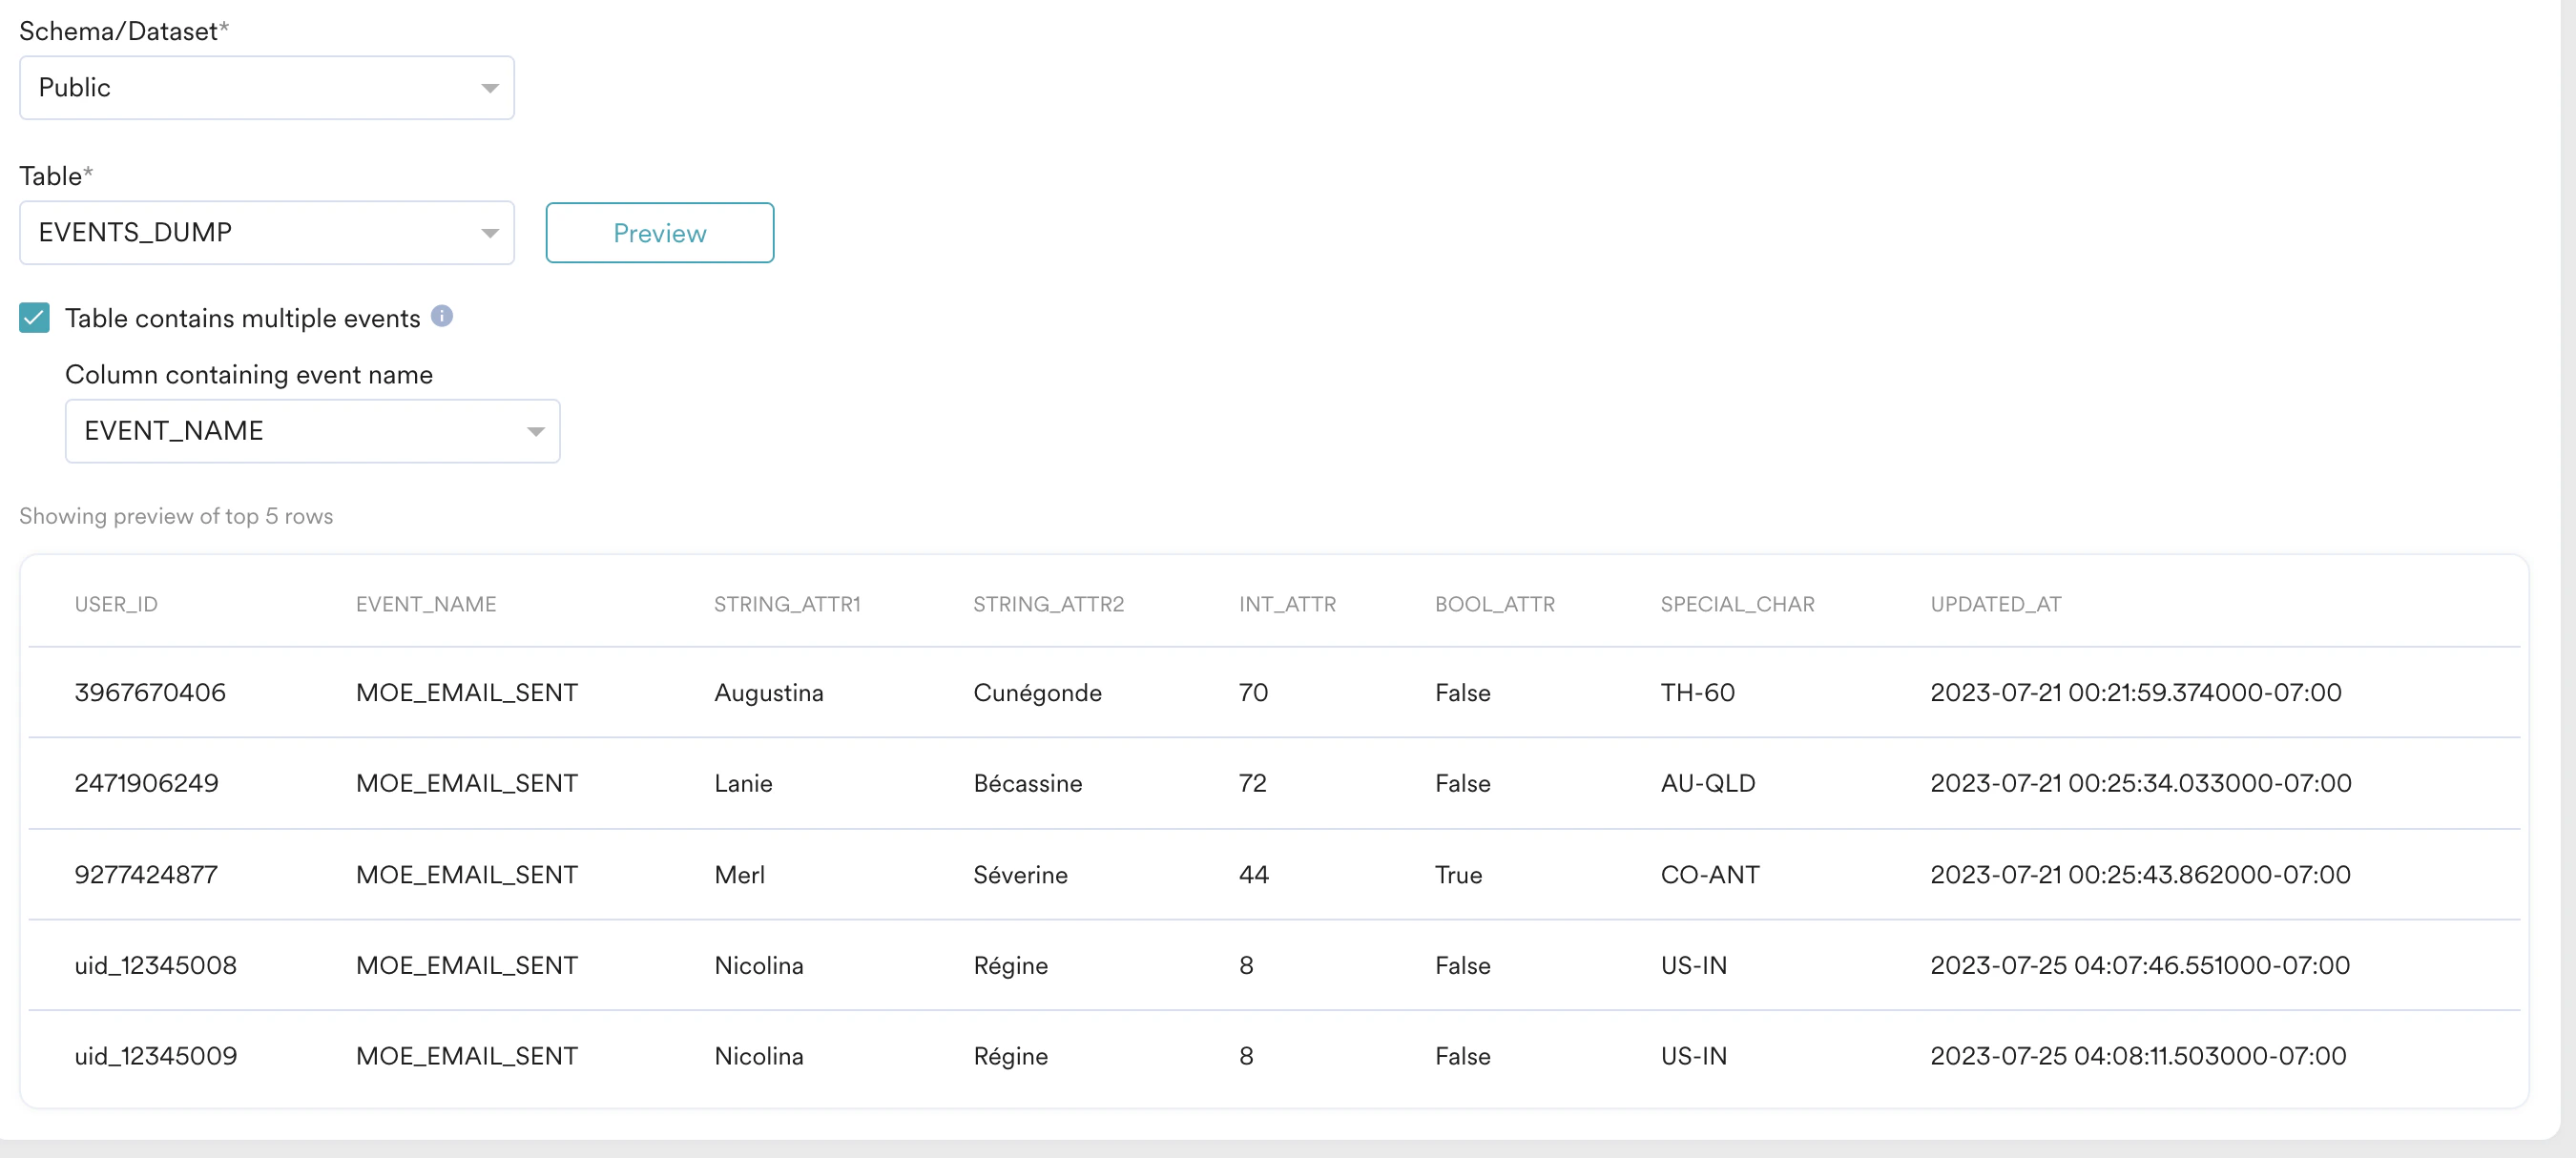 MoEngage uses the values of the **Event\_ Name** column to filter out rows that need to be imported. It imports only those rows that match the selected event name. You can designate an existing column in your table as the event name column. After selecting this column and previewing the data again, filtered rows are displayed for your review before proceeding with the import:
After you preview your table, you will move to the second step, **Import configuration and action**.
## Step 2: Import Configuration and Action
In this step, after configuring the BigQuery connection and file format, you must map your data columns to MoEngage attributes. All your columns are shown one below the other:
MoEngage uses the values of the **Event\_ Name** column to filter out rows that need to be imported. It imports only those rows that match the selected event name. You can designate an existing column in your table as the event name column. After selecting this column and previewing the data again, filtered rows are displayed for your review before proceeding with the import:
After you preview your table, you will move to the second step, **Import configuration and action**.
## Step 2: Import Configuration and Action
In this step, after configuring the BigQuery connection and file format, you must map your data columns to MoEngage attributes. All your columns are shown one below the other:
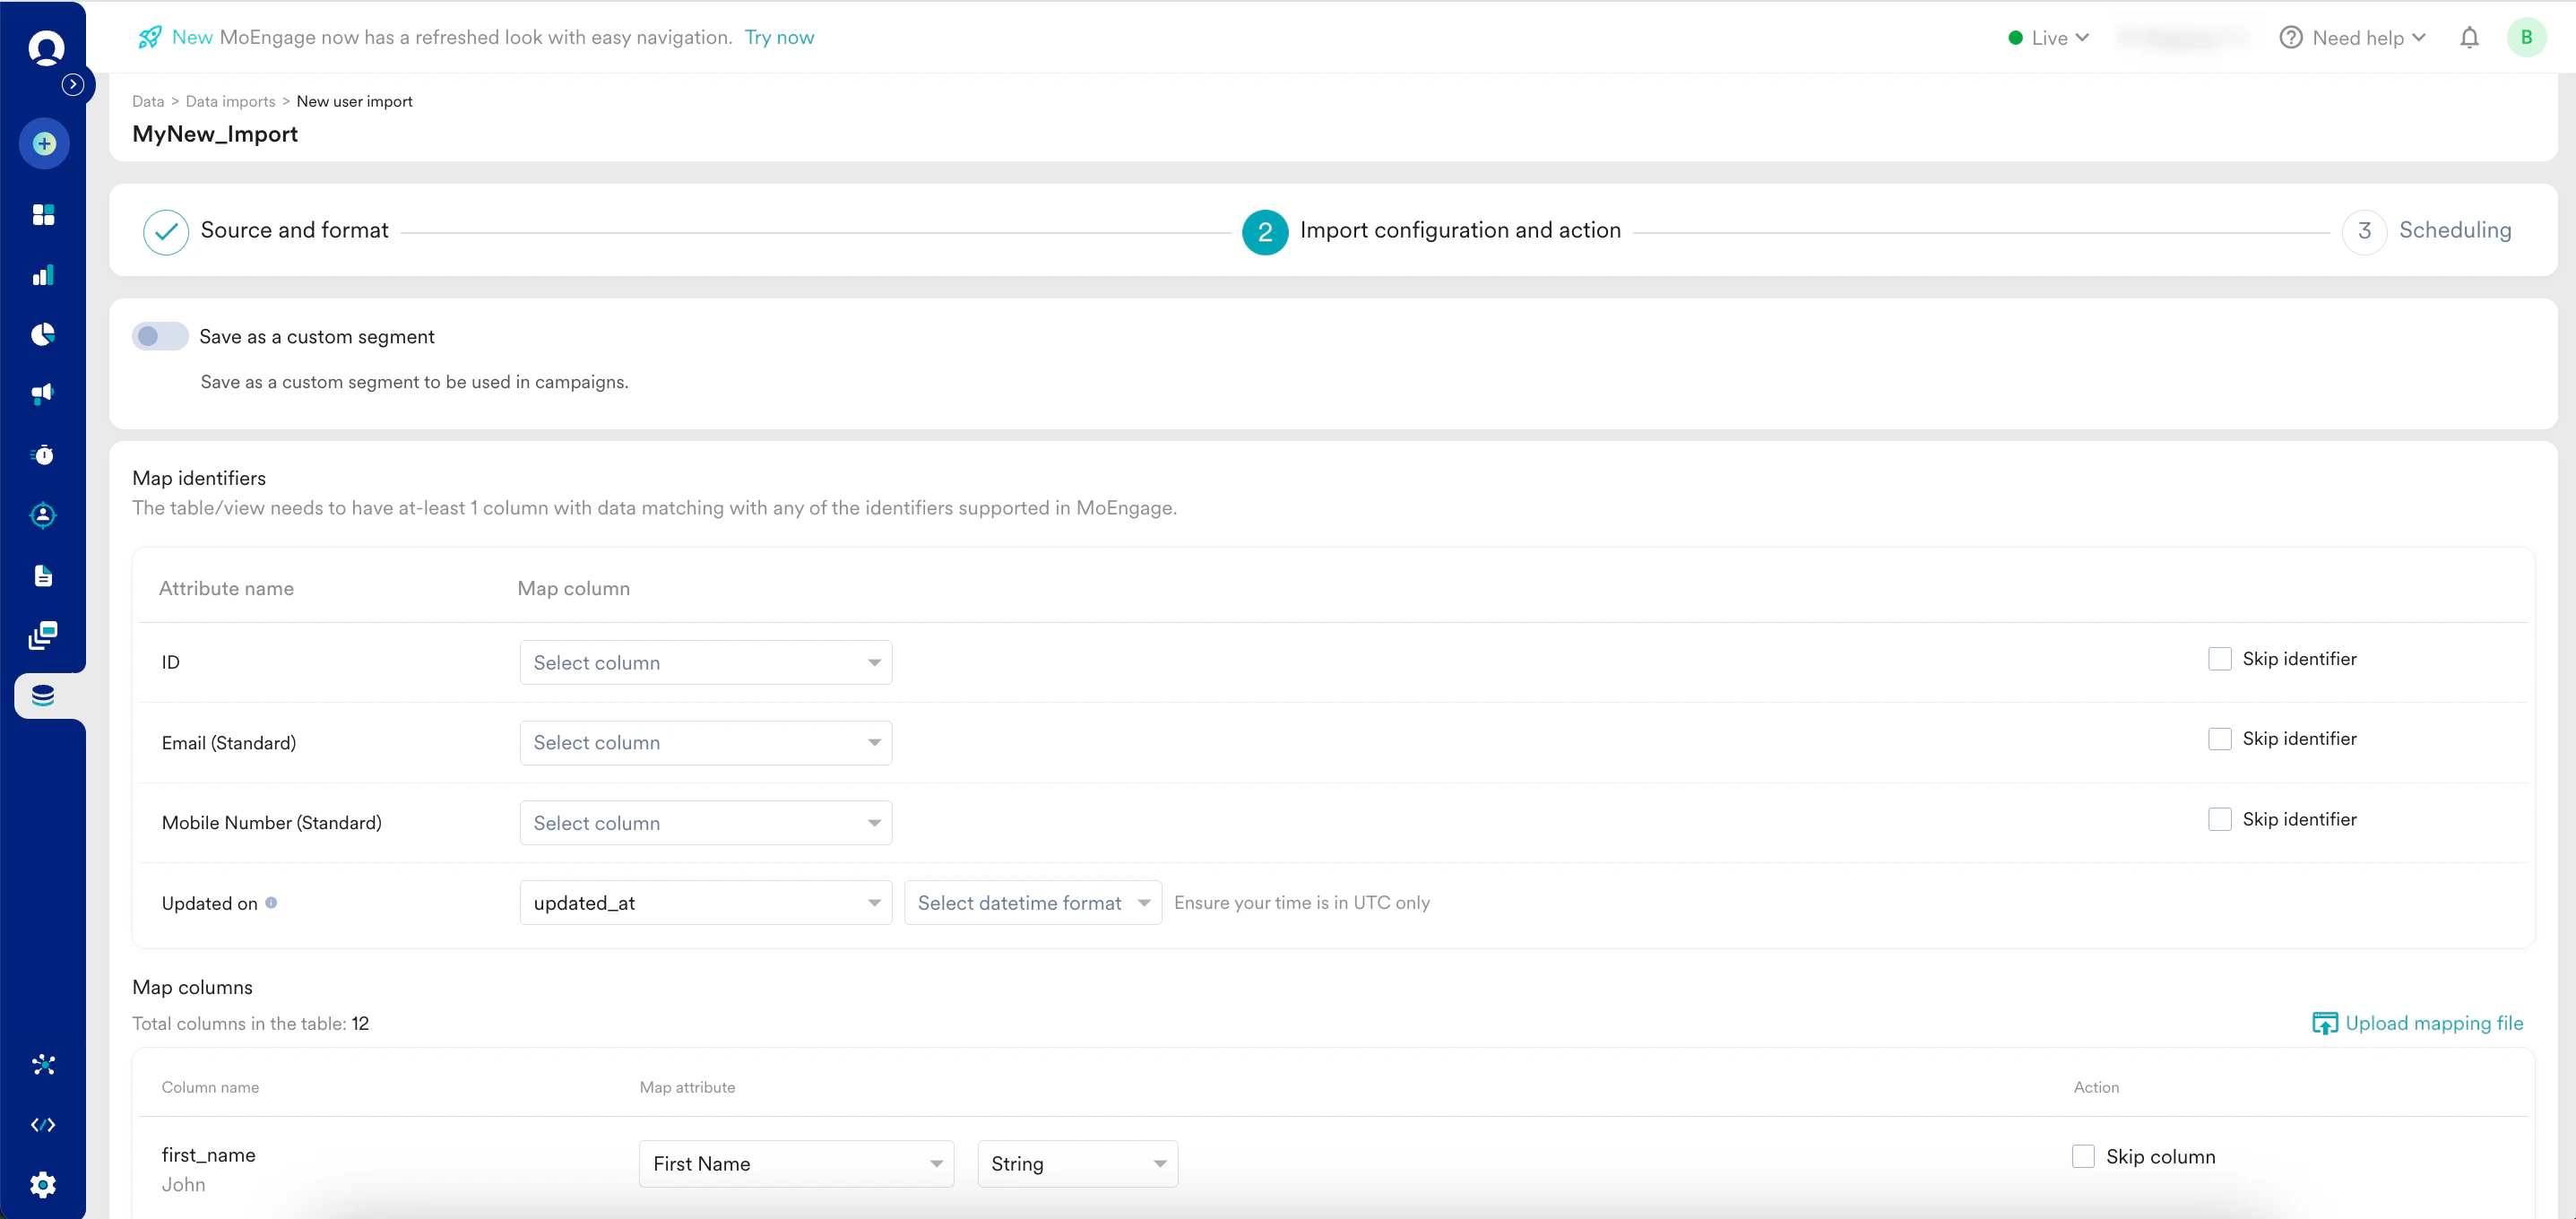 In the **Map Columns** section, you have the following:
1. **Column name**: This is the column name (picked from the first row of the fetched file in the previous step) to be mapped. Below the column name, MoEngage also shows a sample value (picked from the second row of the fetched file in the previous step) for your reference.
2. **Map column to attribute**: You must select which MoEngage attribute you want to map the column to. You can also choose to create a new attribute. Some attributes support ingestion from multiple data types, so you need to pick the data type of the column as well. For the "DateTime" columns, you also need to pick the format. For the "DateTime" columns, you also need to pick the [format](/docs/user-guide/data/imports/overview/overview-imports).
3. **Action**: You can optionally choose to skip the column. The skipped column will not be imported.
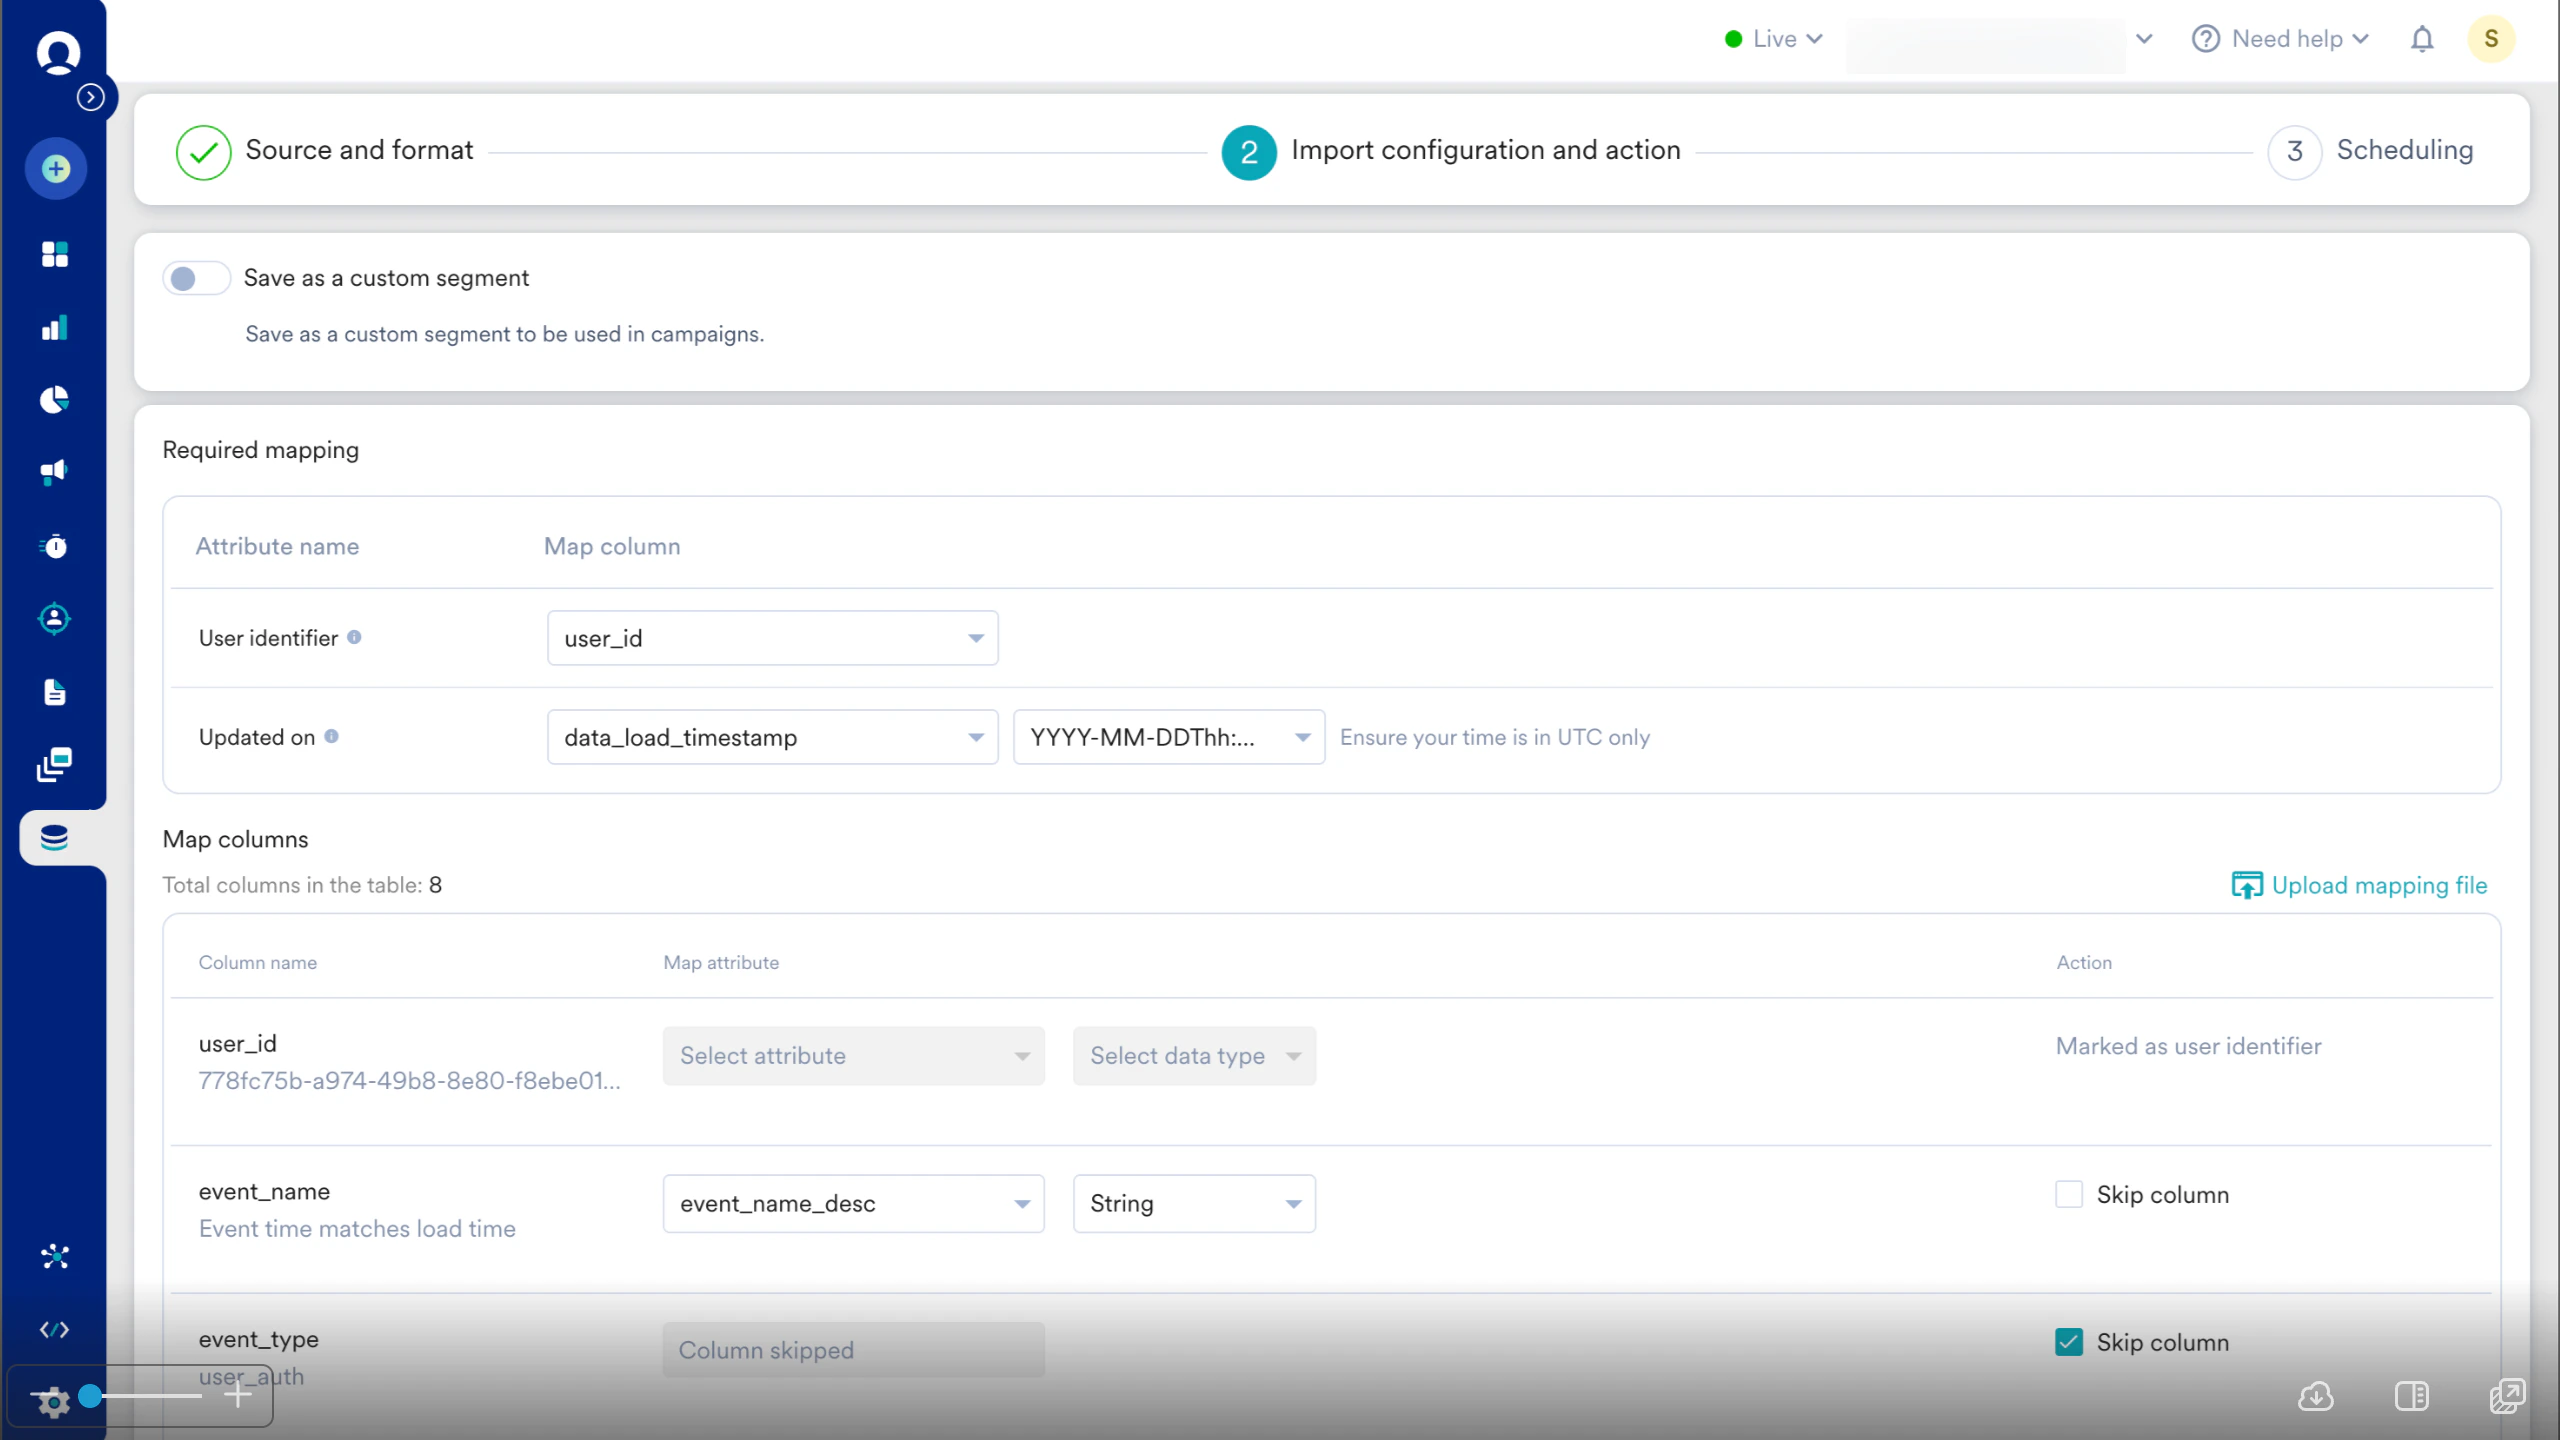
Depending on the type of import, there are a few mandatory mappings required:
| Mapping | Description |
| ---------- | ------------------------------------------------------------------------------------------------------------------------------------------------------------------------------------------------------------------------------------------------------------------------------------------------------------------------------------------------------------------------------------------------------------------------------------------------------------------------------------------------------------------------------------------------------------------------------------------------------------------------------------------------------------------------------------------------------------------------------------------------------------------------------------------------------------------------------------------------------------------------------------------------------------------------------------------------------------------------------------------------------------------------------------------------------------------------------------------------------------------------------------------------------------------------------------------------------------------------------------------------------------------------------------------------------------------------------------------------------------------------------------------------------------------------------------------------------------------------------------------------------------------------------------------------------------------------------------------------------------------------------------------------------------------------------------------------------------- |
| User ID | In your table, include a column with a unique user identifier, which is essential for identifying user accounts within your system. |
| Updated on | MoEngage uses this column to determine which rows were added or updated since the last sync. Ensure that this timestamp (date and time) uses the UTC time zone. The column type for this must be `TIMESTAMP`. For a complete list of supported datetime formats, refer to this [section](/docs/user-guide/data/imports/overview/overview-imports).
In the **Map Columns** section, you have the following:
1. **Column name**: This is the column name (picked from the first row of the fetched file in the previous step) to be mapped. Below the column name, MoEngage also shows a sample value (picked from the second row of the fetched file in the previous step) for your reference.
2. **Map column to attribute**: You must select which MoEngage attribute you want to map the column to. You can also choose to create a new attribute. Some attributes support ingestion from multiple data types, so you need to pick the data type of the column as well. For the "DateTime" columns, you also need to pick the format. For the "DateTime" columns, you also need to pick the [format](/docs/user-guide/data/imports/overview/overview-imports).
3. **Action**: You can optionally choose to skip the column. The skipped column will not be imported.
Depending on the type of import, there are a few mandatory mappings required:
| Mapping | Description |
| ---------- | ------------------------------------------------------------------------------------------------------------------------------------------------------------------------------------------------------------------------------------------------------------------------------------------------------------------------------------------------------------------------------------------------------------------------------------------------------------------------------------------------------------------------------------------------------------------------------------------------------------------------------------------------------------------------------------------------------------------------------------------------------------------------------------------------------------------------------------------------------------------------------------------------------------------------------------------------------------------------------------------------------------------------------------------------------------------------------------------------------------------------------------------------------------------------------------------------------------------------------------------------------------------------------------------------------------------------------------------------------------------------------------------------------------------------------------------------------------------------------------------------------------------------------------------------------------------------------------------------------------------------------------------------------------------------------------------------------------- |
| User ID | In your table, include a column with a unique user identifier, which is essential for identifying user accounts within your system. |
| Updated on | MoEngage uses this column to determine which rows were added or updated since the last sync. Ensure that this timestamp (date and time) uses the UTC time zone. The column type for this must be `TIMESTAMP`. For a complete list of supported datetime formats, refer to this [section](/docs/user-guide/data/imports/overview/overview-imports).
 |
| Mapping | Description |
| ---------- | ----------------------------------------------------------------------------------------------------------------------------------------------------------------------------------------------------------------------------------------------------------------------------------------------------------------------------------------------------------------------------------------------------------------------------------------------------------------------------------------------------------------------------------------------------------------------------------------------------------------------------------------------------------------------------------------------------------------------------------------------------------------------------------------------------------------------------------------------------------------------------------------------------------------------------------------------------------------------------------------------------------------------------------------------------------------------------------------------------------------------------------------------------------------------------------------------------------------------------------------------------------------------------------------------------------------------------------------------------------------------------------------------------------------------------------------------------------------------------------------------------------------------------------------------------------------------------------------------------------------------------------------------------------------------------------------------------------------------- |
| User ID | This column matches MoEngage user IDs to your events. |
| Event time | Map the column that contains the timestamp (date + time) of when the event occurred. MoEngage uses this column to sync new events. Ensure that this timestamp (date + time) is in the UTC time zone. The column type must be `DATETIME`. The *Event Time* of the imported event will be converted to the timezone chosen in your MoEngage dashboard settings. For a complete list of supported datetime formats, refer to this [section](/docs/user-guide/data/imports/overview/overview-imports). |
| Updated on | MoEngage uses this column to determine which rows were added or updated since the last sync. Use this column to import backdated events or manage delays in upstream pipelines. Ensure that this timestamp (date and time) uses the UTC time zone. If you do not have this column, select *Use same as Event time*. The column type must be `DATETIME`.
|
| Mapping | Description |
| ---------- | ----------------------------------------------------------------------------------------------------------------------------------------------------------------------------------------------------------------------------------------------------------------------------------------------------------------------------------------------------------------------------------------------------------------------------------------------------------------------------------------------------------------------------------------------------------------------------------------------------------------------------------------------------------------------------------------------------------------------------------------------------------------------------------------------------------------------------------------------------------------------------------------------------------------------------------------------------------------------------------------------------------------------------------------------------------------------------------------------------------------------------------------------------------------------------------------------------------------------------------------------------------------------------------------------------------------------------------------------------------------------------------------------------------------------------------------------------------------------------------------------------------------------------------------------------------------------------------------------------------------------------------------------------------------------------------------------------------------------- |
| User ID | This column matches MoEngage user IDs to your events. |
| Event time | Map the column that contains the timestamp (date + time) of when the event occurred. MoEngage uses this column to sync new events. Ensure that this timestamp (date + time) is in the UTC time zone. The column type must be `DATETIME`. The *Event Time* of the imported event will be converted to the timezone chosen in your MoEngage dashboard settings. For a complete list of supported datetime formats, refer to this [section](/docs/user-guide/data/imports/overview/overview-imports). |
| Updated on | MoEngage uses this column to determine which rows were added or updated since the last sync. Use this column to import backdated events or manage delays in upstream pipelines. Ensure that this timestamp (date and time) uses the UTC time zone. If you do not have this column, select *Use same as Event time*. The column type must be `DATETIME`.
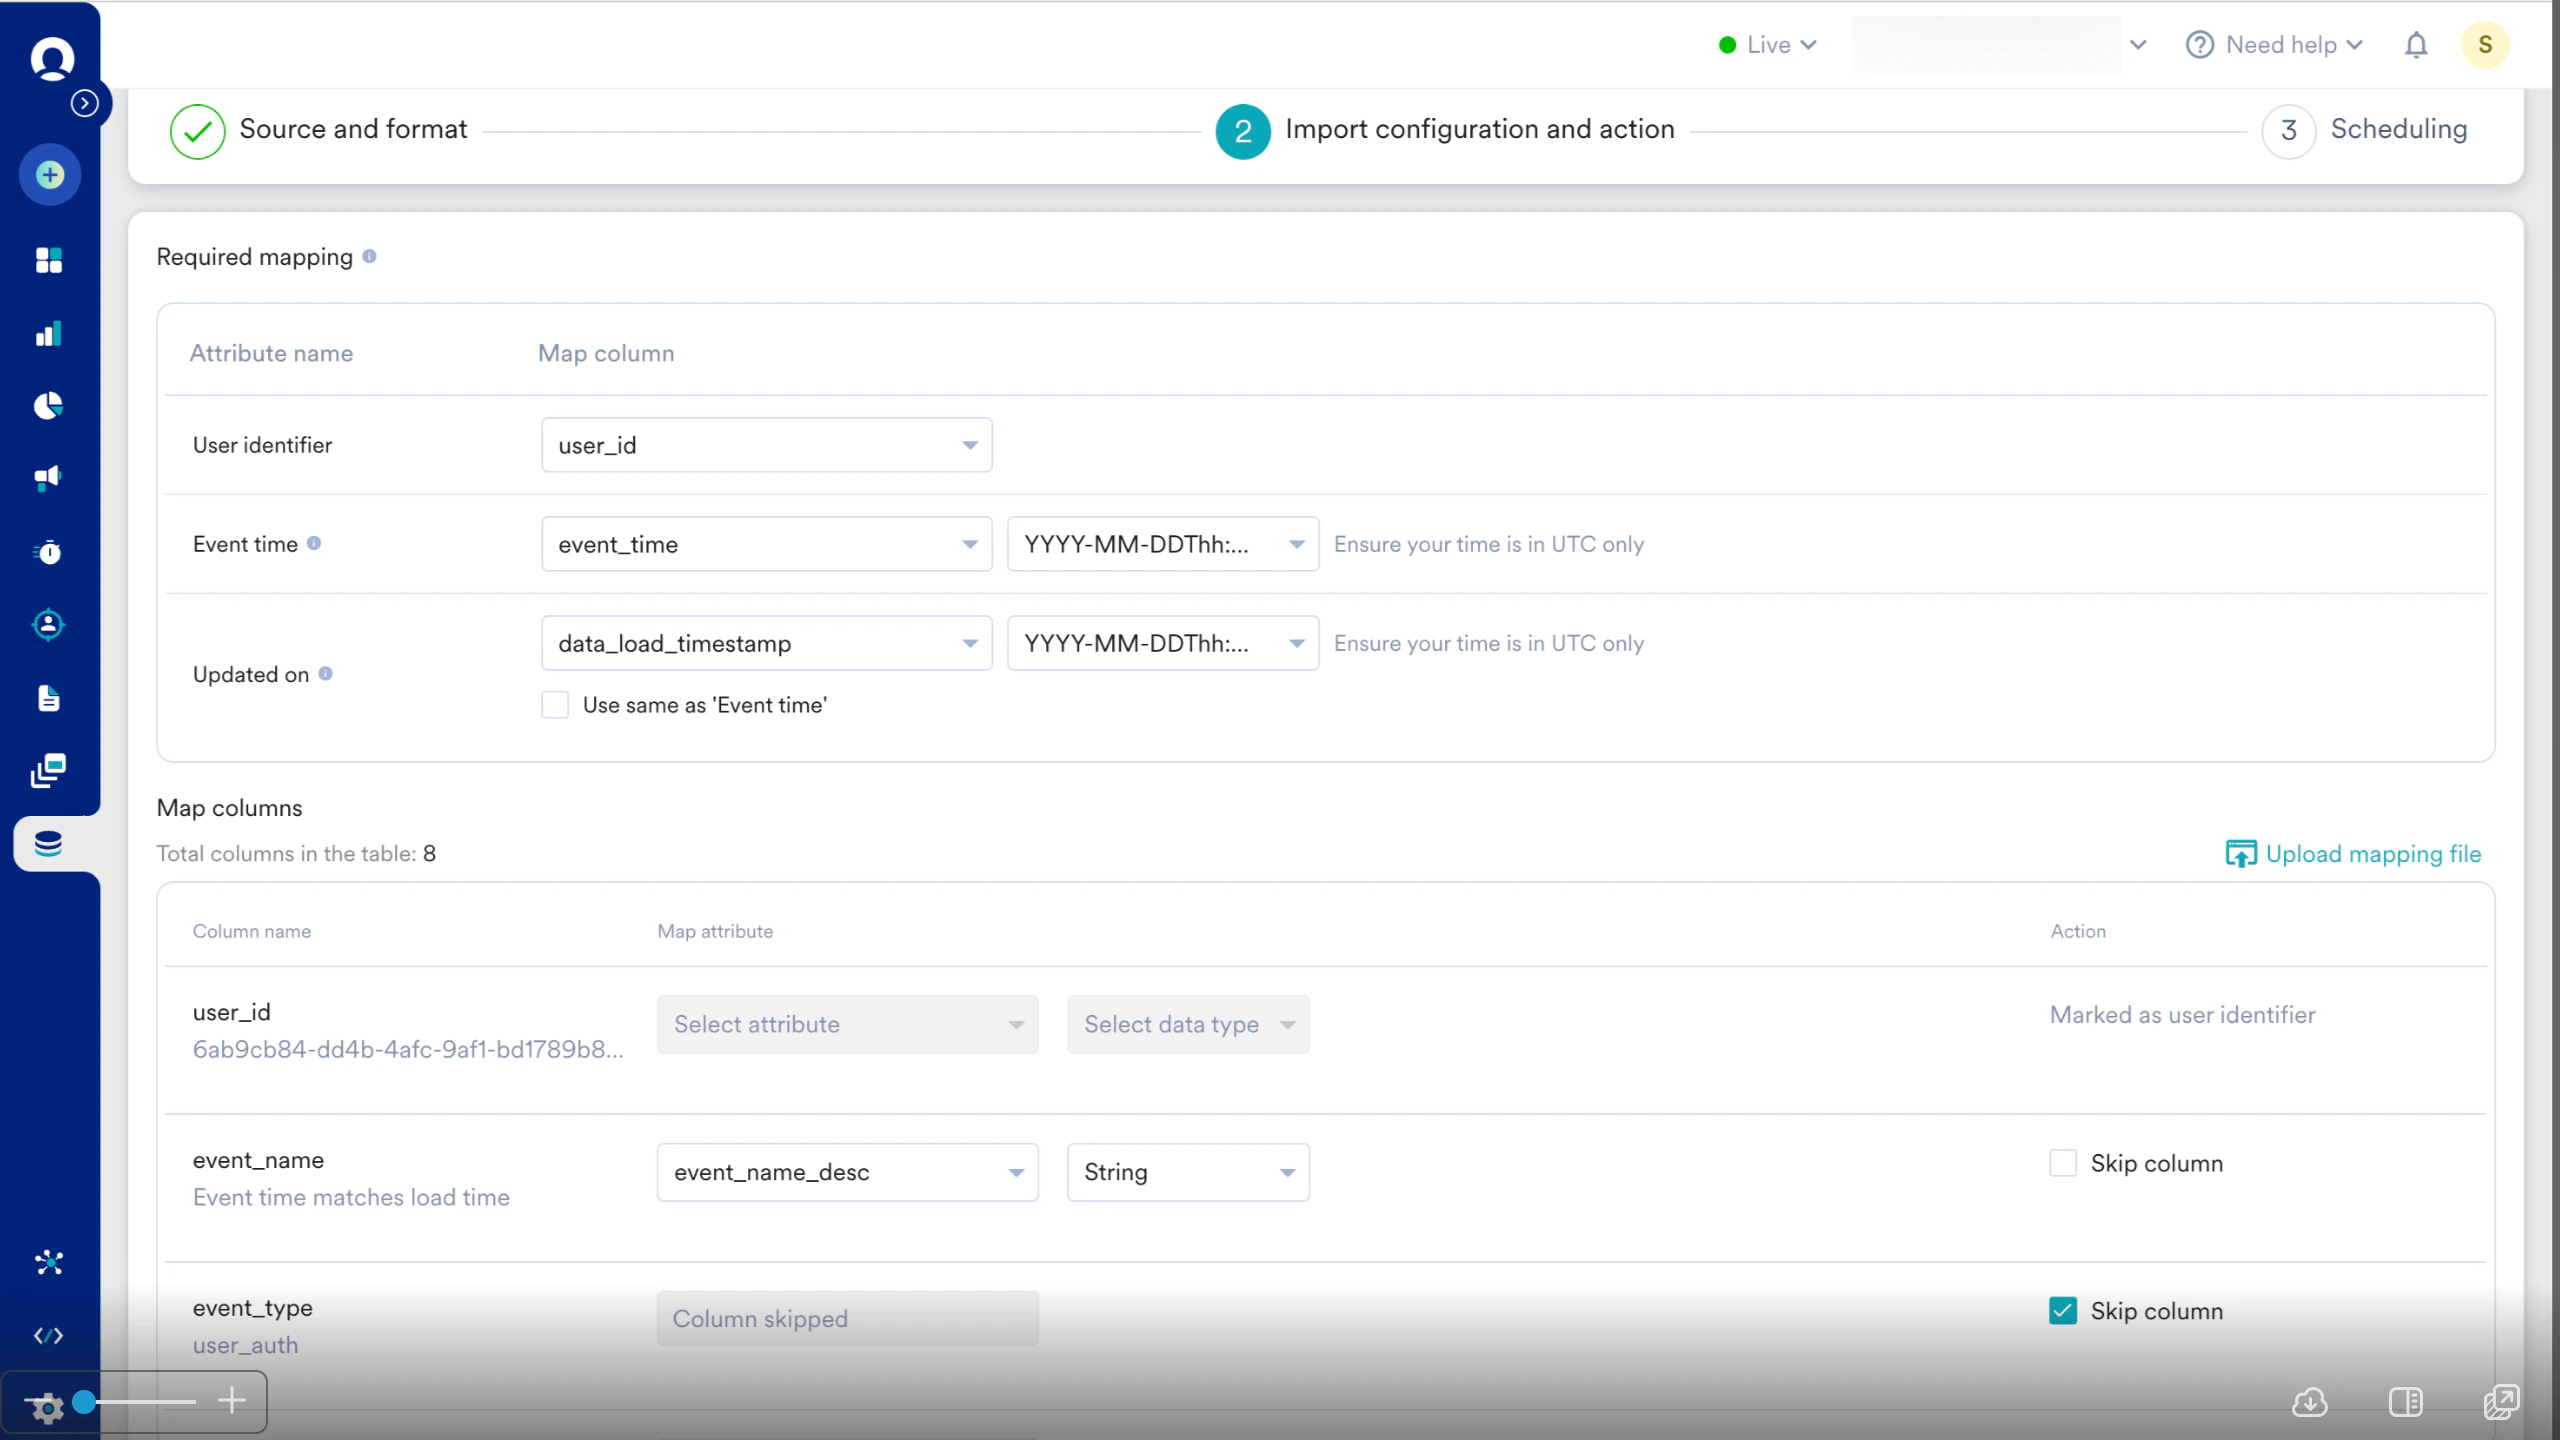 |
After a mandatory mapping is marked, it will reflect against the column name in the mapping table, and you can no longer mark the column as skippable.
Just like new events, you can also create a new user attribute. To do so:
1. Click **+ Create attribute** available in the **Select attribute** list. The **Create new attribute** dialog box is displayed.
|
After a mandatory mapping is marked, it will reflect against the column name in the mapping table, and you can no longer mark the column as skippable.
Just like new events, you can also create a new user attribute. To do so:
1. Click **+ Create attribute** available in the **Select attribute** list. The **Create new attribute** dialog box is displayed.
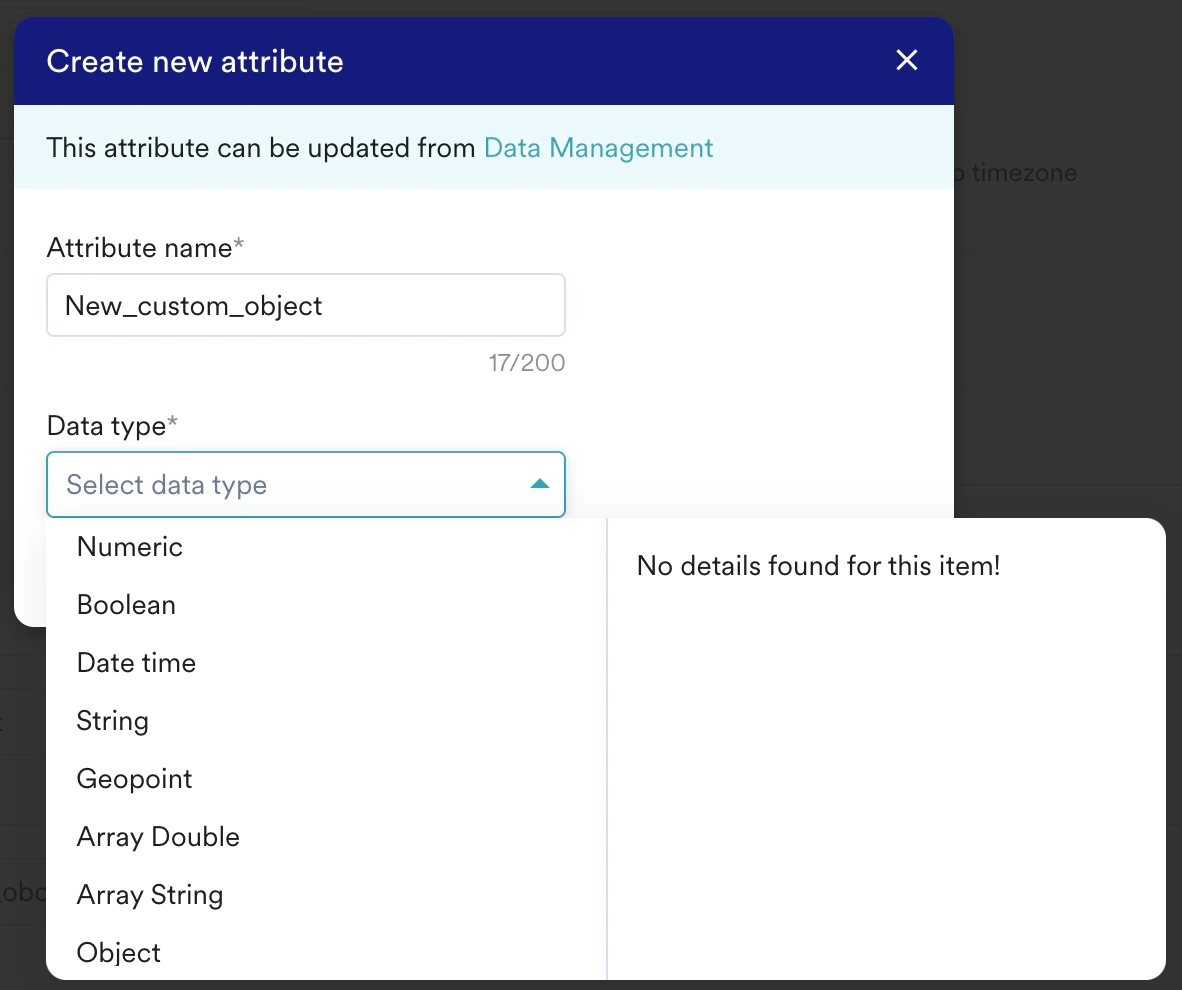
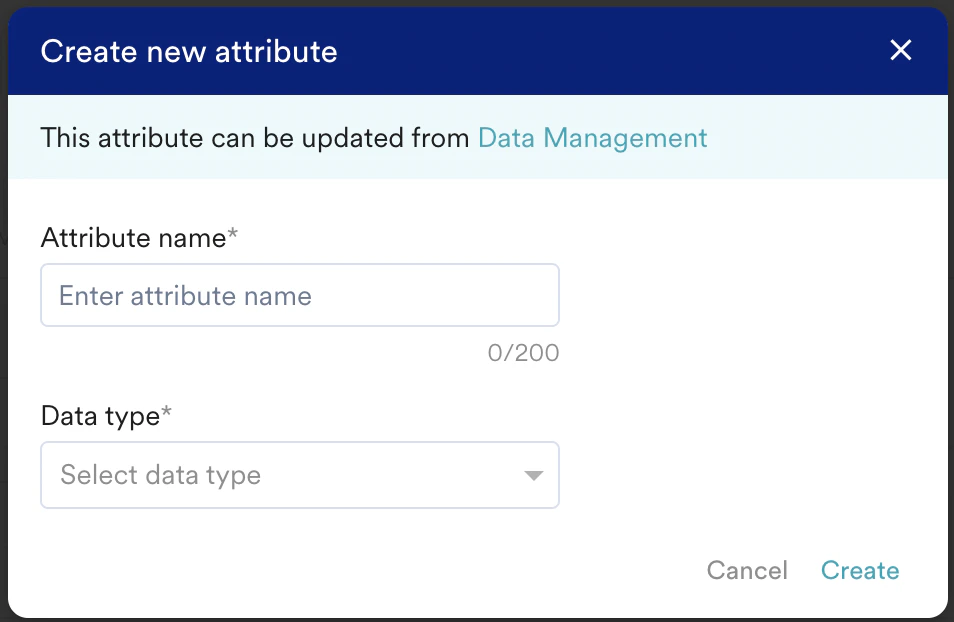 2. In the **Attribute name** box, type a name for your attribute.
3. In the **Data type** list, select a data type. You can edit these and existing attributes from the [Data Management](/docs/user-guide/settings/data-management/overview-data-management) page.
The newly created user attributes will not appear on the **Data Management** page until the initial import is successful.
### Manifest Files
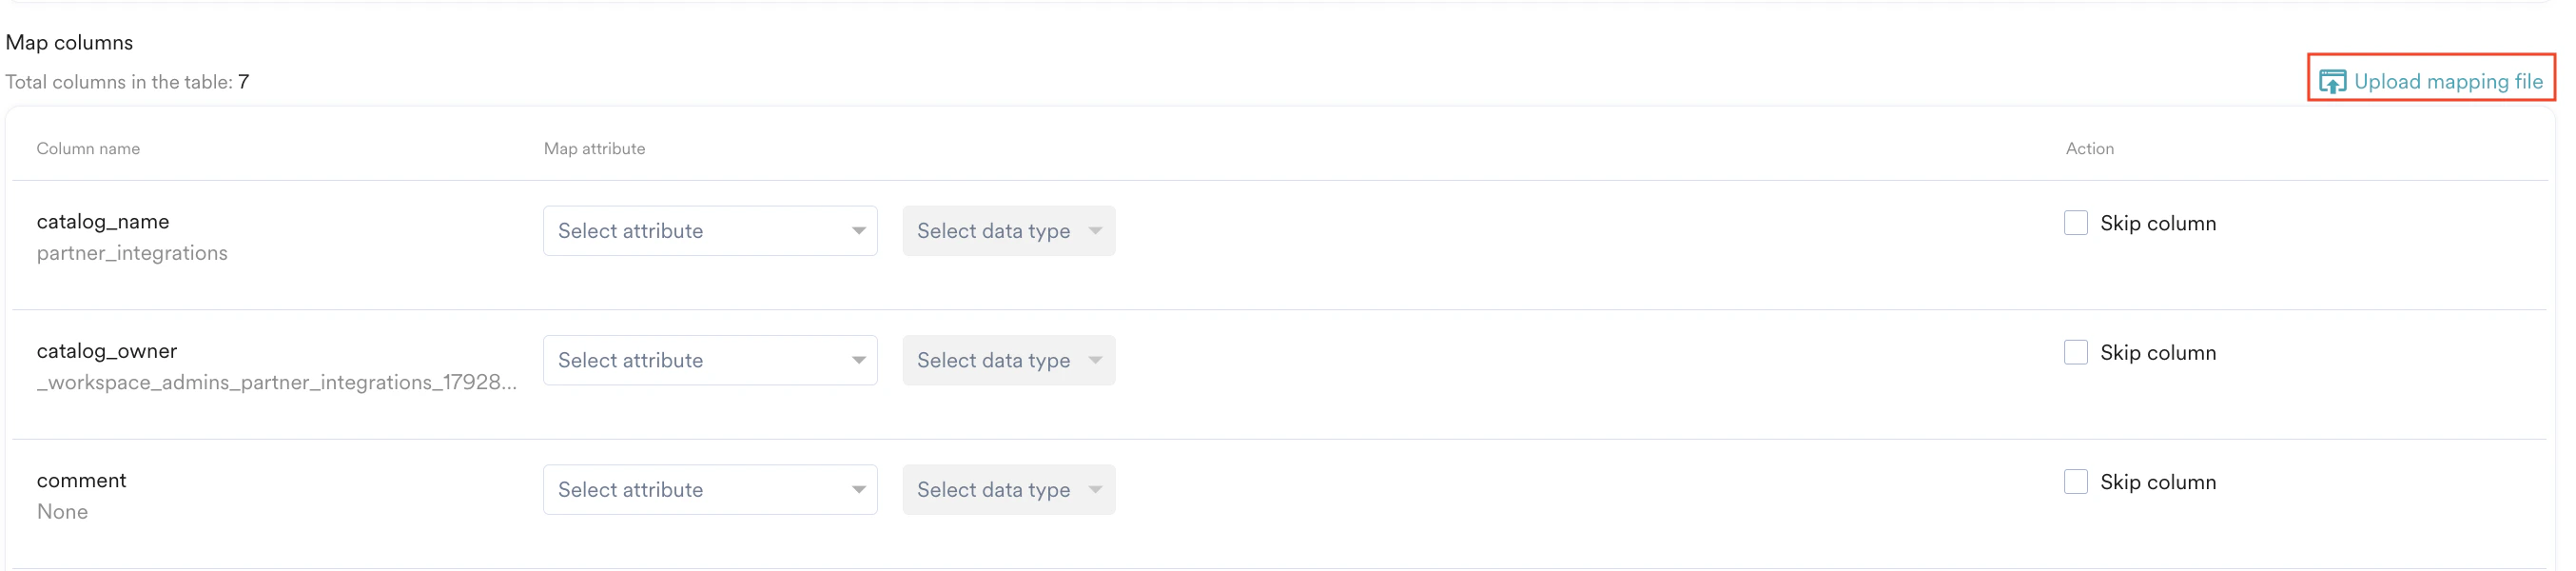
Optionally, you can auto-map these columns by uploading a [Manifest file](/docs/user-guide/data/imports/overview/overview-imports). To upload a manifest file:
1. Click the **Upload mapping** file in the upper-right of the mapping table.
2. In the **Attribute name** box, type a name for your attribute.
3. In the **Data type** list, select a data type. You can edit these and existing attributes from the [Data Management](/docs/user-guide/settings/data-management/overview-data-management) page.
The newly created user attributes will not appear on the **Data Management** page until the initial import is successful.
### Manifest Files
Optionally, you can auto-map these columns by uploading a [Manifest file](/docs/user-guide/data/imports/overview/overview-imports). To upload a manifest file:
1. Click the **Upload mapping** file in the upper-right of the mapping table.
 2. On the **Upload mapping** dialog box, upload your manifest file.
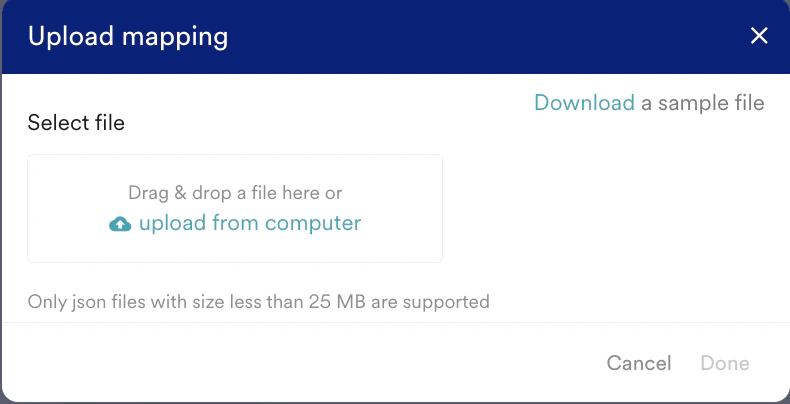 3. Click **Done**.
### Manifest File Functionality
* **Add Manifest (File Selection)**: For every import, you can download a sample manifest file from the MoEngage UI to use as a reference template and to view the [expected conventions](/docs/user-guide/data/imports/overview/overview-imports). Select the file you want to upload as a manifest file.
* **Automatic Configuration**: Once uploaded, MoEngage auto-configures the mapping based on the file contents.
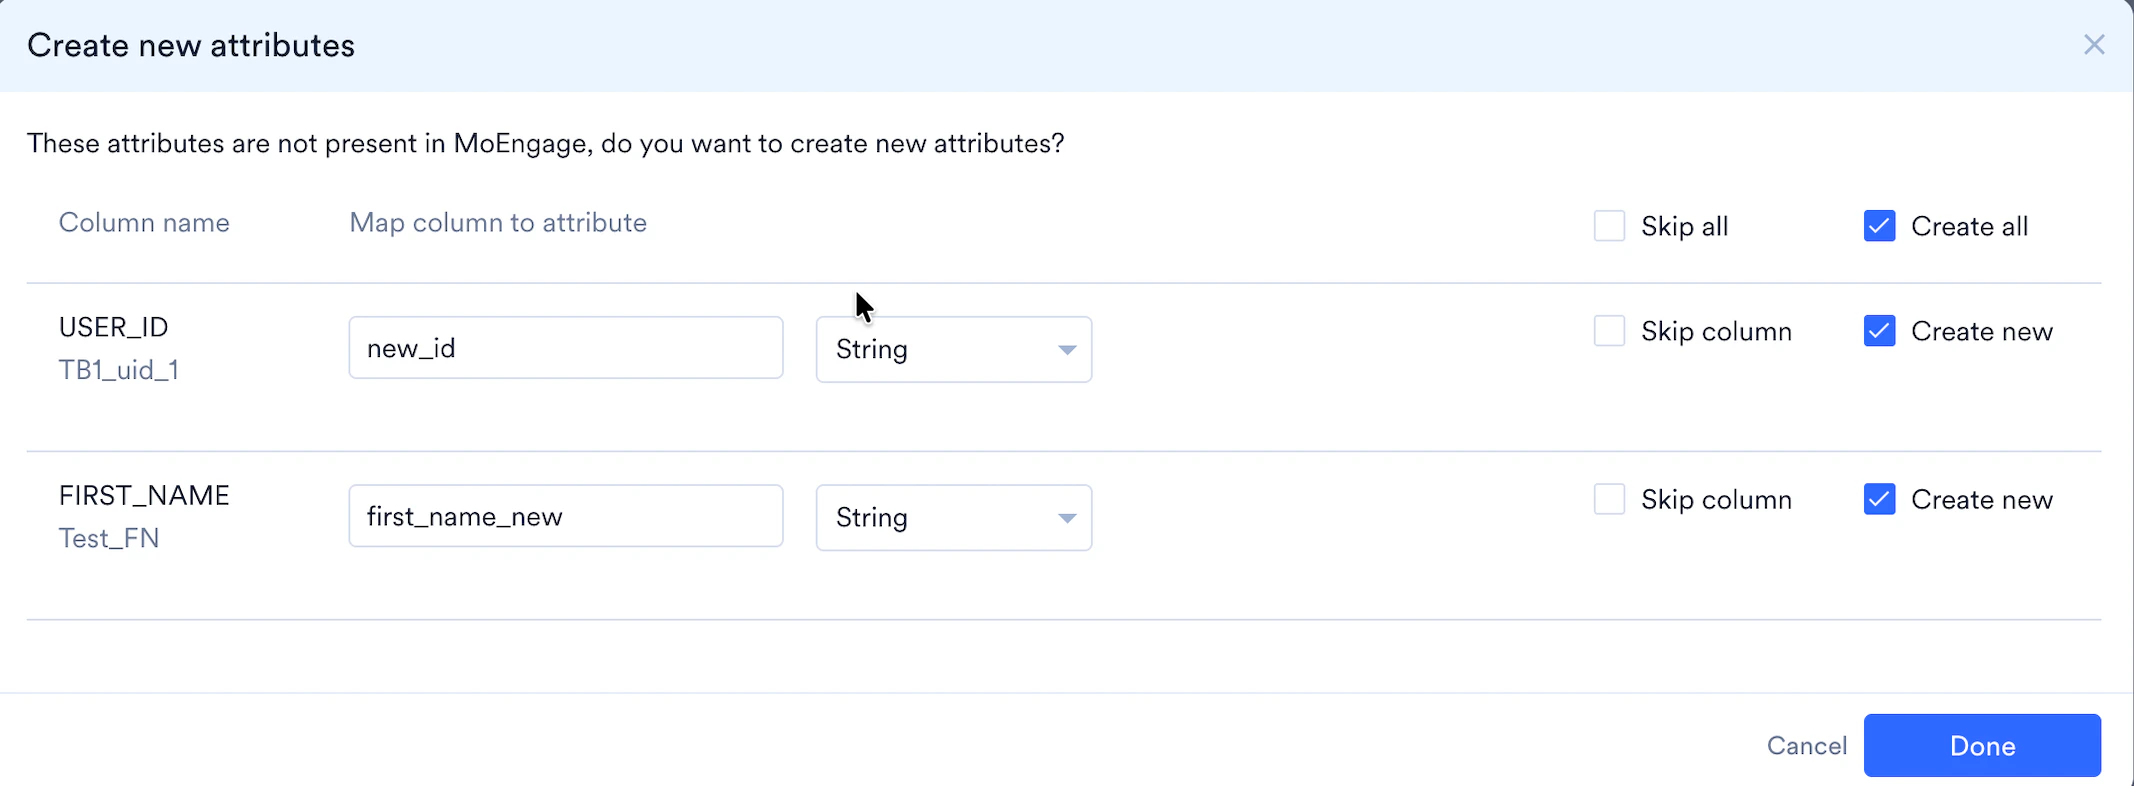
* **Attribute Creation Modal**: If your manifest file includes attributes that do not yet exist in MoEngage, a modal automatically opens. This allows you to create these new attributes directly from the interface during the import process.
### Mapping Discrepancy Rules
* Any columns mapped to a non-existent MoEngage attribute (which you choose not to create via the modal) will be left blank for manual mapping.
* Any additional columns present in your Manifest file but not found in your source table or view will be ignored.
* If a column exists in the table but the mapping is missing from the manifest file, MoEngage keeps the mapping blank for you to configure manually.
3. Click **Done**.
### Manifest File Functionality
* **Add Manifest (File Selection)**: For every import, you can download a sample manifest file from the MoEngage UI to use as a reference template and to view the [expected conventions](/docs/user-guide/data/imports/overview/overview-imports). Select the file you want to upload as a manifest file.
* **Automatic Configuration**: Once uploaded, MoEngage auto-configures the mapping based on the file contents.
* **Attribute Creation Modal**: If your manifest file includes attributes that do not yet exist in MoEngage, a modal automatically opens. This allows you to create these new attributes directly from the interface during the import process.
### Mapping Discrepancy Rules
* Any columns mapped to a non-existent MoEngage attribute (which you choose not to create via the modal) will be left blank for manual mapping.
* Any additional columns present in your Manifest file but not found in your source table or view will be ignored.
* If a column exists in the table but the mapping is missing from the manifest file, MoEngage keeps the mapping blank for you to configure manually.
 ### Support for Object Data Type
The Object data type is supported in BigQuery as well.
#### Store Compatible JSON Data in BigQuery
To store JSON data inside BigQuery, you must change the data type of the column to *VARIANT* type. For more information, refer [here](https://docs.databricks.com/aws/en/sql/language-manual/data-types/variant-type). The JSON stored inside BigQuery should be a valid JSON; otherwise, the values will not be written as JSON. Here is an example JSON column:
```javascript Javascript wrap theme={null}
{ "Designation": "SSE", "Palace": "Banglore", "age": 30, "name": "Shasha" }
```
#### Import JSON Data via BigQuery
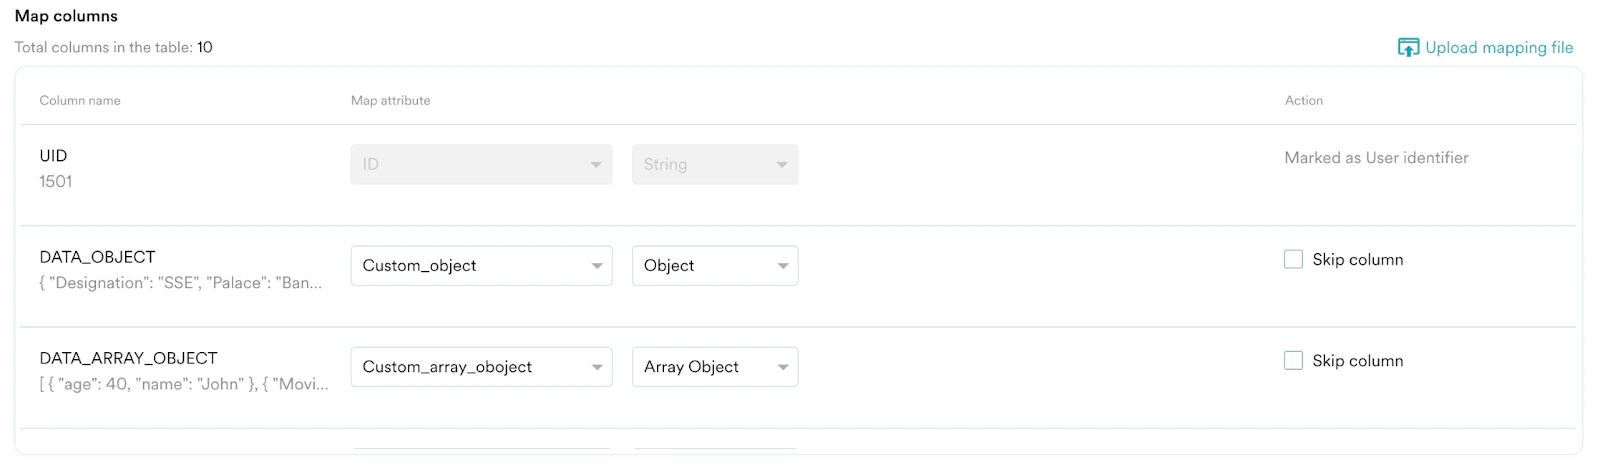
You can import the JSON data into BigQuery by associating existing attributes in the MoEngage platform that have been designated as Object type with columns in BigQuery.
### Support for Object Data Type
The Object data type is supported in BigQuery as well.
#### Store Compatible JSON Data in BigQuery
To store JSON data inside BigQuery, you must change the data type of the column to *VARIANT* type. For more information, refer [here](https://docs.databricks.com/aws/en/sql/language-manual/data-types/variant-type). The JSON stored inside BigQuery should be a valid JSON; otherwise, the values will not be written as JSON. Here is an example JSON column:
```javascript Javascript wrap theme={null}
{ "Designation": "SSE", "Palace": "Banglore", "age": 30, "name": "Shasha" }
```
#### Import JSON Data via BigQuery
You can import the JSON data into BigQuery by associating existing attributes in the MoEngage platform that have been designated as Object type with columns in BigQuery.
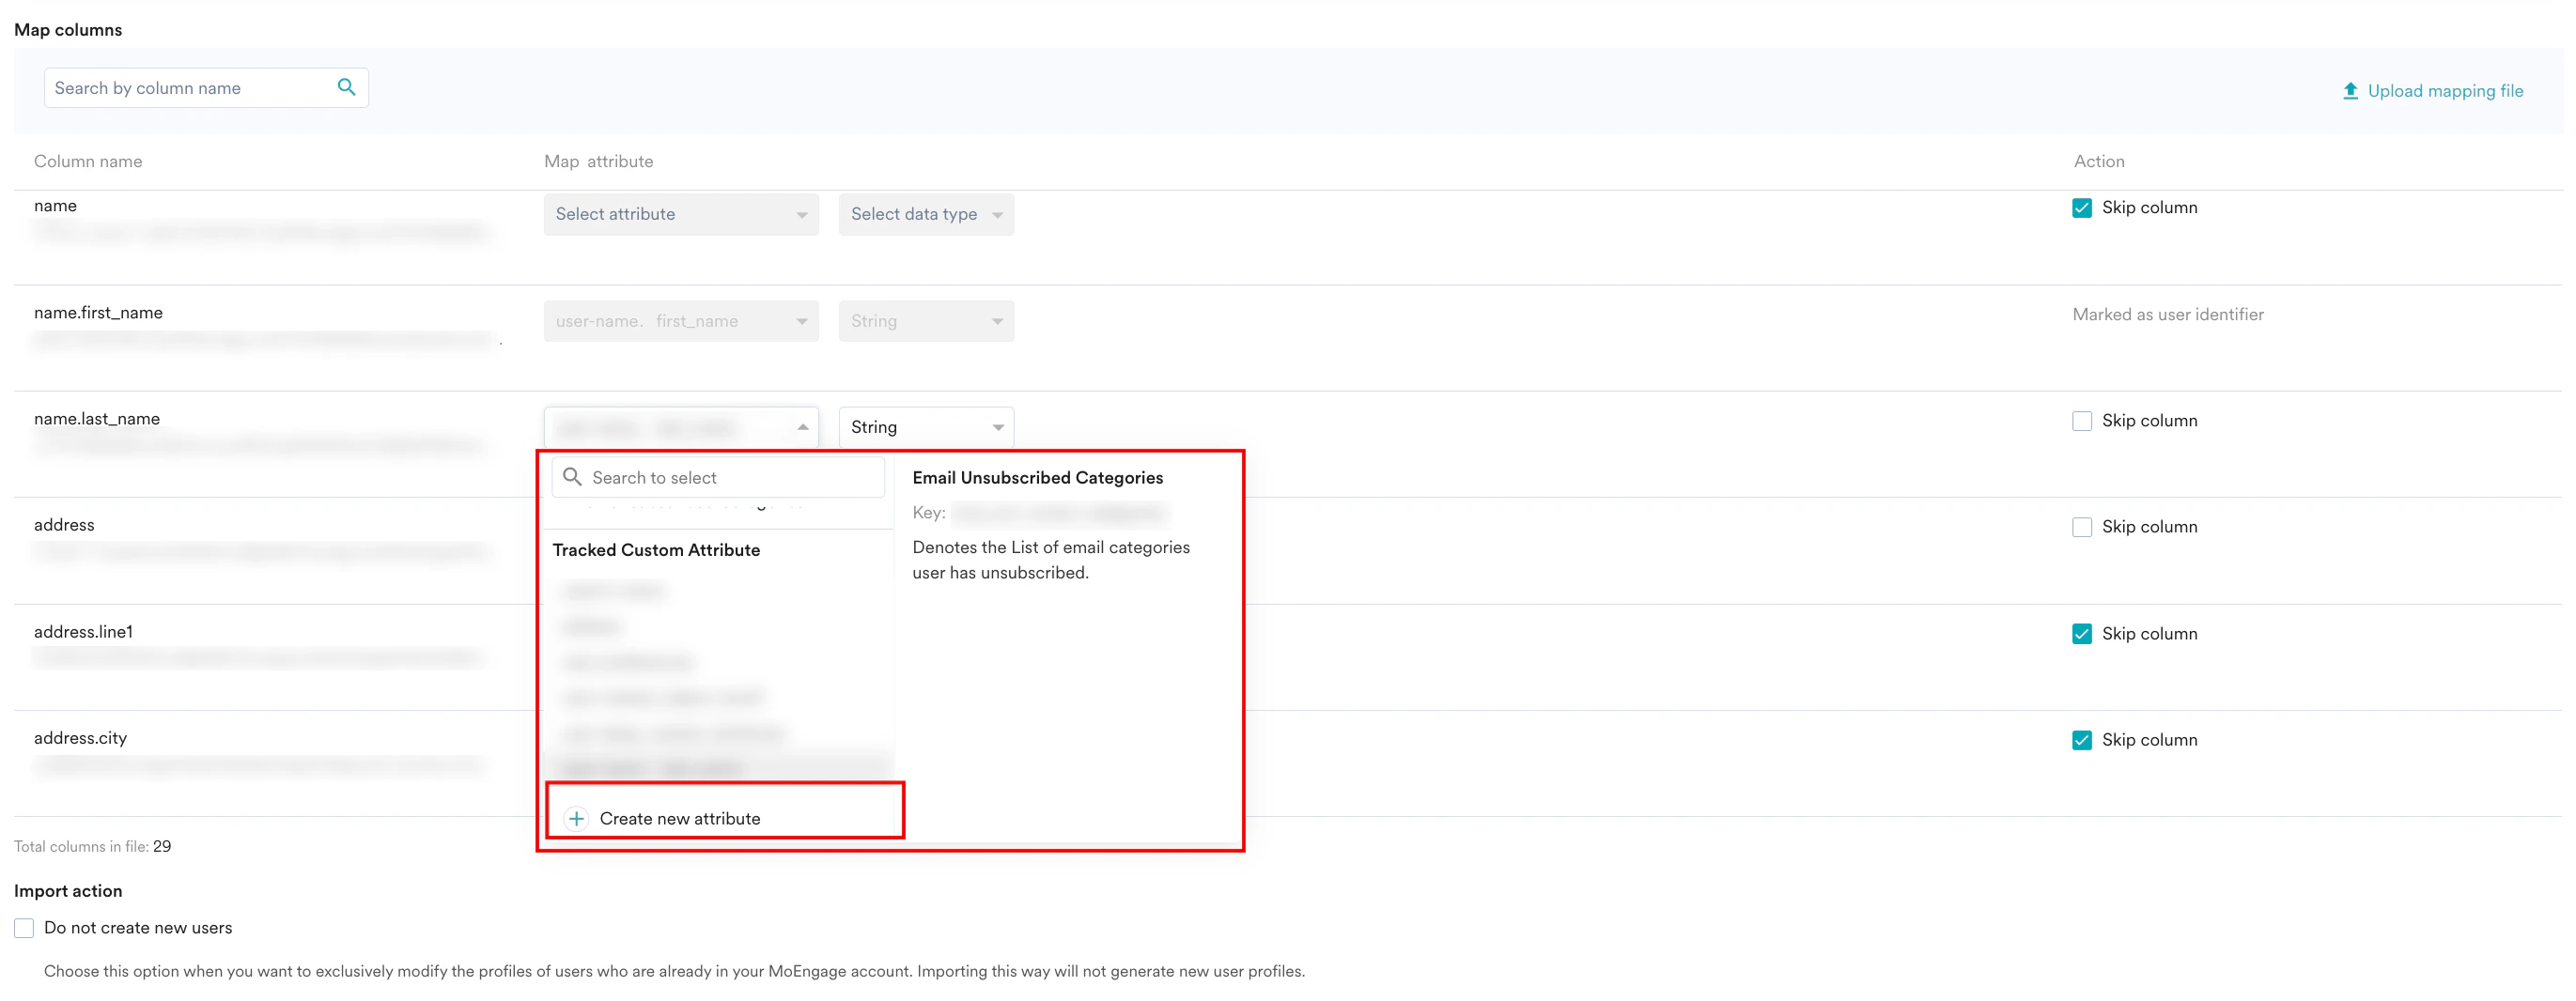
 You can also create new Object attributes by clicking **Create new attribute** in the **Select attribute** list under the **Map attribute** column.
 MoEngage does not support mapping with nested attributes. Only top-level attributes are available to map.
### Save Users as a Segment
When importing users, you can include them in a custom segment in MoEngage. The imported users are consistently added to this segment with each sync, and no users will be removed. To save imported users as a custom segment, perform the following steps:
1. Turn the **Save as a custom segment** toggle on to save your imported users in a custom segment and send tailored campaigns to the same.
MoEngage does not support mapping with nested attributes. Only top-level attributes are available to map.
### Save Users as a Segment
When importing users, you can include them in a custom segment in MoEngage. The imported users are consistently added to this segment with each sync, and no users will be removed. To save imported users as a custom segment, perform the following steps:
1. Turn the **Save as a custom segment** toggle on to save your imported users in a custom segment and send tailored campaigns to the same.
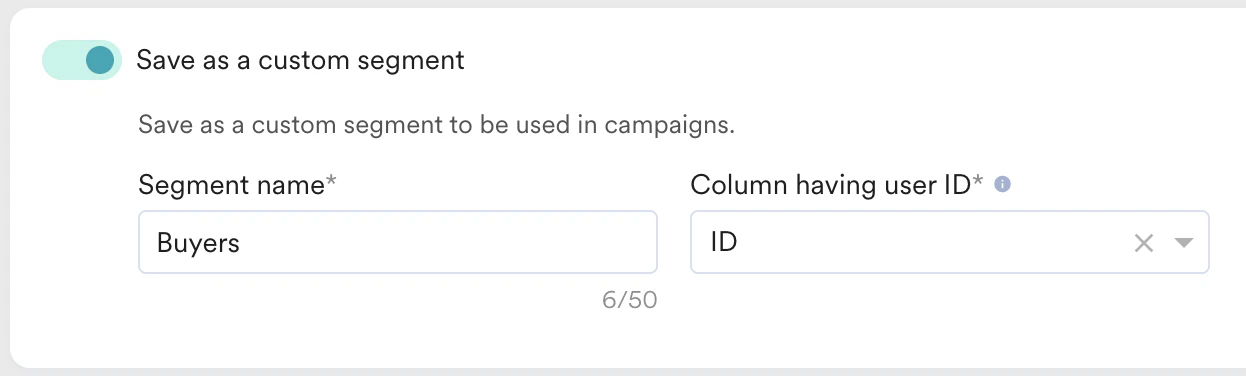 2. In the **Segment name** box, type a name for your segment.
3. In the **Column having user ID** list, select the identifier column in your table.
### Import Behaviour
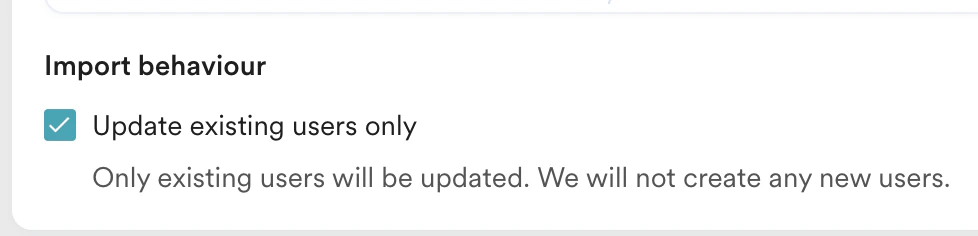
In the case of User Imports, you can also choose to update existing users only. This is helpful when you want to bulk update users' attributes in MoEngage without creating any new users. To enable this, select the **Update existing users only** check box under **Import Behaviour**:
2. In the **Segment name** box, type a name for your segment.
3. In the **Column having user ID** list, select the identifier column in your table.
### Import Behaviour
In the case of User Imports, you can also choose to update existing users only. This is helpful when you want to bulk update users' attributes in MoEngage without creating any new users. To enable this, select the **Update existing users only** check box under **Import Behaviour**:
 ### Send Import Notifications
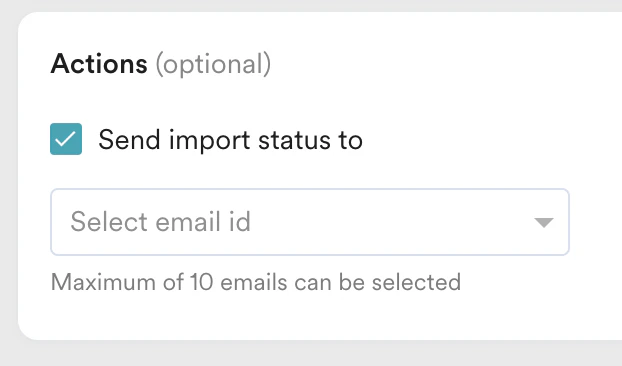
You can choose to be notified about the status of your imports via email. To do so:
1. Select the **Send import status to** check box.
2. In the **Select email id** list, select the email ID. You can select up to 10 emails to send the status emails to.
### Send Import Notifications
You can choose to be notified about the status of your imports via email. To do so:
1. Select the **Send import status to** check box.
2. In the **Select email id** list, select the email ID. You can select up to 10 emails to send the status emails to.
 The import status email contains information about the following events:
* An import was created
* An import was successful
* An import failed
3. After completing all mappings, click **Next**.
## Step 3: Scheduling
In this step, you must define when to import files from your BigQuery server.
The import status email contains information about the following events:
* An import was created
* An import was successful
* An import failed
3. After completing all mappings, click **Next**.
## Step 3: Scheduling
In this step, you must define when to import files from your BigQuery server.
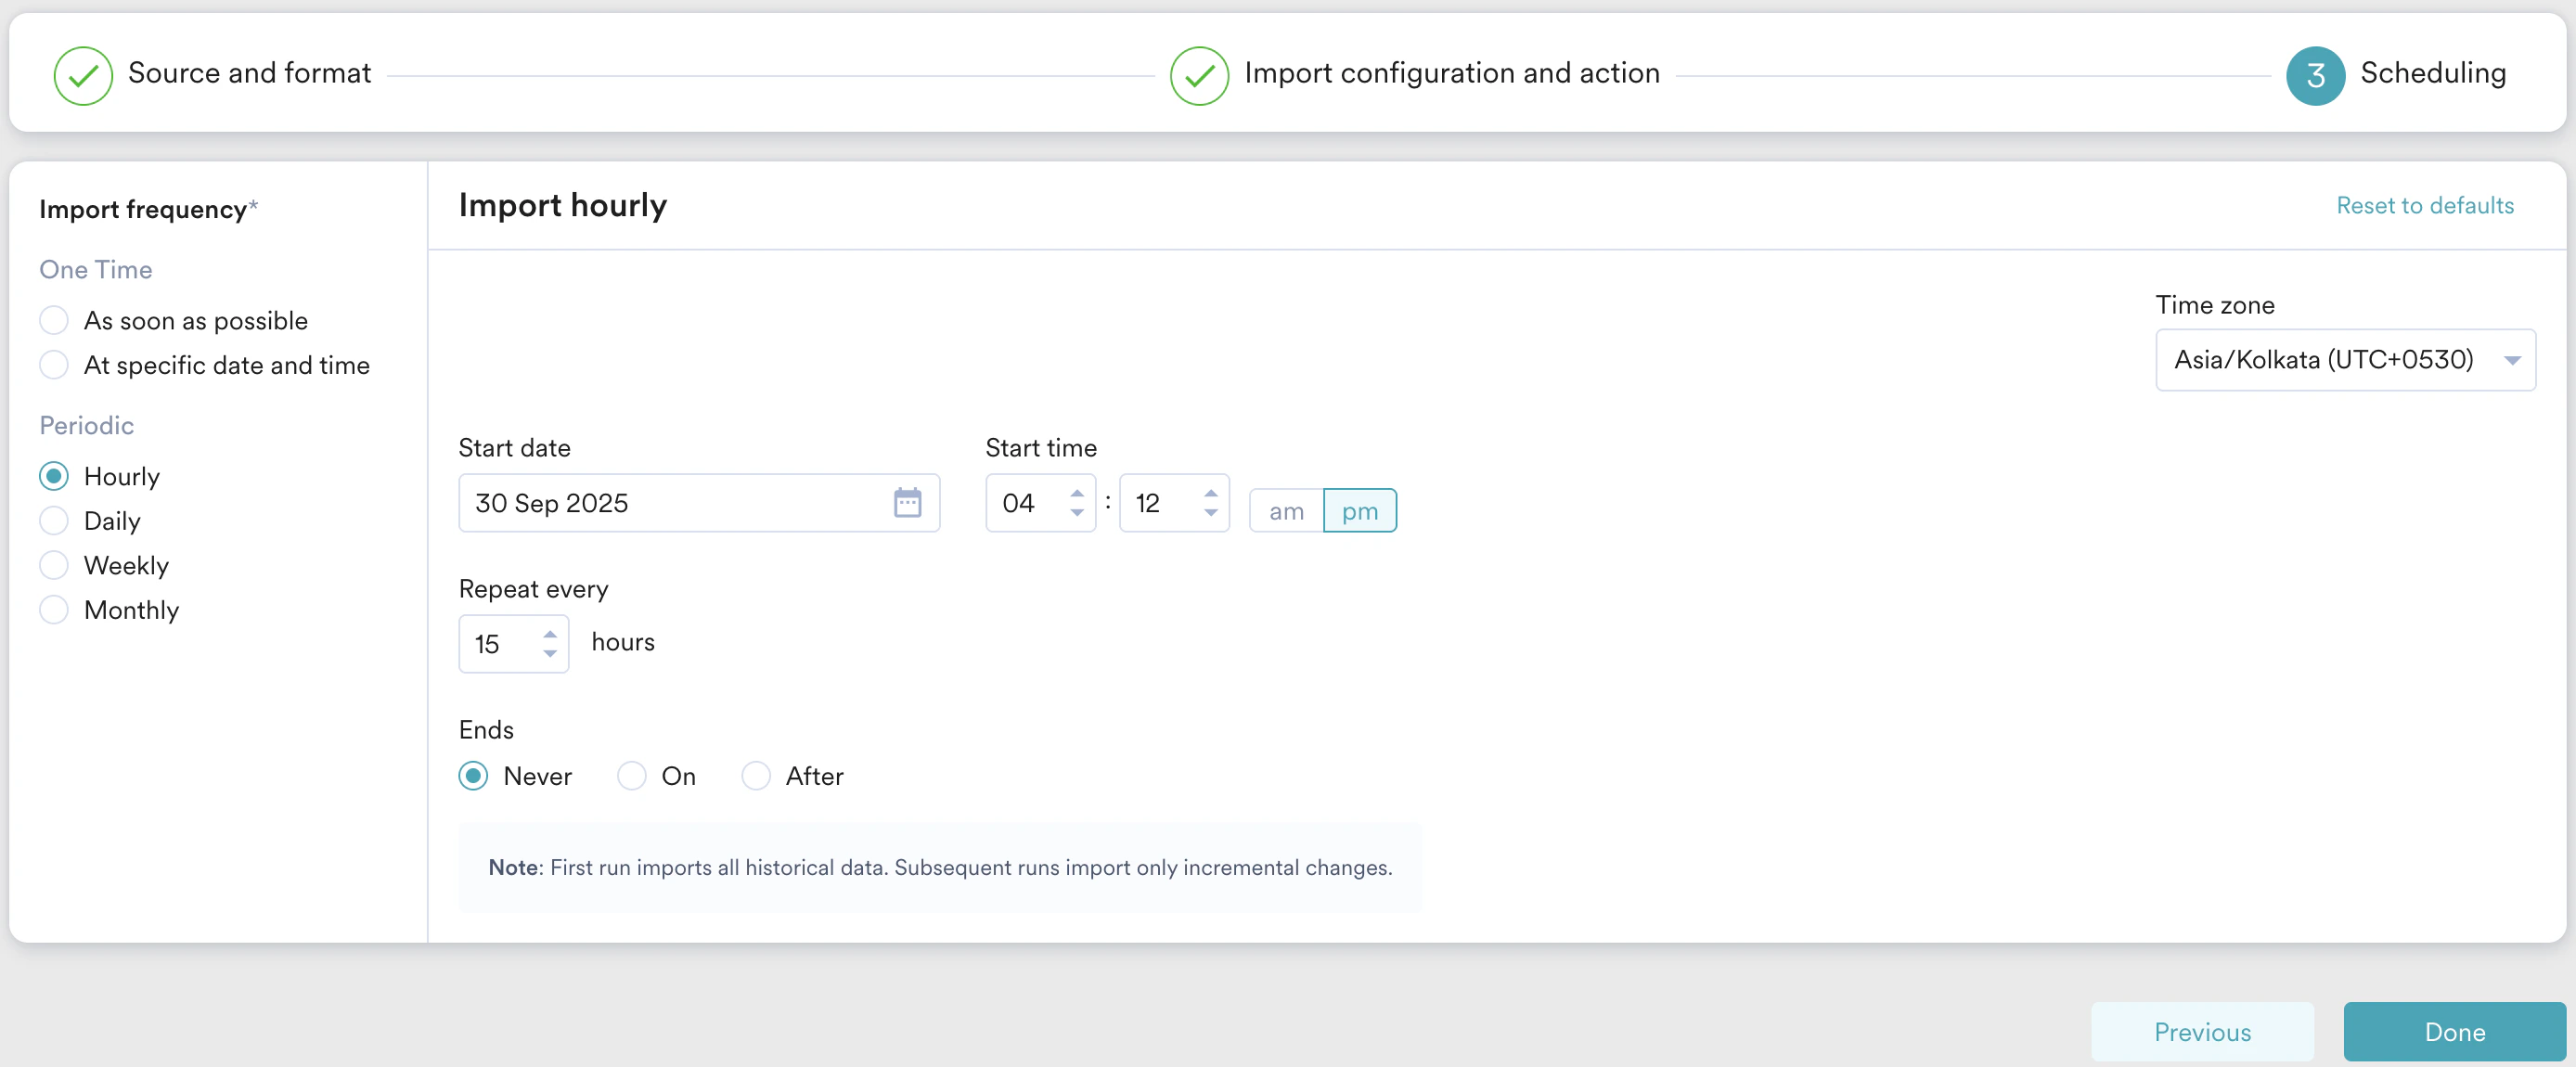 In this step, you must define when to sync with your tables. MoEngage supports the following types of imports:
* **One-time imports**: You can run the import as soon as possible or at a later date and time (scheduled).
* **Periodic**: You can run your imports hourly, daily, weekly, or monthly, or with intervals and advanced configurations.
For each run, MoEngage will try to fetch a file with the configured [DateTime format](/docs/user-guide/data/imports/overview/overview-imports), so ensure your [file names](/docs/user-guide/data/imports/overview/overview-imports) are configured properly. Optionally, you can specify whether the import should end after a specified set of occurrences or at a particular date. Click **Done** when ready.
Import schedule and detail times shown on the Data Imports dashboard use your app's configured timezone. If no app timezone is set, they display in UTC by default. Set the app timezone from **Settings** to see these times in your preferred timezone. This display timezone is separate from the mapped **Updated at** and **Event time** columns, which must always be in UTC.
Upon initial import, all matching rows from your table are imported. Subsequent imports only include changed rows.
## Duplicate Imports
A duplicate import is considered when the:
* Users/ Events import types are the same.
* Event name/ Registered/Anonymous/All users import subtypes are the same.
* Event name/ Registered/Anonymous/All users import types have the same BigQuery connection.
* Event name/ Registered/Anonymous/All users import types have the same Schema/Dataset and Table/View.
## Import Failure Policy
In the event of a connection failure, a recurring BigQuery import will retry up to 10 times. If all retries fail, the import is marked FAILED. The following table outlines the behavior and required action when a recurring BigQuery import fails due to connection issues (for example, credentials, network, or warehouse unavailability).
| Policy | Description | Action |
| --------------- | ------------------------------------------------------------------------------------------------------------------------------------------------------------------------------------------------------------------------------------------- | ------------------------------------- |
| Automatic Retry | MoEngage automatically attempts to restore the connection and retries the import up to 10 times in the event of a connection failure. | None (MoEngage handles automatically) |
| Import Failure | If all 10 retries fail, MoEngage marks the import as FAILED and stops all further automatic attempts and future imports. After it has failed, you must create a new import by either duplicating the failed import or creating a fresh one. | Mandatory Investigation and Restart |
### Restart a Failed Import
Any import that has FAILED requires your manual intervention:
1. You must investigate and resolve the underlying issue on your BigQuery side (for example, update credentials, check permissions, or ensure warehouse availability).
2. After resolving the issue, you must manually duplicate the import from the MoEngage UI to restart it.
* The first successful execution of any new recurring import is always a historical import (it fetches all the data from the configured table/view).
* Duplicating a failed import initiates a new historical import. If the original import previously succeeded, this duplication may result in redundant data. To control data flow effectively, MoEngage recommends using views.
# FAQ
BigQuery requires the column type to be `JSON` during table creation.
You can import `STRUCT` columns as Object Data Types in MoEngage. We will pull in the schema of your `STRUCT` and create a corresponding set of fields in MoEngage. It is not possible to cherry-pick or rename the individual fields within your struct columns when importing them into MoEngage.
MoEngage interprets stored time as UTC. BigQuery advises storing timestamps in UTC.
No. Currently, writing manual queries (to perform joins, and so on) is not supported. It is recommended that you create a dedicated table or view with all the columns you want to import to MoEngage.
Yes. We also support importing data from your BigQuery Views. If you grant MoEngage access to read Views, they will be automatically listed under the Table/View selection drop-down list.
Yes. Creating a one-time import is essentially the same as importing historical data because we pull in all the rows on the first sync.
In this step, you must define when to sync with your tables. MoEngage supports the following types of imports:
* **One-time imports**: You can run the import as soon as possible or at a later date and time (scheduled).
* **Periodic**: You can run your imports hourly, daily, weekly, or monthly, or with intervals and advanced configurations.
For each run, MoEngage will try to fetch a file with the configured [DateTime format](/docs/user-guide/data/imports/overview/overview-imports), so ensure your [file names](/docs/user-guide/data/imports/overview/overview-imports) are configured properly. Optionally, you can specify whether the import should end after a specified set of occurrences or at a particular date. Click **Done** when ready.
Import schedule and detail times shown on the Data Imports dashboard use your app's configured timezone. If no app timezone is set, they display in UTC by default. Set the app timezone from **Settings** to see these times in your preferred timezone. This display timezone is separate from the mapped **Updated at** and **Event time** columns, which must always be in UTC.
Upon initial import, all matching rows from your table are imported. Subsequent imports only include changed rows.
## Duplicate Imports
A duplicate import is considered when the:
* Users/ Events import types are the same.
* Event name/ Registered/Anonymous/All users import subtypes are the same.
* Event name/ Registered/Anonymous/All users import types have the same BigQuery connection.
* Event name/ Registered/Anonymous/All users import types have the same Schema/Dataset and Table/View.
## Import Failure Policy
In the event of a connection failure, a recurring BigQuery import will retry up to 10 times. If all retries fail, the import is marked FAILED. The following table outlines the behavior and required action when a recurring BigQuery import fails due to connection issues (for example, credentials, network, or warehouse unavailability).
| Policy | Description | Action |
| --------------- | ------------------------------------------------------------------------------------------------------------------------------------------------------------------------------------------------------------------------------------------- | ------------------------------------- |
| Automatic Retry | MoEngage automatically attempts to restore the connection and retries the import up to 10 times in the event of a connection failure. | None (MoEngage handles automatically) |
| Import Failure | If all 10 retries fail, MoEngage marks the import as FAILED and stops all further automatic attempts and future imports. After it has failed, you must create a new import by either duplicating the failed import or creating a fresh one. | Mandatory Investigation and Restart |
### Restart a Failed Import
Any import that has FAILED requires your manual intervention:
1. You must investigate and resolve the underlying issue on your BigQuery side (for example, update credentials, check permissions, or ensure warehouse availability).
2. After resolving the issue, you must manually duplicate the import from the MoEngage UI to restart it.
* The first successful execution of any new recurring import is always a historical import (it fetches all the data from the configured table/view).
* Duplicating a failed import initiates a new historical import. If the original import previously succeeded, this duplication may result in redundant data. To control data flow effectively, MoEngage recommends using views.
# FAQ
BigQuery requires the column type to be `JSON` during table creation.
You can import `STRUCT` columns as Object Data Types in MoEngage. We will pull in the schema of your `STRUCT` and create a corresponding set of fields in MoEngage. It is not possible to cherry-pick or rename the individual fields within your struct columns when importing them into MoEngage.
MoEngage interprets stored time as UTC. BigQuery advises storing timestamps in UTC.
No. Currently, writing manual queries (to perform joins, and so on) is not supported. It is recommended that you create a dedicated table or view with all the columns you want to import to MoEngage.
Yes. We also support importing data from your BigQuery Views. If you grant MoEngage access to read Views, they will be automatically listed under the Table/View selection drop-down list.
Yes. Creating a one-time import is essentially the same as importing historical data because we pull in all the rows on the first sync.