> ## Documentation Index
> Fetch the complete documentation index at: https://moengage.com/docs/llms.txt
> Use this file to discover all available pages before exploring further.
# Create Offerings
> Create and manage targeted promotional offerings in MoEngage with user eligibility rules, scheduling, priority settings, and content configuration.
The *Offerings* feature allows you to create and manage targeted promotions for your users. This functionality is designed to provide flexible and powerful ways to engage your audience with relevant content and incentives.
## What are Offerings?
Offerings in MoEngage are defined promotions that include:
* **User Eligibility**: Rules that determine which users are eligible for the offering (for example, customers on a specific plan, in a certain location).
* **Schedule**: The period during which the offering is active.
* **Priority**: A manually assigned score that indicates importance. A higher value means higher importance.
* **Usage Limits**: Controls for how many times an offering can be used, both overall and by individual users, with options for periodic resets (for example, daily, weekly, monthly).
* **User Interface & Content**: The actual content the user sees, such as images, descriptions, and legal terms.
# Create Offerings
To create offerings in MoEngage:
1. On the left navigation menu in the MoEngage dashboard, click **Decisioning**, and then click **Offerings**.
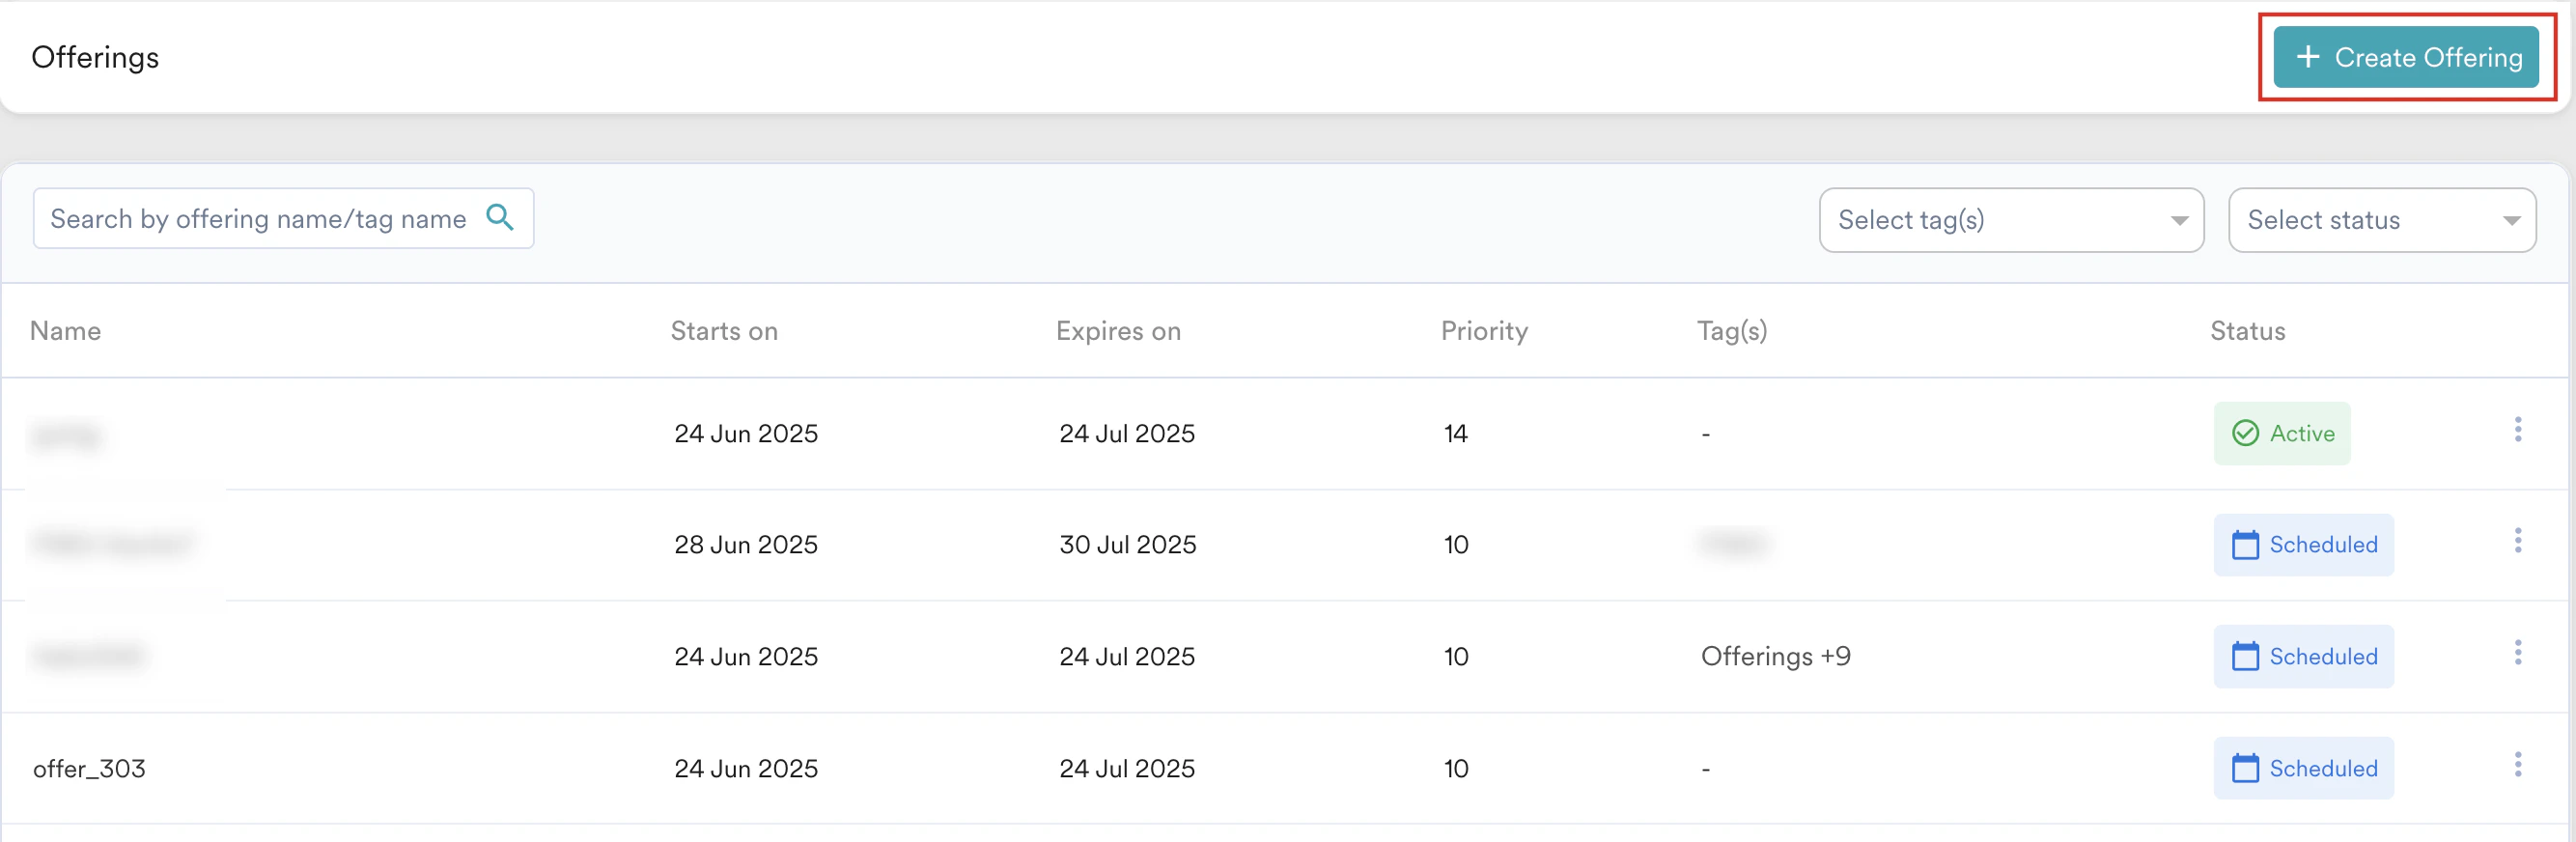
2. On the **Offerings** page, click **+** **Create Offering**.
 You can create offerings using three steps:
* [Step 1: Target Users](/user-guide/decisioning/offer-decisioning/create-offerings#step-1-target-users)
* [Step 2: Content](/user-guide/decisioning/offer-decisioning/create-offerings#step-2-content)
* [Step 3: Schedule and goals](/user-guide/decisioning/offer-decisioning/create-offerings#step-3-schedule-and-goals)
## Step 1: Target Users
### Basic Details
In this section, define the basic details of your offering using the following fields:
You can create offerings using three steps:
* [Step 1: Target Users](/user-guide/decisioning/offer-decisioning/create-offerings#step-1-target-users)
* [Step 2: Content](/user-guide/decisioning/offer-decisioning/create-offerings#step-2-content)
* [Step 3: Schedule and goals](/user-guide/decisioning/offer-decisioning/create-offerings#step-3-schedule-and-goals)
## Step 1: Target Users
### Basic Details
In this section, define the basic details of your offering using the following fields:
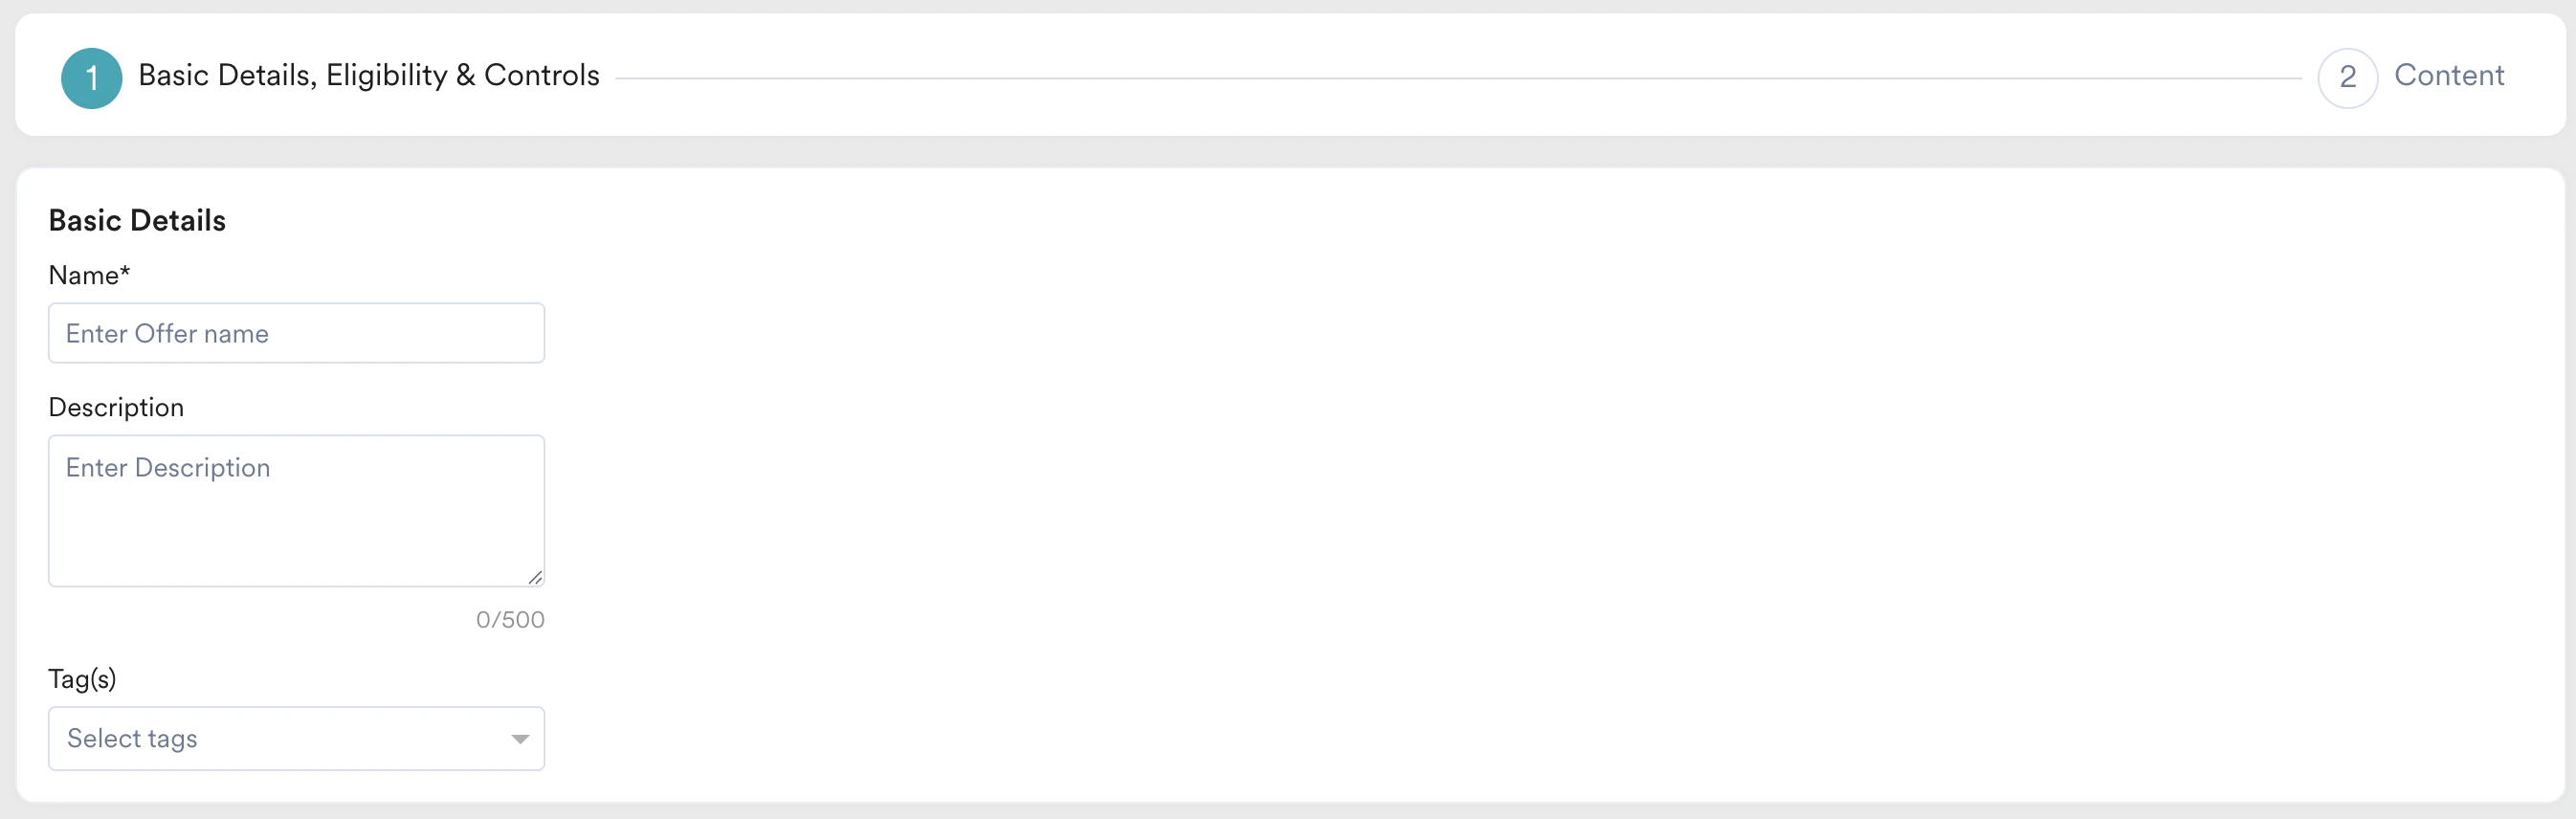 * **Name**: Type the offering name to identify and manage your offer.
* **Description**: Type a summary of the offer's purpose, key features, or terms.
* **Tags**: Select or create tags to categorize and easily filter your offerings. Tags are crucial as they facilitate the grouping of multiple offerings. A tag can be integrated into a decision policy, allowing the strategy to select from all policies with a specific tag.
### Eligibility and Exclusion
In this section, you can select the target audience for your offering using the following segmentation filters:
This filter option makes the offering eligible for all users. No further filtering can be applied.
* **Name**: Type the offering name to identify and manage your offer.
* **Description**: Type a summary of the offer's purpose, key features, or terms.
* **Tags**: Select or create tags to categorize and easily filter your offerings. Tags are crucial as they facilitate the grouping of multiple offerings. A tag can be integrated into a decision policy, allowing the strategy to select from all policies with a specific tag.
### Eligibility and Exclusion
In this section, you can select the target audience for your offering using the following segmentation filters:
This filter option makes the offering eligible for all users. No further filtering can be applied. 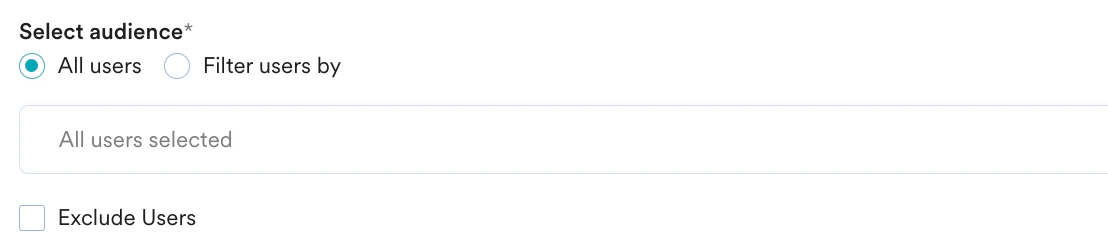 This filter option allows you to target users based on their properties (attributes) such as first seen, city, or subscription plan. Click the **User property** tab and perform the following:
1. Select the desired attribute in the drop-down list. This enables the filters based on the attributes selected. For example, attributes that are numbers can have filter conditions such as 'is equal to', 'is not equal to', 'is between', and so on, while string attributes have different filters.
2. Enter the filter value(s) to create the desired user segment.
3. Click **+ Nested Filter** to add a filter to create nested AND or OR conditions. (This is optional)
For more information, refer to [Create Segments](/user-guide/segment/segment-operations/create-segments).
This filter option allows you to target users based on their properties (attributes) such as first seen, city, or subscription plan. Click the **User property** tab and perform the following:
1. Select the desired attribute in the drop-down list. This enables the filters based on the attributes selected. For example, attributes that are numbers can have filter conditions such as 'is equal to', 'is not equal to', 'is between', and so on, while string attributes have different filters.
2. Enter the filter value(s) to create the desired user segment.
3. Click **+ Nested Filter** to add a filter to create nested AND or OR conditions. (This is optional)
For more information, refer to [Create Segments](/user-guide/segment/segment-operations/create-segments).
 This filter option allows you to target users based on actions they have performed (events), such as *app opened* or *viewed product*. Click the **User Behavior** tab and perform the following:
1. Select the execution condition and the desired user activity (event).
2. Enter the event frequency and time duration for the event execution.
3. Click **+ Attributes** and add an event attribute with a filter condition.
4. Enter the filter value(s) to create a rule.
5. Use the **+ Aggregation** button to add the aggregation functionality. For more information, refer to [Aggregation Operations](/user-guide/segment/advanced-concepts/aggregation-operations).
6. Click **+ Nested Filter** to add a filter to create nested AND or OR conditions. (This is optional)
For more information, refer to [Create Segments](/user-guide/segment/segment-operations/create-segments).
This filter option allows you to target users based on actions they have performed (events), such as *app opened* or *viewed product*. Click the **User Behavior** tab and perform the following:
1. Select the execution condition and the desired user activity (event).
2. Enter the event frequency and time duration for the event execution.
3. Click **+ Attributes** and add an event attribute with a filter condition.
4. Enter the filter value(s) to create a rule.
5. Use the **+ Aggregation** button to add the aggregation functionality. For more information, refer to [Aggregation Operations](/user-guide/segment/advanced-concepts/aggregation-operations).
6. Click **+ Nested Filter** to add a filter to create nested AND or OR conditions. (This is optional)
For more information, refer to [Create Segments](/user-guide/segment/segment-operations/create-segments).
 This filter option allows you to target groups of users based on their affinity for certain attribute values. For more information, refer to [User Affinity](/user-guide/segment/segment-operations/affinity-segments). Click the **User Affinity** tab and perform the following:
1. Select the desired user event or attribute.
2. Select the user affinity parameter from the following:
* **Predominantly**: Select an affinity attribute with a filter condition and provide the affinity values.
* **For a minimum of**: Select an affinity attribute with a filter condition and provide the affinity values.
* **Most no. of times**: Enter a value or use the arrows to provide the top percentage of users.
* **Least no. of times**: Enter a value or use the arrows to provide the bottom percentage of users.
3. Enter or use the arrows to provide the time duration for the event execution.
4. Click **+ Attribute** to add more attributes to the filter.
5. Click **+ Nested Filter** to add a filter to create nested AND or OR conditions. (This is optional)
For more information, refer to [Create Segments](/user-guide/segment/segment-operations/create-segments).
This filter option allows you to target groups of users based on their affinity for certain attribute values. For more information, refer to [User Affinity](/user-guide/segment/segment-operations/affinity-segments). Click the **User Affinity** tab and perform the following:
1. Select the desired user event or attribute.
2. Select the user affinity parameter from the following:
* **Predominantly**: Select an affinity attribute with a filter condition and provide the affinity values.
* **For a minimum of**: Select an affinity attribute with a filter condition and provide the affinity values.
* **Most no. of times**: Enter a value or use the arrows to provide the top percentage of users.
* **Least no. of times**: Enter a value or use the arrows to provide the bottom percentage of users.
3. Enter or use the arrows to provide the time duration for the event execution.
4. Click **+ Attribute** to add more attributes to the filter.
5. Click **+ Nested Filter** to add a filter to create nested AND or OR conditions. (This is optional)
For more information, refer to [Create Segments](/user-guide/segment/segment-operations/create-segments).
 This filter option allows you to target a pre-built custom segment.
1. Select a custom segment as the target audience from the list of custom segments available.
2. Click **+ Nested Filter** to add a filter to create nested AND or OR conditions. (This is optional)
For more information, refer to [Custom Segments](/user-guide/segment/segment-operations/custom-segments).
This filter option allows you to target a pre-built custom segment.
1. Select a custom segment as the target audience from the list of custom segments available.
2. Click **+ Nested Filter** to add a filter to create nested AND or OR conditions. (This is optional)
For more information, refer to [Custom Segments](/user-guide/segment/segment-operations/custom-segments).
 #### In-session attributes
***In-session attributes*** enable real-time visitor grouping based on dynamic conditions via attributes passed as Key-Value (KV) pairs directly within the ***Personalize Experience Fetch*** request.
The values provided in the request are evaluated instantaneously against the criteria defined in your Offering’s target segment. This allows the eligible offerings to change dynamically as the user’s context evolves during their journey.
You can add the following in-session attributes:
| Field | Description |
| ------------------ | ------------------------------------------------------------------------------------------------------------------------------------------------------------------------------------------------------------------------------------------------------------------------------------------------------------------------------------------------------------------------------------------------------------------------------------------------------------------------------------------------------------------------------------------------------------------------------------------------------------------------------------------------------------------------------------------------------------------------------------------------------------------------------------ |
| Session Attributes | The Session Attribute type enables the use of custom key-value pairs to identify and include users in a specific target audience. These key-value pairs act as an additional layer of targeting criteria, supplementing the segmentation rules already defined. **For instance:** If your app supports content in multiple languages, such as English and Spanish, you can define a key called *language\_preference* with corresponding values: **en**: To target users who prefer content in English. **es**: To target users who prefer content in Spanish. By leveraging this field, you can ensure that users are matched to the appropriate audience based on their preferences or attributes, providing them with a more personalized and contextually relevant experience. |
| Geolocation | This field lets you segment users based on the geolocation from where they visit your App and/or website. You can choose the Country, State/Region, and City where the user is located or exclude a specific Country. |
***Exclude Users***
You can exclude users by clicking *Exclude Users* and specifying the exclusion criterion against the specific in-session attributes.
### Control group
This section contains information about control groups for the campaign. To exclude users in the control groups:
* Turn on the **Global control group** toggle to exclude all users in the global control group from this offering.
* Turn on the **Offering control group** toggle to exclude the control group from this specific offering.
For more information, refer to [Control Group](/user-guide/campaigns-and-channels/getting-started/introduction/control-groups).
Click **Next** to navigate to Step 2: **Content**.
## Step 2: Content
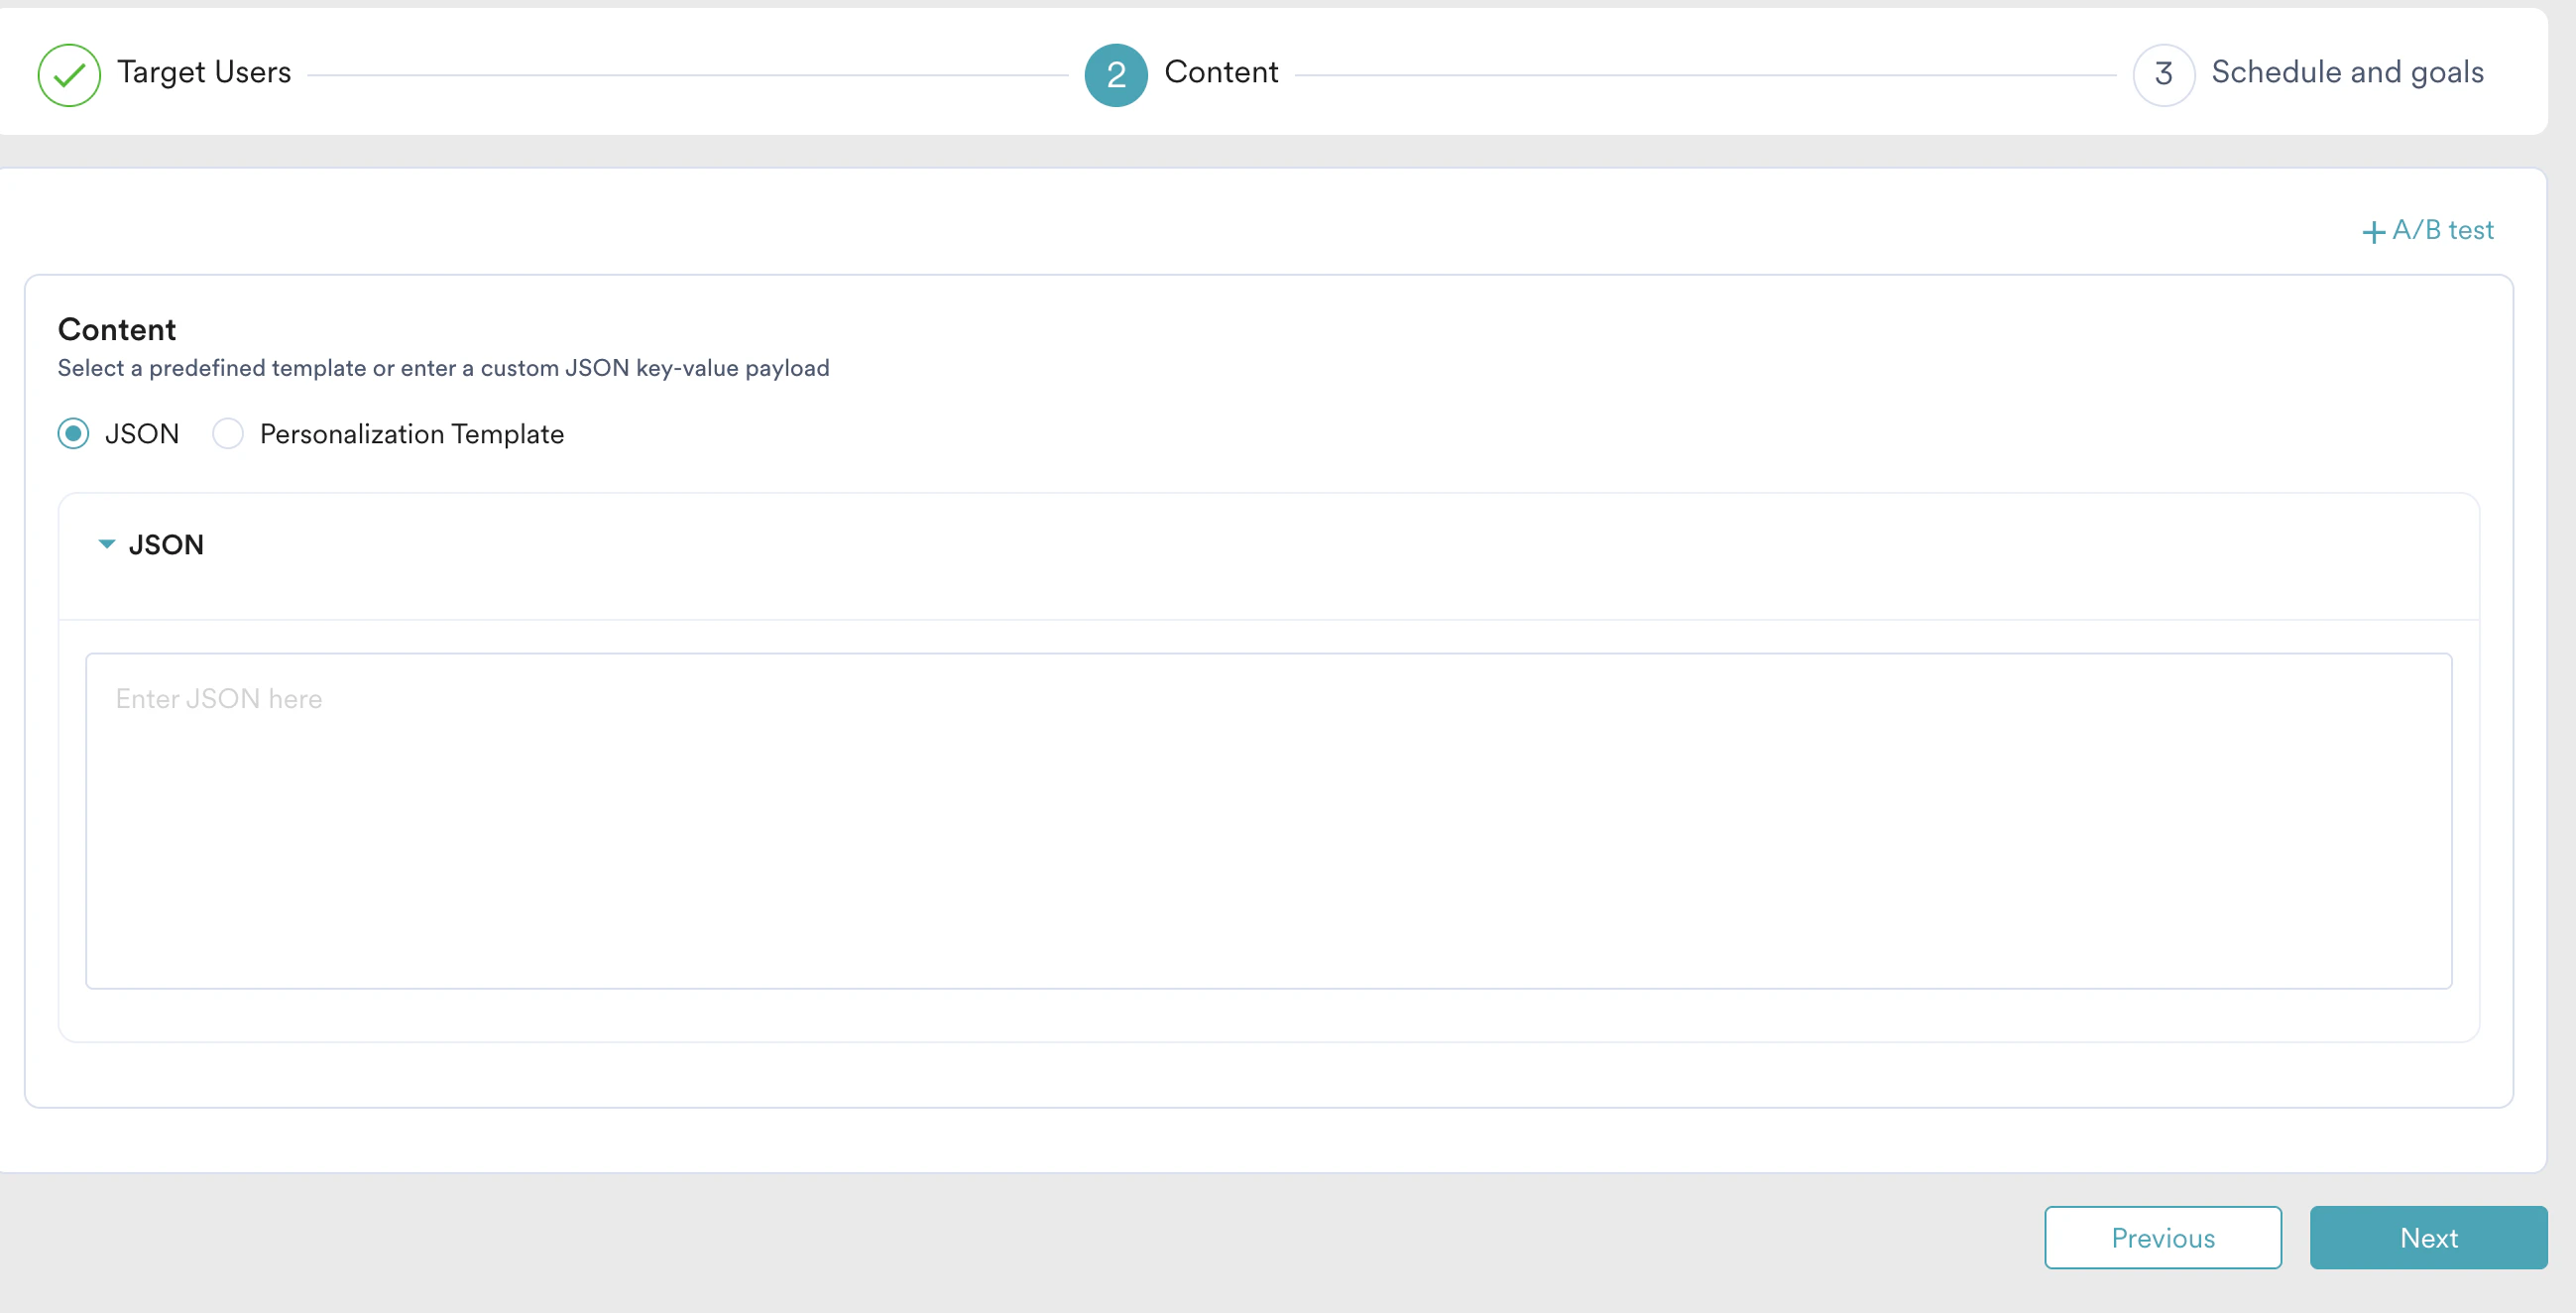
In this step, you define the actual content that your users will see. MoEngage provides two options to help you build your offering content: **JSON** and **Personalization Template**. Additionally, you should consider tailoring your content for various communication channels and placements to maximize its effectiveness.
### JSON
The JSON option gives you complete control over your offer's content.You can select the JSON option and directly input the JSON content that defines your offer's structure and data. This method is ideal for users who need custom layouts, dynamic content, or wish to utilize pre-existing JSON structures.
#### In-session attributes
***In-session attributes*** enable real-time visitor grouping based on dynamic conditions via attributes passed as Key-Value (KV) pairs directly within the ***Personalize Experience Fetch*** request.
The values provided in the request are evaluated instantaneously against the criteria defined in your Offering’s target segment. This allows the eligible offerings to change dynamically as the user’s context evolves during their journey.
You can add the following in-session attributes:
| Field | Description |
| ------------------ | ------------------------------------------------------------------------------------------------------------------------------------------------------------------------------------------------------------------------------------------------------------------------------------------------------------------------------------------------------------------------------------------------------------------------------------------------------------------------------------------------------------------------------------------------------------------------------------------------------------------------------------------------------------------------------------------------------------------------------------------------------------------------------------ |
| Session Attributes | The Session Attribute type enables the use of custom key-value pairs to identify and include users in a specific target audience. These key-value pairs act as an additional layer of targeting criteria, supplementing the segmentation rules already defined. **For instance:** If your app supports content in multiple languages, such as English and Spanish, you can define a key called *language\_preference* with corresponding values: **en**: To target users who prefer content in English. **es**: To target users who prefer content in Spanish. By leveraging this field, you can ensure that users are matched to the appropriate audience based on their preferences or attributes, providing them with a more personalized and contextually relevant experience. |
| Geolocation | This field lets you segment users based on the geolocation from where they visit your App and/or website. You can choose the Country, State/Region, and City where the user is located or exclude a specific Country. |
***Exclude Users***
You can exclude users by clicking *Exclude Users* and specifying the exclusion criterion against the specific in-session attributes.
### Control group
This section contains information about control groups for the campaign. To exclude users in the control groups:
* Turn on the **Global control group** toggle to exclude all users in the global control group from this offering.
* Turn on the **Offering control group** toggle to exclude the control group from this specific offering.
For more information, refer to [Control Group](/user-guide/campaigns-and-channels/getting-started/introduction/control-groups).
Click **Next** to navigate to Step 2: **Content**.
## Step 2: Content
In this step, you define the actual content that your users will see. MoEngage provides two options to help you build your offering content: **JSON** and **Personalization Template**. Additionally, you should consider tailoring your content for various communication channels and placements to maximize its effectiveness.
### JSON
The JSON option gives you complete control over your offer's content.You can select the JSON option and directly input the JSON content that defines your offer's structure and data. This method is ideal for users who need custom layouts, dynamic content, or wish to utilize pre-existing JSON structures.
 ### Personalization Template
This option simplifies content creation by providing pre-designed structures. This is ideal for marketers who want to populate an offering without writing code. To create content using templates, perform the following steps:
1. Select the **Personalization Template** option.
2. Choose the desired template from the list of available templates.
3. Fill in the required fields based on the selected template. You can see a live preview of how the promotion will look to the end-user.
4. To view the underlying JSON structure generated by your template selections, navigate to the **JSON** tab at any time.
### Personalization Template
This option simplifies content creation by providing pre-designed structures. This is ideal for marketers who want to populate an offering without writing code. To create content using templates, perform the following steps:
1. Select the **Personalization Template** option.
2. Choose the desired template from the list of available templates.
3. Fill in the required fields based on the selected template. You can see a live preview of how the promotion will look to the end-user.
4. To view the underlying JSON structure generated by your template selections, navigate to the **JSON** tab at any time. 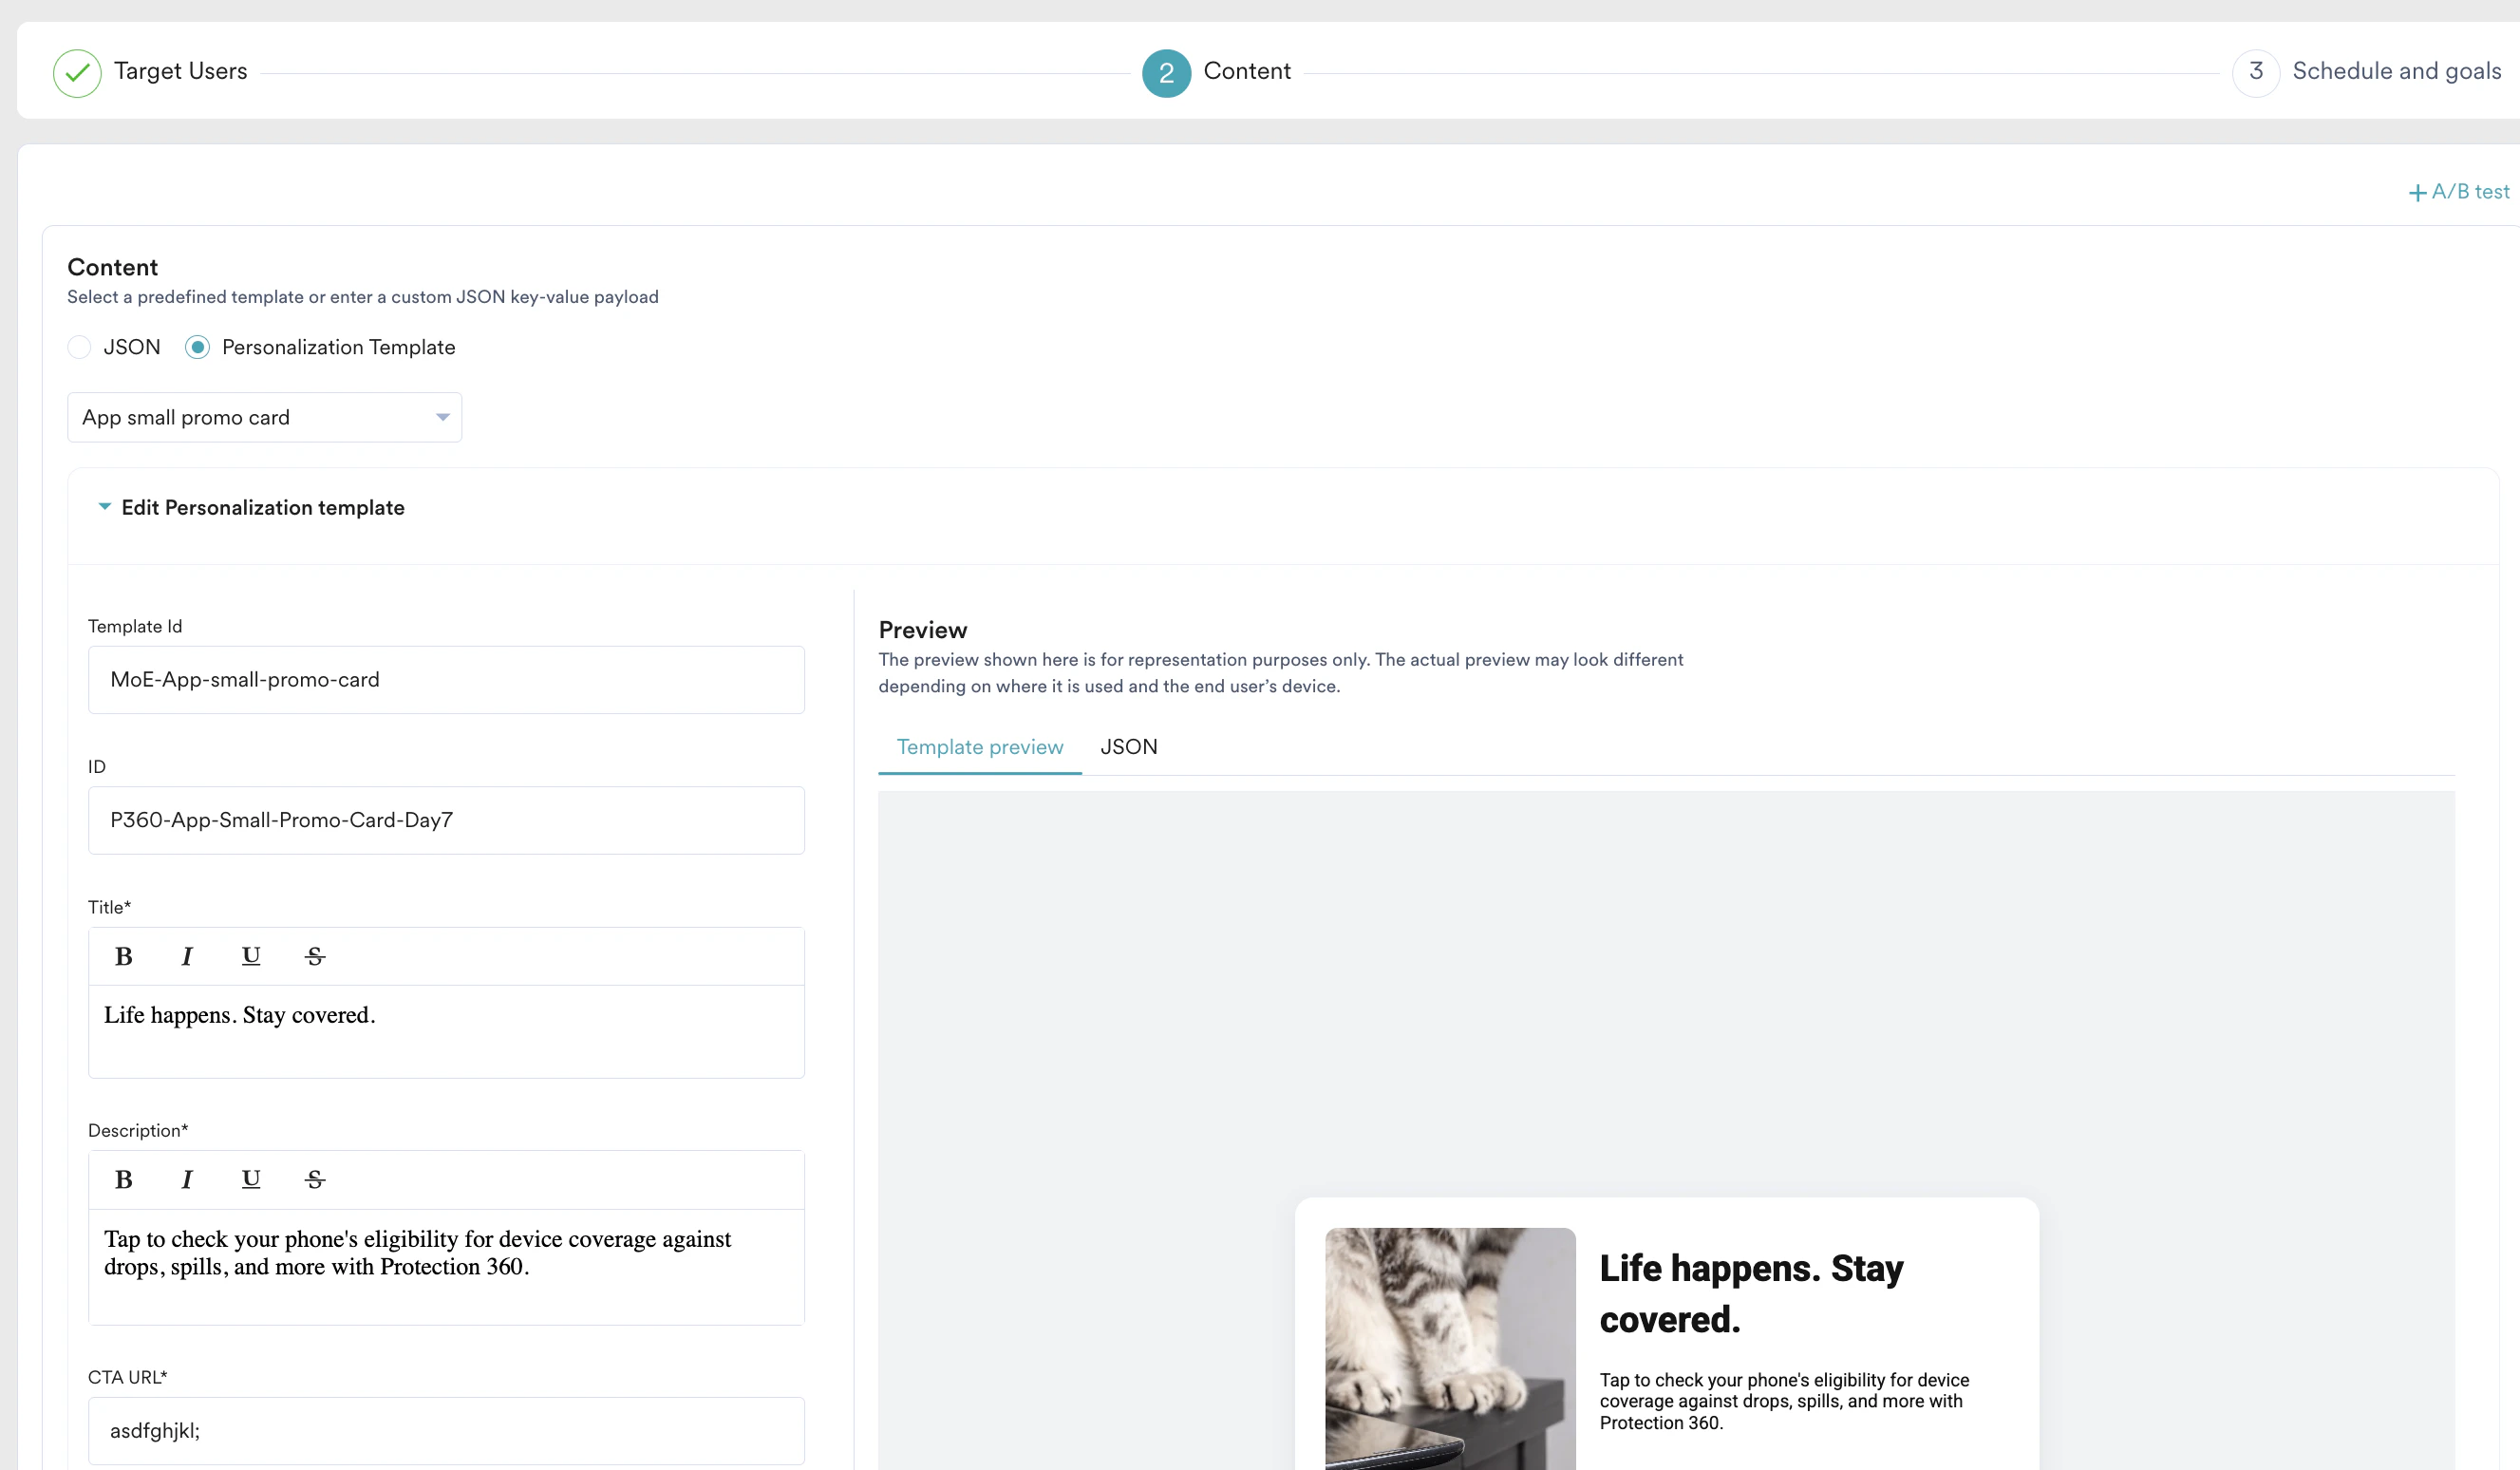 ### +A/B test
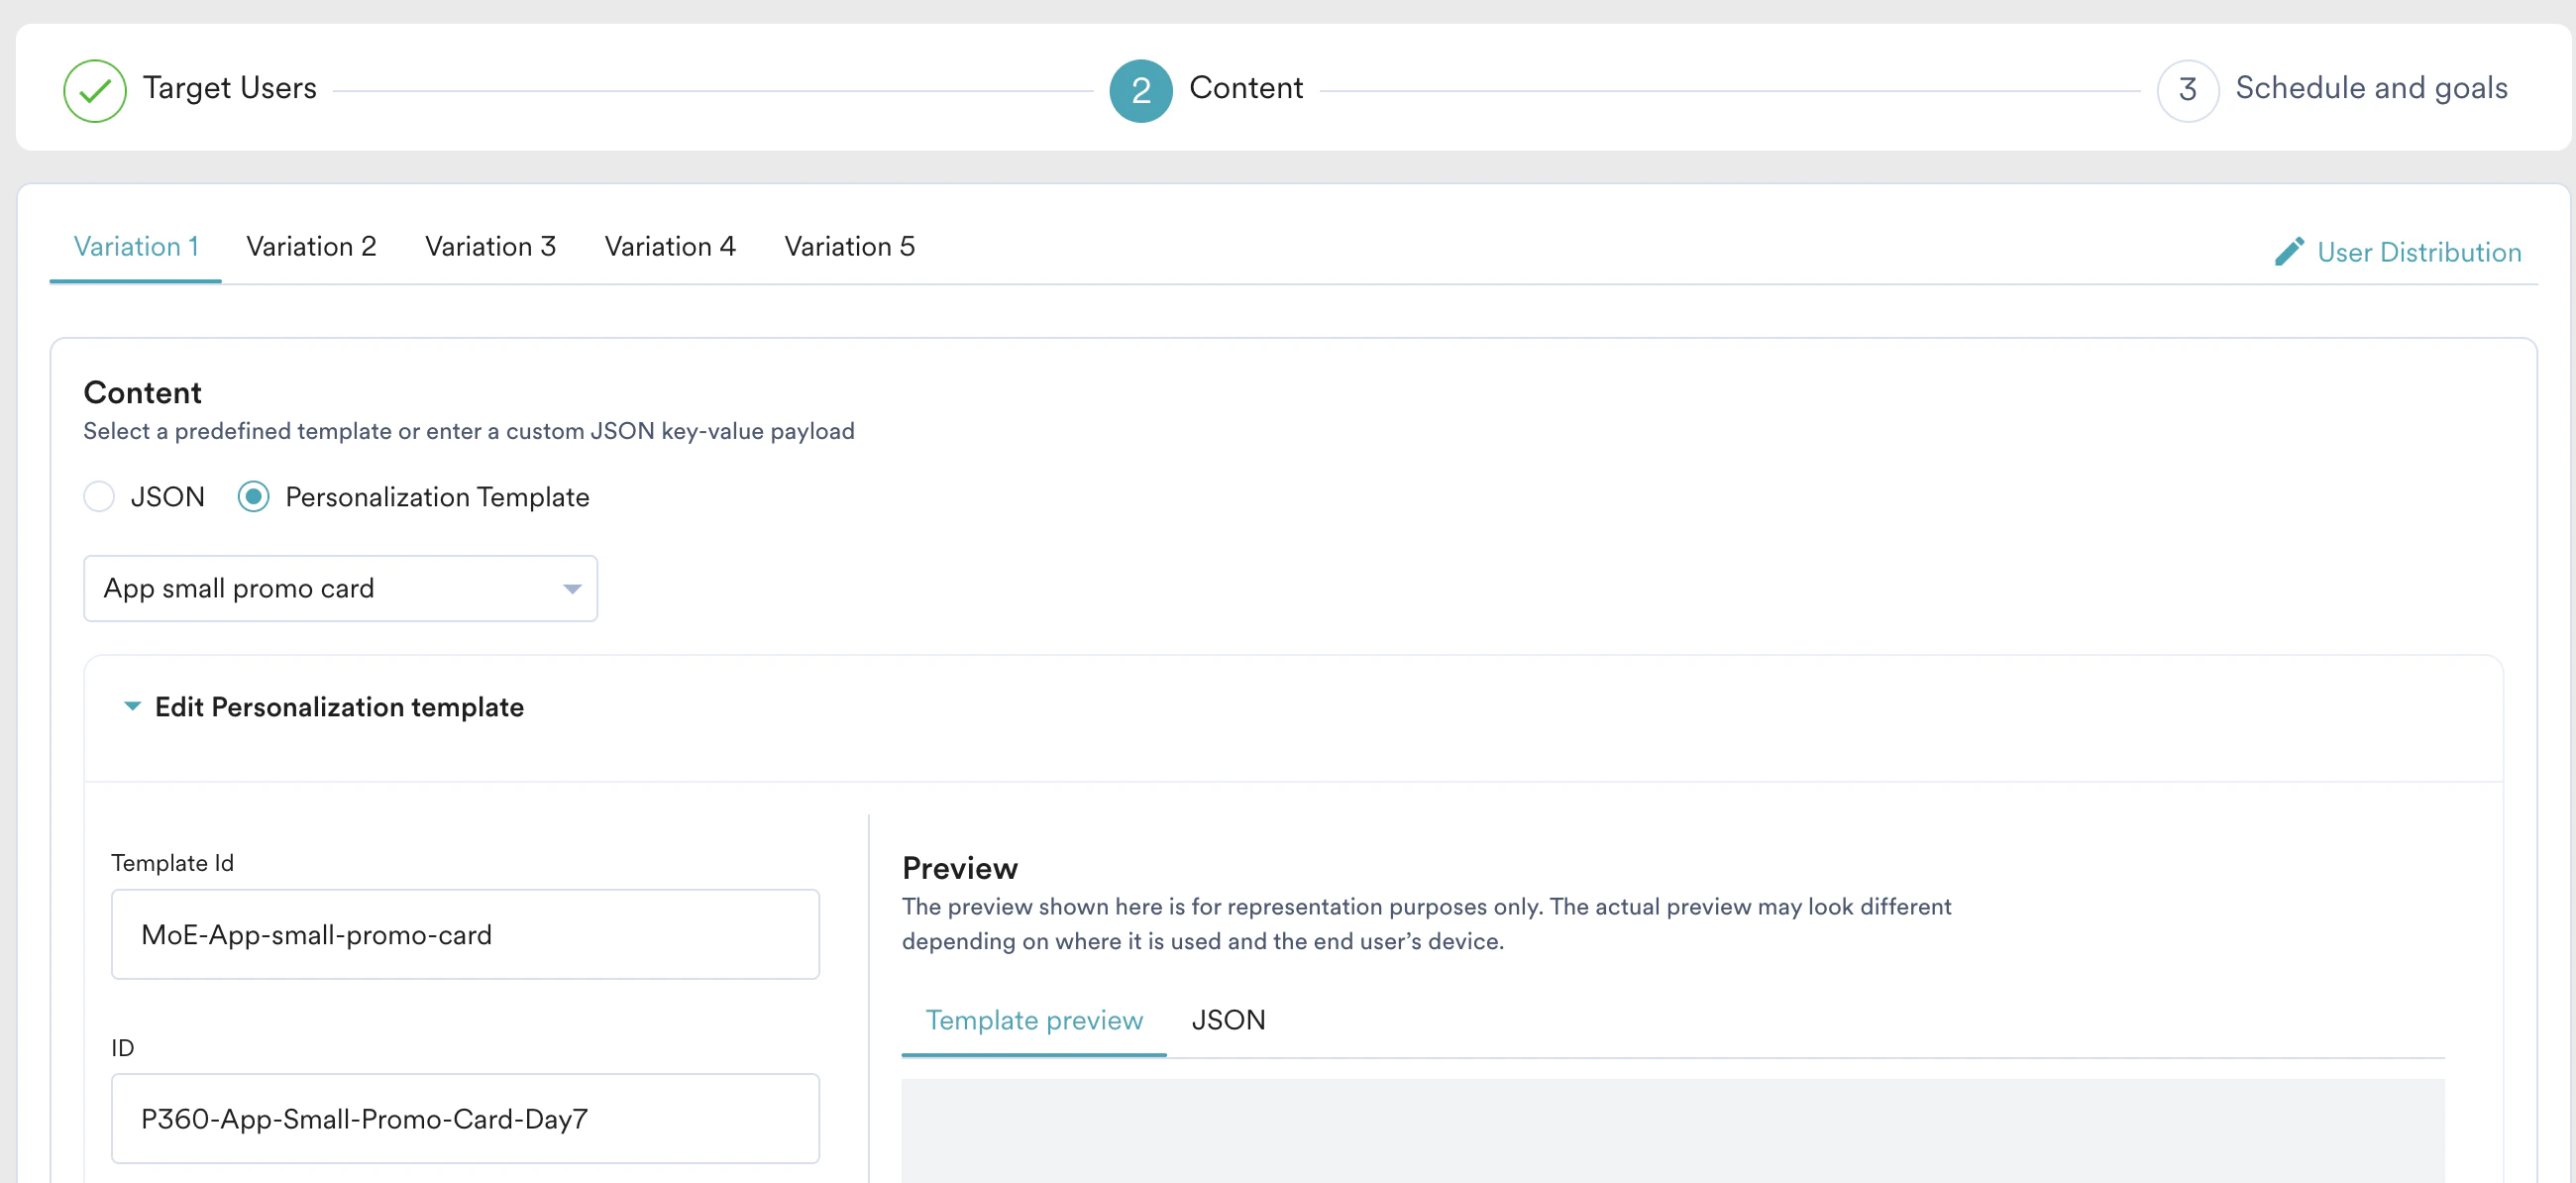
You can refine your strategy by clicking the **+A/B test** option in the upper-right corner to add or copy variations. This allows you to test different content and offers to see what resonates best with your audience.
### +A/B test
You can refine your strategy by clicking the **+A/B test** option in the upper-right corner to add or copy variations. This allows you to test different content and offers to see what resonates best with your audience.
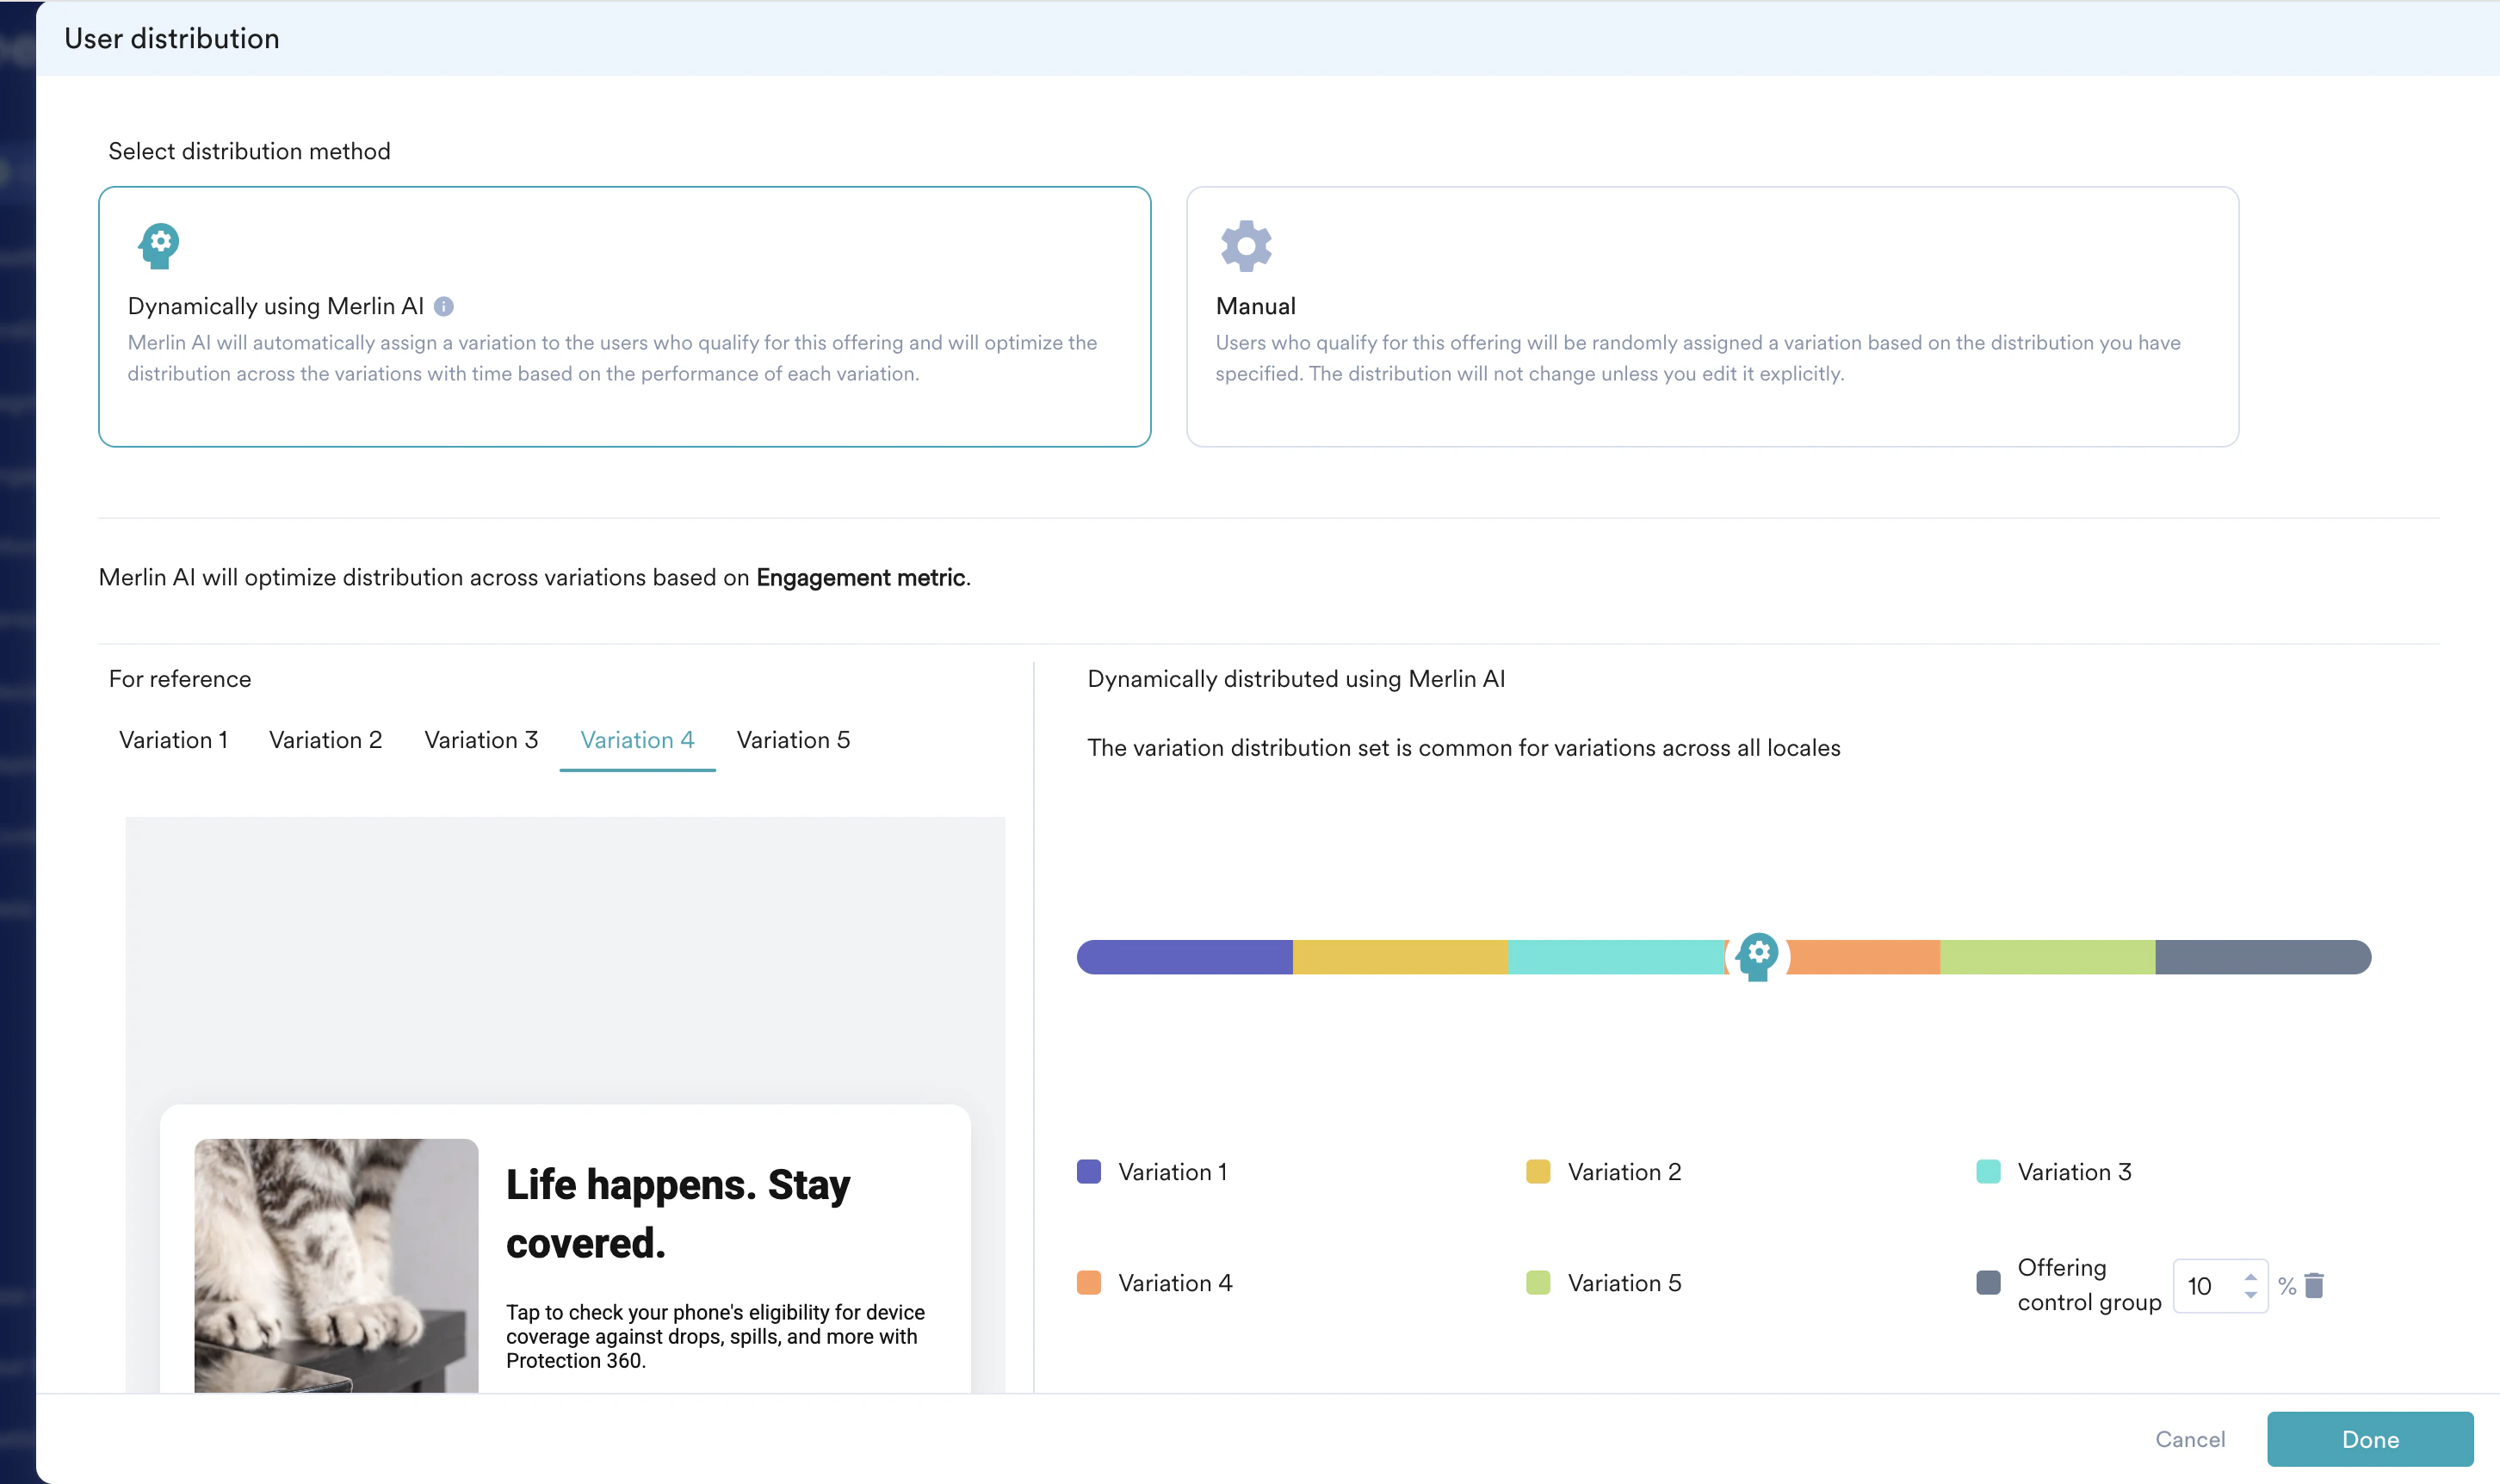
 Once your variations are created, you can choose how to distribute traffic among them in the Distribution step:
* **Manual Distribution**: Manually assign a specific percentage to each variation. Note that the total distribution must equal 100% to proceed.
* **Merlin AI (formerly Sherpa)**: Enable Merlin AI to automatically optimize your offering. It dynamically distributes traffic to the highest-performing variations based on engagement metrics. You can reset this to manual distribution at any time.
Once your variations are created, you can choose how to distribute traffic among them in the Distribution step:
* **Manual Distribution**: Manually assign a specific percentage to each variation. Note that the total distribution must equal 100% to proceed.
* **Merlin AI (formerly Sherpa)**: Enable Merlin AI to automatically optimize your offering. It dynamically distributes traffic to the highest-performing variations based on engagement metrics. You can reset this to manual distribution at any time.
 **Managing Active Offerings**\
For live offerings, you can modify the content and distribution percentages. However, to maintain data integrity, you cannot add or delete variations or change the distribution type once the offering is active.
For more information, refer to [A/B Testing](/user-guide/ai-and-intelligence/ab-testing/what-is-ab-or-multivariate-testing/overview).
## Step 3: Schedule and goals
### Send offering
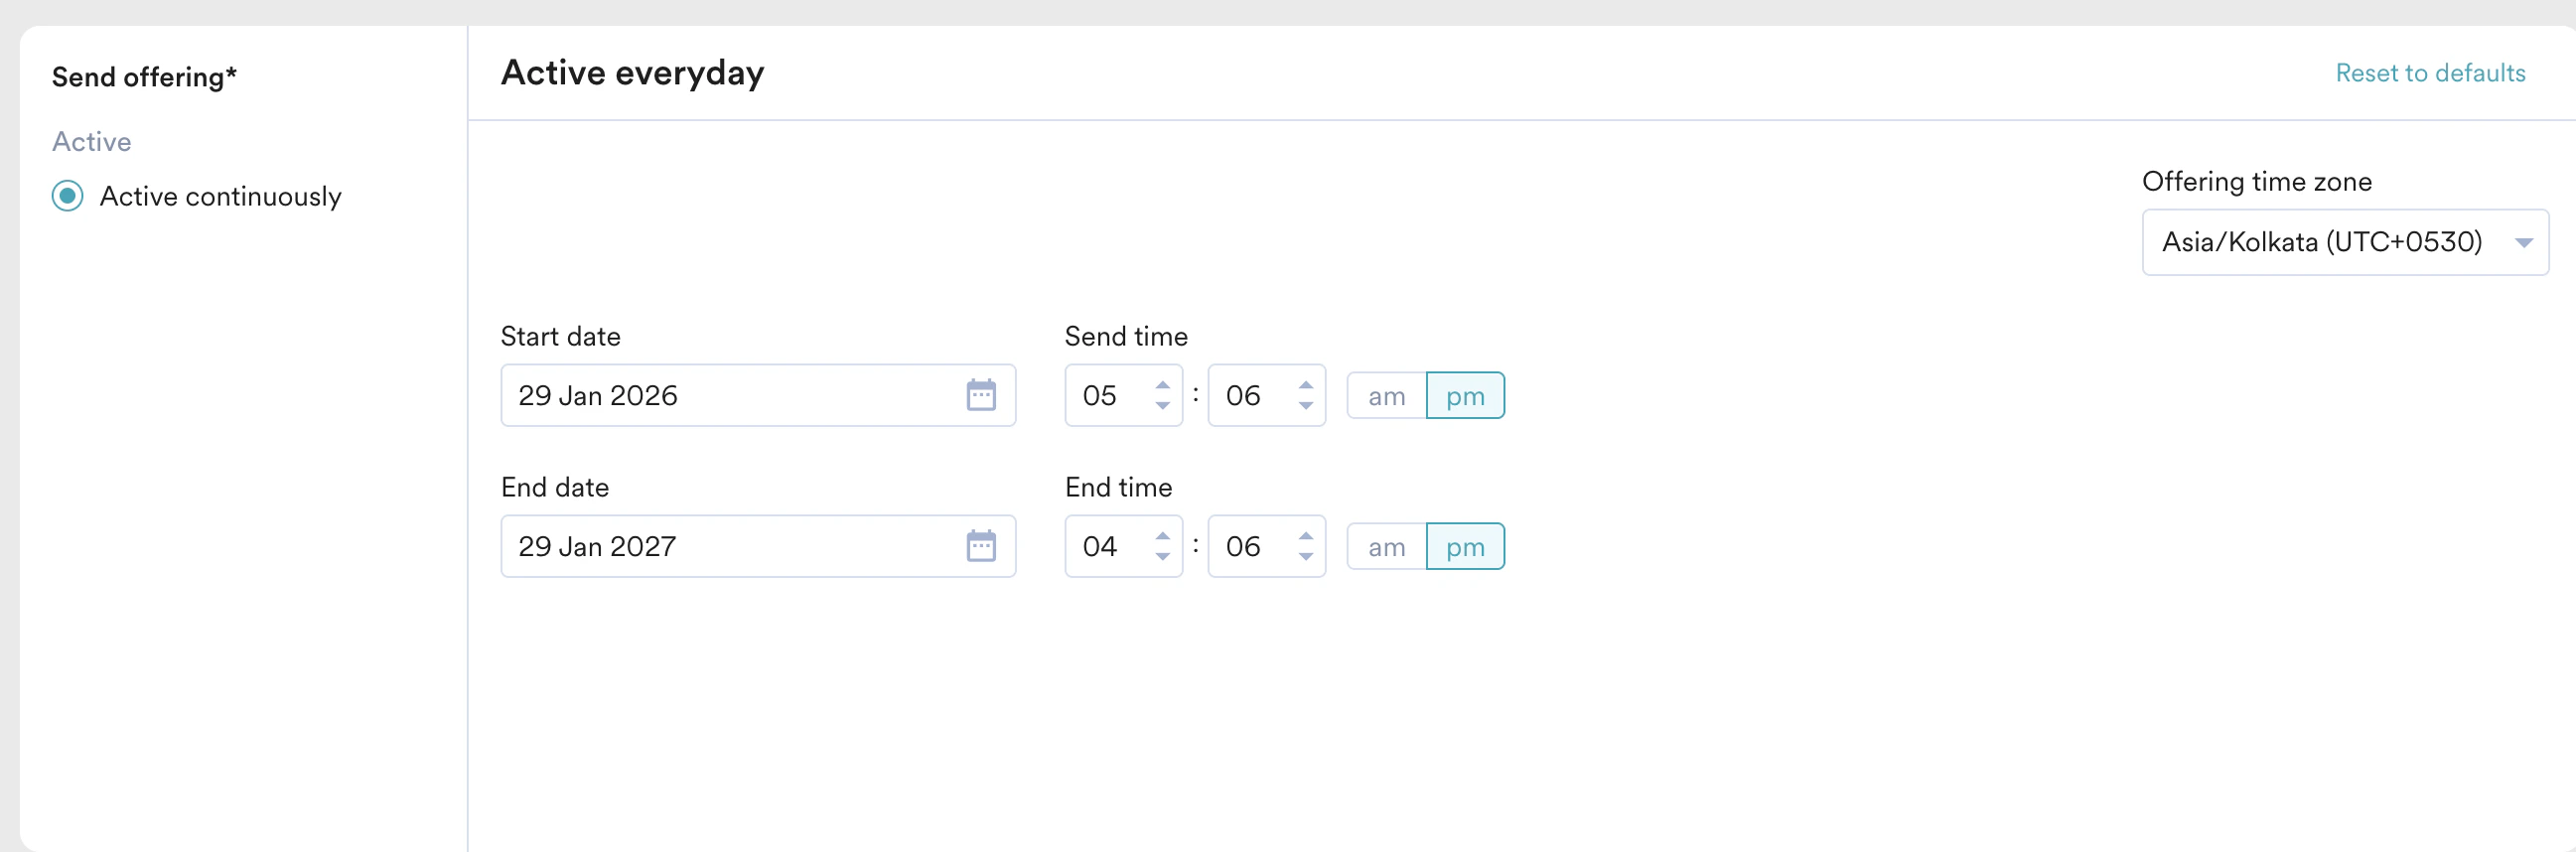
In this section, define the validity period for your offering using the following fields:
* **Start** **Date**: Select the date when your offering becomes active.
* **End** **Date**: Select the date when your offering expires.
* **Send Time**: Select the time when your offering becomes active.
* **End Time**: Select the time when your offering expires.
By default, the start/end date & time are in the workspace's configured timezone. You can update the timezone for the offering.
**Managing Active Offerings**\
For live offerings, you can modify the content and distribution percentages. However, to maintain data integrity, you cannot add or delete variations or change the distribution type once the offering is active.
For more information, refer to [A/B Testing](/user-guide/ai-and-intelligence/ab-testing/what-is-ab-or-multivariate-testing/overview).
## Step 3: Schedule and goals
### Send offering
In this section, define the validity period for your offering using the following fields:
* **Start** **Date**: Select the date when your offering becomes active.
* **End** **Date**: Select the date when your offering expires.
* **Send Time**: Select the time when your offering becomes active.
* **End Time**: Select the time when your offering expires.
By default, the start/end date & time are in the workspace's configured timezone. You can update the timezone for the offering.
 ### Conversion Goals
You can add conversion goals to track the business metrics for your offerings. You can track a maximum of five conversion goals. You can choose any event as a conversion goal activity and set more than one conversion goal. In case of multiple conversion goals, you can mark any of the conversional goals as Primary.
In the **Track above goals for** field, specify the period to track conversion goals. You can enter a minimum of 1 hour and maximum of 10 days.
### Offering Attribute Configuration
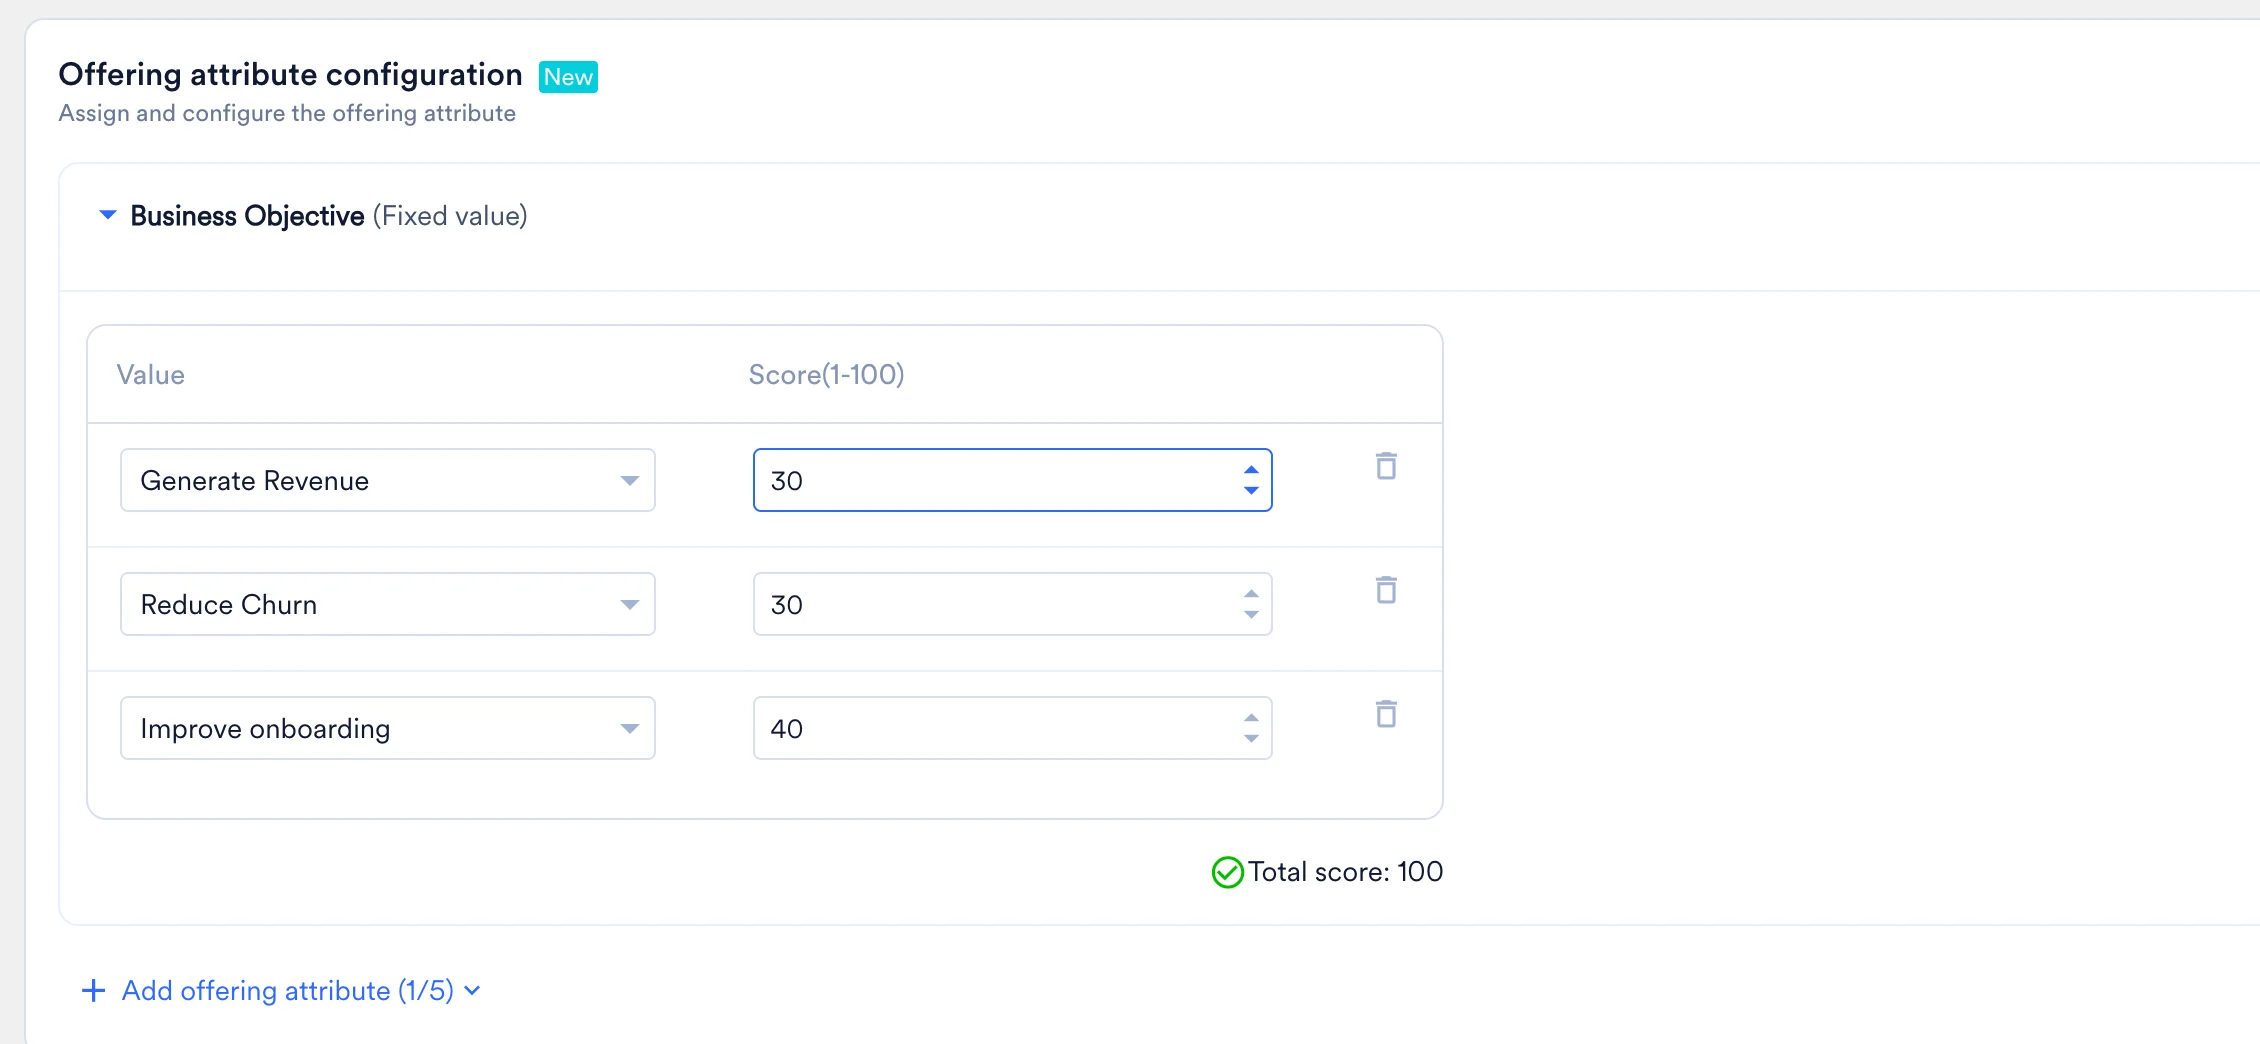
Assign [attributes](/user-guide/decisioning/offer-decisioning/managing-offering-attribute) to your offering so it can be scored by the Custom Formula ranking strategy in a Decision Policy. You can assign up to 5 attributes per offering.
The **+ Add offering attribute** dropdown displays the attributes configured in your account settings. Select an attribute to add it to the offering.
* **Fixed Value attributes:** After adding the attribute, select one or more options from its dropdown and assign a score (0–100) to each option. The total score across all selected options must equal 100.
### Conversion Goals
You can add conversion goals to track the business metrics for your offerings. You can track a maximum of five conversion goals. You can choose any event as a conversion goal activity and set more than one conversion goal. In case of multiple conversion goals, you can mark any of the conversional goals as Primary.
In the **Track above goals for** field, specify the period to track conversion goals. You can enter a minimum of 1 hour and maximum of 10 days.
### Offering Attribute Configuration
Assign [attributes](/user-guide/decisioning/offer-decisioning/managing-offering-attribute) to your offering so it can be scored by the Custom Formula ranking strategy in a Decision Policy. You can assign up to 5 attributes per offering.
The **+ Add offering attribute** dropdown displays the attributes configured in your account settings. Select an attribute to add it to the offering.
* **Fixed Value attributes:** After adding the attribute, select one or more options from its dropdown and assign a score (0–100) to each option. The total score across all selected options must equal 100.
 * **Dynamic Value attributes**: After adding the attribute, select one or more options from its dropdown. The score is calculated automatically at evaluation time based on the user's profile.\
To remove an assigned attribute, click the delete icon next to the attribute name.
* **Dynamic Value attributes**: After adding the attribute, select one or more options from its dropdown. The score is calculated automatically at evaluation time based on the user's profile.\
To remove an assigned attribute, click the delete icon next to the attribute name.
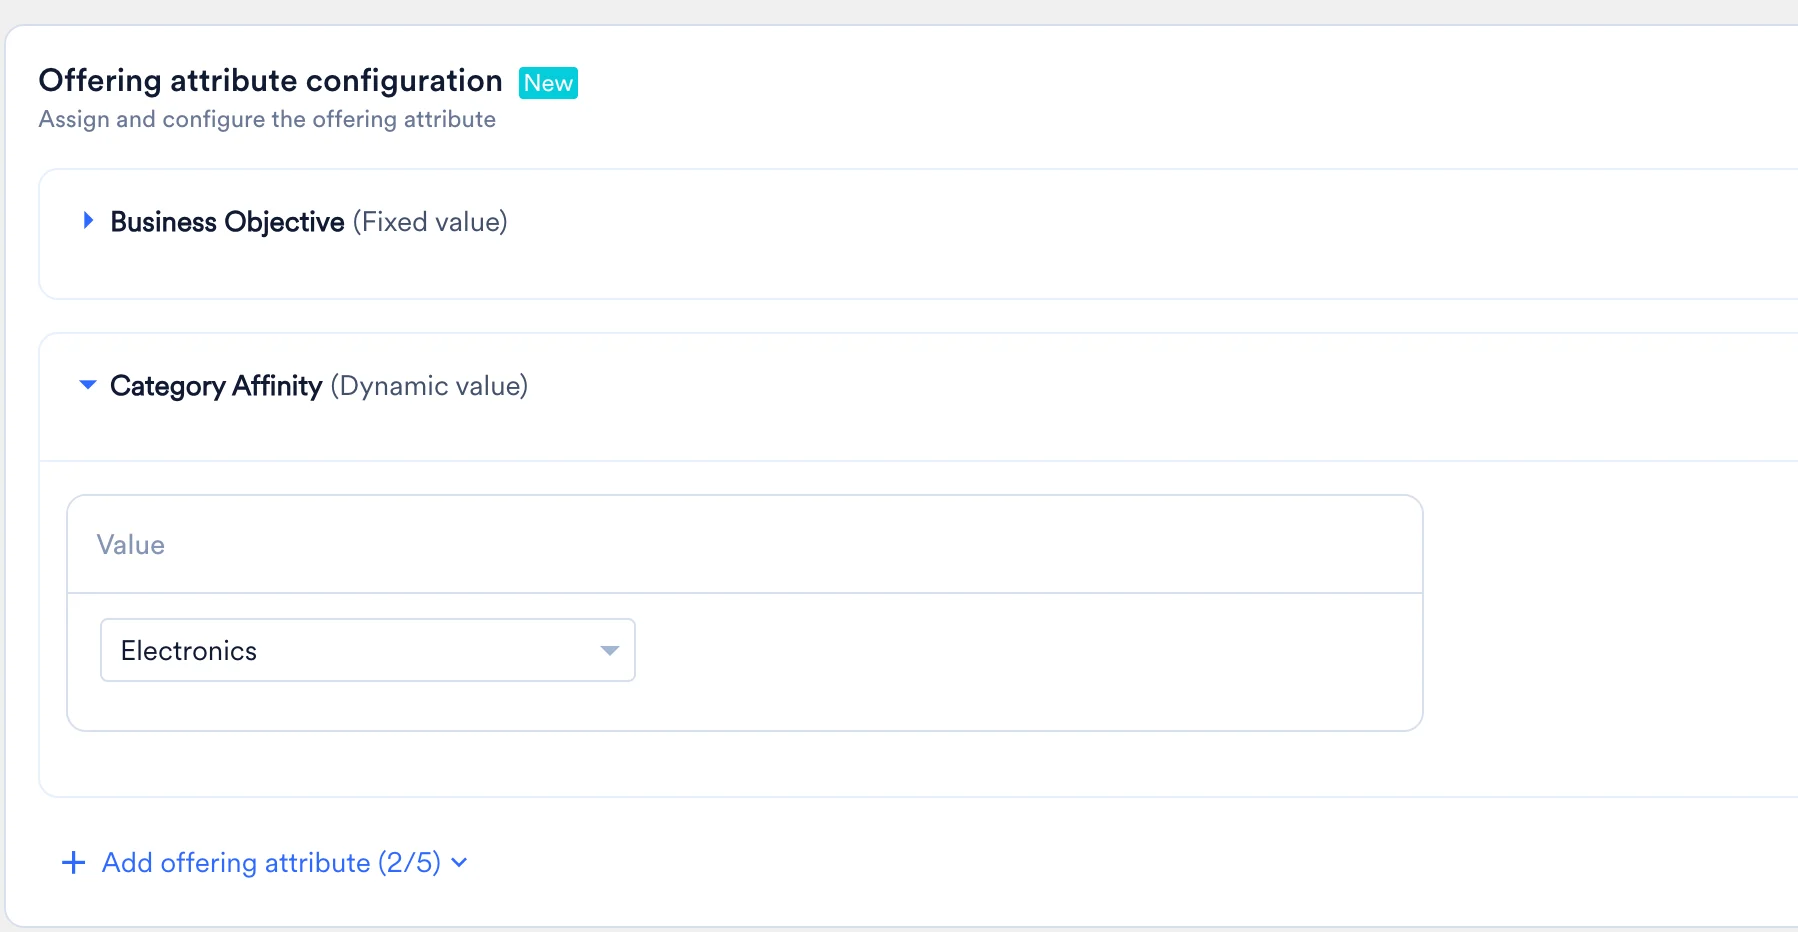 If no attributes are available in the dropdown, you must first configure them in **Settings** > **Offer Decisioning** > **Offering Attributes**. For more information, refer to [Managing Offering Attributes](/user-guide/decisioning/offer-decisioning/managing-offering-attribute).
### Priority
In the **Priority** section, select your offer's display priority using the **Priority Score** list. A higher score ensures your offering is more likely to be displayed when a user is eligible for multiple offerings at the same time.
If no attributes are available in the dropdown, you must first configure them in **Settings** > **Offer Decisioning** > **Offering Attributes**. For more information, refer to [Managing Offering Attributes](/user-guide/decisioning/offer-decisioning/managing-offering-attribute).
### Priority
In the **Priority** section, select your offer's display priority using the **Priority Score** list. A higher score ensures your offering is more likely to be displayed when a user is eligible for multiple offerings at the same time.
 ### Capping Rules
In the **Capping Rules** section, define how frequently and how many times users view or claim your offer. Select one of the following options to set your offer's display limits:
### Capping Rules
In the **Capping Rules** section, define how frequently and how many times users view or claim your offer. Select one of the following options to set your offer's display limits:
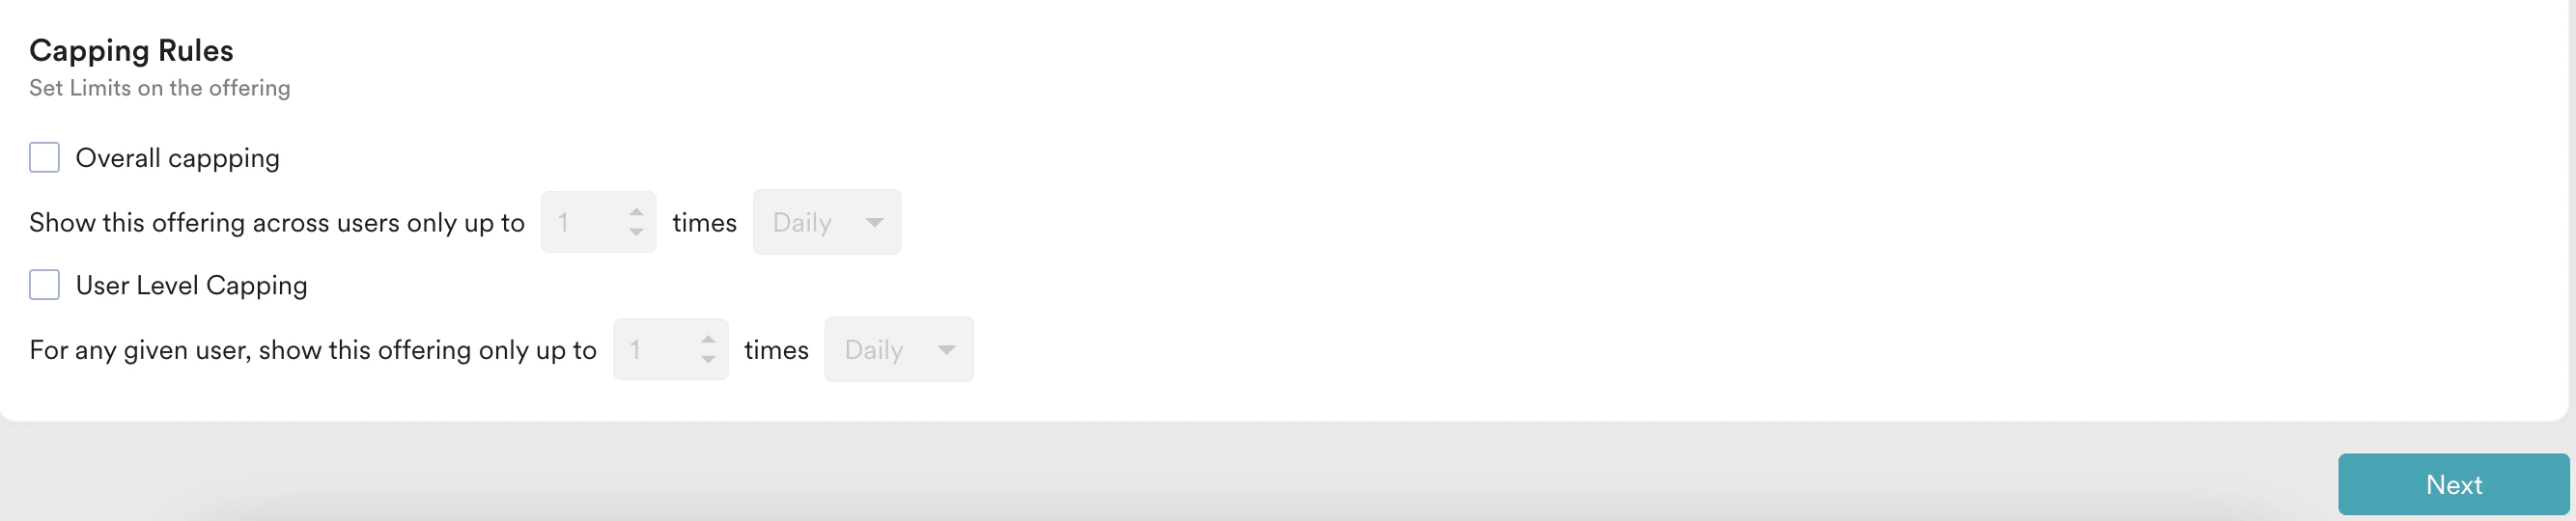 * **Overall Capping**: This limit specifies how many times this offering can be claimed across all users in the targeted segment. You can also specify the maximum number of times the offering can be used and choose a reset frequency from: **Daily**, **Weekly**, or **Monthly**.\
For example, if you want an offering to be shown only 100 times in a day, set the Overall Capping to 100 with a "Daily" frequency. After the 100th view, the offering will stop being served to anyone until the daily reset occurs.
* **User Level Capping**: This limit specifies how many times a single user who is part of the targeted segment can claim the offer. You can also specify the maximum number of times a user can claim it and choose a reset frequency from: **Daily**, **Weekly**, or **Monthly**.\
For example, to limit an offering so each user can claim it only once per week, set the User Capping to 1 and the Frequency to "Weekly". A user who claims the offering will not be eligible again until the cap resets at the start of the next week.
Click **Create**.
# View and Manage Created Offerings
* **Overall Capping**: This limit specifies how many times this offering can be claimed across all users in the targeted segment. You can also specify the maximum number of times the offering can be used and choose a reset frequency from: **Daily**, **Weekly**, or **Monthly**.\
For example, if you want an offering to be shown only 100 times in a day, set the Overall Capping to 100 with a "Daily" frequency. After the 100th view, the offering will stop being served to anyone until the daily reset occurs.
* **User Level Capping**: This limit specifies how many times a single user who is part of the targeted segment can claim the offer. You can also specify the maximum number of times a user can claim it and choose a reset frequency from: **Daily**, **Weekly**, or **Monthly**.\
For example, to limit an offering so each user can claim it only once per week, set the User Capping to 1 and the Frequency to "Weekly". A user who claims the offering will not be eligible again until the cap resets at the start of the next week.
Click **Create**.
# View and Manage Created Offerings
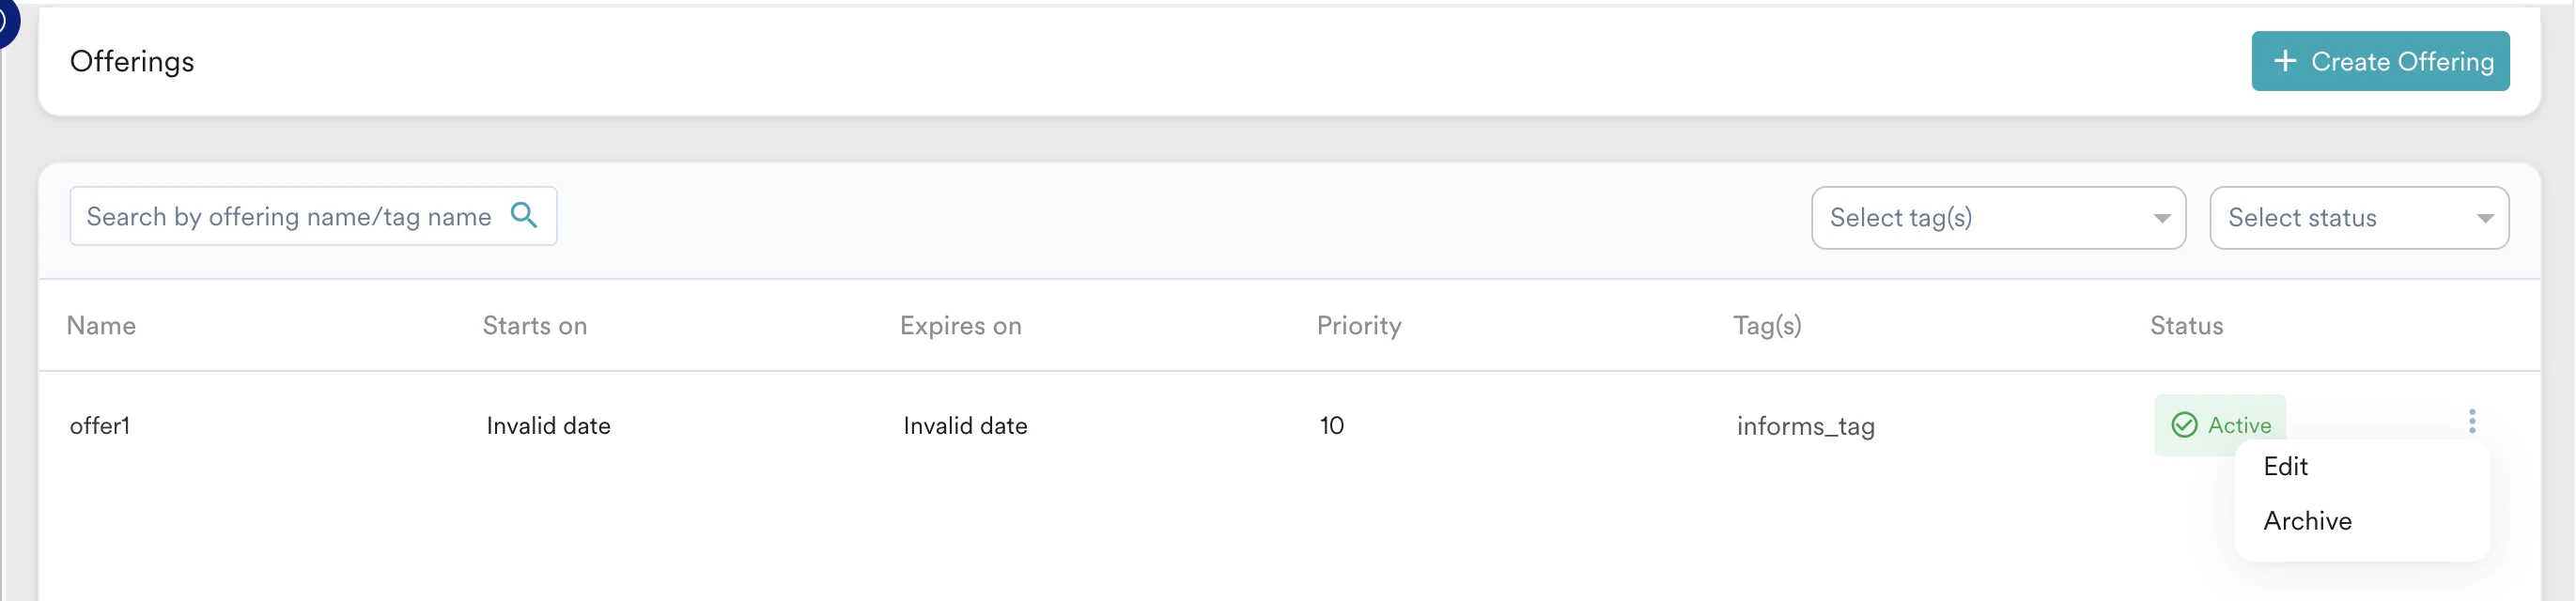 After creating the offers, they are listed on the **Offerings** page with one of the following statuses: **Active**, **Scheduled**, **Expired**, **Archived**. You can perform the following functions on this page:
* Search for the offering using name or tags.
* Filter the offerings based on tags and status.
* **Edit** or **Archive** the offering by clicking the ellipsis icon against that offer.
For more information, refer to [FAQs on Offerings](/user-guide/decisioning/offer-decisioning/faqs-on-offerings).
# Next Step
After creating your offerings, a decision policy then determines how MoEngage intelligently selects and displays them to your users. For more information, refer to [Decision Policy](/user-guide/decisioning/offer-decisioning/decision-policy).
After creating the offers, they are listed on the **Offerings** page with one of the following statuses: **Active**, **Scheduled**, **Expired**, **Archived**. You can perform the following functions on this page:
* Search for the offering using name or tags.
* Filter the offerings based on tags and status.
* **Edit** or **Archive** the offering by clicking the ellipsis icon against that offer.
For more information, refer to [FAQs on Offerings](/user-guide/decisioning/offer-decisioning/faqs-on-offerings).
# Next Step
After creating your offerings, a decision policy then determines how MoEngage intelligently selects and displays them to your users. For more information, refer to [Decision Policy](/user-guide/decisioning/offer-decisioning/decision-policy).