> ## Documentation Index
> Fetch the complete documentation index at: https://moengage.com/docs/llms.txt
> Use this file to discover all available pages before exploring further.
# Warehouse Segments
> Create audience segments from your data warehouse in MoEngage without moving data. Launch targeted campaigns using warehouse data in a few clicks.
Warehouse segments enable you to create segments on MoEngage based on data from your data warehouse without the hassles of copying or moving it to MoEngage.
Let's say that your brand wishes to offer exclusive discounts to loyal shoppers based on an engagement score that is computed with your proprietary logic. This data is stored and accessible only from your data warehouse. With Warehouse segments, you can access this data from the warehouse directly, build an audience on MoEngage, and send a campaign from MoEngage within a few clicks.
With Warehouse segments, you get real-time access to warehouse data without any syncing delays, accelerating audience generation and enabling timely engagement. Moreover, with data securely stored within the warehouse, Warehouse segments ensure data security, simplifying compliance with privacy regulations and industry standards.
# Create a Warehouse segment
## Step 1: Set up your data source
Big Query Snowflake Databricks Redshift
Follow the below steps to grant read access to certain tables in BigQuery to MoEngage. Additionally, it covers providing access to BigQuery Jobs API, enabling Moengage to submit jobs and download query results.
These instructions assume you have administrative privileges in the Google Cloud Platform, specifically in the project that hosts the BigQuery dataset and jobs.
### Create a Service Account for MoEngage
1. Open the [Google Cloud](https://console.cloud.google.com) Console.
2. Navigate to the project housing the **BigQuery** dataset and jobs.
3. Go to the **IAM & Admin** section and select **Service Accounts**.
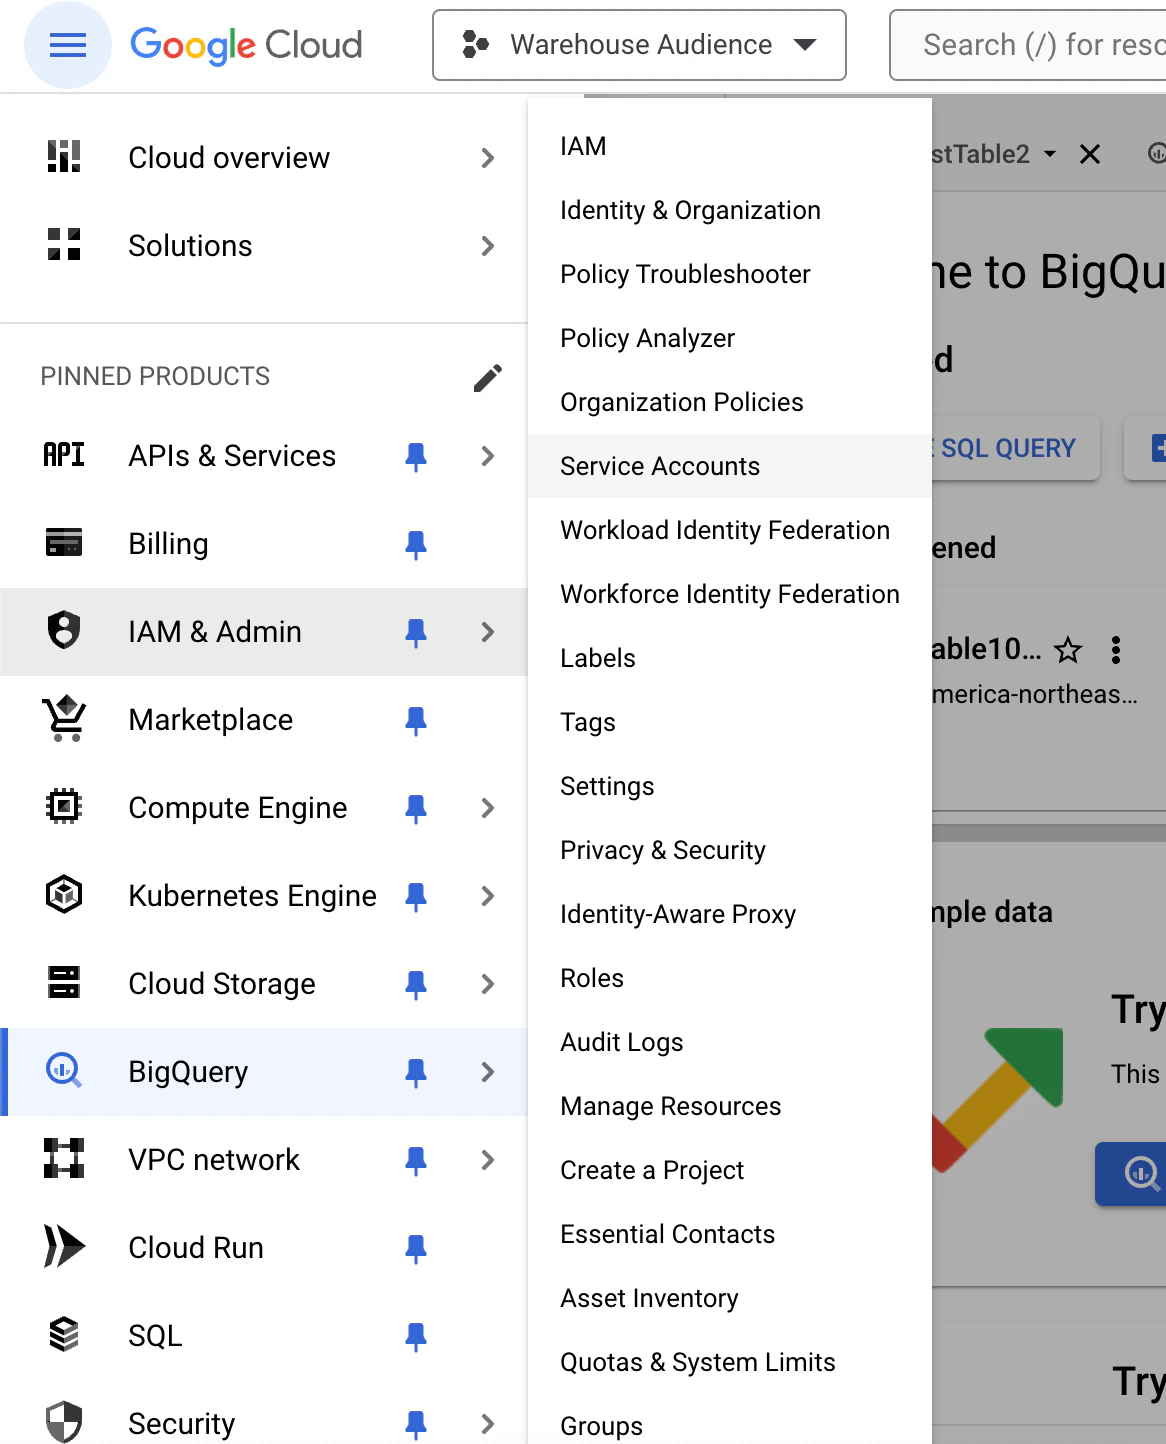 4. Click **Create Service Account**.
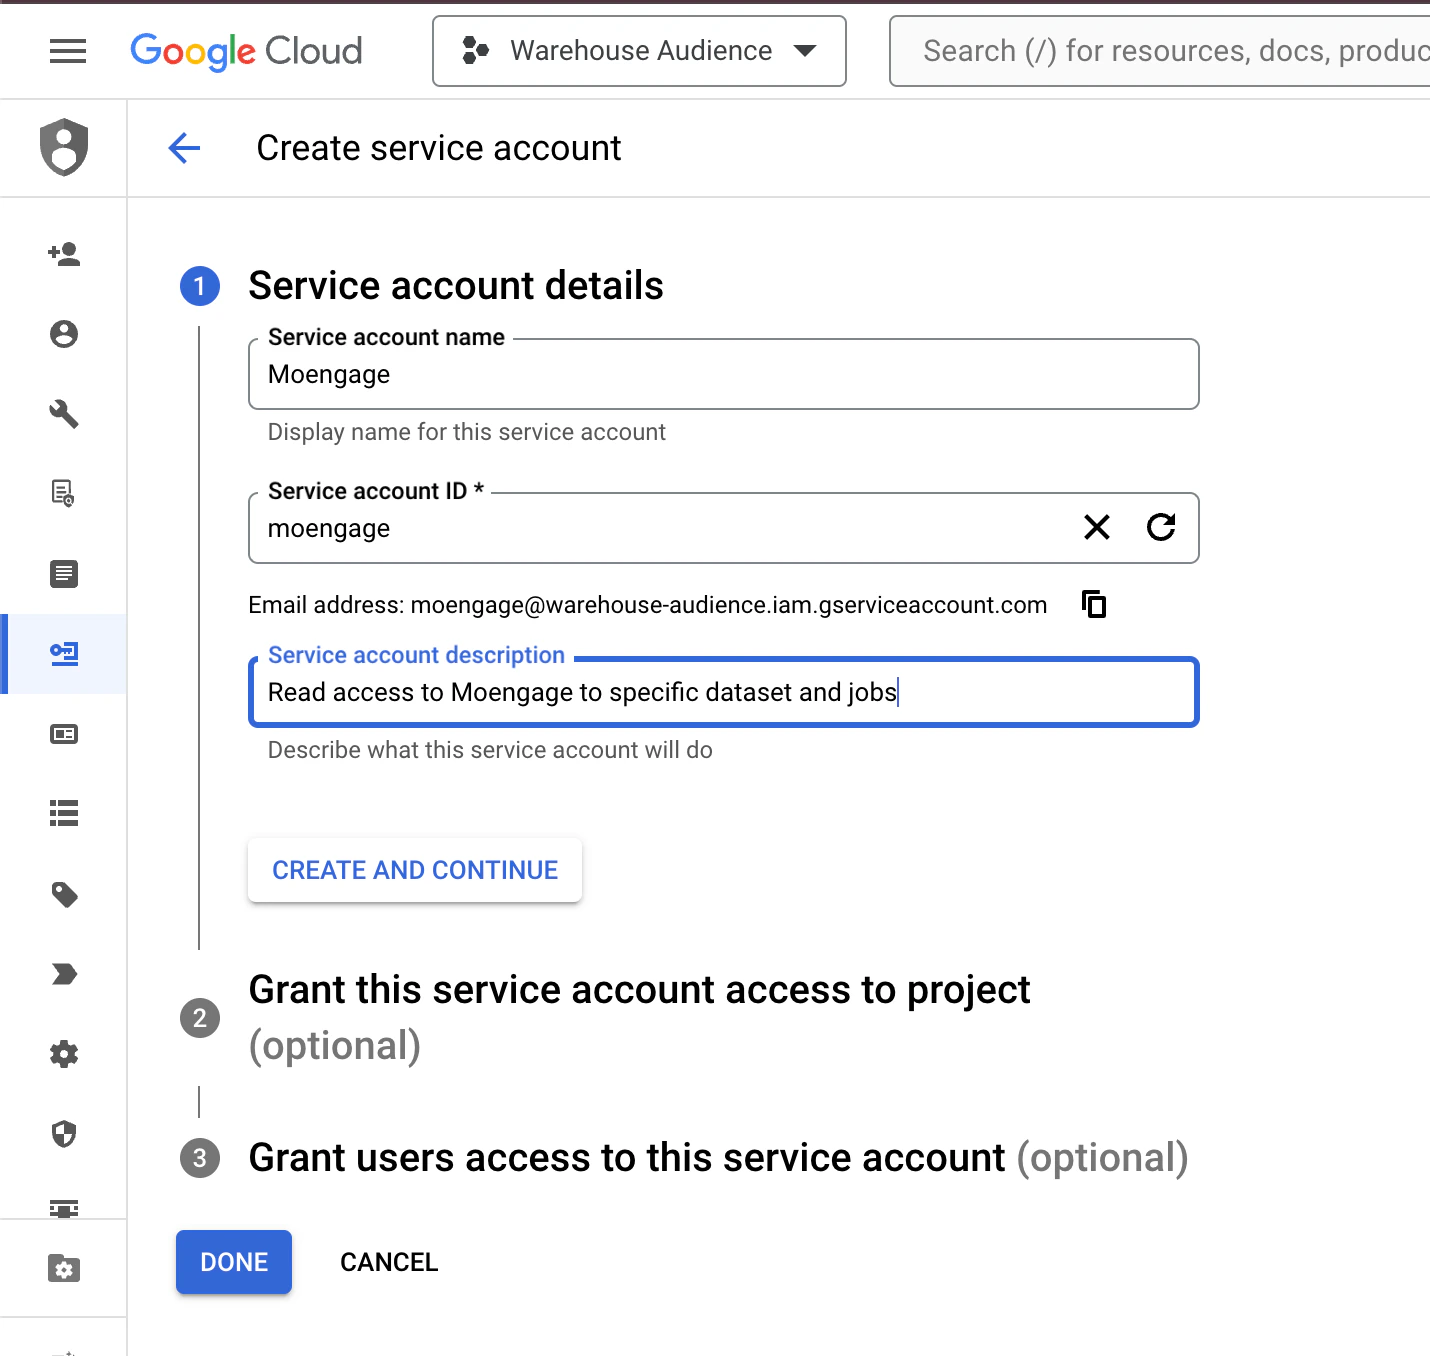
5. Provide a name for the service account (e.g., moengage-access).
4. Click **Create Service Account**.
5. Provide a name for the service account (e.g., moengage-access).
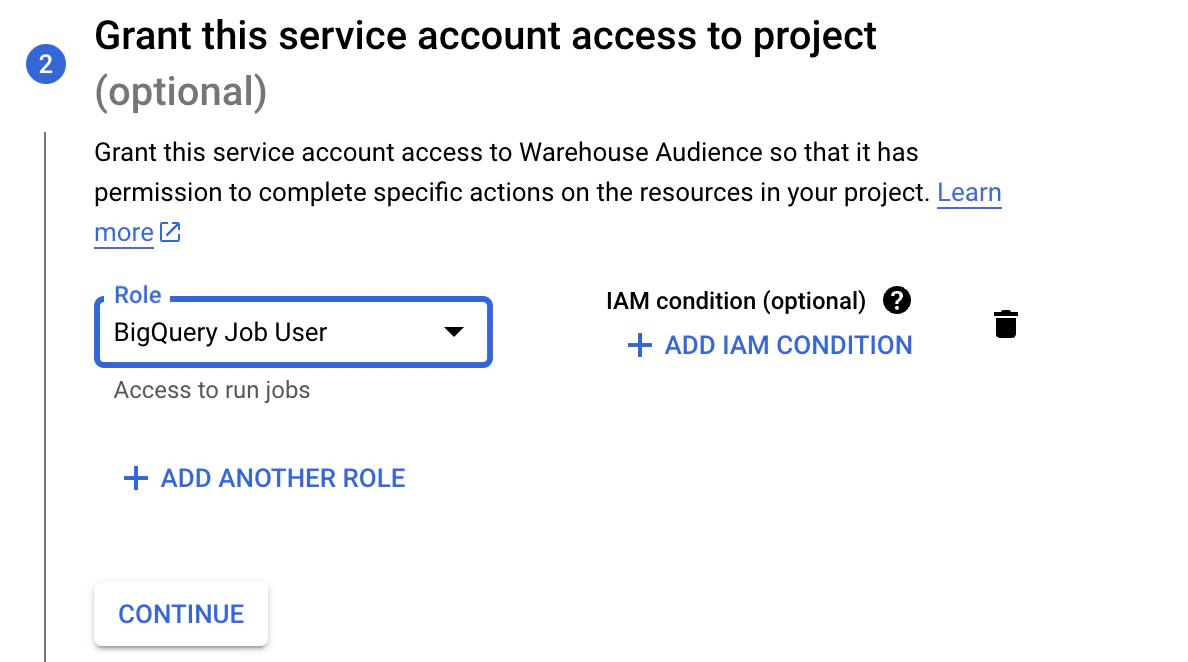
 6. Set the appropriate role for the service account as **BigQuery Job User**.
 7. Create the service account.
8. Navigate to the **service account** and select the **KEYS** tab.
9. Click the **ADD** KEY dropdown and then select Create new key. **
7. Create the service account.
8. Navigate to the **service account** and select the **KEYS** tab.
9. Click the **ADD** KEY dropdown and then select Create new key. **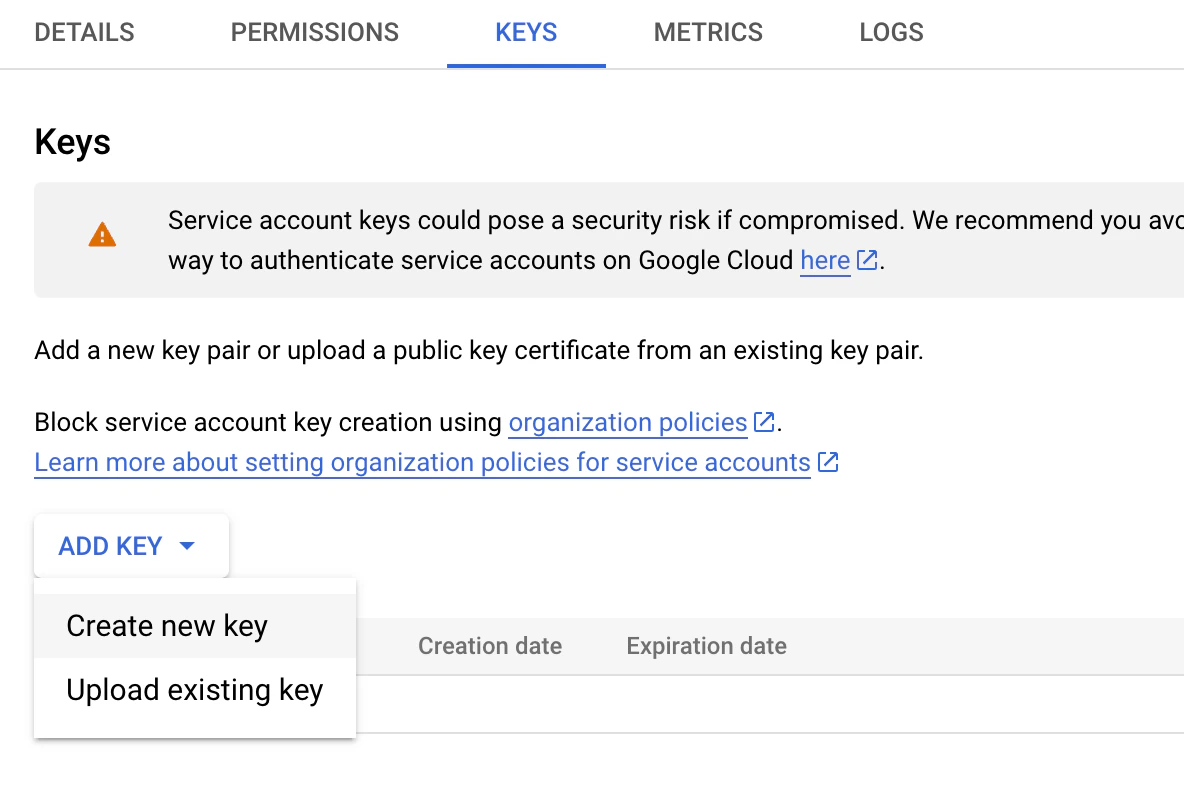 **
10. Select **JSON** as the screen type in the pop-up
11. Click CREATE to generate and download the JSON key file.
12. Keep the JSON file securely and share it with MoEngag as below.
Share the below details to [warehousesegments@moengage.com](mailto:warehousesegments@moengage.com) to get warehouse segments enabled on your workspace:
1. JSON key file of the service account created for MoEngage as per the steps above
2. Your MoEngage workspace name, along with your data cluster (DC)
3. Your BigQuery location
### Share Access to Specific Tables with Moengage
1. In the BigQuery console, navigate to the dataset containing the tables you want Moengage to access.
2. Click the **SHARING** dropdown and then select **Permissions.**
**
10. Select **JSON** as the screen type in the pop-up
11. Click CREATE to generate and download the JSON key file.
12. Keep the JSON file securely and share it with MoEngag as below.
Share the below details to [warehousesegments@moengage.com](mailto:warehousesegments@moengage.com) to get warehouse segments enabled on your workspace:
1. JSON key file of the service account created for MoEngage as per the steps above
2. Your MoEngage workspace name, along with your data cluster (DC)
3. Your BigQuery location
### Share Access to Specific Tables with Moengage
1. In the BigQuery console, navigate to the dataset containing the tables you want Moengage to access.
2. Click the **SHARING** dropdown and then select **Permissions.**
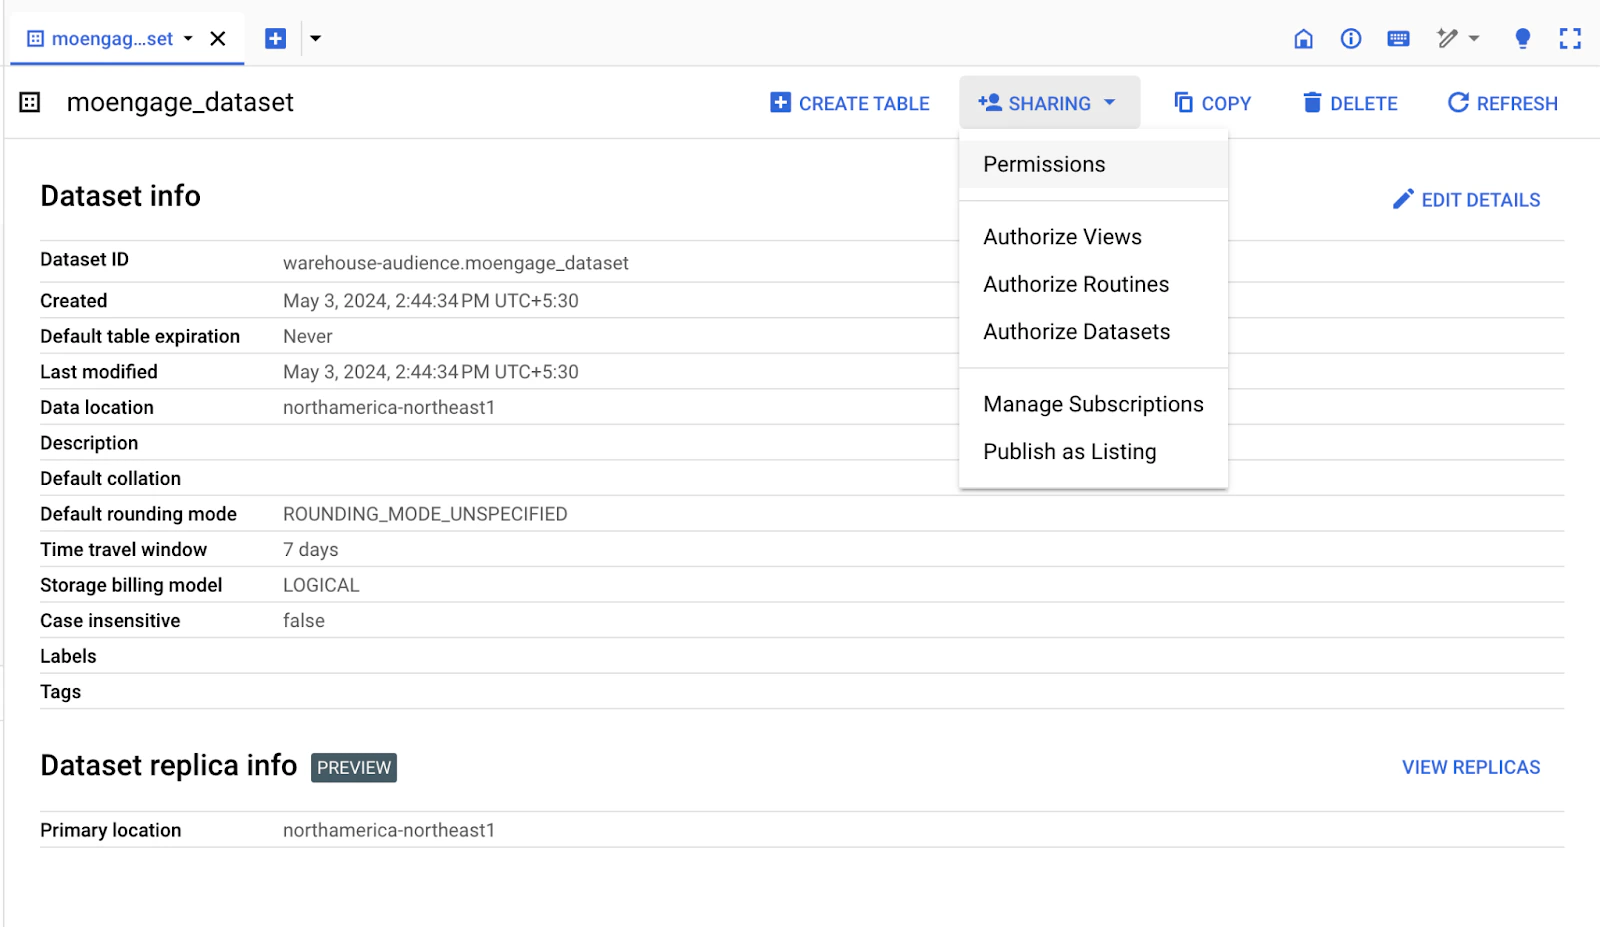 3. Add the service account's email address (found in the JSON key file) as a member with the "BigQuery Data Viewer" role.
 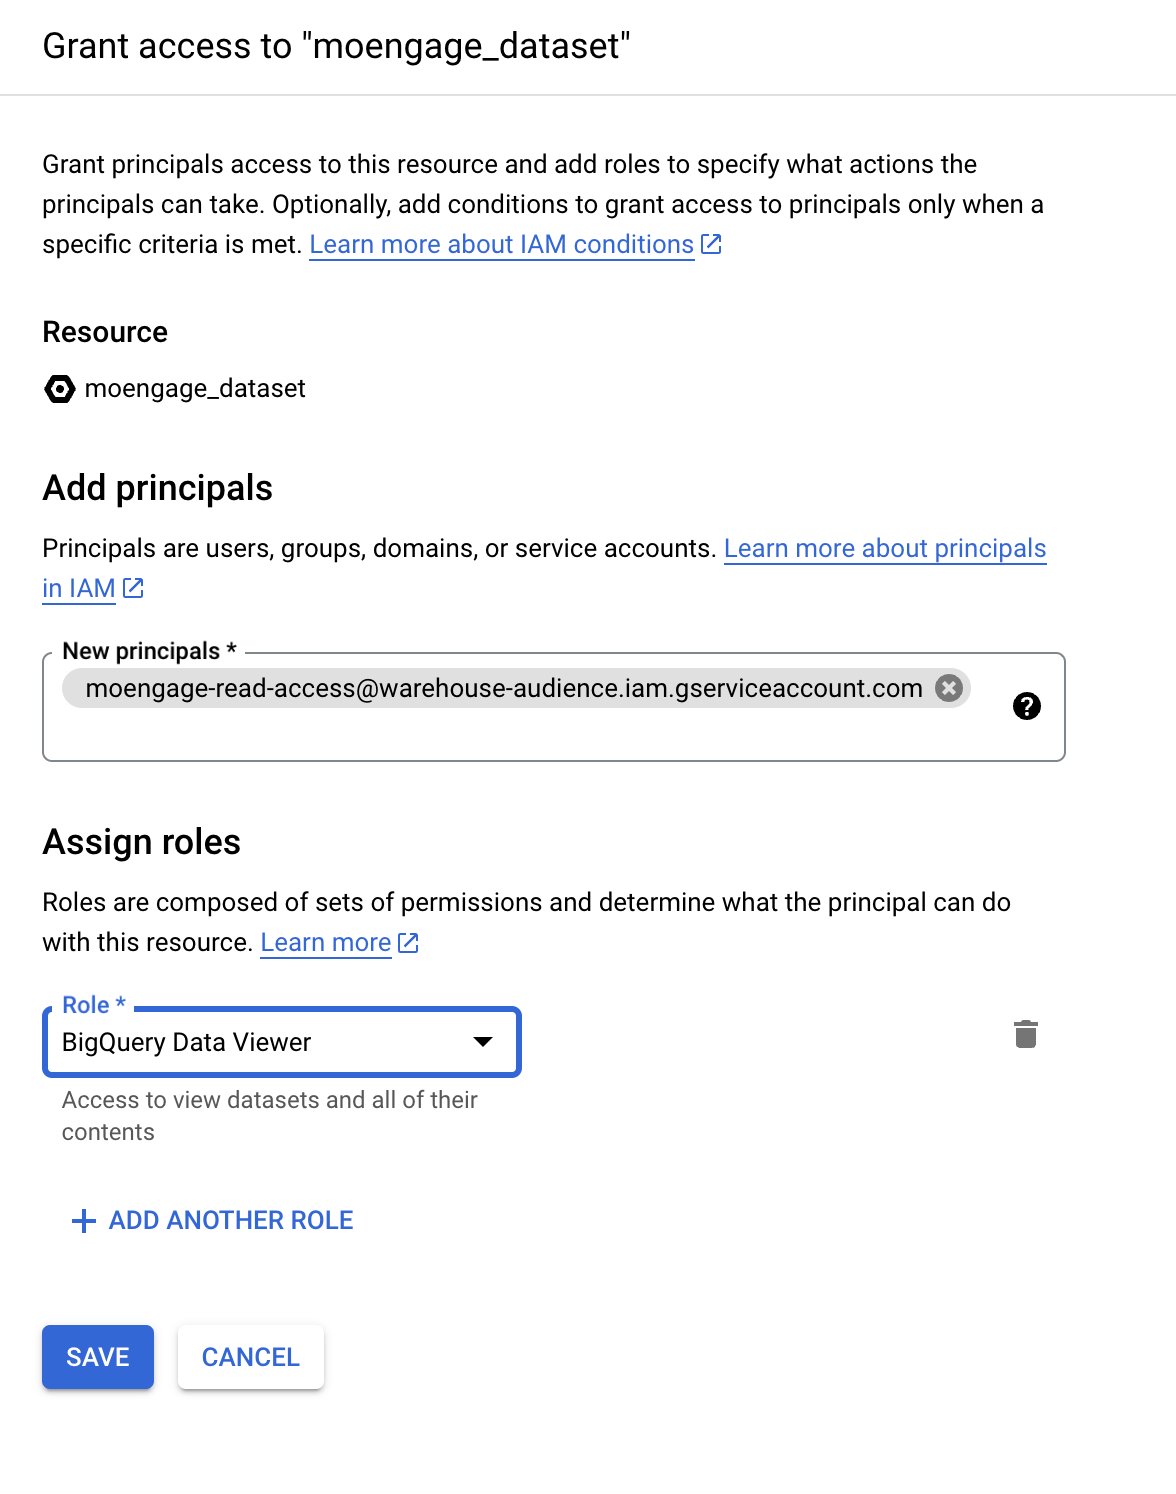 4. Click **Save** to grant access to the dataset.
### Grant Access to BigQuery Jobs API
Skip if access is already given in the first step.
1. In the Google Cloud Console, go to the **IAM & Admin** section and then select IAM.
2. Click **Grant Access**to add a new member.
3. Enter the service account's email address (found in the JSON key file).
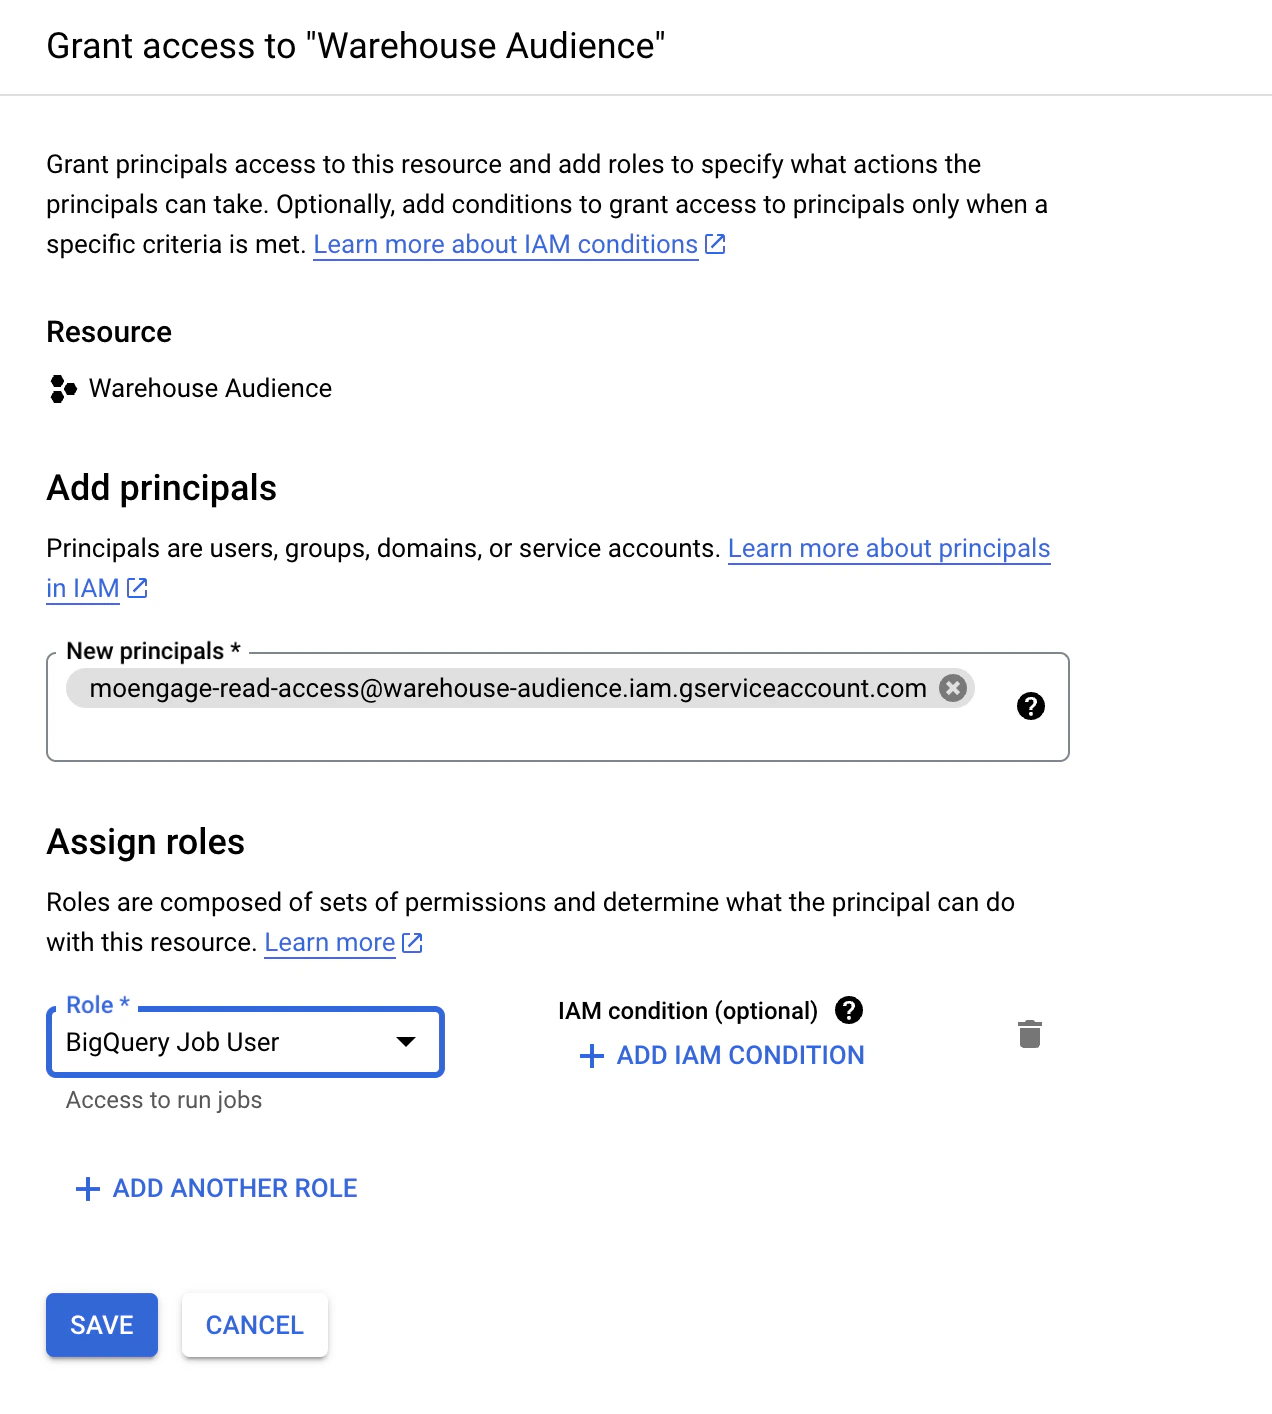
4. Assign the **Role** as **BigQuery Job Use**r to enable interaction with the BigQuery Jobs API.
5. Click **Save** to grant access to the API.
4. Click **Save** to grant access to the dataset.
### Grant Access to BigQuery Jobs API
Skip if access is already given in the first step.
1. In the Google Cloud Console, go to the **IAM & Admin** section and then select IAM.
2. Click **Grant Access**to add a new member.
3. Enter the service account's email address (found in the JSON key file).
4. Assign the **Role** as **BigQuery Job Use**r to enable interaction with the BigQuery Jobs API.
5. Click **Save** to grant access to the API.
 1) Open the JSON key file shared with Moengage.
2) Locate the private\_key\_id attribute in the JSON content.
3) In the BigQuery console, open the dataset with the desired tables.
4) Select the table(s) you want to restrict access to and click on "Share Table" from the context menu.
5) Add the service account's email address as a member and restrict the role to "BigQuery Data Viewer" only for these table(s).
By following the above steps, you have successfully granted Moengage read access to specific tables in BigQuery.
Additionally, you have authorized access to the BigQuery Jobs API, allowing them to submit jobs and download query results. It is essential to review and manage access permissions periodically to maintain data security.
In order to run queries on data from Snowflake, you will first need to connect MoEngage to your Snowflake data warehouse.
### Steps to create a new Snowflake Connection
1. On your MoEngage Dashboard, go to the **App Marketplace.**
2. Search for Snowflake.
1) Open the JSON key file shared with Moengage.
2) Locate the private\_key\_id attribute in the JSON content.
3) In the BigQuery console, open the dataset with the desired tables.
4) Select the table(s) you want to restrict access to and click on "Share Table" from the context menu.
5) Add the service account's email address as a member and restrict the role to "BigQuery Data Viewer" only for these table(s).
By following the above steps, you have successfully granted Moengage read access to specific tables in BigQuery.
Additionally, you have authorized access to the BigQuery Jobs API, allowing them to submit jobs and download query results. It is essential to review and manage access permissions periodically to maintain data security.
In order to run queries on data from Snowflake, you will first need to connect MoEngage to your Snowflake data warehouse.
### Steps to create a new Snowflake Connection
1. On your MoEngage Dashboard, go to the **App Marketplace.**
2. Search for Snowflake. 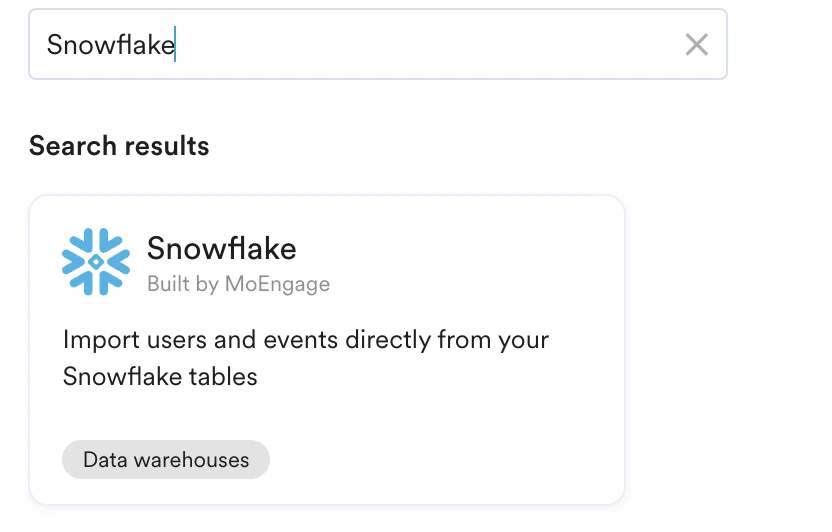 3. Go to the **Integrate tab,** and click **Add Connection**
4. Provide your Snowflake data warehouse details.
3. Go to the **Integrate tab,** and click **Add Connection**
4. Provide your Snowflake data warehouse details.
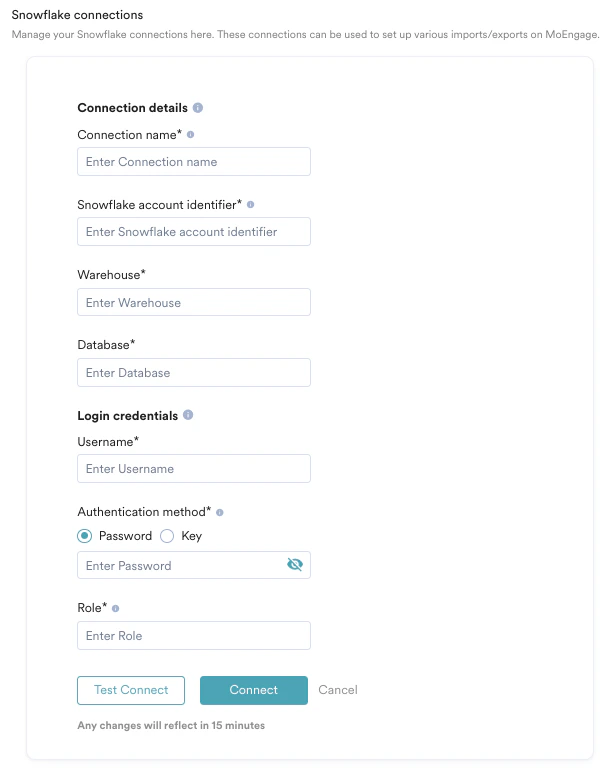 Enter the following fields in Snowflake.
1. **Connect Name:** Give this connection an identifiable name, e.g., My Snowflake Prod
2. **Snowflake Account Identifier**
* It is always found at the beginning of your Snowflake URL, for example; ([https://ACCOUNT\\\_IDENTIFIER.snowflakecomputing.com](https://ACCOUNT\\_IDENTIFIER.snowflakecomputing.com)).
* The format may differ based on Snowflake account age. For details, [refer to Snowflake documentation.](https://docs.snowflake.com/en/user-guide/admin-account-identifier.html)
3. If you're using Snowsight, you can find **your account name** at the bottom of the left navigation. Select the account you want to import from and then click on the “copy” icon to copy the Account ID. For up-to-date information and details, [refer to Snowflake documentation.](https://docs.snowflake.com/en/user-guide/admin-account-identifier.html)
Enter the following fields in Snowflake.
1. **Connect Name:** Give this connection an identifiable name, e.g., My Snowflake Prod
2. **Snowflake Account Identifier**
* It is always found at the beginning of your Snowflake URL, for example; ([https://ACCOUNT\\\_IDENTIFIER.snowflakecomputing.com](https://ACCOUNT\\_IDENTIFIER.snowflakecomputing.com)).
* The format may differ based on Snowflake account age. For details, [refer to Snowflake documentation.](https://docs.snowflake.com/en/user-guide/admin-account-identifier.html)
3. If you're using Snowsight, you can find **your account name** at the bottom of the left navigation. Select the account you want to import from and then click on the “copy” icon to copy the Account ID. For up-to-date information and details, [refer to Snowflake documentation.](https://docs.snowflake.com/en/user-guide/admin-account-identifier.html) 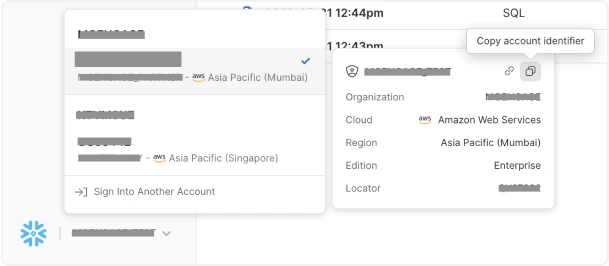 4. **Warehouse:** The name of the warehouse MoEngage uses to execute the queries. For example, COMPUTE \_WAREHOUSE
5. **Database:** The database that MoEngage should use to read the tables from. You can choose the schema while setting up warehouse segments/imports/exports. e.g., MY\_DEMO\_DB
6. **Username:** The database that MoEngage should use to read the tables from. You can choose the schema while setting up warehouse segments/imports/exports.
7. **Authentication Method:** MoEngage can connect to your Snowflake Instance using two methods:
* **Password:** If you select a password, provide the password of the database user (username) you entered above.
* **Key:** If you select "Key" as your authentication method. Perform the below-mentioned steps.
* Click on "Generate Key," and MoEngage will display your public key. You will need to add this public key to your database user. Follow the instructions mentioned on [Snowflake help docs](https://docs.snowflake.com/en/user-guide/key-pair-auth#assign-the-public-key-to-a-snowflake-user) to set this up: **Key** - MoEngage can connect to your Snowflake Instance using the Key pair authentication method. To use this method:
4. **Warehouse:** The name of the warehouse MoEngage uses to execute the queries. For example, COMPUTE \_WAREHOUSE
5. **Database:** The database that MoEngage should use to read the tables from. You can choose the schema while setting up warehouse segments/imports/exports. e.g., MY\_DEMO\_DB
6. **Username:** The database that MoEngage should use to read the tables from. You can choose the schema while setting up warehouse segments/imports/exports.
7. **Authentication Method:** MoEngage can connect to your Snowflake Instance using two methods:
* **Password:** If you select a password, provide the password of the database user (username) you entered above.
* **Key:** If you select "Key" as your authentication method. Perform the below-mentioned steps.
* Click on "Generate Key," and MoEngage will display your public key. You will need to add this public key to your database user. Follow the instructions mentioned on [Snowflake help docs](https://docs.snowflake.com/en/user-guide/key-pair-auth#assign-the-public-key-to-a-snowflake-user) to set this up: **Key** - MoEngage can connect to your Snowflake Instance using the Key pair authentication method. To use this method:
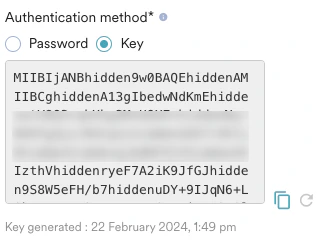 * Once you have added this key to your database user, click on "Test connection," and MoEngage will attempt to verify the credentials.
8. MoEngage also supports the rotating of keys. If your IT Policy requires to rotate the keys, you can do it by following these steps:
* Go to the **App Marketplace** > **Snowflake** > **Integrate and edit the connection.**
* Click on the generate new key icon:
* Once you have added this key to your database user, click on "Test connection," and MoEngage will attempt to verify the credentials.
8. MoEngage also supports the rotating of keys. If your IT Policy requires to rotate the keys, you can do it by following these steps:
* Go to the **App Marketplace** > **Snowflake** > **Integrate and edit the connection.**
* Click on the generate new key icon: 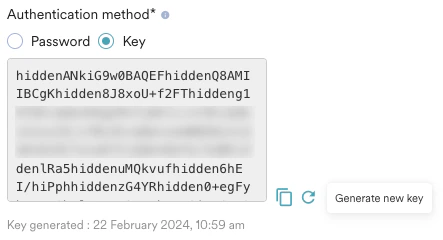 * You will be asked for a confirmation to review. Please read the instructions carefully. Once you save the connection with the newly generated key, MoEngage will no longer use the previous key. You have to ensure that the new key is attached to your database user as the second RSA key (see [Snowflake](https://docs.snowflake.com/en/user-guide/key-pair-auth#configuring-key-pair-rotation) help doc on rotating keys) for the rotation to work properly. If the new key is not attached after saving the connection, your imports and exports might break: **
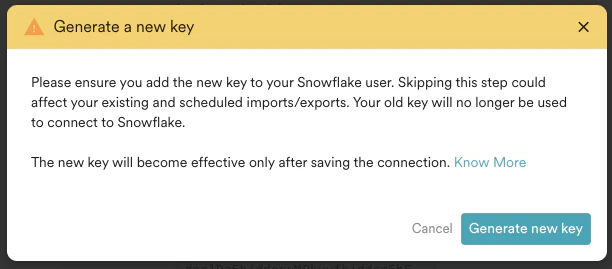 **
* Your new key will be generated and shown to you. At this point, it is highly recommended to copy this new key and attach it as an additional key to your Snowflake database user by following the instructions provided on the [Snowflake help docs](https://docs.snowflake.com/en/user-guide/key-pair-auth#configuring-key-pair-rotation). Once you have attached the new key, you need to test the connection successfully to complete the rotation.
* If you decide to close the edit form or do not click **Connec**t at any point after generating the new key, your old (existing) key will continue to be used as before, and the newly generated key will be deleted from our system.
9. **Role:** This role will be used to execute queries from MoEngage.
Once you have set up a Snowflake Connection, you can use it to set up warehouse segments, imports and exports in MoEngage. If your Snowflake instances aren't public and are on AWS, we recommend you set up [AWS Private Link](https://docs.snowflake.com/en/user-guide/admin-security-privatelink) with MoEngage AWS account. Please reach out to your account manager for more information on this.
In order to run queries on data from Databricks, you must connect MoEngage to your Databricks warehouse. Ensure, you have administrative privileges in the Databricks platform.
### Steps to grant read access to MoEnagage
1. [Add a service principal in Databricks](/user-guide/segment/segment-operations/warehouse-segments)
2. [Assign a service principal to Databricks workspace](/user-guide/segment/segment-operations/warehouse-segments)
3. [Provide data reader access to the service principal](/user-guide/segment/segment-operations/warehouse-segments)
4. [Provide compute permissions on SQL warehouses to service principal](/user-guide/segment/segment-operations/warehouse-segments)
5. [Create a personal access token (PAT)](/user-guide/segment/segment-operations/warehouse-segments)
6. [Fetch the HTTP path and Hostname](/user-guide/segment/segment-operations/warehouse-segments)
7. [Connect Databricks on the App Marketplace](/user-guide/segment/segment-operations/warehouse-segments)
### Add a Service Principal in Databricks
Account admins can add service principals to the Databricks account using the account console. For more information, refer [here.](https://docs.databricks.com/aws/en/admin/users-groups/service-principals#add-service-principals-to-your-account-using-the-account-console)
Perform the following steps to add a service principal:
1. Log in to your [account console](https://accounts.cloud.databricks.com/) in Databricks as an admin.
2. In the sidebar, click **User Management**.
3. On the **Service principals** tab, click **Add Service principal**.
4. Enter a name for the Service principal.
5. Click **Add**.
### Assign a Service Principal to Databricks Workspace
As an admin, assign a service principal to a workspace using the [account console](https://accounts.cloud.databricks.com/). For more information, refer [here](https://docs.databricks.com/aws/en/admin/users-groups/service-principals#assign-a-service-principal-to-a-workspace-using-the-account-console).
Perform the following steps to assign permissions:
1. Log in to your account console in Databricks as an admin.
2. In the sidebar, click **Workspaces**.
3. Click your workspace name.
4. On the **Permissions** tab, click **Add permissions.**
5. Search for and select the service principal, and assign the permission level (Workspace **User**). You can assign the [workspace admin role](https://docs.databricks.com/aws/en/admin/users-groups/service-principals#add-sp-admin-console) to the workspace admin settings page.
6. Click **Save**.
### Provide Data Reader Access to The Service Principal
Provide data reader access, as shown below to the entire workspace or individual schemas to the service principal, ensuring that the tables you want to query in MoEngage are available in the schema.
**
* Your new key will be generated and shown to you. At this point, it is highly recommended to copy this new key and attach it as an additional key to your Snowflake database user by following the instructions provided on the [Snowflake help docs](https://docs.snowflake.com/en/user-guide/key-pair-auth#configuring-key-pair-rotation). Once you have attached the new key, you need to test the connection successfully to complete the rotation.
* If you decide to close the edit form or do not click **Connec**t at any point after generating the new key, your old (existing) key will continue to be used as before, and the newly generated key will be deleted from our system.
9. **Role:** This role will be used to execute queries from MoEngage.
Once you have set up a Snowflake Connection, you can use it to set up warehouse segments, imports and exports in MoEngage. If your Snowflake instances aren't public and are on AWS, we recommend you set up [AWS Private Link](https://docs.snowflake.com/en/user-guide/admin-security-privatelink) with MoEngage AWS account. Please reach out to your account manager for more information on this.
In order to run queries on data from Databricks, you must connect MoEngage to your Databricks warehouse. Ensure, you have administrative privileges in the Databricks platform.
### Steps to grant read access to MoEnagage
1. [Add a service principal in Databricks](/user-guide/segment/segment-operations/warehouse-segments)
2. [Assign a service principal to Databricks workspace](/user-guide/segment/segment-operations/warehouse-segments)
3. [Provide data reader access to the service principal](/user-guide/segment/segment-operations/warehouse-segments)
4. [Provide compute permissions on SQL warehouses to service principal](/user-guide/segment/segment-operations/warehouse-segments)
5. [Create a personal access token (PAT)](/user-guide/segment/segment-operations/warehouse-segments)
6. [Fetch the HTTP path and Hostname](/user-guide/segment/segment-operations/warehouse-segments)
7. [Connect Databricks on the App Marketplace](/user-guide/segment/segment-operations/warehouse-segments)
### Add a Service Principal in Databricks
Account admins can add service principals to the Databricks account using the account console. For more information, refer [here.](https://docs.databricks.com/aws/en/admin/users-groups/service-principals#add-service-principals-to-your-account-using-the-account-console)
Perform the following steps to add a service principal:
1. Log in to your [account console](https://accounts.cloud.databricks.com/) in Databricks as an admin.
2. In the sidebar, click **User Management**.
3. On the **Service principals** tab, click **Add Service principal**.
4. Enter a name for the Service principal.
5. Click **Add**.
### Assign a Service Principal to Databricks Workspace
As an admin, assign a service principal to a workspace using the [account console](https://accounts.cloud.databricks.com/). For more information, refer [here](https://docs.databricks.com/aws/en/admin/users-groups/service-principals#assign-a-service-principal-to-a-workspace-using-the-account-console).
Perform the following steps to assign permissions:
1. Log in to your account console in Databricks as an admin.
2. In the sidebar, click **Workspaces**.
3. Click your workspace name.
4. On the **Permissions** tab, click **Add permissions.**
5. Search for and select the service principal, and assign the permission level (Workspace **User**). You can assign the [workspace admin role](https://docs.databricks.com/aws/en/admin/users-groups/service-principals#add-sp-admin-console) to the workspace admin settings page.
6. Click **Save**.
### Provide Data Reader Access to The Service Principal
Provide data reader access, as shown below to the entire workspace or individual schemas to the service principal, ensuring that the tables you want to query in MoEngage are available in the schema.
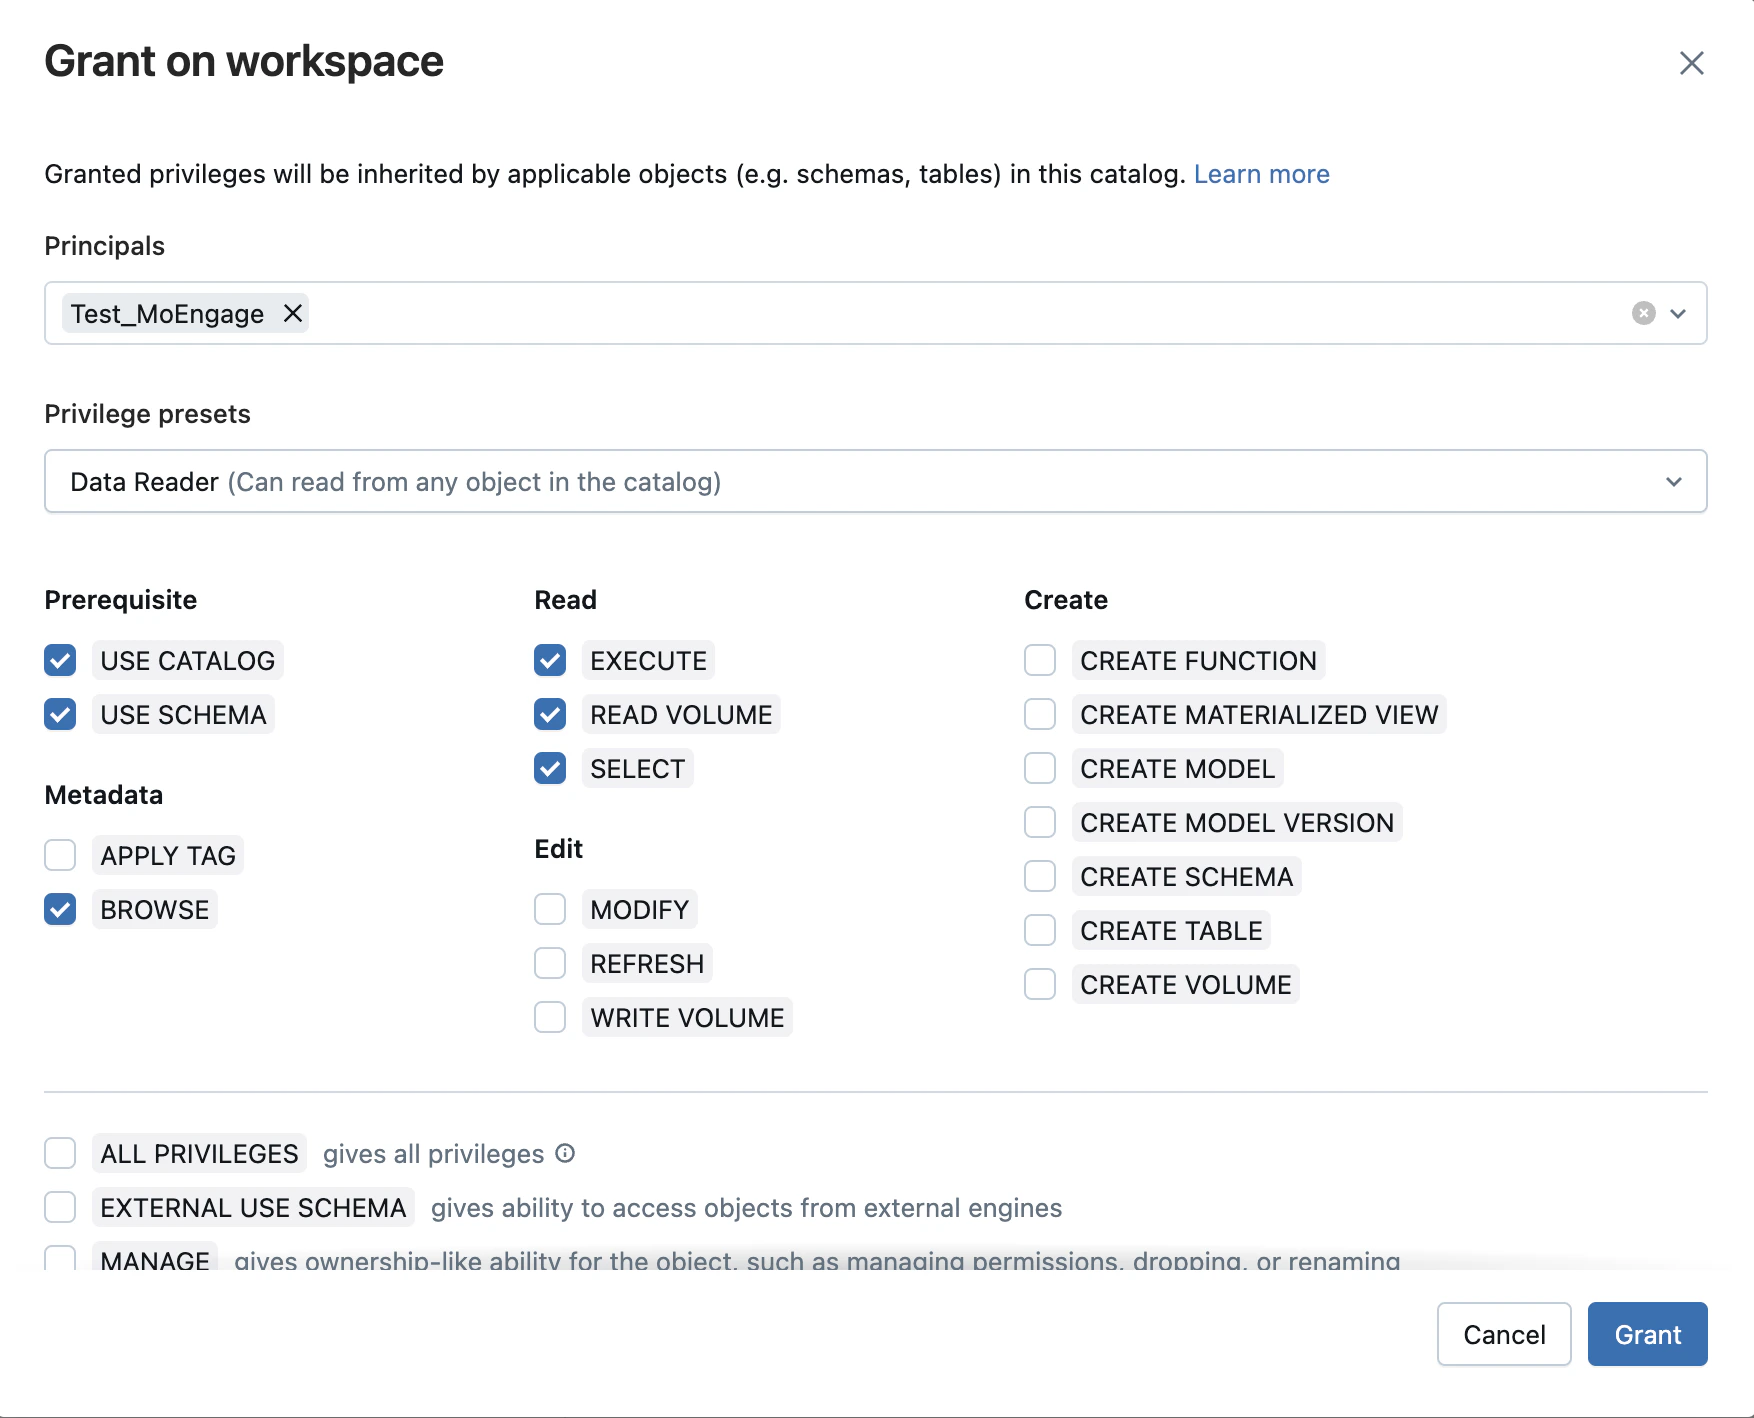 ### Provide Permissions for Service Principal to Compute on SQL Warehouses
Perform the following steps to provide compute permissions:
1. In the Databricks dashboard, Click **Settings > Compute > SQL warehouses**
2. Select the warehouse that needs to be accessed by the service principal.
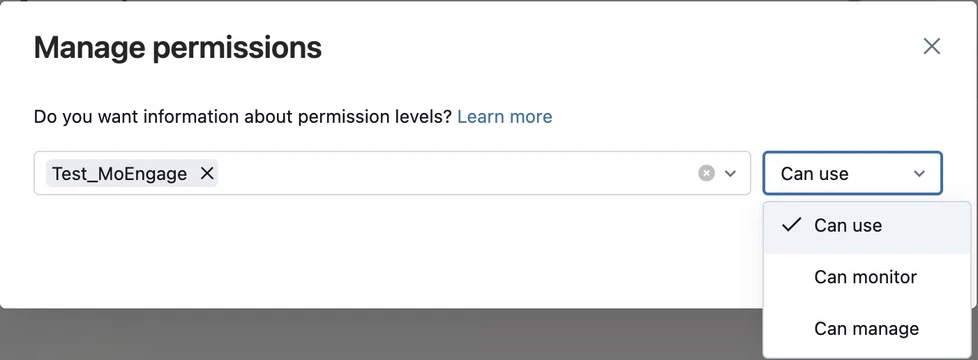
3. Click **Permissions**. In the list, select *Can use* for the service principal.
### Provide Permissions for Service Principal to Compute on SQL Warehouses
Perform the following steps to provide compute permissions:
1. In the Databricks dashboard, Click **Settings > Compute > SQL warehouses**
2. Select the warehouse that needs to be accessed by the service principal.
3. Click **Permissions**. In the list, select *Can use* for the service principal.
 ##
### Create a Personal Access Token (PAT)
You can create a PAT for a service principal using Databricks CLI. For more information, refer [here](https://docs.databricks.com/aws/en/dev-tools/auth/pat#step-1-as-a-databricks-admin-create-a-pat-for-your-databricks-service-principal-from-the-cli).
You can also create a user, assign appropriate access to the user, and allow MoEngage to access your warehouse from that user’s role. However, Databricks recommends the service principal approach. In case you want to create a personal access token for a user, please follow the steps below:
1. In your Databricks workspace, select your Databricks username in the title bar, and then select **Settings** from the dropdown list.
2. On the **Access Tokens** tab, select **Generate New Token.**
3. Enter a comment to identify this token, and change the token’s lifetime to no lifetime by leaving the Lifetime box empty.
4. Click **Generate** and copy the generated token
5. Click **Done**.
##
### Create a Personal Access Token (PAT)
You can create a PAT for a service principal using Databricks CLI. For more information, refer [here](https://docs.databricks.com/aws/en/dev-tools/auth/pat#step-1-as-a-databricks-admin-create-a-pat-for-your-databricks-service-principal-from-the-cli).
You can also create a user, assign appropriate access to the user, and allow MoEngage to access your warehouse from that user’s role. However, Databricks recommends the service principal approach. In case you want to create a personal access token for a user, please follow the steps below:
1. In your Databricks workspace, select your Databricks username in the title bar, and then select **Settings** from the dropdown list.
2. On the **Access Tokens** tab, select **Generate New Token.**
3. Enter a comment to identify this token, and change the token’s lifetime to no lifetime by leaving the Lifetime box empty.
4. Click **Generate** and copy the generated token
5. Click **Done**. 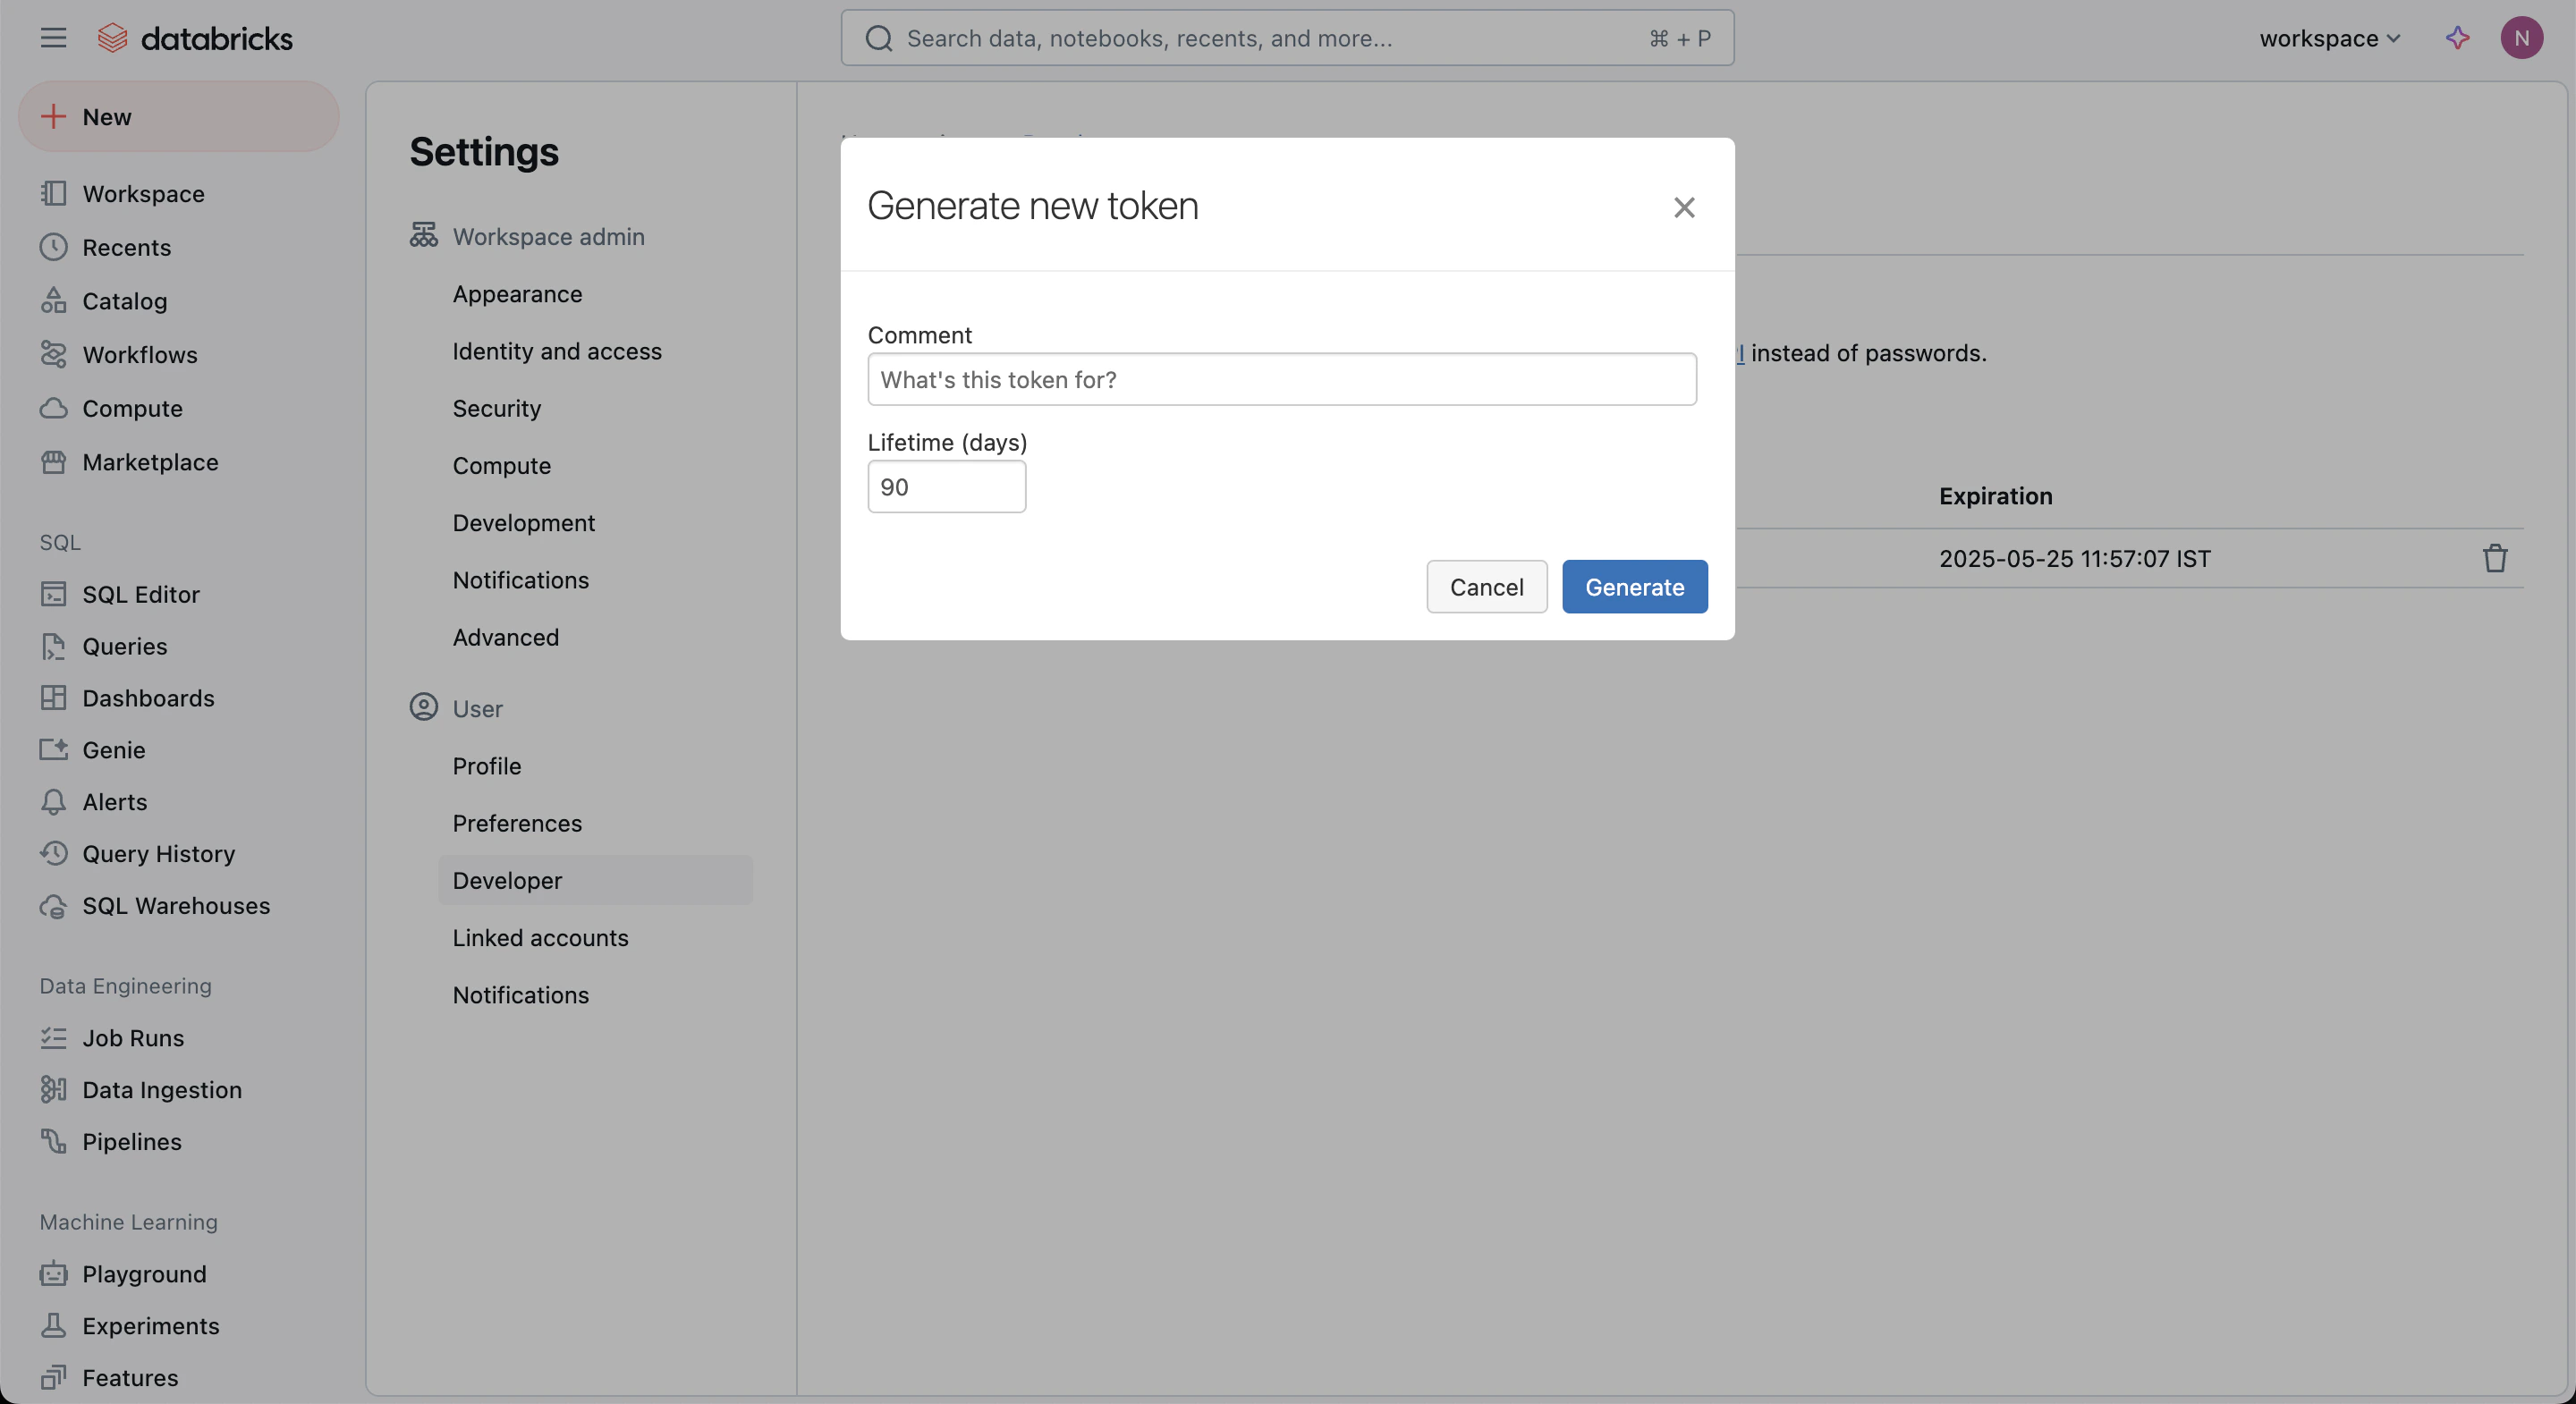 ### Fetch the HTTP Path and Hostname
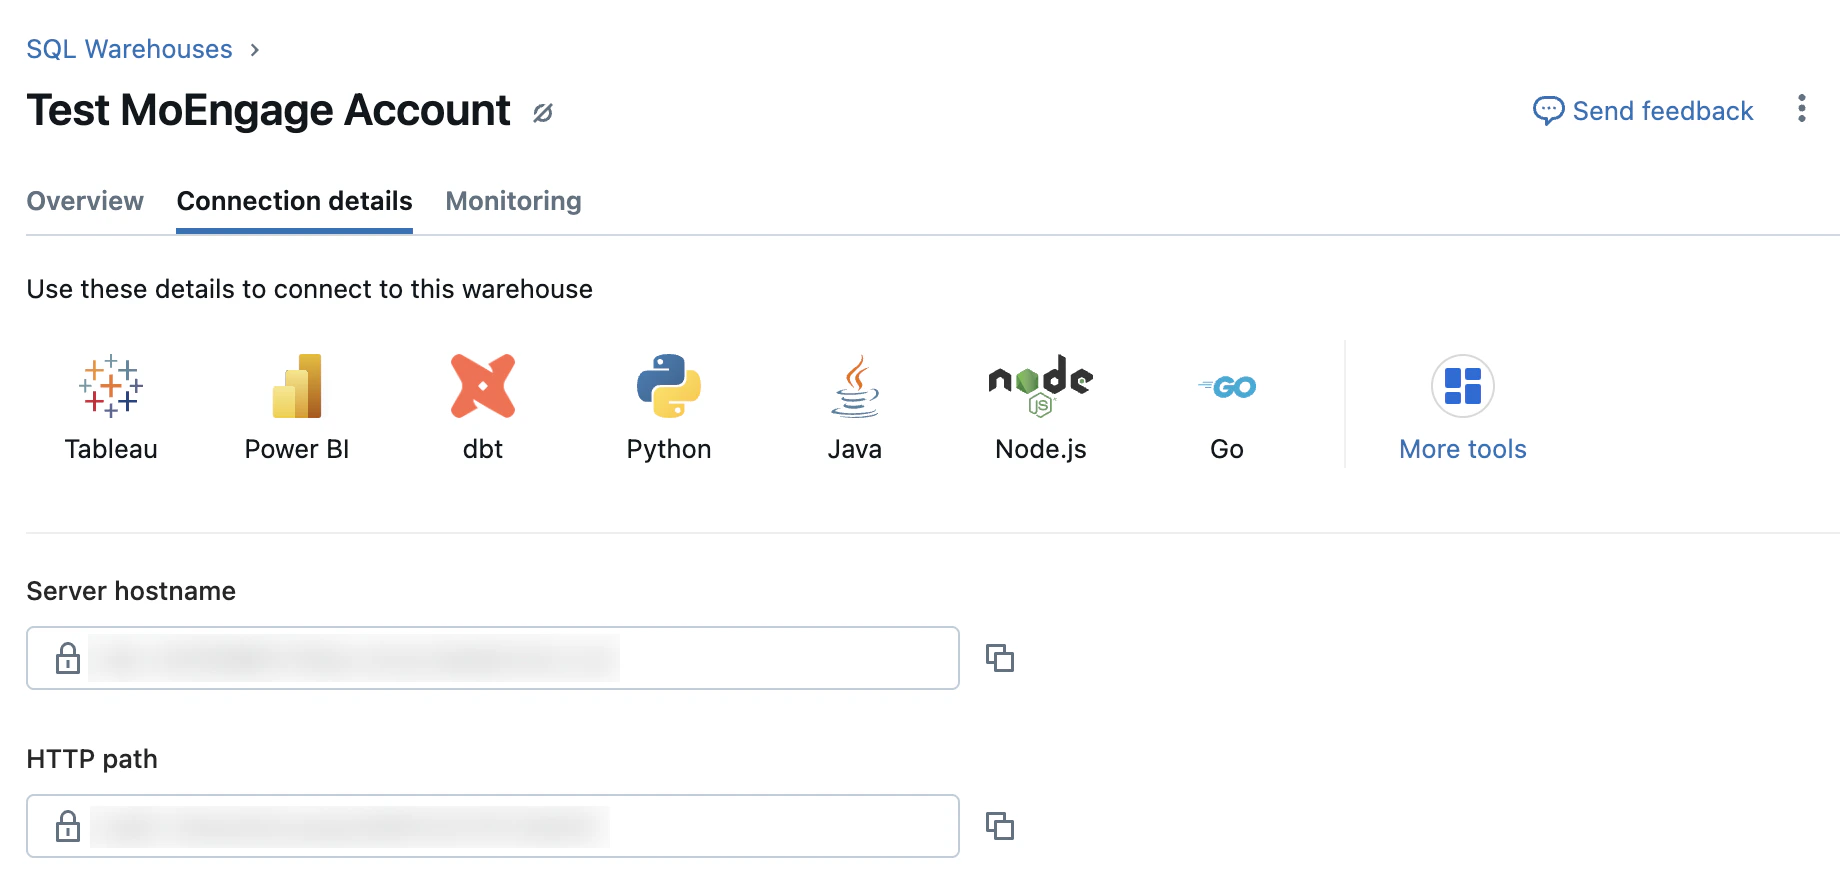
Perform the following steps to fetch the HTTP path and Server hostname, which MoEngage requires to access your Databricks workspace.
1. In your Databricks workspace, select **SQL warehouses**.
2. Choose your warehouse.
3. Click the **Connection details** tab and copy the hostname and HTTP path provided, which is required for MoEngage.
### Fetch the HTTP Path and Hostname
Perform the following steps to fetch the HTTP path and Server hostname, which MoEngage requires to access your Databricks workspace.
1. In your Databricks workspace, select **SQL warehouses**.
2. Choose your warehouse.
3. Click the **Connection details** tab and copy the hostname and HTTP path provided, which is required for MoEngage.
 ### Connect Databricks on the App Marketplace
To connect Databricks on the App marketplace, perform the following steps:
1. On the left navigation menu in the MoEngage dashboard, click **App marketplace**.
2. On the App Marketplace page, search for **Databricks**.
### Connect Databricks on the App Marketplace
To connect Databricks on the App marketplace, perform the following steps:
1. On the left navigation menu in the MoEngage dashboard, click **App marketplace**.
2. On the App Marketplace page, search for **Databricks**. 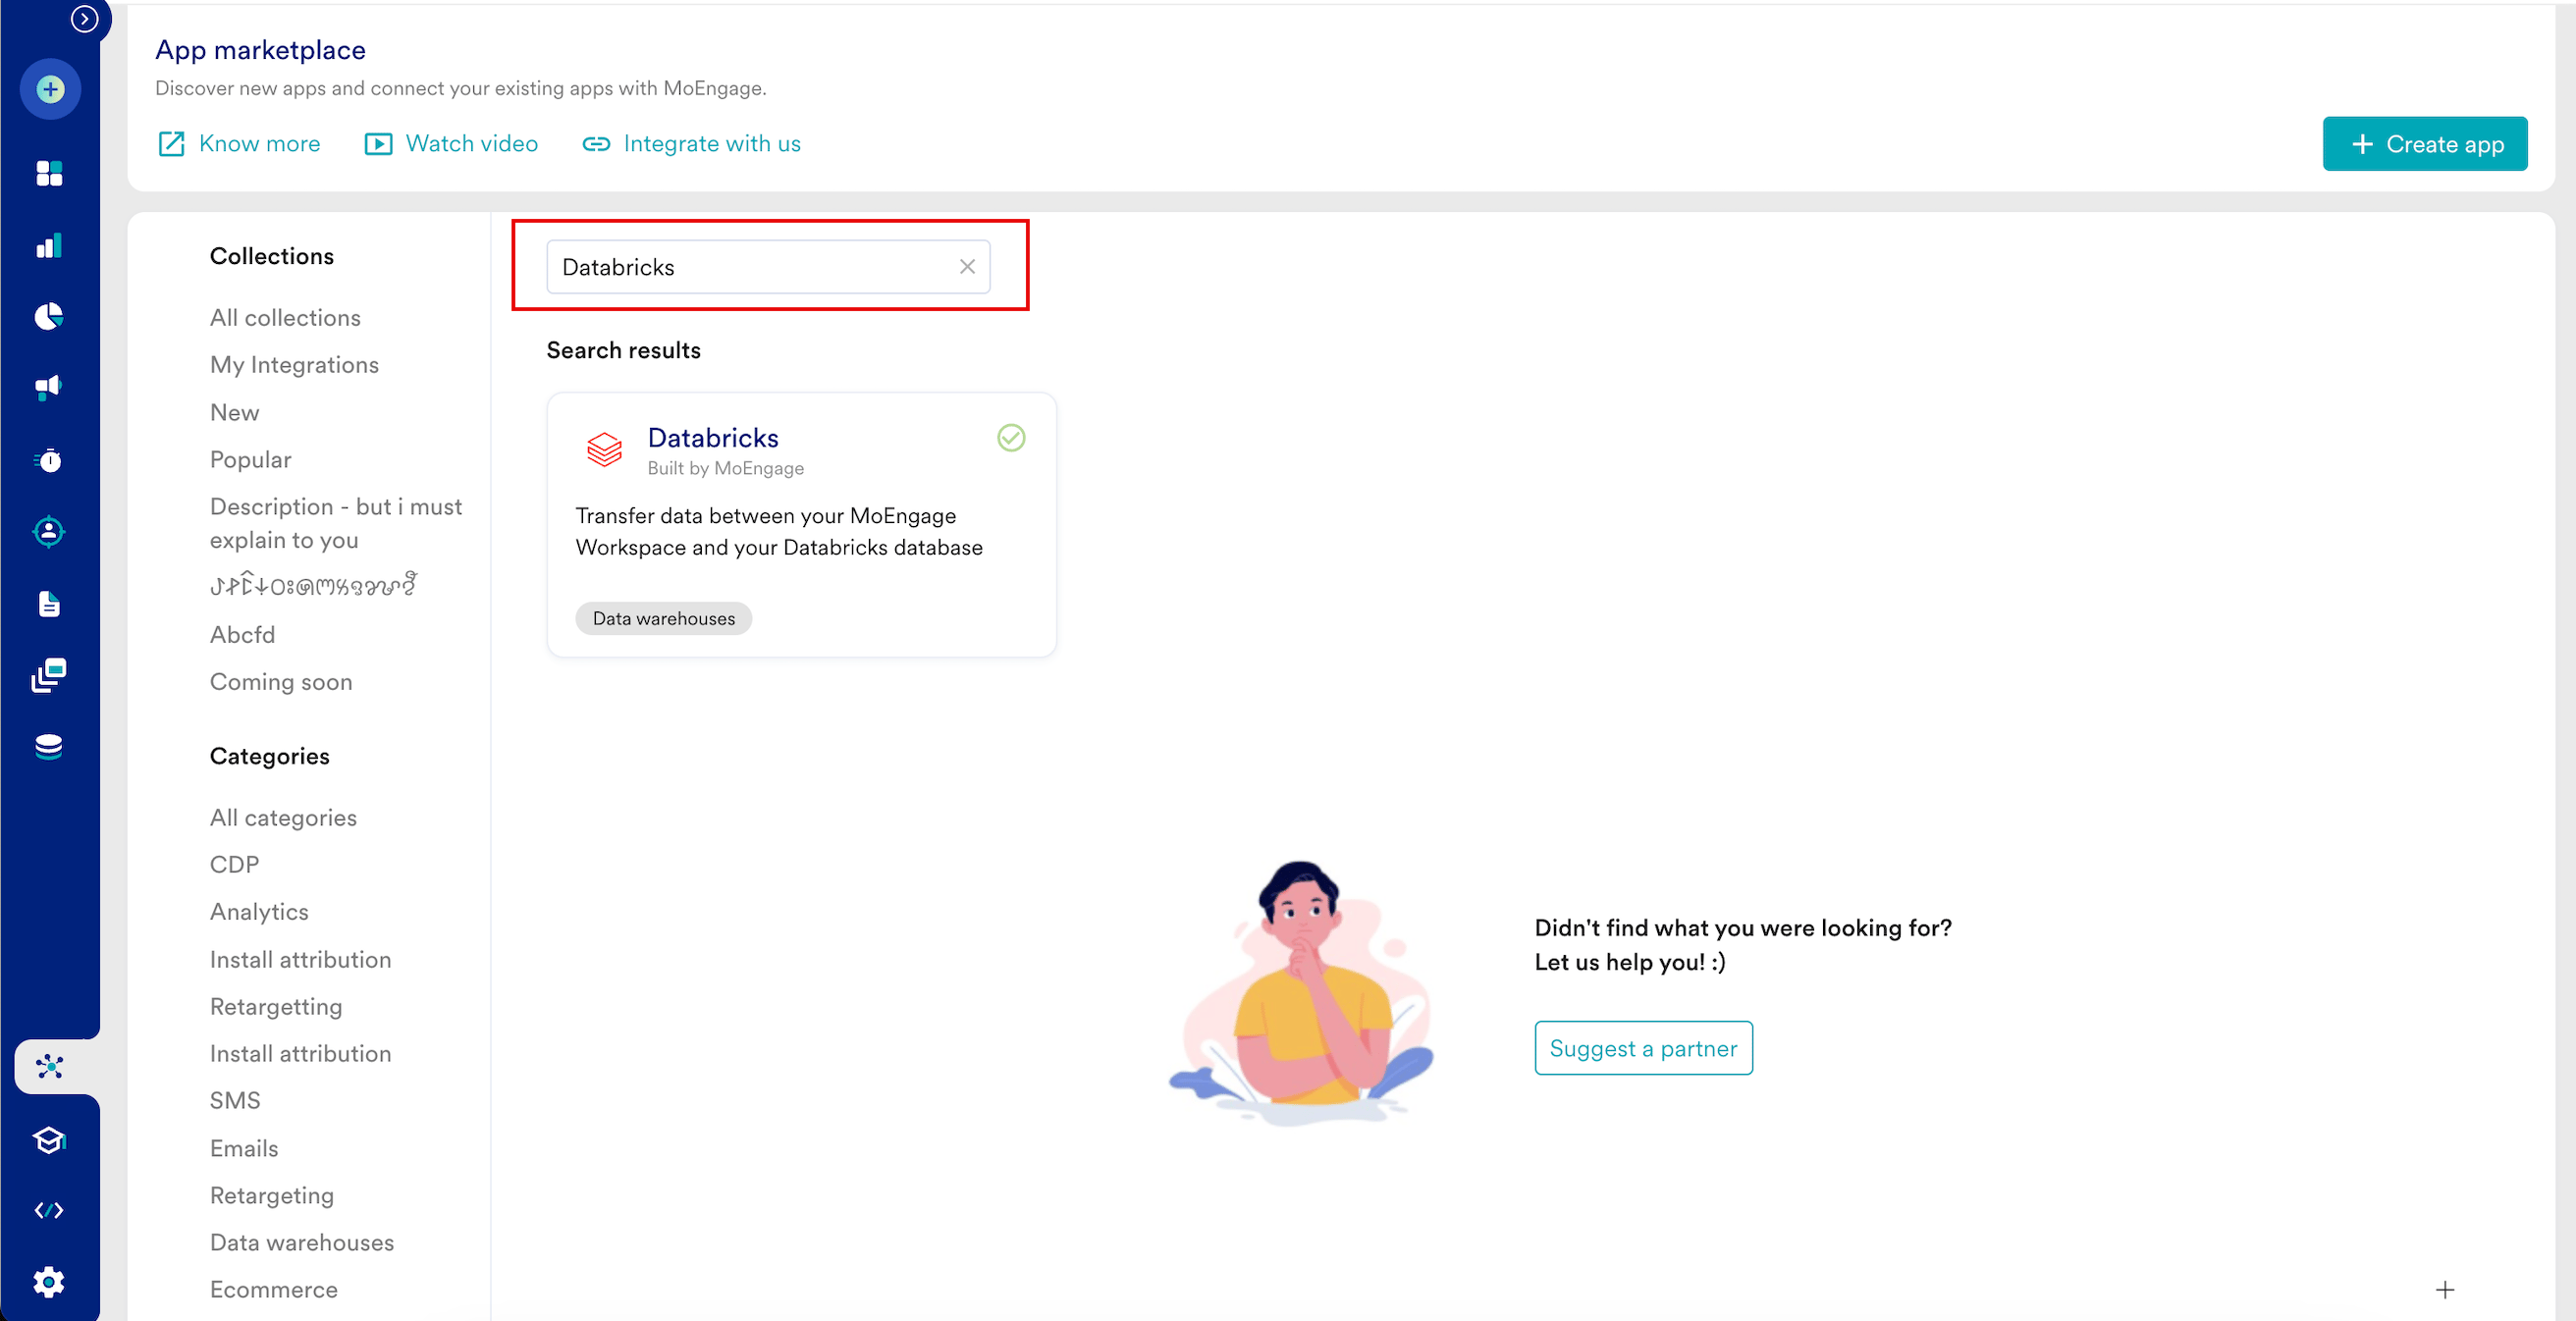 3. Click the **Databricks** tile.
4. On the Databricks page, go to the **Integrate** tab and click +**Add Connection**.
5. Enter the following details:
| Field | Required | Description |
| ------------------- | -------- | ----------------------------------------------------------------------------------------------------------------------------------------------------------------------------------------------------------------------------------------------------------------------------------------------------------- |
| **Connection name** | Yes | Type a name for the Databricks connection. |
| **Host name** | Yes | This refers to the unique identifier assigned to a specific cluster. Type the hostname that you want to connect. To find your server hostname, visit the Databricks web console and locate your cluster. Then, click to reveal Advanced options and navigate to the JDBC/ODBC tab. |
| **Port** | Optional | Type the port to which you want to connect your Databricks server. It defaults to 443. |
| **HTTP path** | Yes | Type the HTTP path of your compute resource on Databricks. To find your HTTP path, go to your Databricks workspace, locate your warehouse, and then get your HTTP path from the connection details tab. |
| **Access token** | Yes | This is an authentication token used to access Databricks APIs securely. Type the Access token, which helps you make authorized requests to the Databricks server with the necessary permissions. On your Databricks workspace, go to **Settings** > **Developer** > **Access tokens** > **Manage tokens**. |
| **Catalog** | Yes | Type the Databricks Catalog name to which MoEngage will have access. |
3. Click the **Databricks** tile.
4. On the Databricks page, go to the **Integrate** tab and click +**Add Connection**.
5. Enter the following details:
| Field | Required | Description |
| ------------------- | -------- | ----------------------------------------------------------------------------------------------------------------------------------------------------------------------------------------------------------------------------------------------------------------------------------------------------------- |
| **Connection name** | Yes | Type a name for the Databricks connection. |
| **Host name** | Yes | This refers to the unique identifier assigned to a specific cluster. Type the hostname that you want to connect. To find your server hostname, visit the Databricks web console and locate your cluster. Then, click to reveal Advanced options and navigate to the JDBC/ODBC tab. |
| **Port** | Optional | Type the port to which you want to connect your Databricks server. It defaults to 443. |
| **HTTP path** | Yes | Type the HTTP path of your compute resource on Databricks. To find your HTTP path, go to your Databricks workspace, locate your warehouse, and then get your HTTP path from the connection details tab. |
| **Access token** | Yes | This is an authentication token used to access Databricks APIs securely. Type the Access token, which helps you make authorized requests to the Databricks server with the necessary permissions. On your Databricks workspace, go to **Settings** > **Developer** > **Access tokens** > **Manage tokens**. |
| **Catalog** | Yes | Type the Databricks Catalog name to which MoEngage will have access. |
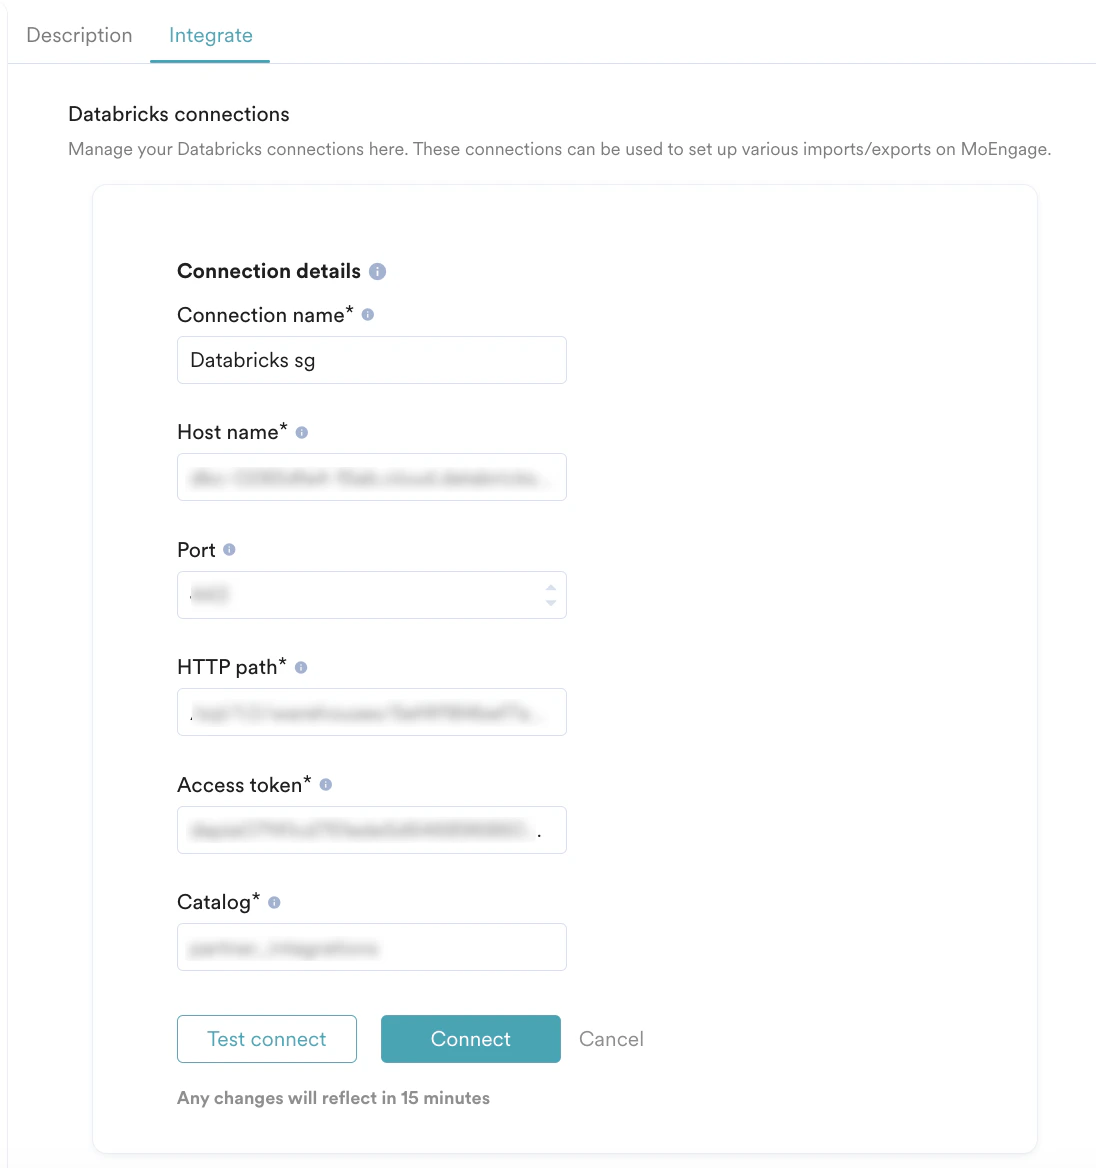 6. Click **Connect**. Your Databricks connection is now integrated.
After you have set up a Databricks connection, you can use it to set up various imports and exports in MoEngage.
Ensure at least two to five minutes of warm-up time when MoEngage connects to Classic and Pro SQL instances. There might be a delay in connection setup and testing, as well as during warehouse segment query execution, segment creation, and refresh. Using a serverless SQL instance will minimize warmup time and improve query throughput but may result in slightly higher integration costs
To run queries on data from Redshift, you must connect MoEngage to your Redshift warehouse and ensure you have administrative privileges on the Redshift platform.
* Administrative privileges on the Redshift platform.
* Trust Policy JSON obtained from MoEngage
### Steps to create an IAM role and Provide Access to MoEnagage
If you have created a Redshift connection earlier, make sure you have the [current permissions](/user-guide/segment/segment-operations/warehouse-segments) listed below.
### Step 1: Create an Identity and Access Management (IAM) Role in Your Account
1. Sign in to your AWS account in the **AWS Management Console**.
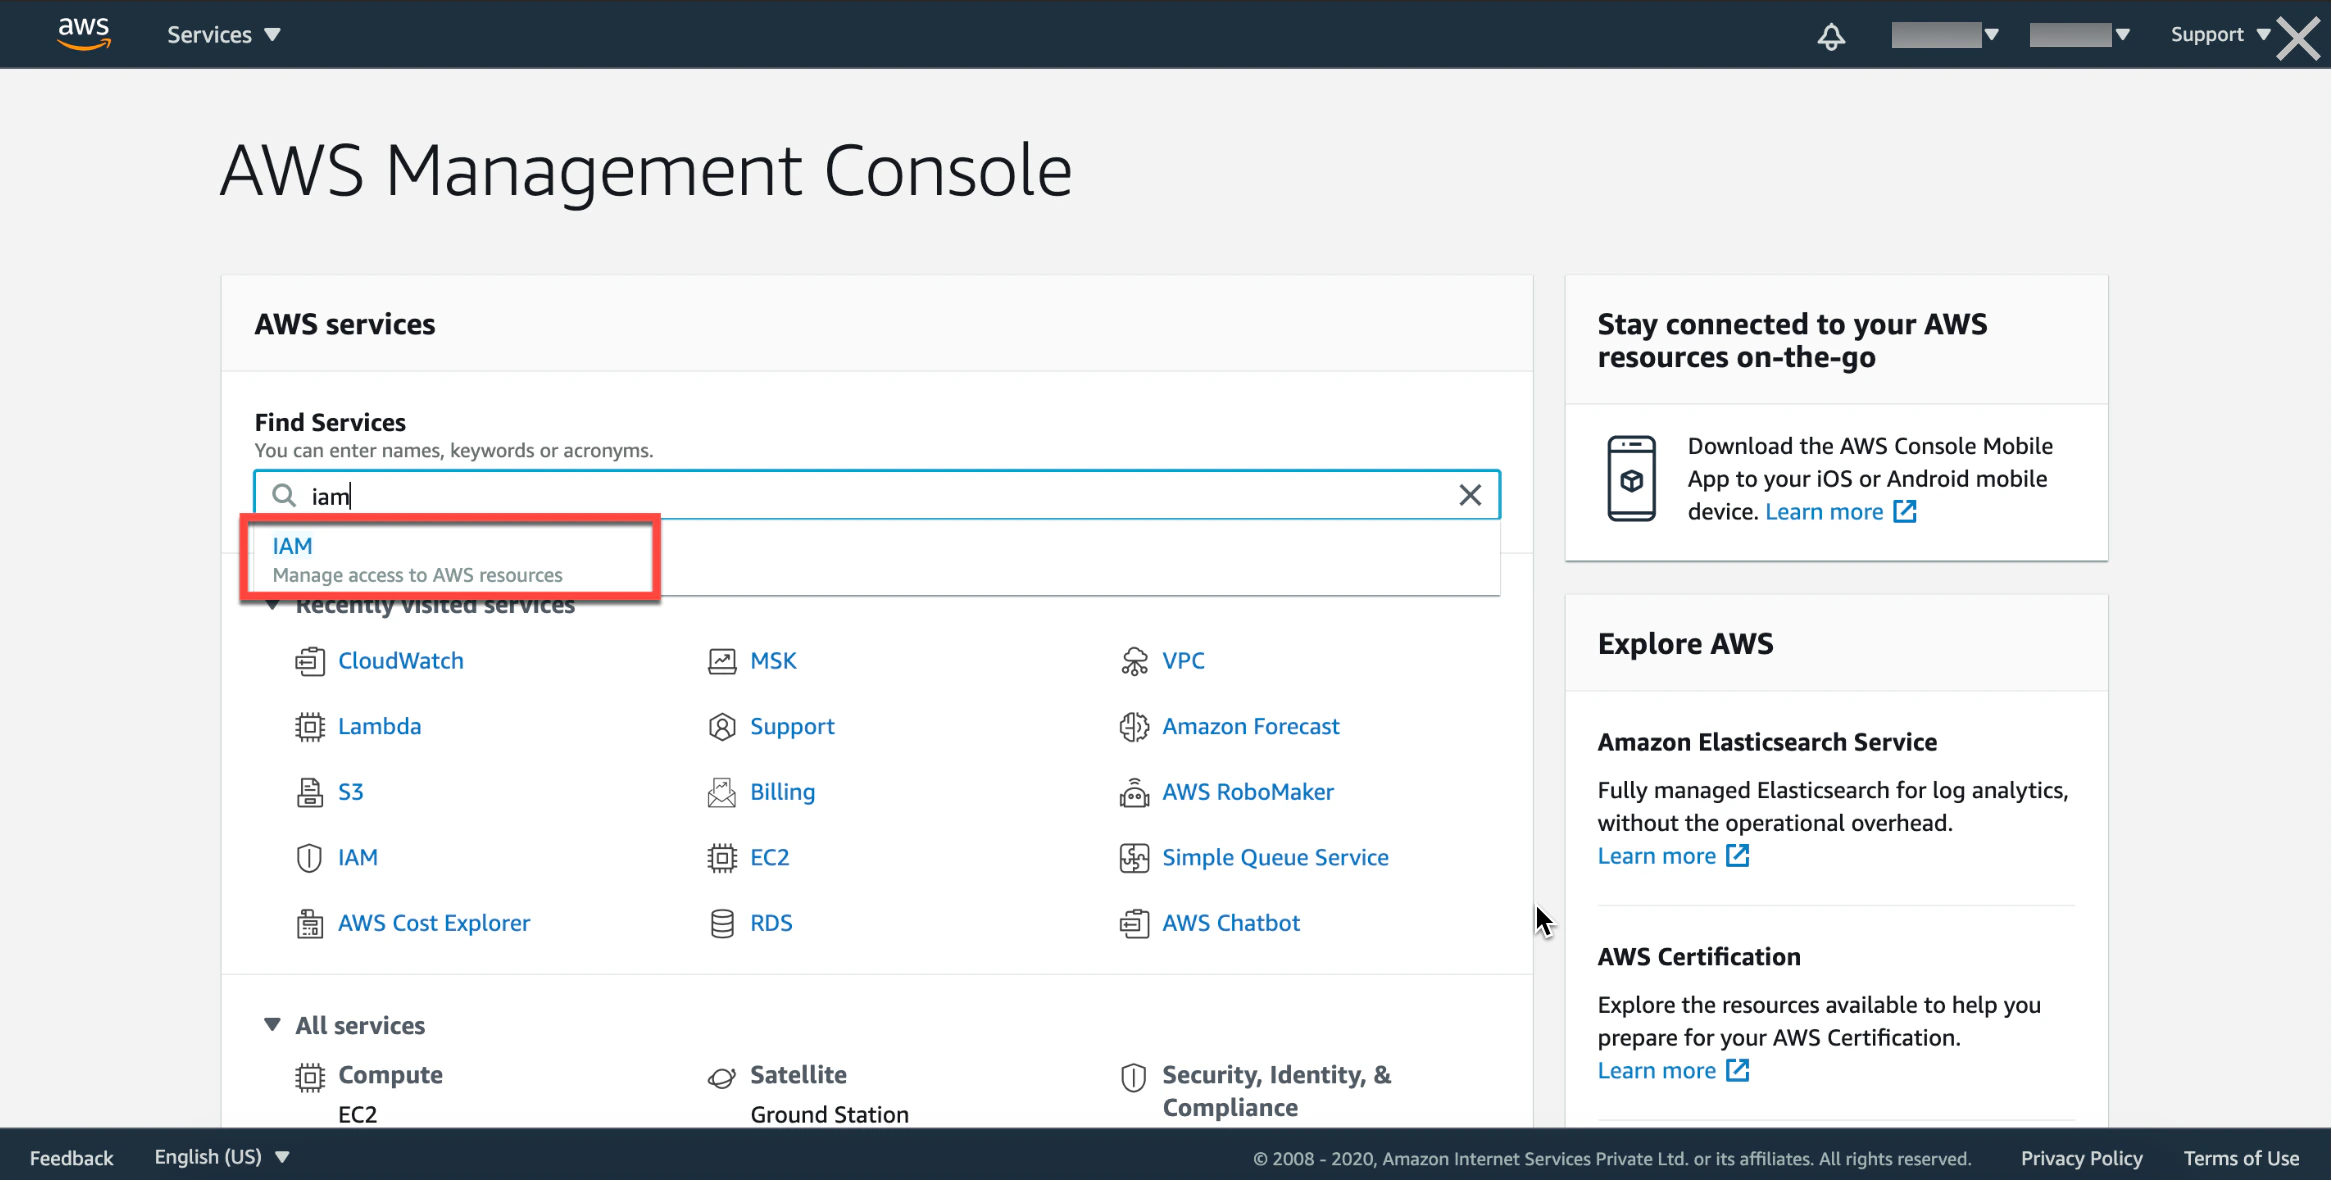
2. In the **Find Services** search box, search for IAM. You will be directed to the IAM dashboard.
6. Click **Connect**. Your Databricks connection is now integrated.
After you have set up a Databricks connection, you can use it to set up various imports and exports in MoEngage.
Ensure at least two to five minutes of warm-up time when MoEngage connects to Classic and Pro SQL instances. There might be a delay in connection setup and testing, as well as during warehouse segment query execution, segment creation, and refresh. Using a serverless SQL instance will minimize warmup time and improve query throughput but may result in slightly higher integration costs
To run queries on data from Redshift, you must connect MoEngage to your Redshift warehouse and ensure you have administrative privileges on the Redshift platform.
* Administrative privileges on the Redshift platform.
* Trust Policy JSON obtained from MoEngage
### Steps to create an IAM role and Provide Access to MoEnagage
If you have created a Redshift connection earlier, make sure you have the [current permissions](/user-guide/segment/segment-operations/warehouse-segments) listed below.
### Step 1: Create an Identity and Access Management (IAM) Role in Your Account
1. Sign in to your AWS account in the **AWS Management Console**.
2. In the **Find Services** search box, search for IAM. You will be directed to the IAM dashboard.
 3. In the IAM dashboard, select the **Roles** tab.
4. Click **Create role.**
5. Select **AWS account**.
6. Under the **Select trusted entity** section, select **Custom trust policy.
3. In the IAM dashboard, select the **Roles** tab.
4. Click **Create role.**
5. Select **AWS account**.
6. Under the **Select trusted entity** section, select **Custom trust policy. 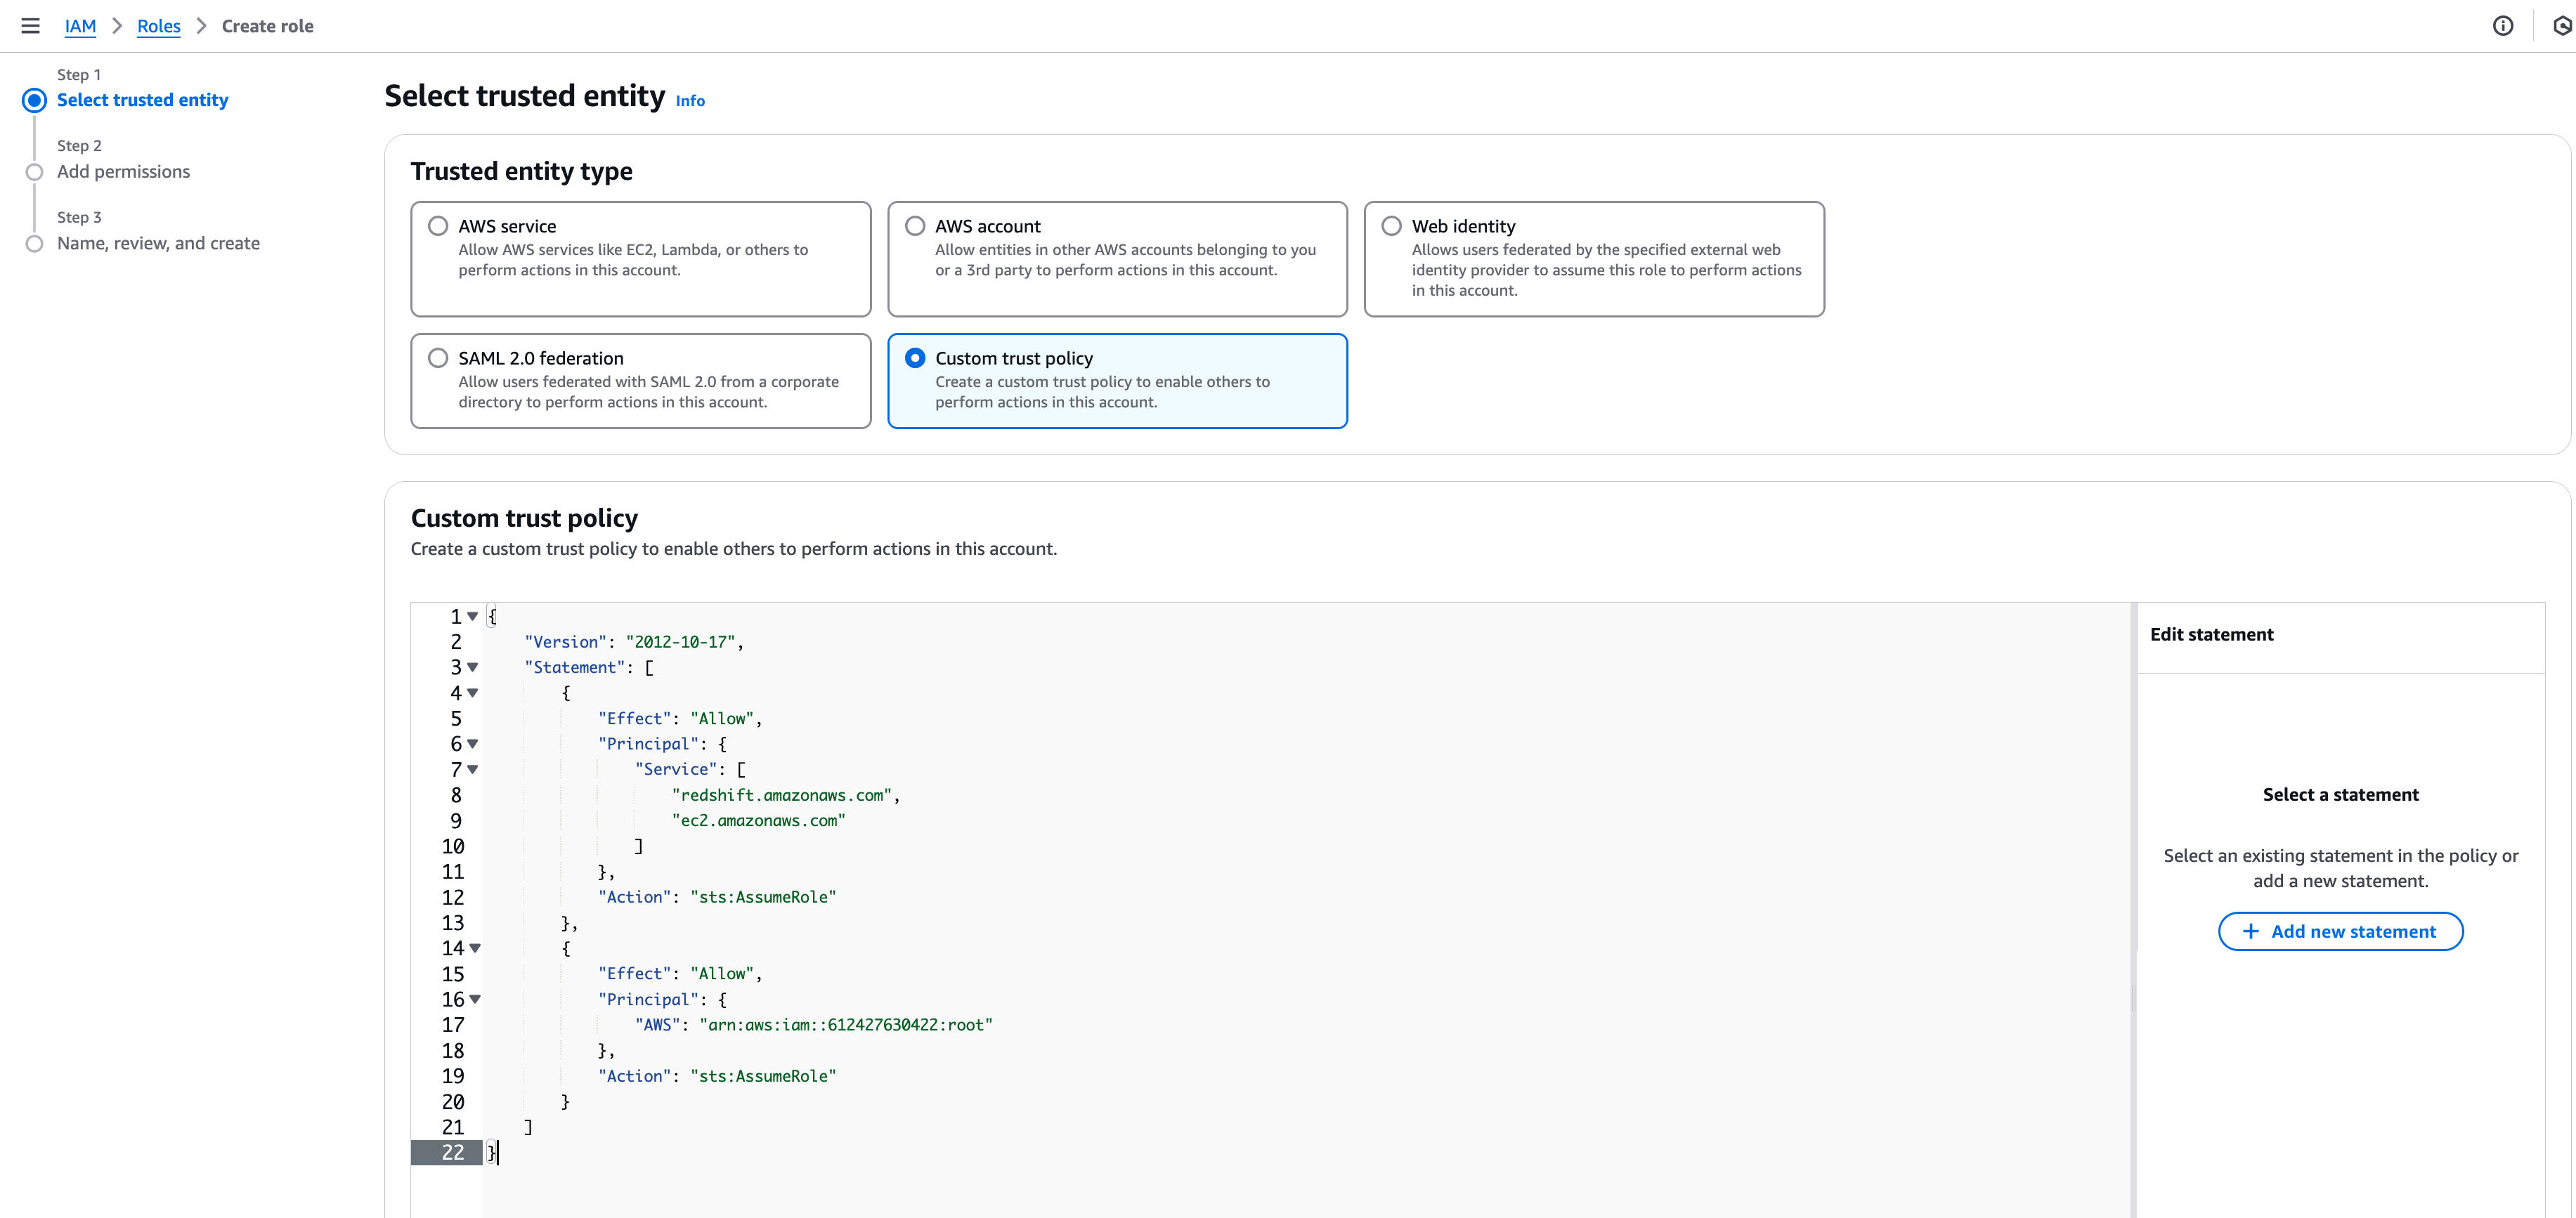 **
7. Paste the Trust Policy JSON obtained from MoEngage, as shown below. MoEngage's AWS Account ID is 612427630422. Ensure this ID is present in the trusted relationship JSON.
```
{
"Version": "2012-10-17",
"Statement": [
{
"Effect": "Allow",
"Principal": {
"Service": [
"redshift.amazonaws.com",
"ec2.amazonaws.com"
]
},
"Action": "sts:AssumeRole"
},
{
"Effect": "Allow",
"Principal": {
"AWS": "arn:aws:iam::612427630422:root"
},
"Action": "sts:AssumeRole"
}
]
}
```
8. Select **Allow assuming roles** from this account option.
9. Click **Next** > **Permissions.**
10. ctvtvgd4t Add the permissions mentioned below:
```
redshift\_finegrained (customer-managed policy)
```
```
{
"Version": "2012-10-17",
"Statement": [
{
"Sid": "DataAPIPermissions",
"Action": [
"redshift-data:ExecuteStatement",
"redshift-data:CancelStatement",
"redshift-data:ListStatements",
"redshift-data:GetStatementResult",
"redshift-data:DescribeStatement",
"redshift-data:ListDatabases",
"redshift-data:ListSchemas",
"redshift-data:ListTables",
"redshift-data:DescribeTable"
],
"Effect": "Allow",
"Resource": "\*"
},
{
"Sid": "Redshiftminimal",
"Action": [
"redshift:Get\*",
"redshift:Describe\*"
],
"Effect": "Allow",
"Resource": "\*"
},
{
"Effect": "Allow",
"Action": "iam:CreateServiceLinkedRole",
"Resource": "arn:aws:iam::\*:role/aws-service-role/redshift.amazonaws.com/AWSServiceRoleForRedshift",
"Condition": {
"StringLike": {
"iam:AWSServiceName": "redshift.amazonaws.com"
}
}
}
]
}
```
```
stsAssumerRole (customer-managed policy)
```
```
{
"Version": "2012-10-17",
"Statement": [
{
"Sid": "123",
"Effect": "Allow",
"Action": [
"sts:AssumeRole"
],
"Resource": [
"\*"
]
}
]
}
```
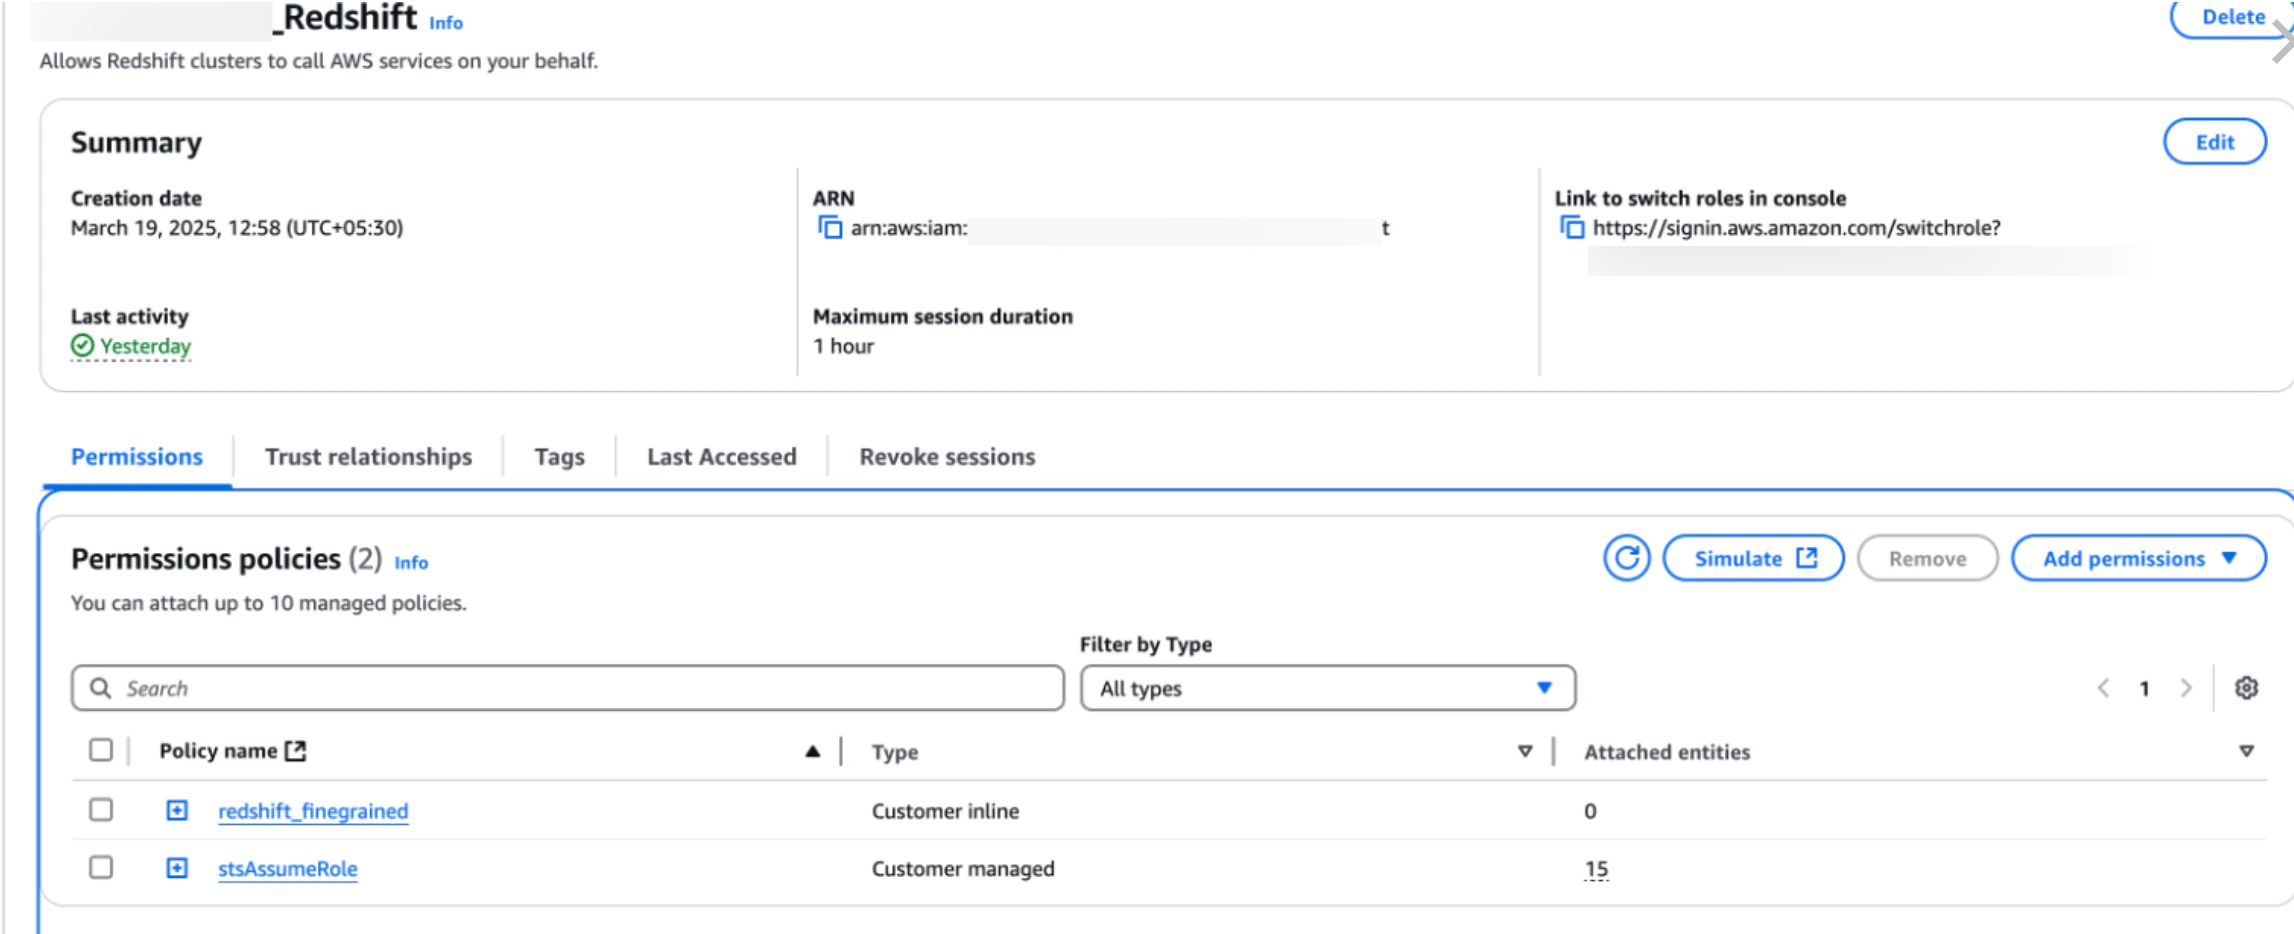
11. You can optionally restrict access to specific db-groups and users by selecting those options in the policy editor.
**
7. Paste the Trust Policy JSON obtained from MoEngage, as shown below. MoEngage's AWS Account ID is 612427630422. Ensure this ID is present in the trusted relationship JSON.
```
{
"Version": "2012-10-17",
"Statement": [
{
"Effect": "Allow",
"Principal": {
"Service": [
"redshift.amazonaws.com",
"ec2.amazonaws.com"
]
},
"Action": "sts:AssumeRole"
},
{
"Effect": "Allow",
"Principal": {
"AWS": "arn:aws:iam::612427630422:root"
},
"Action": "sts:AssumeRole"
}
]
}
```
8. Select **Allow assuming roles** from this account option.
9. Click **Next** > **Permissions.**
10. ctvtvgd4t Add the permissions mentioned below:
```
redshift\_finegrained (customer-managed policy)
```
```
{
"Version": "2012-10-17",
"Statement": [
{
"Sid": "DataAPIPermissions",
"Action": [
"redshift-data:ExecuteStatement",
"redshift-data:CancelStatement",
"redshift-data:ListStatements",
"redshift-data:GetStatementResult",
"redshift-data:DescribeStatement",
"redshift-data:ListDatabases",
"redshift-data:ListSchemas",
"redshift-data:ListTables",
"redshift-data:DescribeTable"
],
"Effect": "Allow",
"Resource": "\*"
},
{
"Sid": "Redshiftminimal",
"Action": [
"redshift:Get\*",
"redshift:Describe\*"
],
"Effect": "Allow",
"Resource": "\*"
},
{
"Effect": "Allow",
"Action": "iam:CreateServiceLinkedRole",
"Resource": "arn:aws:iam::\*:role/aws-service-role/redshift.amazonaws.com/AWSServiceRoleForRedshift",
"Condition": {
"StringLike": {
"iam:AWSServiceName": "redshift.amazonaws.com"
}
}
}
]
}
```
```
stsAssumerRole (customer-managed policy)
```
```
{
"Version": "2012-10-17",
"Statement": [
{
"Sid": "123",
"Effect": "Allow",
"Action": [
"sts:AssumeRole"
],
"Resource": [
"\*"
]
}
]
}
```
11. You can optionally restrict access to specific db-groups and users by selecting those options in the policy editor.
 12. Click **Next.**
13. In the **Add tags** section, click the Add new tag button to add the tags required for this IAM role.
12. Click **Next.**
13. In the **Add tags** section, click the Add new tag button to add the tags required for this IAM role.  14. Click on **Next** > **Review.**
15. In **Role name** box, enter the name for your role (for example, moengage-redshift-data-access-role").
14. Click on **Next** > **Review.**
15. In **Role name** box, enter the name for your role (for example, moengage-redshift-data-access-role").
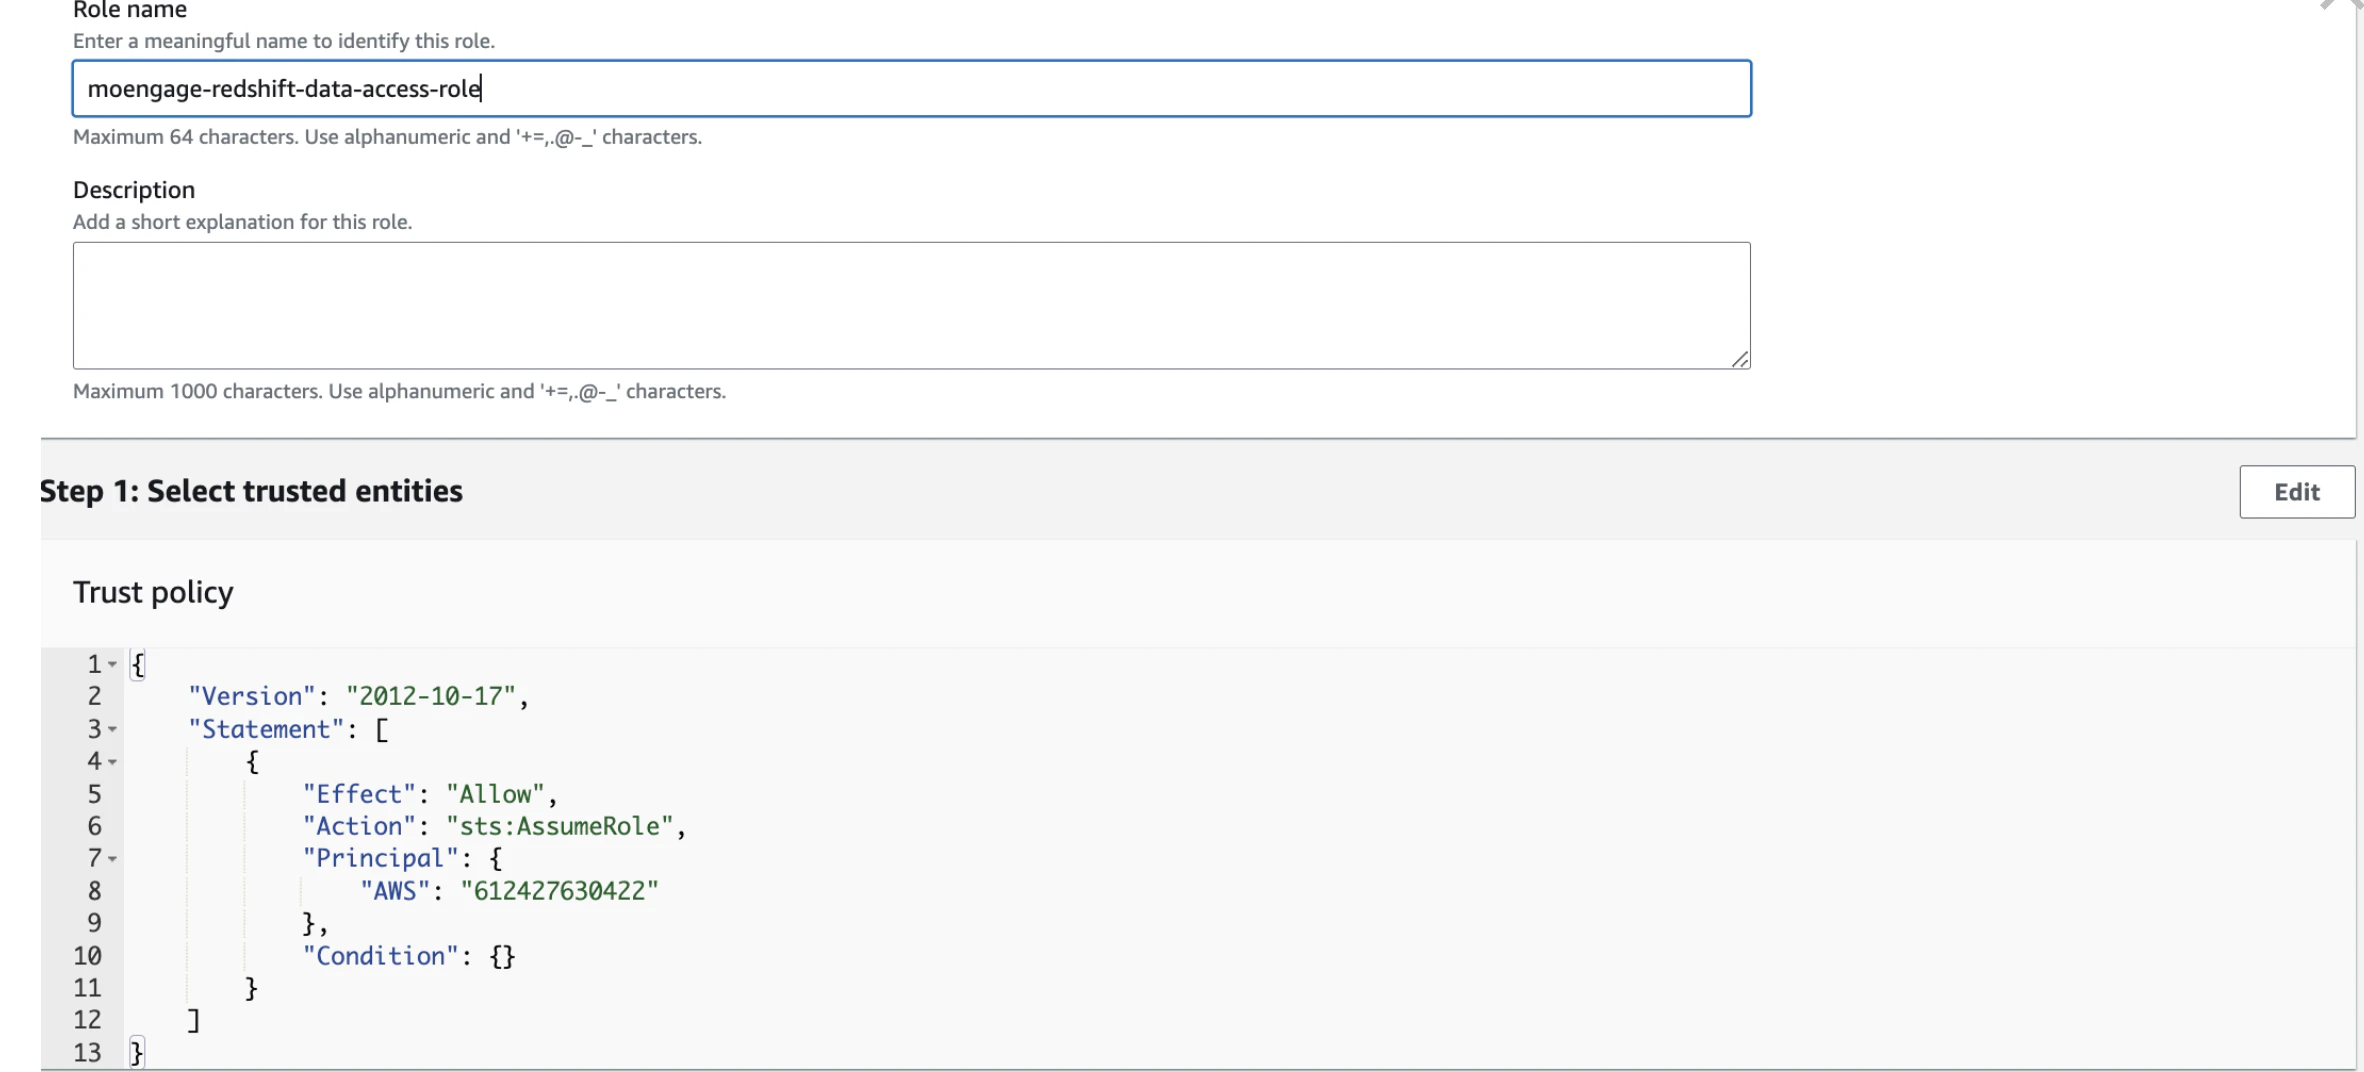 16. Click on **Create IAM role**.
 ### Step 2: Share Details with MoEngage
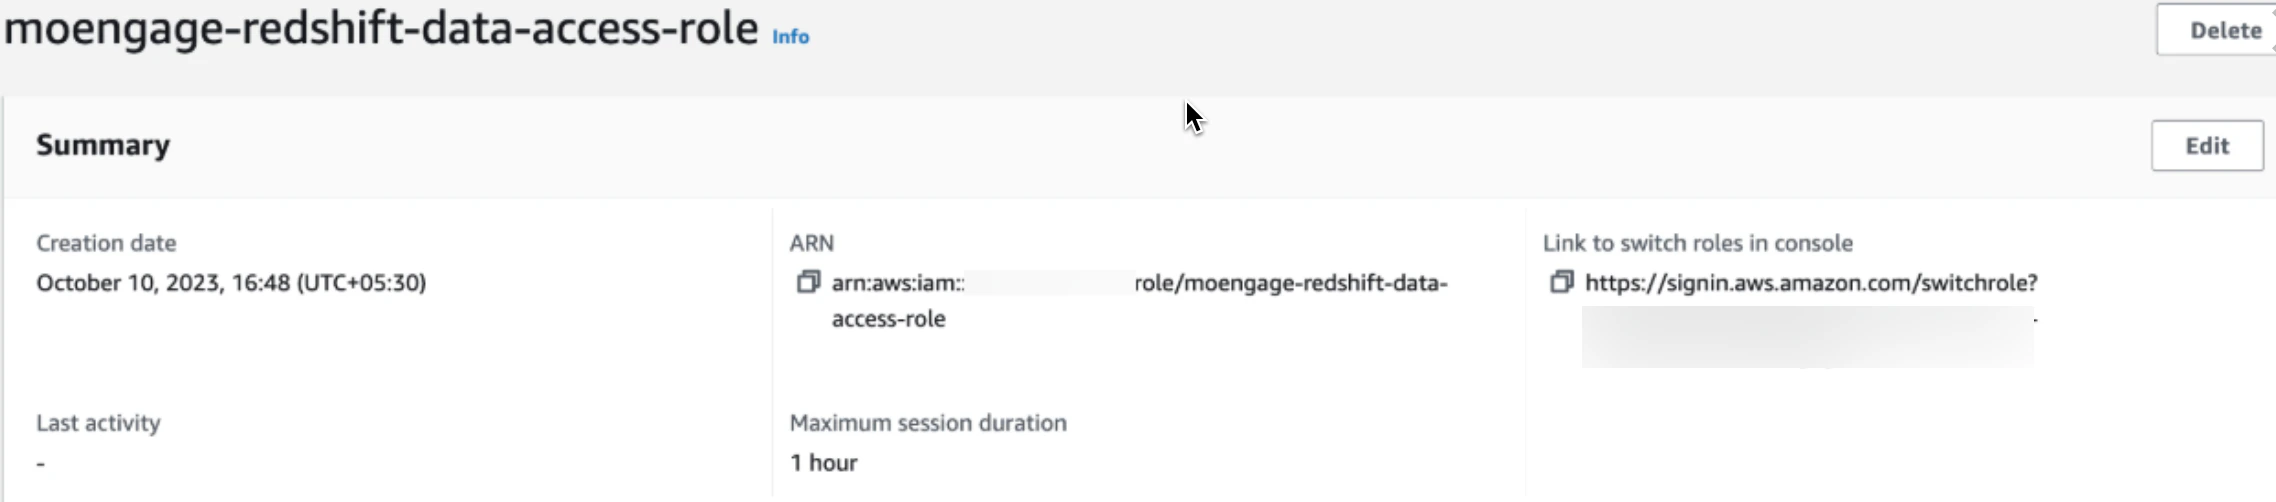
Share the following details to *[warehousesegments@moengage.com](mailto:warehousesegments@moengage.com)* to get warehouse segments on Redshift enabled on your workspace:
* **ARN** (Amazon Resource Name):
* In your AWS Management Console, go to the IAM dashboard and select the IAM Role that you created in step 1.
* Copy the ARN for the IAM role.
MoEngage will use this ARN to assume the IAM role in your account to access the Redshift cluster.
### Step 2: Share Details with MoEngage
Share the following details to *[warehousesegments@moengage.com](mailto:warehousesegments@moengage.com)* to get warehouse segments on Redshift enabled on your workspace:
* **ARN** (Amazon Resource Name):
* In your AWS Management Console, go to the IAM dashboard and select the IAM Role that you created in step 1.
* Copy the ARN for the IAM role.
MoEngage will use this ARN to assume the IAM role in your account to access the Redshift cluster.
 * **Database name:** The default Redshift database name is used for the queries that will be running. It is recommended that separate connections be created for each database.
* **Redshift Cluster Identifier name:** It is recommended that separate connections be created for each provisioned Redshift cluster.
```
#{
"role\_arn" : "arn:aws:iam::5822XXXX730:role/Segmentation\_Redshift",
"aws\_regions" : "ap-south-1",
"cluster\_identifier" : "redshift-segmentation-cluster",
"default\_db" : "dev",
}
```
## Step 2: Run a warehouse query
1. On the sidebar menu in MoEngage, hover over the **Segment** menu item
* **Database name:** The default Redshift database name is used for the queries that will be running. It is recommended that separate connections be created for each database.
* **Redshift Cluster Identifier name:** It is recommended that separate connections be created for each provisioned Redshift cluster.
```
#{
"role\_arn" : "arn:aws:iam::5822XXXX730:role/Segmentation\_Redshift",
"aws\_regions" : "ap-south-1",
"cluster\_identifier" : "redshift-segmentation-cluster",
"default\_db" : "dev",
}
```
## Step 2: Run a warehouse query
1. On the sidebar menu in MoEngage, hover over the **Segment** menu item  . The **Segment** menu appears.
2. Click **Warehouse segment**.
. The **Segment** menu appears.
2. Click **Warehouse segment**.
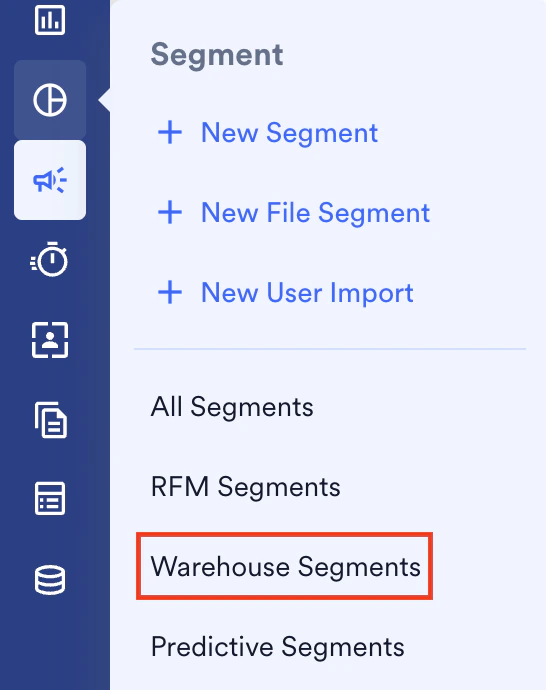 3. Here, you can choose the data warehouse connection which was set up in the previous step, from the **Source** dropdown on the top.
4. Once a source is chosen, the data warehouse **schema** - database, tables, and columns, will be populated on the left panel. From here, you can search for any database, table, or column that you want to use in your query.
5. You can enter your SQL query in the **SQL editor** on the right. You can perform any operations, such as joining multiple tables, sub-queries, aliases, etc., as required to return your optimal results.
6. Click on **Run Query** to run the SQL query in your data warehouse. You should be able to see a new row added in the Query results section below.
3. Here, you can choose the data warehouse connection which was set up in the previous step, from the **Source** dropdown on the top.
4. Once a source is chosen, the data warehouse **schema** - database, tables, and columns, will be populated on the left panel. From here, you can search for any database, table, or column that you want to use in your query.
5. You can enter your SQL query in the **SQL editor** on the right. You can perform any operations, such as joining multiple tables, sub-queries, aliases, etc., as required to return your optimal results.
6. Click on **Run Query** to run the SQL query in your data warehouse. You should be able to see a new row added in the Query results section below. 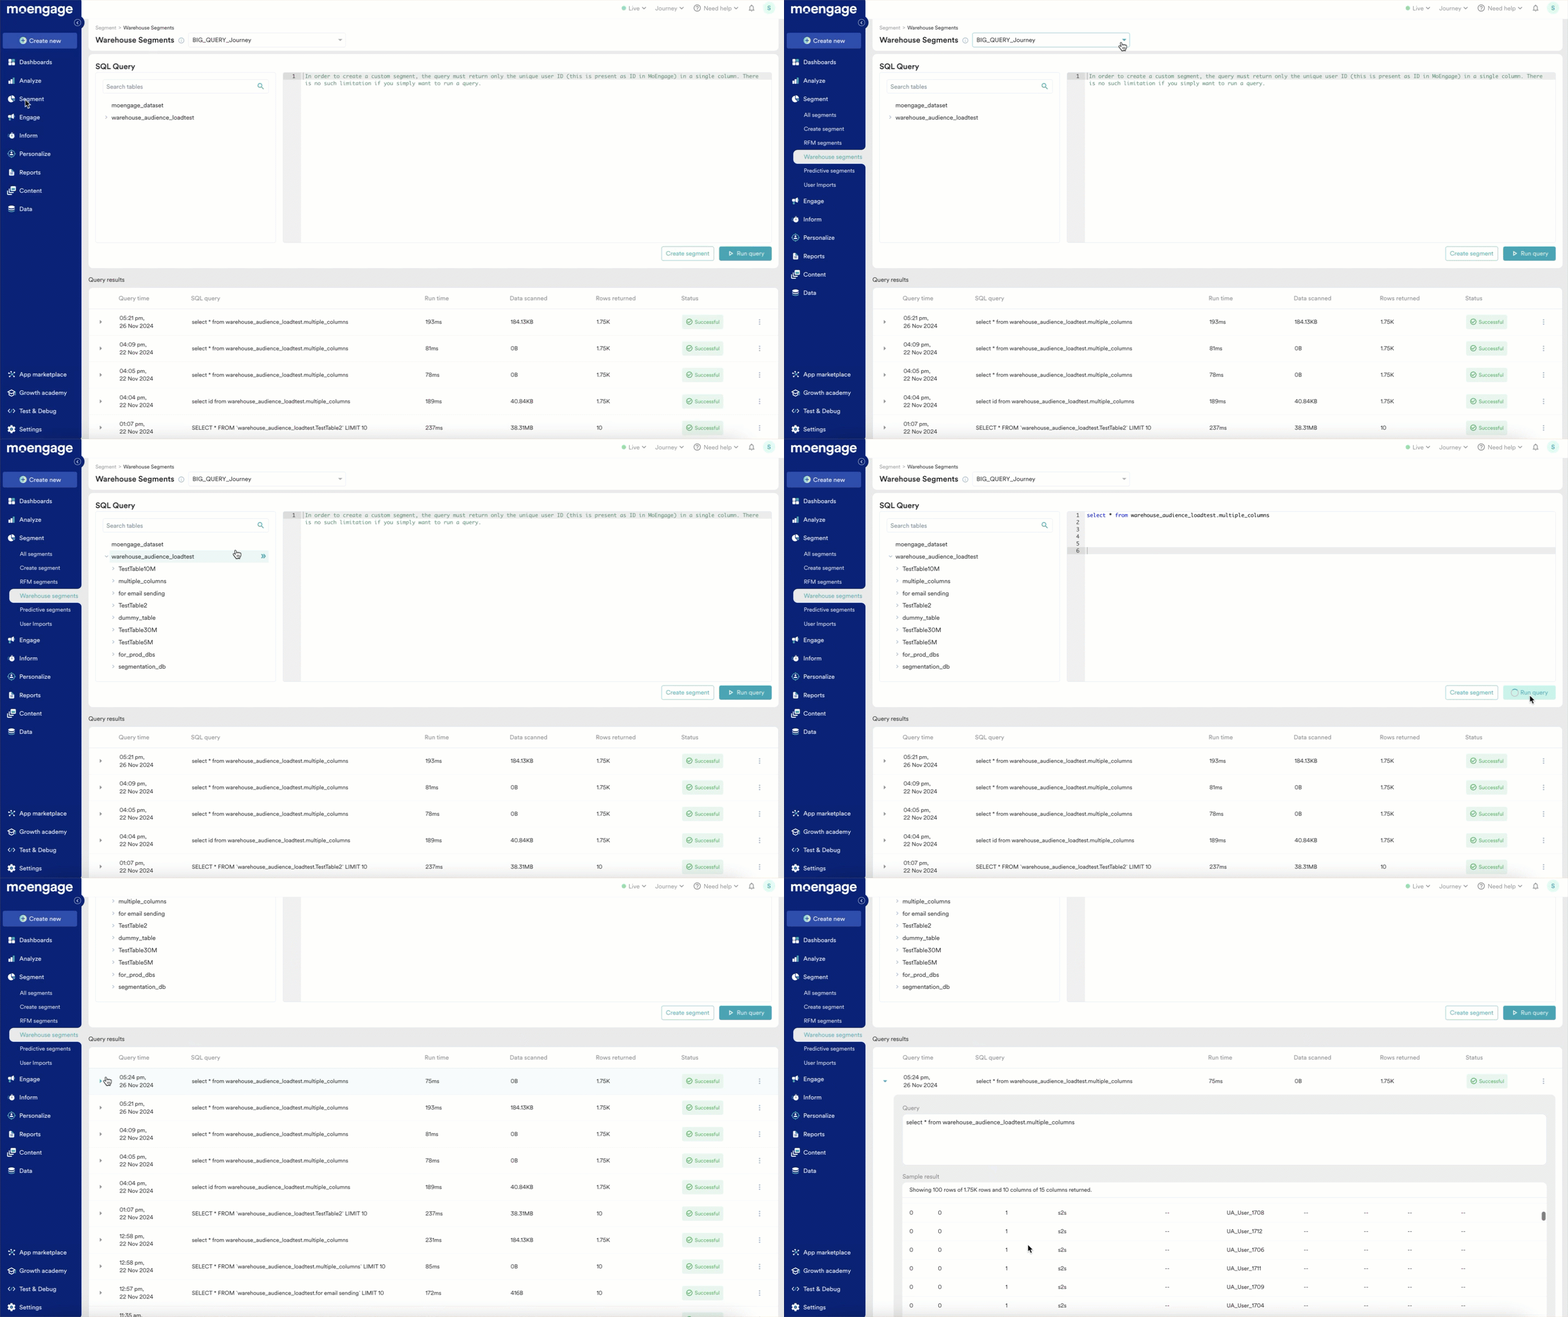 7. The **Query results** section provides a list of recently run warehouse queries with query metrics such as Run time, Data scanned, and the number of rows of data returned by a specific query from your data warehouse. These metrics are useful for gauging the performance of your data warehouse queries and can be used to optimize your queries while you write them on MoEngage.
1. Credits used per query are available for Snowflake.
2. Databricks does not provide credits utilized when a query is executed; hence, regularly monitoring the [usage](https://docs.databricks.com/aws/en/admin/account-settings/usage) is recommended.
3. Redshift does not provide data scanned when a query is executed; hence, regularly monitoring the usage is recommended.
8. The Query results section also provides the status of each warehouse query run from MoEngage. The status can be successful, failed, or processed.
9. Once a query has run successfully, you should be able to expand the row from the Query results section and see the sample results of each query. We show up to 100 rows and 10 columns of data for each query.
10. Each query result also has a set of actions that can be accessed from the 3-dot menu on each row.
* **Insert in SQL editor:** You can directly insert a particular SQL query from the Query results section on the editor.\
Do note that this action will replace any existing query in the editor.
* **Create a custom segment:** You can directly create a custom segment from any query result. However, we expect the query to return a single column of IDs (the unique user identification that is present as an ID in MoEngage) in order to be saved as a custom segment. Hence, this option will be active only for those queries that return a single column.
* **Copy query:** This action will copy the query to the clipboard.
* **Run query:** You can run the query from Query results directly using the Run query action. A new row will be added to the Query results section at the top for the new execution.
* \*\*Download results:\*\*You can download the results of a query using the download results action. The downloaded file will contain a maximum of 100 rows and 100 columns of data
7. The **Query results** section provides a list of recently run warehouse queries with query metrics such as Run time, Data scanned, and the number of rows of data returned by a specific query from your data warehouse. These metrics are useful for gauging the performance of your data warehouse queries and can be used to optimize your queries while you write them on MoEngage.
1. Credits used per query are available for Snowflake.
2. Databricks does not provide credits utilized when a query is executed; hence, regularly monitoring the [usage](https://docs.databricks.com/aws/en/admin/account-settings/usage) is recommended.
3. Redshift does not provide data scanned when a query is executed; hence, regularly monitoring the usage is recommended.
8. The Query results section also provides the status of each warehouse query run from MoEngage. The status can be successful, failed, or processed.
9. Once a query has run successfully, you should be able to expand the row from the Query results section and see the sample results of each query. We show up to 100 rows and 10 columns of data for each query.
10. Each query result also has a set of actions that can be accessed from the 3-dot menu on each row.
* **Insert in SQL editor:** You can directly insert a particular SQL query from the Query results section on the editor.\
Do note that this action will replace any existing query in the editor.
* **Create a custom segment:** You can directly create a custom segment from any query result. However, we expect the query to return a single column of IDs (the unique user identification that is present as an ID in MoEngage) in order to be saved as a custom segment. Hence, this option will be active only for those queries that return a single column.
* **Copy query:** This action will copy the query to the clipboard.
* **Run query:** You can run the query from Query results directly using the Run query action. A new row will be added to the Query results section at the top for the new execution.
* \*\*Download results:\*\*You can download the results of a query using the download results action. The downloaded file will contain a maximum of 100 rows and 100 columns of data 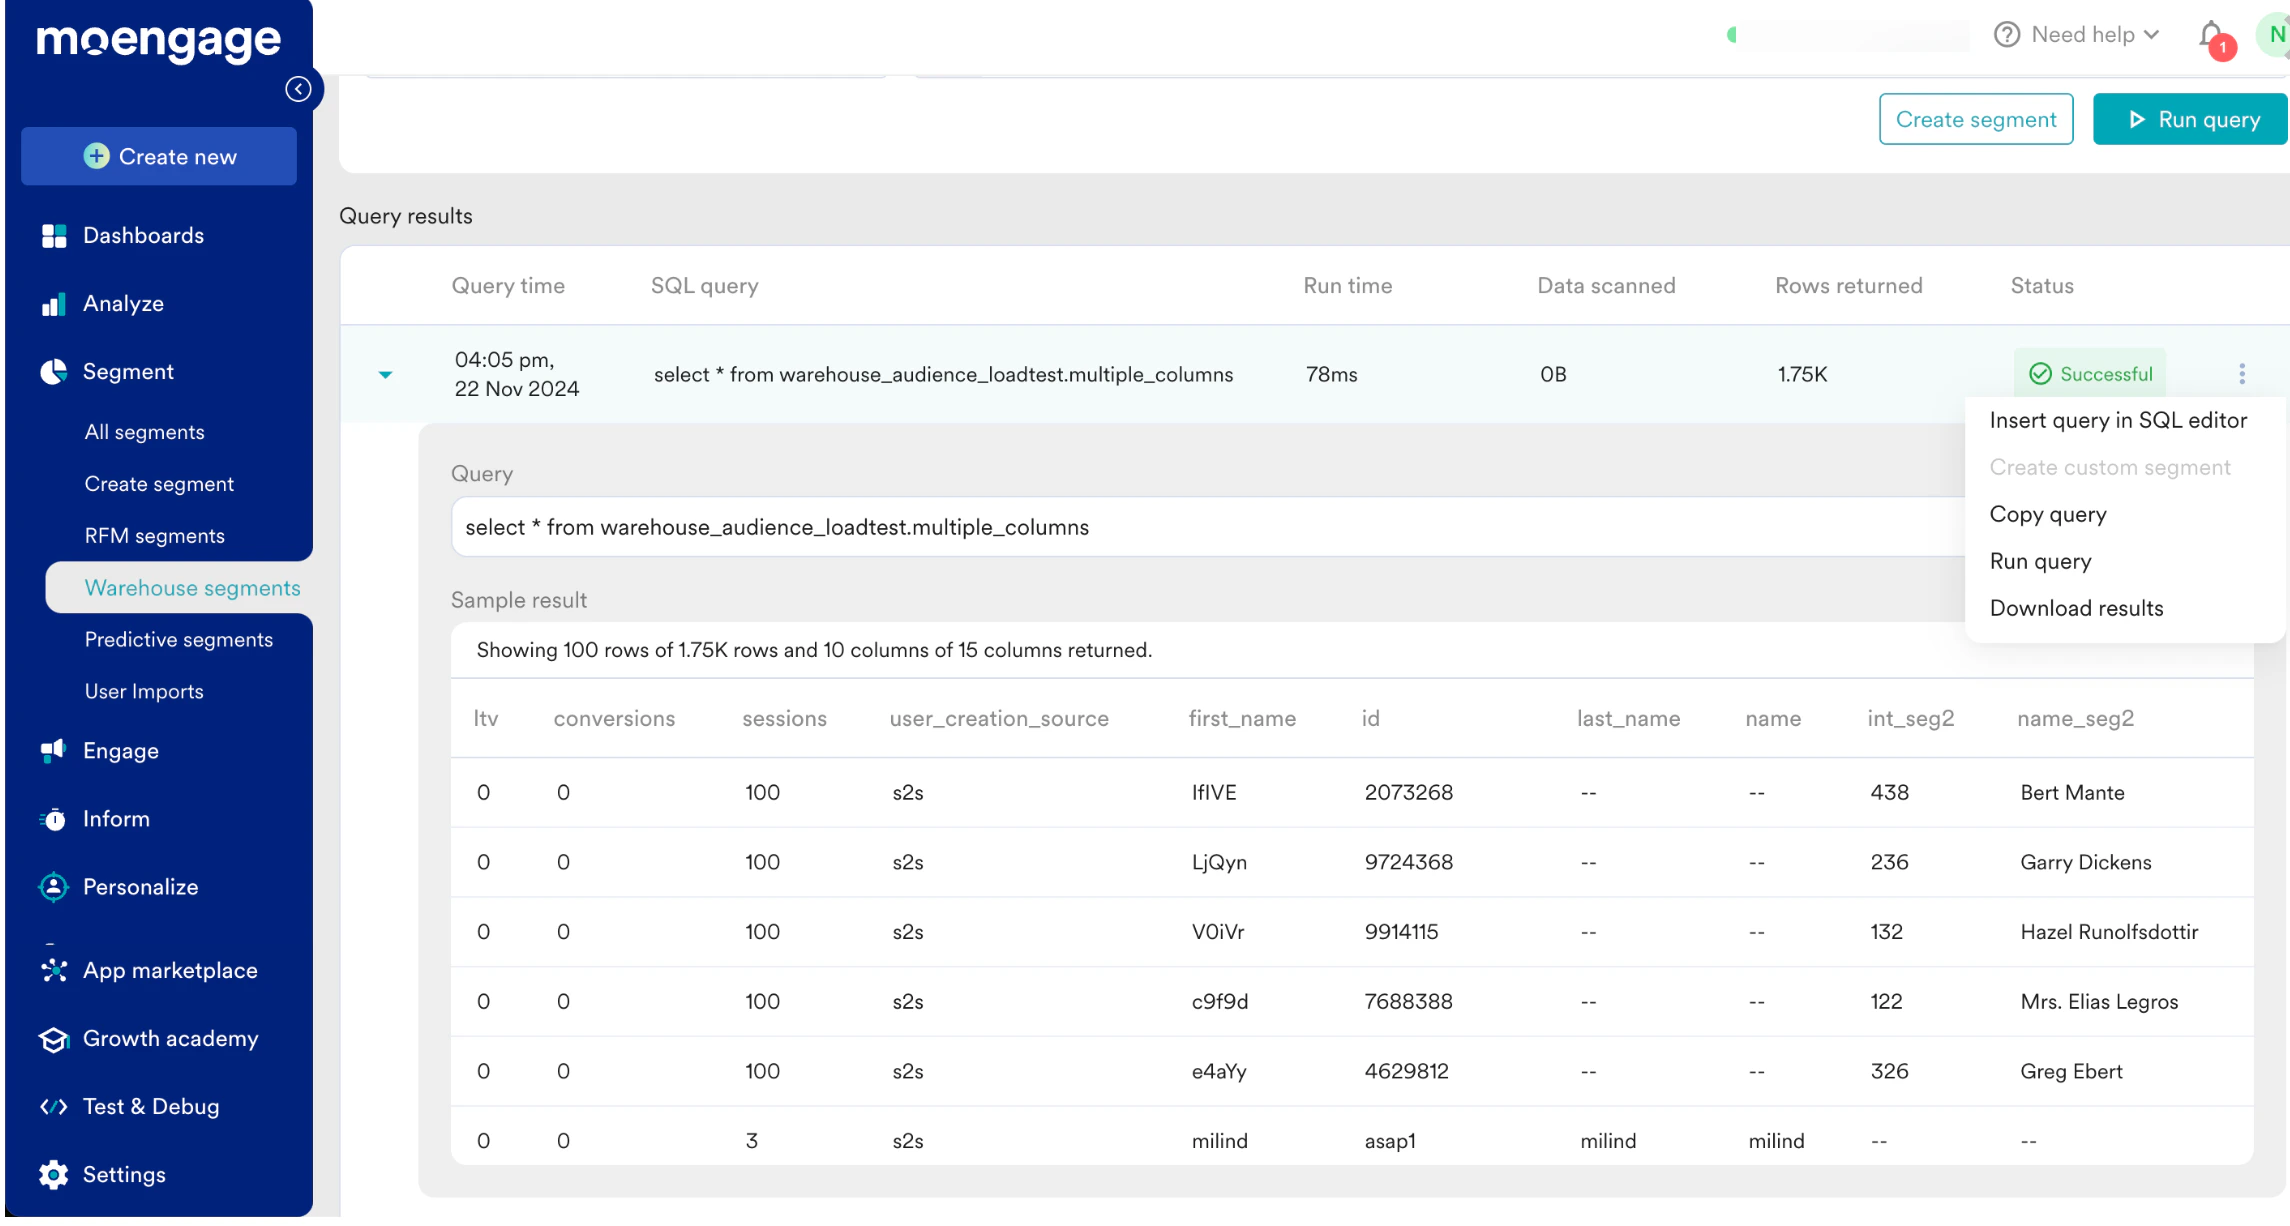 11. \*\*Preview Table:\*\*Now you can one-click preview a few sample rows from any table listed in the schema section. On hovering over a table name in the schema, you should be able to see an eye icon, clicking on this will run a sample query on the table providing up to 10 rows of data as a preview.
1) The SQL query must return a single column of IDs in order to be saved as a custom segment. If the query returns multiple columns, the segment will not return any users.
2) The SQL query runs on your data warehouse directly. Please note that when utilizing this feature, you will incur the costs associated with running the queries from your data warehouse.
3) The SQL query will timeout in 15 min. Reach out to your CSM to configure this limit.
4) The SQL query should be compatible with your DWH. If you are using Warehouse segments on BigQuery, the SQL query must be supported by [GoogleSQL.](https://cloud.google.com/bigquery/docs/introduction-sql) Similarly, Snowflake supports [Standard SQL](https://docs.snowflake.com/guides-overview-queries) for querying, Databricks supports [ANSI standard SQL,](https://www.databricks.com/blog/2021/11/16/evolution-of-the-sql-language-at-databricks-ansi-standard-by-default-and-easier-migrations-from-data-warehouses.html) and Redshift supports [PostgreSQL](https://docs.aws.amazon.com/redshift/latest/dg/c_SQL_commands.html).
## Step 3: Define a warehouse custom segment
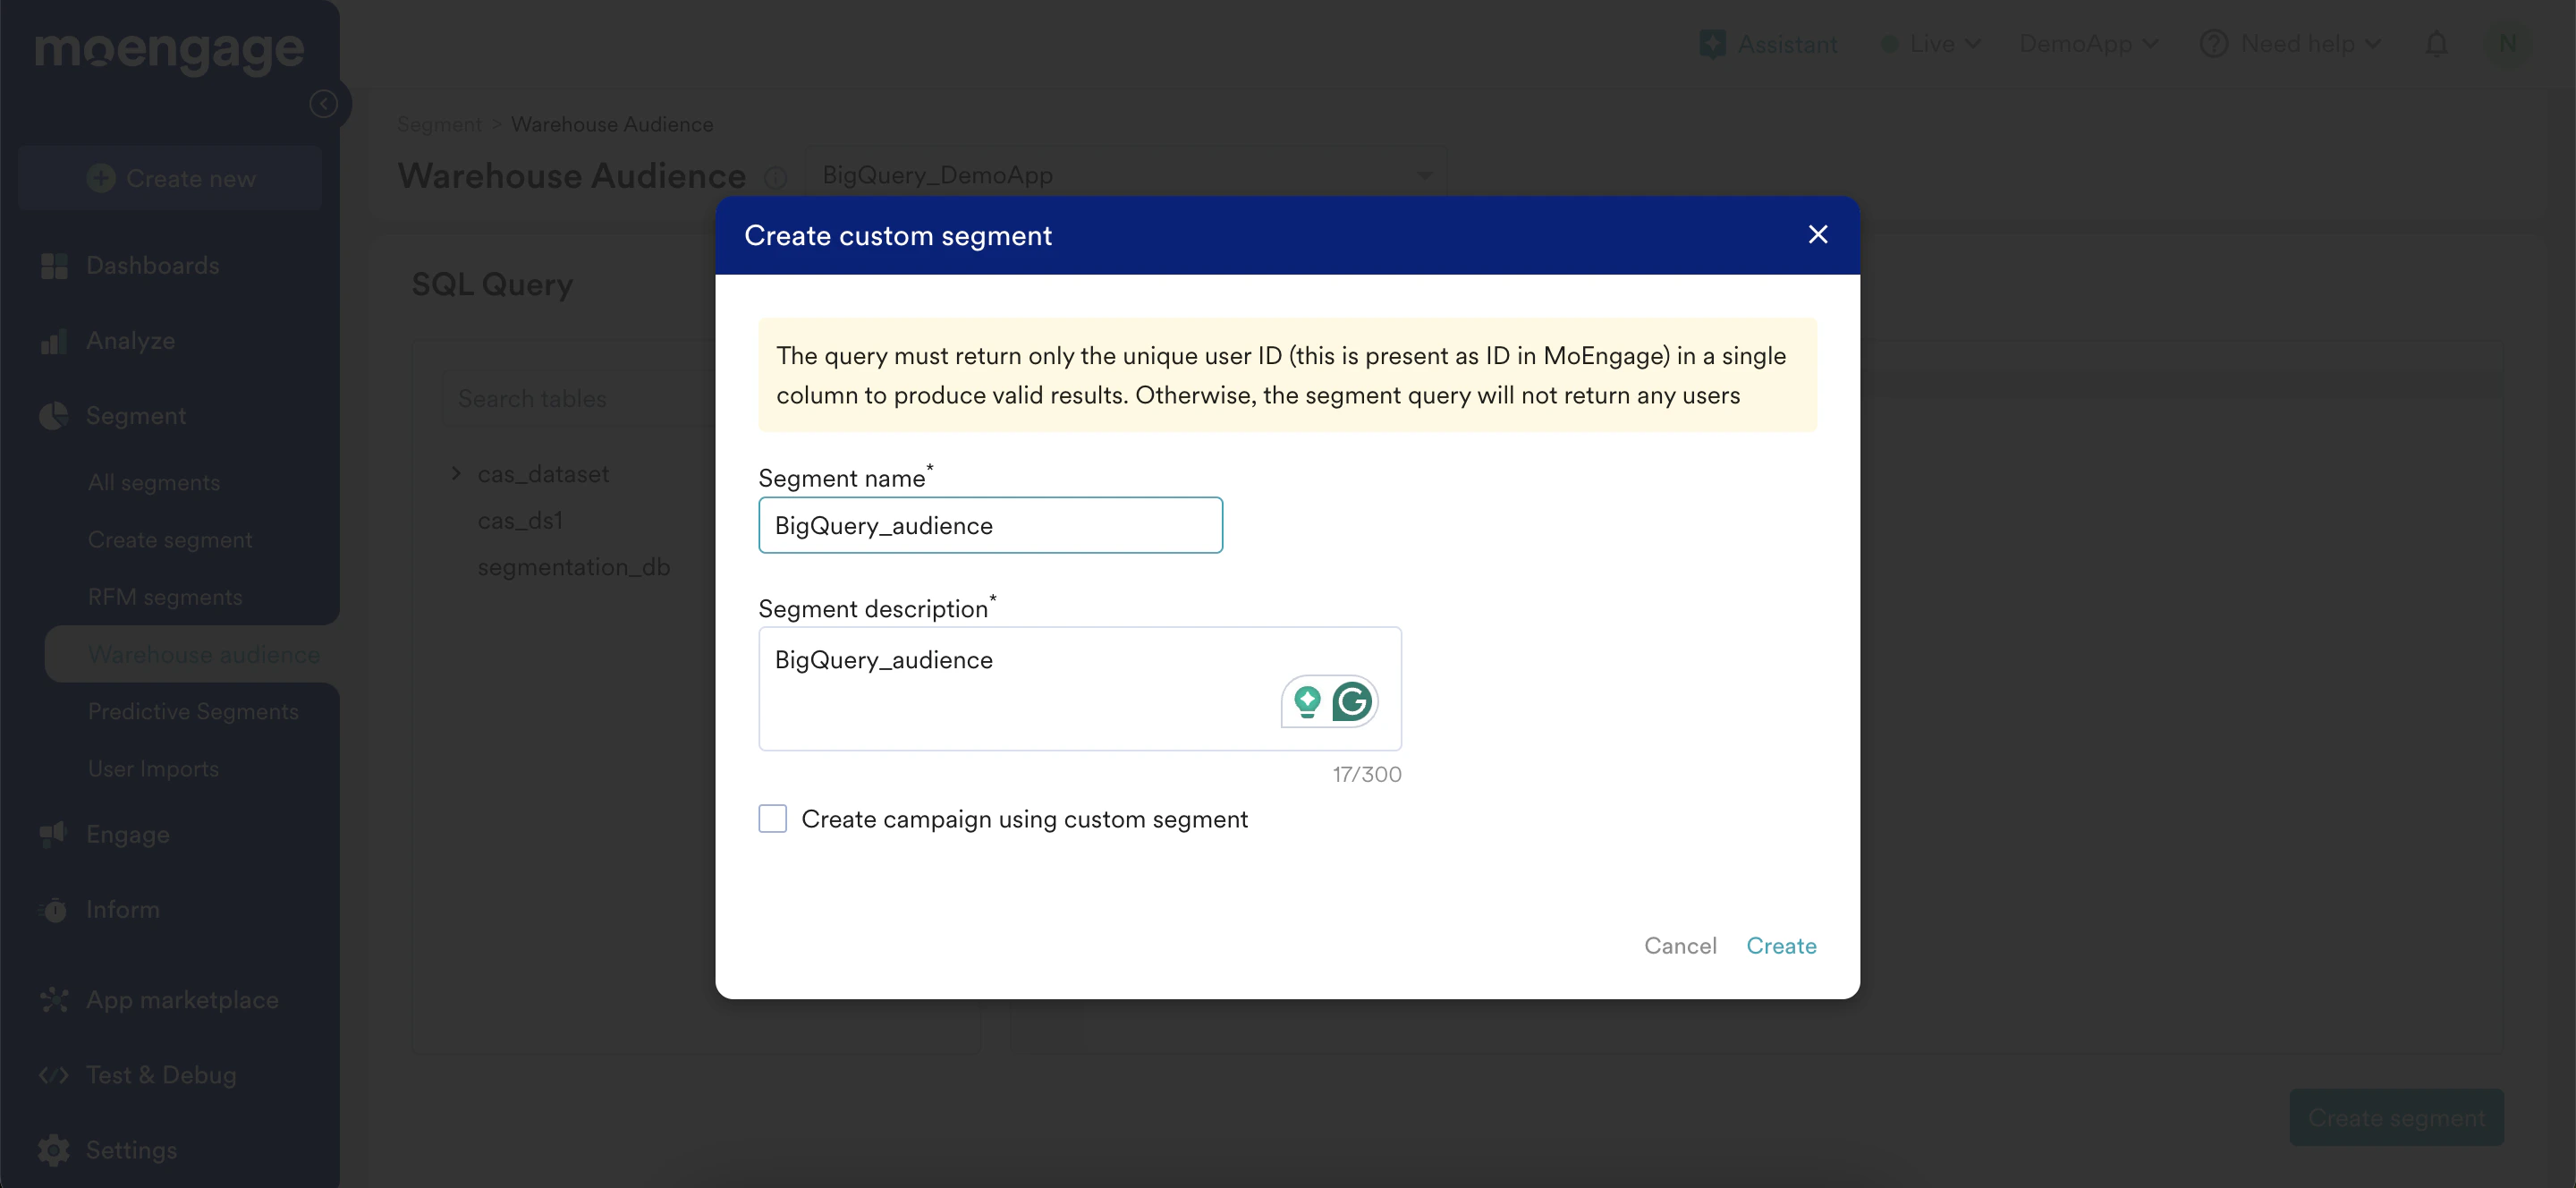
Once the SQL query is finalized, you can proceed to create a custom segment. We expect the custom segment query to return a single column of IDs (the unique user identification that is present as an ID in MoEngage). Give a name and a description for the segment.
11. \*\*Preview Table:\*\*Now you can one-click preview a few sample rows from any table listed in the schema section. On hovering over a table name in the schema, you should be able to see an eye icon, clicking on this will run a sample query on the table providing up to 10 rows of data as a preview.
1) The SQL query must return a single column of IDs in order to be saved as a custom segment. If the query returns multiple columns, the segment will not return any users.
2) The SQL query runs on your data warehouse directly. Please note that when utilizing this feature, you will incur the costs associated with running the queries from your data warehouse.
3) The SQL query will timeout in 15 min. Reach out to your CSM to configure this limit.
4) The SQL query should be compatible with your DWH. If you are using Warehouse segments on BigQuery, the SQL query must be supported by [GoogleSQL.](https://cloud.google.com/bigquery/docs/introduction-sql) Similarly, Snowflake supports [Standard SQL](https://docs.snowflake.com/guides-overview-queries) for querying, Databricks supports [ANSI standard SQL,](https://www.databricks.com/blog/2021/11/16/evolution-of-the-sql-language-at-databricks-ansi-standard-by-default-and-easier-migrations-from-data-warehouses.html) and Redshift supports [PostgreSQL](https://docs.aws.amazon.com/redshift/latest/dg/c_SQL_commands.html).
## Step 3: Define a warehouse custom segment
Once the SQL query is finalized, you can proceed to create a custom segment. We expect the custom segment query to return a single column of IDs (the unique user identification that is present as an ID in MoEngage). Give a name and a description for the segment.
 ## Step 4: Use the warehouse custom segment
Custom segments created using warehouse segment are of type Warehouse - SQL. They will be listed on the All Segments page.
## Step 4: Use the warehouse custom segment
Custom segments created using warehouse segment are of type Warehouse - SQL. They will be listed on the All Segments page.
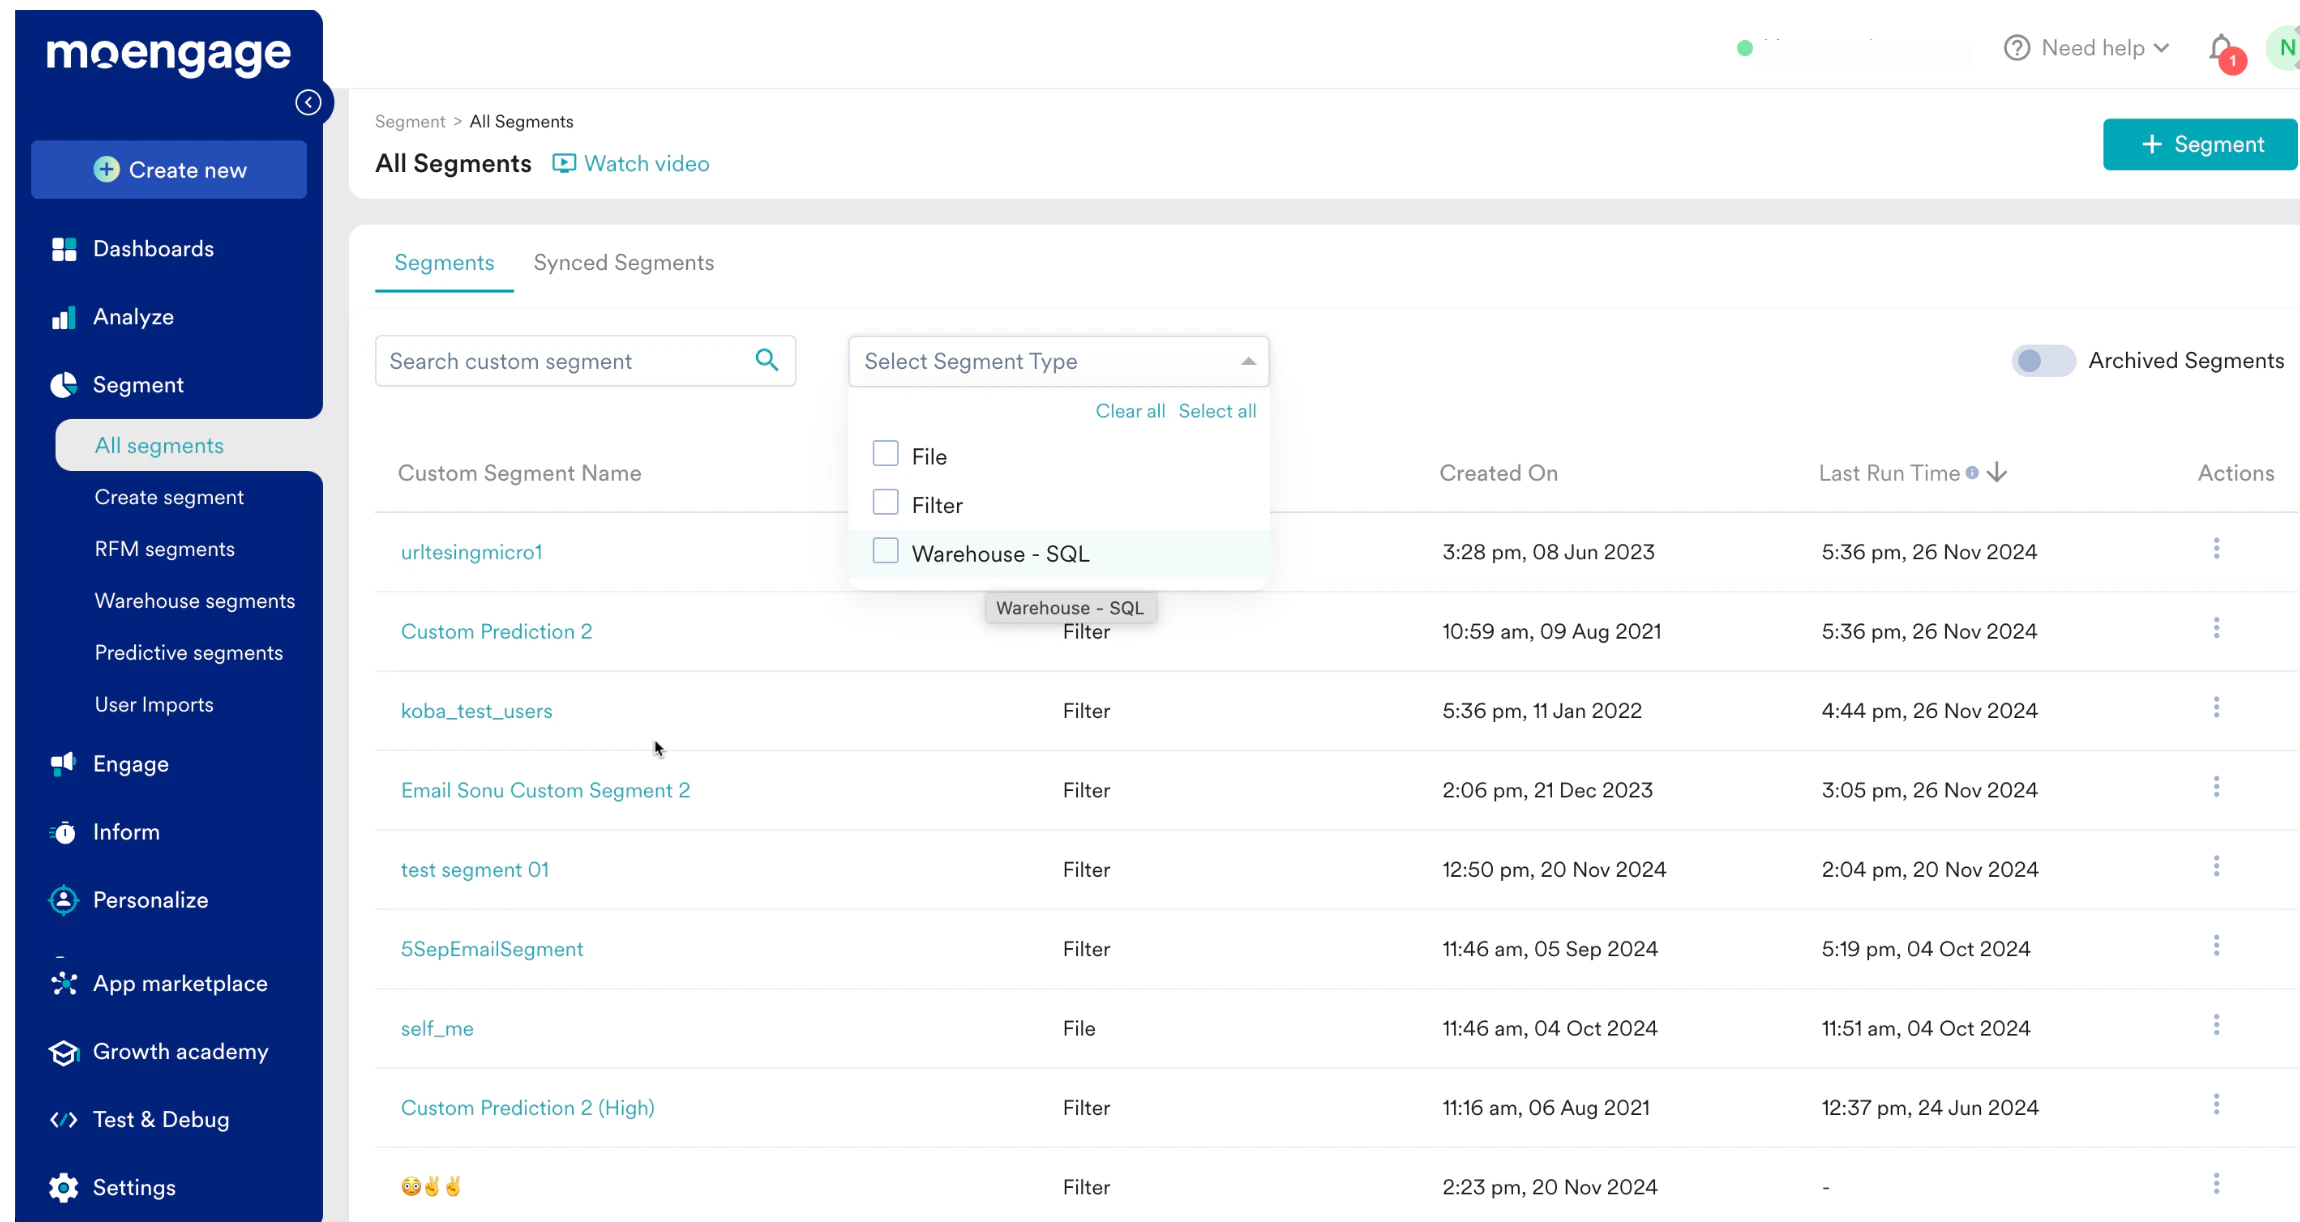 ### Actions possible on external custom segments:
* **View** - View the details of the custom segment on the segment info page. Here you can:
* View the SQL query that defines the segment
* Run the custom segment to update user count - This is when MoEngage connects to your data warehouse, runs the SQL query, and updates the user count.
* **Edit** - You can edit the SQL query that was used to define the custom segment
* **Create campaign** - You can create a campaign directly from the All Segments page. The target audience section of campaign creation will be populated with the selected custom segment.
* External data warehouse segments can be combined with other custom segments as well as user attributes, and behaviors captured in MoEngage.
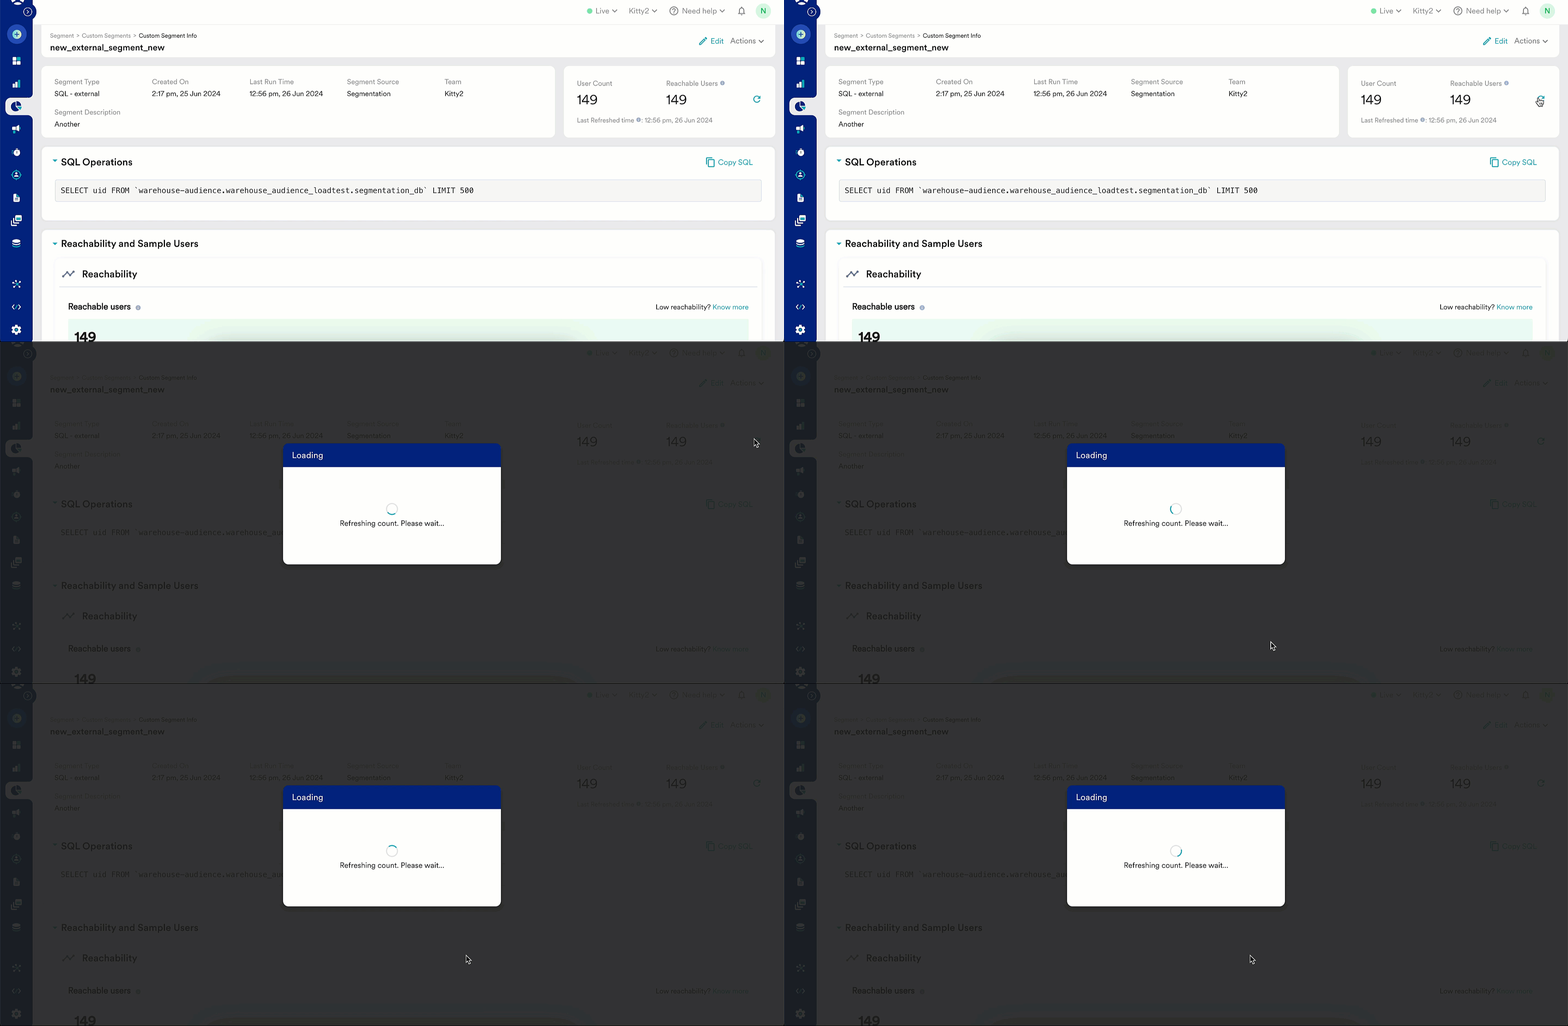
# Refresh the user count of a Warehouse segment
You can update the user count of an external data warehouse segment in two ways:
* **On campaign run-time** - The data warehouse segment that is part of the Target audience of a campaign will auto-refresh at the campaign run-time.
* **Run the custom segment from the segment info page** - You can also run the segment manually from the segment info page.
### Actions possible on external custom segments:
* **View** - View the details of the custom segment on the segment info page. Here you can:
* View the SQL query that defines the segment
* Run the custom segment to update user count - This is when MoEngage connects to your data warehouse, runs the SQL query, and updates the user count.
* **Edit** - You can edit the SQL query that was used to define the custom segment
* **Create campaign** - You can create a campaign directly from the All Segments page. The target audience section of campaign creation will be populated with the selected custom segment.
* External data warehouse segments can be combined with other custom segments as well as user attributes, and behaviors captured in MoEngage.
# Refresh the user count of a Warehouse segment
You can update the user count of an external data warehouse segment in two ways:
* **On campaign run-time** - The data warehouse segment that is part of the Target audience of a campaign will auto-refresh at the campaign run-time.
* **Run the custom segment from the segment info page** - You can also run the segment manually from the segment info page.
 # Considerations
* One warehouse segment can be defined on one data warehouse connection. You can combine multiple custom segments pointing to different sources and create a new custom segment.
* Running analysis - Behaviour, Funnel, etc., will not refresh the user count of a warehouse segment. The target audience containing a warehouse segment will either:
* Return 0 if the segment has never run.
* Return the last run count of users if the segment has run before.
# Considerations
* One warehouse segment can be defined on one data warehouse connection. You can combine multiple custom segments pointing to different sources and create a new custom segment.
* Running analysis - Behaviour, Funnel, etc., will not refresh the user count of a warehouse segment. The target audience containing a warehouse segment will either:
* Return 0 if the segment has never run.
* Return the last run count of users if the segment has run before.