> ## Documentation Index
> Fetch the complete documentation index at: https://moengage.com/docs/llms.txt
> Use this file to discover all available pages before exploring further.
# Just-in-Time User Provisioning (JIT)
> Automate user creation and role management in MoEngage with Just-in-Time (JIT) provisioning. Provision users directly from your identity provider on first login.
**Early Access**
Just-in-Time User Provisioning is an Early Access feature. To enable it for your account, please contact your MoEngage Customer Success Manager (CSM) or the Support team.
# Overview
Just-in-Time User Provisioning lets you automate the creation and management of users in your MoEngage workspace. This feature creates users directly from your Identity Provider on their first login.
**Prerequisites**
Before enabling JIT provisioning, ensure SSO is configured and active for your workspace. For more information, refer to [Single Sign-On (SSO)](/user-guide/settings/account/security/single-sign-on-sso).
## Advantages
* **Faster onboarding**: New team members can access MoEngage immediately without waiting for a manual invitation.
* **Dynamic role assignment**: Roles can be automatically assigned or updated from the identity provider (if enabled in MoEngage).
* **Temporary access**: Provide session-based access to your users, where they can be automatically deleted after their session ends (if enabled in MoEngage).
# Access Just-in-Time User Provisioning
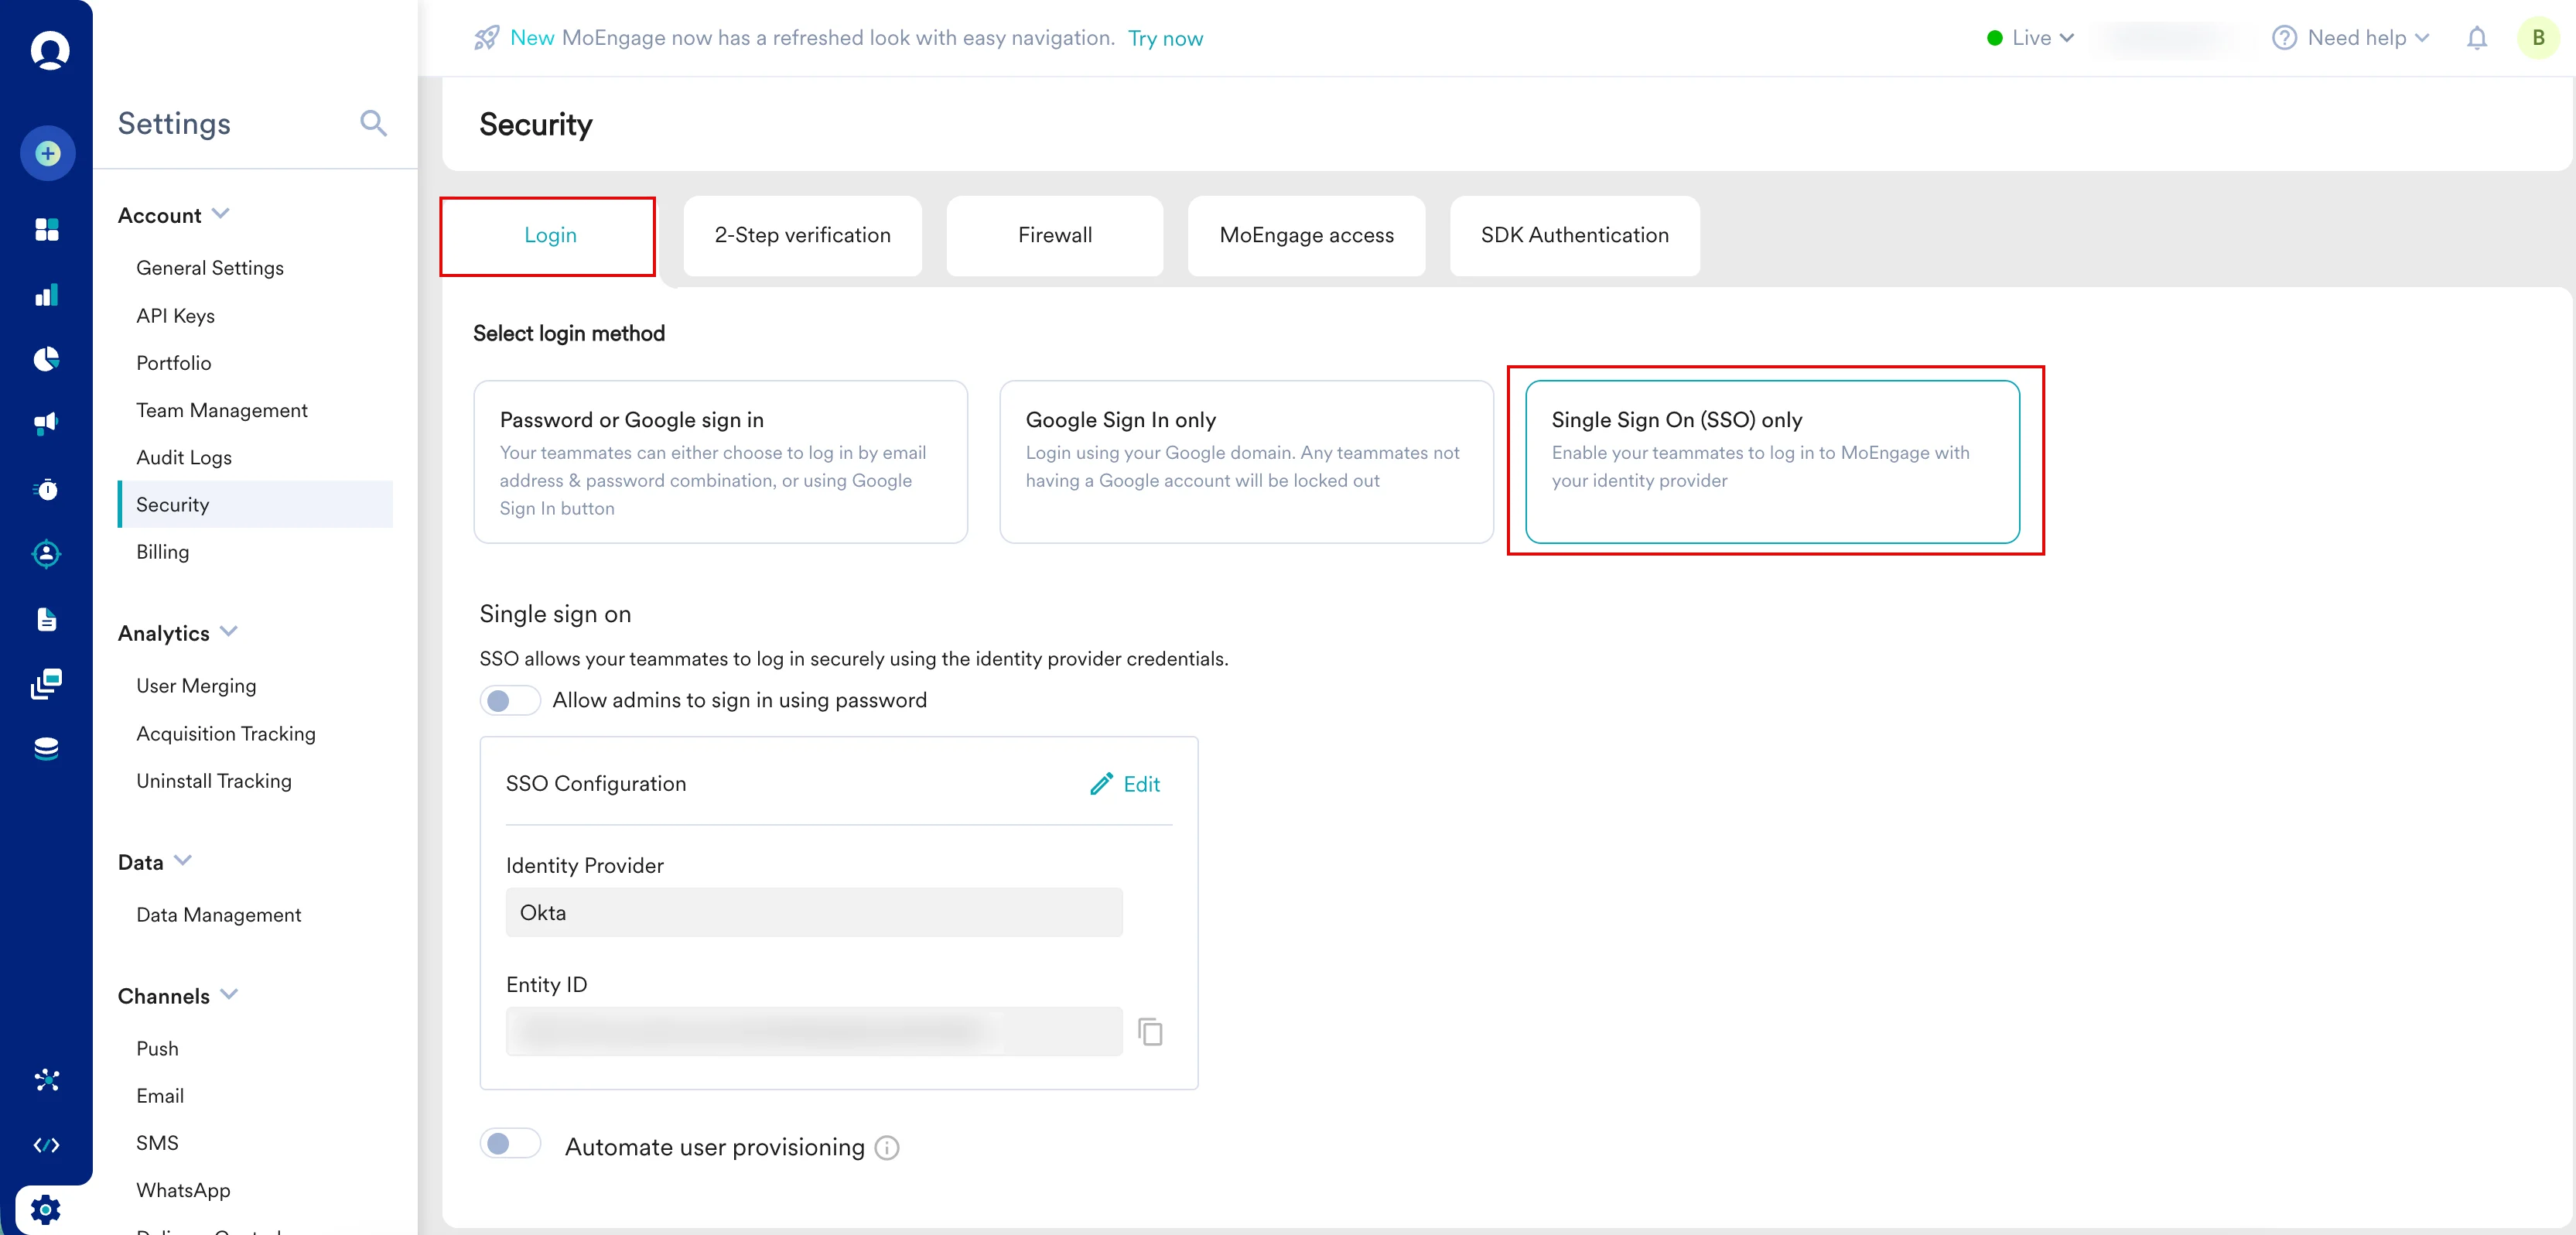
1. On the left navigation menu in your MoEngage workspace, navigate to **Settings** > **Account** > **Security** > **Login**.
2. Click **Single Sign On (SSO) only**.\
**Note**: Ensure SSO is configured. For more information, refer to [how to configure SSO](/user-guide/settings/account/security/single-sign-on-sso).
3. Scroll to the **Automate user provisioning** section.
 ## Permissions to Access
The following table describes the permissions required to access and use JIT provisioning:
| Permission Component | Permission Name | Details |
| -------------------- | --------------- | ----------------------------------------------------------------- |
| Security Settings | Setup & Manage | Allows you to view, enable, update, or disable user provisioning. |
## Step 1: Enable Just-in-Time User Provisioning
1. Turn the **Automate user provisioning** toggle on.
## Permissions to Access
The following table describes the permissions required to access and use JIT provisioning:
| Permission Component | Permission Name | Details |
| -------------------- | --------------- | ----------------------------------------------------------------- |
| Security Settings | Setup & Manage | Allows you to view, enable, update, or disable user provisioning. |
## Step 1: Enable Just-in-Time User Provisioning
1. Turn the **Automate user provisioning** toggle on.
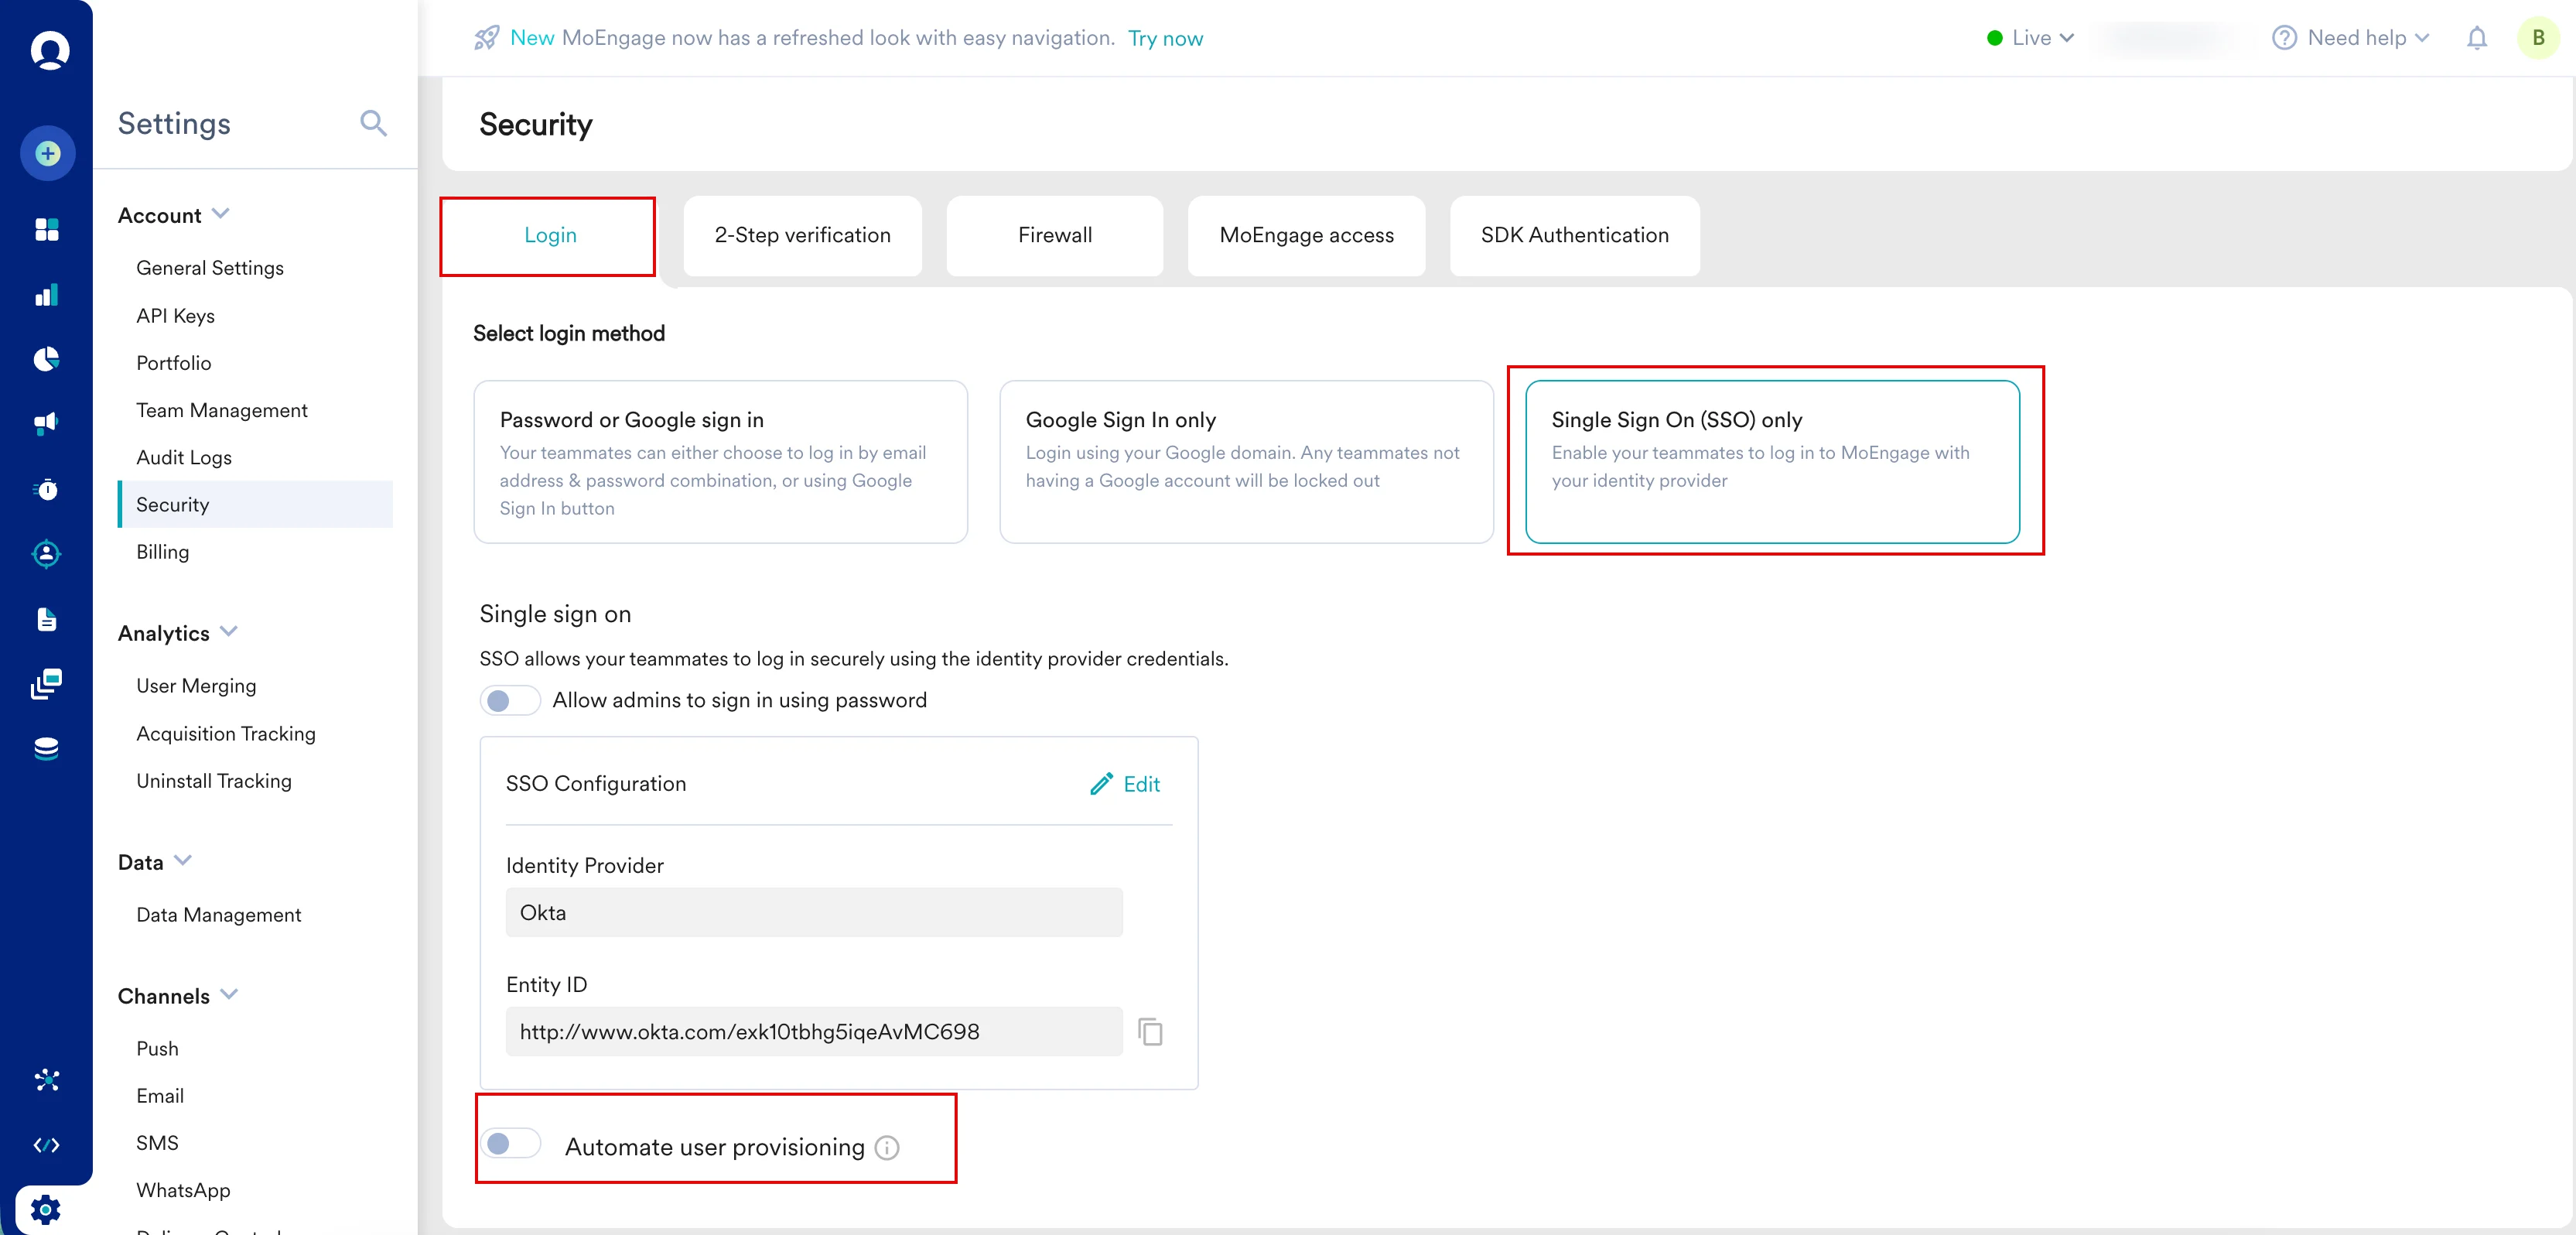 \
The **Configure provisioning method** dialog box appears.
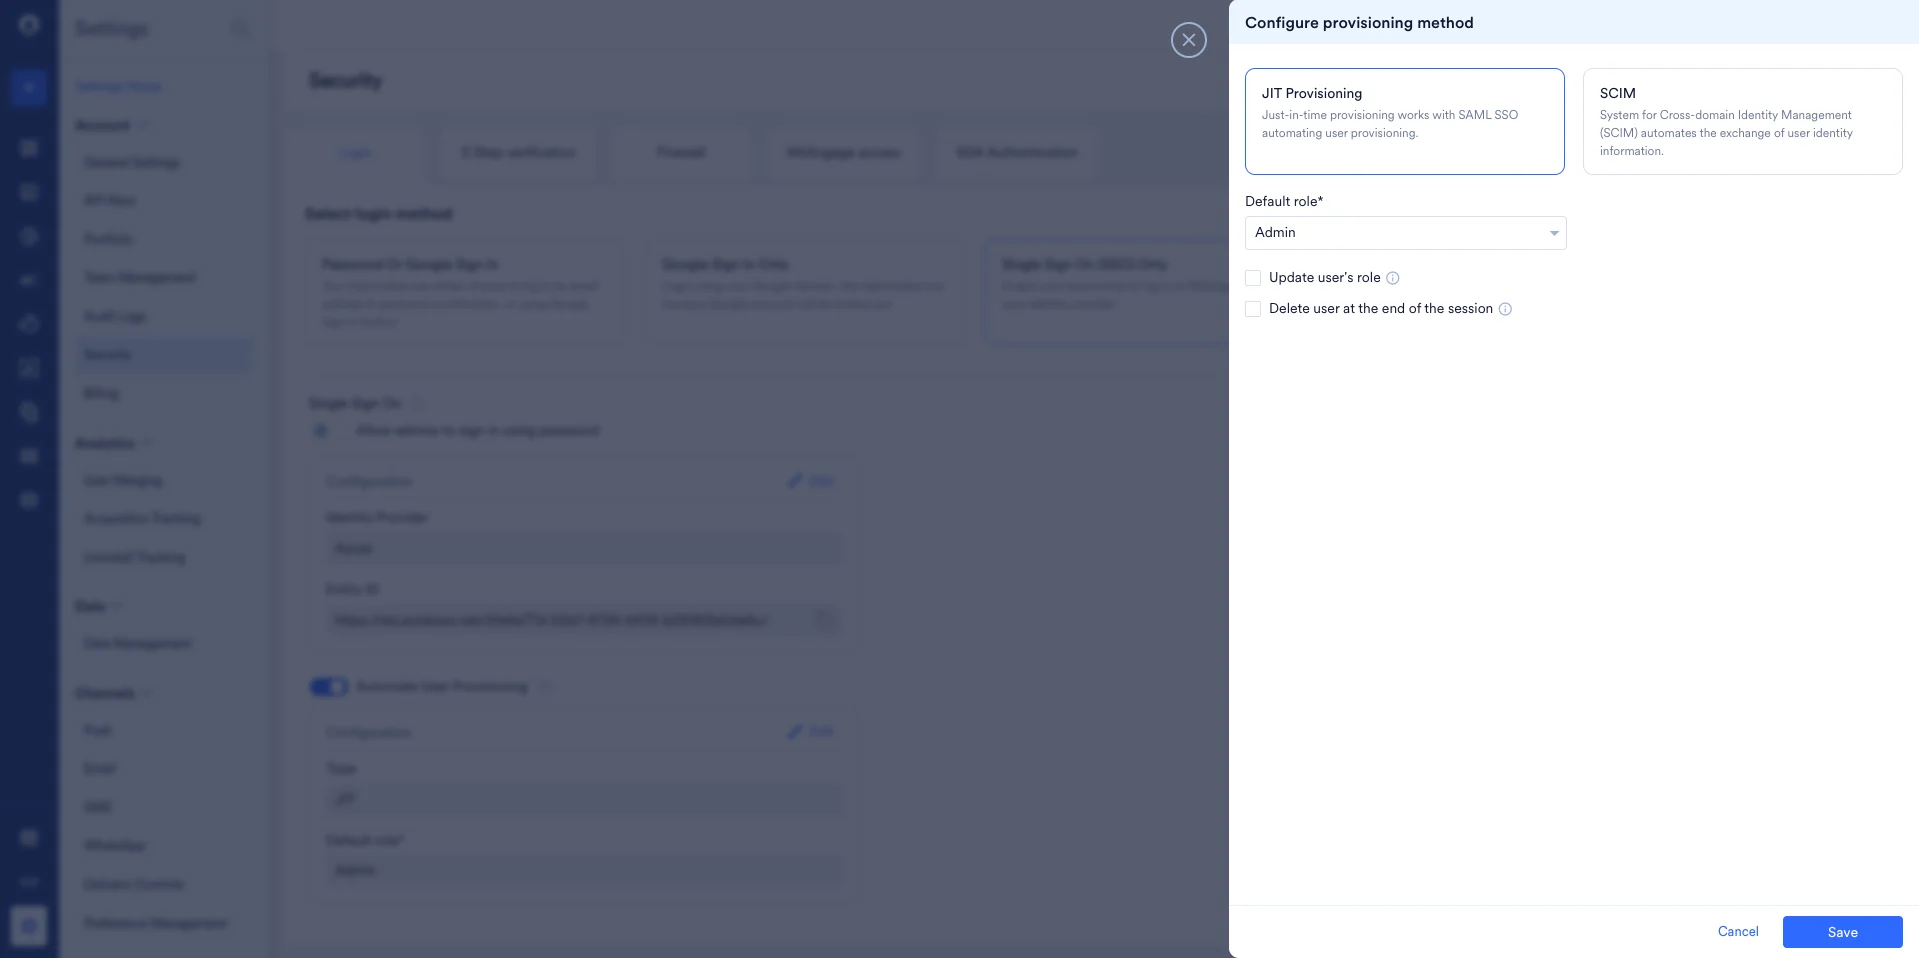
2. Select **JIT Provisioning** as your configuration type.
\
The **Configure provisioning method** dialog box appears.
2. Select **JIT Provisioning** as your configuration type.
 ## Step 2: Configure and Save
1. Provide the following fields:
| Field | Required | Description |
| ------------------------------------- | -------- | -------------------------------------------------------------------------------------------------------------------------------------------------------------------------------------------------------------------------------------------------------------------------------------------------------------------------------------------------------------------------------------------------------------------------------------------------------------------- |
| Default role | Yes |
## Step 2: Configure and Save
1. Provide the following fields:
| Field | Required | Description |
| ------------------------------------- | -------- | -------------------------------------------------------------------------------------------------------------------------------------------------------------------------------------------------------------------------------------------------------------------------------------------------------------------------------------------------------------------------------------------------------------------------------------------------------------------- |
| Default role | Yes | - MoEngage requires a fallback role. If the role is not passed from the Identity Provider (via the SAML assertion call) or does not contain the role value, the user is assigned this default role to access the workspace.
- All default and custom roles are available for selection as the default role.
|
| Update user's role | Optional | If checked, the user's role in the workspace is updated based on the value received from the Identity Provider in each SAML assertion call.
**Note**: If unchecked, and the user's role received from the Identity Provider is different from the role in the workspace, the user is granted access based on the role received from the Identity Provider for that particular session only, without any permanent changes to their role in the workspace. |
| Delete user at the end of the session | Optional | If checked, the user is deleted and removed from that workspace either when the session expires (for example, user logout or force logout) or after 24 hours, whichever happens first. |
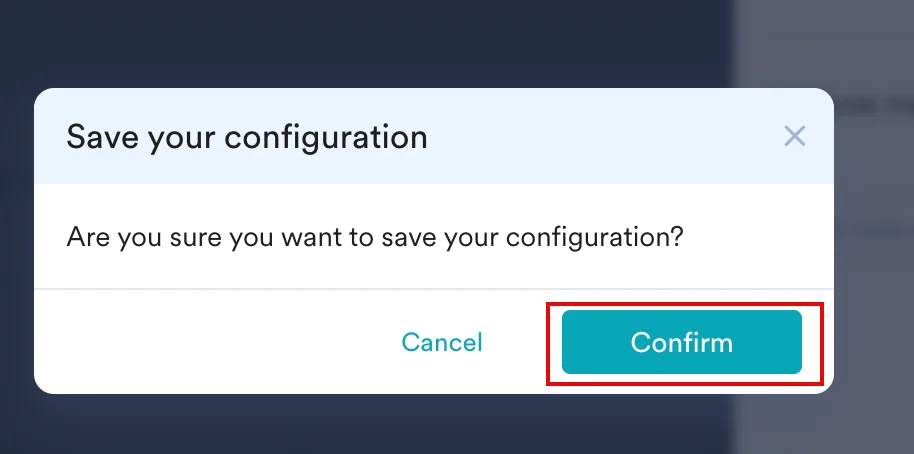
2. Click **Save**.
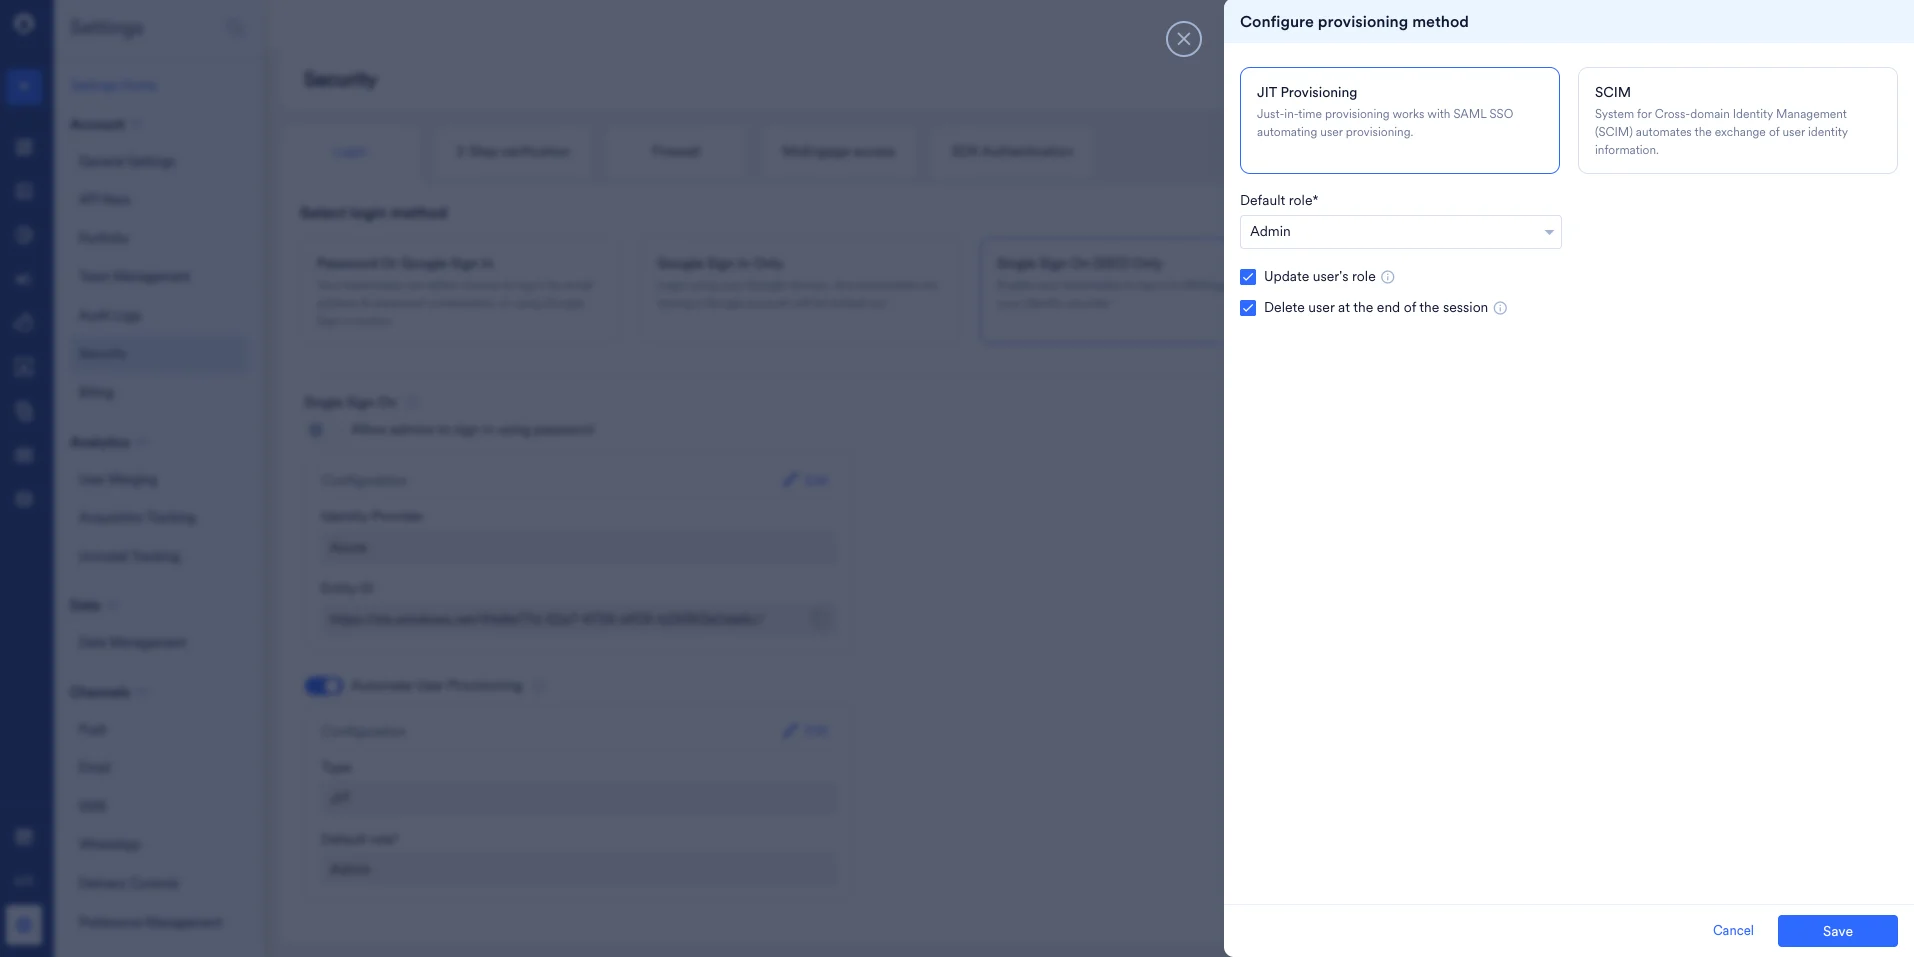 \
The **Save your configuration** dialog box appears, prompting you to confirm your configuration.
3. Click **Confirm**.
\
The **Save your configuration** dialog box appears, prompting you to confirm your configuration.
3. Click **Confirm**.
 \
The enabled successfully message appears.
# Identity Provider (IdP) Setup
JIT provisioning supports the following Identity Providers:
* Okta
* Microsoft Azure
* OneLogin
* Any Identity Provider that supports Just-in-Time User Provisioning
## Step 1: Add the Role Attribute to the MoEngage SSO Application
1. Navigate to the **Okta Admin Console**.
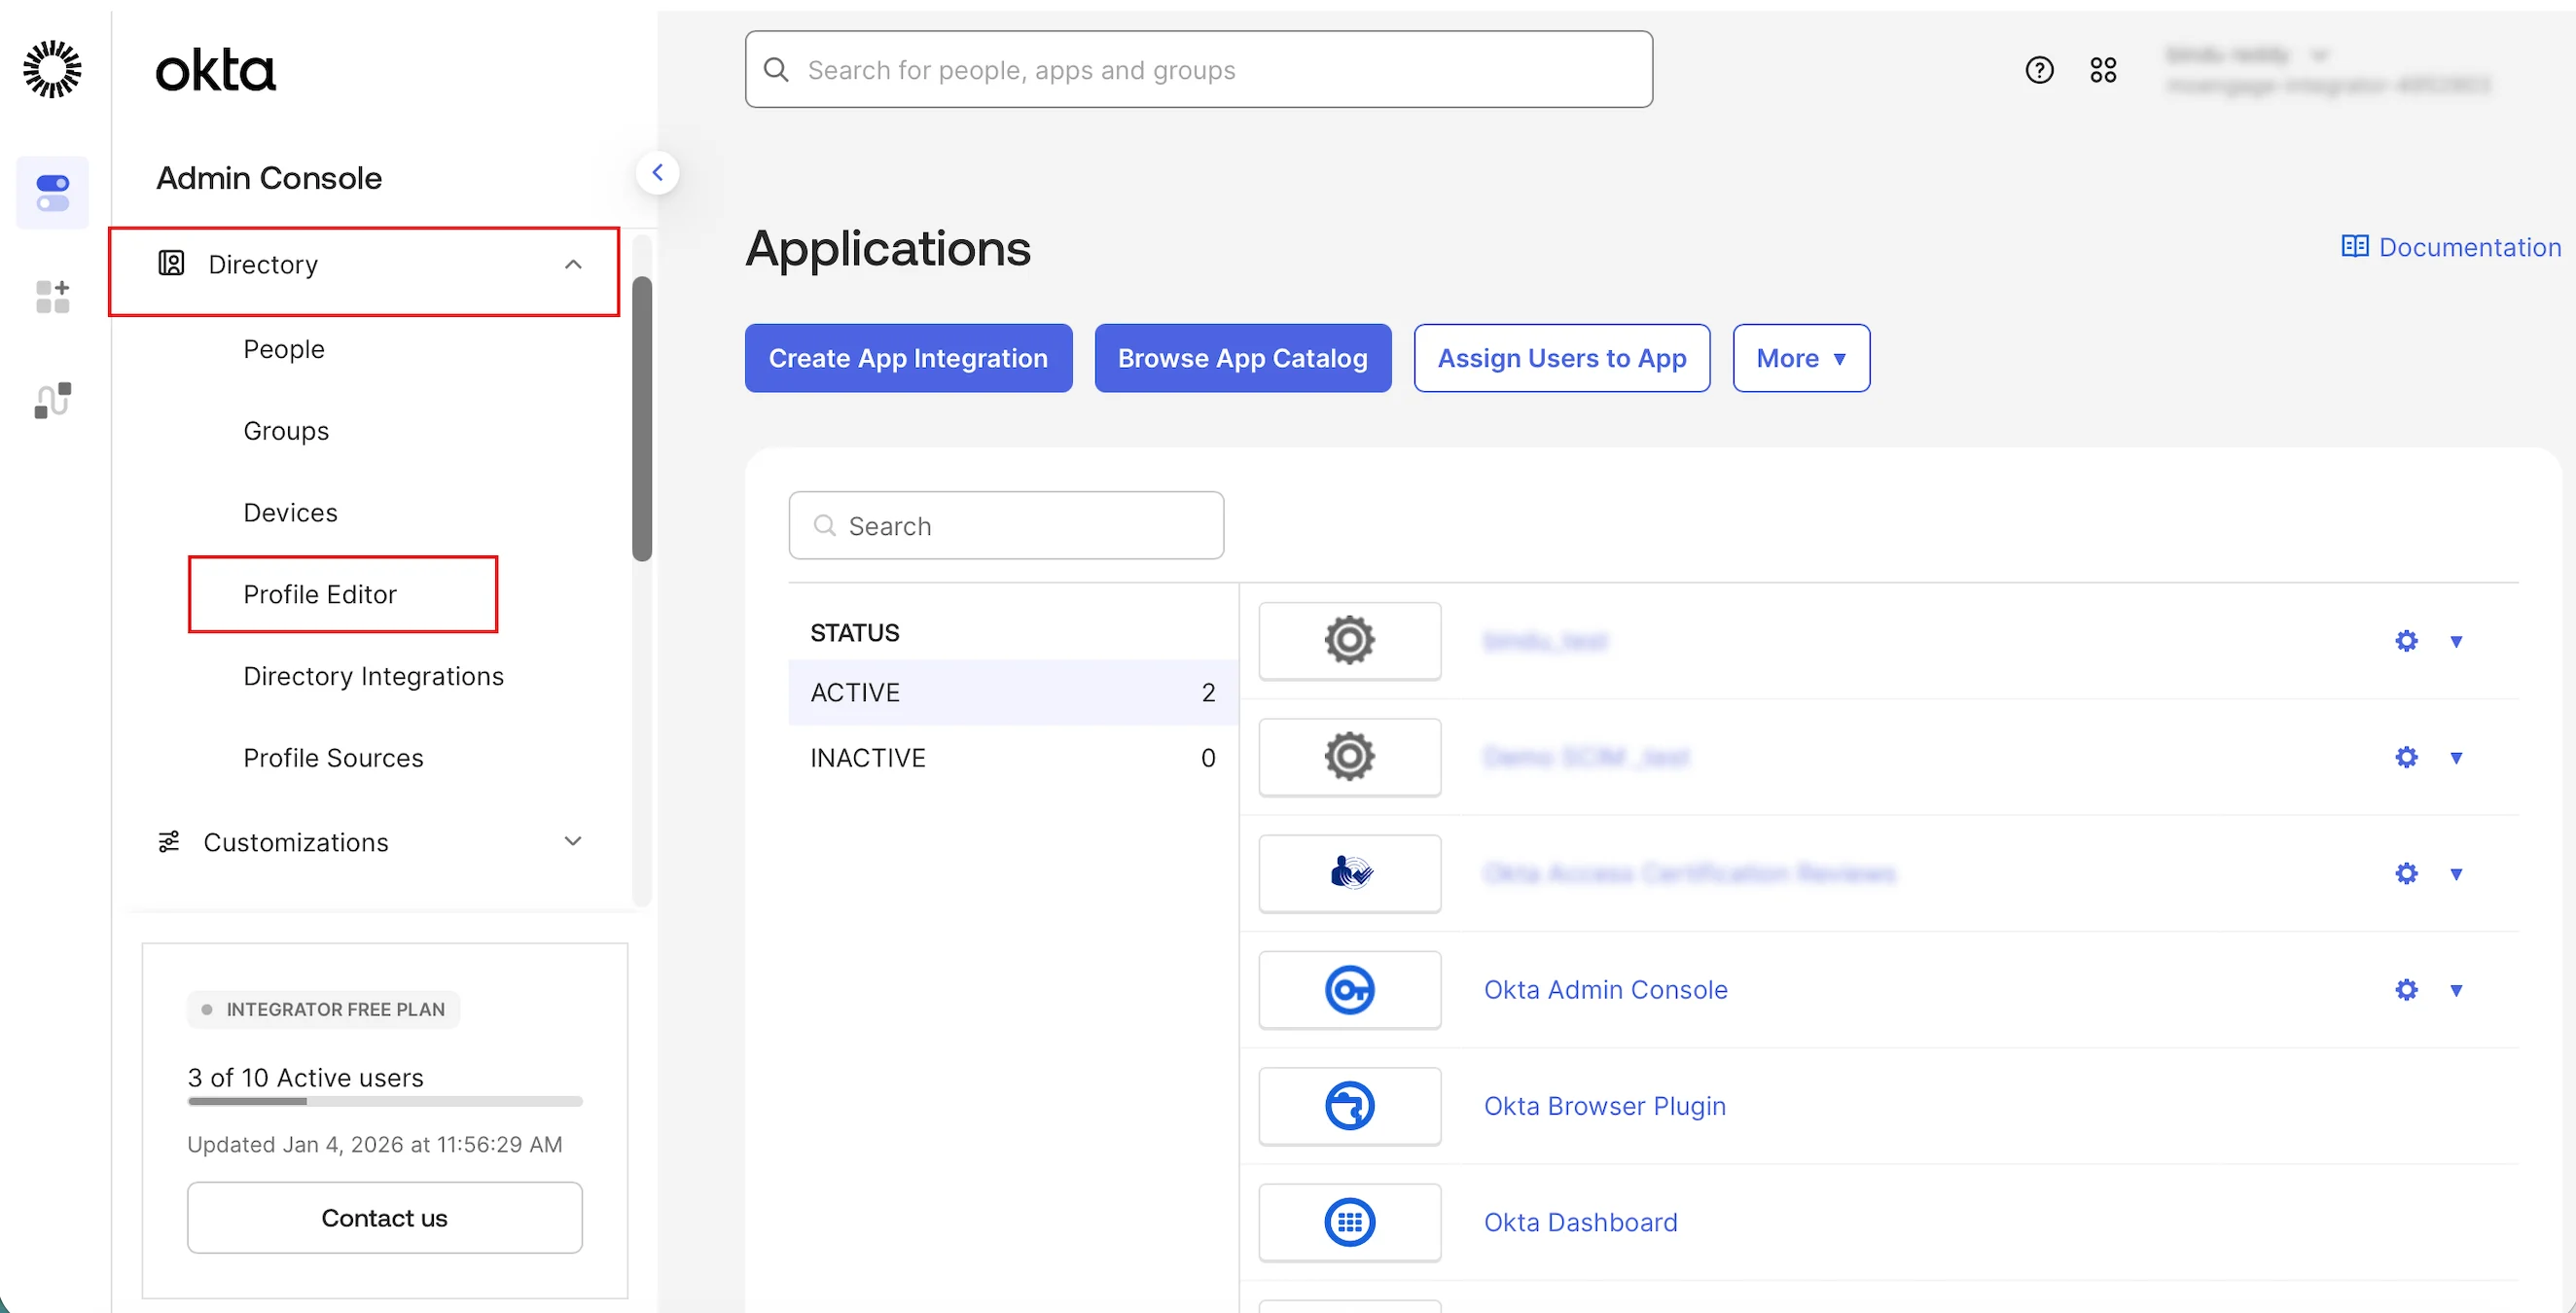
2. On the left navigation menu, click **Directory** > **Profile Editor**.
\
The enabled successfully message appears.
# Identity Provider (IdP) Setup
JIT provisioning supports the following Identity Providers:
* Okta
* Microsoft Azure
* OneLogin
* Any Identity Provider that supports Just-in-Time User Provisioning
## Step 1: Add the Role Attribute to the MoEngage SSO Application
1. Navigate to the **Okta Admin Console**.
2. On the left navigation menu, click **Directory** > **Profile Editor**.
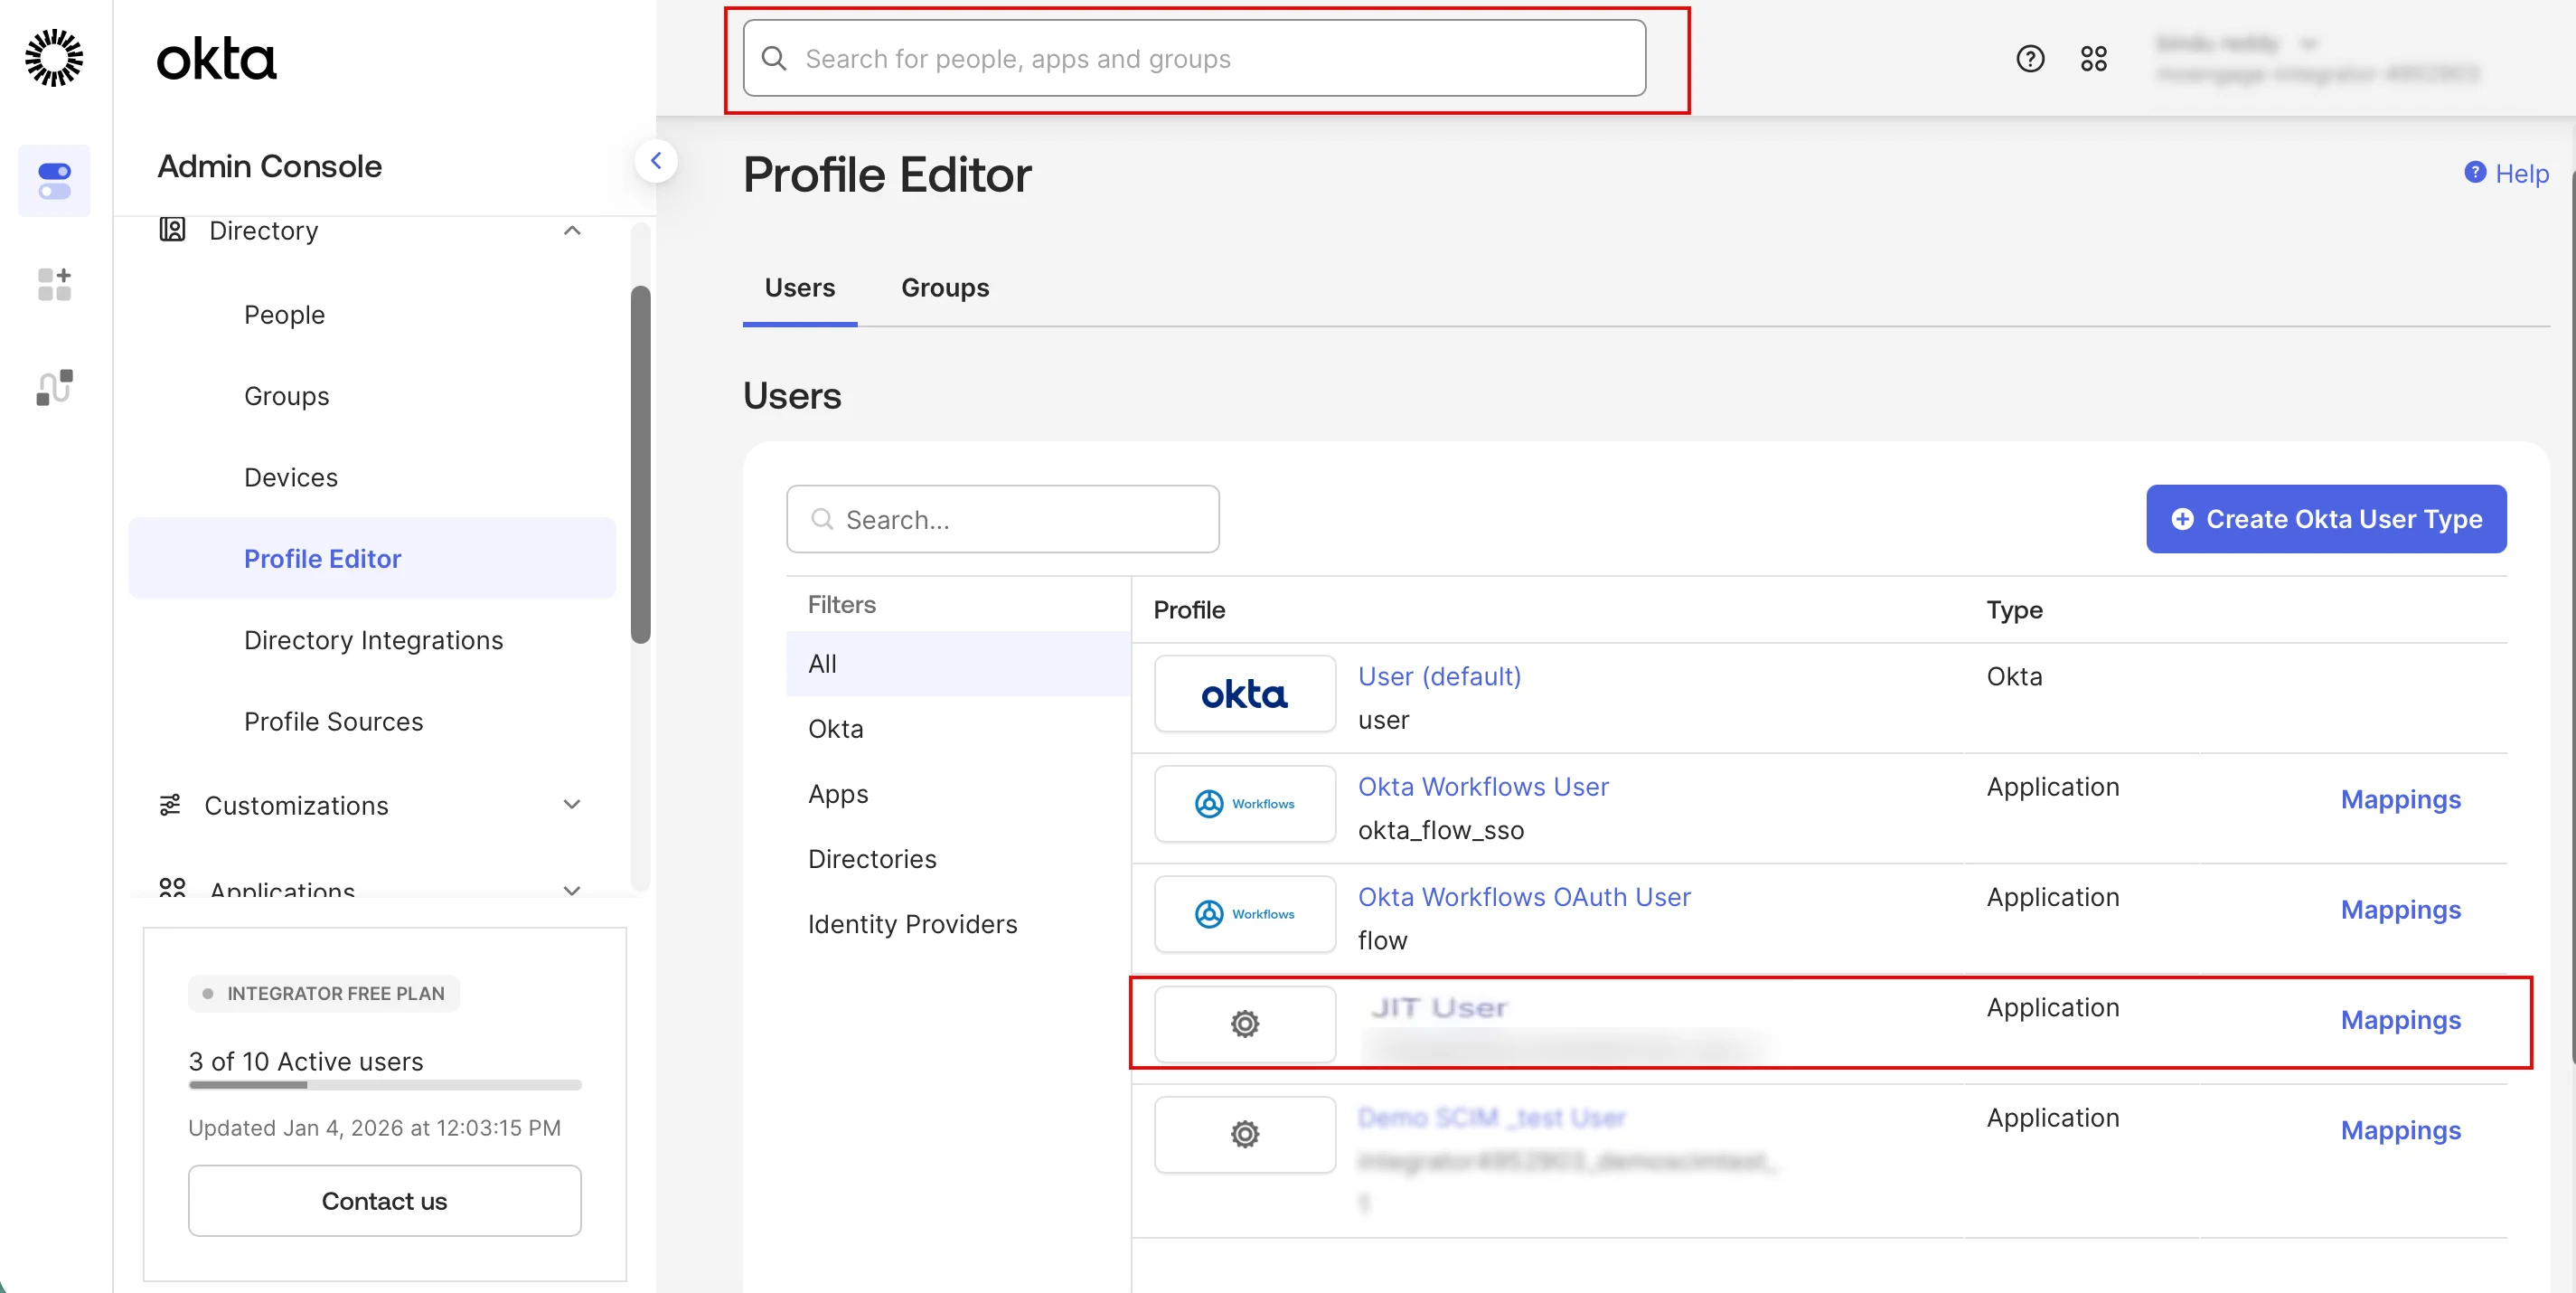
 3. On the **Profile Editor** page, select the MoEngage SSO application you created, or use the **Search for people, apps, and groups** box to find it.
 4. Click **Add Attribute**.
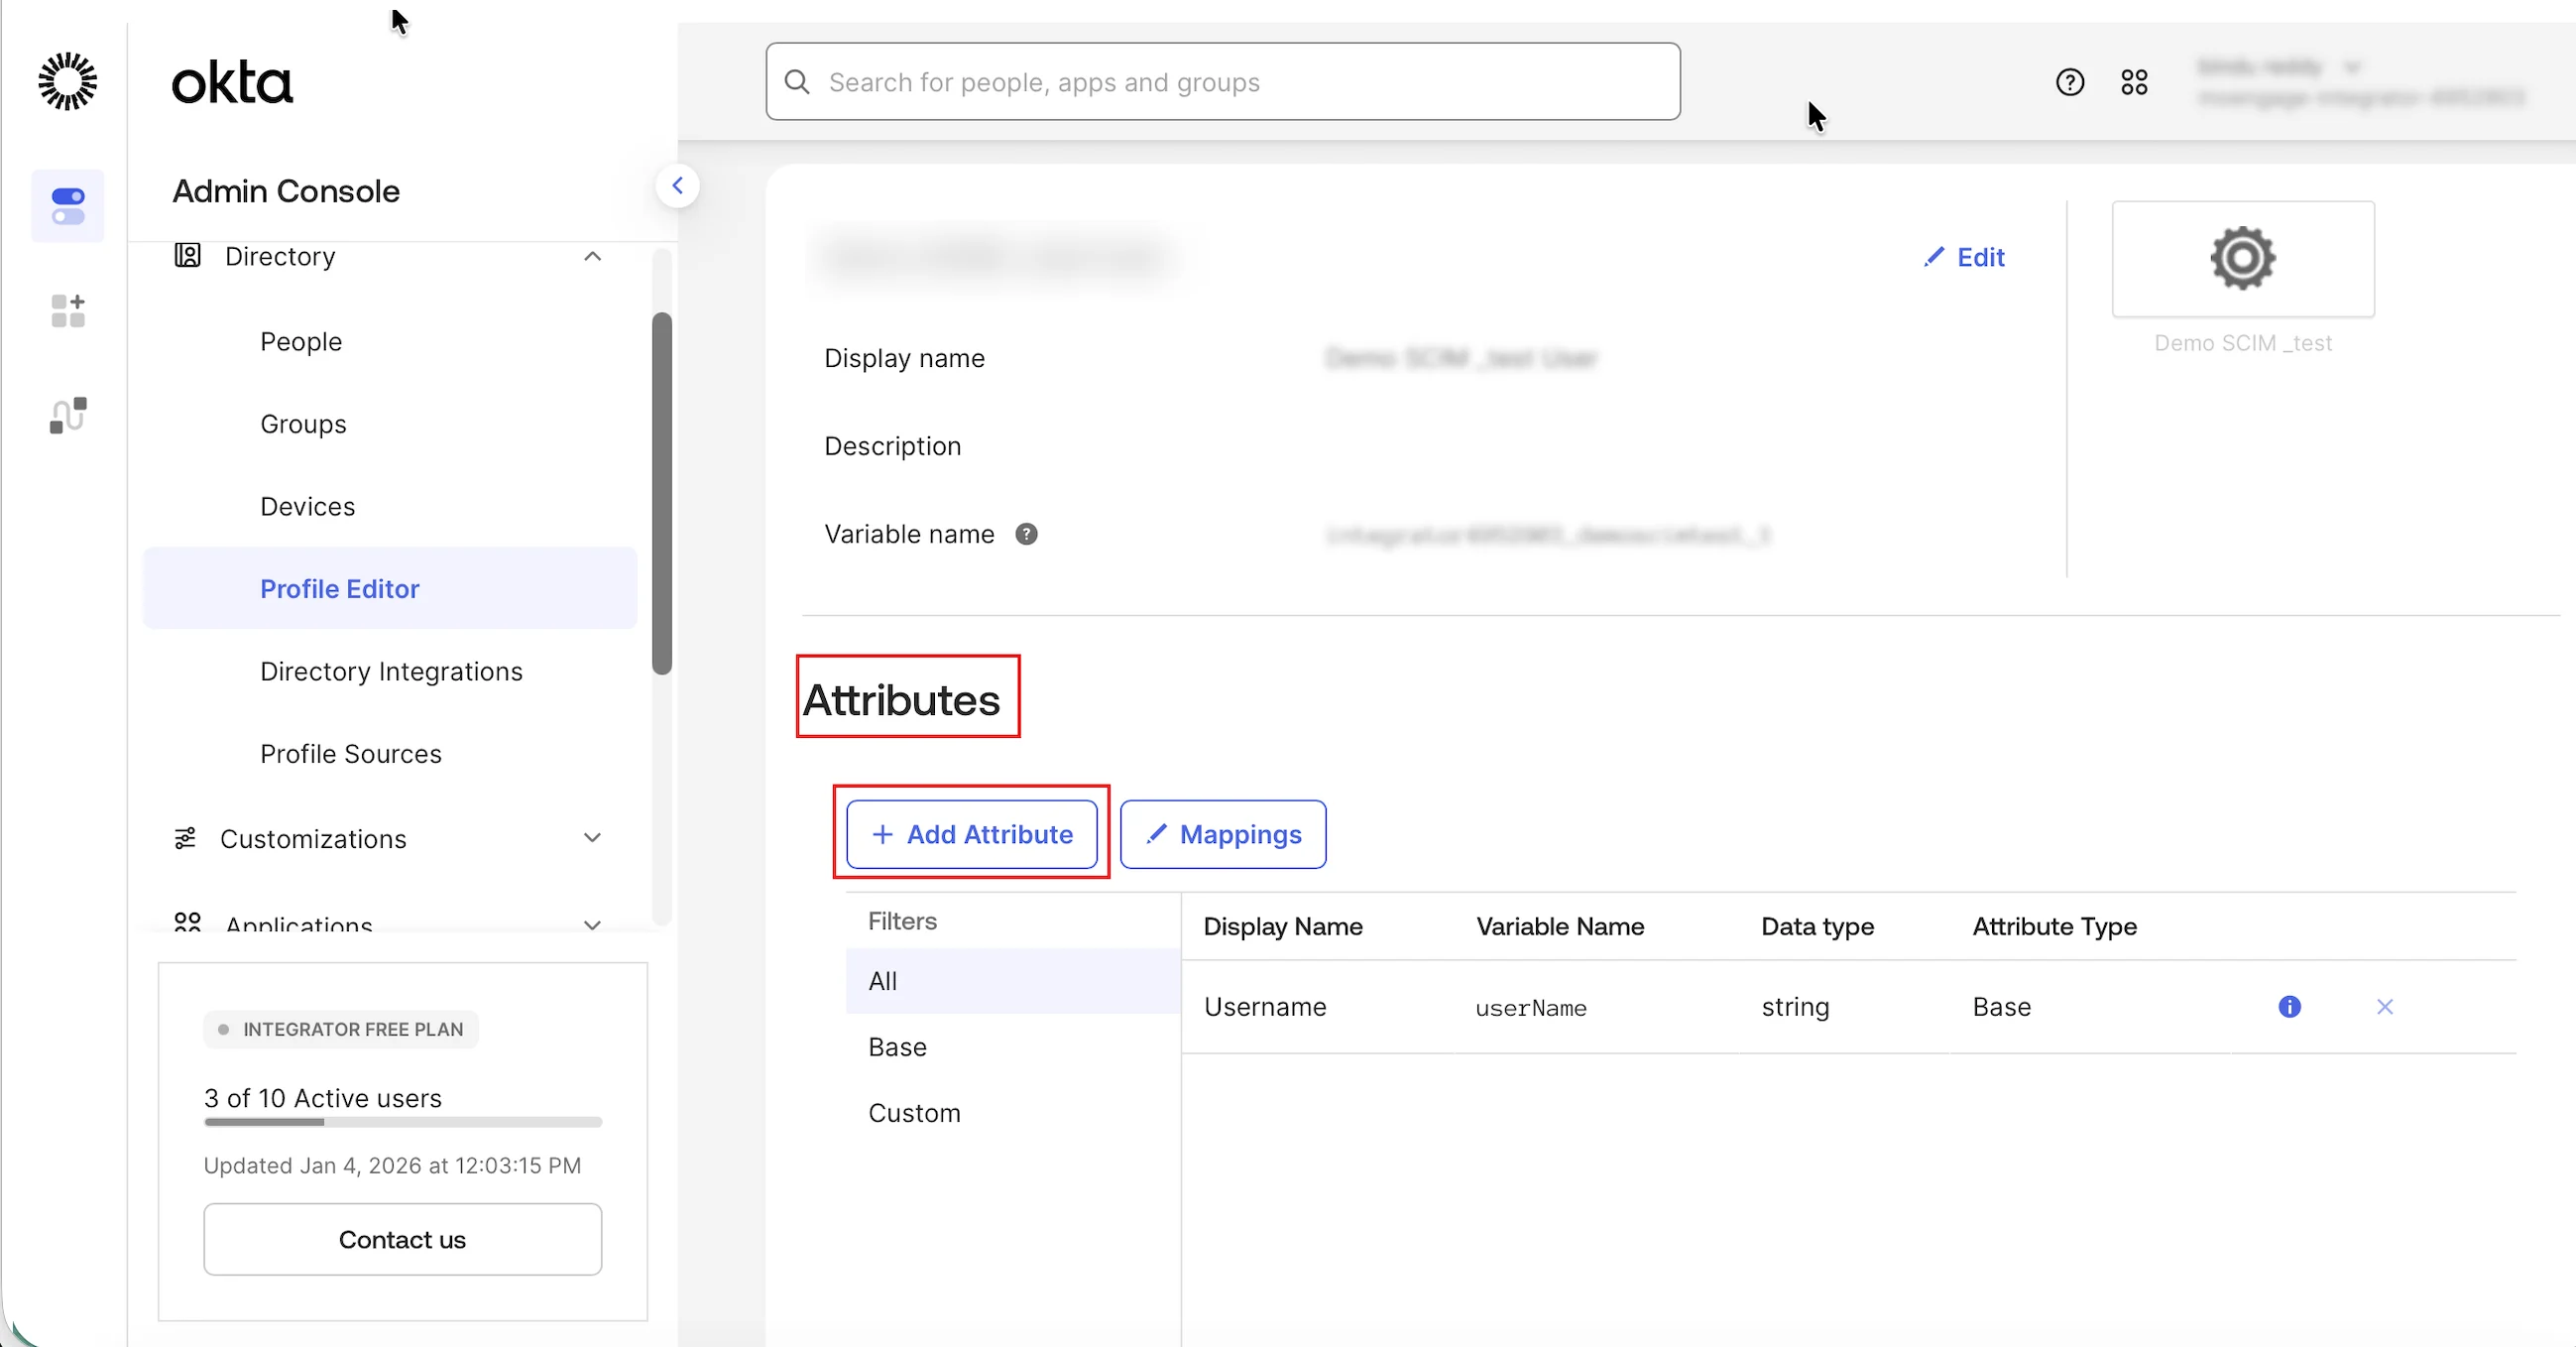 \
The **Add Attribute** dialog box appears.
5. In the **Data type** list, select **string**.
6. In the **Display name** box, enter role.
7. In the **Variable name** box, enter role.
8. In the **Description** box, enter role.
9. Click **Save**.
## Step 2: Configure SAML Attribute Statements
1. Navigate to **Applications** > **Applications** and click the MoEngage SSO application.
\
The **Add Attribute** dialog box appears.
5. In the **Data type** list, select **string**.
6. In the **Display name** box, enter role.
7. In the **Variable name** box, enter role.
8. In the **Description** box, enter role.
9. Click **Save**.
## Step 2: Configure SAML Attribute Statements
1. Navigate to **Applications** > **Applications** and click the MoEngage SSO application.
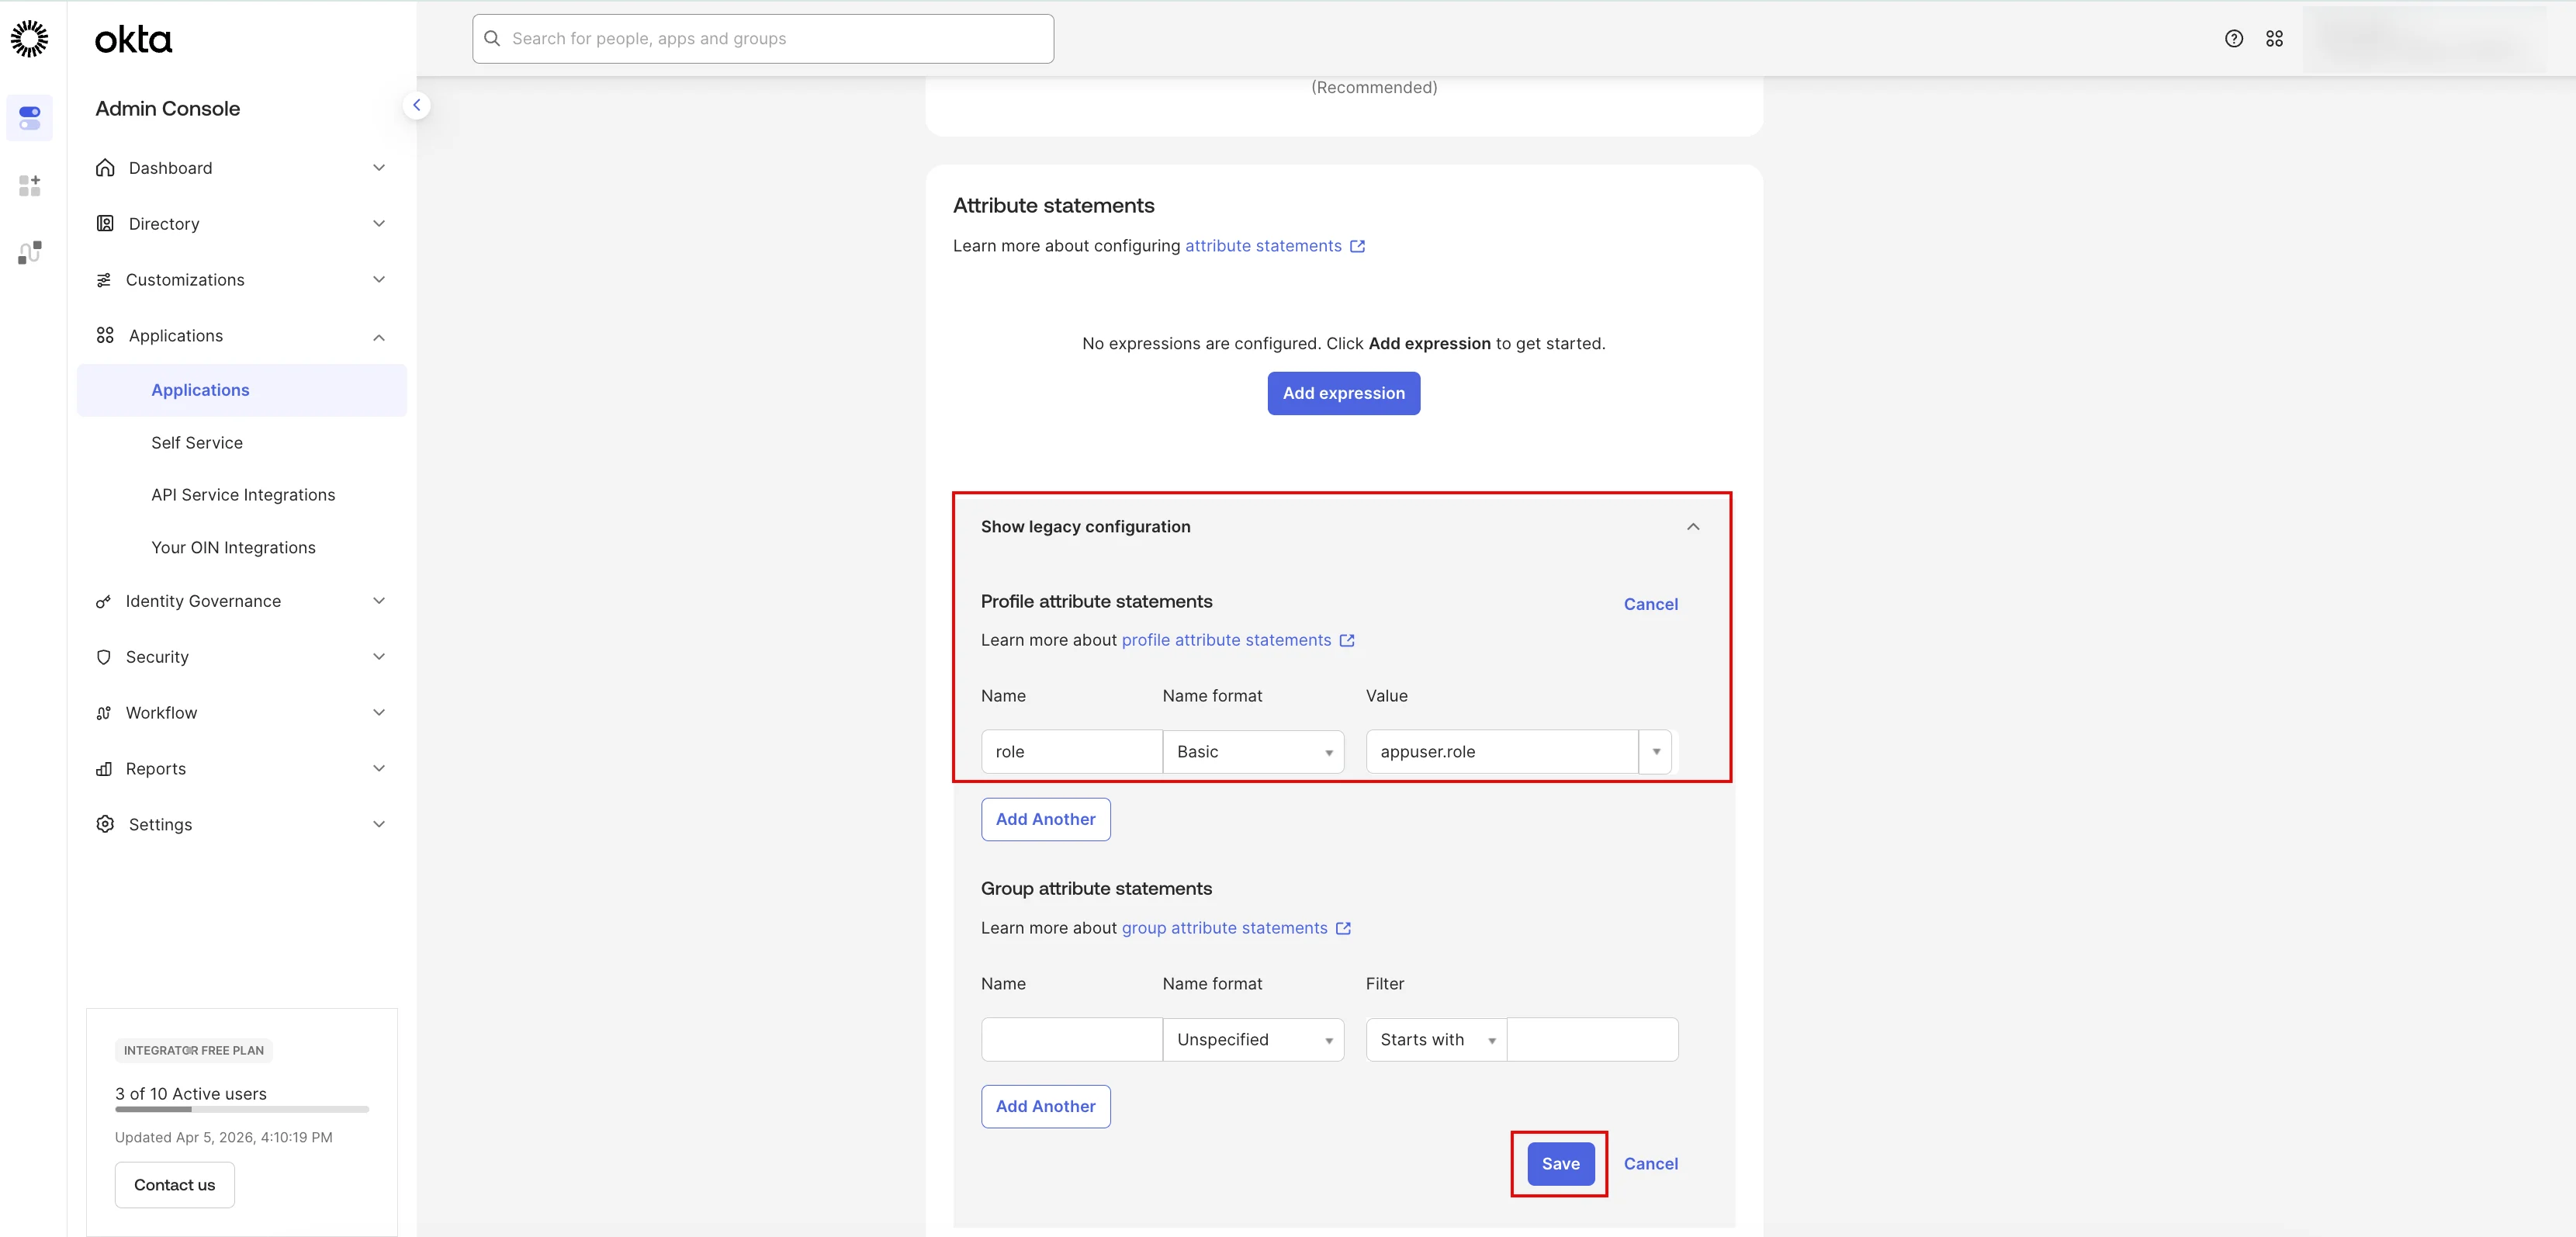
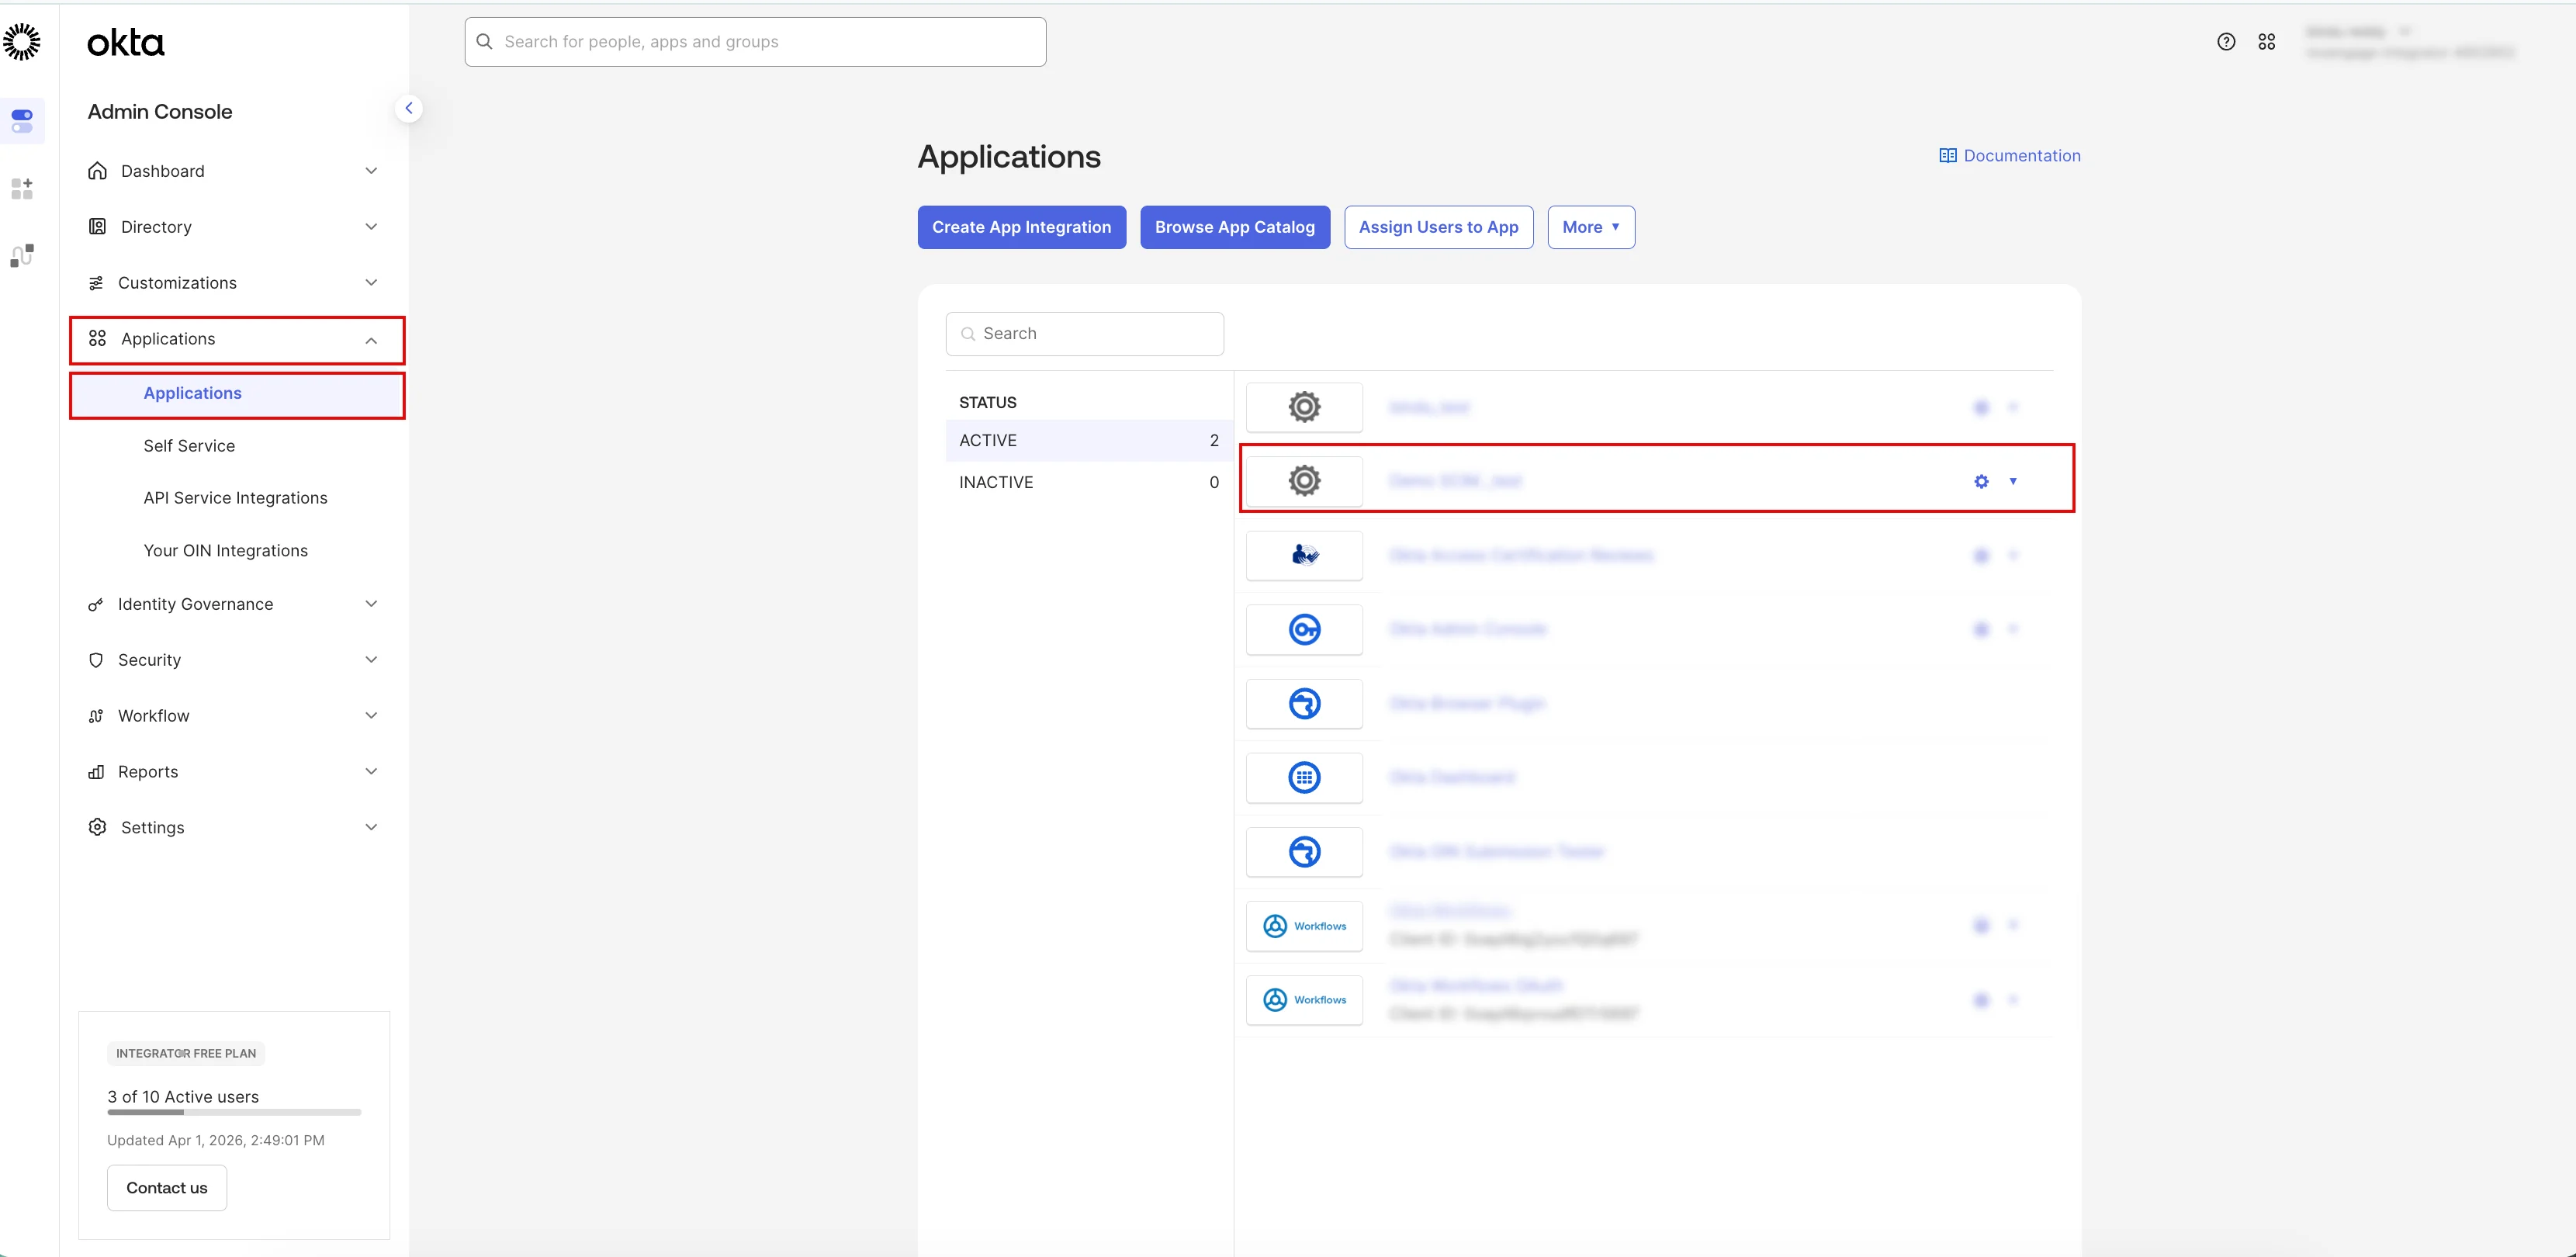 2. Click the **Sign On** tab and scroll down to the **Attribute Statements (Optional)** section.
3. Click **Show legacy configuration** to expand the section.
4. Click **Edit** adjacent to the **Profile attribute statements** section and enter the following details:
| Field | Value |
| ----------- | ------------ |
| Name | role |
| Name format | Basic |
| Value | appuser.role |
5. Click **Save**.
2. Click the **Sign On** tab and scroll down to the **Attribute Statements (Optional)** section.
3. Click **Show legacy configuration** to expand the section.
4. Click **Edit** adjacent to the **Profile attribute statements** section and enter the following details:
| Field | Value |
| ----------- | ------------ |
| Name | role |
| Name format | Basic |
| Value | appuser.role |
5. Click **Save**.
 ## Step 3: Assign the User and Define the Role
1. Navigate to **Applications** > **Applications** and click your MoEngage SSO application.
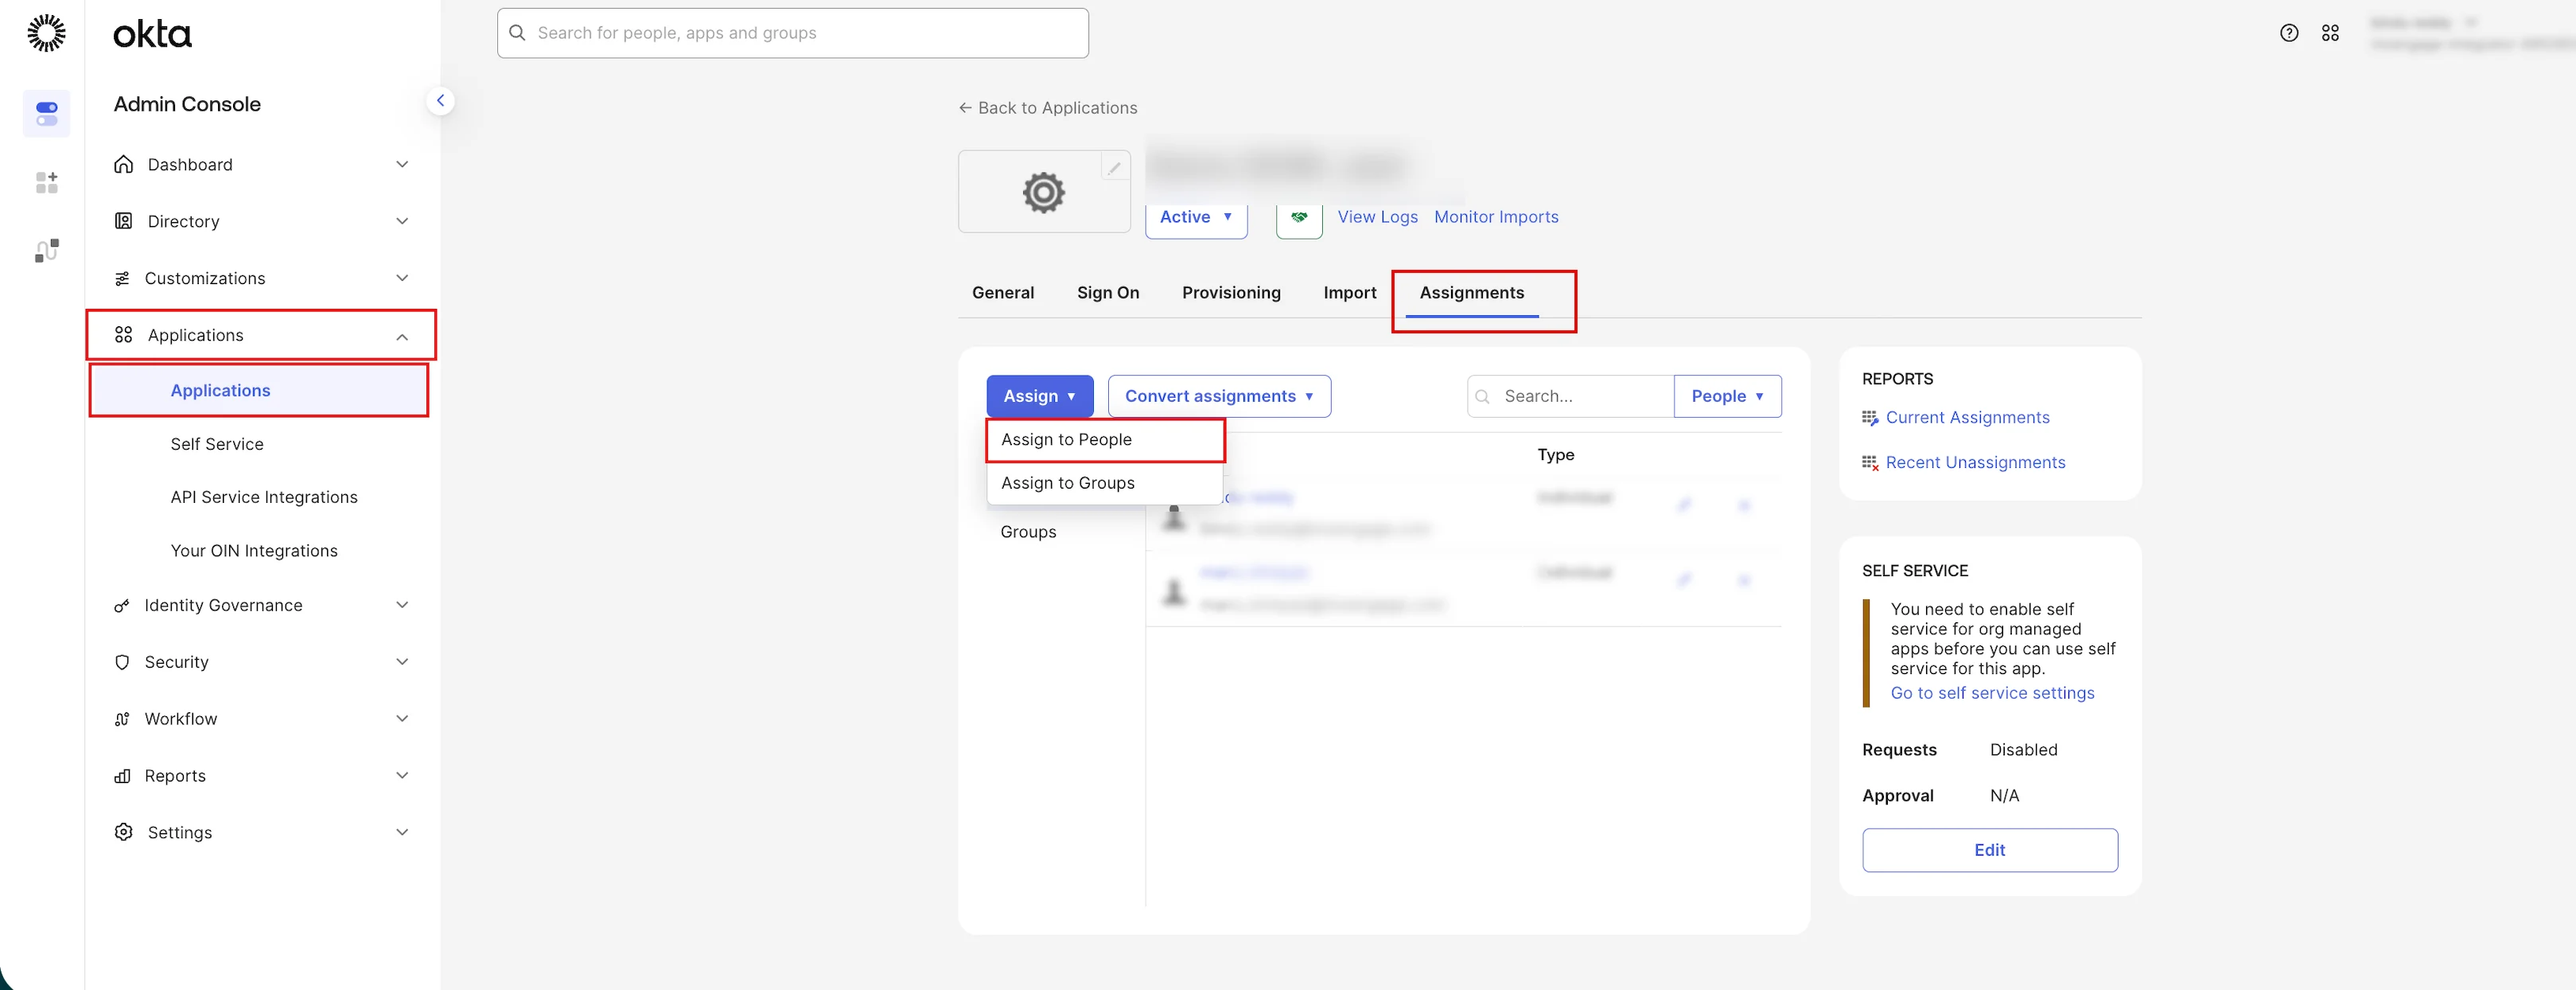
2. On the **Assignments** tab, click **Assign** > **Assign to People**.
## Step 3: Assign the User and Define the Role
1. Navigate to **Applications** > **Applications** and click your MoEngage SSO application.
2. On the **Assignments** tab, click **Assign** > **Assign to People**.
 3. In the **assignment attributes** modal, locate the **Role** field and enter the exact role name (for example, Admin, Manager, Marketer, or a custom role) as defined in your MoEngage workspace.
4. Click **Save and Go Back**, and then click **Done**.
3. In the **assignment attributes** modal, locate the **Role** field and enter the exact role name (for example, Admin, Manager, Marketer, or a custom role) as defined in your MoEngage workspace.
4. Click **Save and Go Back**, and then click **Done**.
 5. To update an existing user:
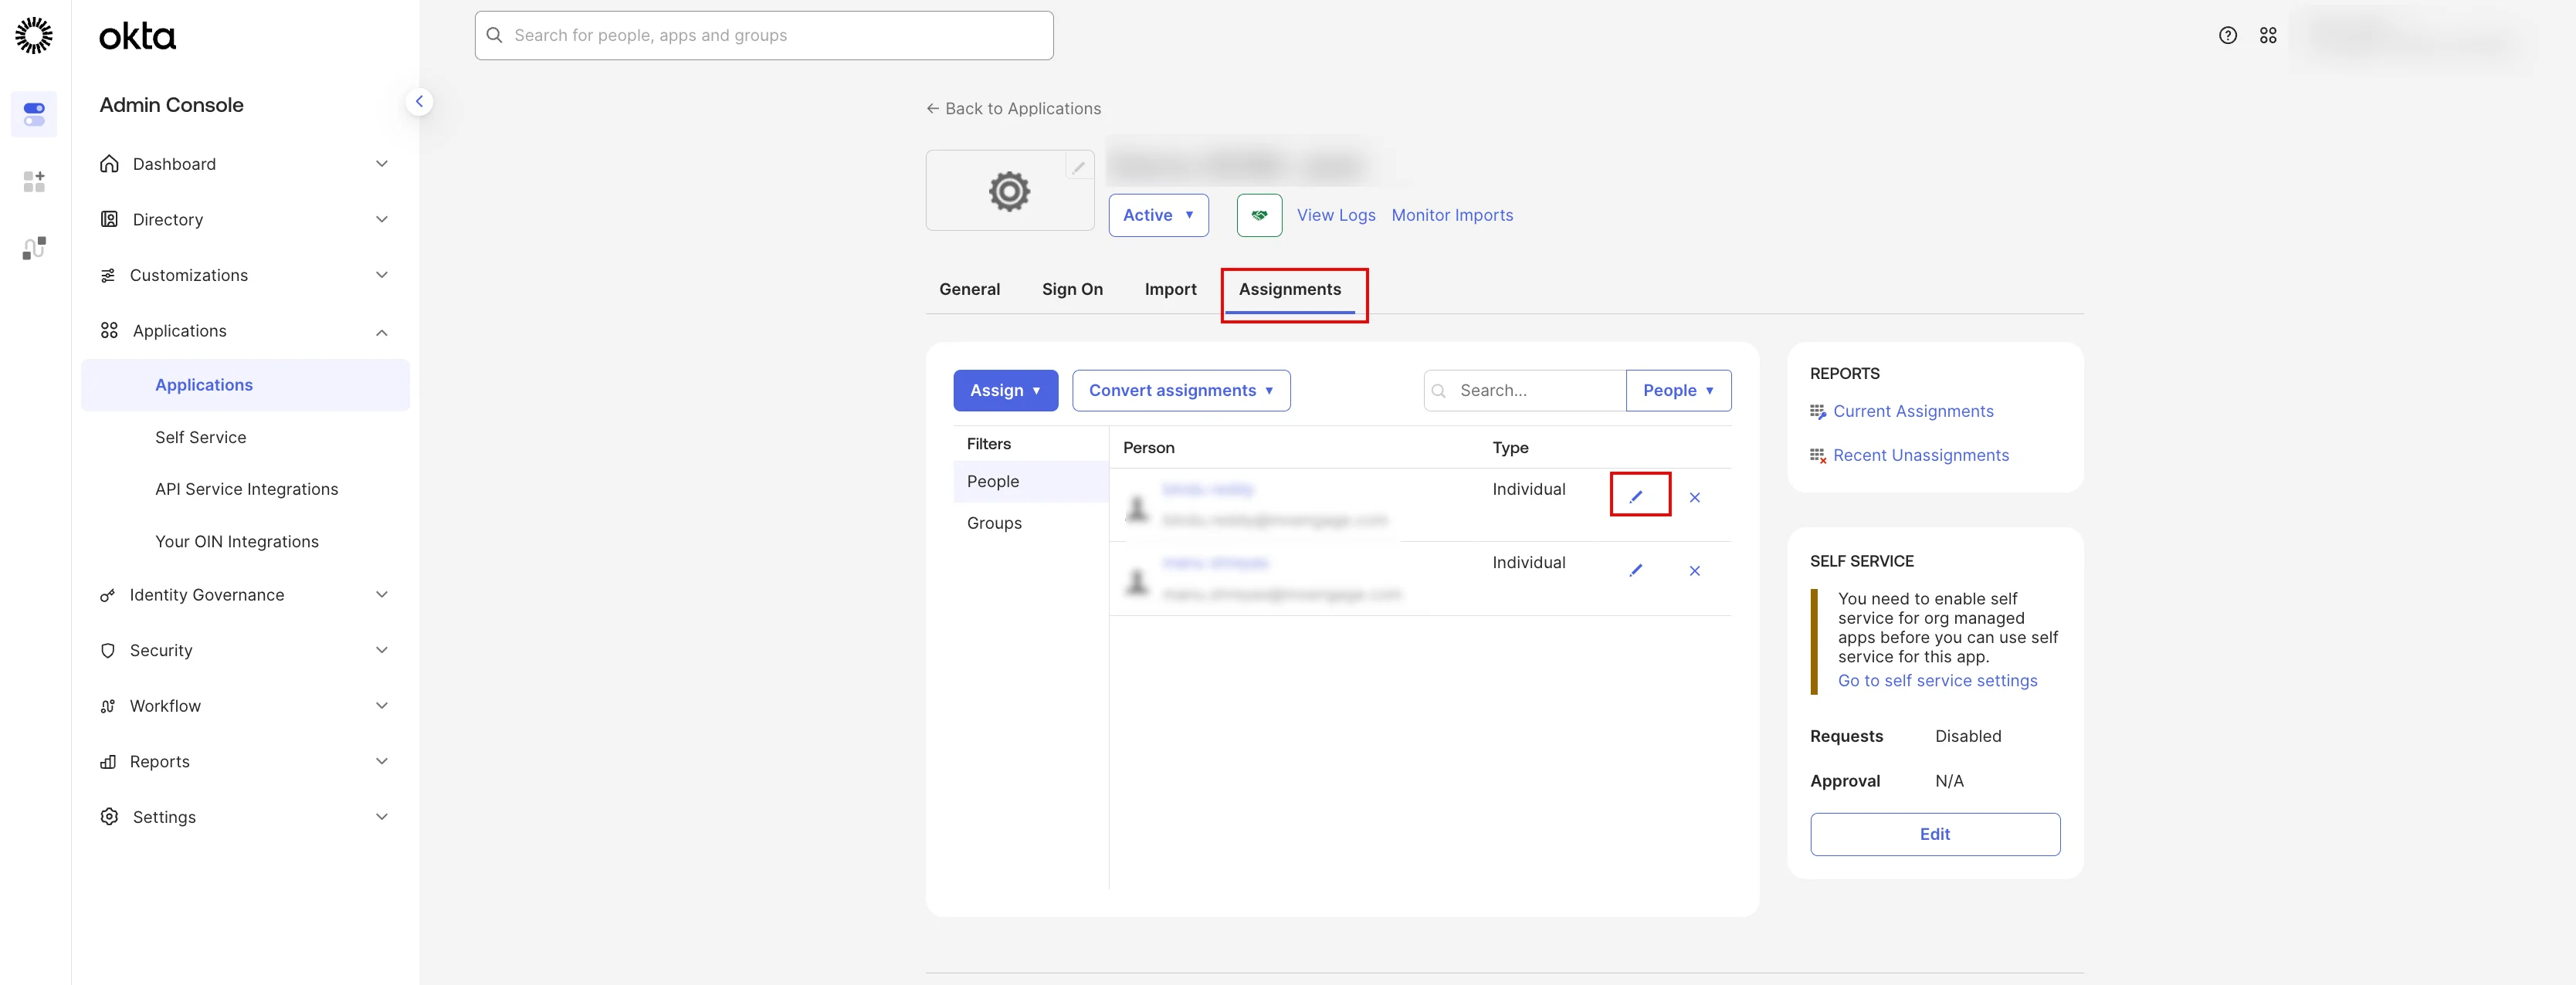
1. In the **Assignments** tab, click the pencil icon
5. To update an existing user:
1. In the **Assignments** tab, click the pencil icon  next to the user.
2. Edit the role and click **Save**.
next to the user.
2. Edit the role and click **Save**.
 ## Step 4: Validation
After the setup is complete, log in to MoEngage through your Identity Provider (IdP). To verify that roles are passed correctly, inspect the ACS payload and confirm that the role attribute contains the expected value as passed in the Identity Provider and defined in MoEngage (for example, Admin). This confirms that users are assigned the appropriate role upon redirection.
## Step 1: Configure Attributes and Claims
1. Navigate to the **Azure Admin Console**.
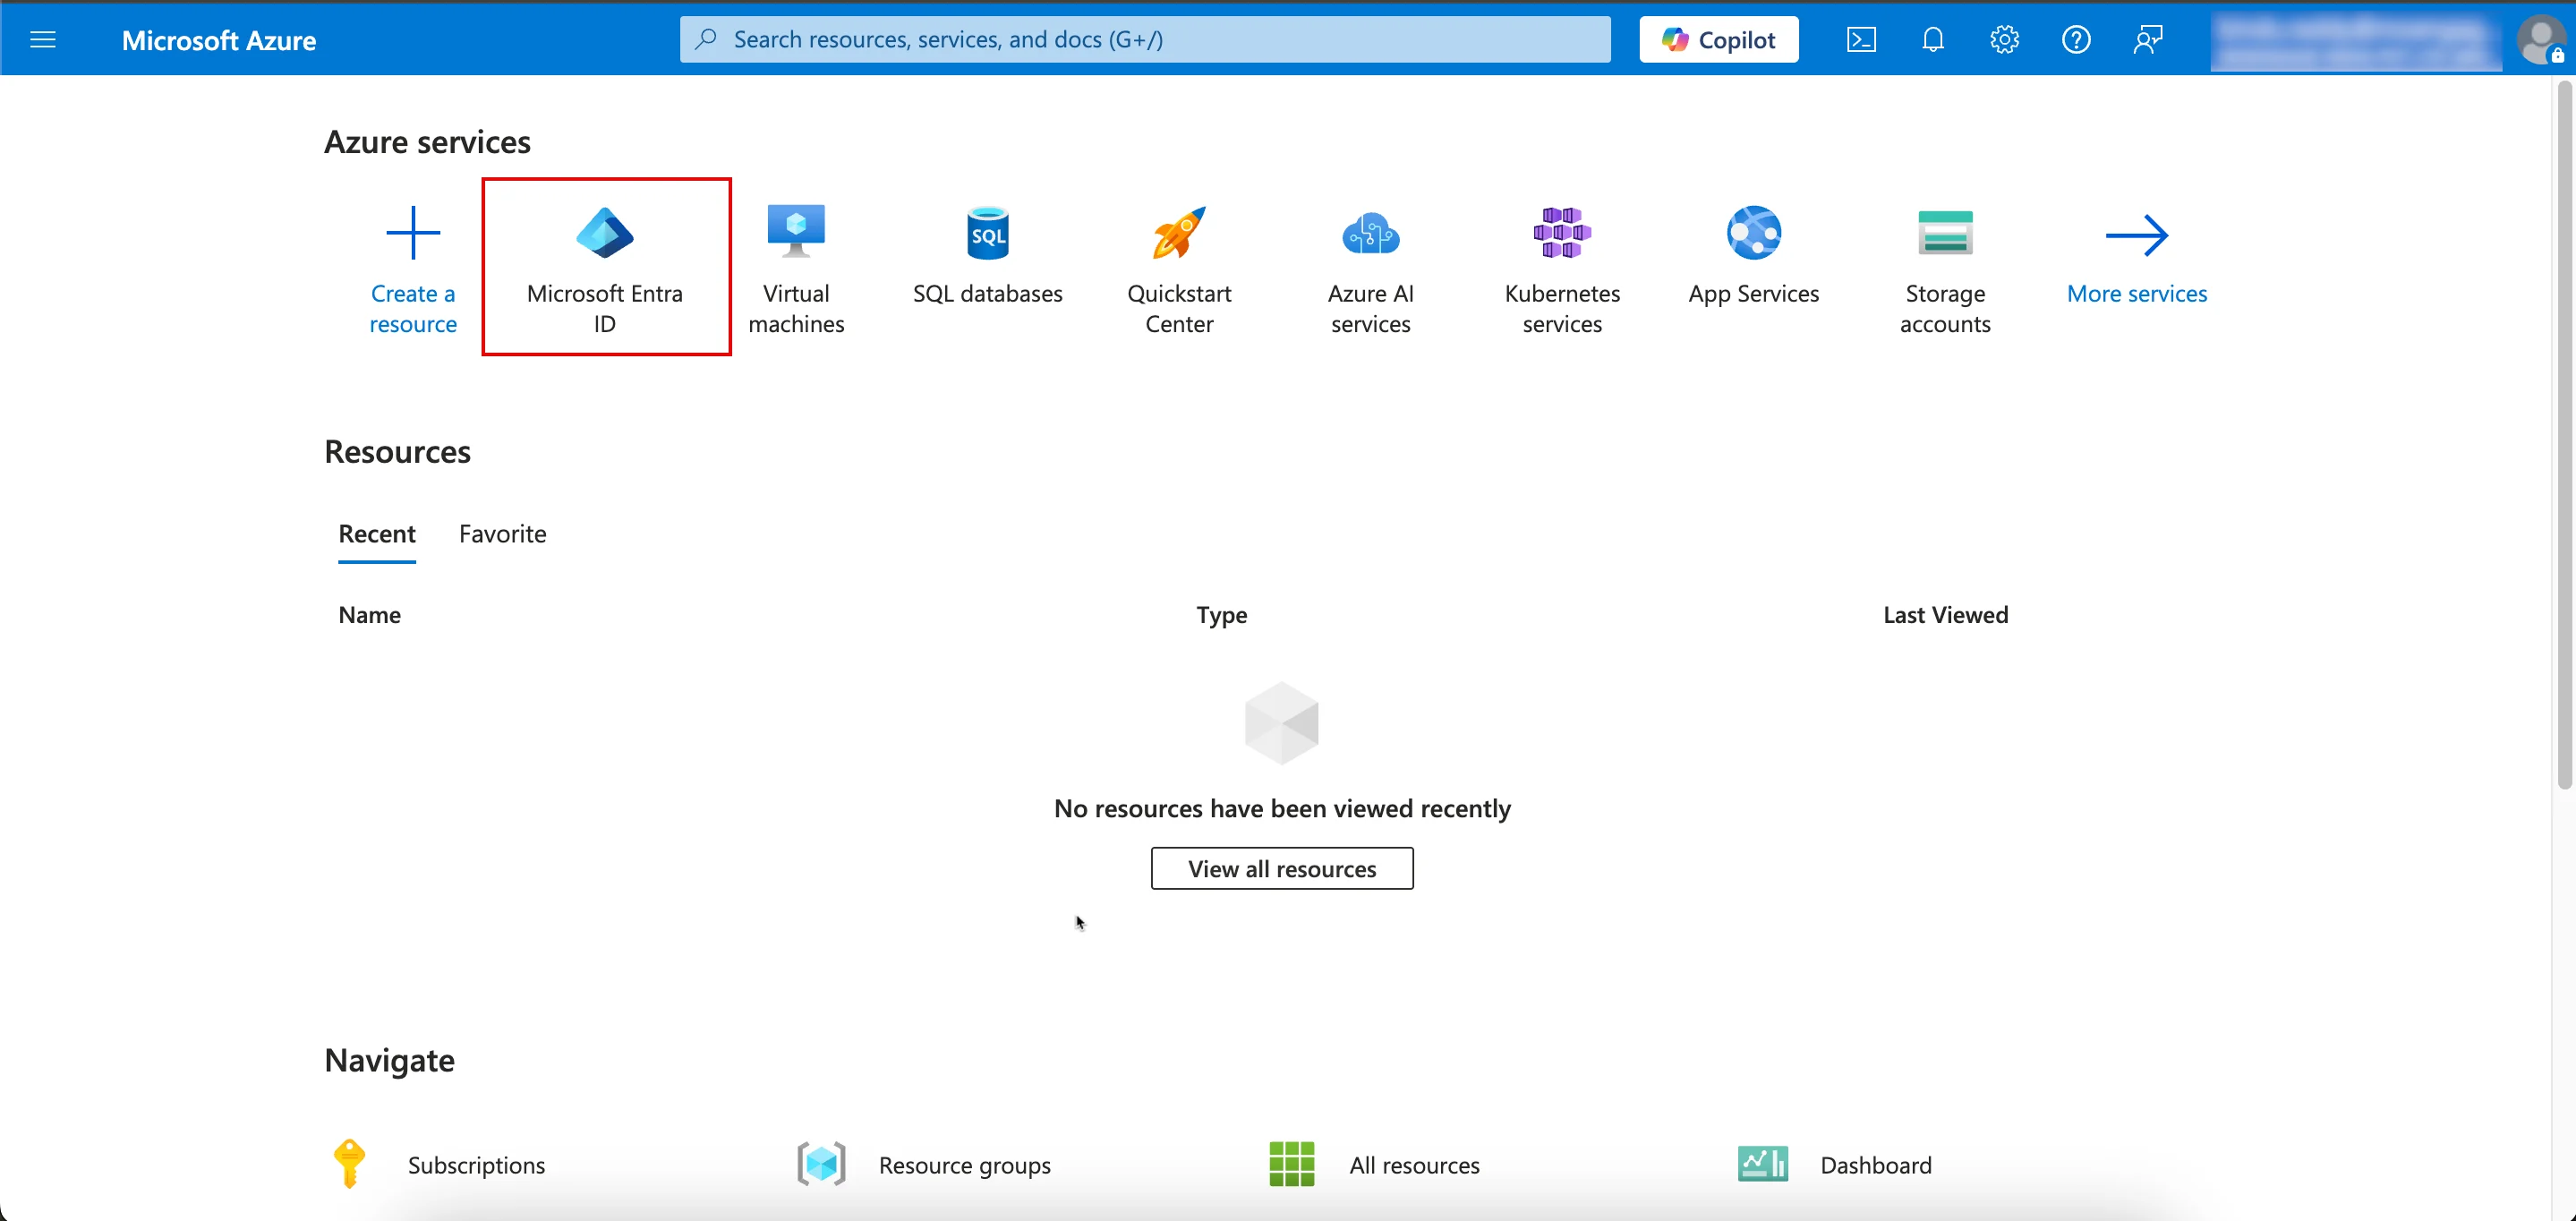
2. On the Azure services page, click **Microsoft Entra ID**.
## Step 4: Validation
After the setup is complete, log in to MoEngage through your Identity Provider (IdP). To verify that roles are passed correctly, inspect the ACS payload and confirm that the role attribute contains the expected value as passed in the Identity Provider and defined in MoEngage (for example, Admin). This confirms that users are assigned the appropriate role upon redirection.
## Step 1: Configure Attributes and Claims
1. Navigate to the **Azure Admin Console**.
2. On the Azure services page, click **Microsoft Entra ID**.
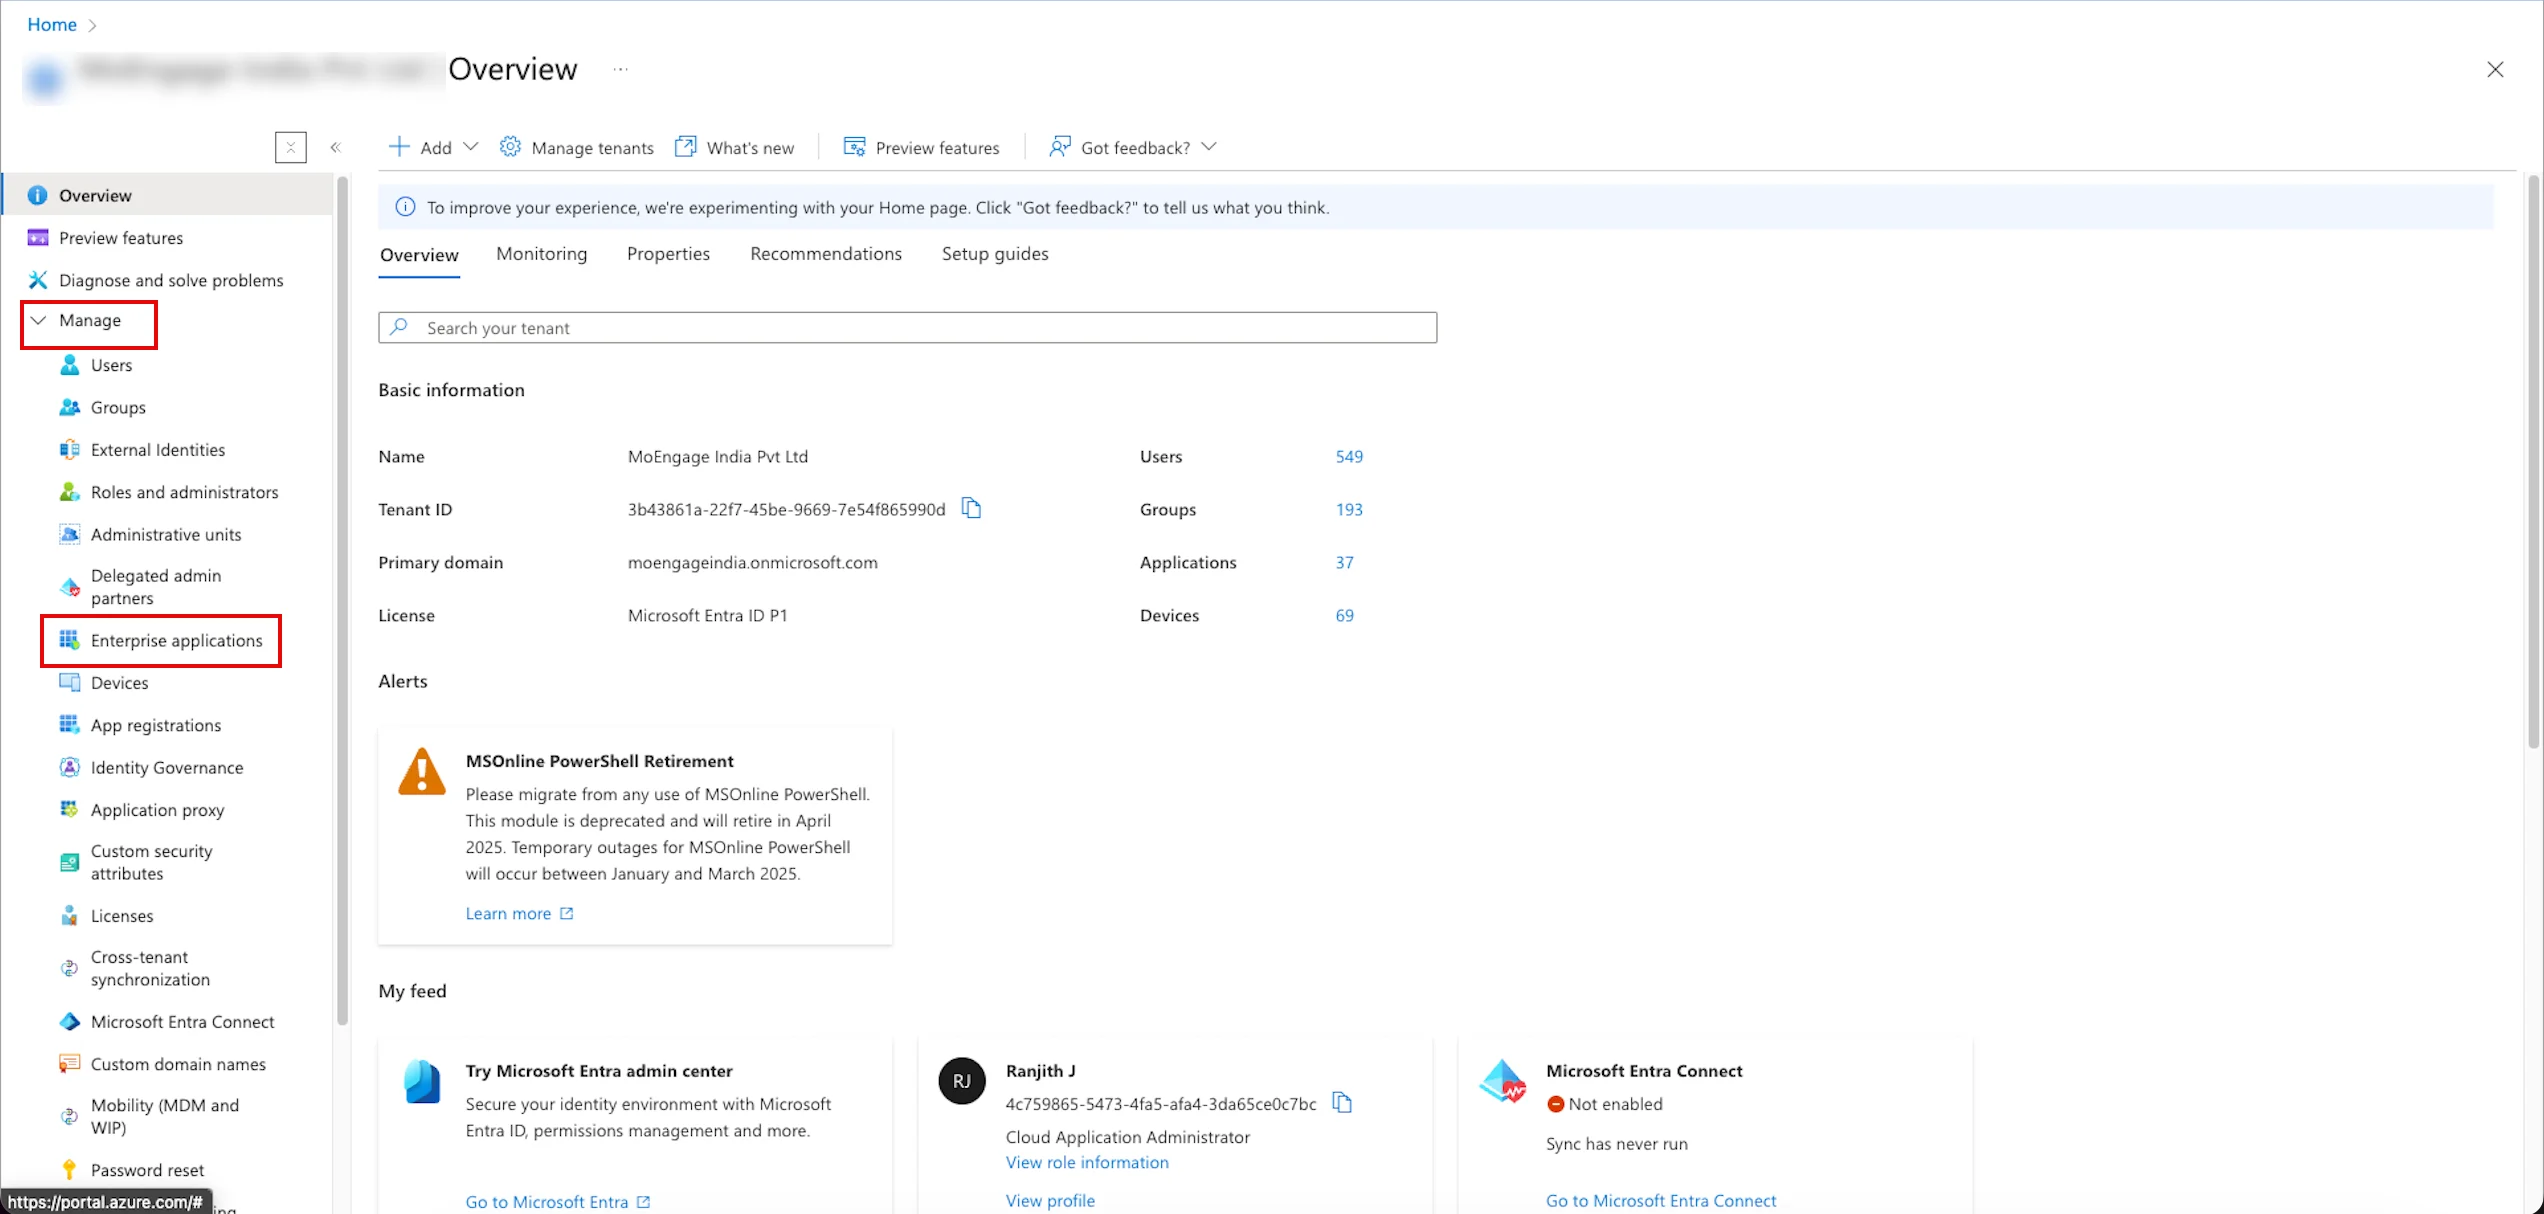
 3. On the **Overview** page, go to the left navigation menu and click **Manage** > **Enterprise applications**.
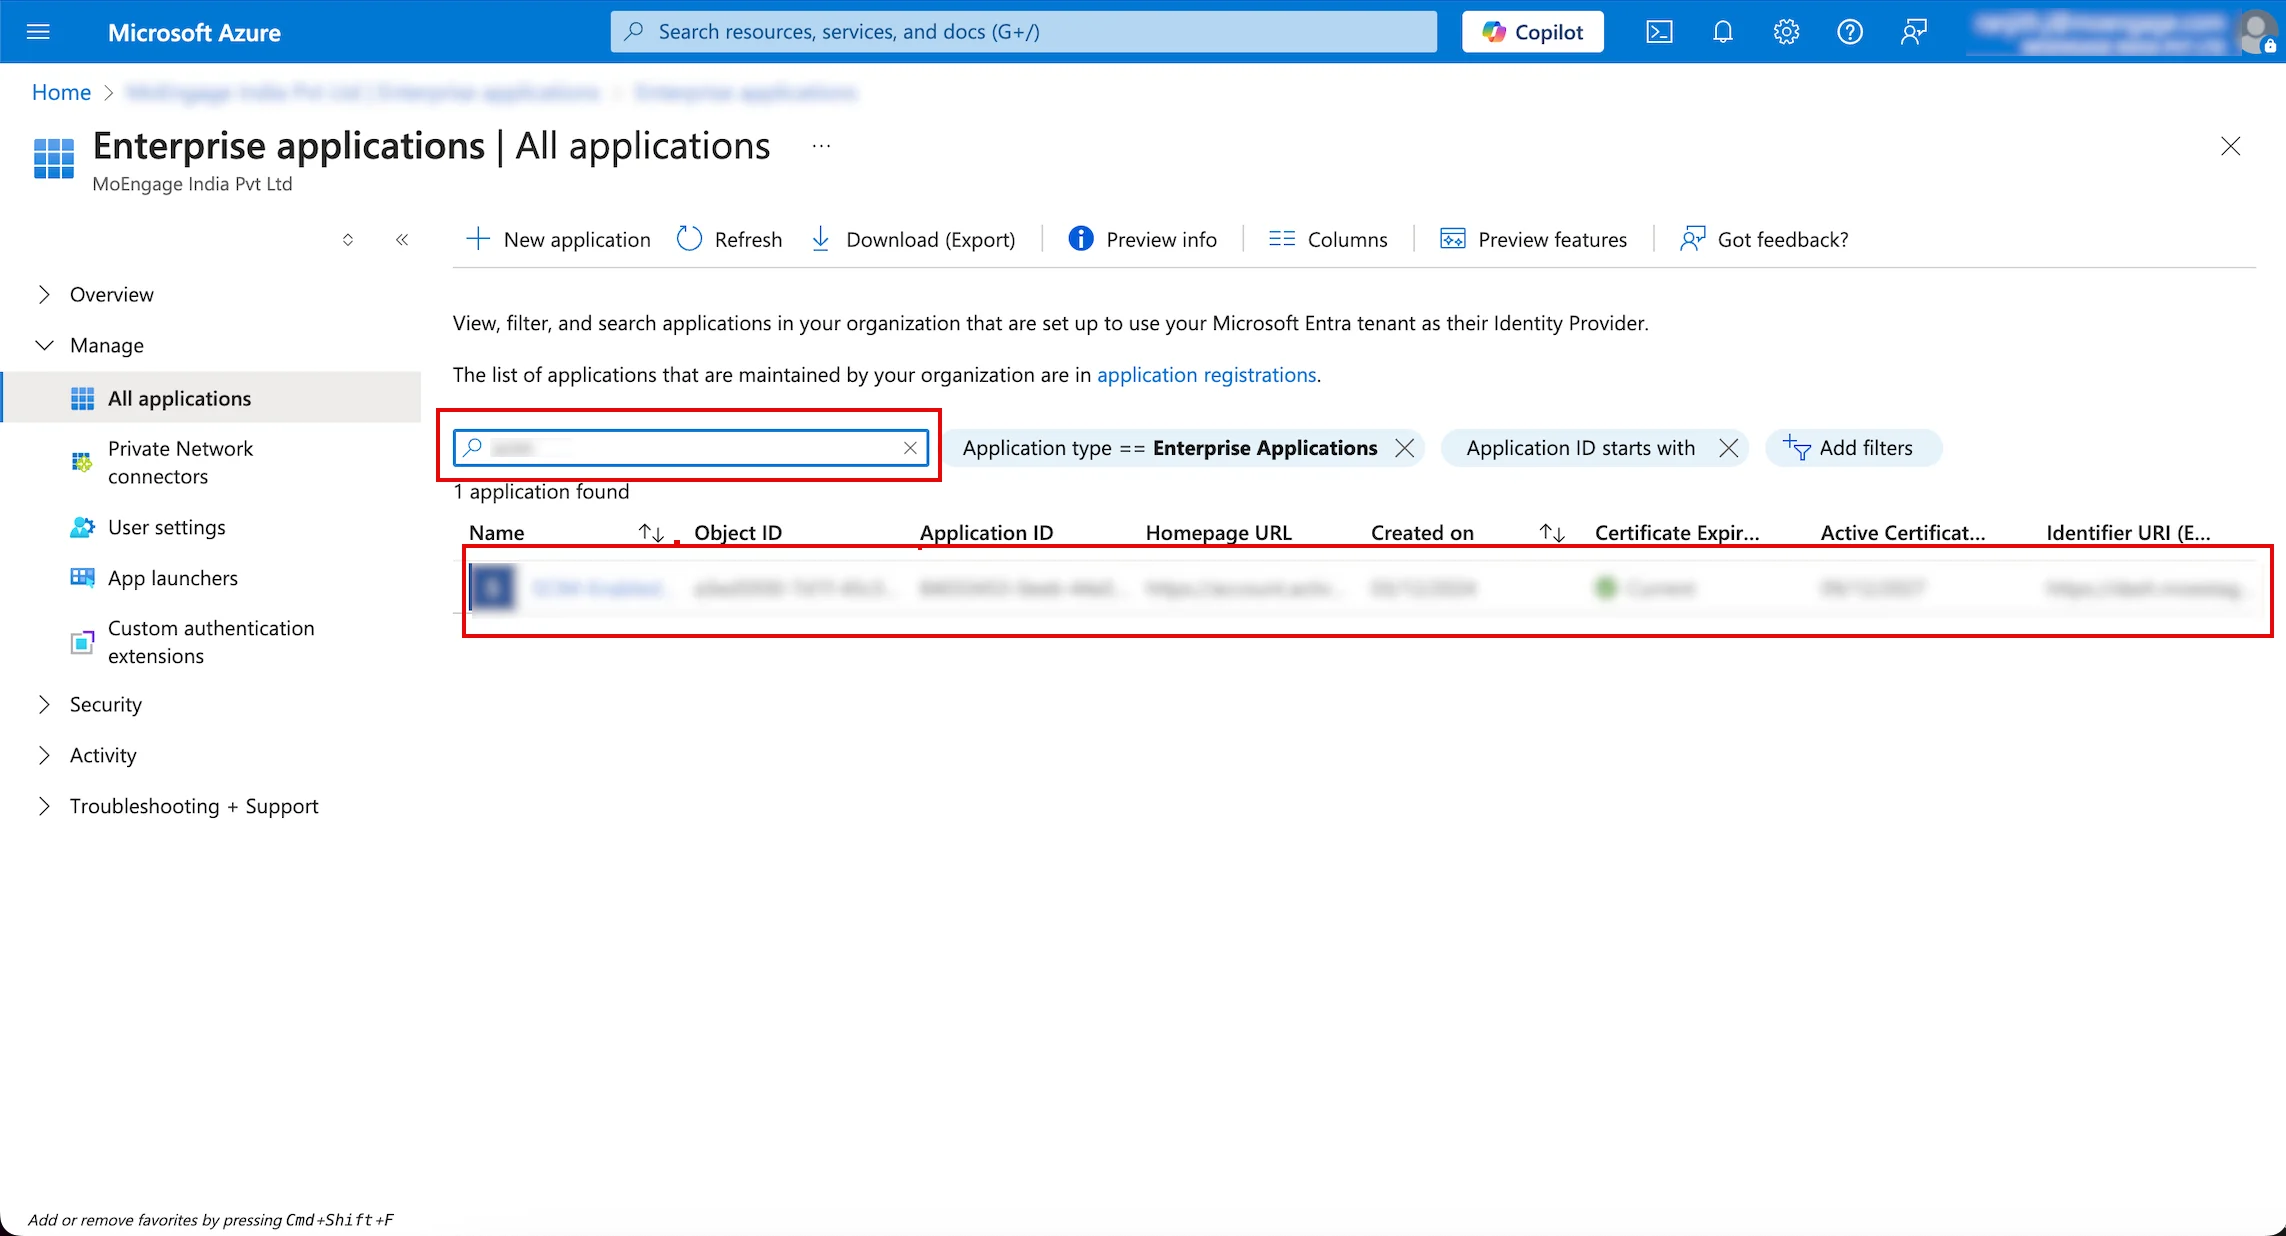
 4. On the **Enterprise applications | All applications** page, find your application in the list or use the **Search by application name or object ID** box to find it, and select the application you want to configure.
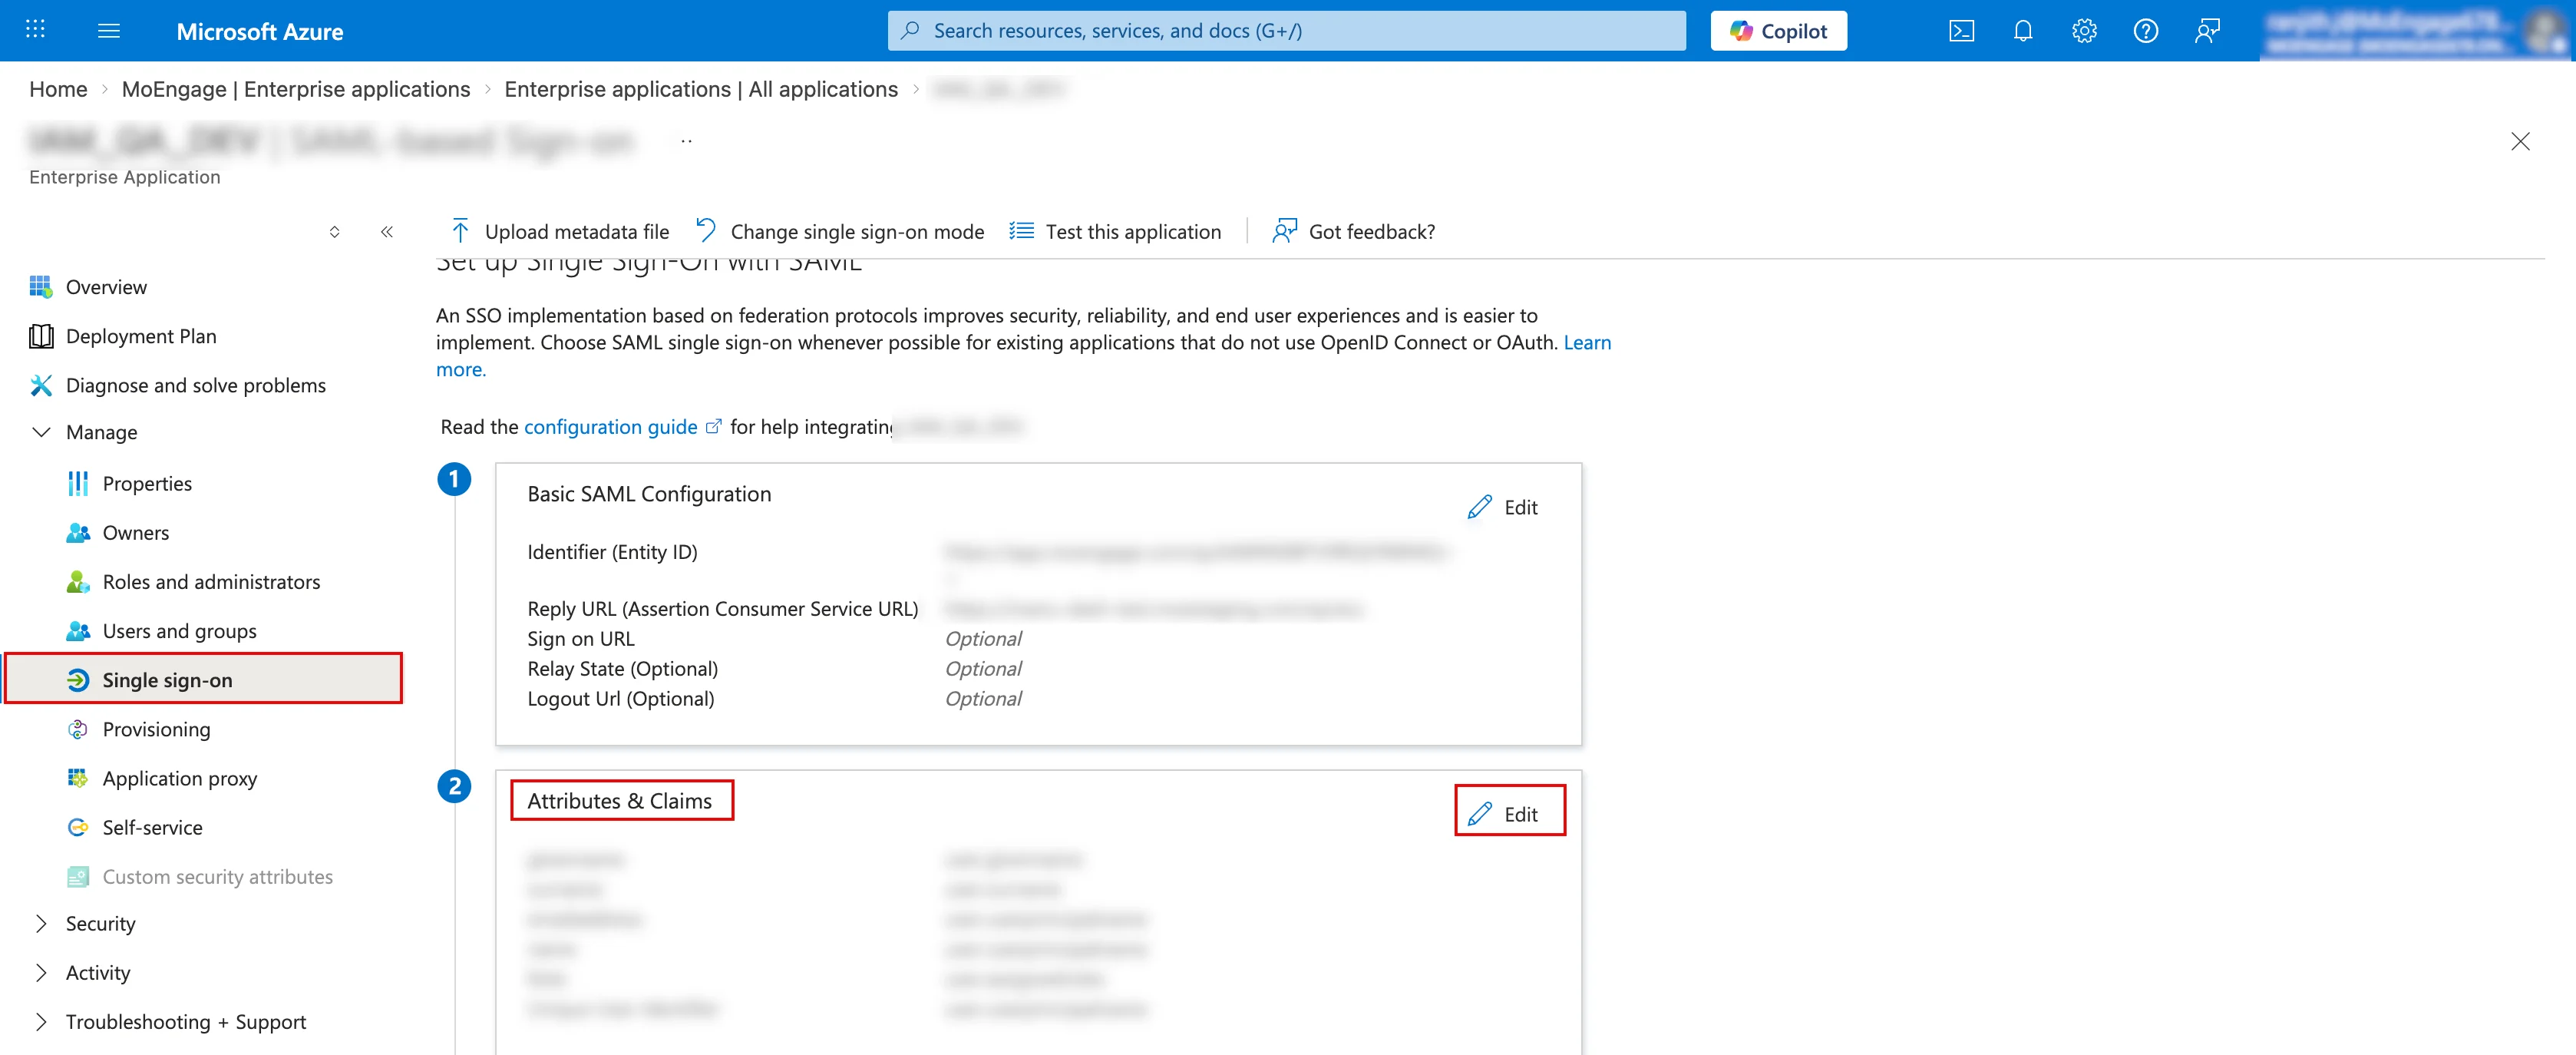
 5. On the left navigation menu, click **Single sign-on** and then click **Edit** in the **Attributes & Claims** section.
 6. On the **Attributes & Claims** page, click **Add new claim**.
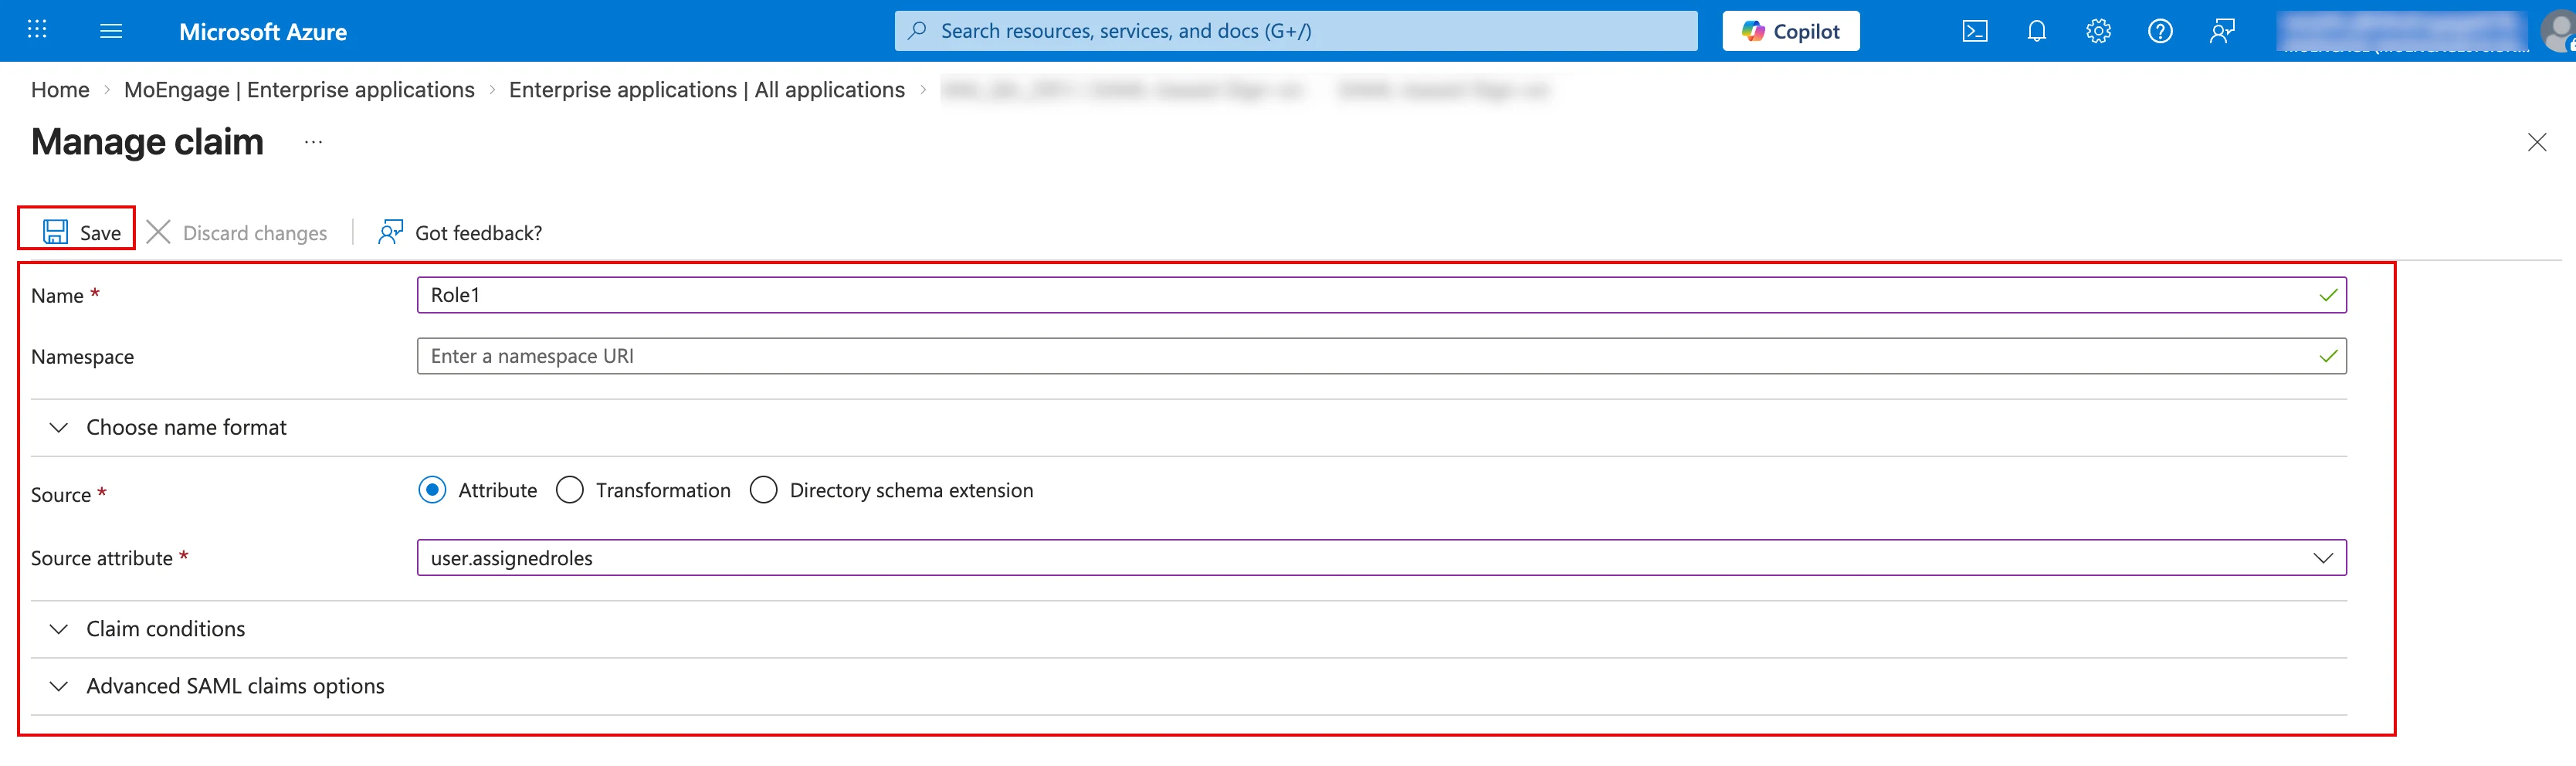
7. On the **Manage claim** page, enter the following details:
| Field | Required | Value |
| ---------------- | -------- | ------------------------------------------------------------------------------------------------ |
| Name | Yes | Any value can be entered here (for example, role).
6. On the **Attributes & Claims** page, click **Add new claim**.
7. On the **Manage claim** page, enter the following details:
| Field | Required | Value |
| ---------------- | -------- | ------------------------------------------------------------------------------------------------ |
| Name | Yes | Any value can be entered here (for example, role).
**Note**: The claim name must be unique. |
| Name format | Optional | Leave it blank. |
| Source | Yes | Select the **Attribute** option (this is selected by default). |
| Source attribute | Yes | Click **user.assignedroles** in the drop-down list. |
8. Click **Save**.
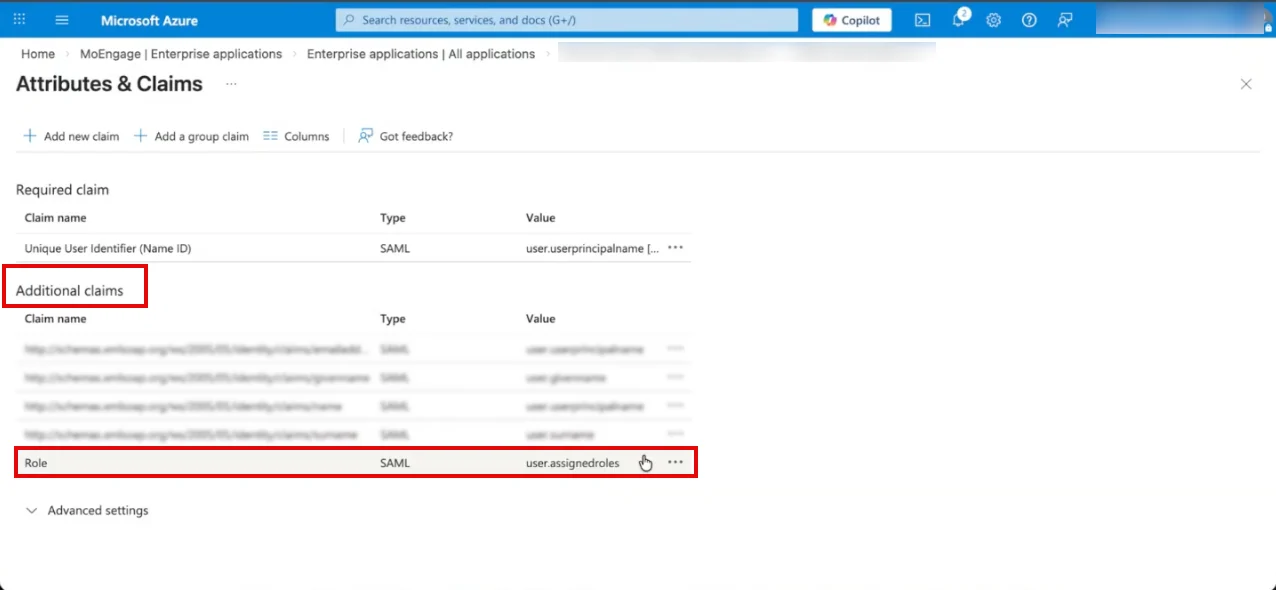
 9. After you click **Save**, verify that the Role claim appears in the **Additional claims** list with the value **user.assignedroles**.
 ## Step 2: Assign Users and Roles
Follow the steps mentioned in [Role Creation](/user-guide/settings/account/security/system-for-cross-domain-identity-management-scim#step-5-role-creation) (Step 5) of the SCIM documentation before proceeding with the steps below:
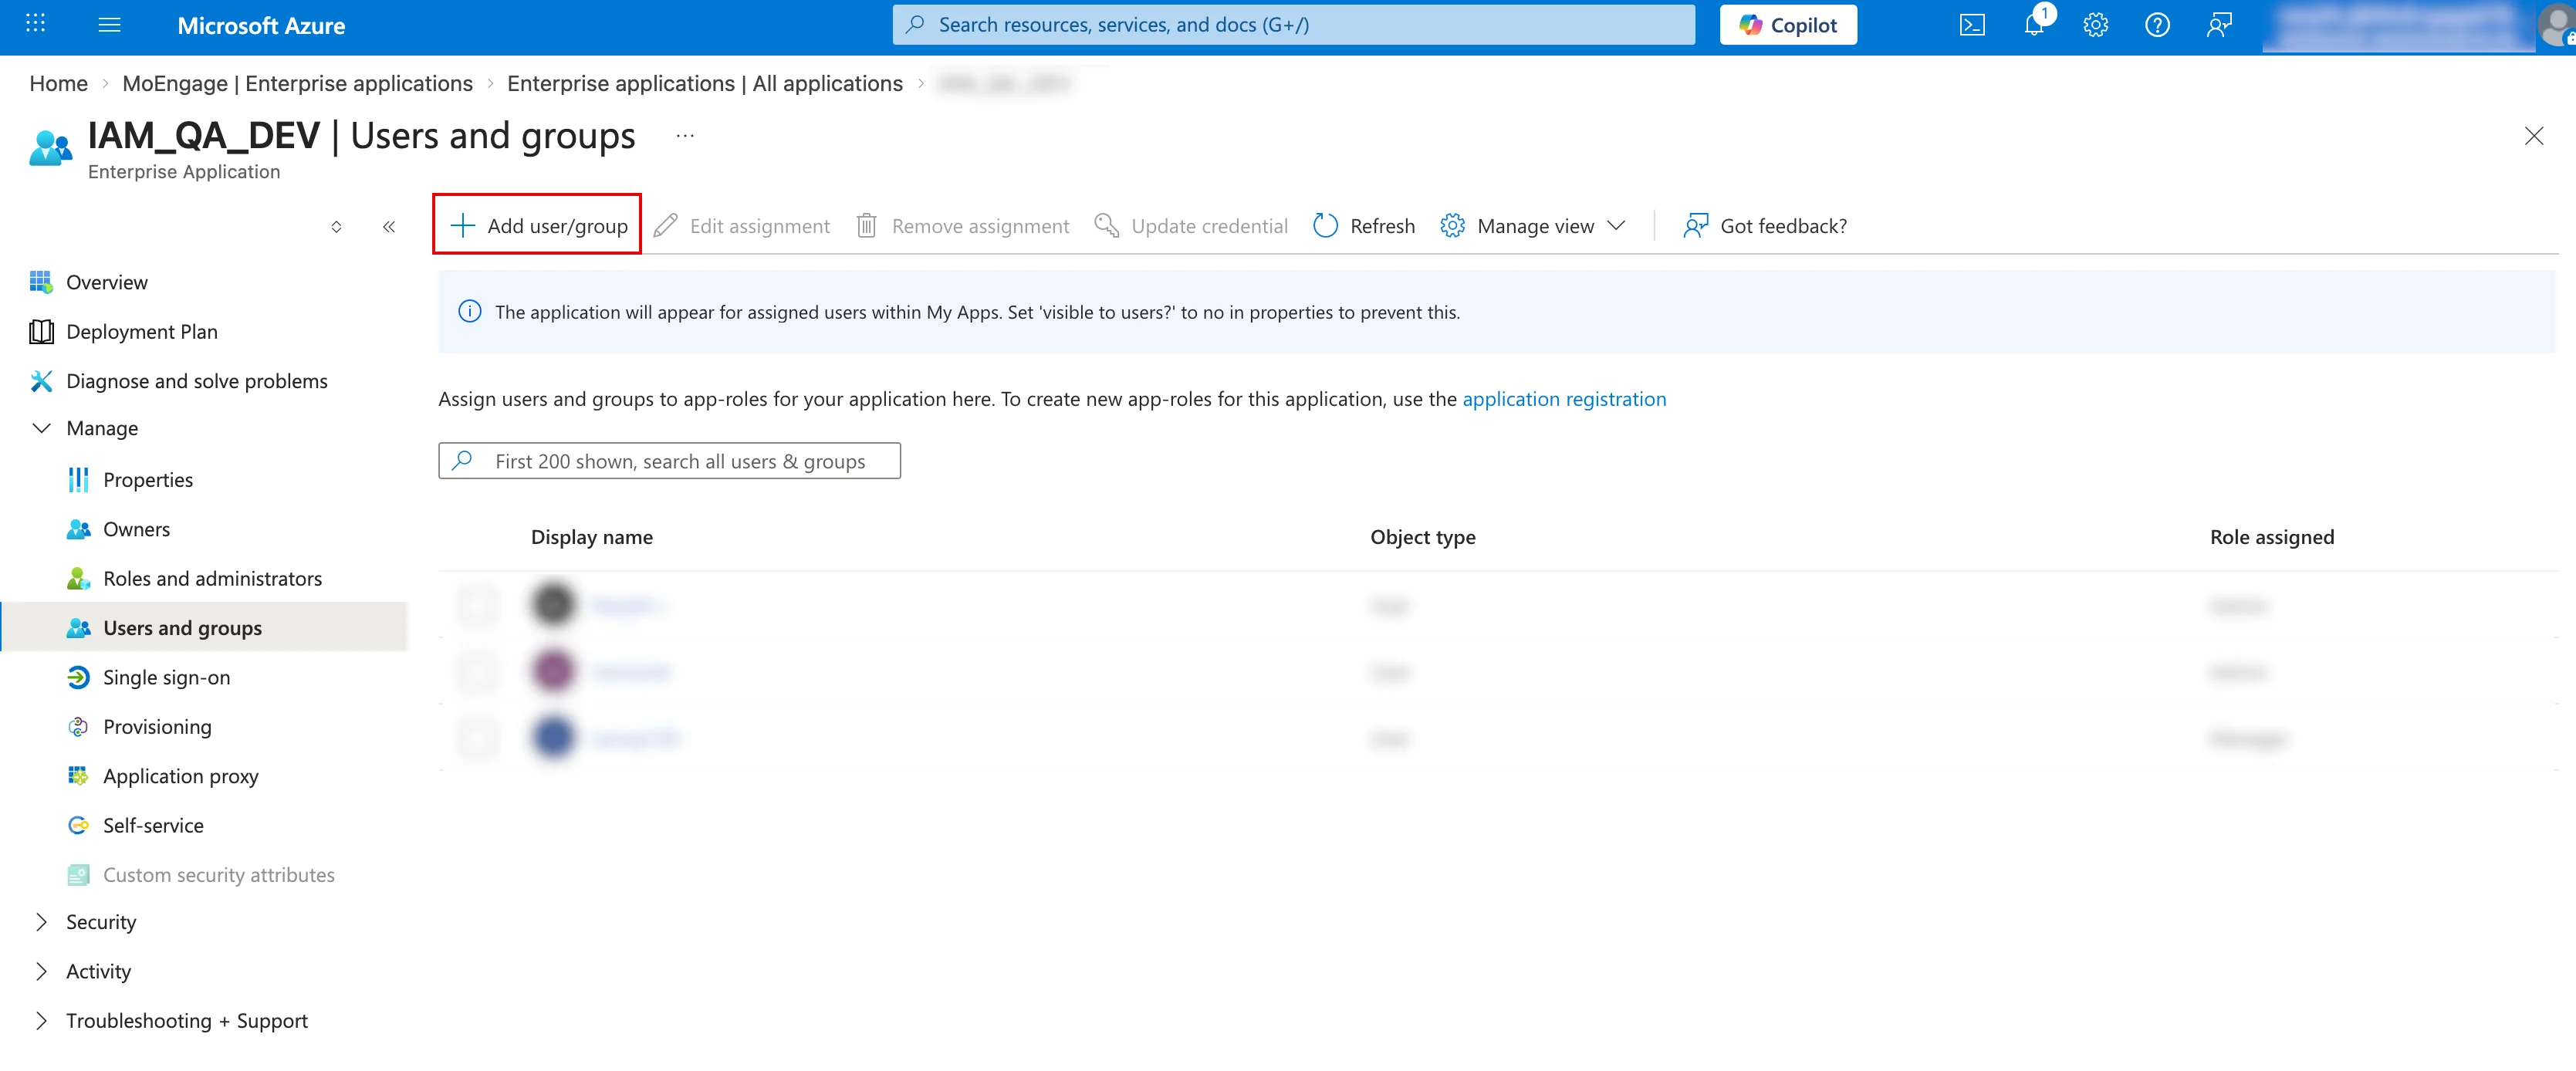
1. Go back to the **Enterprise applications | All applications** page, and click **Users and groups**.
2. Click **Add user/group**.
## Step 2: Assign Users and Roles
Follow the steps mentioned in [Role Creation](/user-guide/settings/account/security/system-for-cross-domain-identity-management-scim#step-5-role-creation) (Step 5) of the SCIM documentation before proceeding with the steps below:
1. Go back to the **Enterprise applications | All applications** page, and click **Users and groups**.
2. Click **Add user/group**.
 \
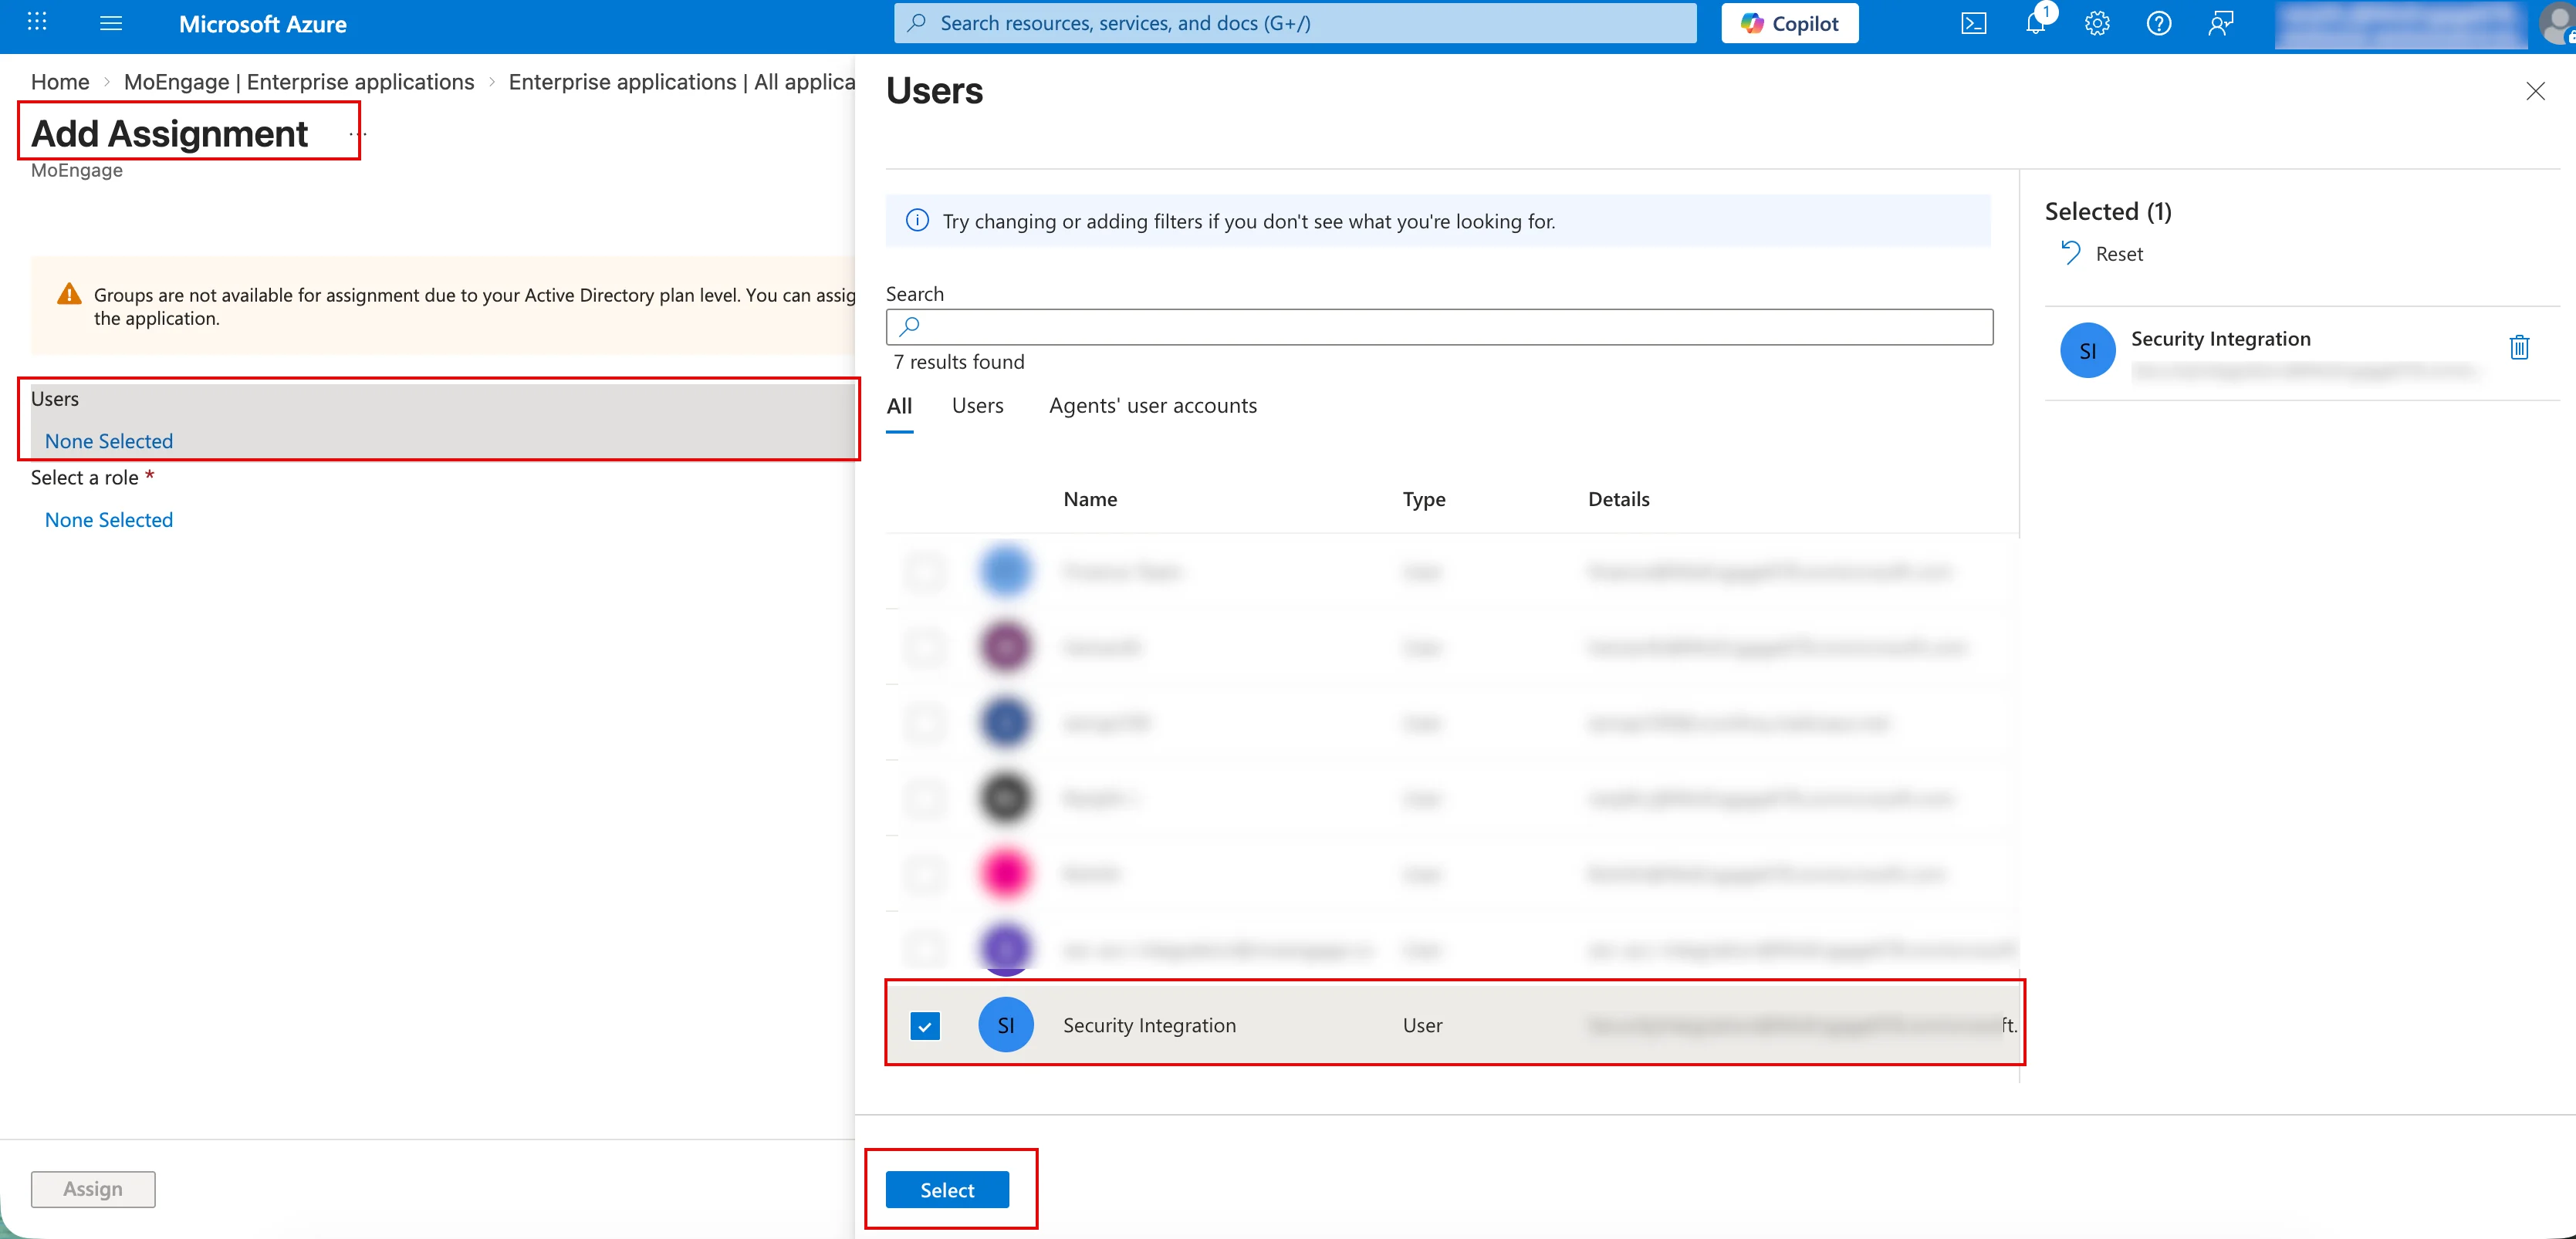
The **Add Assignment** page appears.
3. Under **Users**, click the **None Selected** link. The **Users** dialog box pane appears on the right side.
4. Select the required user checkbox (for example, Security Integration) and click **Select**.
\
The **Add Assignment** page appears.
3. Under **Users**, click the **None Selected** link. The **Users** dialog box pane appears on the right side.
4. Select the required user checkbox (for example, Security Integration) and click **Select**.
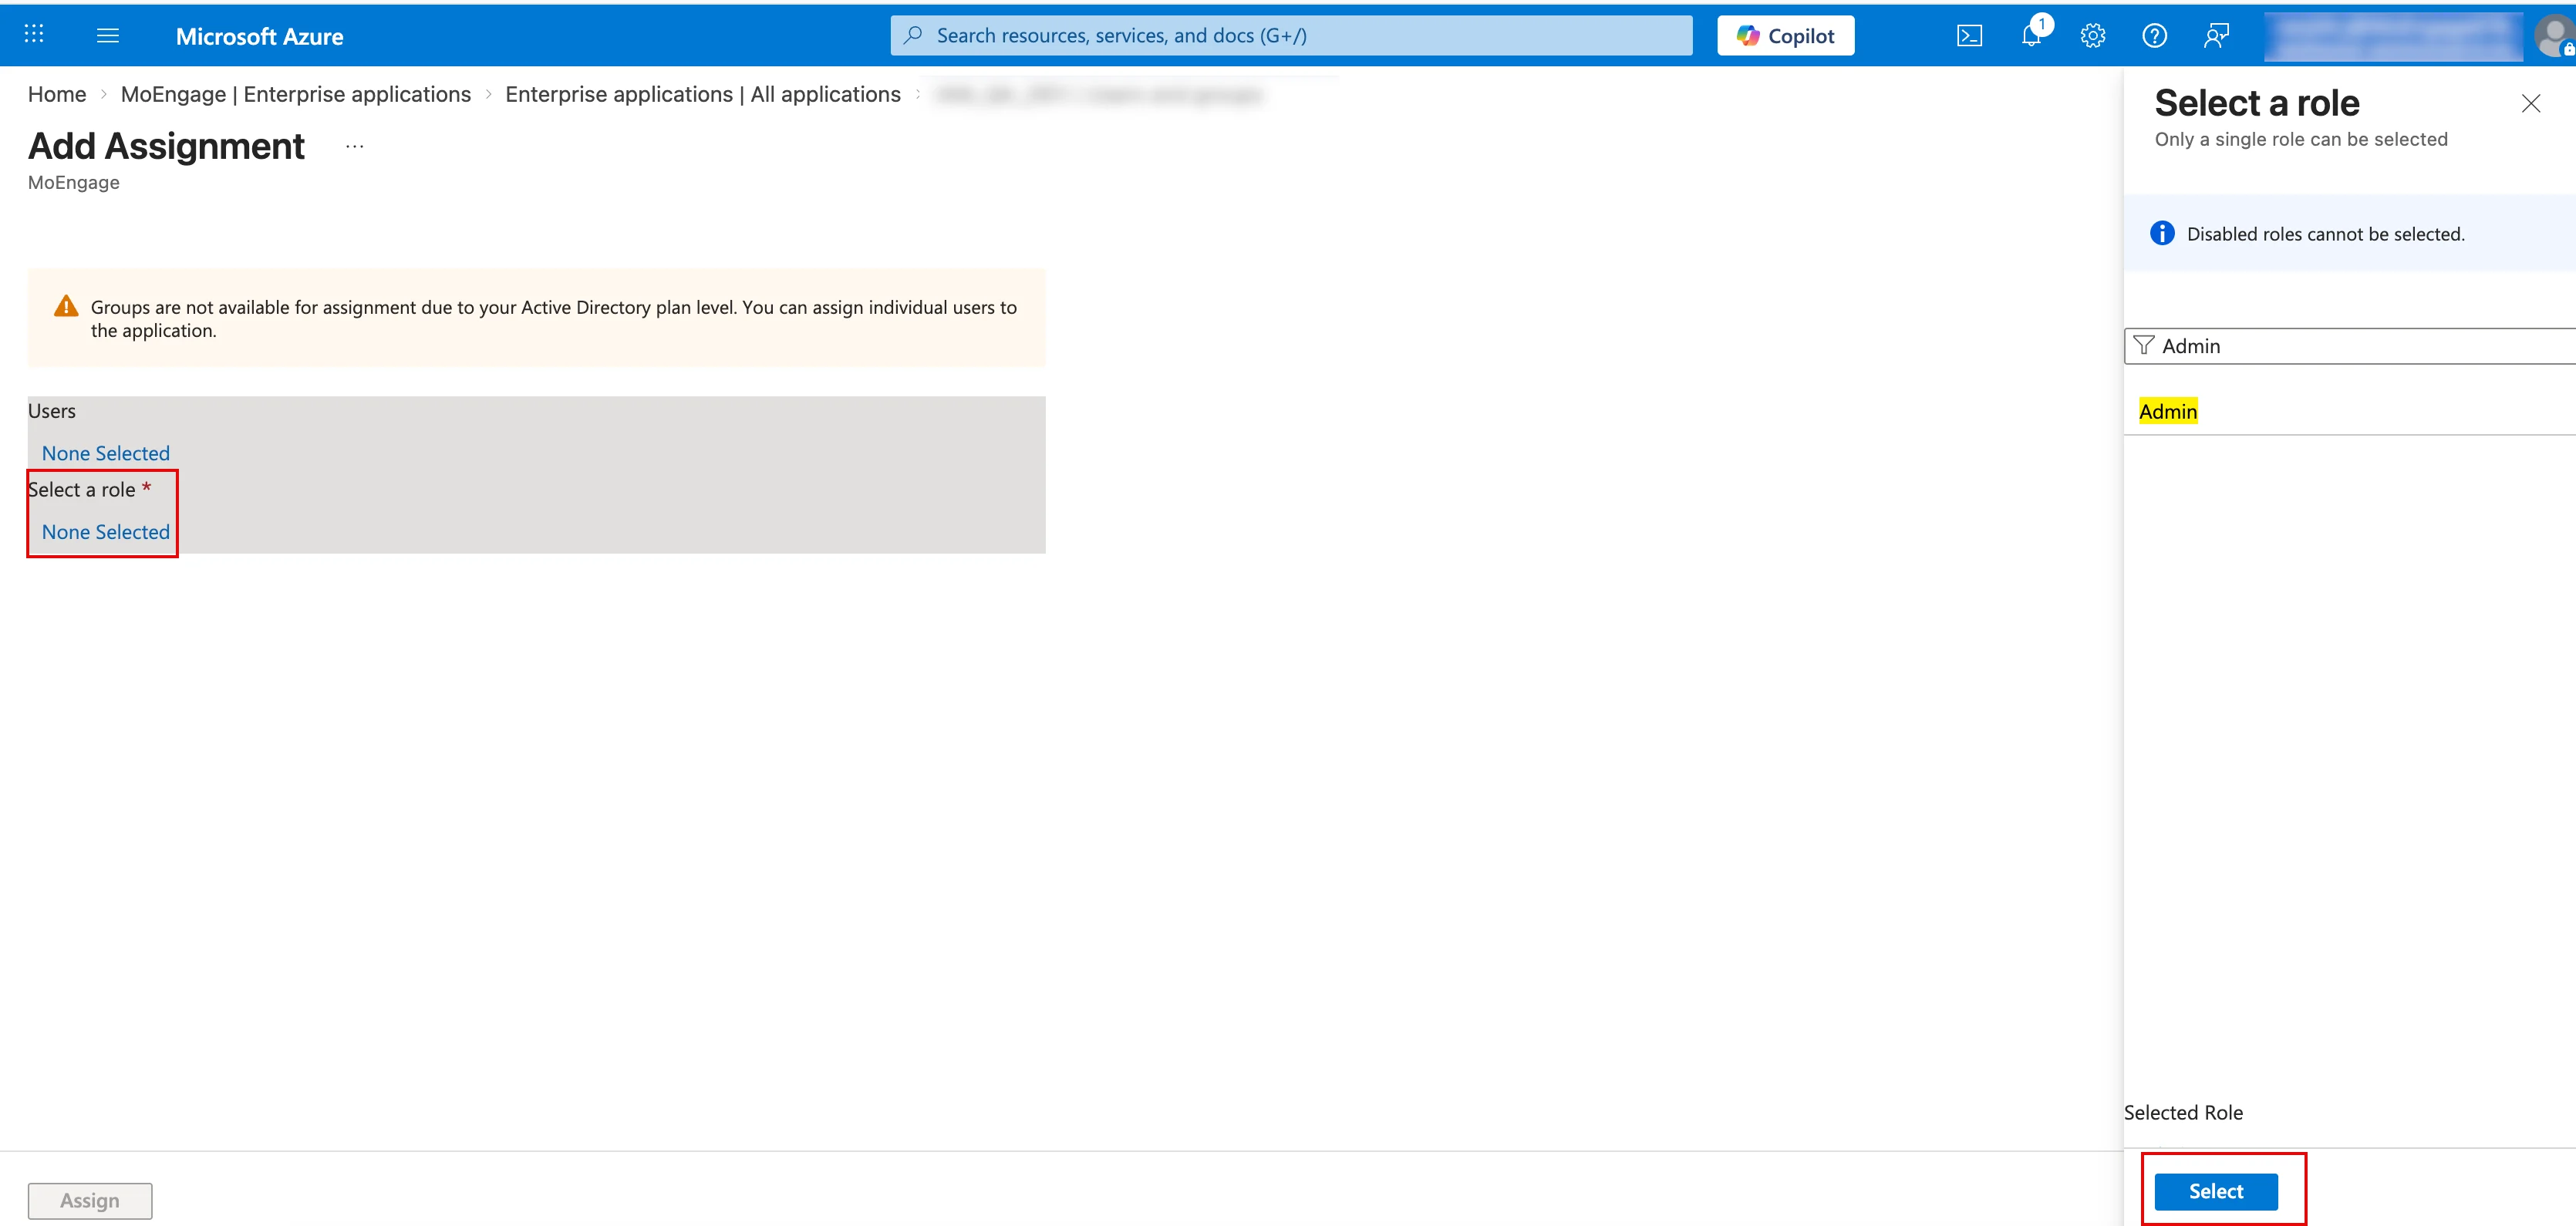
 5. Under **Select a role**, click the **None Selected** link. The **Select a role** dialog box pane appears on the right side.
6. In the **Enter role name to filter items** box, type the appropriate role (for example, Analyst or Admin) and click **Select**.
5. Under **Select a role**, click the **None Selected** link. The **Select a role** dialog box pane appears on the right side.
6. In the **Enter role name to filter items** box, type the appropriate role (for example, Analyst or Admin) and click **Select**.
 7. Click **Assign** at the bottom of the **Add Assignment** page.
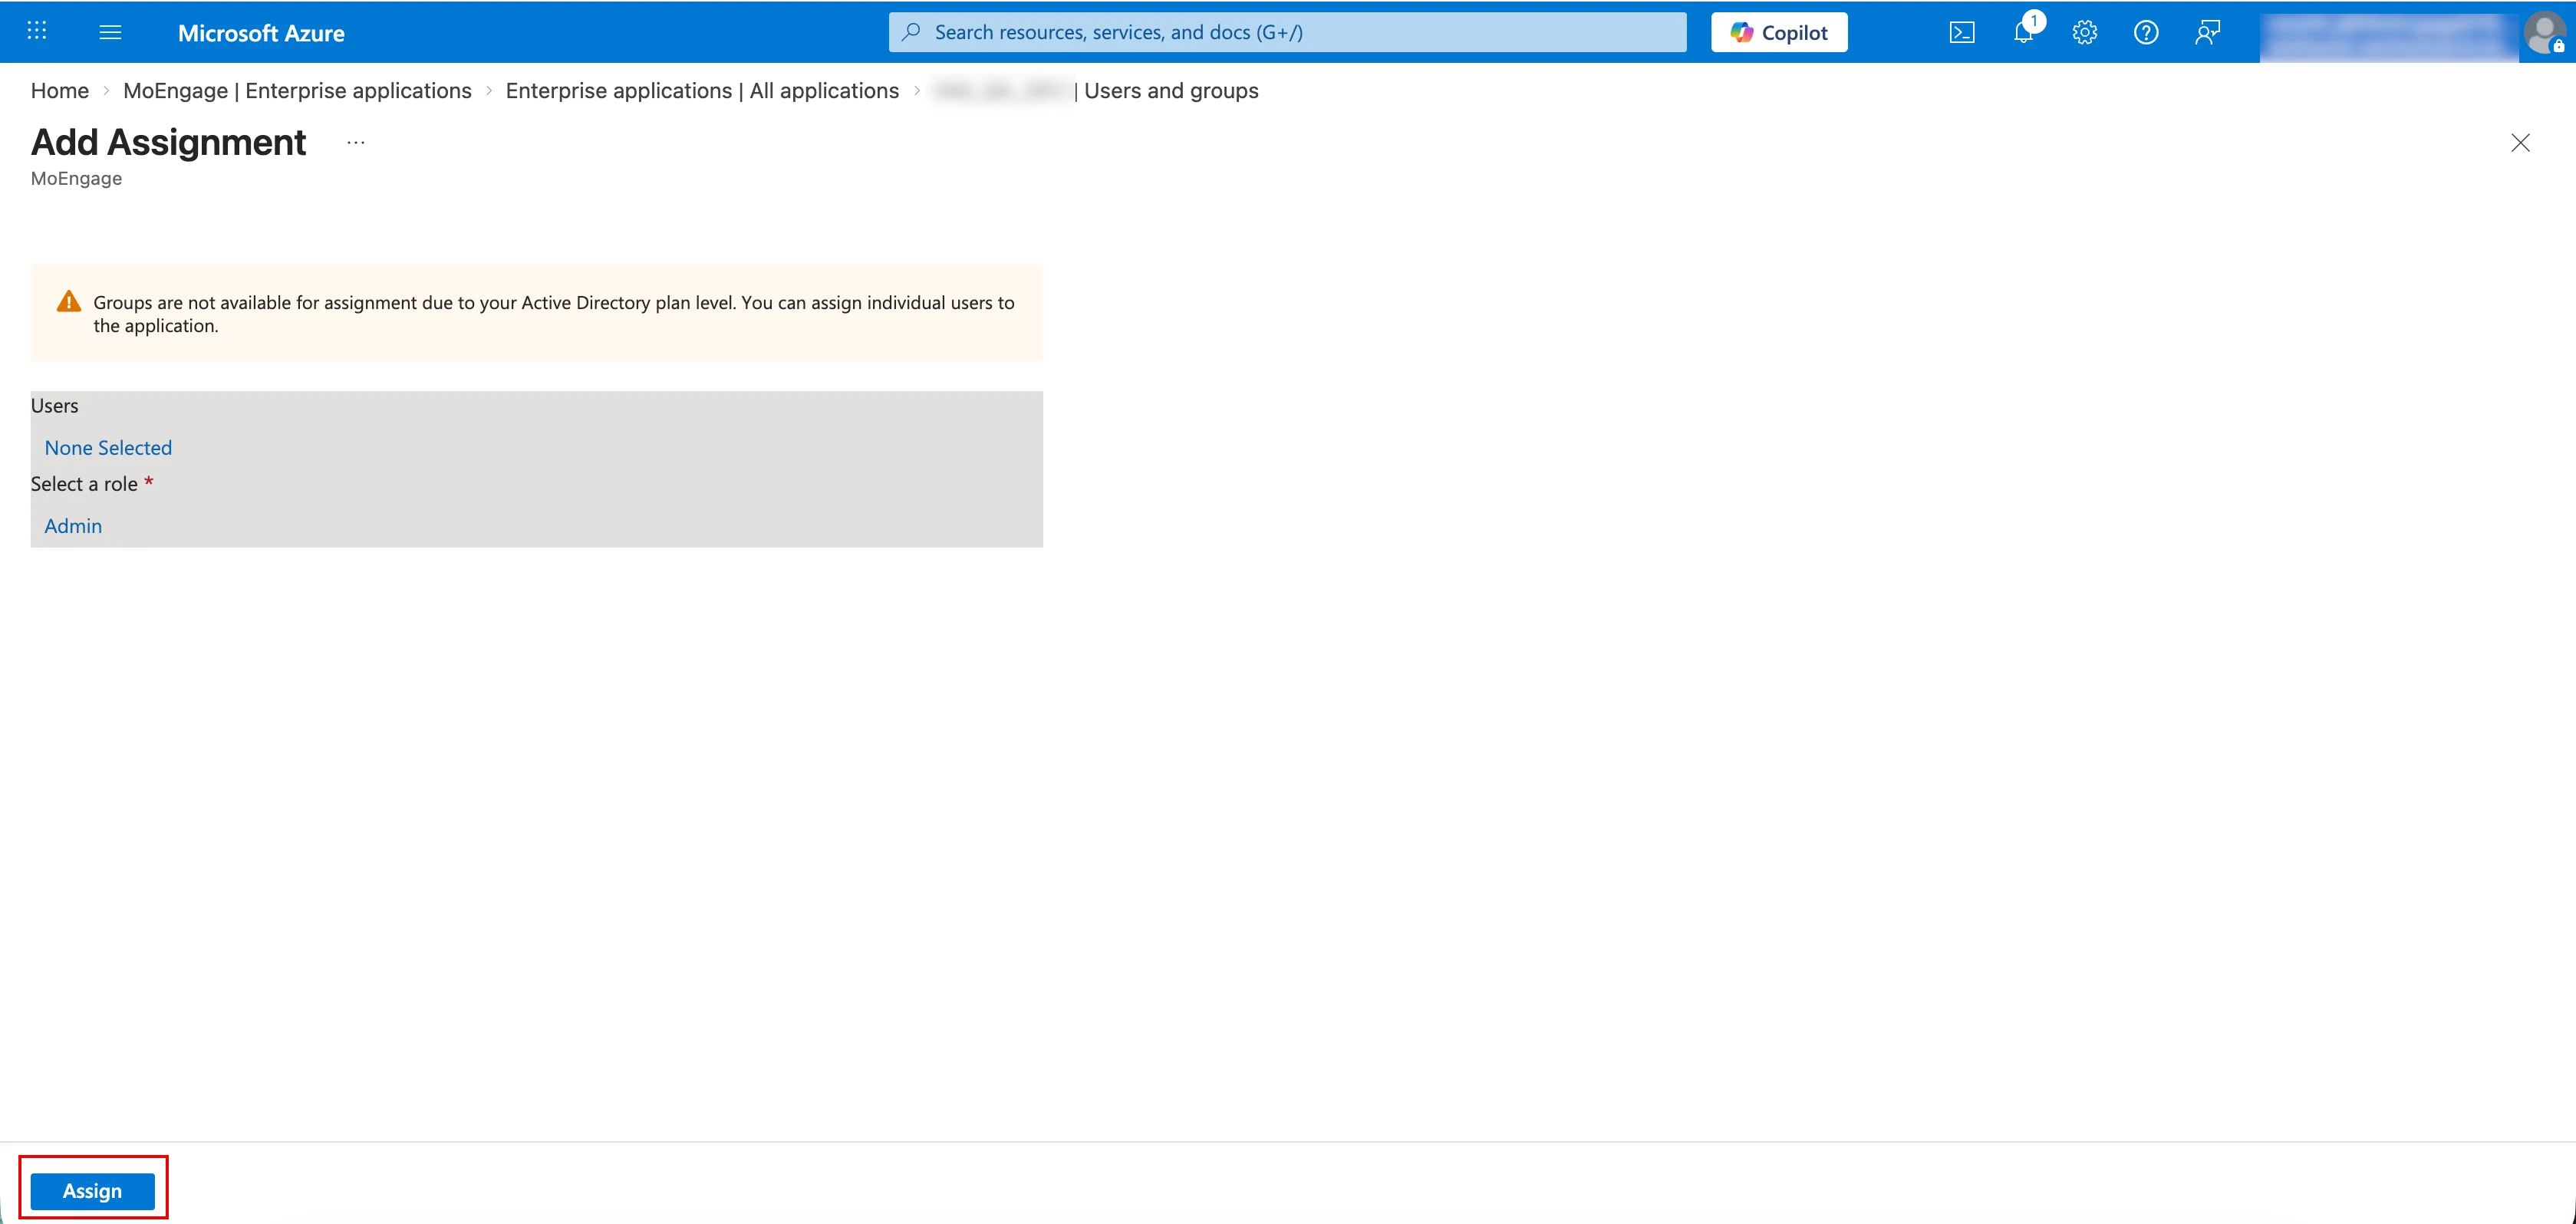 \
After Microsoft Entra ID successfully updates the user, the Application assignment succeeded message appears.
## Step 3: Validation
After the setup is complete, log in to MoEngage through the Microsoft My Apps portal ([myapps.microsoft.com](https://myapps.microsoft.com)) by clicking the assigned application. You are redirected to the login flow. During the login process, inspect the ACS payload and verify that the role attribute is present and contains the expected value (for example, Analyst). This confirms that the role is passed correctly and that the user is provisioned in MoEngage with the appropriate role upon their first login.
# Update or Disable JIT Provisioning Configuration
## Update Configuration
1. Navigate to the **Automate user provisioning** section.
2. Click **Edit**.
\
After Microsoft Entra ID successfully updates the user, the Application assignment succeeded message appears.
## Step 3: Validation
After the setup is complete, log in to MoEngage through the Microsoft My Apps portal ([myapps.microsoft.com](https://myapps.microsoft.com)) by clicking the assigned application. You are redirected to the login flow. During the login process, inspect the ACS payload and verify that the role attribute is present and contains the expected value (for example, Analyst). This confirms that the role is passed correctly and that the user is provisioned in MoEngage with the appropriate role upon their first login.
# Update or Disable JIT Provisioning Configuration
## Update Configuration
1. Navigate to the **Automate user provisioning** section.
2. Click **Edit**.
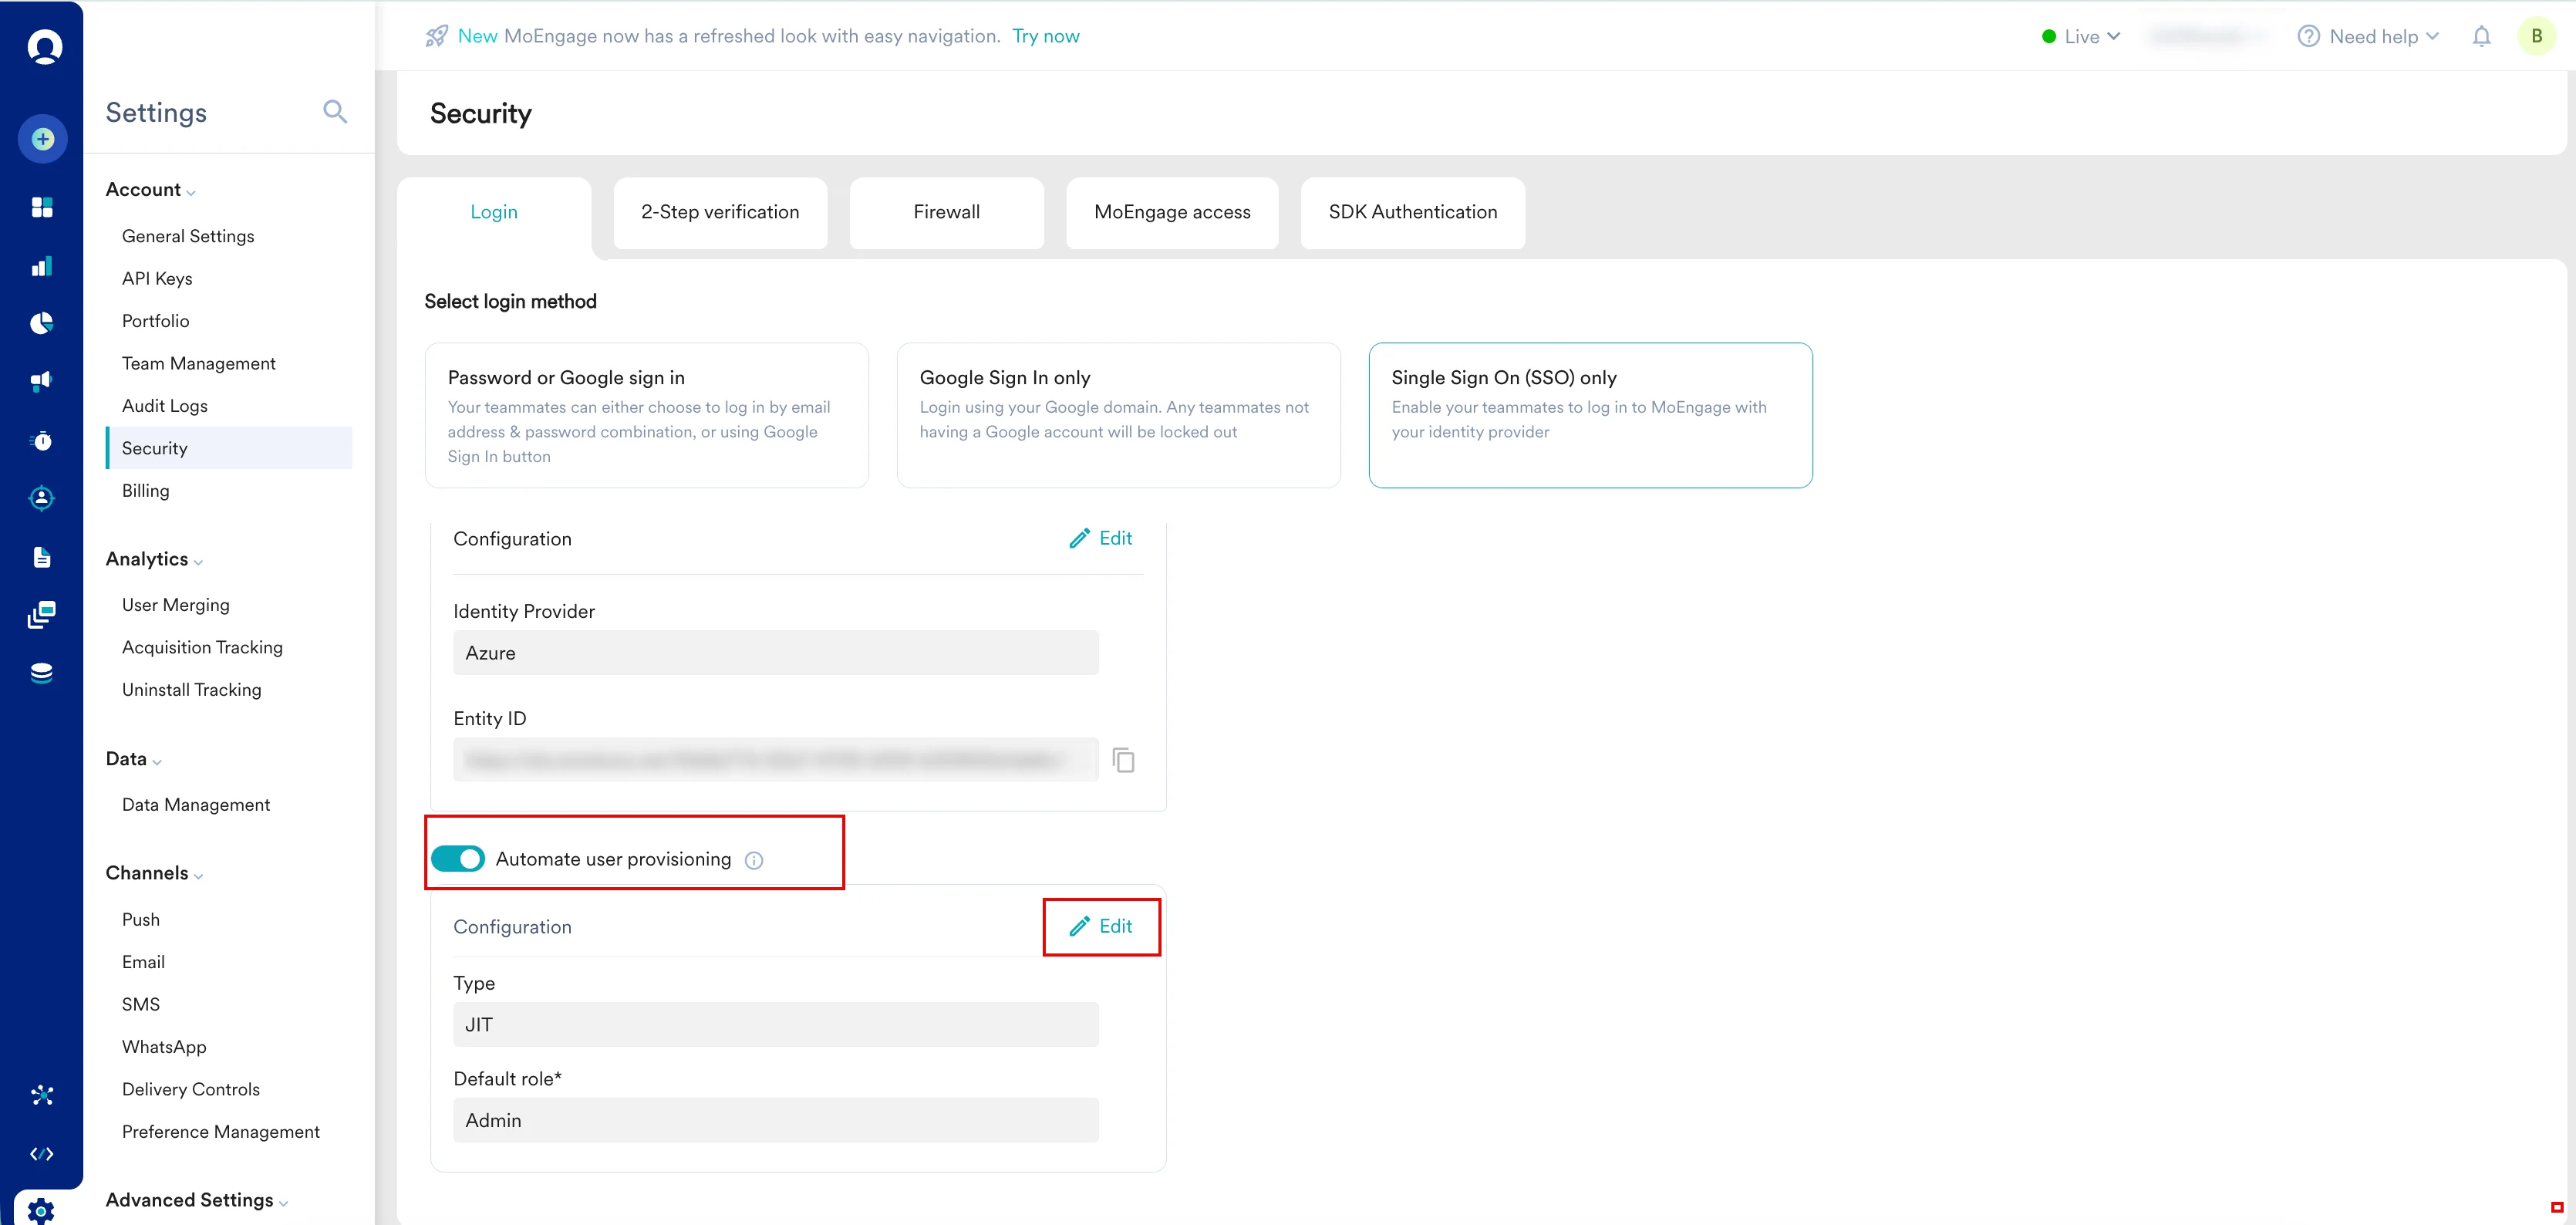 3. Modify the required settings as needed.
4. Click **Save**.
3. Modify the required settings as needed.
4. Click **Save**.
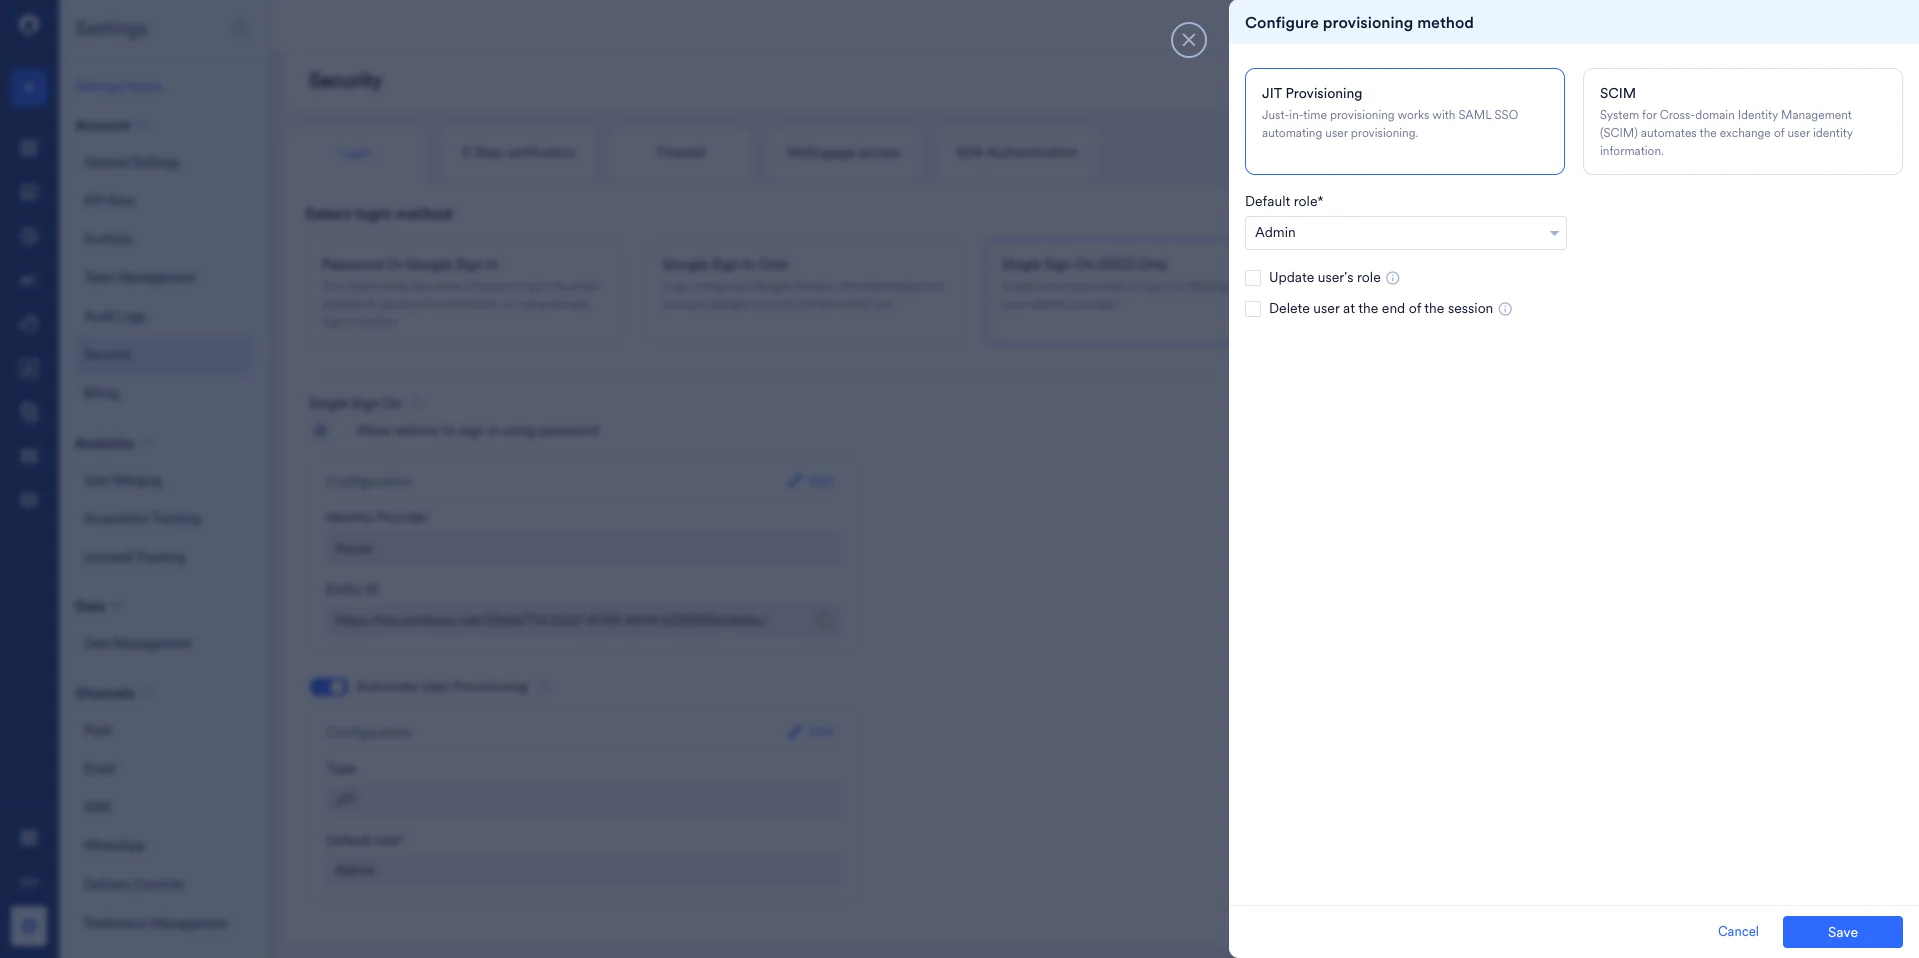 \
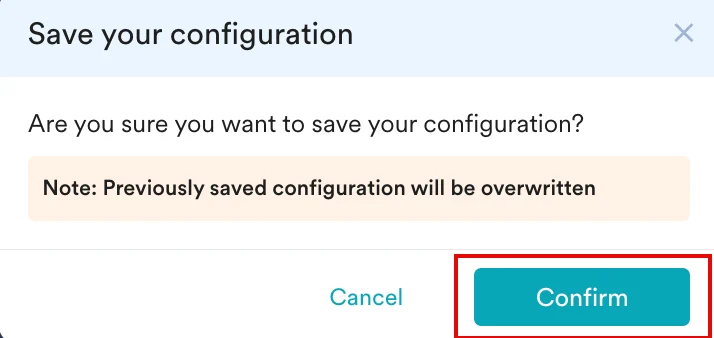
The **Save your configuration** dialog box appears, prompting you to confirm your configuration.
5. Click **Confirm** to apply the changes.
\
The **Save your configuration** dialog box appears, prompting you to confirm your configuration.
5. Click **Confirm** to apply the changes.
 ## Disable Configuration
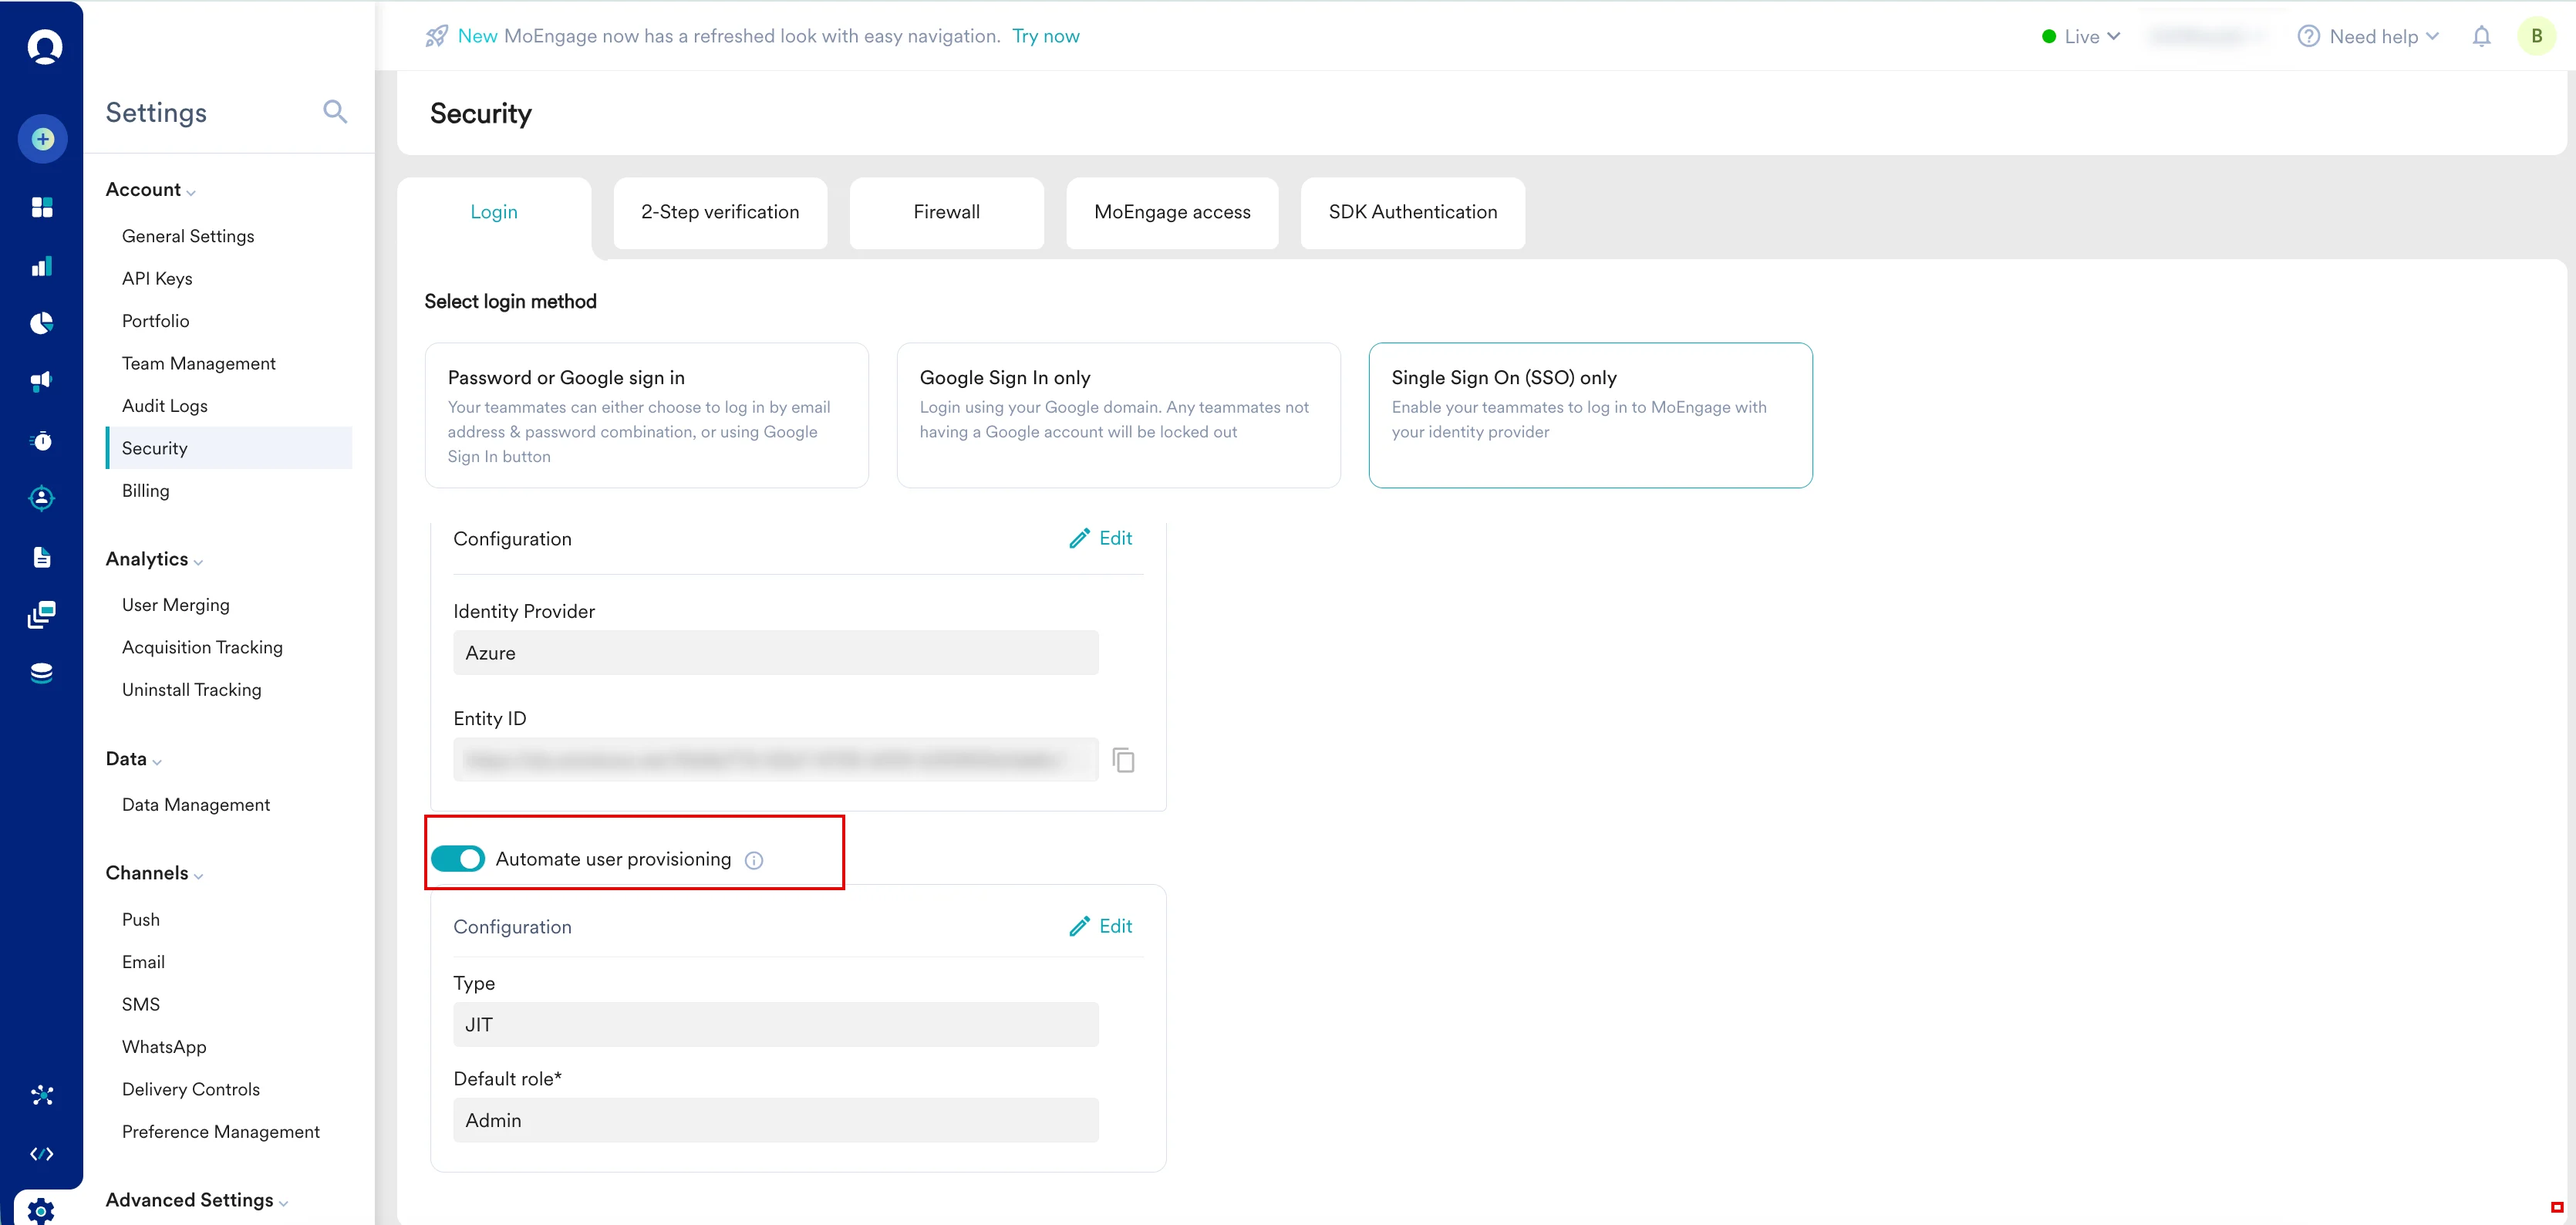
1. Navigate to the **Automate user provisioning** section.
2. Turn the **Automate user provisioning** toggle off.
## Disable Configuration
1. Navigate to the **Automate user provisioning** section.
2. Turn the **Automate user provisioning** toggle off.
 \
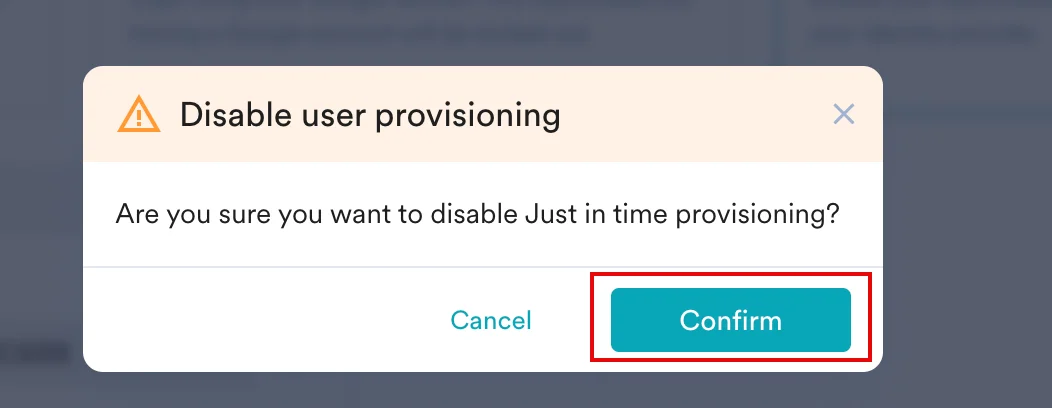
The **Disable user provisioning** dialog box appears.
3. Click **Confirm**.
\
The **Disable user provisioning** dialog box appears.
3. Click **Confirm**.
 \
The **JIT provisioning disabled successfully** message appears to confirm the action.
# Security and Logs
* **2FA and firewall**: Existing firewall rules apply to the users created via Just-in-Time User Provisioning. If 2FA is enforced for the workspace, these users must set up and enter a 2FA code upon login.
* **Audit logs**: All activities, including enable, disable, and update operations and user create, delete, and update operations, are recorded in the Audit Logs under Login settings.
* **Notifications**: Admins receive email notifications whenever Just-in-Time User Provisioning is enabled or disabled, or when a new user is created via Just-in-Time User Provisioning.
# FAQs
You cannot enable Just-in-Time User Provisioning while SCIM is enabled. You must first disable SCIM.
MoEngage creates the user upon their first sign-in. The user remains active in the workspace until access is manually revoked. For more information, refer to [how to revoke access](/user-guide/settings/account/team-management/manage-members).
MoEngage creates the user for that specific session. The system automatically revokes access when the session ends or 24 hours after user creation, whichever happens first.
**Note**: This rule applies only to users created via Just-in-Time User Provisioning.
The users created via SCIM remain active in the workspace along with their role information. For further role updates, you can use JIT (if the option to update users' roles is selected) or the **Team Management** > **Members** page (if the option to update users' roles is not selected). To revoke access, refer to [how to revoke access](/user-guide/settings/account/team-management/manage-members).
MoEngage refers to the first role value in the list when multiple values are received in the SAML assertion call.
* **Invite**: The user is invited to the workspace.
* **Update Role**: The user's role can be updated. However, it is only effective if the option to update users' roles under JIT configuration is not selected.\
**Note**: This option is provided to facilitate role updates for users who are not part of the JIT application in the Identity Provider but are part of the SSO application, or are admins logging in via password (and not part of any application in the Identity Provider).
* **Revoke Access**: The user can be deleted or access can be revoked using the same page. However, if the user is part of the IdP application where JIT is configured, the user can log in again.
\
The **JIT provisioning disabled successfully** message appears to confirm the action.
# Security and Logs
* **2FA and firewall**: Existing firewall rules apply to the users created via Just-in-Time User Provisioning. If 2FA is enforced for the workspace, these users must set up and enter a 2FA code upon login.
* **Audit logs**: All activities, including enable, disable, and update operations and user create, delete, and update operations, are recorded in the Audit Logs under Login settings.
* **Notifications**: Admins receive email notifications whenever Just-in-Time User Provisioning is enabled or disabled, or when a new user is created via Just-in-Time User Provisioning.
# FAQs
You cannot enable Just-in-Time User Provisioning while SCIM is enabled. You must first disable SCIM.
MoEngage creates the user upon their first sign-in. The user remains active in the workspace until access is manually revoked. For more information, refer to [how to revoke access](/user-guide/settings/account/team-management/manage-members).
MoEngage creates the user for that specific session. The system automatically revokes access when the session ends or 24 hours after user creation, whichever happens first.
**Note**: This rule applies only to users created via Just-in-Time User Provisioning.
The users created via SCIM remain active in the workspace along with their role information. For further role updates, you can use JIT (if the option to update users' roles is selected) or the **Team Management** > **Members** page (if the option to update users' roles is not selected). To revoke access, refer to [how to revoke access](/user-guide/settings/account/team-management/manage-members).
MoEngage refers to the first role value in the list when multiple values are received in the SAML assertion call.
* **Invite**: The user is invited to the workspace.
* **Update Role**: The user's role can be updated. However, it is only effective if the option to update users' roles under JIT configuration is not selected.\
**Note**: This option is provided to facilitate role updates for users who are not part of the JIT application in the Identity Provider but are part of the SSO application, or are admins logging in via password (and not part of any application in the Identity Provider).
* **Revoke Access**: The user can be deleted or access can be revoked using the same page. However, if the user is part of the IdP application where JIT is configured, the user can log in again.