> ## Documentation Index
> Fetch the complete documentation index at: https://moengage.com/docs/llms.txt
> Use this file to discover all available pages before exploring further.
# System for Cross-domain Identity Management (SCIM)
> Automate user provisioning and role management in MoEngage with SCIM integration. Sync users from your identity provider automatically.
# Introduction
System for Cross-domain Identity Management (SCIM) is an open standard that automates the exchange of user identity information between your Identity Provider (IdP) and MoEngage. SCIM integration streamlines user management by automatically synchronizing provisioning, role updates, and access revocation across all platforms.
## Operations Supported
SCIM enables the following user management operations that you can perform from your IdP:
* **Create users**: Provision new users in MoEngage.
* **Update users**: Automatically sync role updates.
* **Get users**: Retrieve a list of MoEngage users.
* **Revoke access**: Revoke user access.
## Advantages of SCIM
The following are the advantages of providing SCIM:
* **Automated lifecycle management**: Automatically manage user provisioning.
* **Centralized role assignmen**t: Assign MoEngage roles, such as default and custom roles, directly from your organization's identity provider.
* **Improved efficiency**: This process eliminates the manual overhead of inviting users individually to the MoEngage workspace.
# Identity Providers (IdPs)
MoEngage utilizes Identity Providers to simplify and centralize logins. MoEngage supports SCIM provisioning (based on the SAML 2.0 standard) for the following platforms:
* Okta
* Azure (Microsoft Entra ID)
**Prerequisites**
Before you begin the configuration, ensure you have the following:
* A working single sign-on (SSO) configuration for your MoEngage workspace.
* An Admin role with **Setup & manage** permissions for the **Security Settings** component.\
**Note**: The **Login Settings** component is renamed to **Security Settings**.
* Google Chrome browser—other browsers may truncate or corrupt metadata and XML strings, which can result in integration failures.
* Complete the SSO configuration before enabling SCIM. For more information, refer to [Single Sign-On (SSO)](/user-guide/settings/account/security/single-sign-on-sso).
# Configure SCIM in Okta
## Step 1: Locate and Verify the SSO Application
To verify the SSO configuration, perform the following steps:
1. Navigate to the **Okta Admin Console**.
2. On the left navigation menu, go to **Applications** > **Applications**.
3. On the **Applications** page, find your application in the list or use the **Search for people, apps, and groups** box to find it.
4. Click the application name from your list that you want to configure SCIM for. 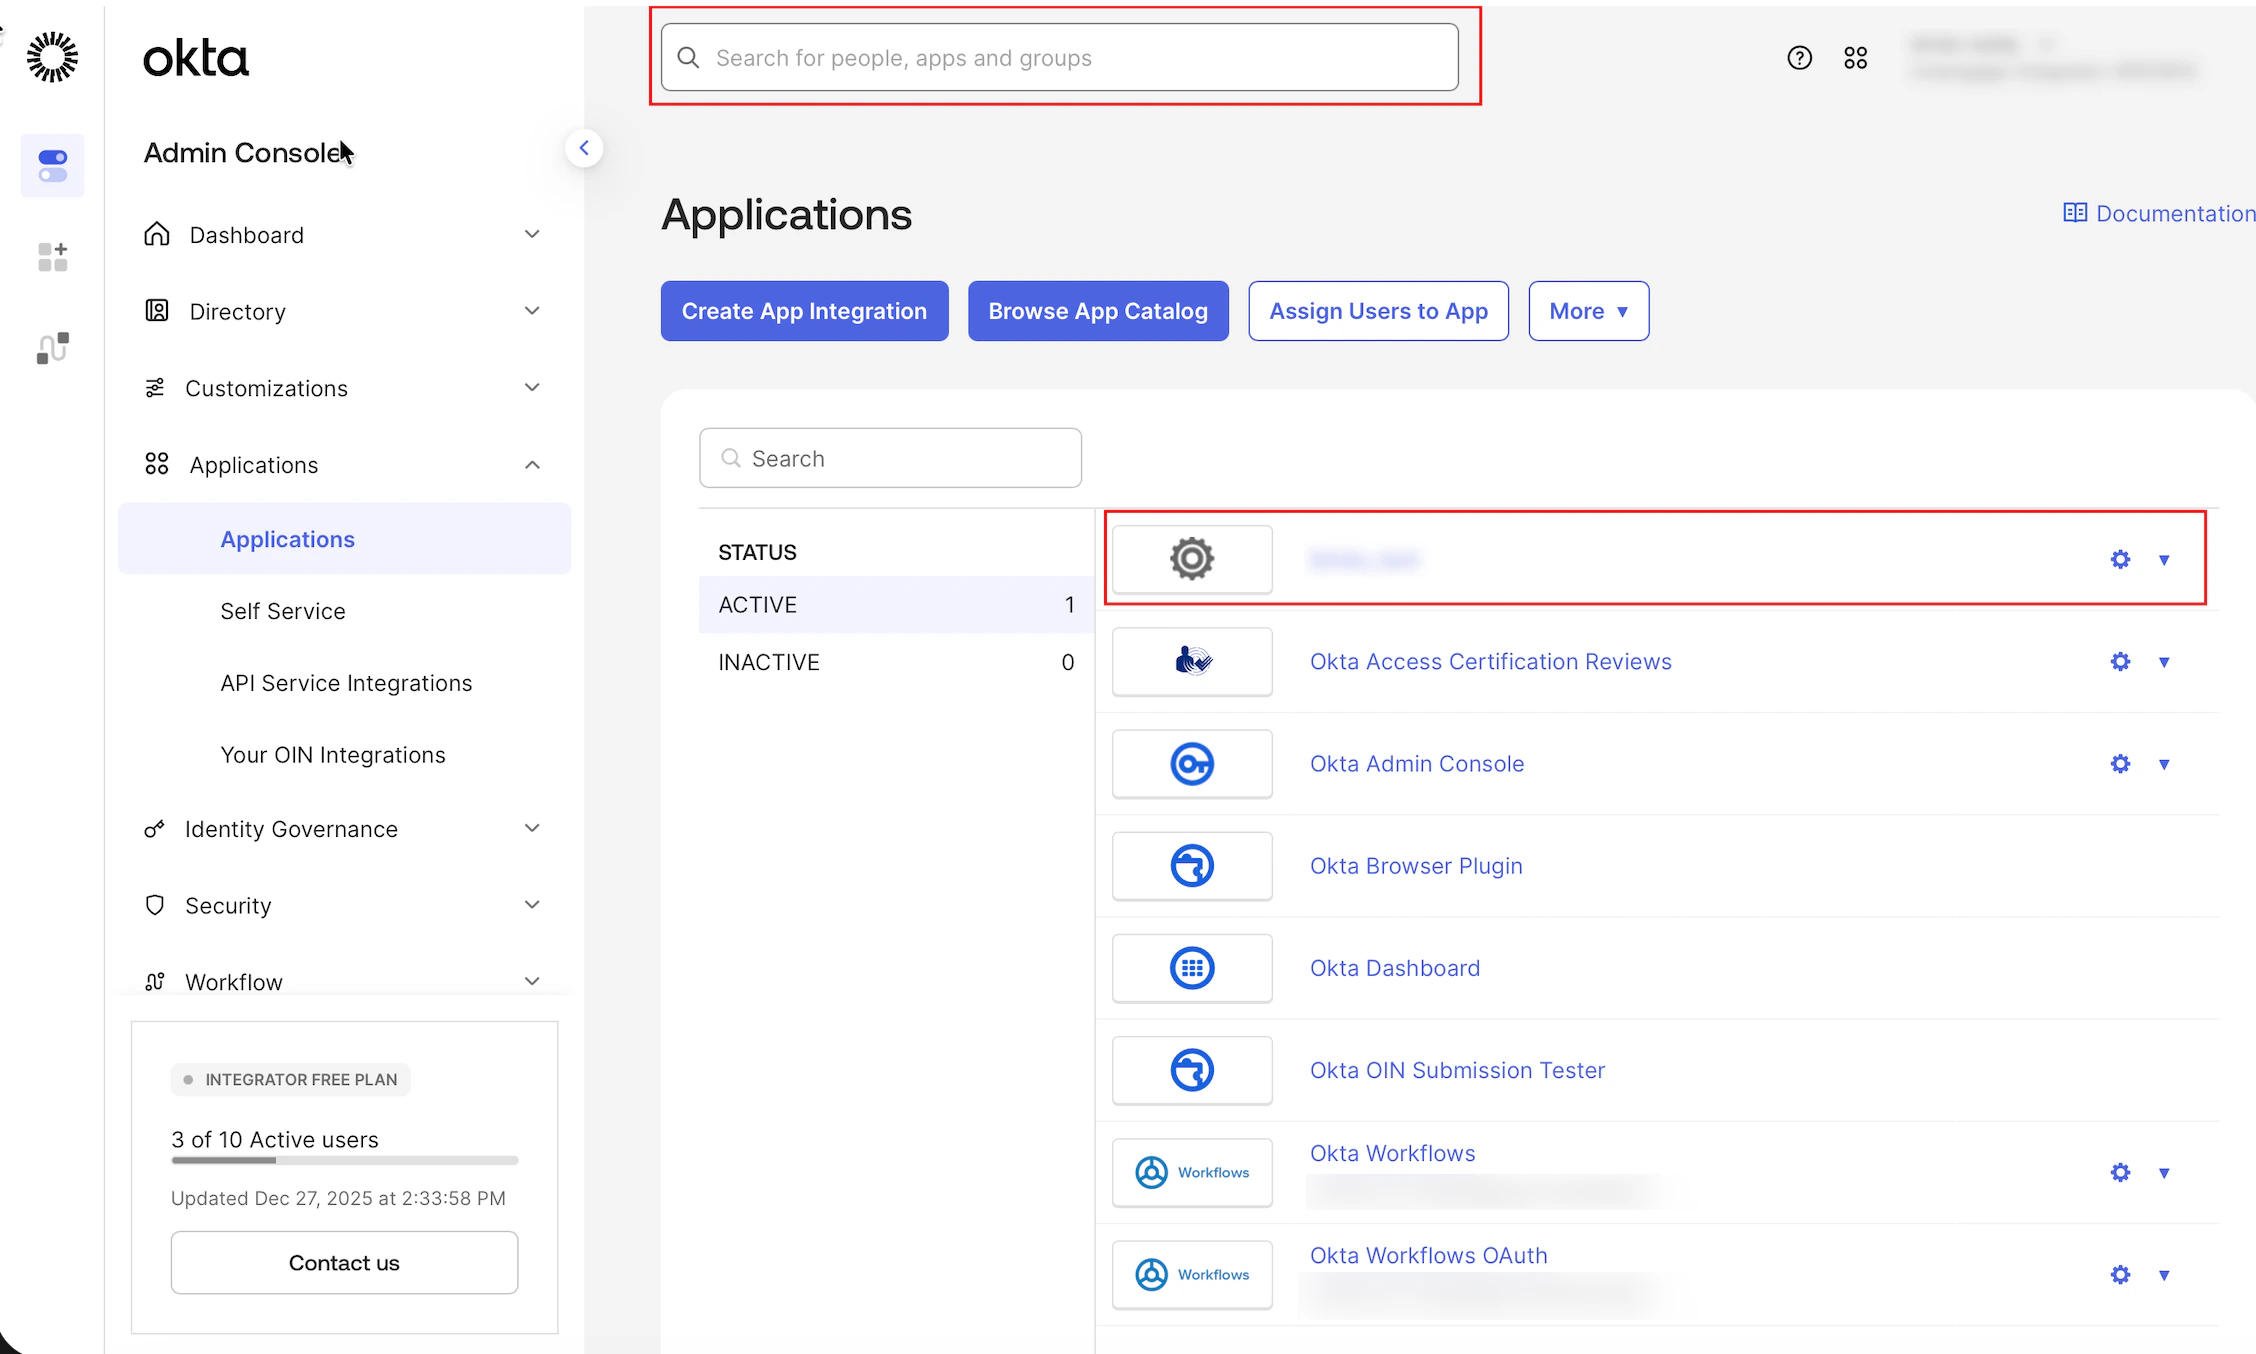 5. Click the **General** tab.
6. Scroll to the **SAML Settings** section, and verify that the SAML configuration details match the metadata from your MoEngage workspace.
5. Click the **General** tab.
6. Scroll to the **SAML Settings** section, and verify that the SAML configuration details match the metadata from your MoEngage workspace. 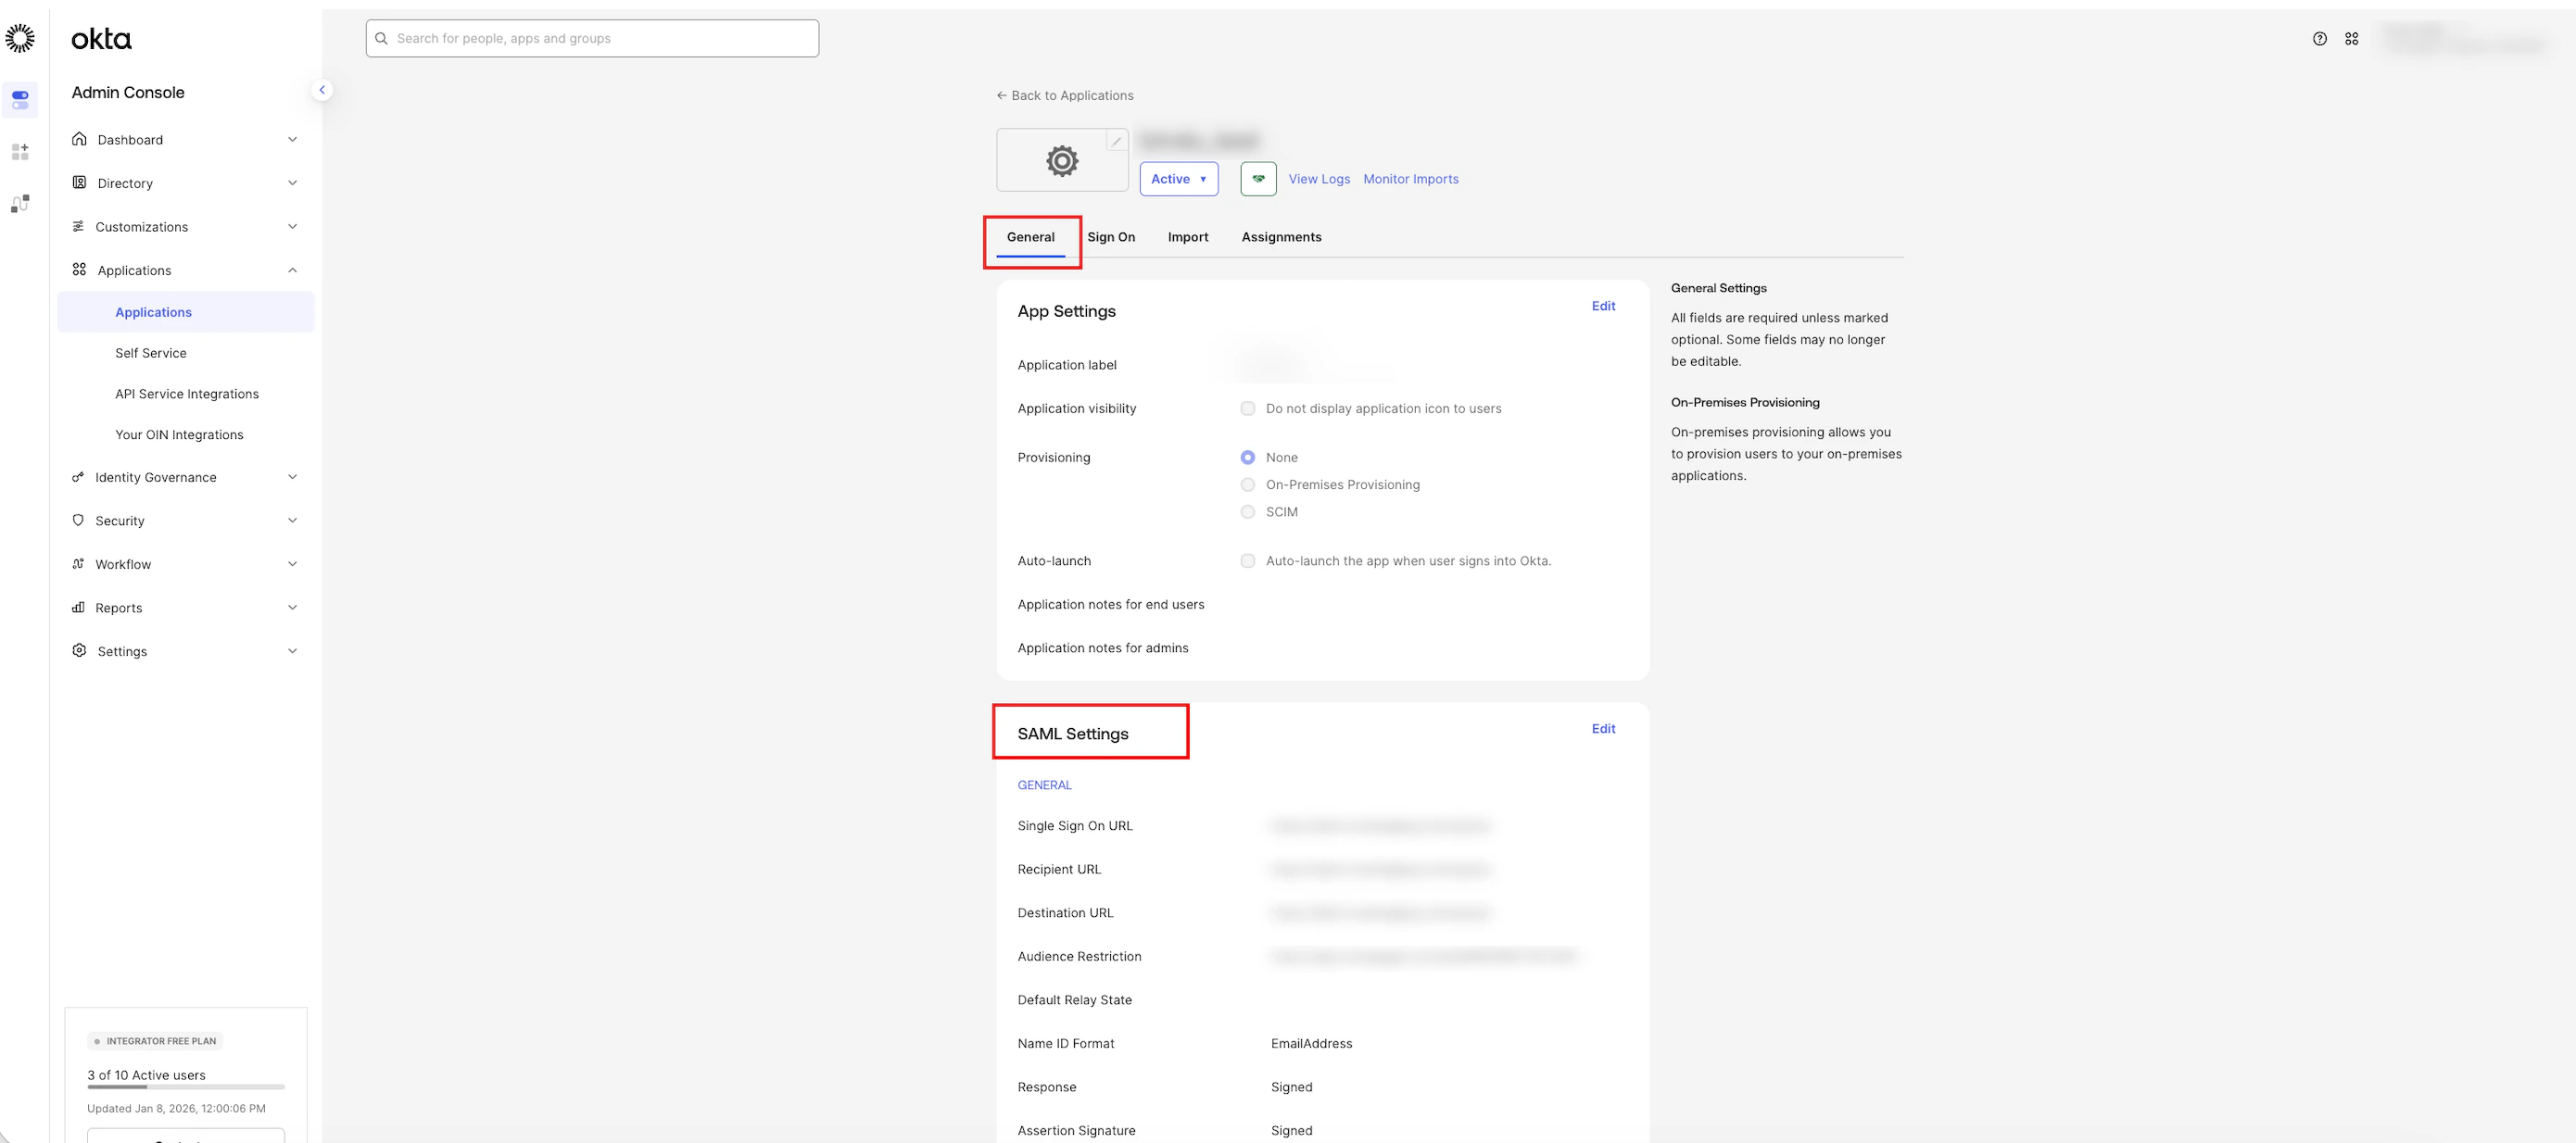 ## Step 2: Enable SCIM in Okta App Settings
Now, to enable SCIM in Okta, perform the following steps:
1. Repeat steps 2 through 5 as mentioned in [Step 1](/user-guide/settings/account/security/system-for-cross-domain-identity-management-scim#step-1-locate-and-verify-the-sso-application).
2. In the **App Settings** section, click **Edit** in the right corner.
3. Click the **SCIM** radio button, and then click **Save**.
## Step 2: Enable SCIM in Okta App Settings
Now, to enable SCIM in Okta, perform the following steps:
1. Repeat steps 2 through 5 as mentioned in [Step 1](/user-guide/settings/account/security/system-for-cross-domain-identity-management-scim#step-1-locate-and-verify-the-sso-application).
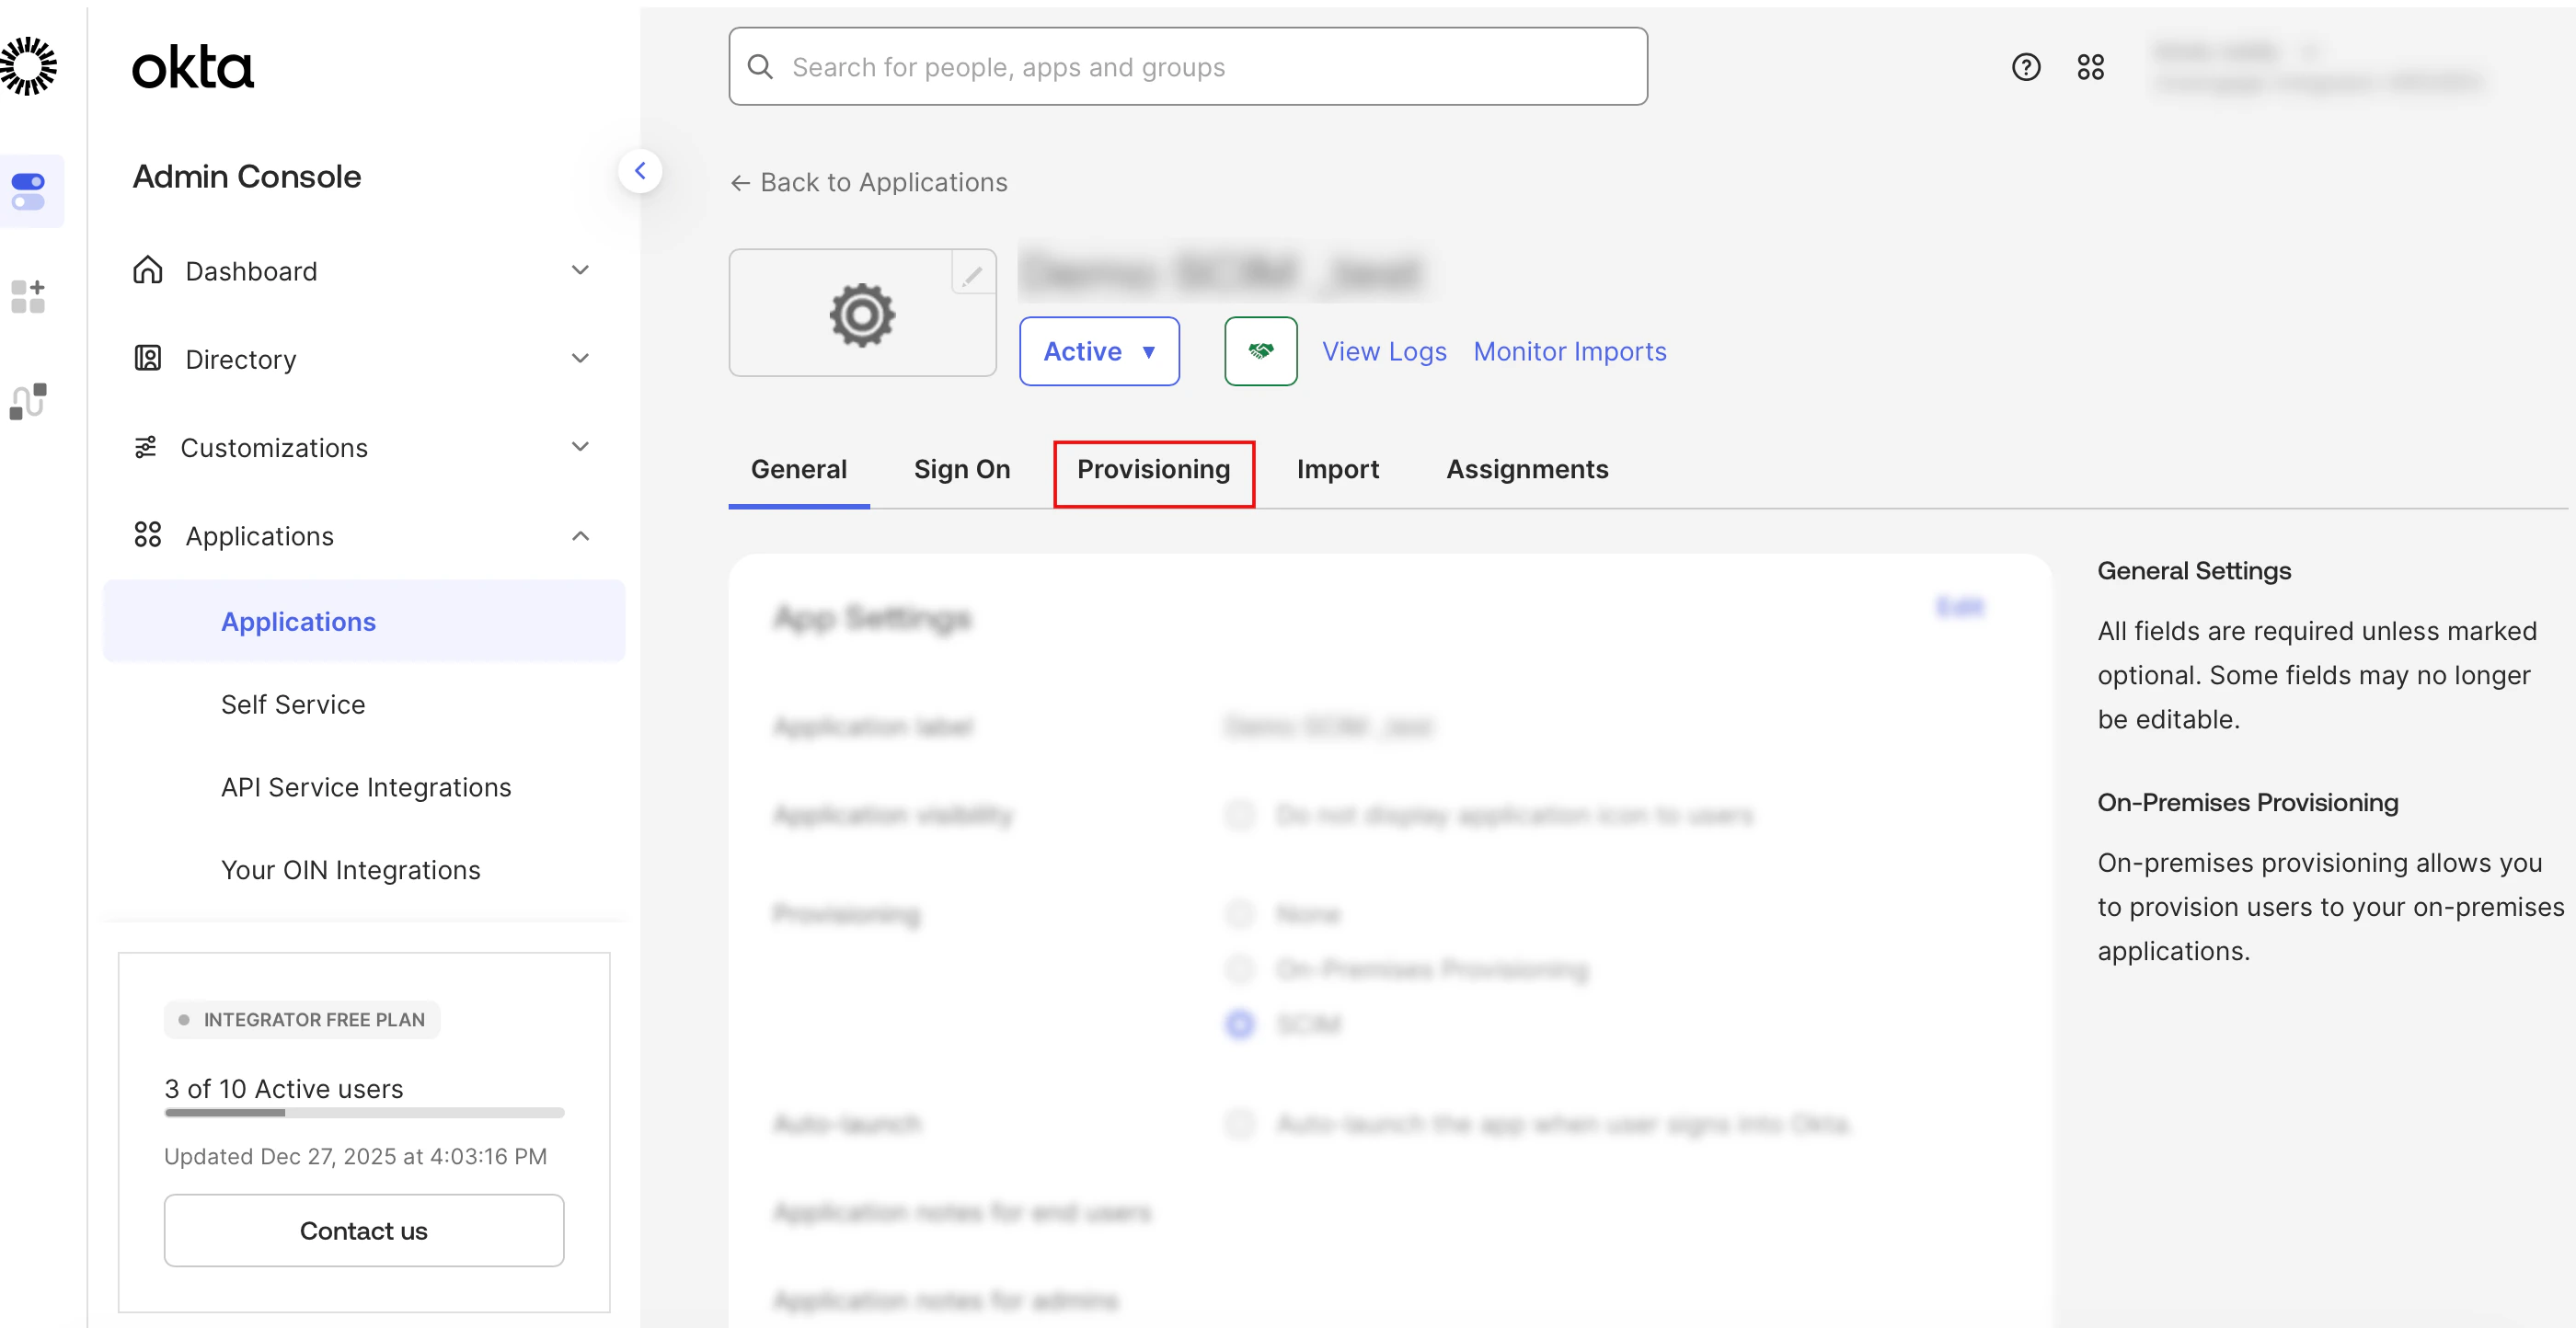
2. In the **App Settings** section, click **Edit** in the right corner.
3. Click the **SCIM** radio button, and then click **Save**.  The **Provisioning** tab is displayed next to the **Sign On** tab.
  ## Step 3: Configure SCIM in MoEngage and Generate Token
To configure SCIM on MoEngage and generate a token, perform the following steps:
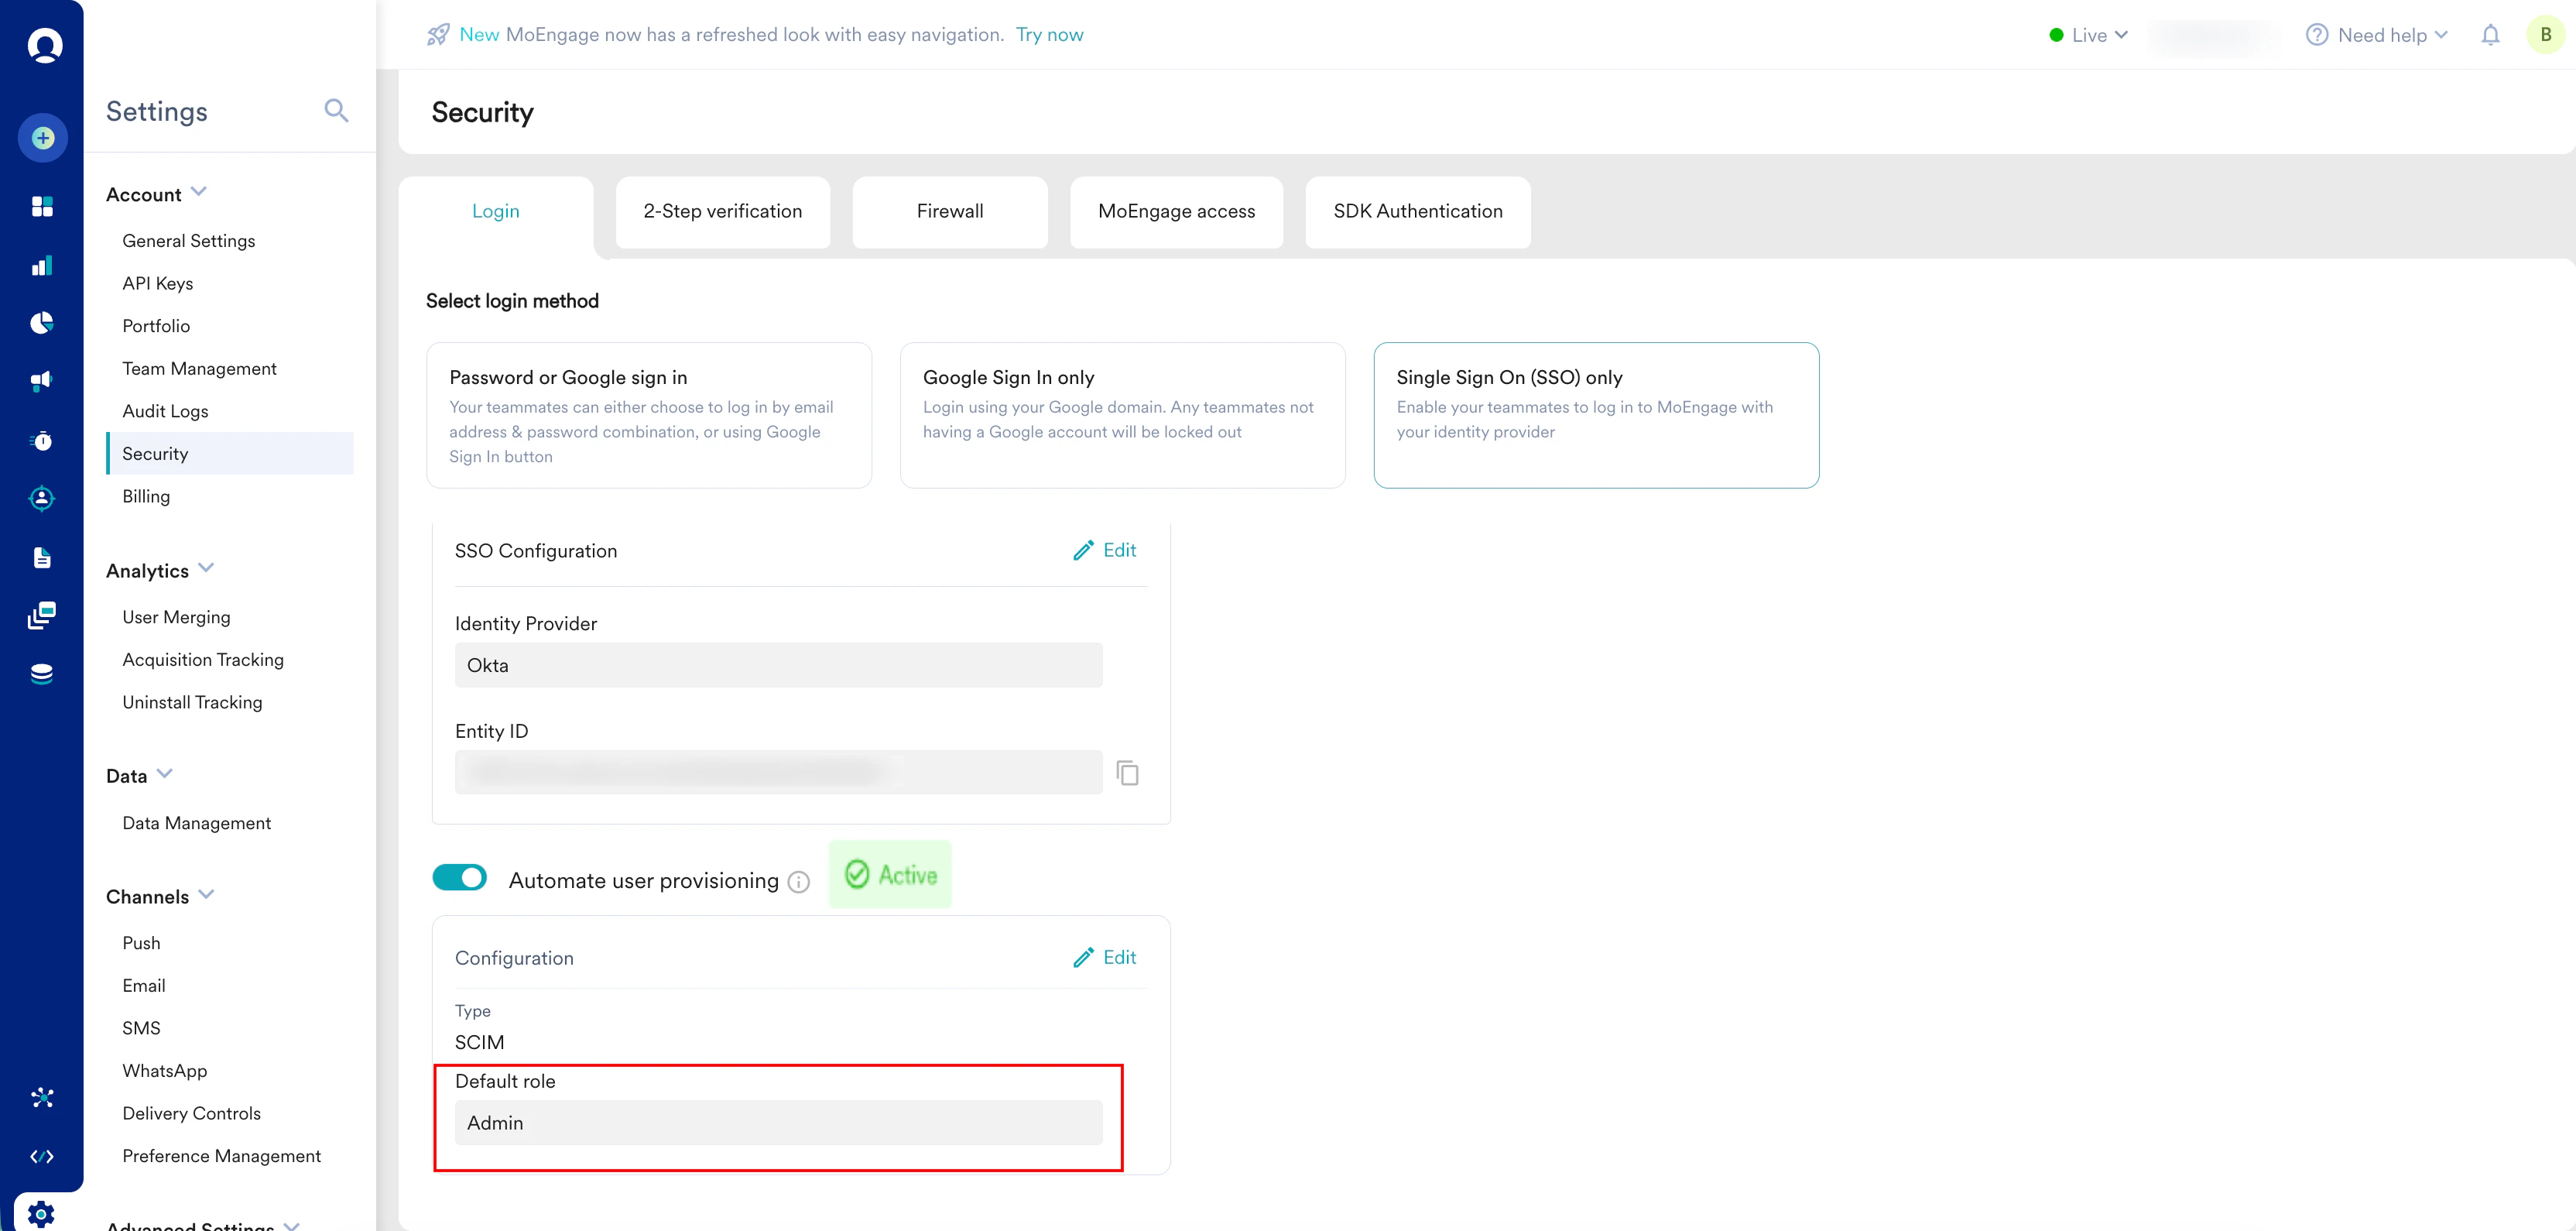
1. In the left navigation menu on the MoEngage workspace, click **Settings** > **Account** > **Security**.
2. On the **Security** page, click the **Login** tab.
3. Click **Single Sign On (SSO) only**.
4. Scroll to the **Automate user provisioning** section.
5. Turn the **Automate user provisioning** toggle on.
## Step 3: Configure SCIM in MoEngage and Generate Token
To configure SCIM on MoEngage and generate a token, perform the following steps:
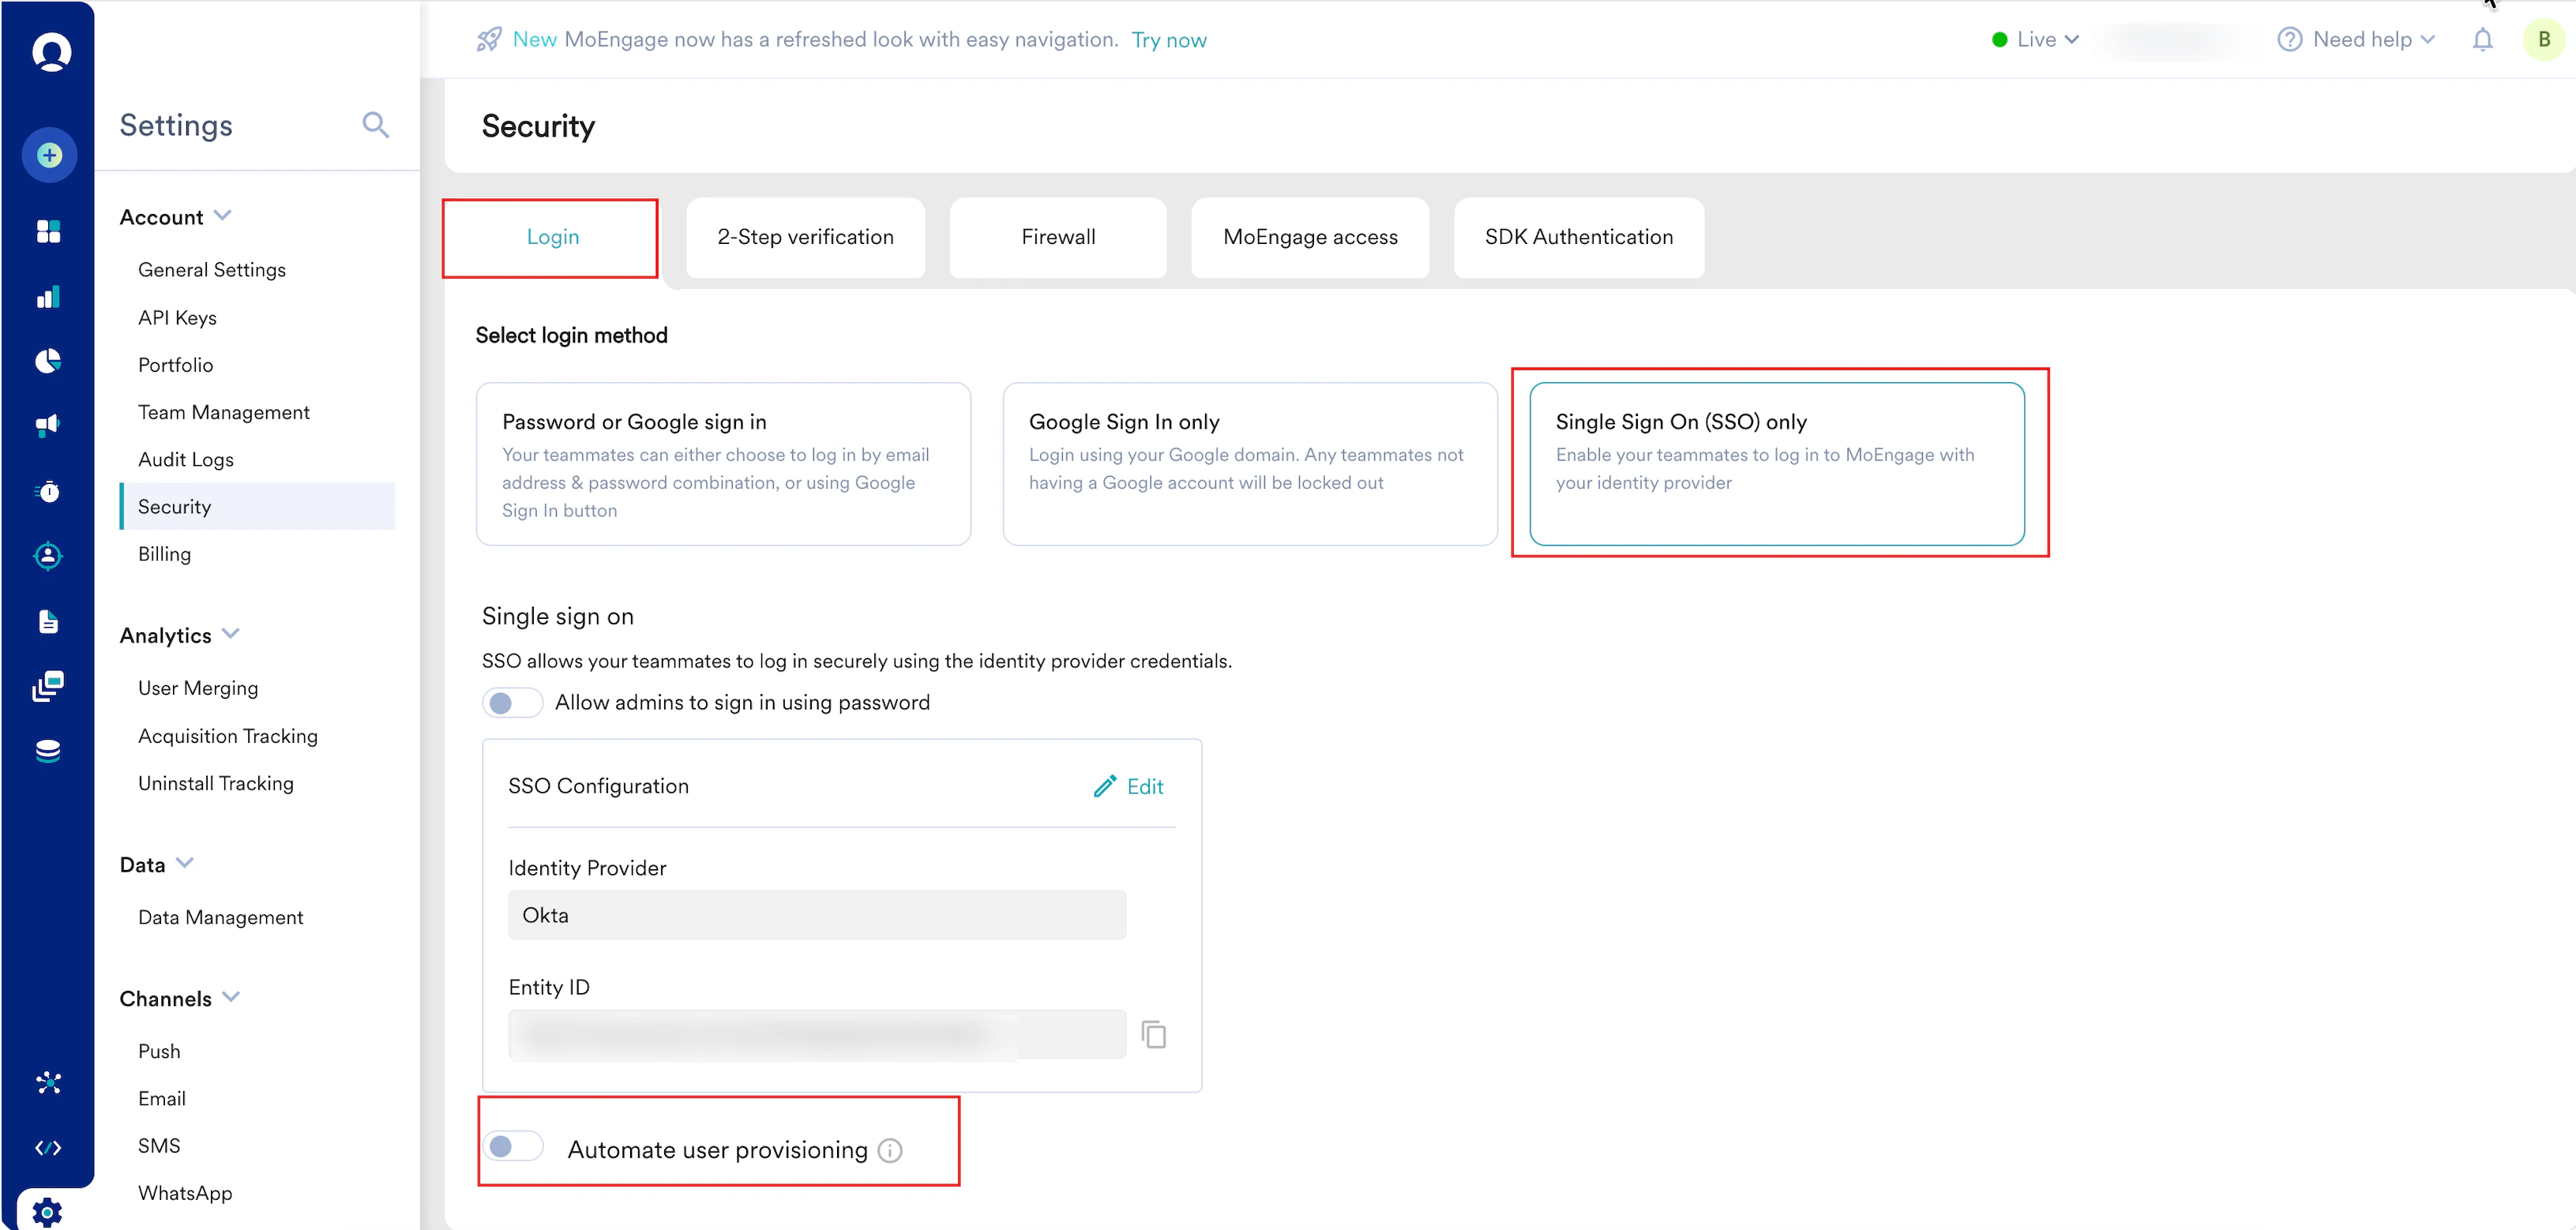
1. In the left navigation menu on the MoEngage workspace, click **Settings** > **Account** > **Security**.
2. On the **Security** page, click the **Login** tab.
3. Click **Single Sign On (SSO) only**.
4. Scroll to the **Automate user provisioning** section.
5. Turn the **Automate user provisioning** toggle on.
 \
The **Configure provisioning method** dialog box appears.
6. Click **SCIM configuration** as your configuration type.
\
The **Configure provisioning method** dialog box appears.
6. Click **SCIM configuration** as your configuration type.
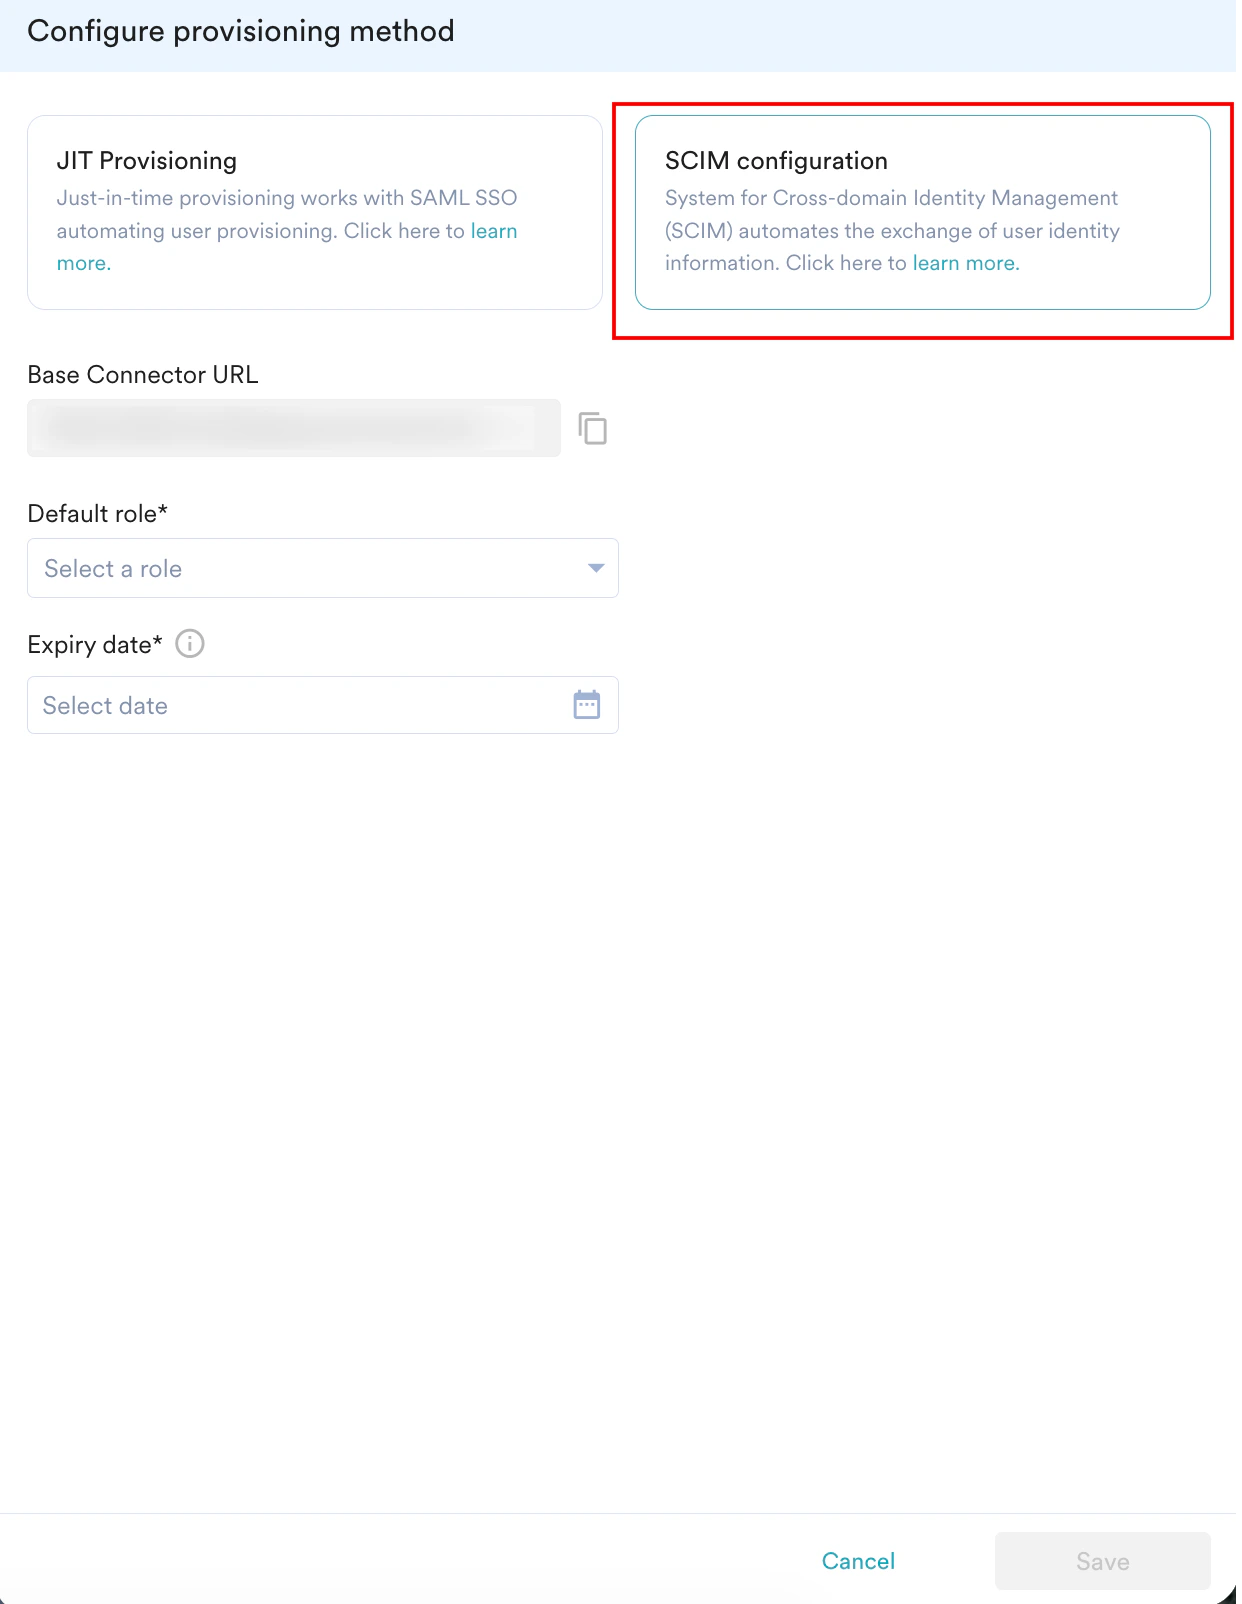 7. Copy the **Base Connector URL** and save it (to use in [Step 4](/user-guide/settings/account/security/system-for-cross-domain-identity-management-scim#step-4-configure-scim-on-okta)).
8. In the **Default role** list, select the required role (Default or Custom role).
9. In the **Expiry Date** field, select the expiry date for the SCIM access token.\
**Note**: MoEngage recommends setting an **Expiry date** period of one year.
10. Click **Save**.\
The **Save your configuration** dialog box appears, prompting you to confirm your configuration.
11. Click **Confirm**.\
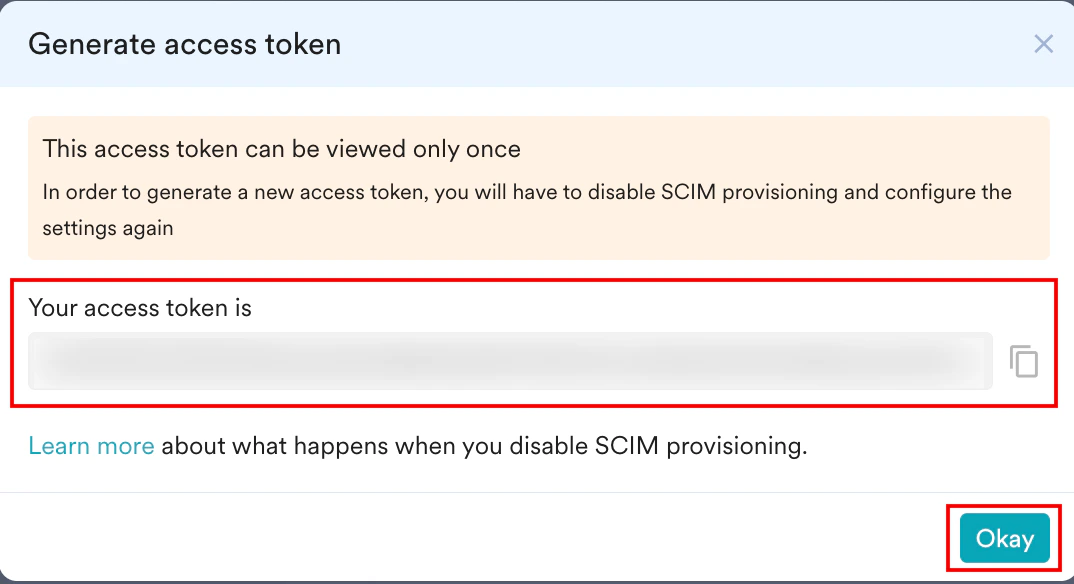
The **Successfully generated SCIM token** message and the **Generate access token** dialog box appear. **Note**: Copy the token immediately; it is only shown once.
12. Click **Okay**.
7. Copy the **Base Connector URL** and save it (to use in [Step 4](/user-guide/settings/account/security/system-for-cross-domain-identity-management-scim#step-4-configure-scim-on-okta)).
8. In the **Default role** list, select the required role (Default or Custom role).
9. In the **Expiry Date** field, select the expiry date for the SCIM access token.\
**Note**: MoEngage recommends setting an **Expiry date** period of one year.
10. Click **Save**.\
The **Save your configuration** dialog box appears, prompting you to confirm your configuration.
11. Click **Confirm**.\
The **Successfully generated SCIM token** message and the **Generate access token** dialog box appear. **Note**: Copy the token immediately; it is only shown once.
12. Click **Okay**.
 ## Step 4: Configure SCIM on Okta
To configure SCIM on Okta, perform the following steps:
1. Return to the **Okta Admin Console** and click the **Provisioning** tab.
2. On the left navigation pane, click **Integration**, and then click **Edit**.
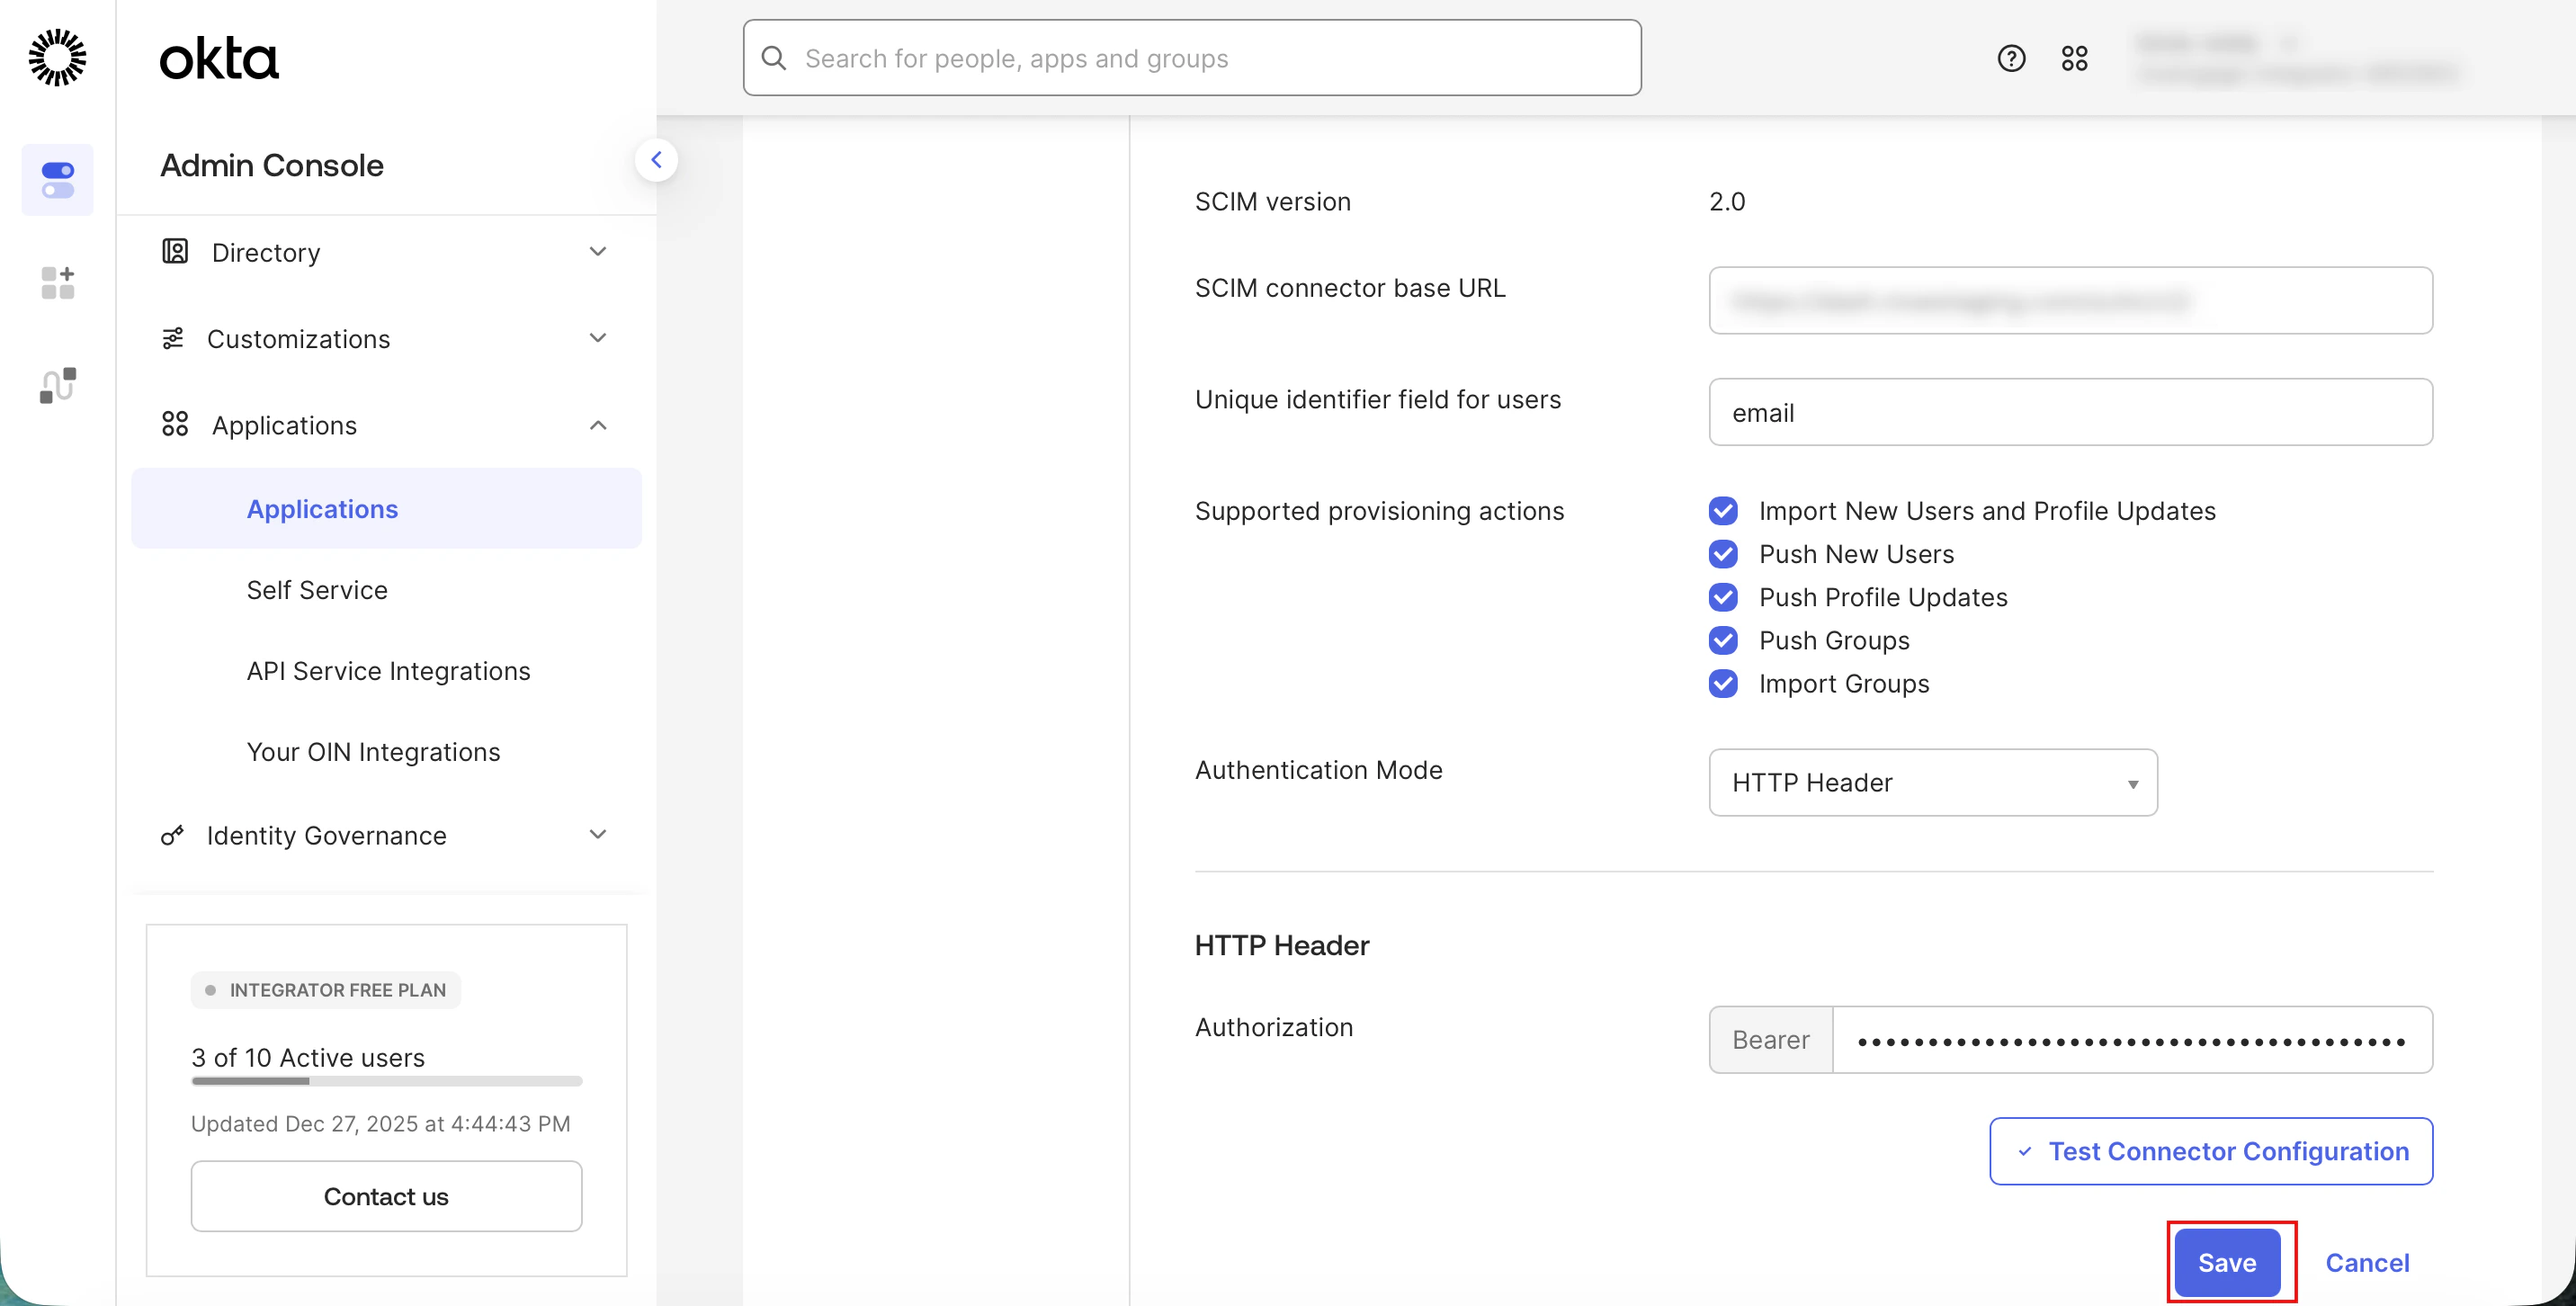
3. Enter the connection details:
1. **SCIM connector base URL**: Paste the URL copied from the MoEngage workspace in [Step 3](/user-guide/settings/account/security/system-for-cross-domain-identity-management-scim#step-3-configure-scim-in-moengage-and-generate-token).
2. **Unique identifier field for users**: Type **email**.
4. In the **Configure Supported Provisioning Actions** section, select the appropriate check boxes to define the data flow. You can enable all five to automate both individual users and groups, or select them based on the following requirements:
* **Import New Users and Profile Updates**: Select this to bring existing users from MoEngage into Okta.
* **Push New Users**: Select this to automatically create a MoEngage user when a new user is assigned to the application in Okta.
* **Push Profile Updates**: Select this to sync attribute changes, such as **Role** updates, from Okta to MoEngage.
* **Push Groups**: Select this to sync Okta groups and their user lists to MoEngage.
* **Import Groups**: Select this to fetch existing groups from MoEngage into Okta.
5. In the **Authentication Mode** list, click **HTTP Header**.
6. In the **HTTP Header** section, in the **Authorization** box, paste the generated access token copied in [Step 3](/user-guide/settings/account/security/system-for-cross-domain-identity-management-scim#step-3-configure-scim-in-moengage-and-generate-token) from the MoEngage workspace.
7. Click **Test Connector Configuration**.
## Step 4: Configure SCIM on Okta
To configure SCIM on Okta, perform the following steps:
1. Return to the **Okta Admin Console** and click the **Provisioning** tab.
2. On the left navigation pane, click **Integration**, and then click **Edit**.
3. Enter the connection details:
1. **SCIM connector base URL**: Paste the URL copied from the MoEngage workspace in [Step 3](/user-guide/settings/account/security/system-for-cross-domain-identity-management-scim#step-3-configure-scim-in-moengage-and-generate-token).
2. **Unique identifier field for users**: Type **email**.
4. In the **Configure Supported Provisioning Actions** section, select the appropriate check boxes to define the data flow. You can enable all five to automate both individual users and groups, or select them based on the following requirements:
* **Import New Users and Profile Updates**: Select this to bring existing users from MoEngage into Okta.
* **Push New Users**: Select this to automatically create a MoEngage user when a new user is assigned to the application in Okta.
* **Push Profile Updates**: Select this to sync attribute changes, such as **Role** updates, from Okta to MoEngage.
* **Push Groups**: Select this to sync Okta groups and their user lists to MoEngage.
* **Import Groups**: Select this to fetch existing groups from MoEngage into Okta.
5. In the **Authentication Mode** list, click **HTTP Header**.
6. In the **HTTP Header** section, in the **Authorization** box, paste the generated access token copied in [Step 3](/user-guide/settings/account/security/system-for-cross-domain-identity-management-scim#step-3-configure-scim-in-moengage-and-generate-token) from the MoEngage workspace.
7. Click **Test Connector Configuration**.  A **Test Connector Configuration** dialogue box appears (this process may take up to 30 seconds). The connector configured successfully message appears to review the following list of provisioning features detected in your connector:
* **User Import** and **Import Profile Updates**: This confirms that Okta fetches user data from MoEngage.
* **Create Users** and **Update User Attributes**: This confirms that Okta sends new users and profile changes to MoEngage.
* **Push Groups** and **Import Groups**: This confirms that group memberships and roles are synchronized.
8. Click **Close** and then **Save.**
A **Test Connector Configuration** dialogue box appears (this process may take up to 30 seconds). The connector configured successfully message appears to review the following list of provisioning features detected in your connector:
* **User Import** and **Import Profile Updates**: This confirms that Okta fetches user data from MoEngage.
* **Create Users** and **Update User Attributes**: This confirms that Okta sends new users and profile changes to MoEngage.
* **Push Groups** and **Import Groups**: This confirms that group memberships and roles are synchronized.
8. Click **Close** and then **Save.** 
 If you do not select **Push New Users**, MoEngage does not create users for the newly assigned users, and they won't be able to sign in. You can select **Push Groups** to automatically assign specific permissions to a group of users in MoEngage based on their Okta details, eliminating the need for manual user management.
## Step 5: Enable Provisioning Actions
To ensure identity data flows correctly from Okta to MoEngage, you must enable Create, Update, and Deactivate provisioning actions within the To App settings. To enable the provisioning actions, perform the following steps:
1. On the **Provisioning** tab, in the left navigation pane, under **Settings**, click **To App**.
2. Click **Edit** next to the **Provisioning to App** section.
3. Select the **Enable** check box for the following actions:
* **Create Users**: Grant Okta permission to create users on MoEngage.
* **Update User Attributes**: Sync profile updates from Okta to MoEngage.
* **Deactivate Users**: Revoke MoEngage access immediately when a user is unassigned in Okta.
If you do not select **Push New Users**, MoEngage does not create users for the newly assigned users, and they won't be able to sign in. You can select **Push Groups** to automatically assign specific permissions to a group of users in MoEngage based on their Okta details, eliminating the need for manual user management.
## Step 5: Enable Provisioning Actions
To ensure identity data flows correctly from Okta to MoEngage, you must enable Create, Update, and Deactivate provisioning actions within the To App settings. To enable the provisioning actions, perform the following steps:
1. On the **Provisioning** tab, in the left navigation pane, under **Settings**, click **To App**.
2. Click **Edit** next to the **Provisioning to App** section.
3. Select the **Enable** check box for the following actions:
* **Create Users**: Grant Okta permission to create users on MoEngage.
* **Update User Attributes**: Sync profile updates from Okta to MoEngage.
* **Deactivate Users**: Revoke MoEngage access immediately when a user is unassigned in Okta. 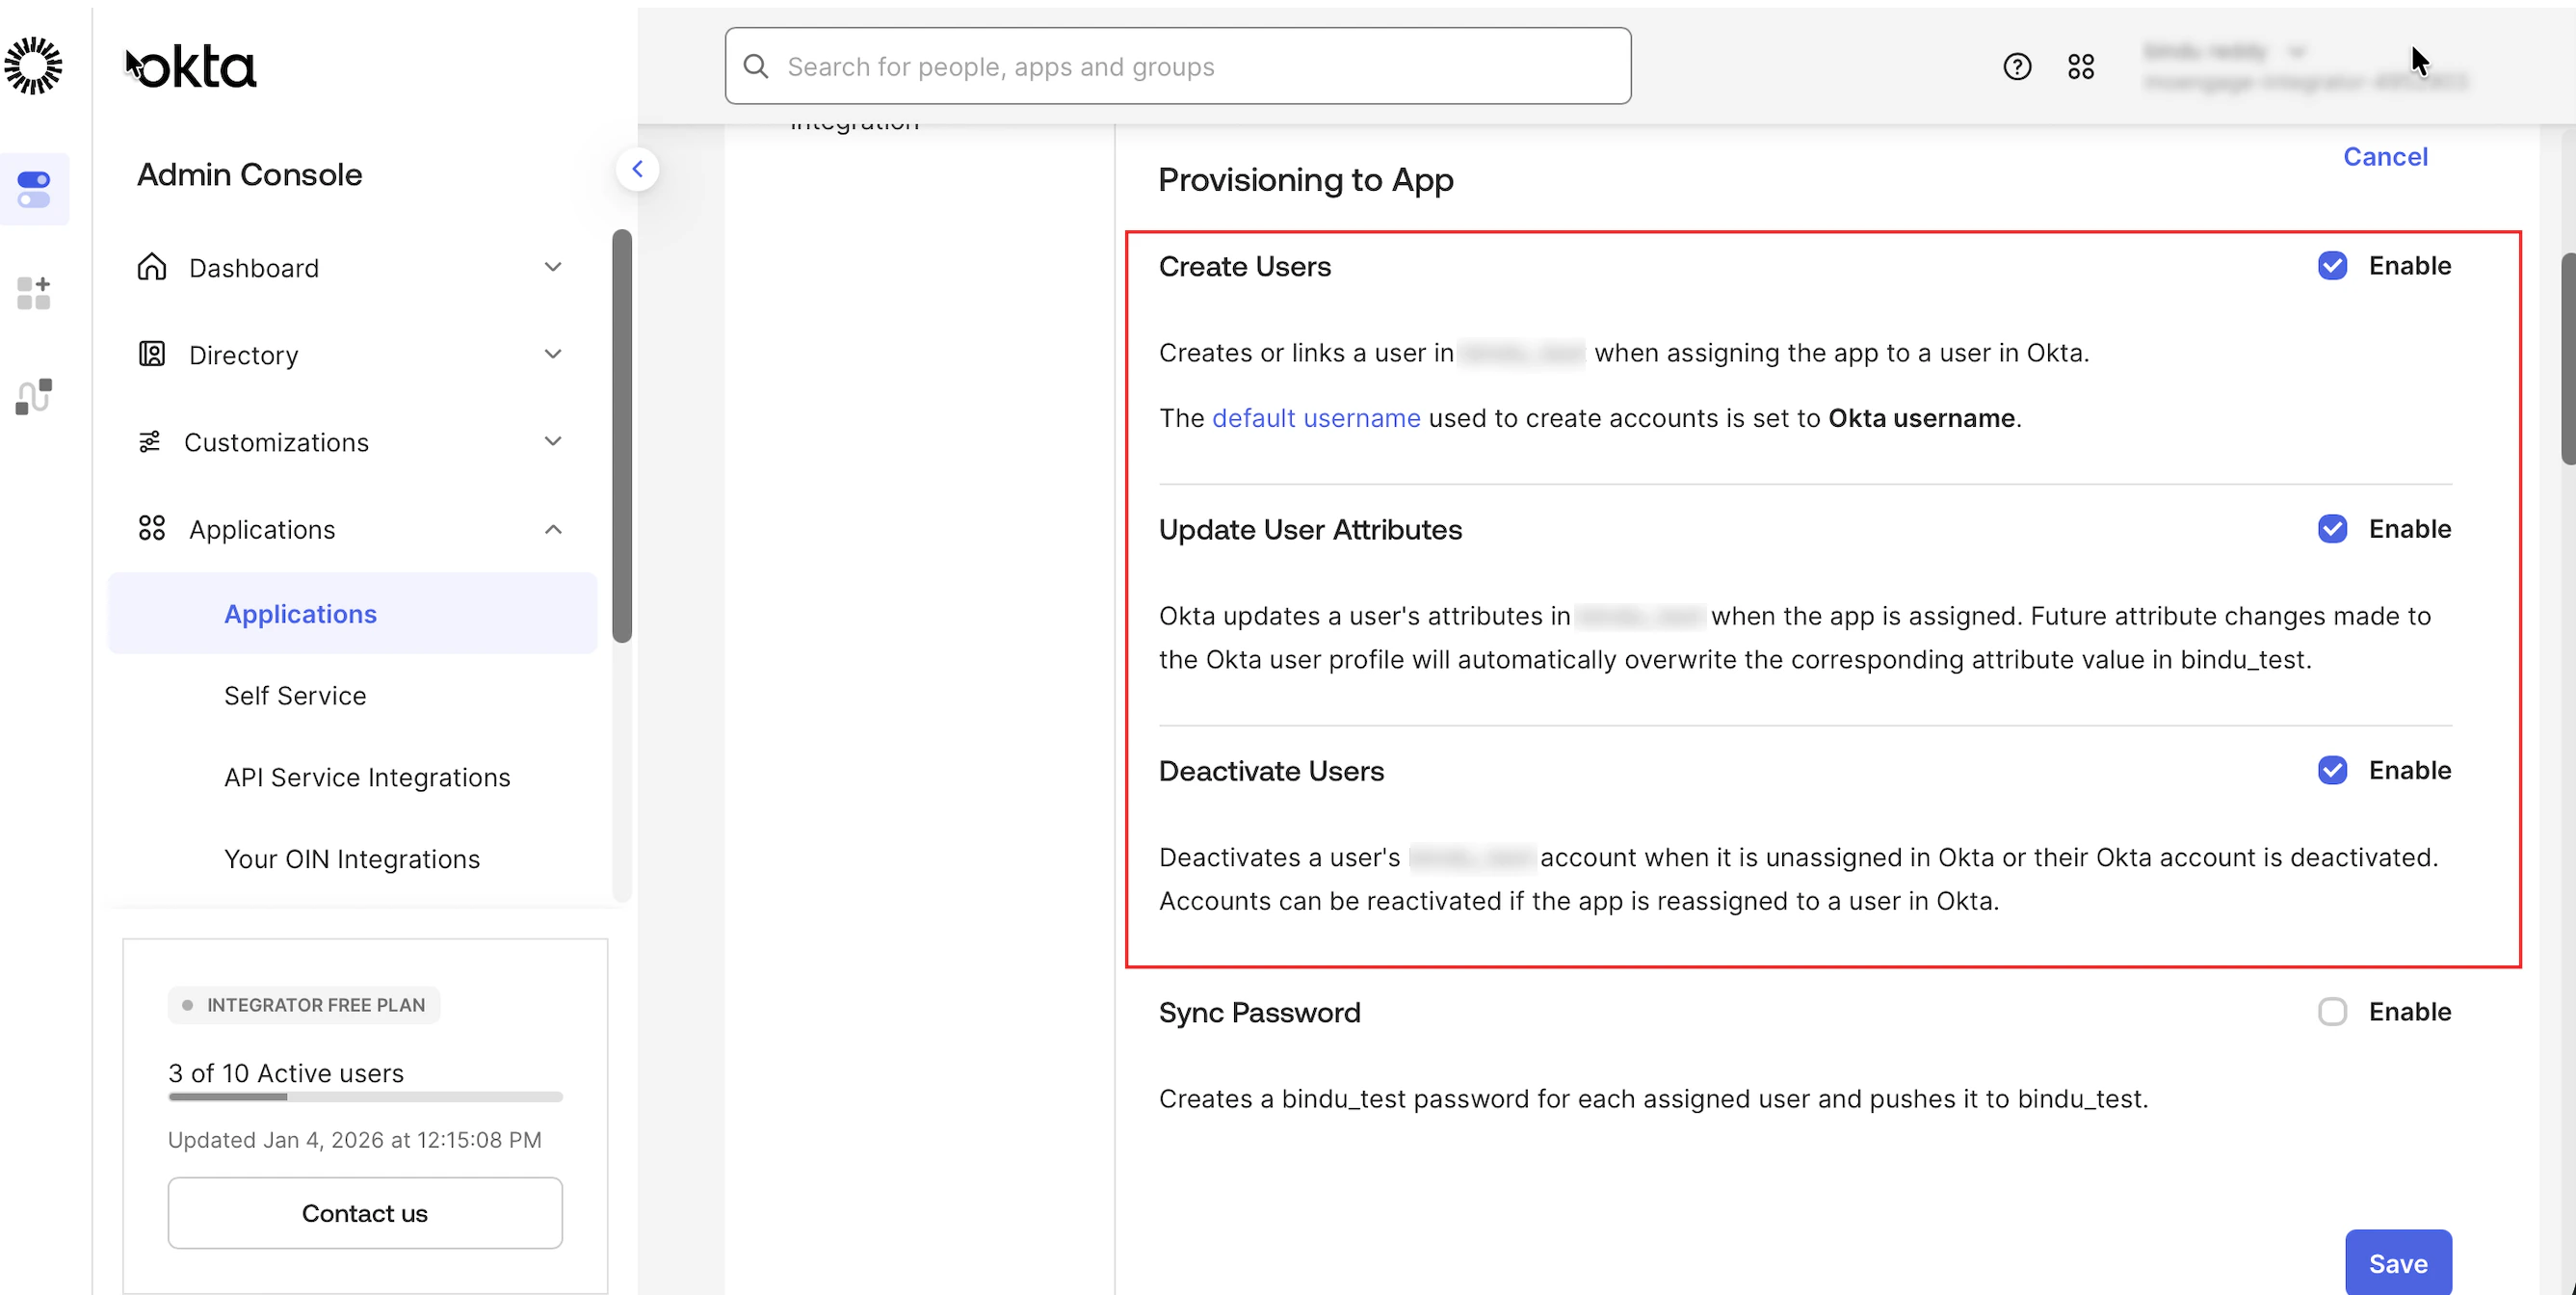 ## Step 6: Create Attribute Mappings
Grant specific write permissions in Okta and map the role attribute to help ensure that users are provisioned with the correct permissions in MoEngage. You must create roles in MoEngage to assign them to users correctly. This attribute mapping helps ensure that users receive their intended access levels rather than the **Default** role that was configured earlier.
### Step 6.1: Configure Profile Attributes
**Information**
MoEngage prioritizes attributes passed via the external namespace. If multiple role attributes are configured, MoEngage resolves them in the following order:
* **extension.role (urn:ietf:params:scim:schemas:extension:moengage:2.0:User.role):** Attributes defined with the 2.0 namespace (Highest Priority).
* **standard role.role**: Attributes defined under the role namespace. (This parameter will be deprecated in a future release.
* **Default Role**: If no roles are passed via SCIM, the system uses the default role configured in the MoEngage workspace ([Step 3](/user-guide/settings/account/security/system-for-cross-domain-identity-management-scim#step-3-configure-scim-in-moengage-and-generate-token)).
To configure the custom role attribute, perform the following steps:
1. Navigate to the **Okta Admin Console**.
2. On the left navigation menu, click **Directory** > **Profile Editor**.\
## Step 6: Create Attribute Mappings
Grant specific write permissions in Okta and map the role attribute to help ensure that users are provisioned with the correct permissions in MoEngage. You must create roles in MoEngage to assign them to users correctly. This attribute mapping helps ensure that users receive their intended access levels rather than the **Default** role that was configured earlier.
### Step 6.1: Configure Profile Attributes
**Information**
MoEngage prioritizes attributes passed via the external namespace. If multiple role attributes are configured, MoEngage resolves them in the following order:
* **extension.role (urn:ietf:params:scim:schemas:extension:moengage:2.0:User.role):** Attributes defined with the 2.0 namespace (Highest Priority).
* **standard role.role**: Attributes defined under the role namespace. (This parameter will be deprecated in a future release.
* **Default Role**: If no roles are passed via SCIM, the system uses the default role configured in the MoEngage workspace ([Step 3](/user-guide/settings/account/security/system-for-cross-domain-identity-management-scim#step-3-configure-scim-in-moengage-and-generate-token)).
To configure the custom role attribute, perform the following steps:
1. Navigate to the **Okta Admin Console**.
2. On the left navigation menu, click **Directory** > **Profile Editor**.\ 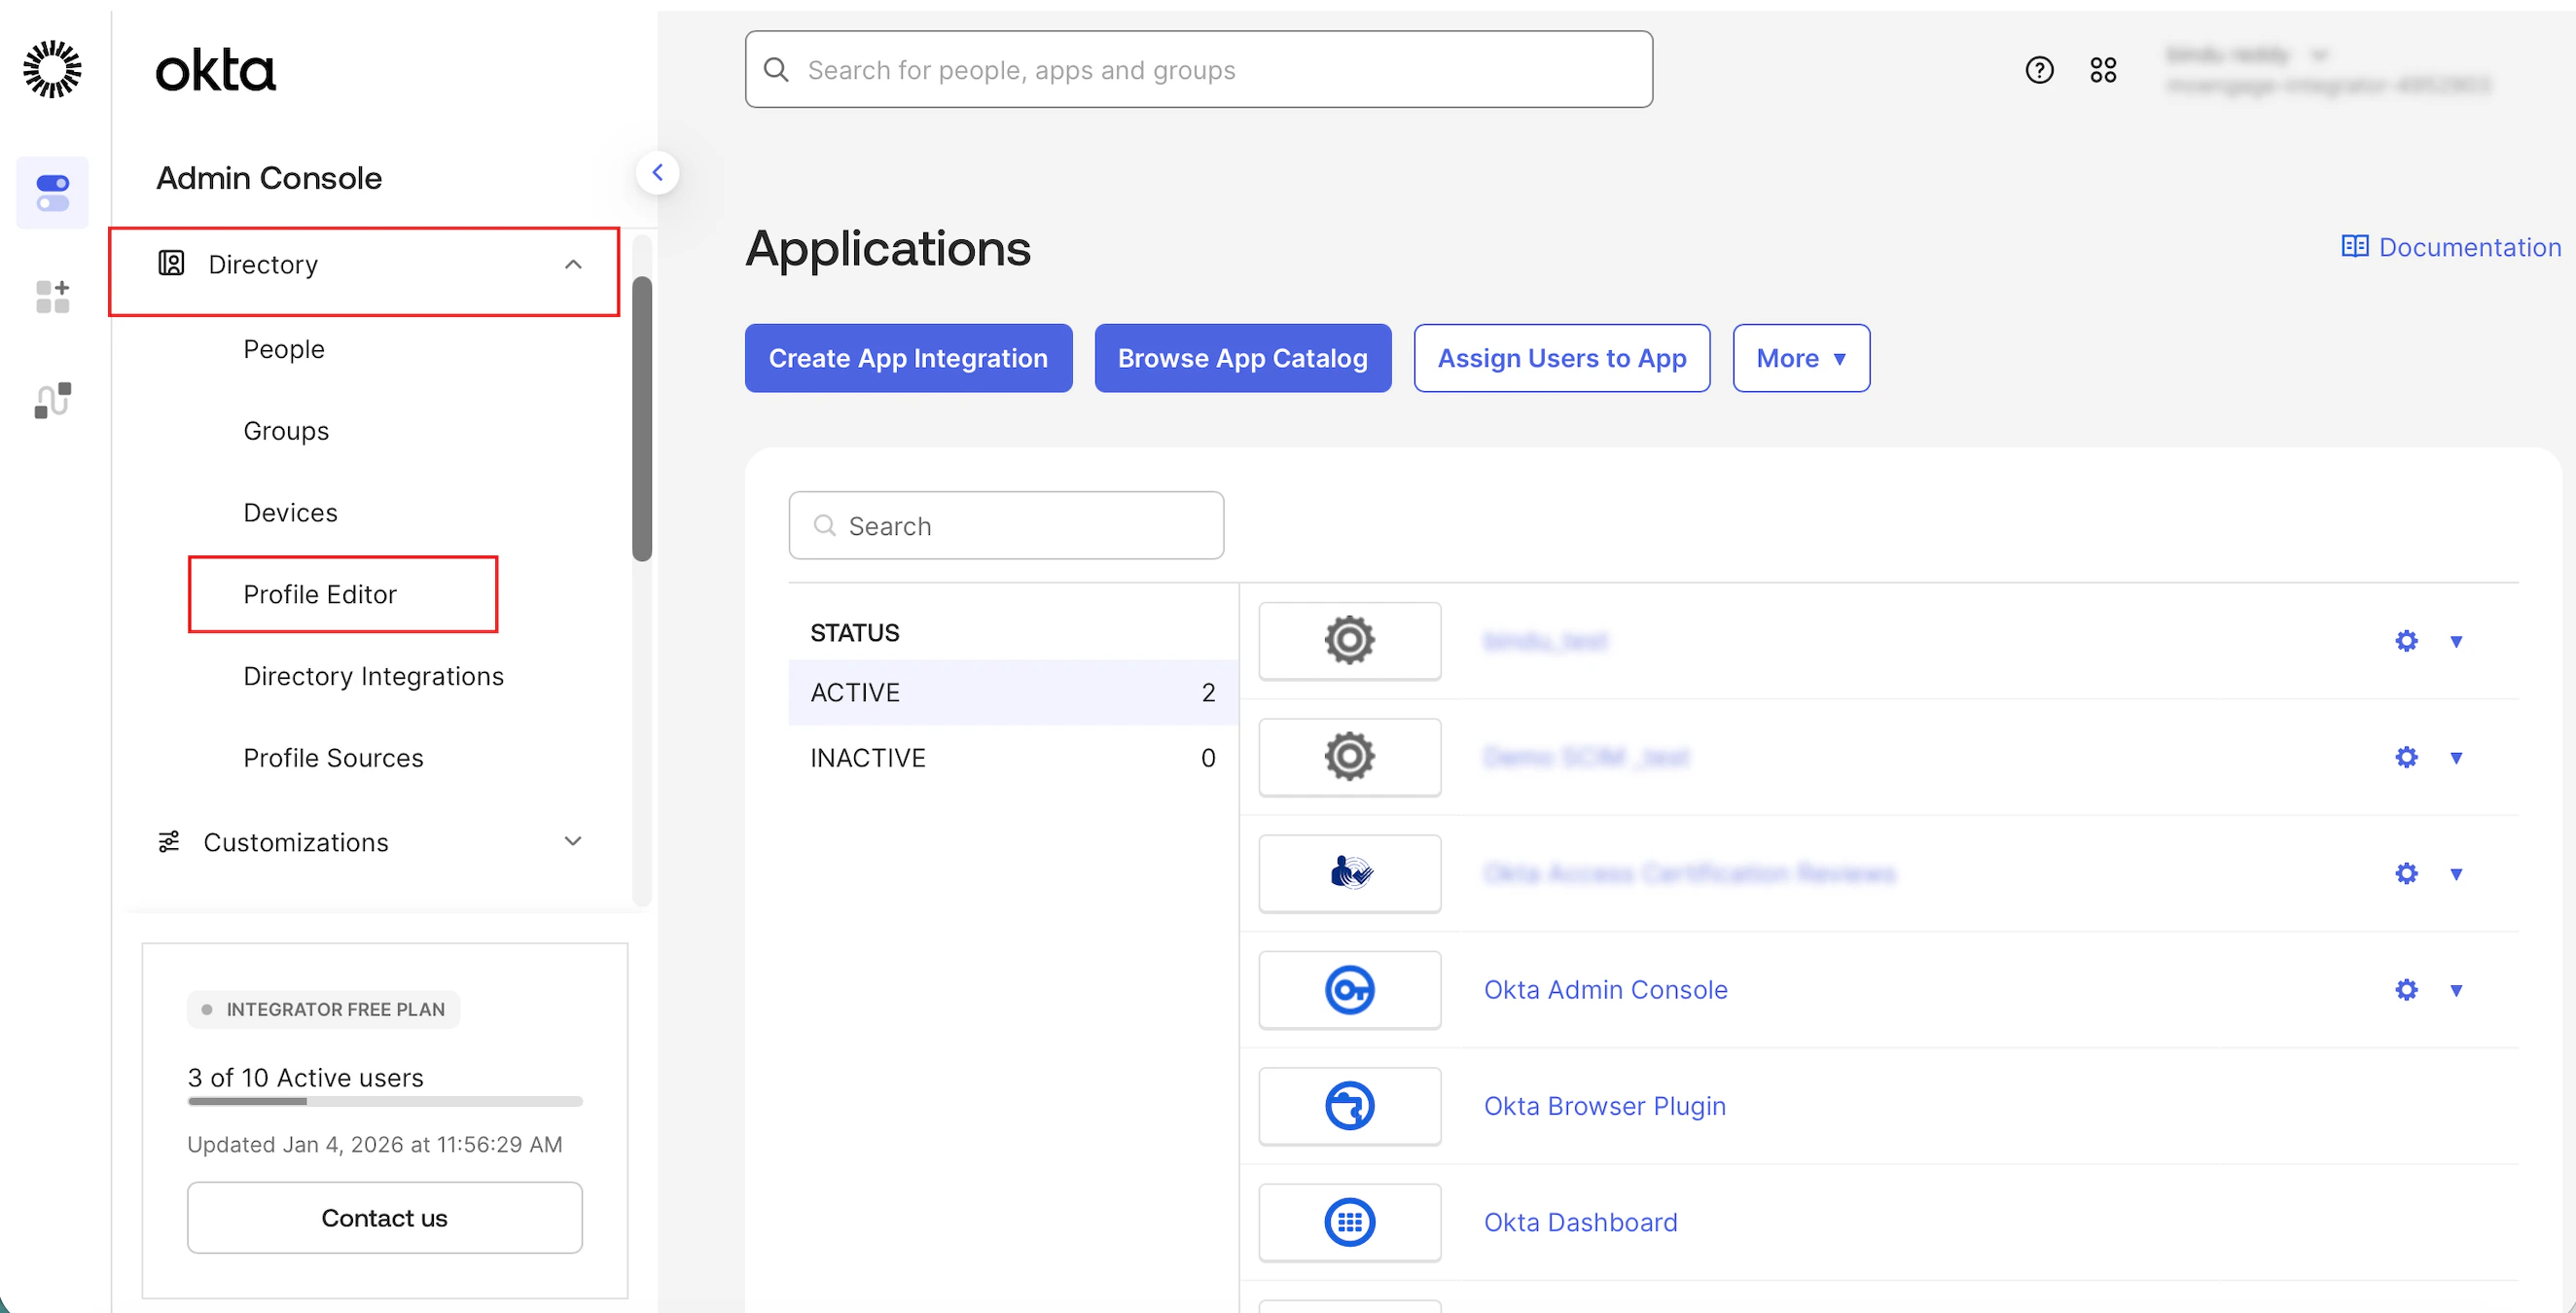 3. On the **Profile Editor** page, find your application in the list or use the **Search for people, apps, and groups** box to find and select the appropriate application from your list.
 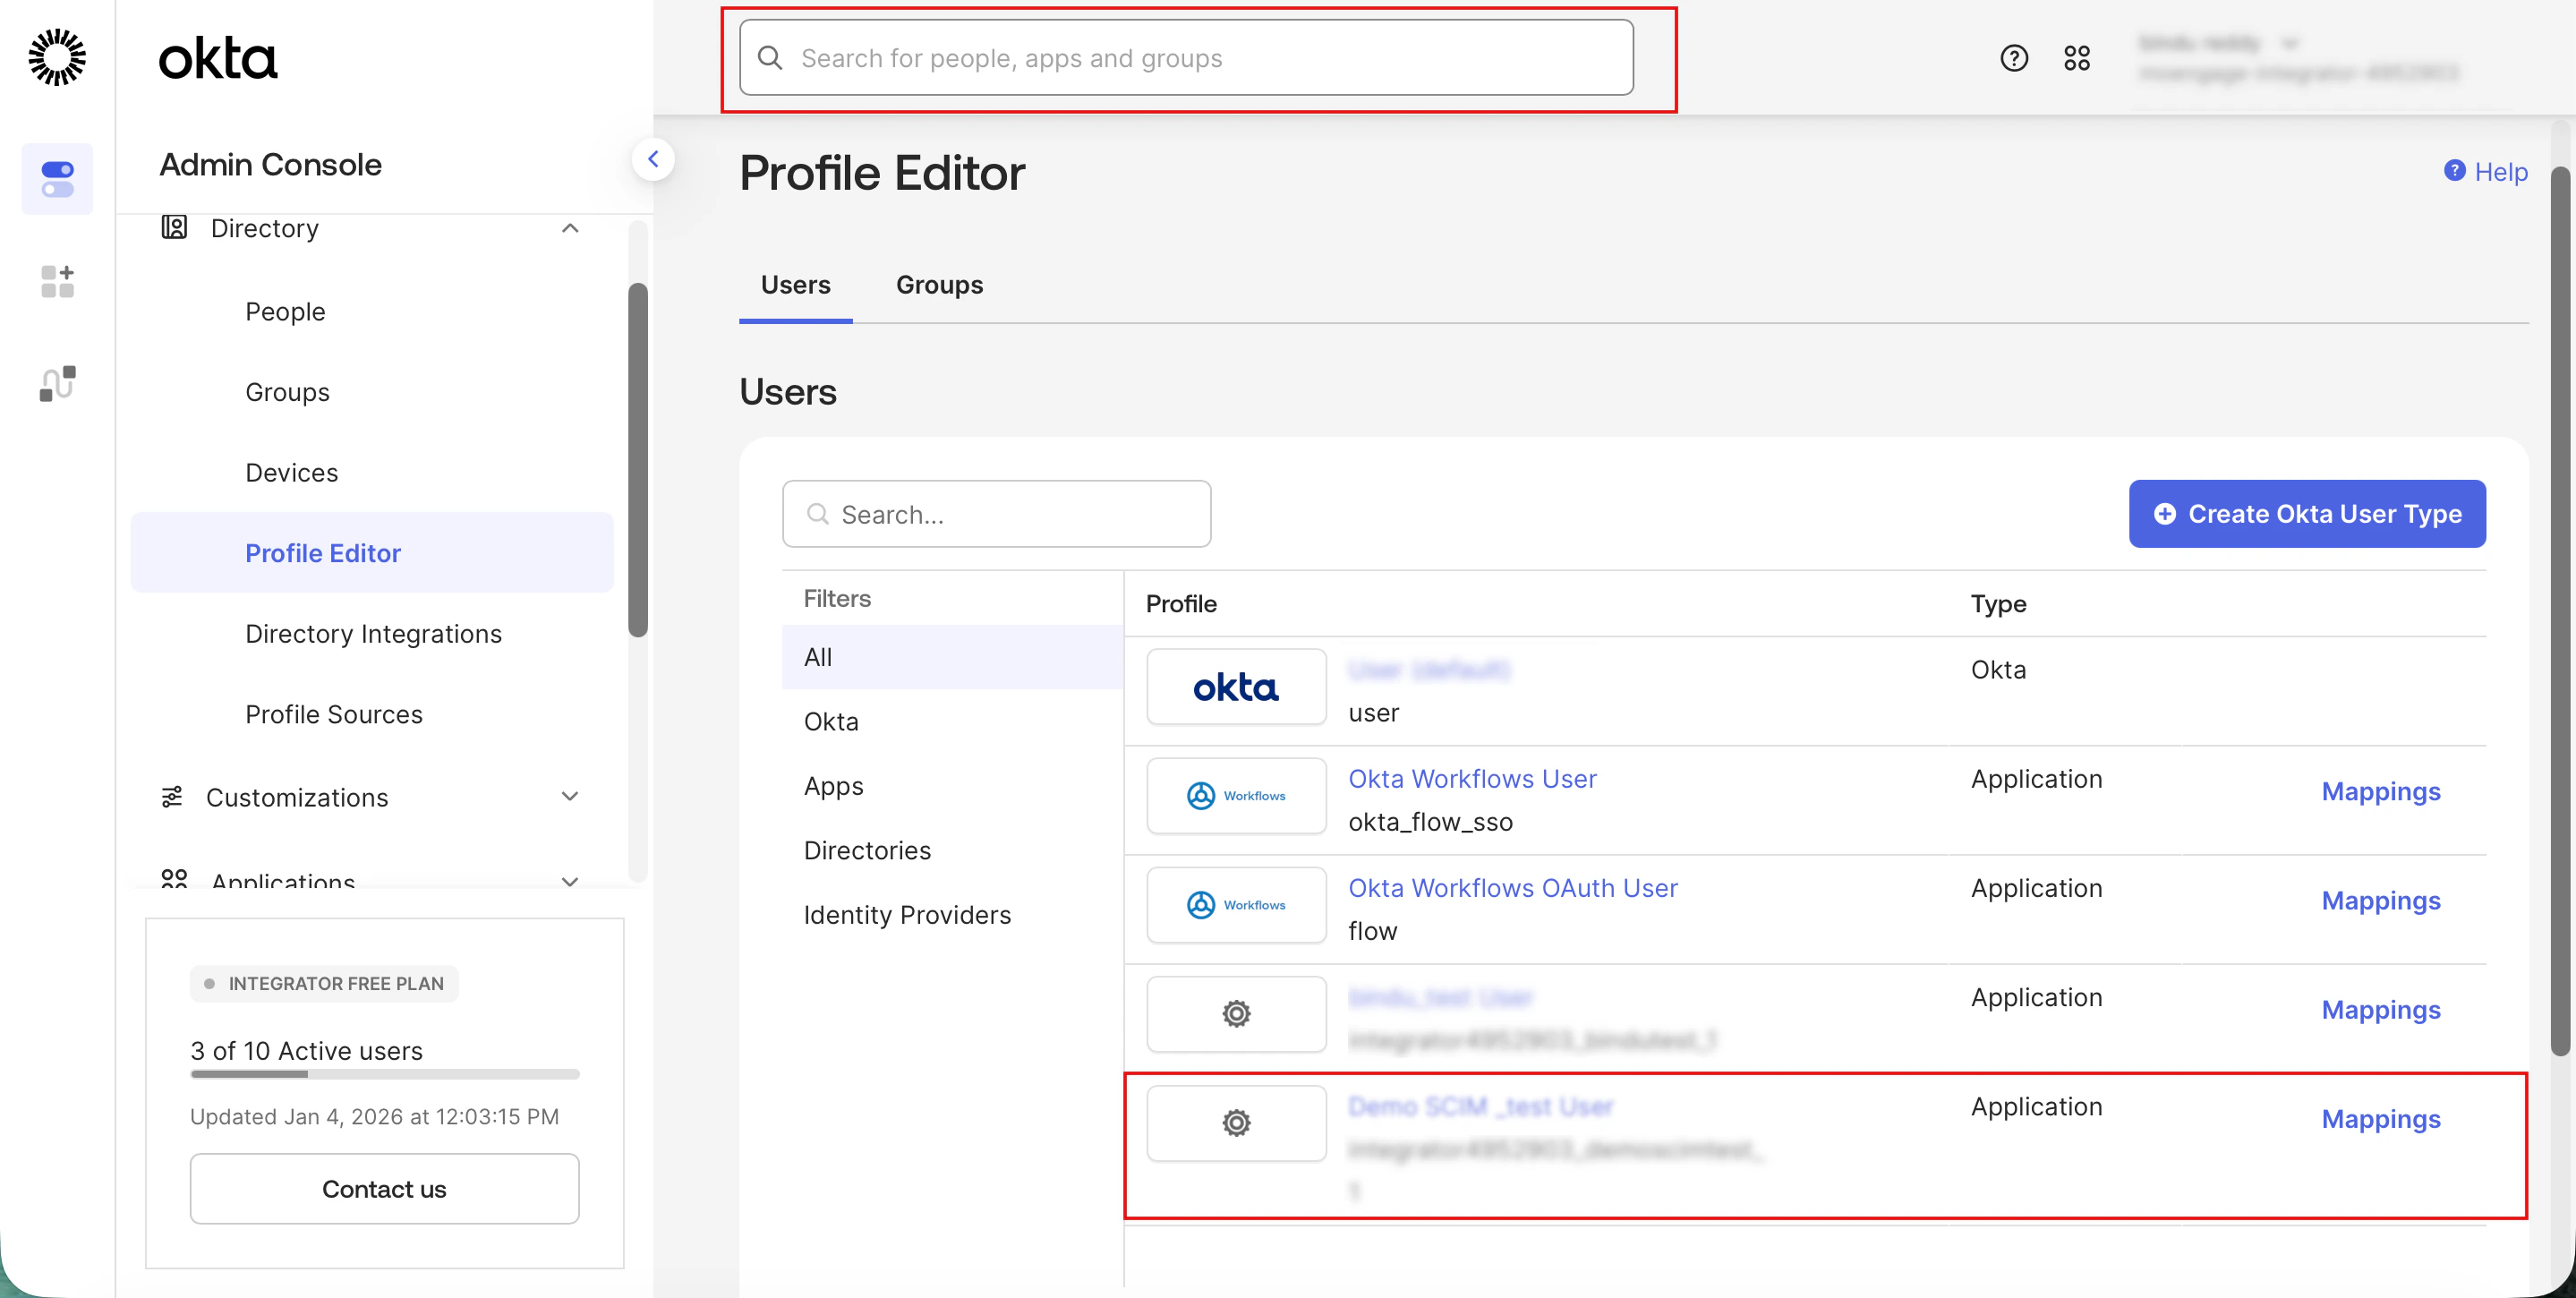 4. Under the **Attributes** section, click **+ Add Attribute**.
  The **Add Attribute** dialogue box is displayed.
5. In the **Add Attribute** dialogue box, configure the following details:
1. In the **Data type**list, click **string**.
2. In the**Display name**box, enter role (for example, MoEngage role).
3. In the **Variable name** box, enter role (any value can be defined by the client).
4. In the **External name** box, enter role (This is the specific name passed within the schema).
5. In the **External namespace,** enter *urn:ietf:params:scim:schemas:extension:moengage:2.0:User*
The **Add Attribute** dialogue box is displayed.
5. In the **Add Attribute** dialogue box, configure the following details:
1. In the **Data type**list, click **string**.
2. In the**Display name**box, enter role (for example, MoEngage role).
3. In the **Variable name** box, enter role (any value can be defined by the client).
4. In the **External name** box, enter role (This is the specific name passed within the schema).
5. In the **External namespace,** enter *urn:ietf:params:scim:schemas:extension:moengage:2.0:User* 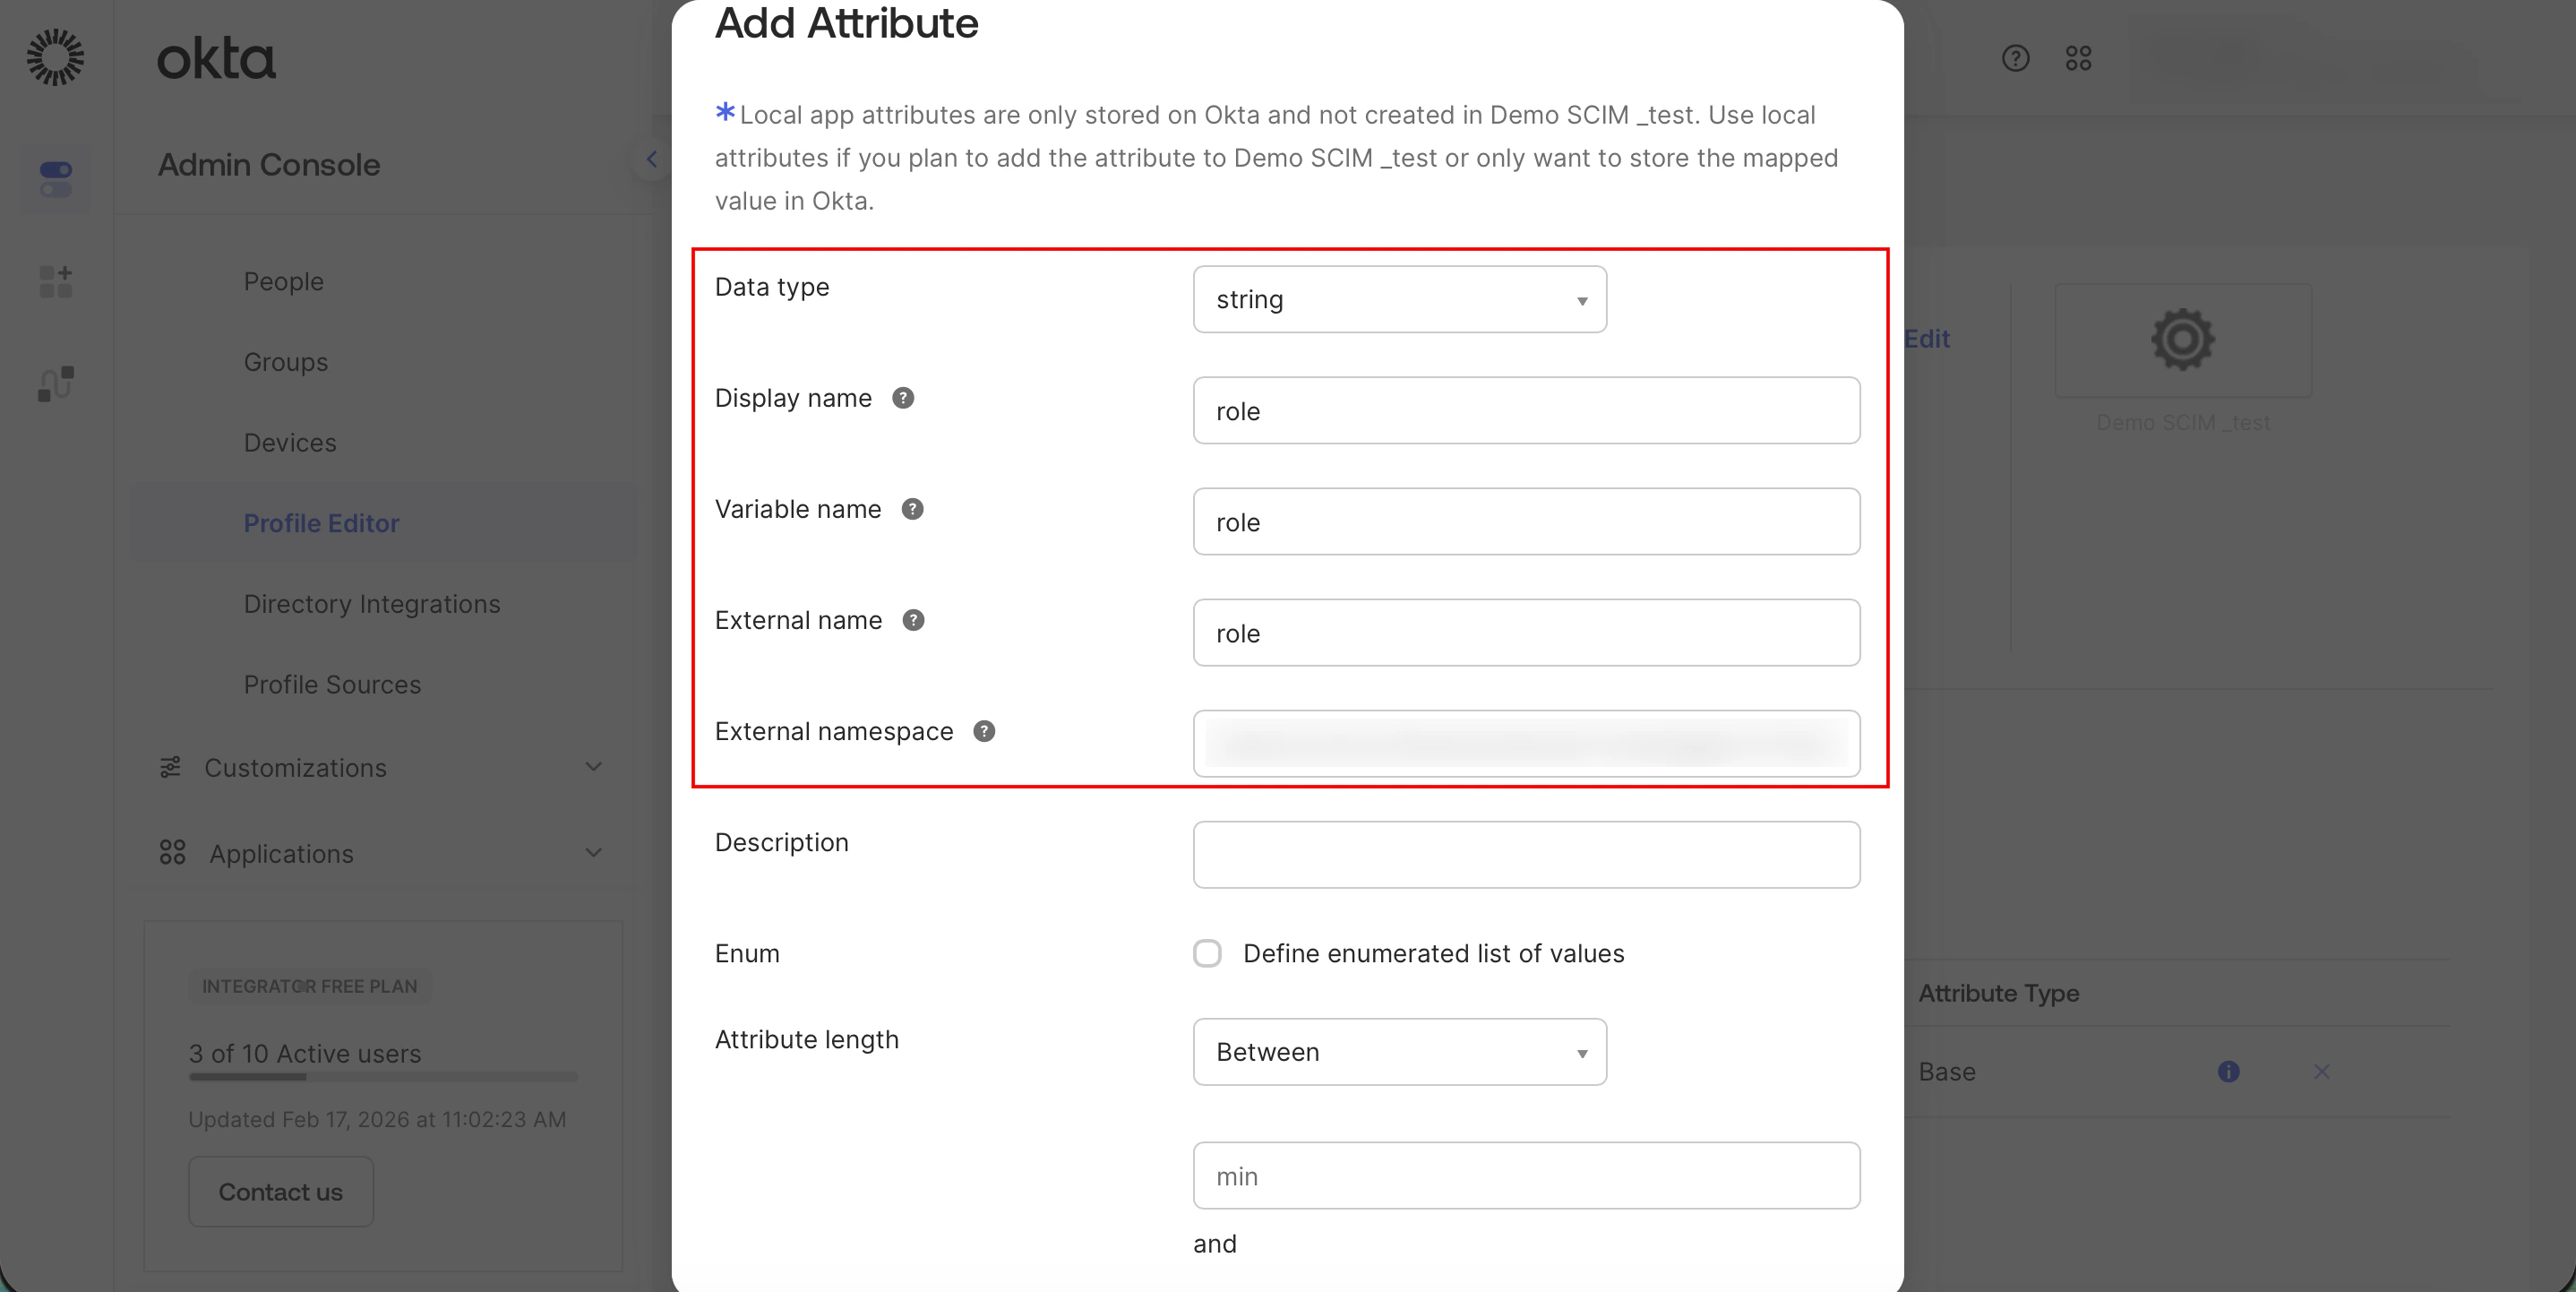 6. Scroll down and set the following:
1. **Attribute required**: Select the **Yes** check box to enforce that a role is provided during the user invitation process in Okta.\
**Note**: This must be set to **Yes**. If a user invites an email without a role, MoEngage needs **Attribute required** to be active so it can fetch the default role from the MoEngage workspace. This ensures both default and custom role scenarios work during testing.
2. **Attribute type:**
* **For Individual Assigning**: Select the **Personal** radio button.
* **For Group Assigning (Bulk Update)**: Select the **Group** radio button.
7. Click **Save**.
6. Scroll down and set the following:
1. **Attribute required**: Select the **Yes** check box to enforce that a role is provided during the user invitation process in Okta.\
**Note**: This must be set to **Yes**. If a user invites an email without a role, MoEngage needs **Attribute required** to be active so it can fetch the default role from the MoEngage workspace. This ensures both default and custom role scenarios work during testing.
2. **Attribute type:**
* **For Individual Assigning**: Select the **Personal** radio button.
* **For Group Assigning (Bulk Update)**: Select the **Group** radio button.
7. Click **Save**.  The MoEngage **Role** is now established in the application's attribute list.
### Step 6.2: Group Creation and Role Updates
To update roles effectively for groups, perform the following sequence:
### Step 6.2.1: Create a Group
1. Navigate to the **Okta Admin Console**.
2. On the left navigation menu, click **DirectoryGroups**.
3. Click **Add group**.
The MoEngage **Role** is now established in the application's attribute list.
### Step 6.2: Group Creation and Role Updates
To update roles effectively for groups, perform the following sequence:
### Step 6.2.1: Create a Group
1. Navigate to the **Okta Admin Console**.
2. On the left navigation menu, click **DirectoryGroups**.
3. Click **Add group**.  The **Add group** dialog box appears.
1. In the **Name** box, enter a group's name.
2. In the **Description** box (optional), provide a description.
4. Click **Save**.
The **Add group** dialog box appears.
1. In the **Name** box, enter a group's name.
2. In the **Description** box (optional), provide a description.
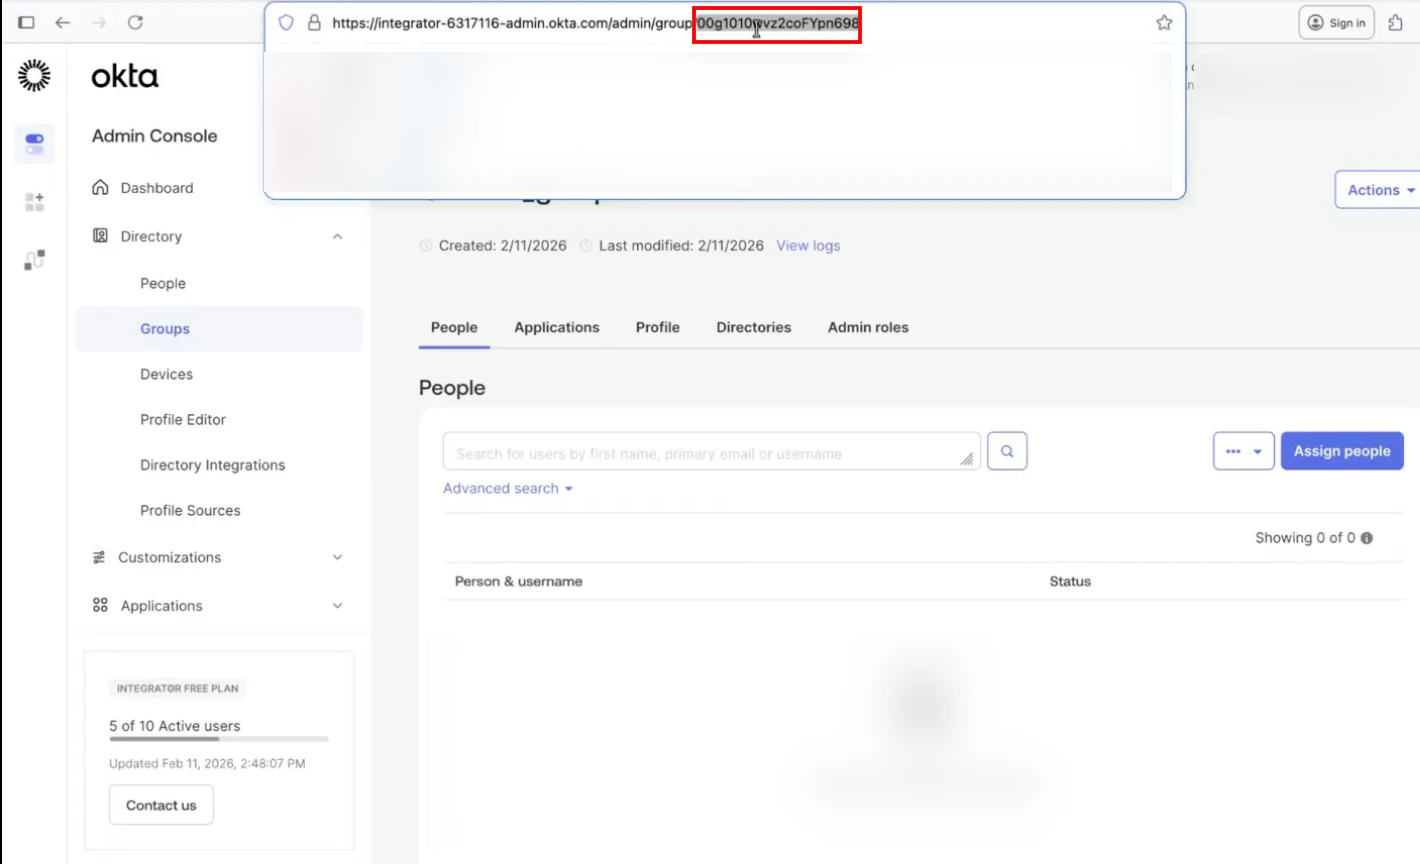
4. Click **Save**. 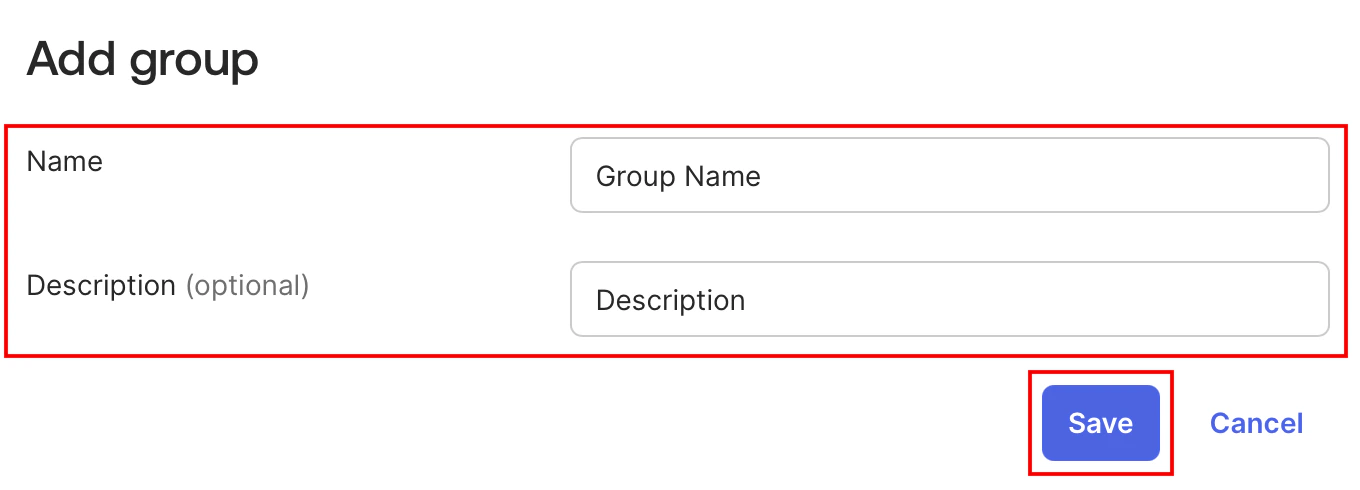 5. After the group is created, click it and copy the Group ID from the browser's URL (this is the unique identifier required for mapping logic).
  ### Step 6.2.2: Assign Users
1. Within the **Groups** page, click **Assign People**.
### Step 6.2.2: Assign Users
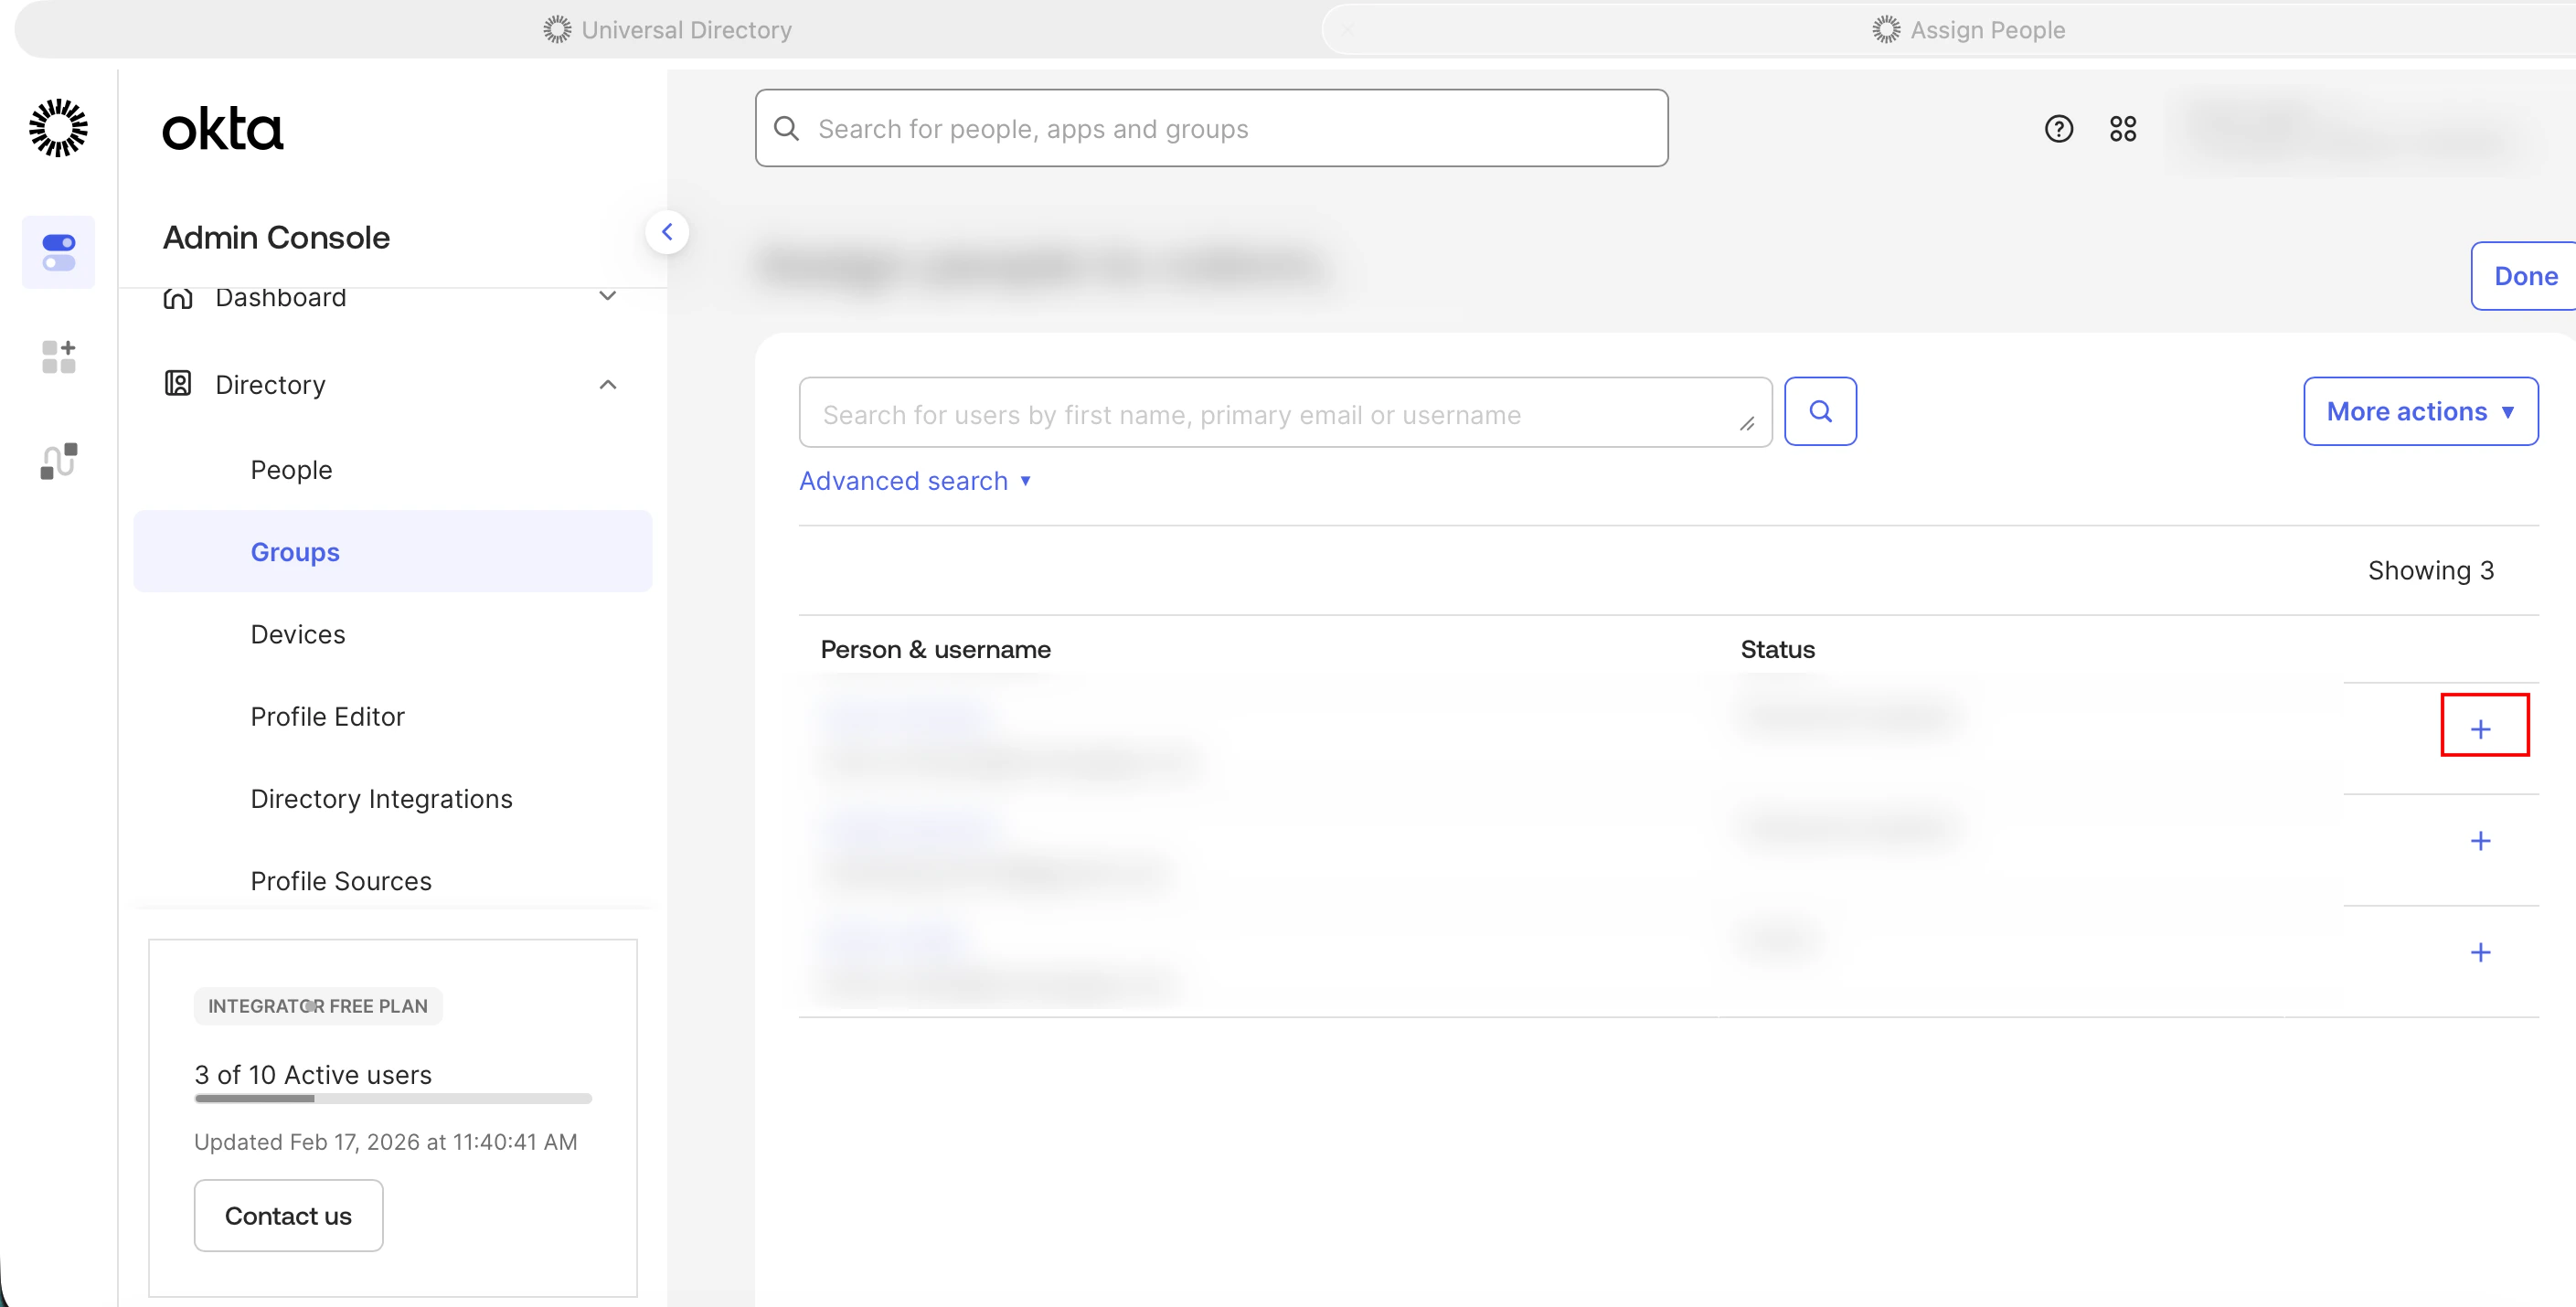
1. Within the **Groups** page, click **Assign People**. 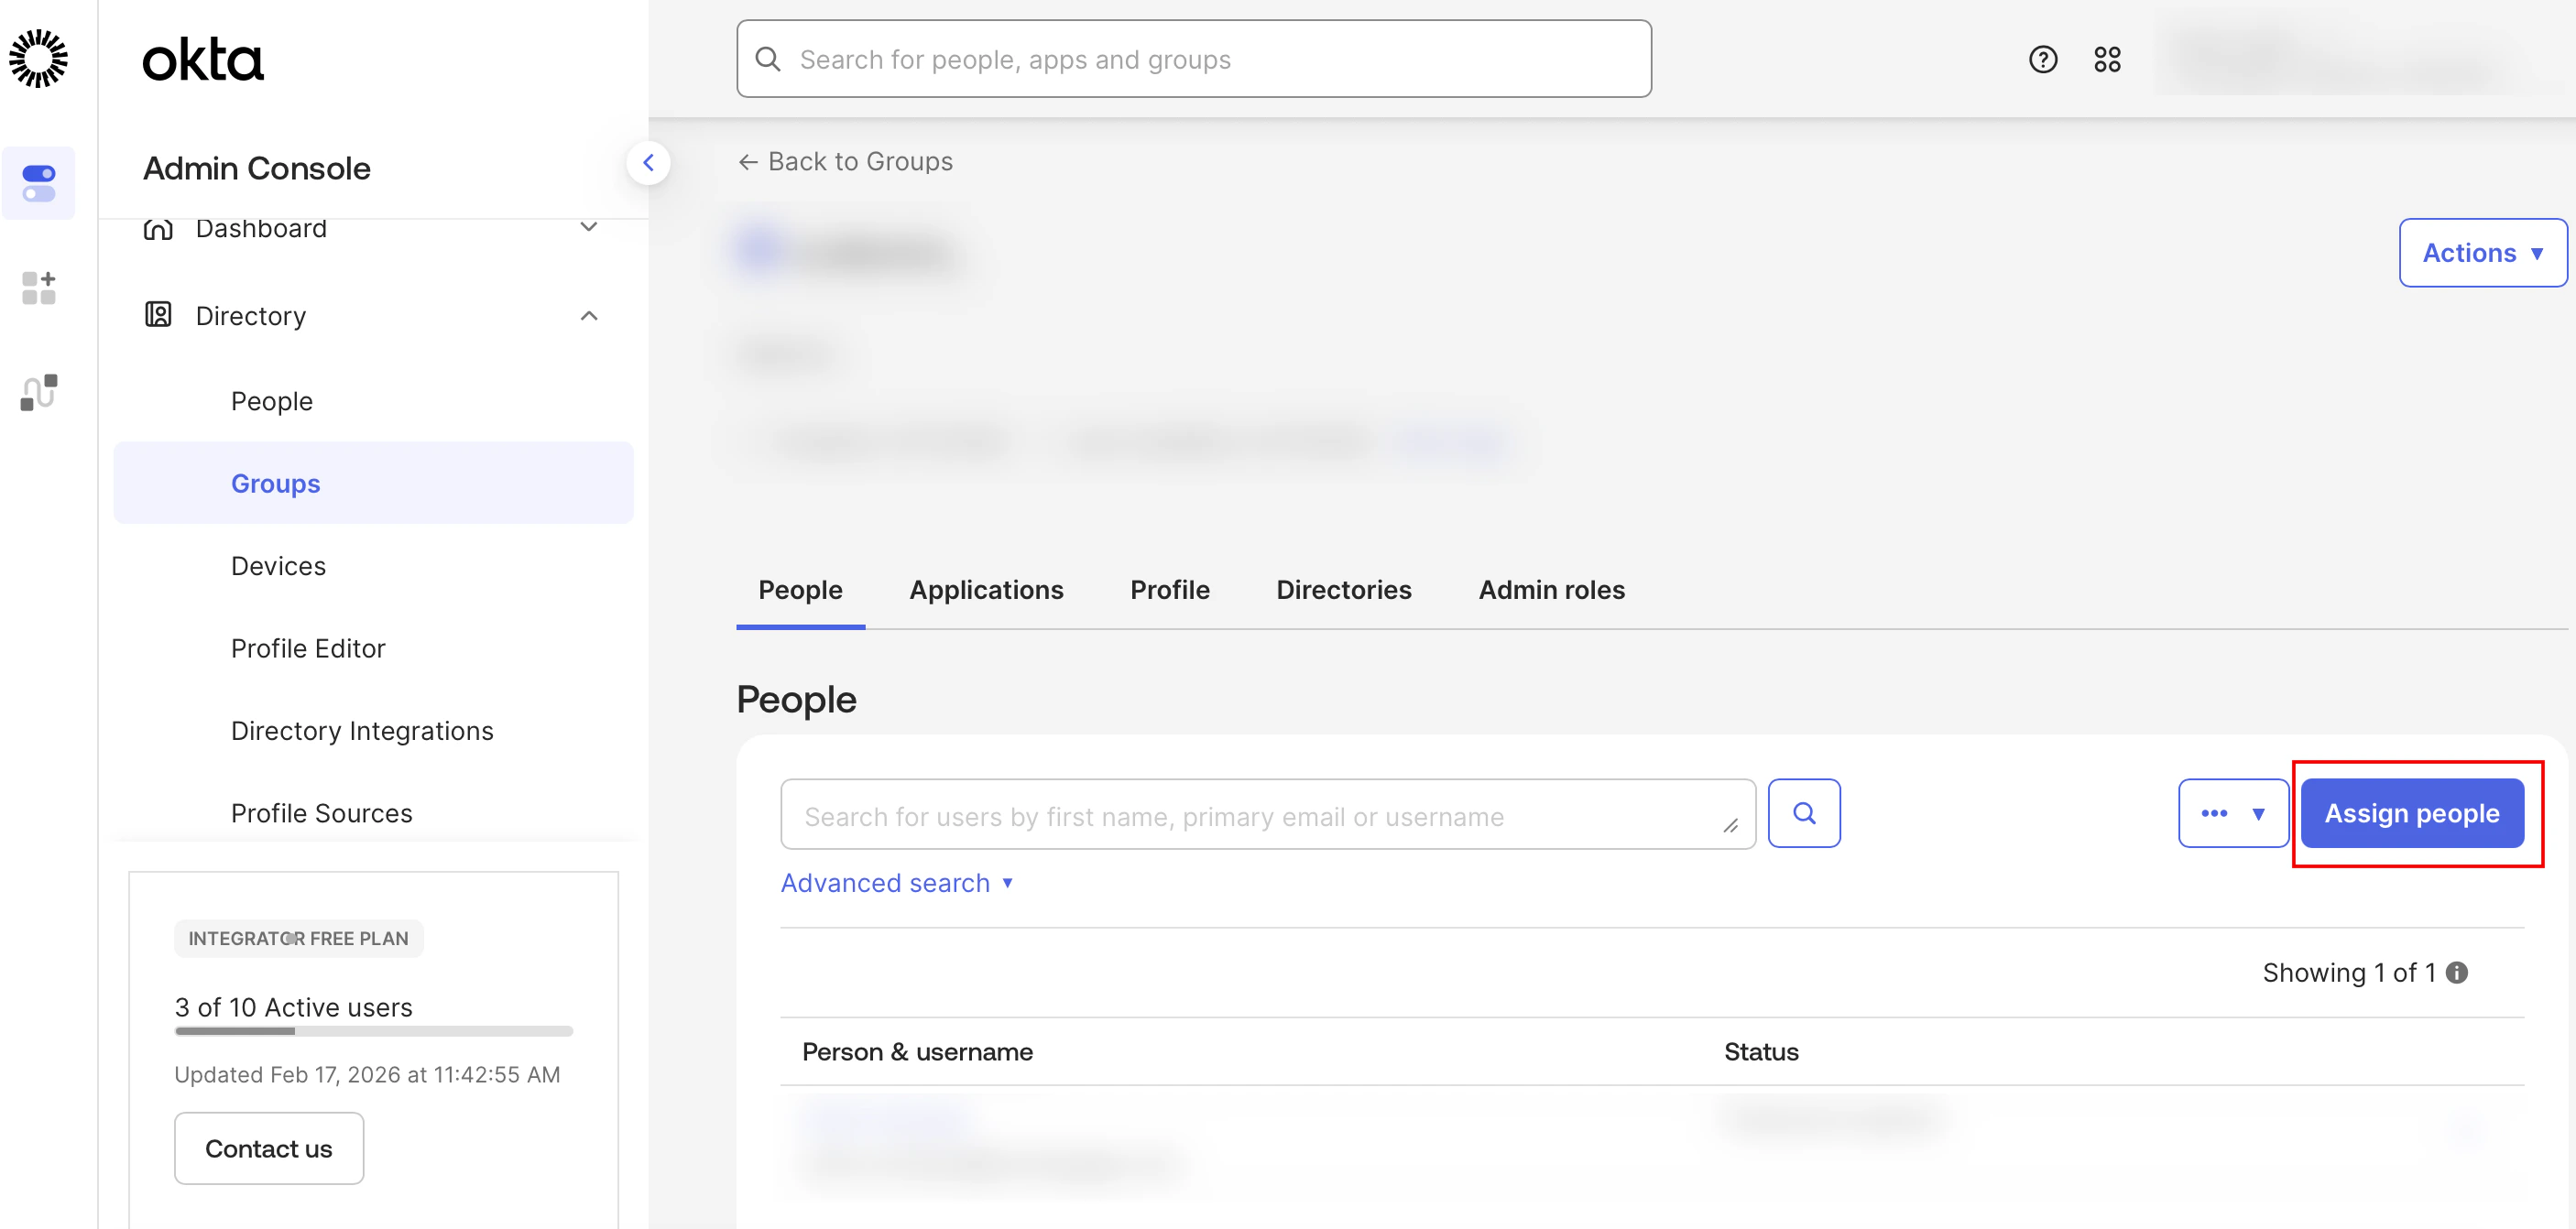 2. Click the **+** (plus) icon next to each user whose MoEngage roles need to be updated or assigned via this group.
  ### Step 6.2.3: Update Okta User Attribute
1. Navigate to **Directory** > **Profile Editor**. On the **Profile Editor** page, the **All** filter is selected by default.
2. Click the **Okta** filter and click the **Okta User (default)** profile.
### Step 6.2.3: Update Okta User Attribute
1. Navigate to **Directory** > **Profile Editor**. On the **Profile Editor** page, the **All** filter is selected by default.
2. Click the **Okta** filter and click the **Okta User (default)** profile. 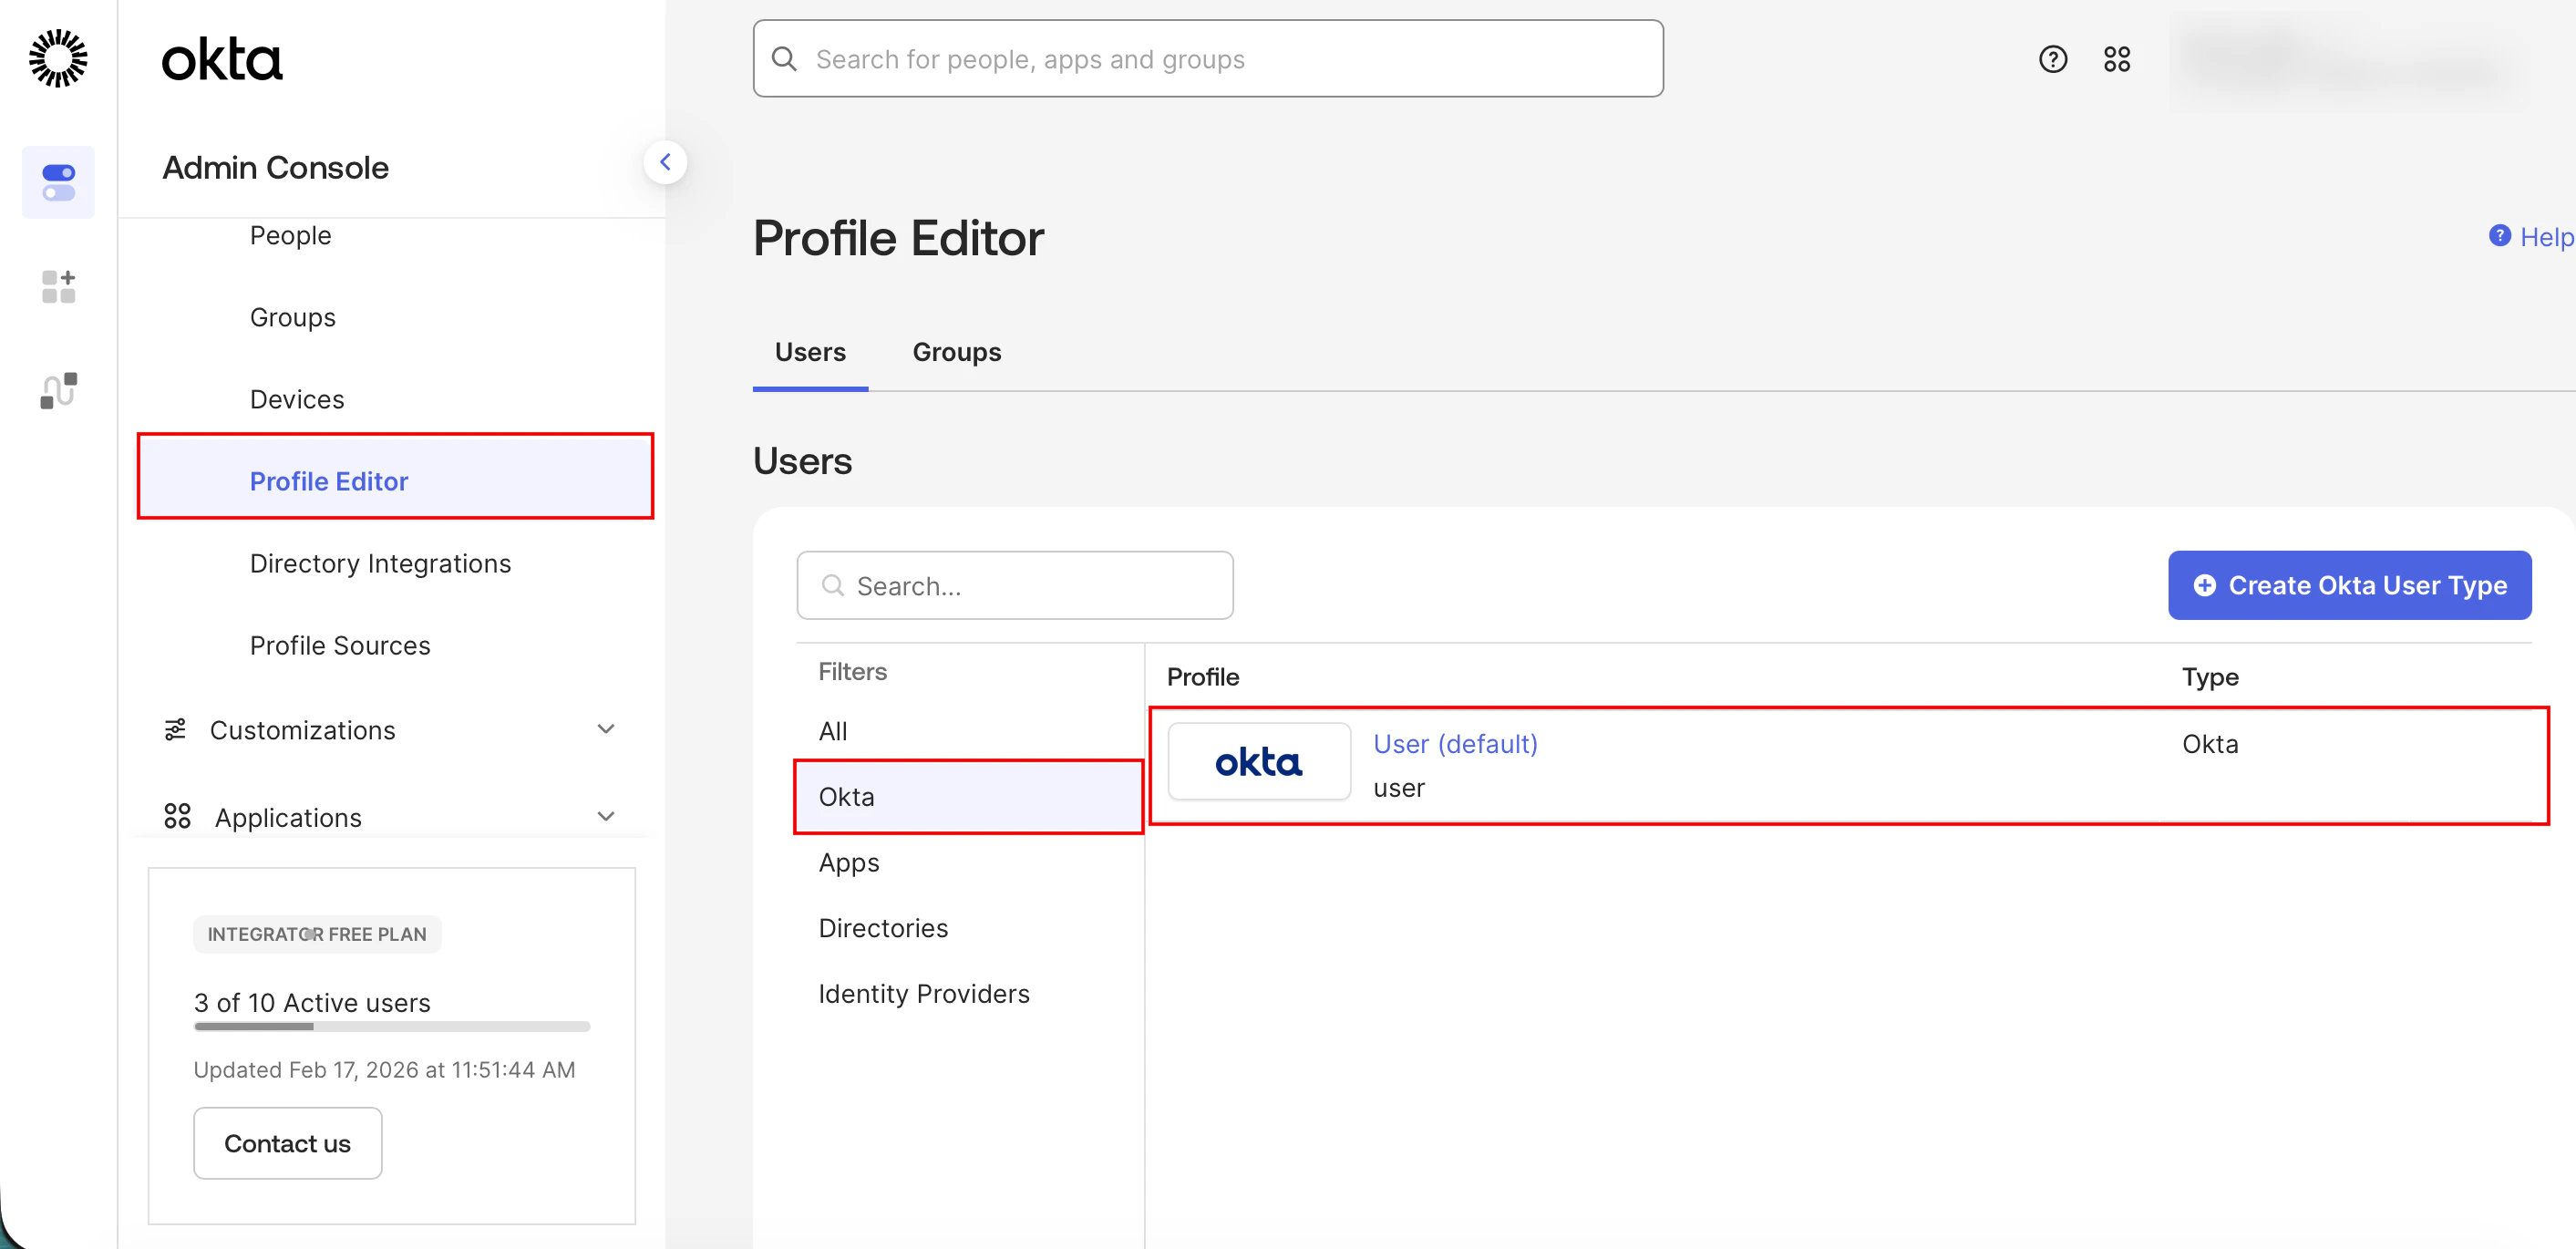 3. Scroll to the end of the page and verify whether the role attribute created in [Step 6.1](/user-guide/settings/account/security/system-for-cross-domain-identity-management-scim#step-6-1-configure-profile-attributes) exists. If the attribute is missing, click **+ Add Attribute**.
4. In the **Add Attribute** dialog box, add a role attribute with the following settings:
1. In the **Data type** list, click string.
2. In the **Display name** box, enter role.
3. In the **Variable name** box, enter role.
4. In the **Description** (optional) box, enter a description for the role.
3. Scroll to the end of the page and verify whether the role attribute created in [Step 6.1](/user-guide/settings/account/security/system-for-cross-domain-identity-management-scim#step-6-1-configure-profile-attributes) exists. If the attribute is missing, click **+ Add Attribute**.
4. In the **Add Attribute** dialog box, add a role attribute with the following settings:
1. In the **Data type** list, click string.
2. In the **Display name** box, enter role.
3. In the **Variable name** box, enter role.
4. In the **Description** (optional) box, enter a description for the role. 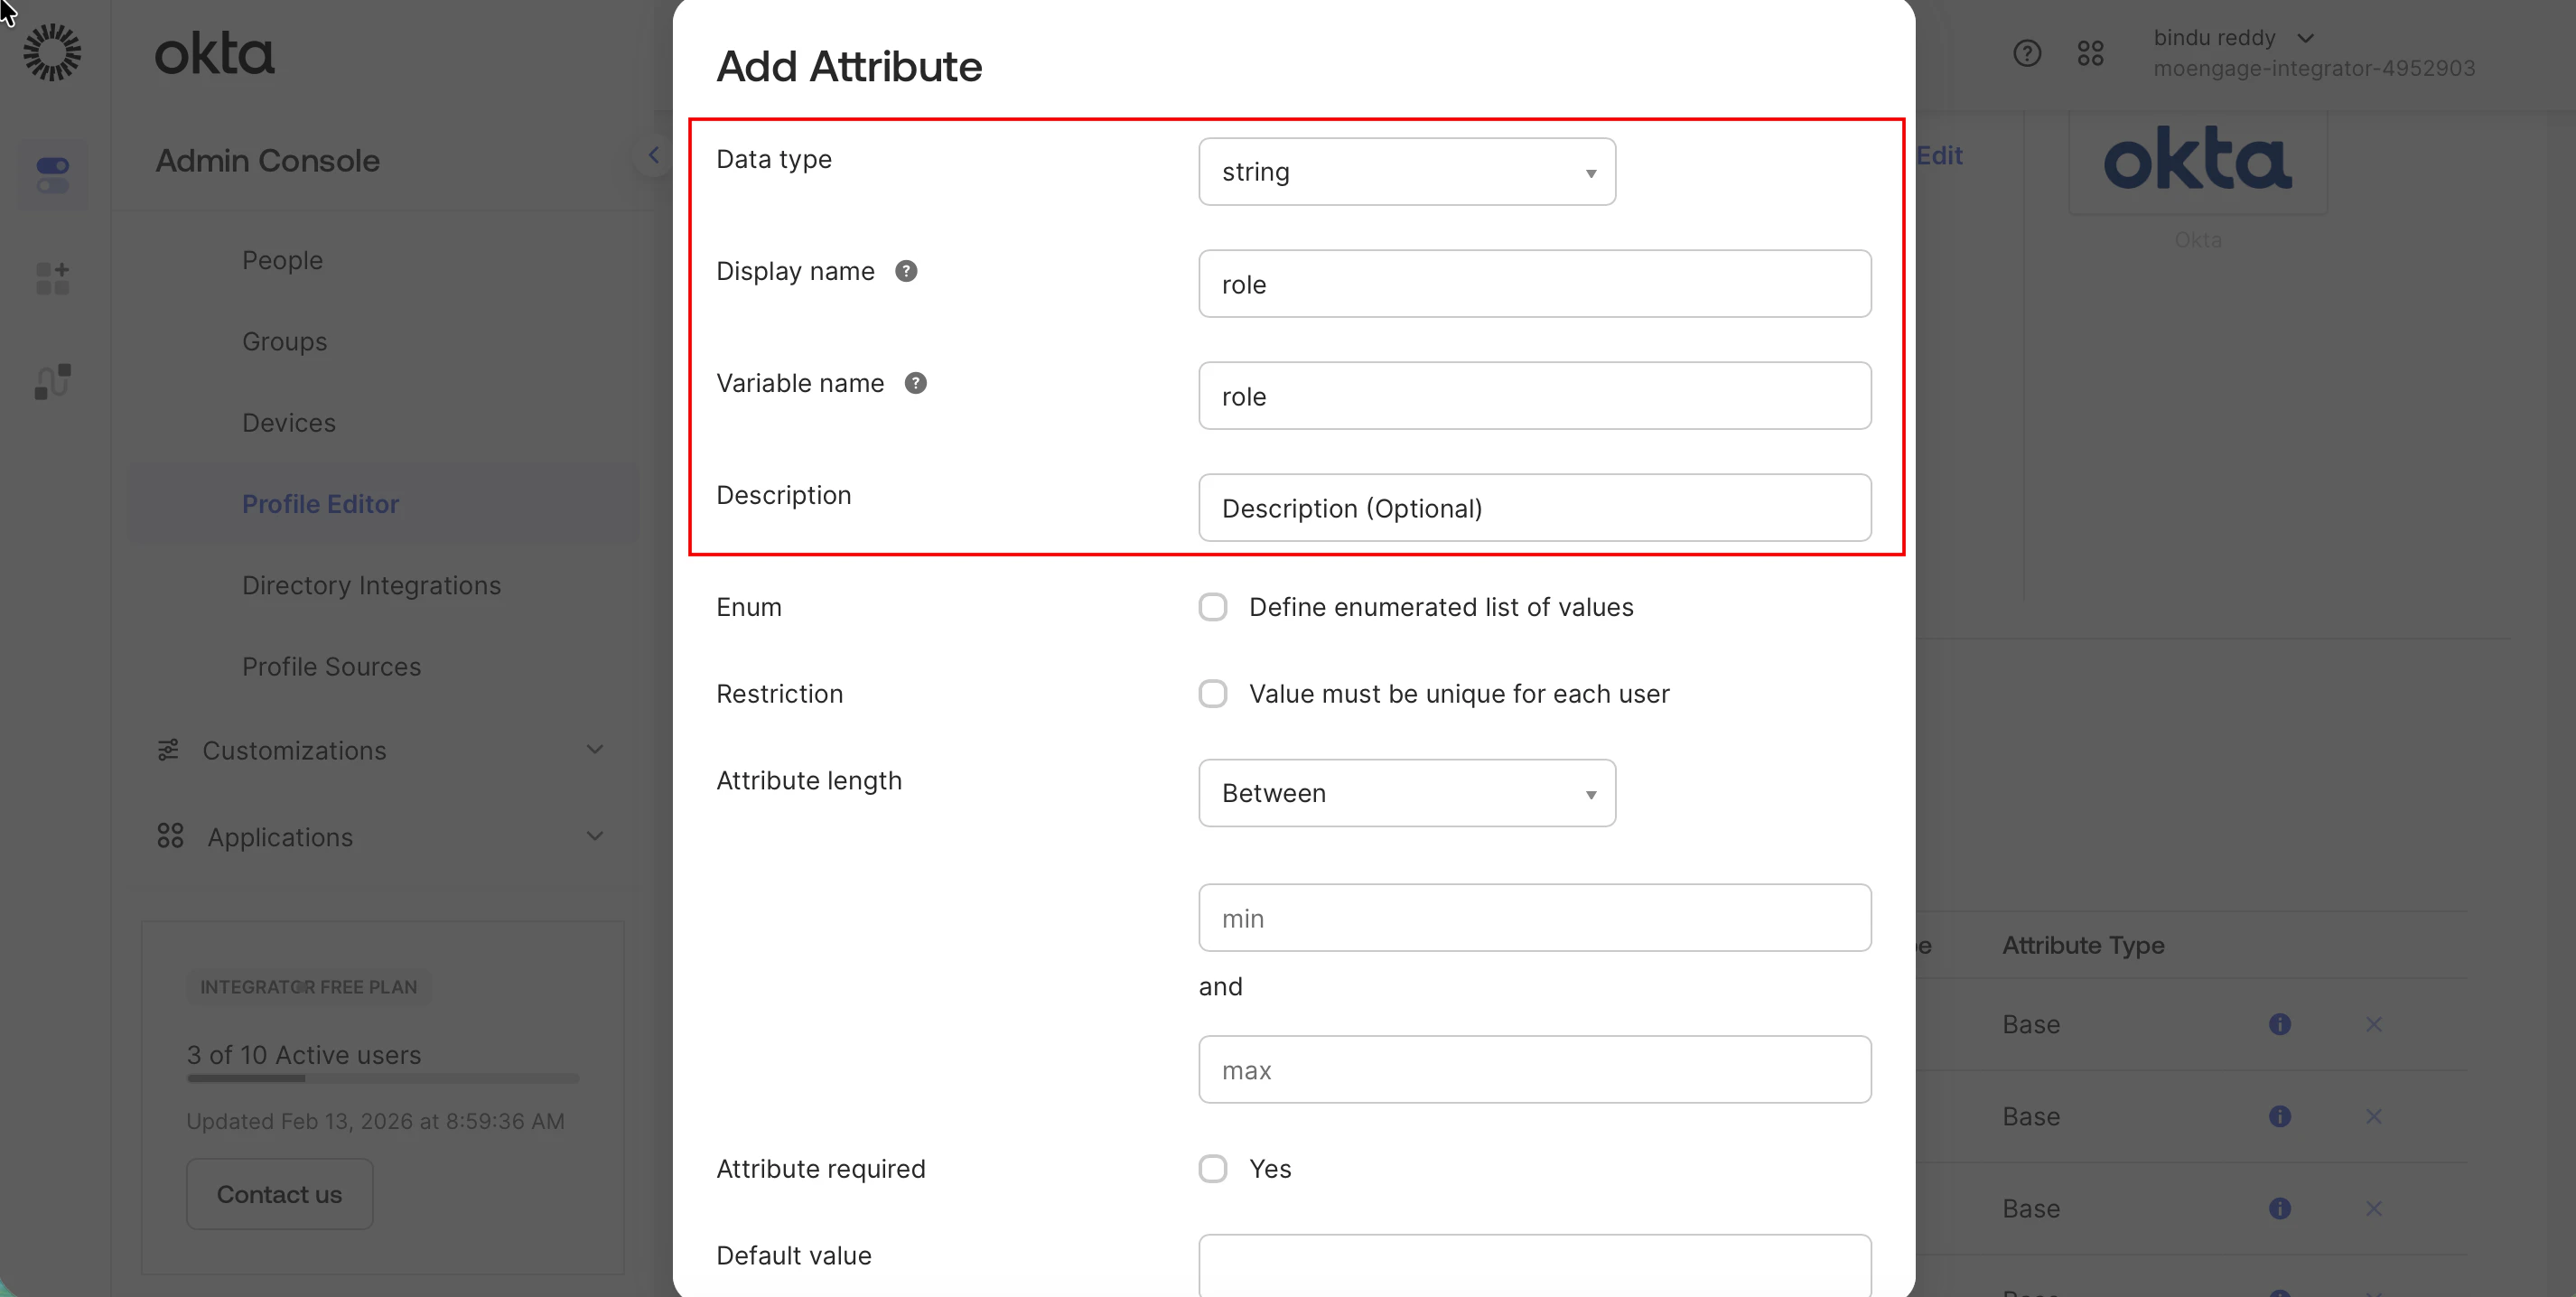 5. In the **User permission** section, select the **Read-Write** radio button.
5. Click **Save**.
5. In the **User permission** section, select the **Read-Write** radio button.
5. Click **Save**. 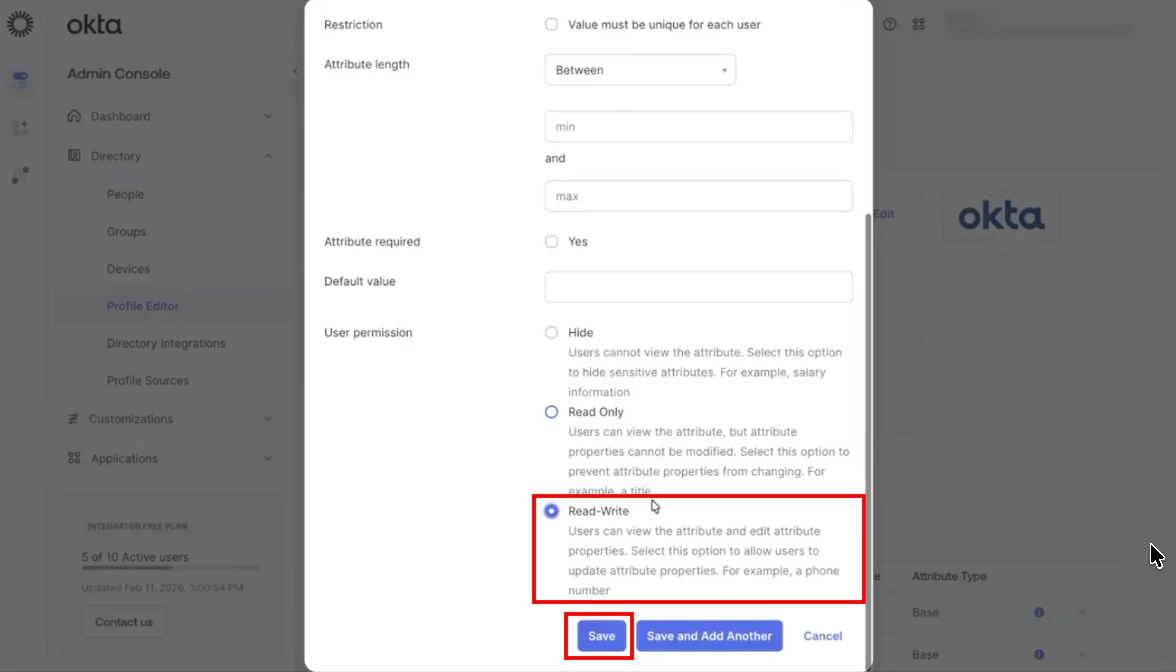 ### Step 6.2.4: Update the Application Attribute Mapping
1. In the **Profile Editor**, click the **Apps** filter and find your application.
2. Click **Mappings**.
### Step 6.2.4: Update the Application Attribute Mapping
1. In the **Profile Editor**, click the **Apps** filter and find your application.
2. Click **Mappings**. 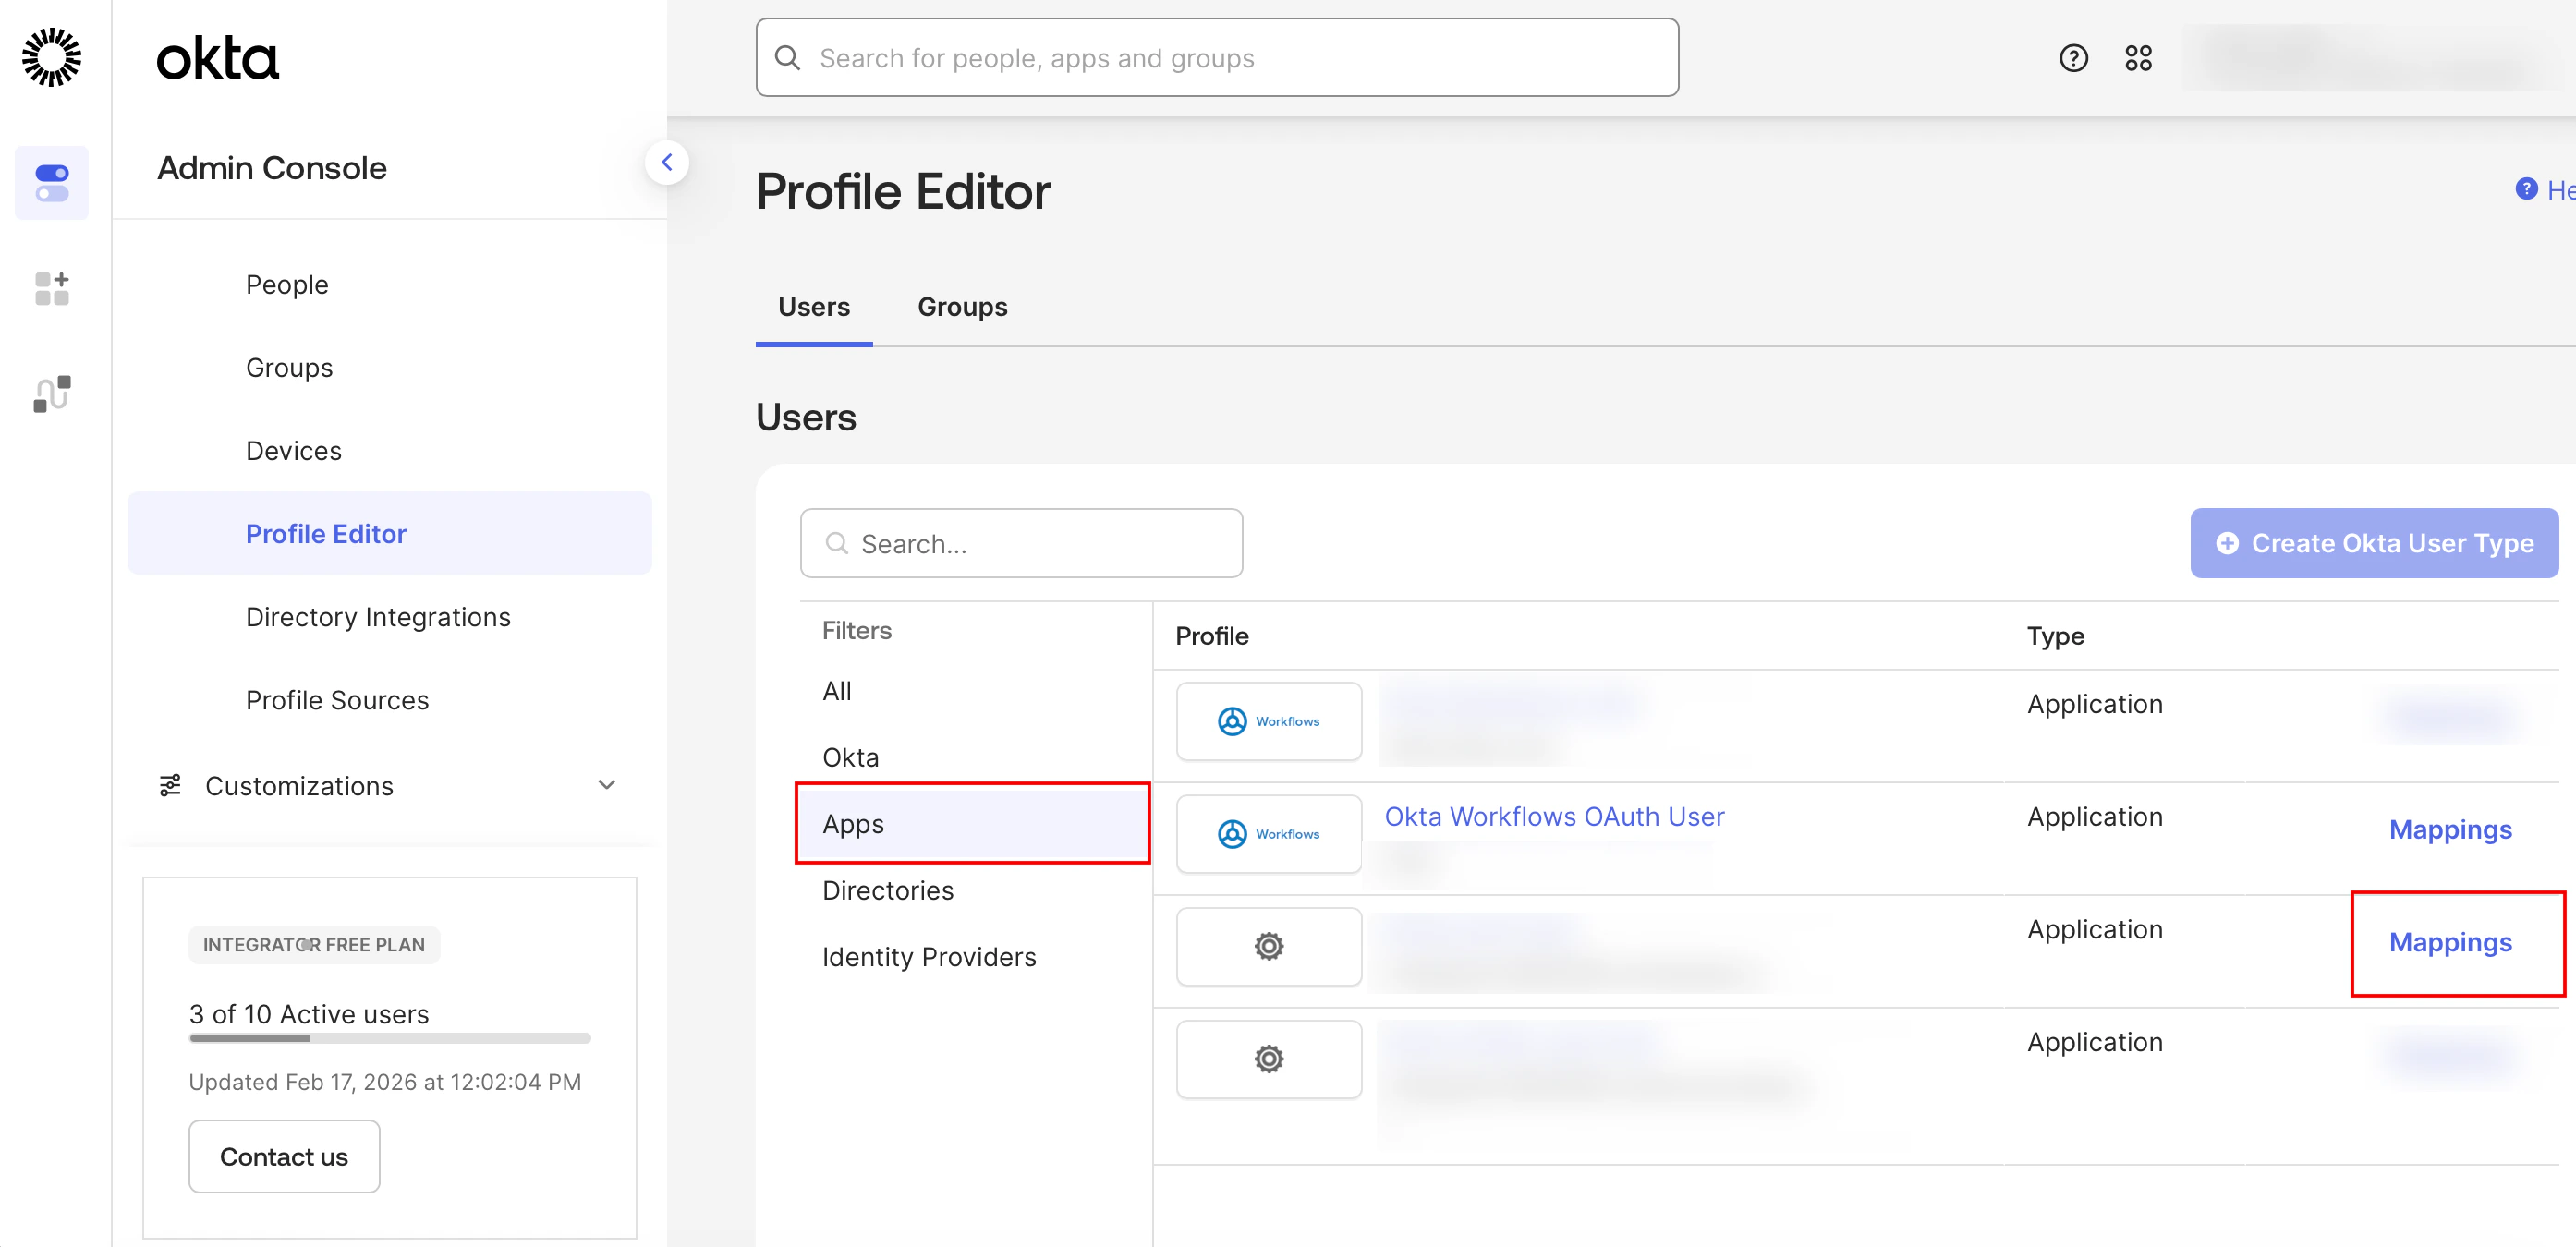 3. Select the **Okta User to** \[**Your Application Name**] (for example, **Okta User to DC 03**) tab.
 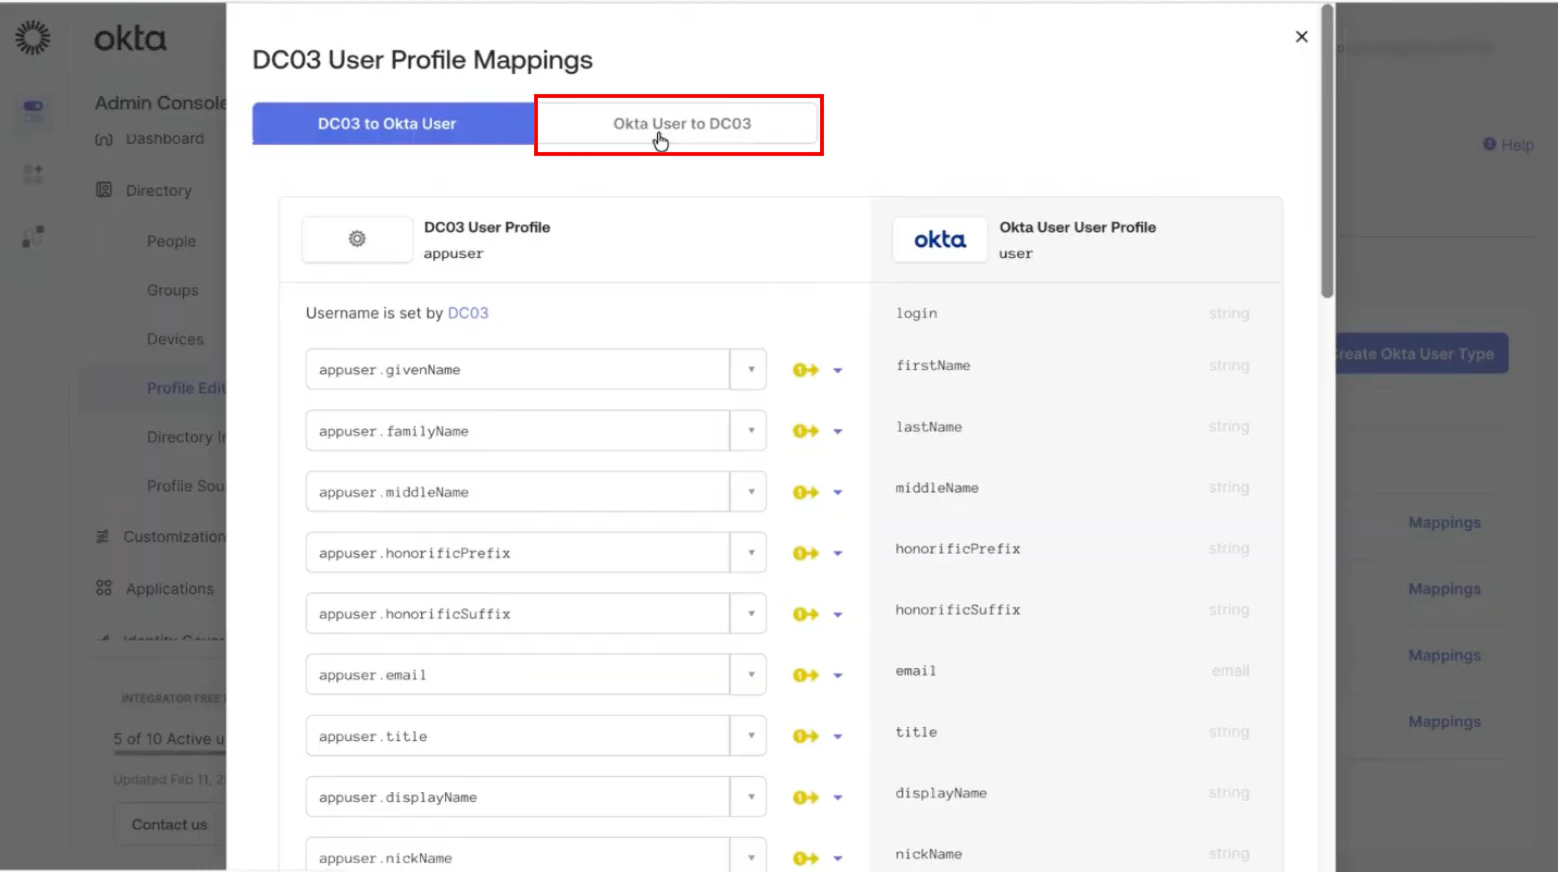 4. Scroll to the **role** attribute at the bottom of the list.
5. In the **expression** box, enter the role attribute following logic to map Okta groups to MoEngage roles (isMemberOfGroup("group\_id") ? "Admin" : "User").
1. **group\_id**: Paste the ID copied in [Step 6.2.1](/user-guide/settings/account/security/system-for-cross-domain-identity-management-scim#step-6-2-1-create-a-group)
2. **Role**: The specific role name as defined in your MoEngage workspace.
6. Confirm and paste that the role attribute details (namespace and external name) for the role attribute match the mandatory values defined in [Step 6.1](/user-guide/settings/account/security/system-for-cross-domain-identity-management-scim#step-6-1-configure-profile-attributes).
7. Click **Save Mappings** and then click **Apply updates**.
4. Scroll to the **role** attribute at the bottom of the list.
5. In the **expression** box, enter the role attribute following logic to map Okta groups to MoEngage roles (isMemberOfGroup("group\_id") ? "Admin" : "User").
1. **group\_id**: Paste the ID copied in [Step 6.2.1](/user-guide/settings/account/security/system-for-cross-domain-identity-management-scim#step-6-2-1-create-a-group)
2. **Role**: The specific role name as defined in your MoEngage workspace.
6. Confirm and paste that the role attribute details (namespace and external name) for the role attribute match the mandatory values defined in [Step 6.1](/user-guide/settings/account/security/system-for-cross-domain-identity-management-scim#step-6-1-configure-profile-attributes).
7. Click **Save Mappings** and then click **Apply updates**. 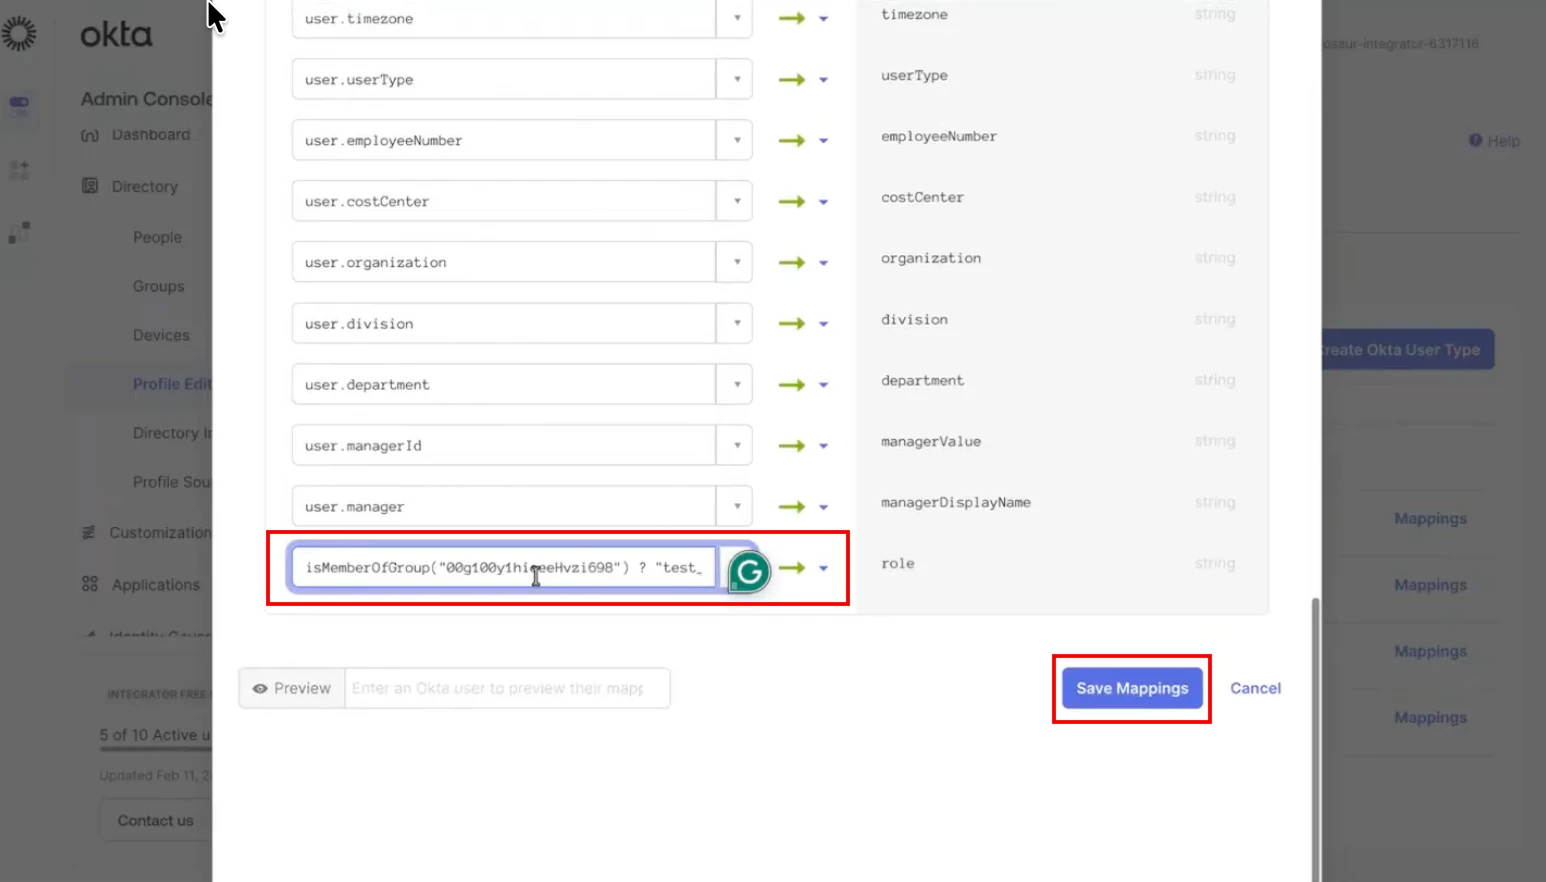 ## Step 7: Push Groups
Use this option to bulk push entire groups to MoEngage. This triggers the creation of all group members in the MoEngage workspace at once.
1. Click the **Push Groups** tab.
2. Click **+ Push Groups** > **Find groups by name**.
## Step 7: Push Groups
Use this option to bulk push entire groups to MoEngage. This triggers the creation of all group members in the MoEngage workspace at once.
1. Click the **Push Groups** tab.
2. Click **+ Push Groups** > **Find groups by name**. 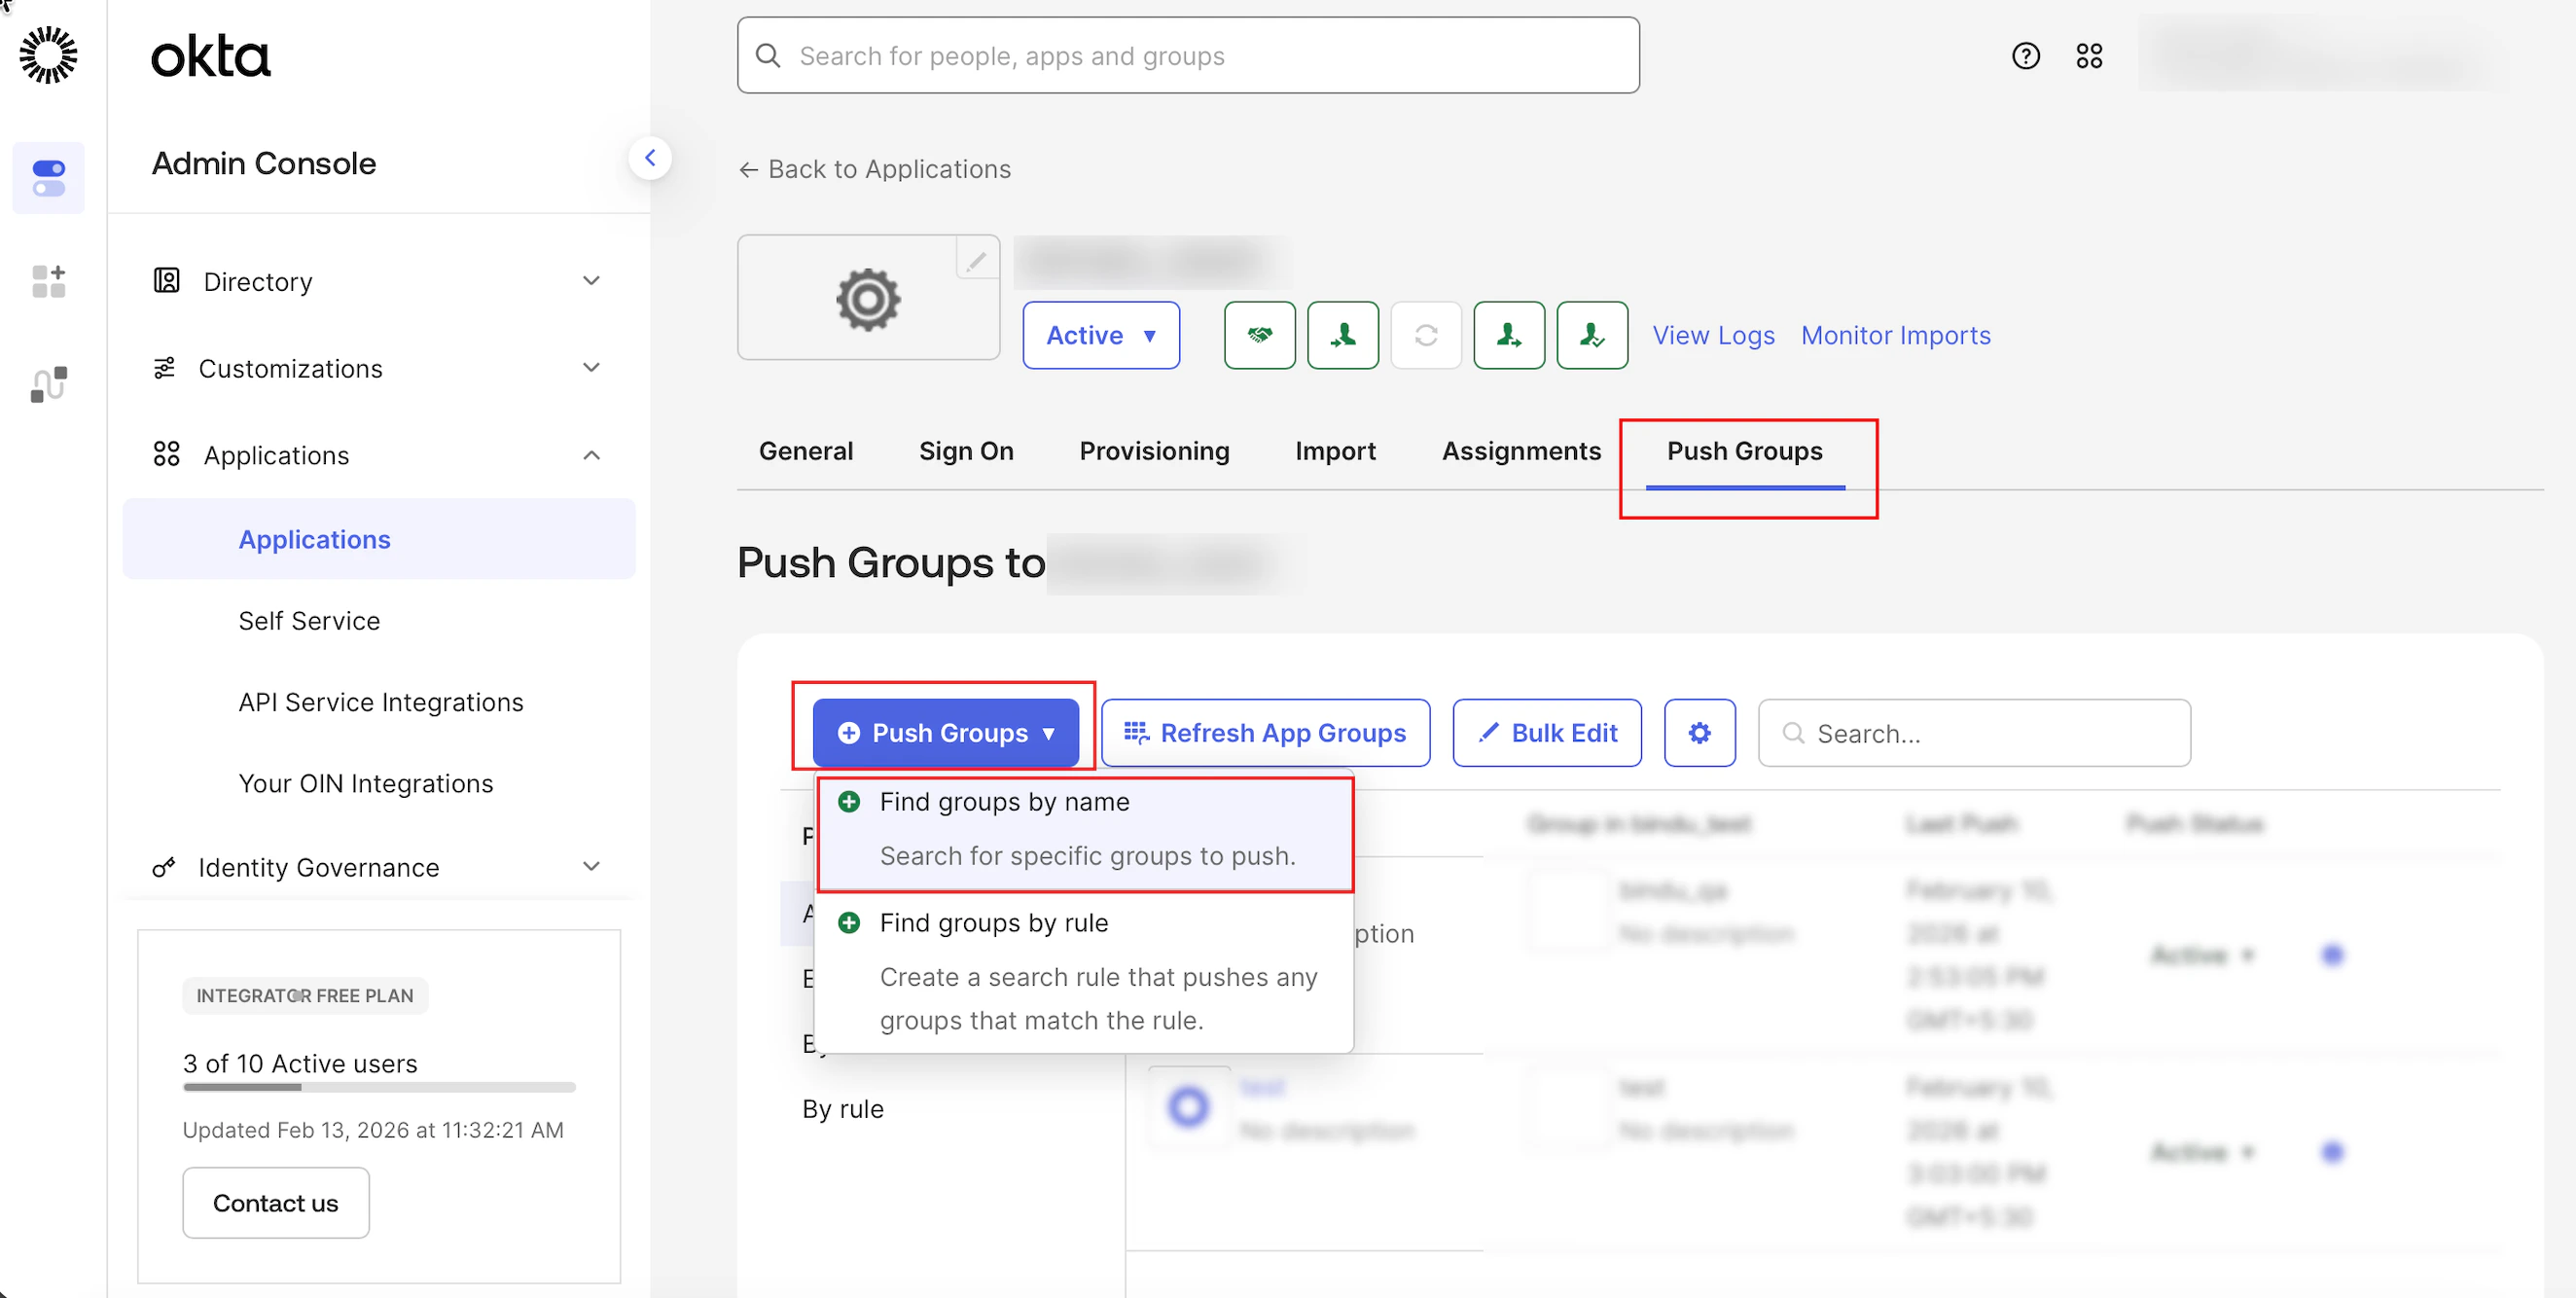 3. Under **Push groups by name**, in the **Enter a group to push** field, enter the name of the group assigned to the MoEngage workspace.
4. Ensure the **Push group memberships immediately** check box is selected.
3. Under **Push groups by name**, in the **Enter a group to push** field, enter the name of the group assigned to the MoEngage workspace.
4. Ensure the **Push group memberships immediately** check box is selected. 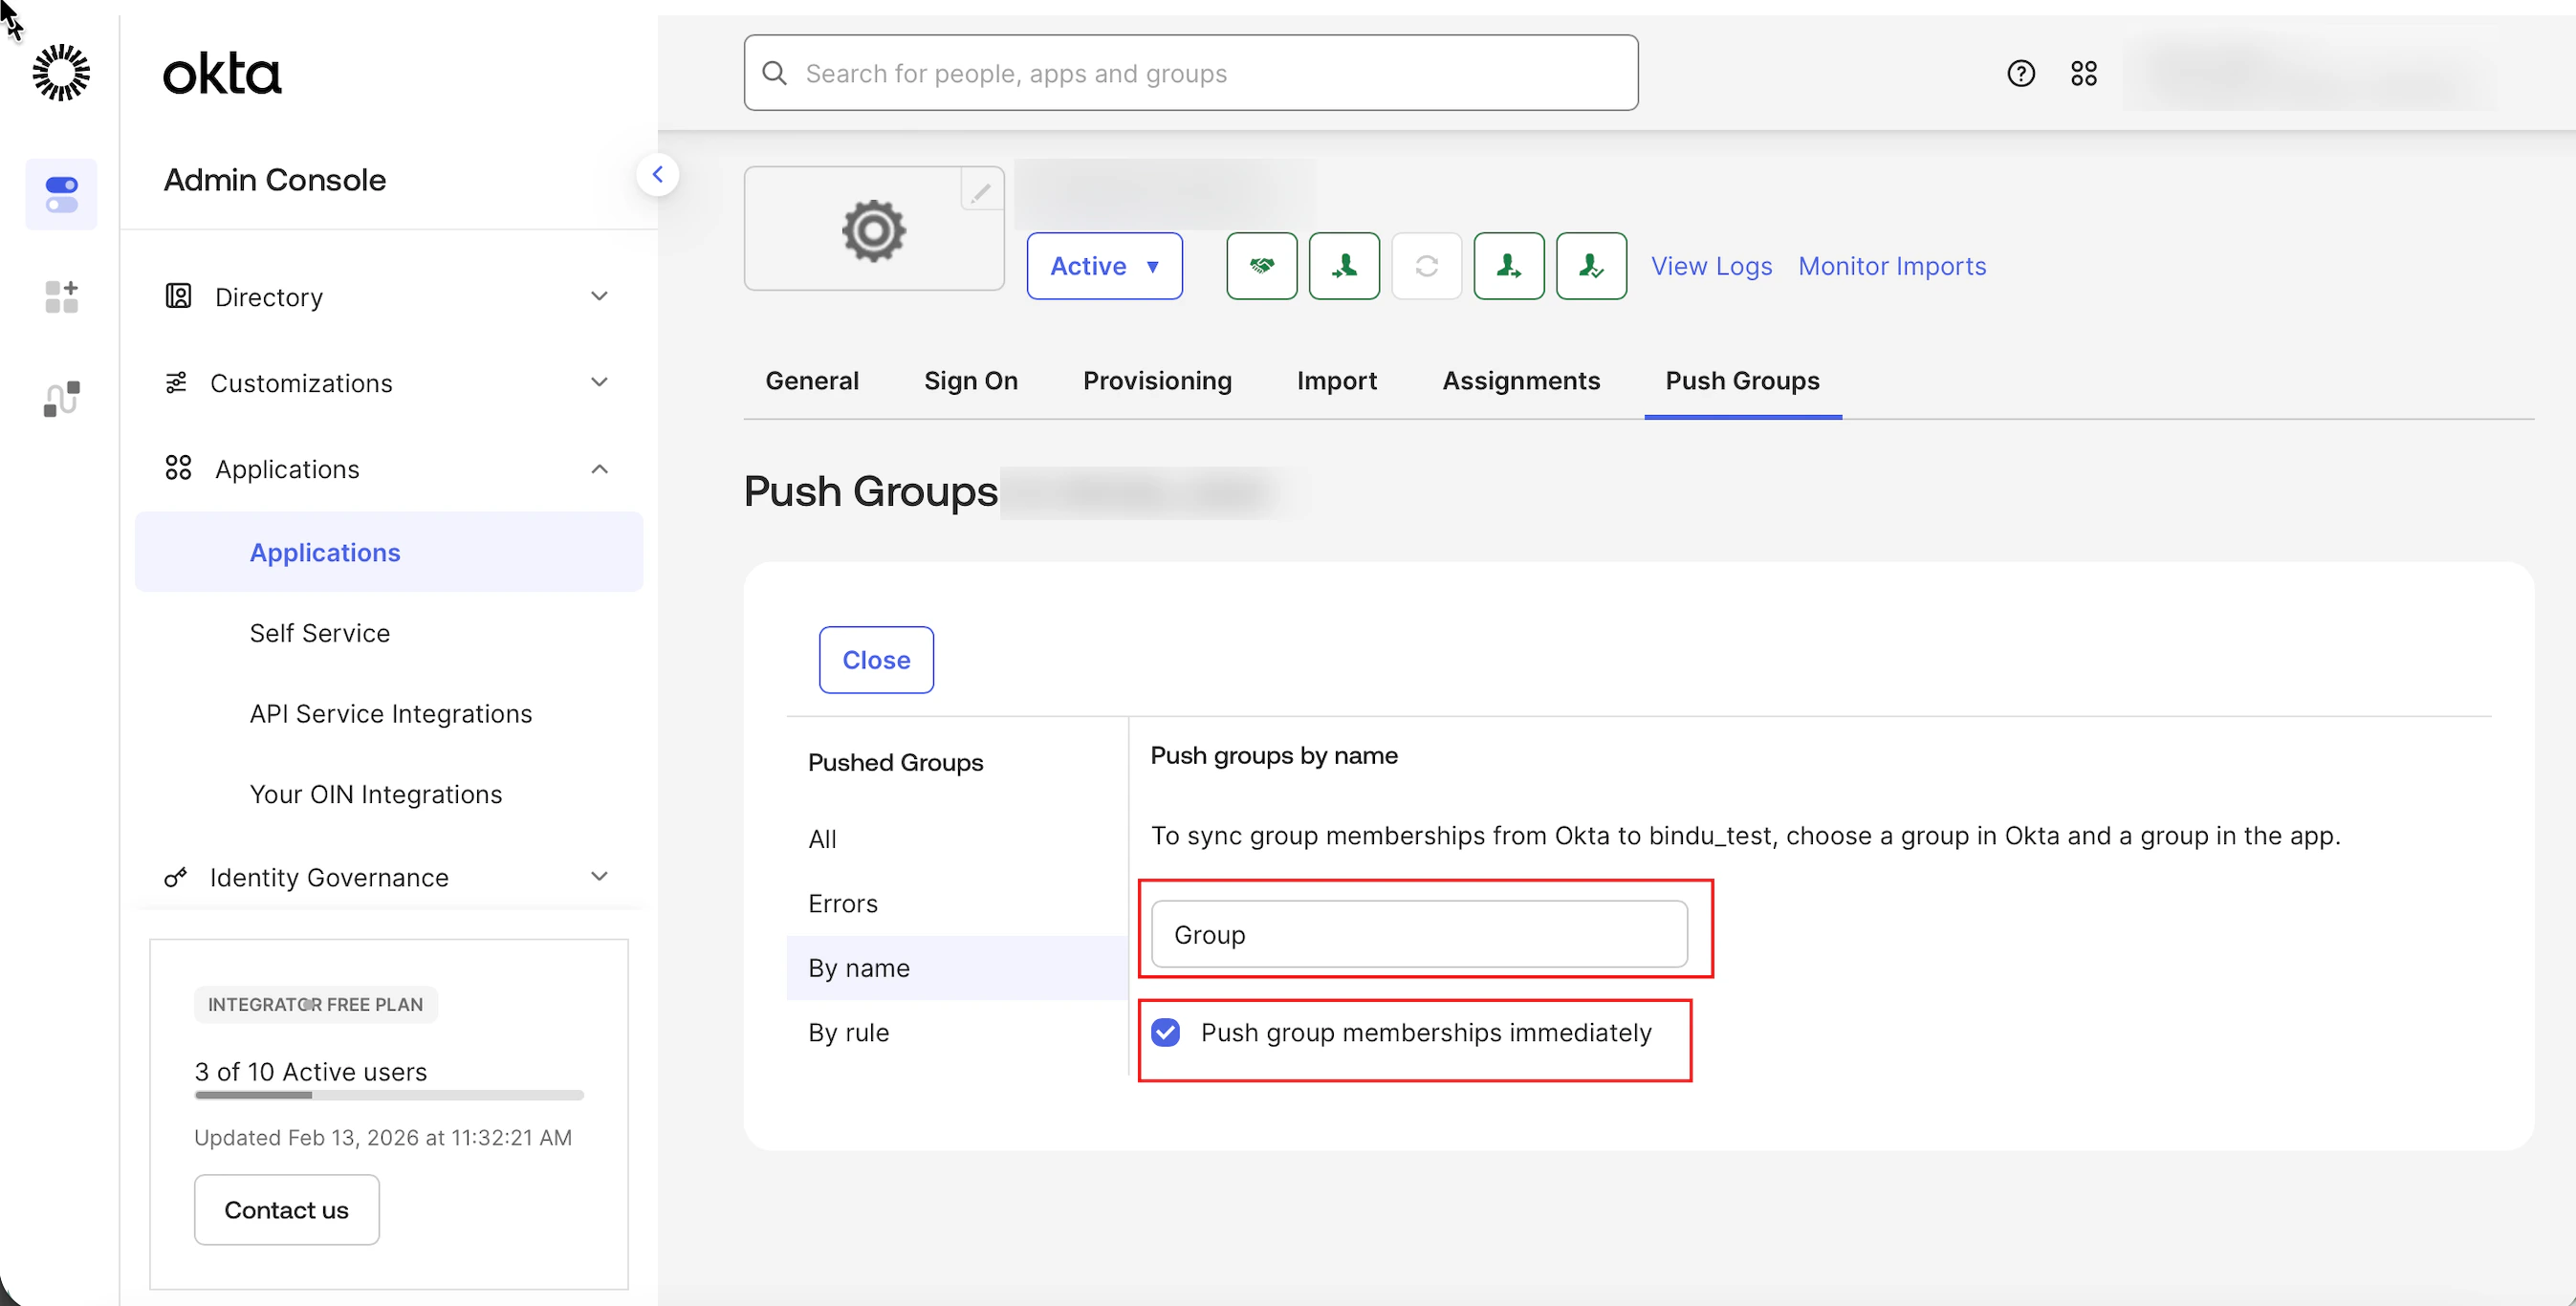 5. Click **Save**. Okta initiates a background job to sync all members.
## Step 8: Final Force Synchronization
Manual force sync ensures that mapped properties and roles are updated instantly across all assigned users.
1. Click the **Provisioning** tab, and in the left navigation pane under **Settings**, click **To App**.
2. Scroll down to the **Attribute Mappings** section.
3. Click **Force Sync**.
5. Click **Save**. Okta initiates a background job to sync all members.
## Step 8: Final Force Synchronization
Manual force sync ensures that mapped properties and roles are updated instantly across all assigned users.
1. Click the **Provisioning** tab, and in the left navigation pane under **Settings**, click **To App**.
2. Scroll down to the **Attribute Mappings** section.
3. Click **Force Sync**.  This initiates a global synchronization, pushing the newly mapped attribute data immediately and ensuring global attributes are in sync. Individual user sync via the **Assignments** tab is not required separately as Force Sync covers all assigned users.
## Step 9: Validation
Verify the following in the MoEngage workspace (**Settings** > **Account** > **Team Management**):
* **User Invitation**: Confirm the user is successfully invited and the status is Joined.
This initiates a global synchronization, pushing the newly mapped attribute data immediately and ensuring global attributes are in sync. Individual user sync via the **Assignments** tab is not required separately as Force Sync covers all assigned users.
## Step 9: Validation
Verify the following in the MoEngage workspace (**Settings** > **Account** > **Team Management**):
* **User Invitation**: Confirm the user is successfully invited and the status is Joined.
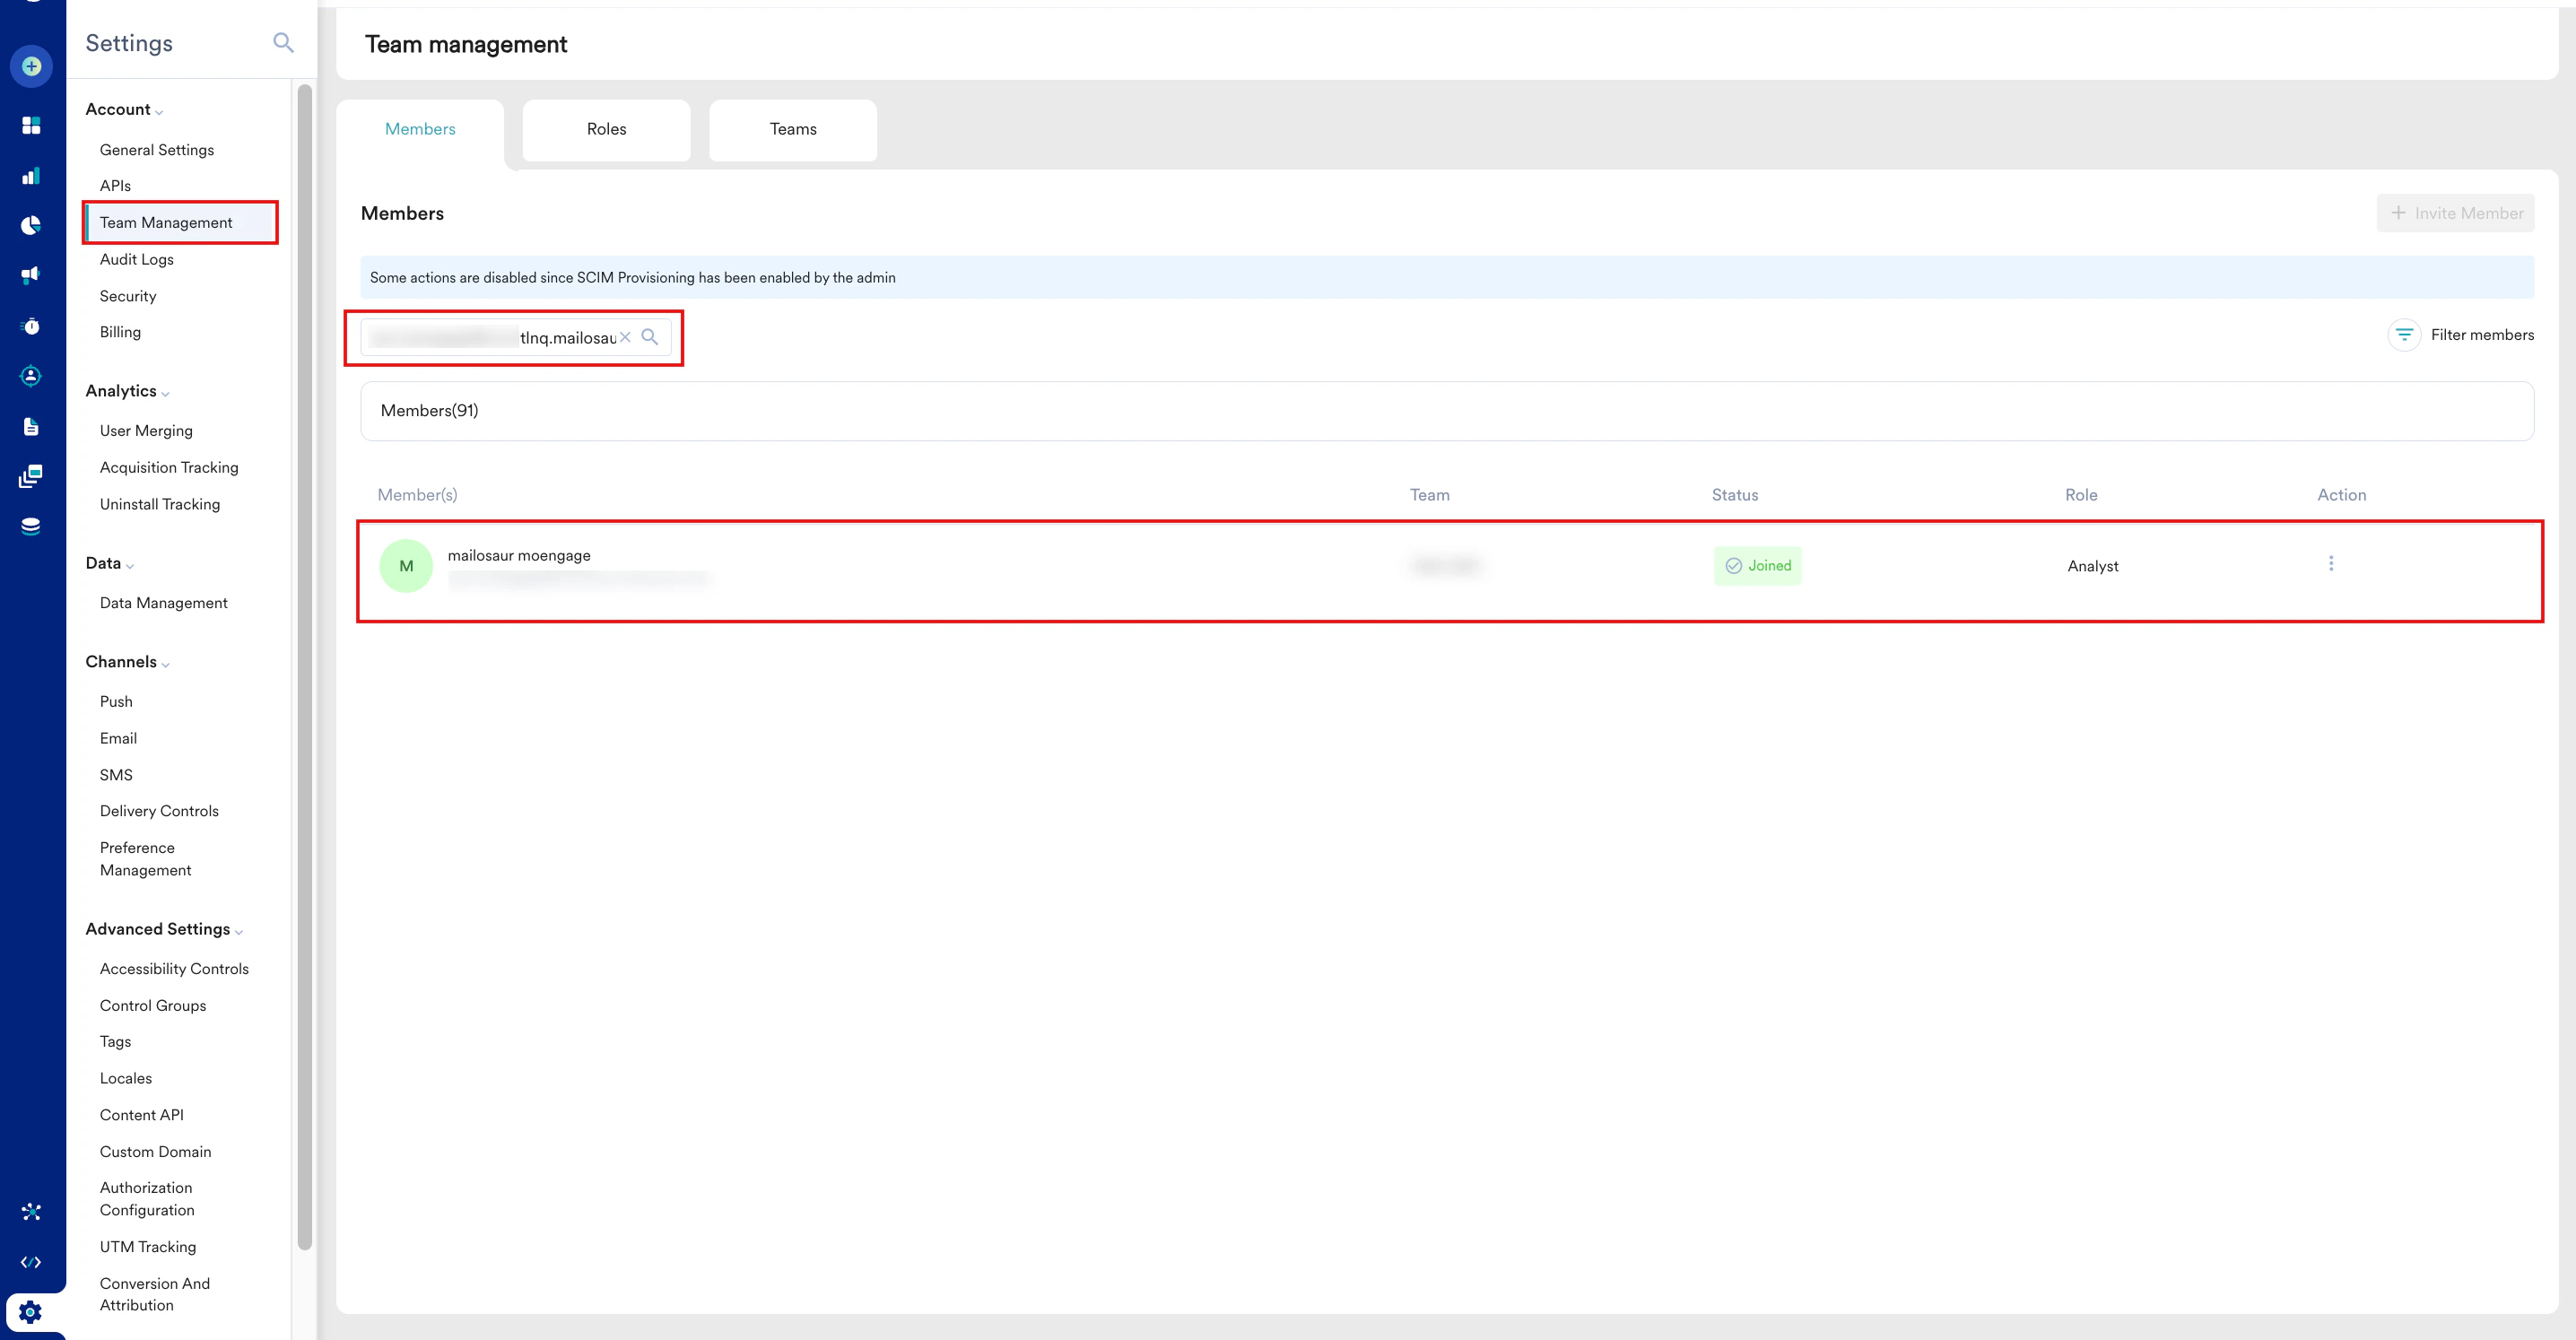 * **Default Role Update**: Confirm that if no specific role was passed from Okta, the system correctly assigned the Default Role configured in [Step 3](/user-guide/settings/account/security/system-for-cross-domain-identity-management-scim#step-3-configure-scim-in-moengage-and-generate-token).
* **Role Accuracy**: Confirm that the specific role sent from Okta (based on group membership logic) matches the assigned role in the workspace.
* **Default Role Update**: Confirm that if no specific role was passed from Okta, the system correctly assigned the Default Role configured in [Step 3](/user-guide/settings/account/security/system-for-cross-domain-identity-management-scim#step-3-configure-scim-in-moengage-and-generate-token).
* **Role Accuracy**: Confirm that the specific role sent from Okta (based on group membership logic) matches the assigned role in the workspace.
 # Configure SCIM in Azure
## Step 1: Locate and Verify the SSO Application
To successfully configure SCIM provisioning, you must first ensure you have an active Enterprise Application in Microsoft Entra ID.
1. Before enabling SCIM, ensure you have successfully set up the SSO connection between MoEngage and Azure. For more information, refer to [Single Sign-On (SSO)](/user-guide/settings/account/security/single-sign-on-sso).
2. To verify your enterprise application,
1. Navigate to the **Azure Admin Console**.
2. On the Azure services page, click **Microsoft Entra ID**.
# Configure SCIM in Azure
## Step 1: Locate and Verify the SSO Application
To successfully configure SCIM provisioning, you must first ensure you have an active Enterprise Application in Microsoft Entra ID.
1. Before enabling SCIM, ensure you have successfully set up the SSO connection between MoEngage and Azure. For more information, refer to [Single Sign-On (SSO)](/user-guide/settings/account/security/single-sign-on-sso).
2. To verify your enterprise application,
1. Navigate to the **Azure Admin Console**.
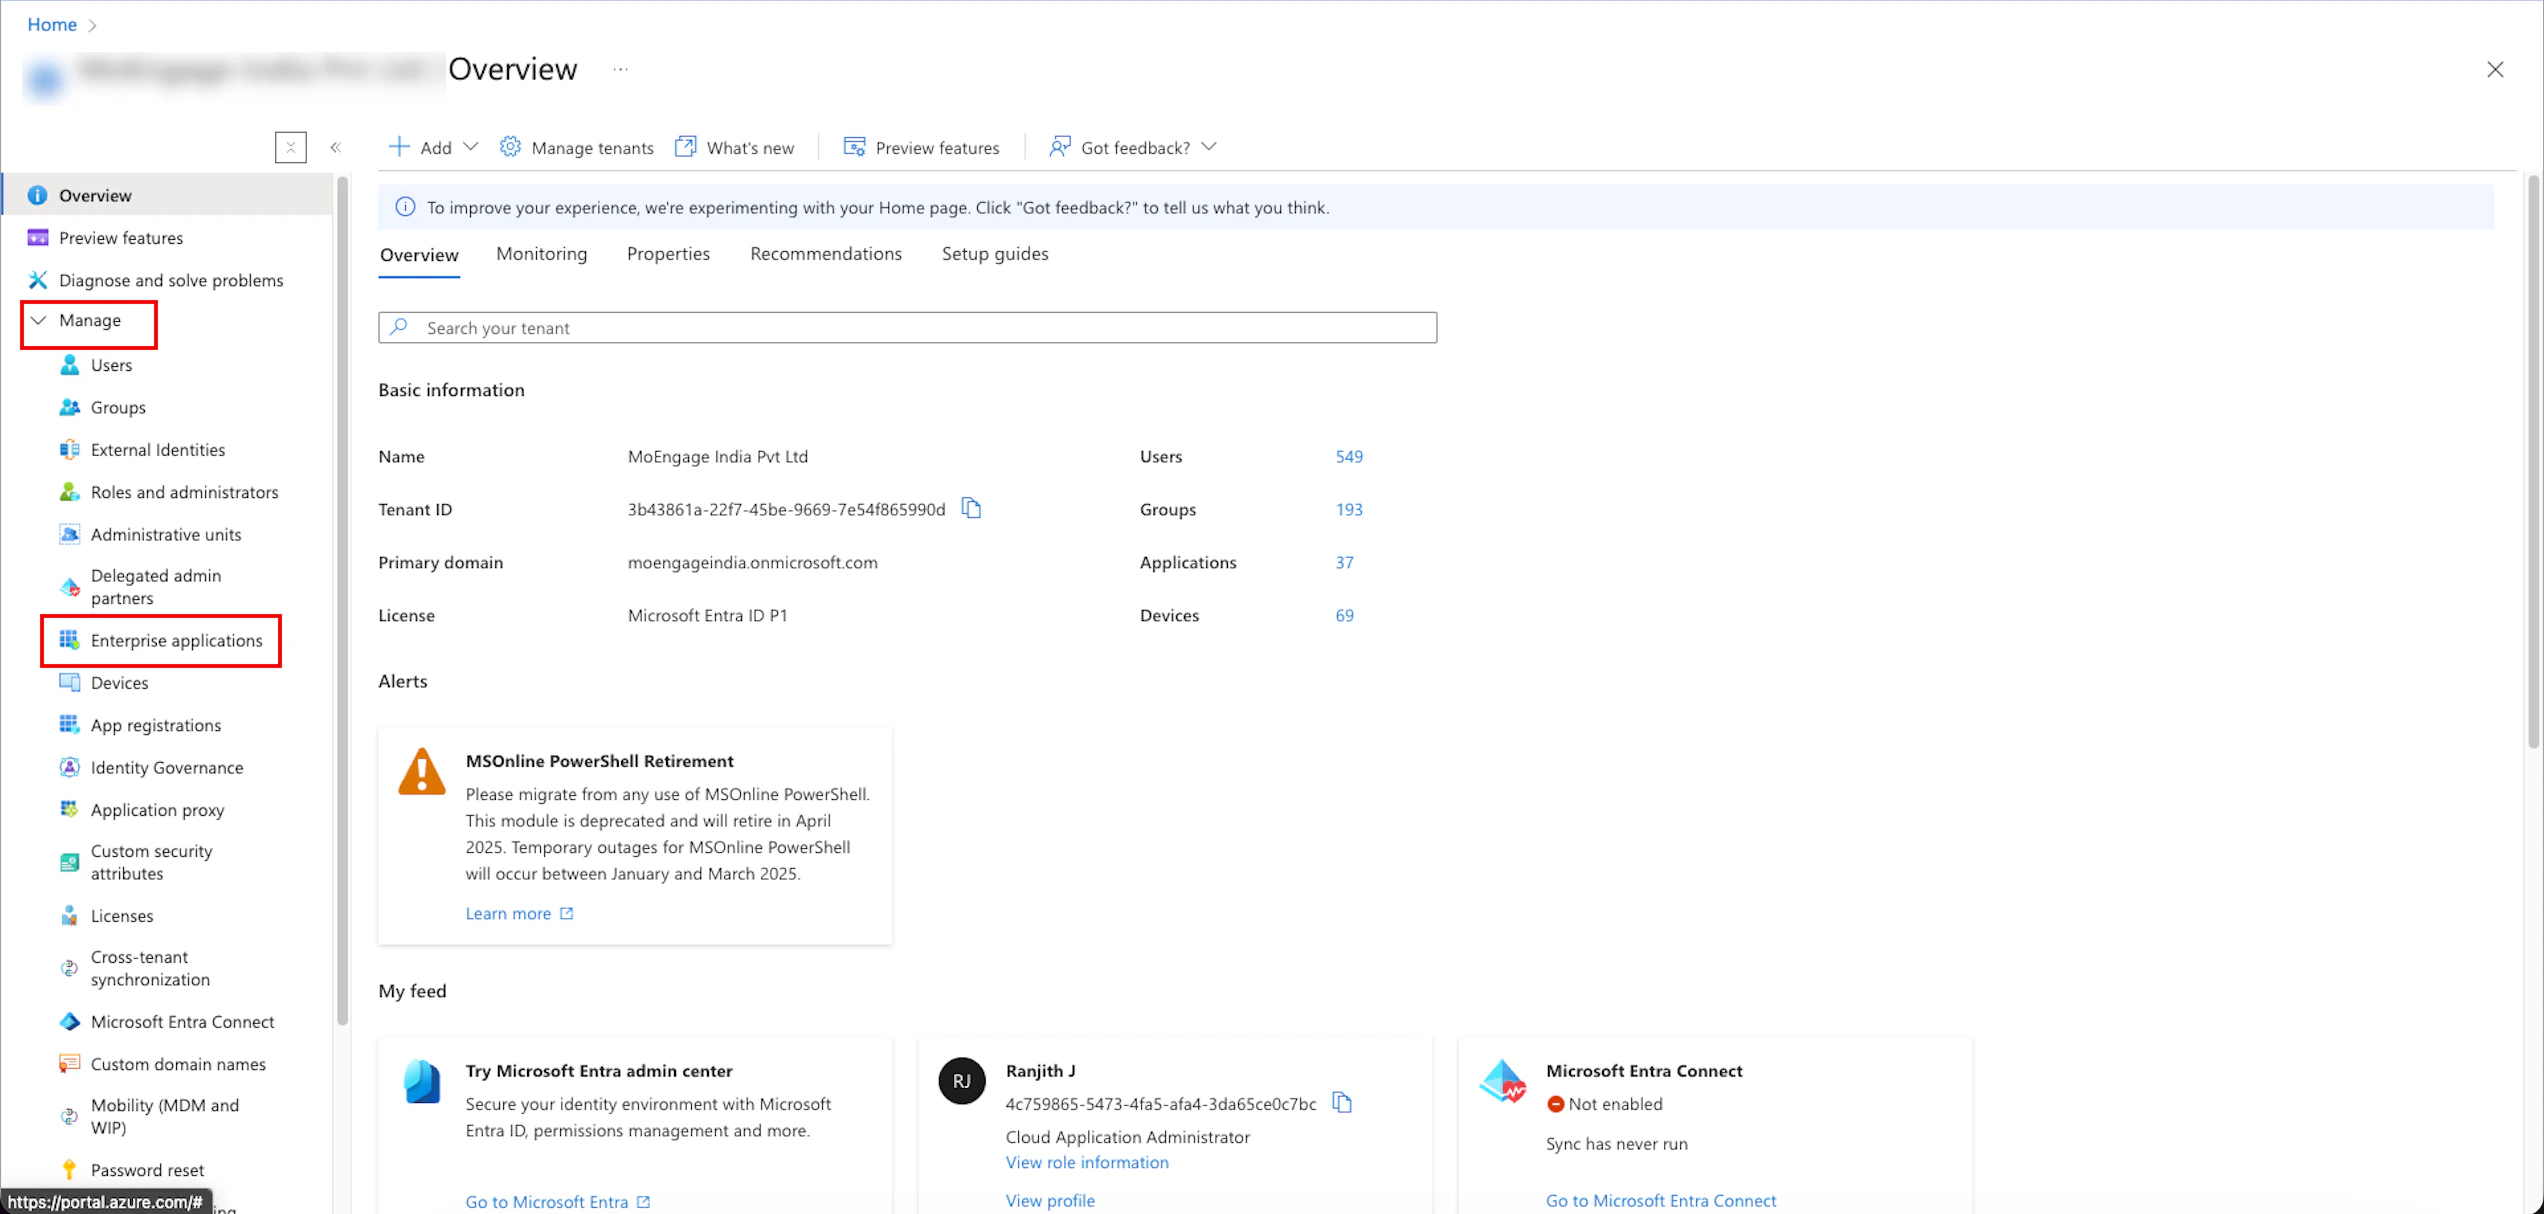
2. On the Azure services page, click **Microsoft Entra ID**. 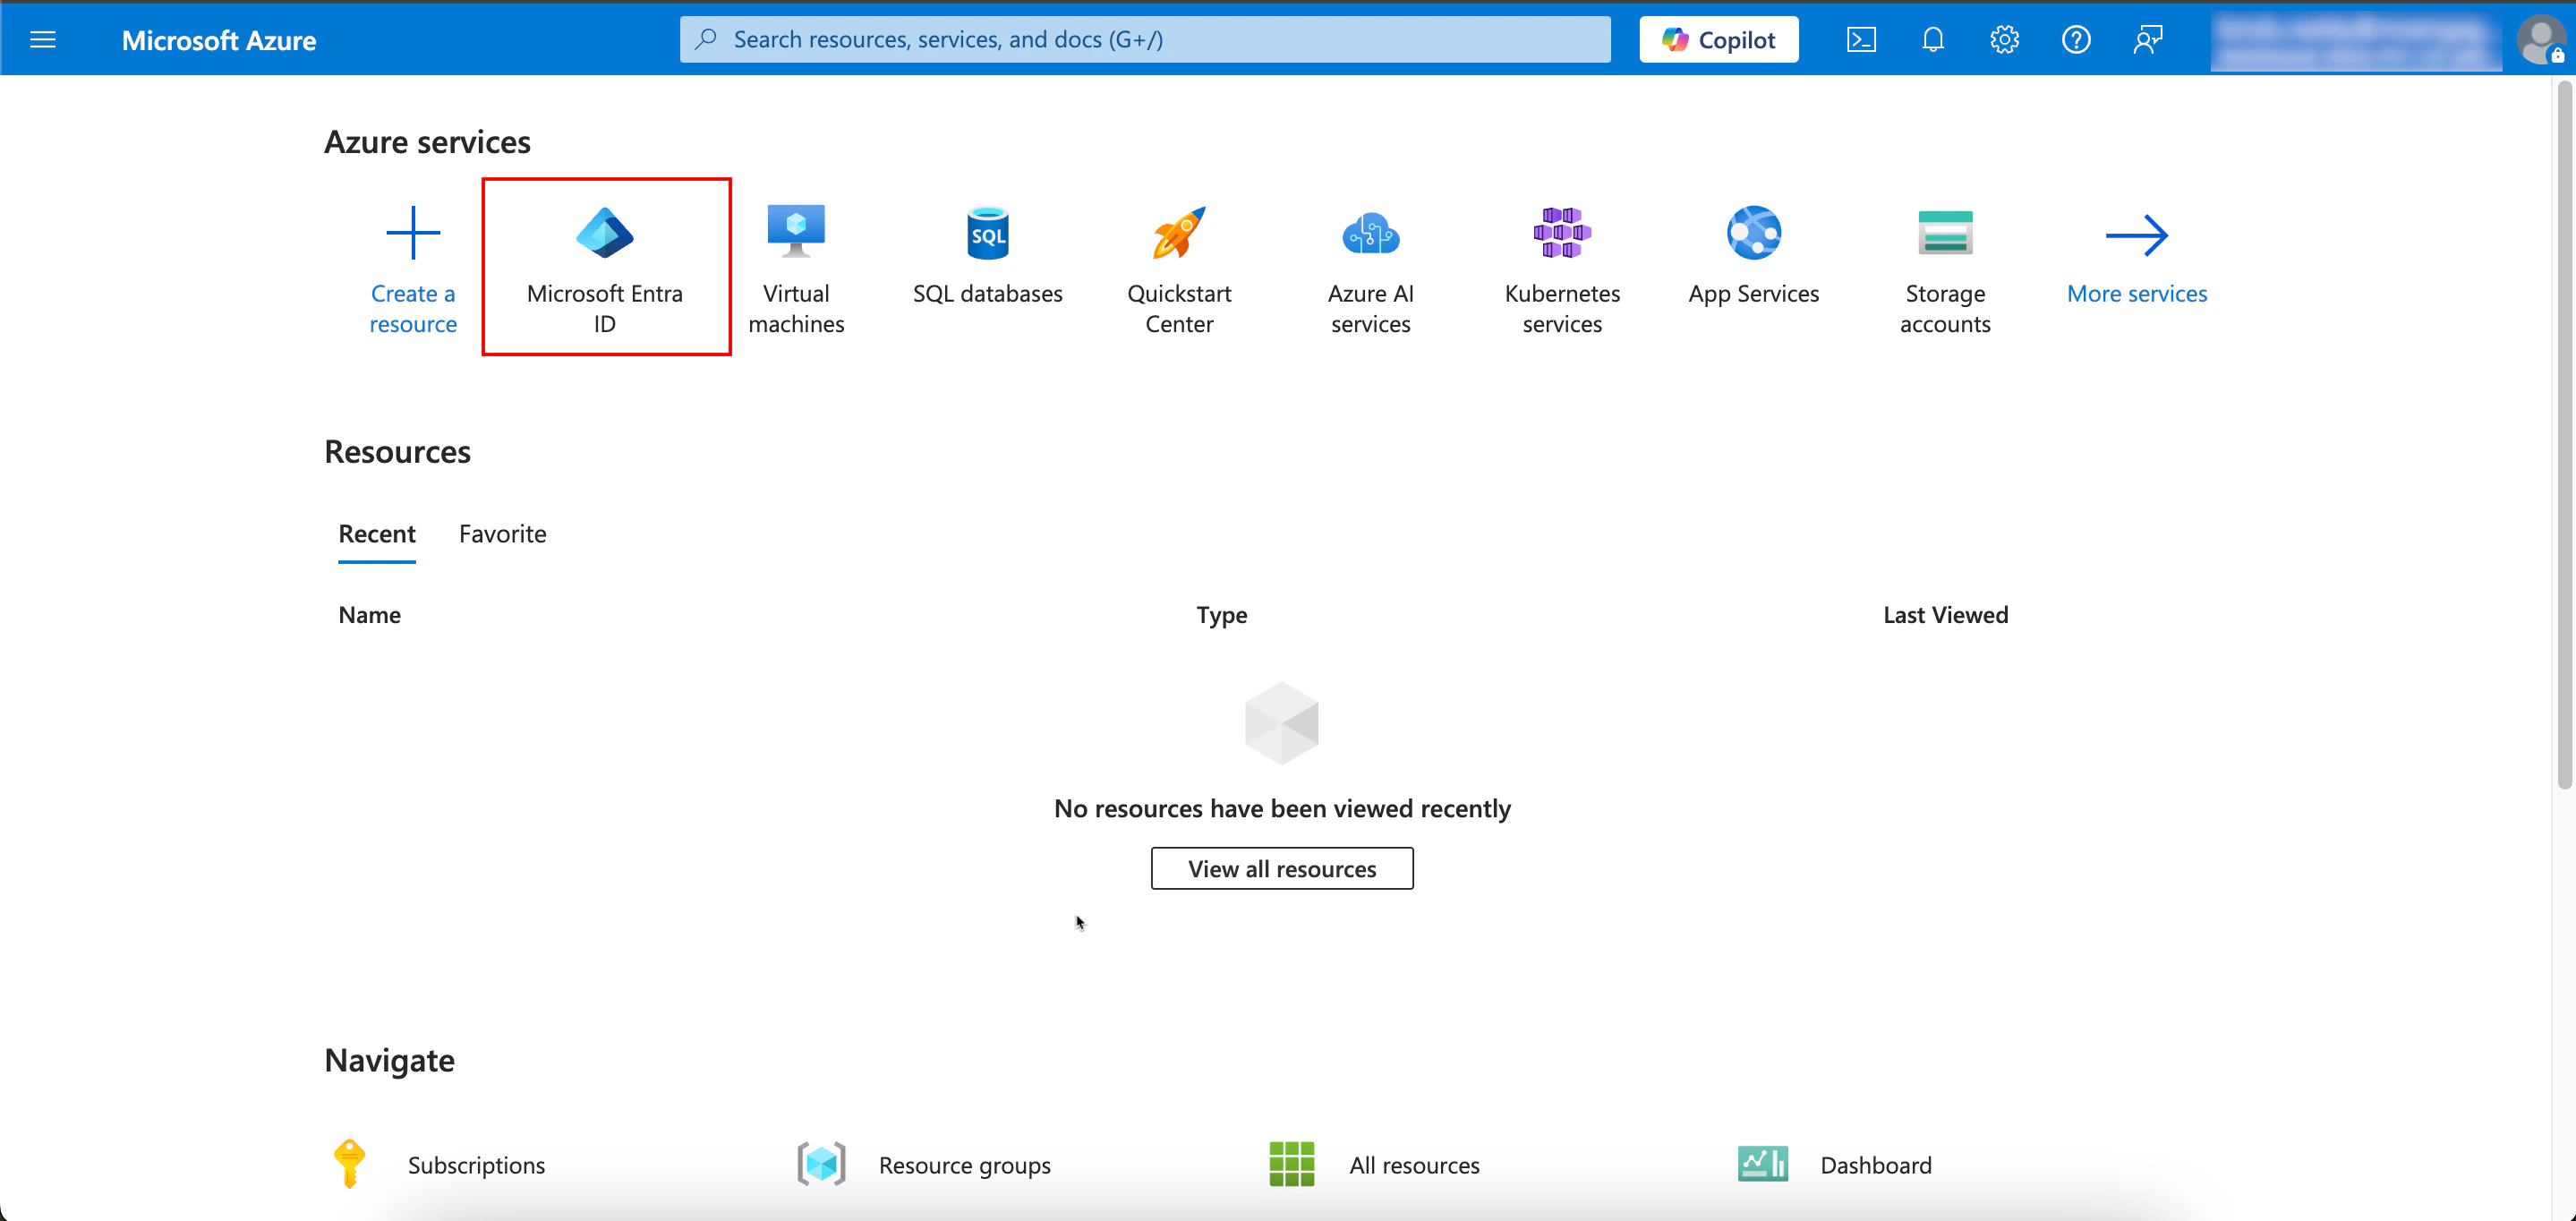 3. On the Overview page, go to the left navigation menu and click **Manage** > **Enterprise applications**.
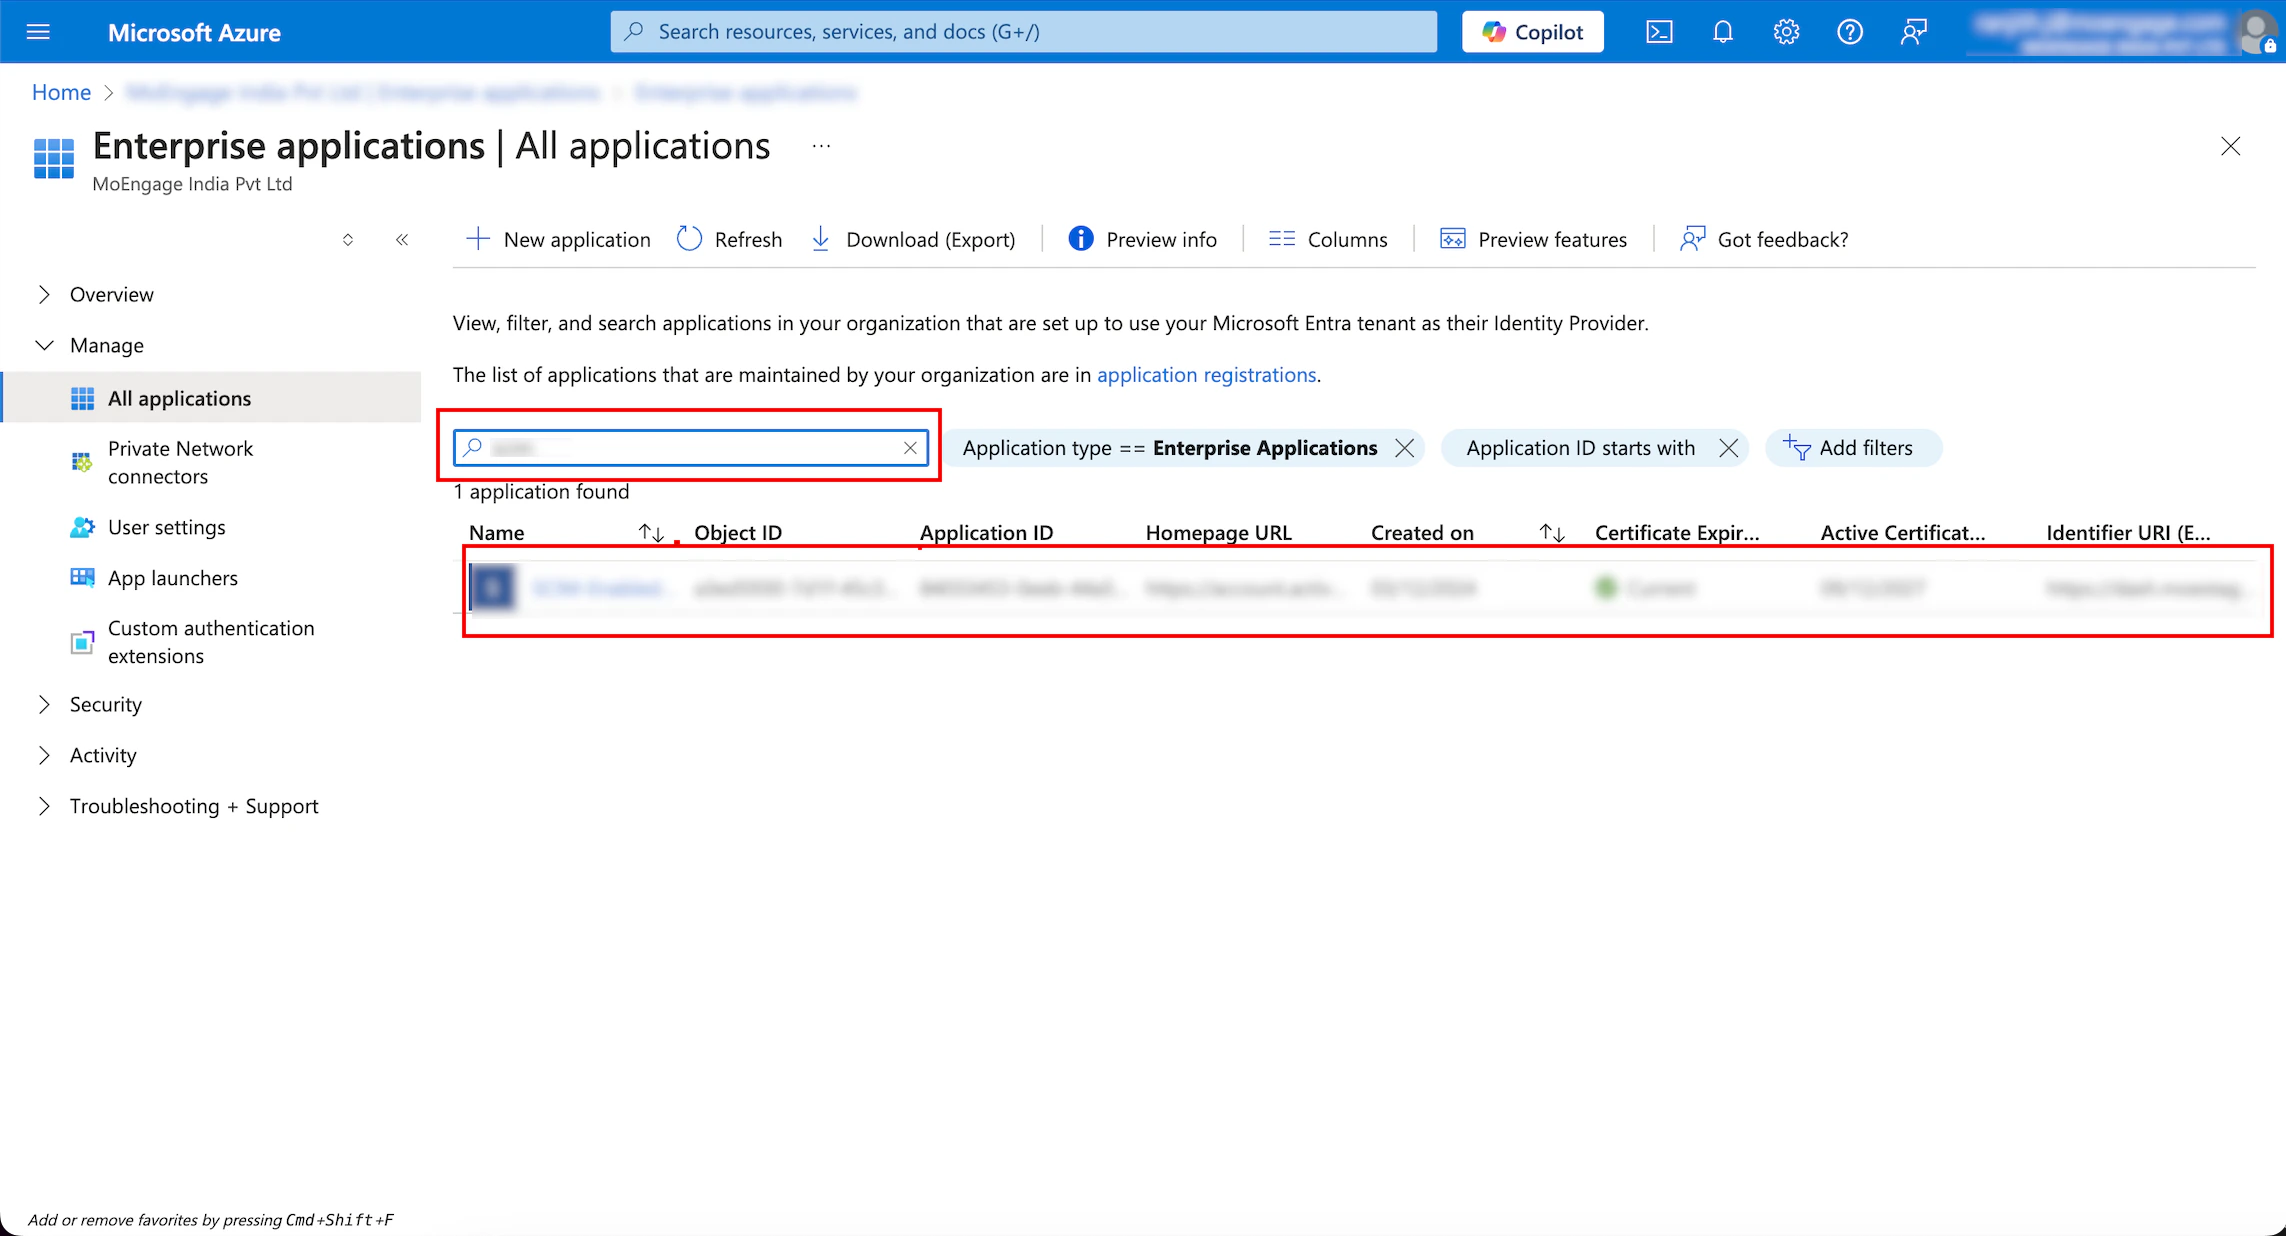
  4. On the **Enterprise applications | All applications** page, find your application in the list or use the **Search by application name or object ID** box to find it and select the application name you want to configure from your list.
  ## Step 2: Configure SCIM Provisioning in Azure
You must enable automated user management by establishing a secure handshake between Microsoft Entra ID and the MoEngage API using the SCIM 2.0 protocol.
### Step 2.1: Activate SCIM in MoEngage and Generate Token
To activate SCIM in MoEngage and generate a token, perform the following steps:
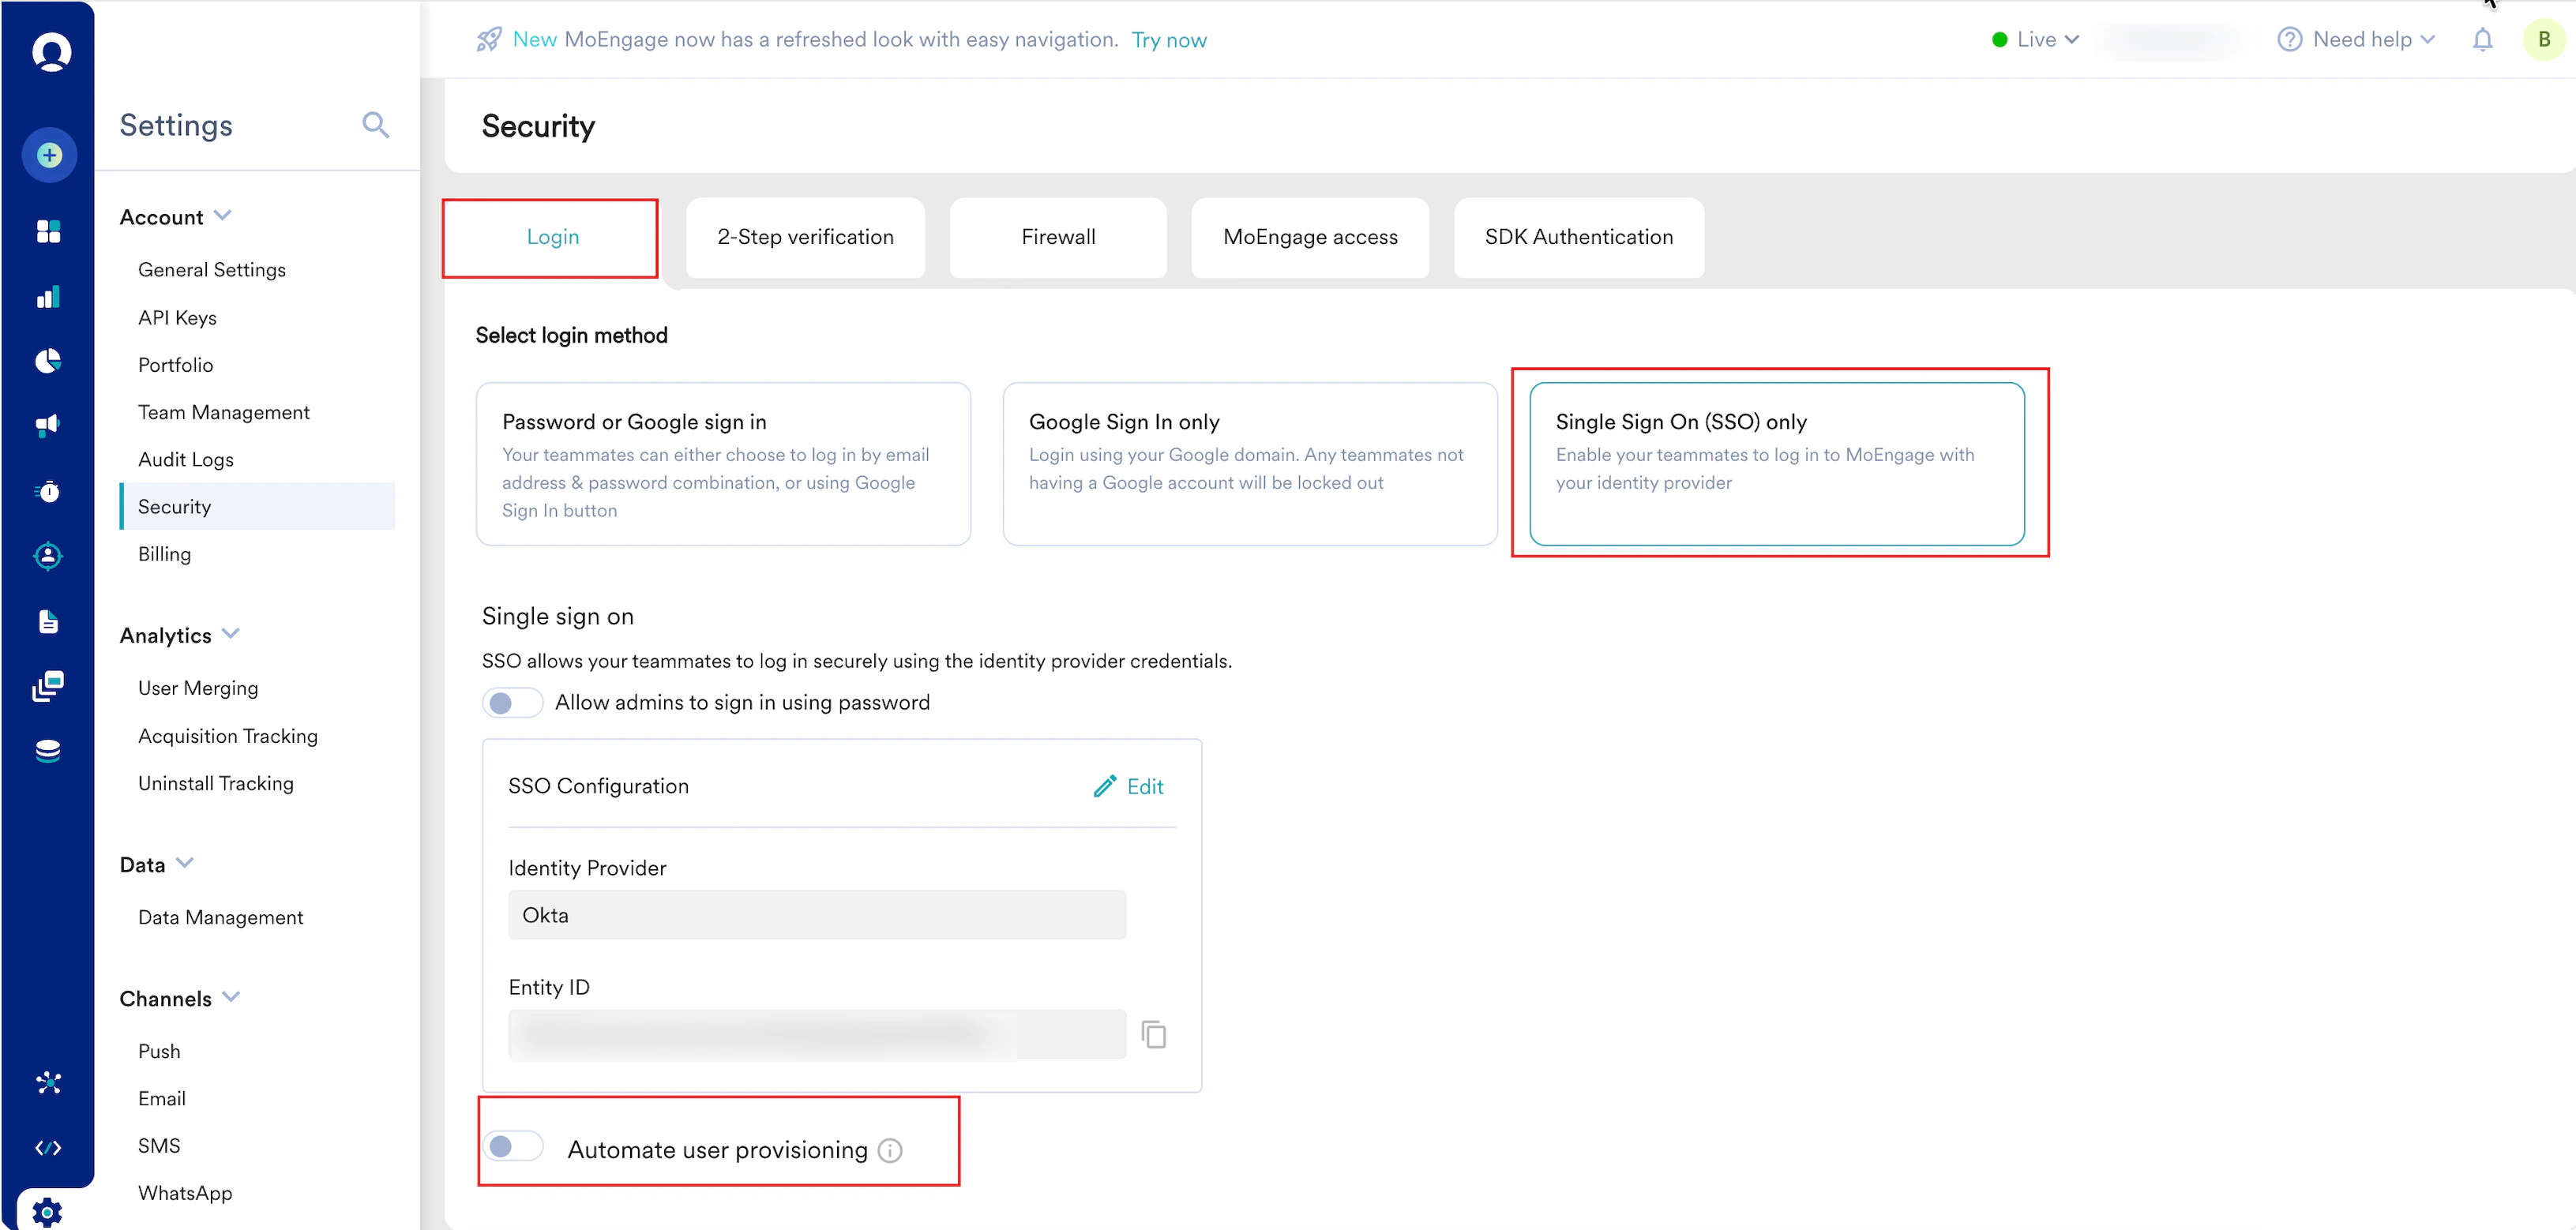
1. In the left navigation menu on the MoEngage workspace, click **Settings** > **Account** > **Security**.
2. On the **Security** page, click the **Login** tab.
3. Click **Single Sign On (SSO) only**.
4. Scroll to the **Automate user provisioning** section.
5. Turn the **Automate user provisioning** toggle on.
## Step 2: Configure SCIM Provisioning in Azure
You must enable automated user management by establishing a secure handshake between Microsoft Entra ID and the MoEngage API using the SCIM 2.0 protocol.
### Step 2.1: Activate SCIM in MoEngage and Generate Token
To activate SCIM in MoEngage and generate a token, perform the following steps:
1. In the left navigation menu on the MoEngage workspace, click **Settings** > **Account** > **Security**.
2. On the **Security** page, click the **Login** tab.
3. Click **Single Sign On (SSO) only**.
4. Scroll to the **Automate user provisioning** section.
5. Turn the **Automate user provisioning** toggle on.
 \
The **Configure provisioning method** dialog box appears.
6. Click **SCIM configuration** as your configuration type.
\
The **Configure provisioning method** dialog box appears.
6. Click **SCIM configuration** as your configuration type.
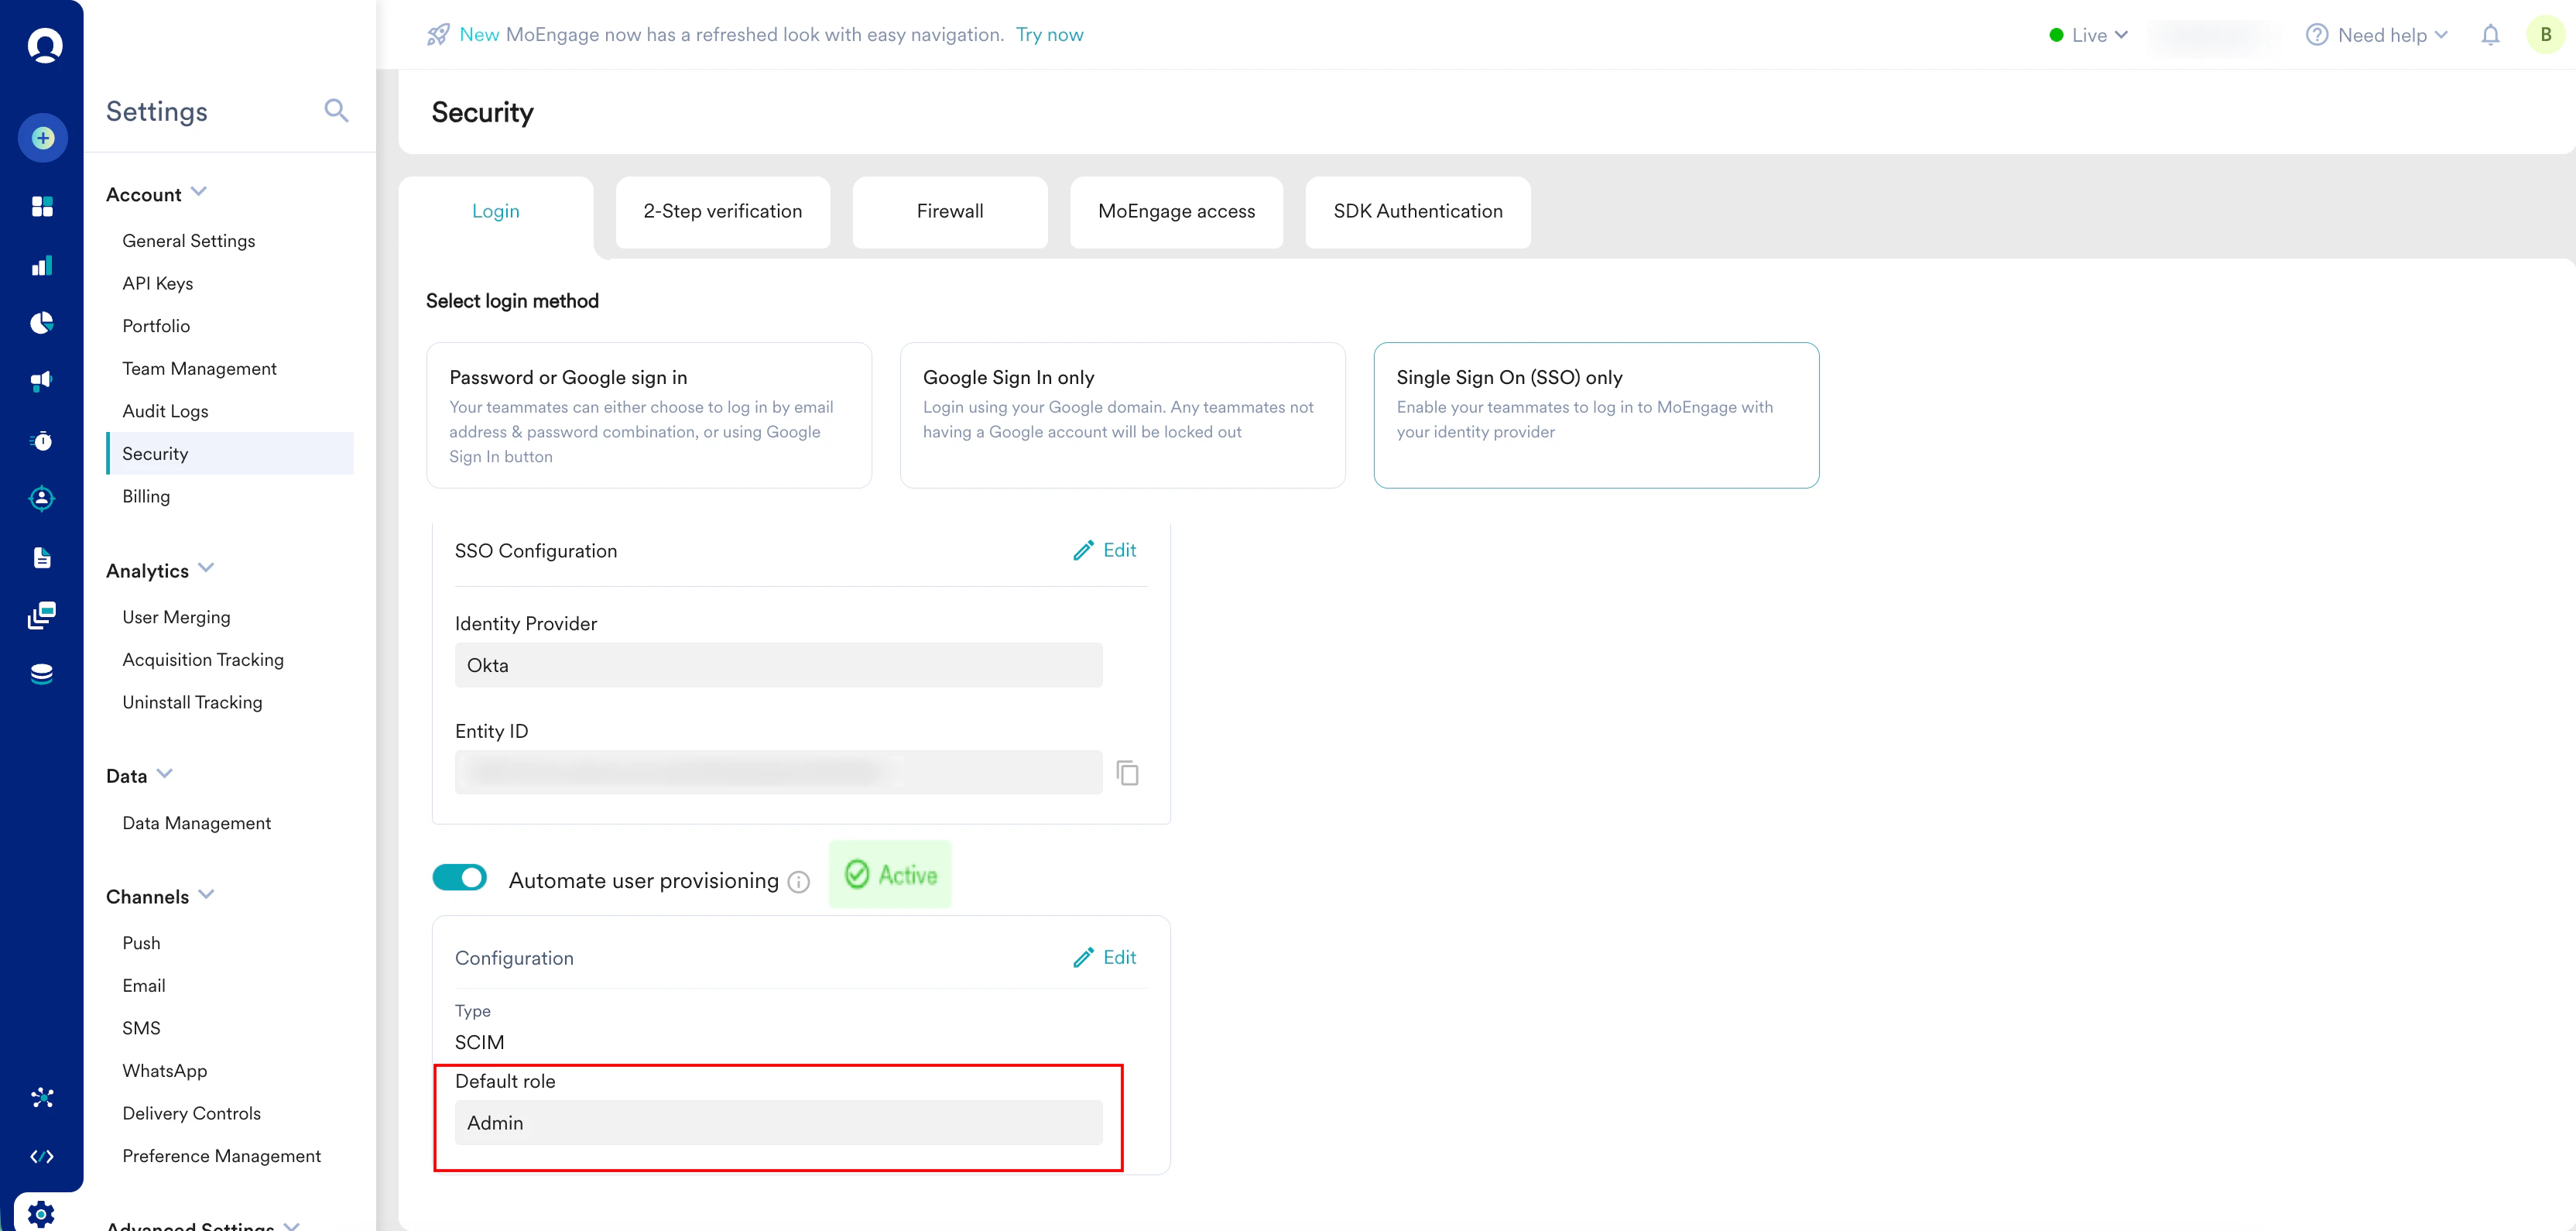
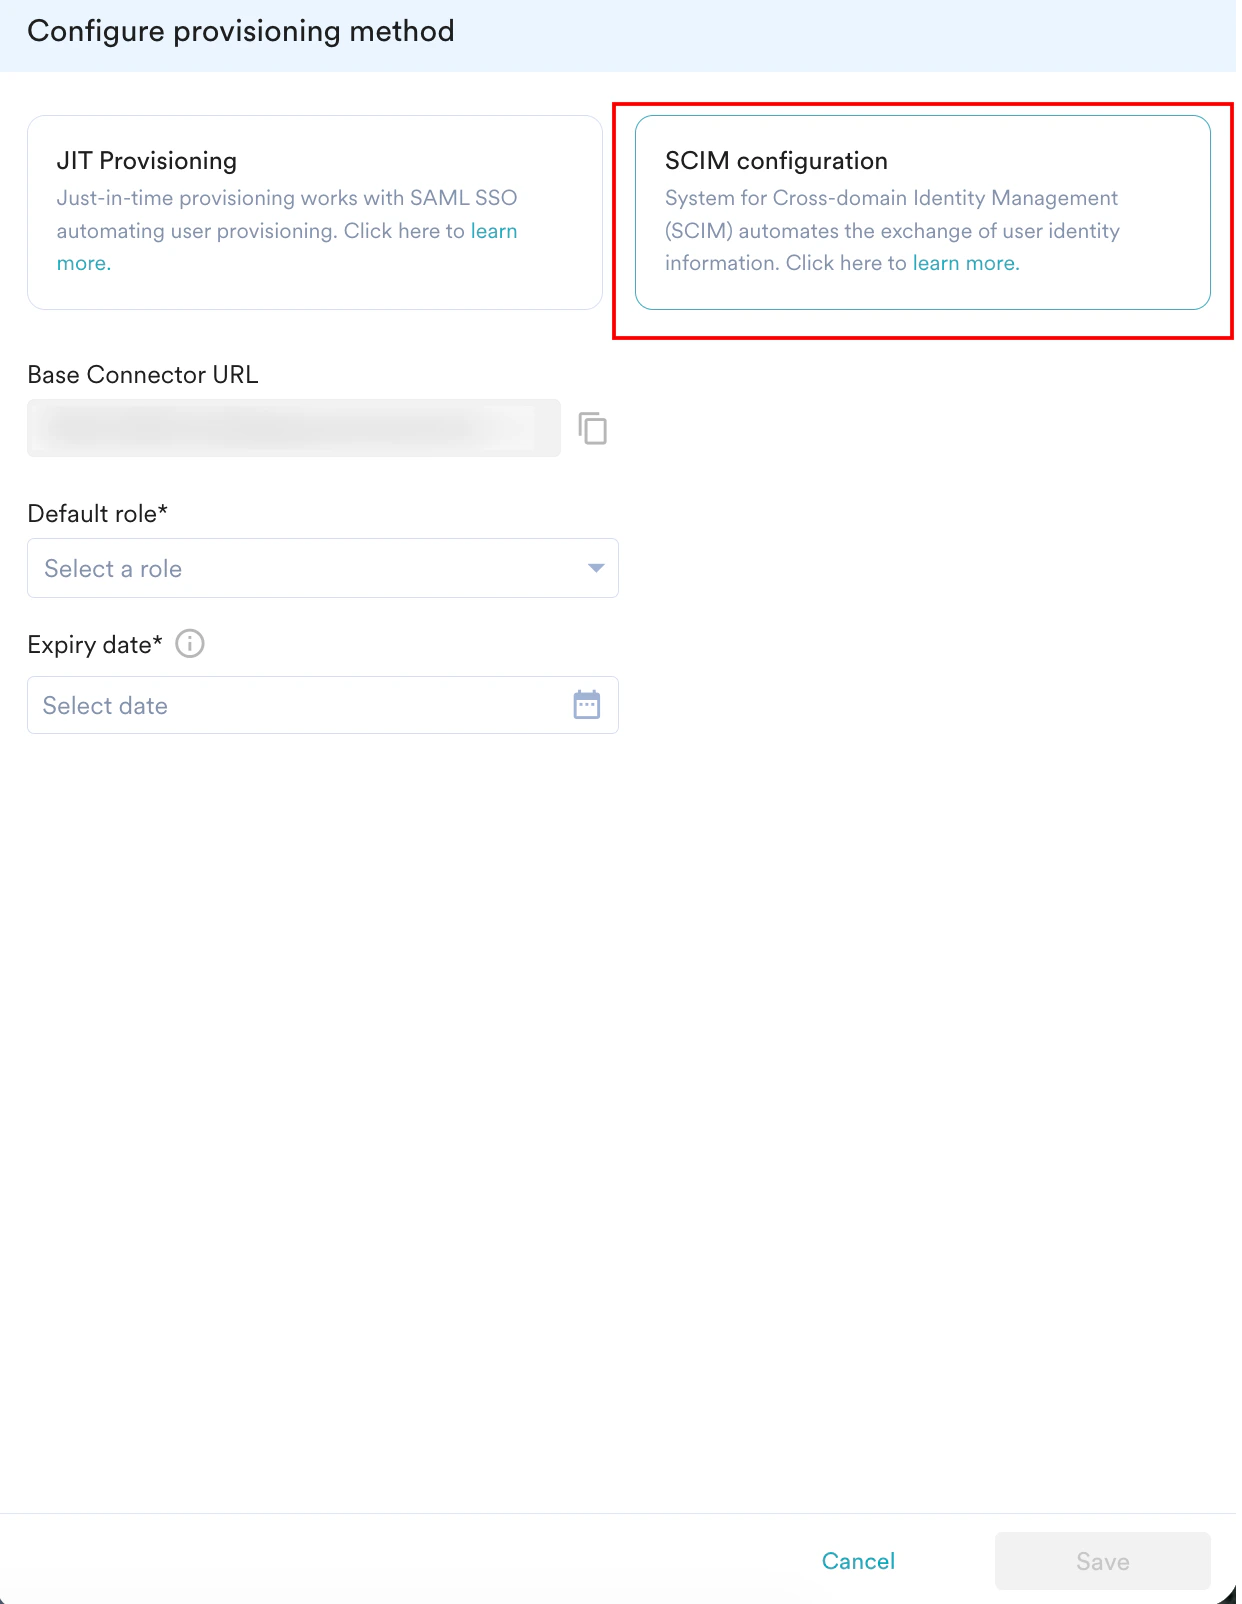 7. Copy the **Base Connector URL** and save it (to use in [Step 3](/user-guide/settings/account/security/system-for-cross-domain-identity-management-scim#step-3-configure-provisioning-credentials-in-azure)).
8. In the **Default role** list, select the required role.
9. In the **Expiry Date** field, select the expiry date for the SCIM access token.\
**Note**: MoEngage recommends setting an **Expiry date** period of one year.
10. Click **Save**.\
The **Save your configuration** dialog box appears, prompting you to confirm your configuration.
11. Click **Confirm**.\
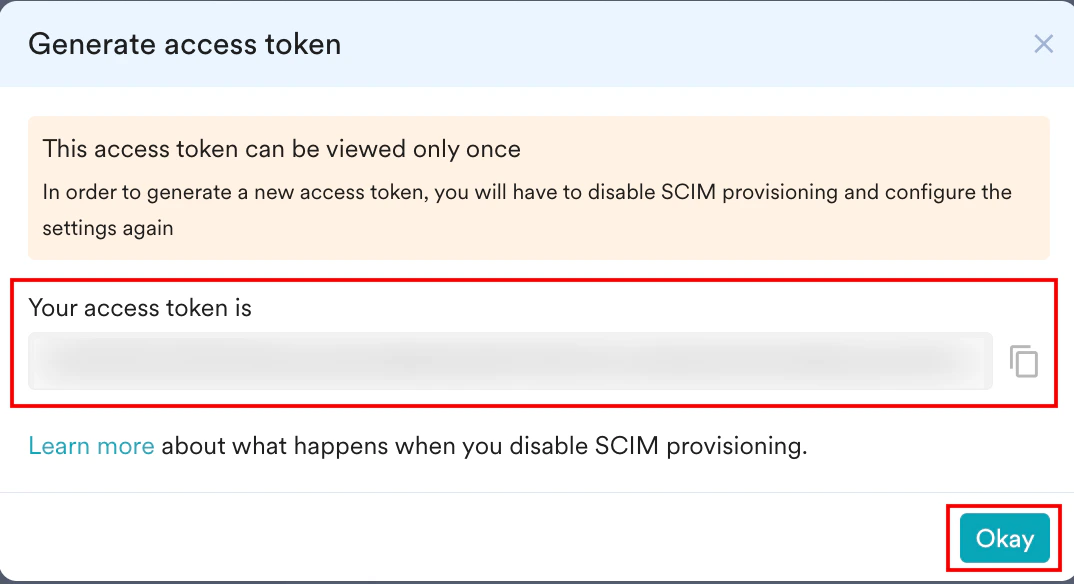
The **Successfully generated SCIM token** message and the **Generate access token** dialog box appear. **Note**: Copy the token immediately; it is only shown once.
12. Click **Okay**.
7. Copy the **Base Connector URL** and save it (to use in [Step 3](/user-guide/settings/account/security/system-for-cross-domain-identity-management-scim#step-3-configure-provisioning-credentials-in-azure)).
8. In the **Default role** list, select the required role.
9. In the **Expiry Date** field, select the expiry date for the SCIM access token.\
**Note**: MoEngage recommends setting an **Expiry date** period of one year.
10. Click **Save**.\
The **Save your configuration** dialog box appears, prompting you to confirm your configuration.
11. Click **Confirm**.\
The **Successfully generated SCIM token** message and the **Generate access token** dialog box appear. **Note**: Copy the token immediately; it is only shown once.
12. Click **Okay**.
 ## Step 3: Configure Provisioning Credentials in Azure
To configure the provisioning credentials in Azure, perform the following steps:
1. Return to the Azure application, on the **Overview** page, go to the left navigation menu, and click **Manage** > **Provisioning**.
2. In the **Provisioning Mode**, click **Automatic**.
## Step 3: Configure Provisioning Credentials in Azure
To configure the provisioning credentials in Azure, perform the following steps:
1. Return to the Azure application, on the **Overview** page, go to the left navigation menu, and click **Manage** > **Provisioning**.
2. In the **Provisioning Mode**, click **Automatic**. 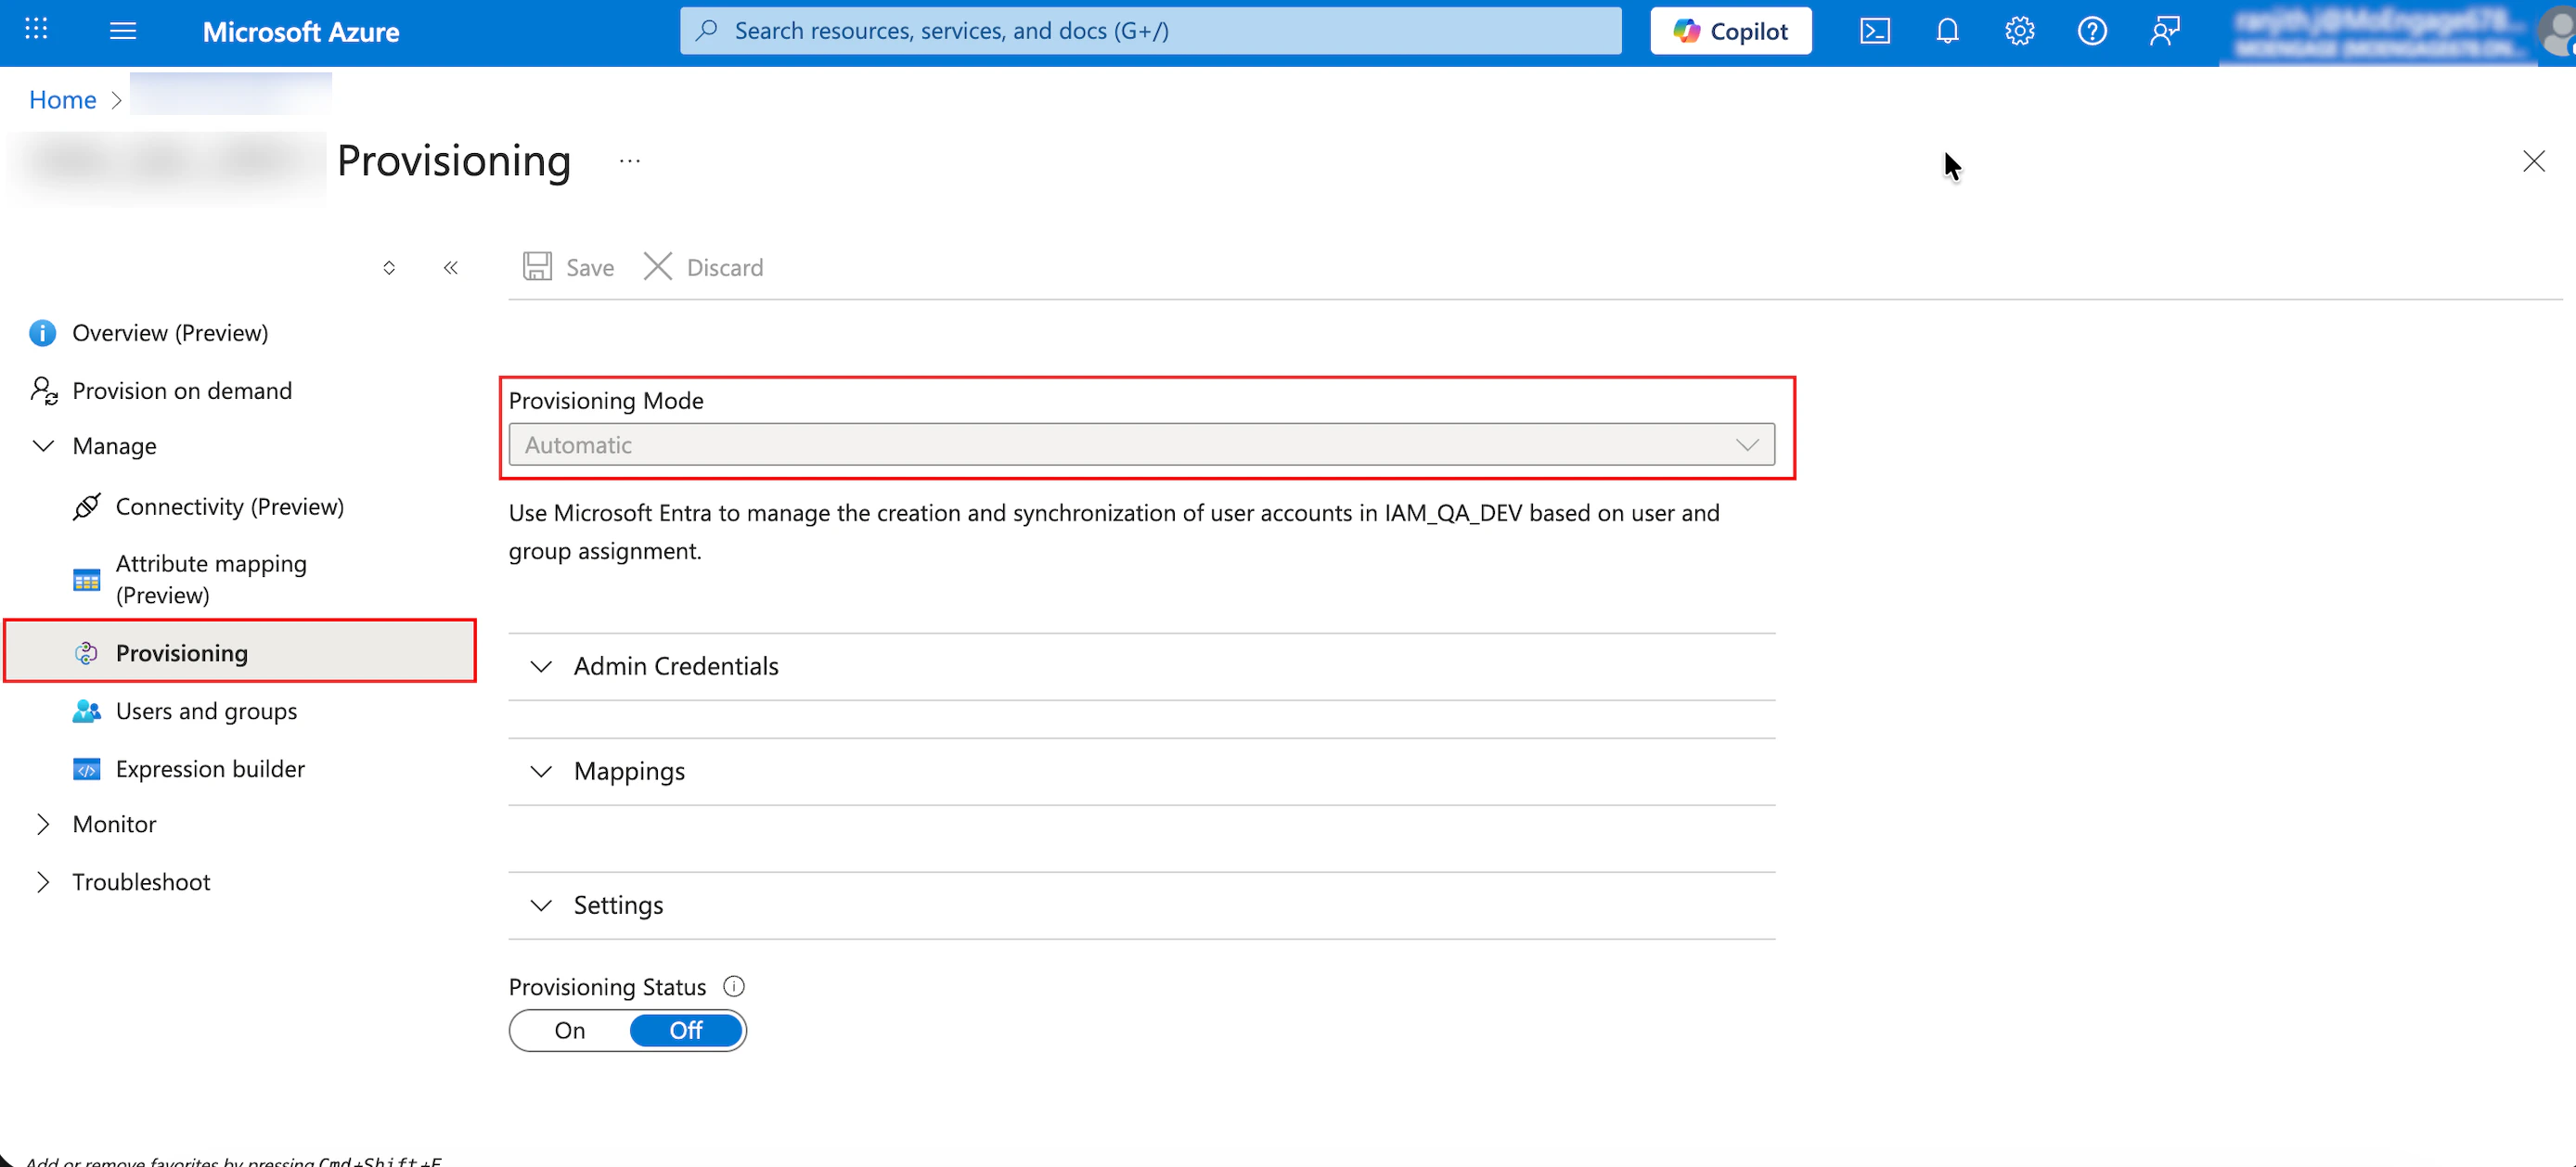 3. Expand **Admin Credentials** and enter the following:
1. In the **Tenant URL** box, paste the **Base Connector URL** copied from the MoEngage workspace earlier.
2. In the **Secret Token** box, paste the **SCIM Access Token** generated in [Step 2.1](/user-guide/settings/account/security/system-for-cross-domain-identity-management-scim#step-2-1-activate-scim-in-moengage-and-generate-token).
3. Click **Test Connection** to verify that Microsoft Entra ID can securely connect to the MoEngage API.\
**Note**: A successful connection test automatically updates the SCIM status in your MoEngage workspace from *Inactive* to *Active*.
4. Click **Save** at the top.
3. Expand **Admin Credentials** and enter the following:
1. In the **Tenant URL** box, paste the **Base Connector URL** copied from the MoEngage workspace earlier.
2. In the **Secret Token** box, paste the **SCIM Access Token** generated in [Step 2.1](/user-guide/settings/account/security/system-for-cross-domain-identity-management-scim#step-2-1-activate-scim-in-moengage-and-generate-token).
3. Click **Test Connection** to verify that Microsoft Entra ID can securely connect to the MoEngage API.\
**Note**: A successful connection test automatically updates the SCIM status in your MoEngage workspace from *Inactive* to *Active*.
4. Click **Save** at the top. 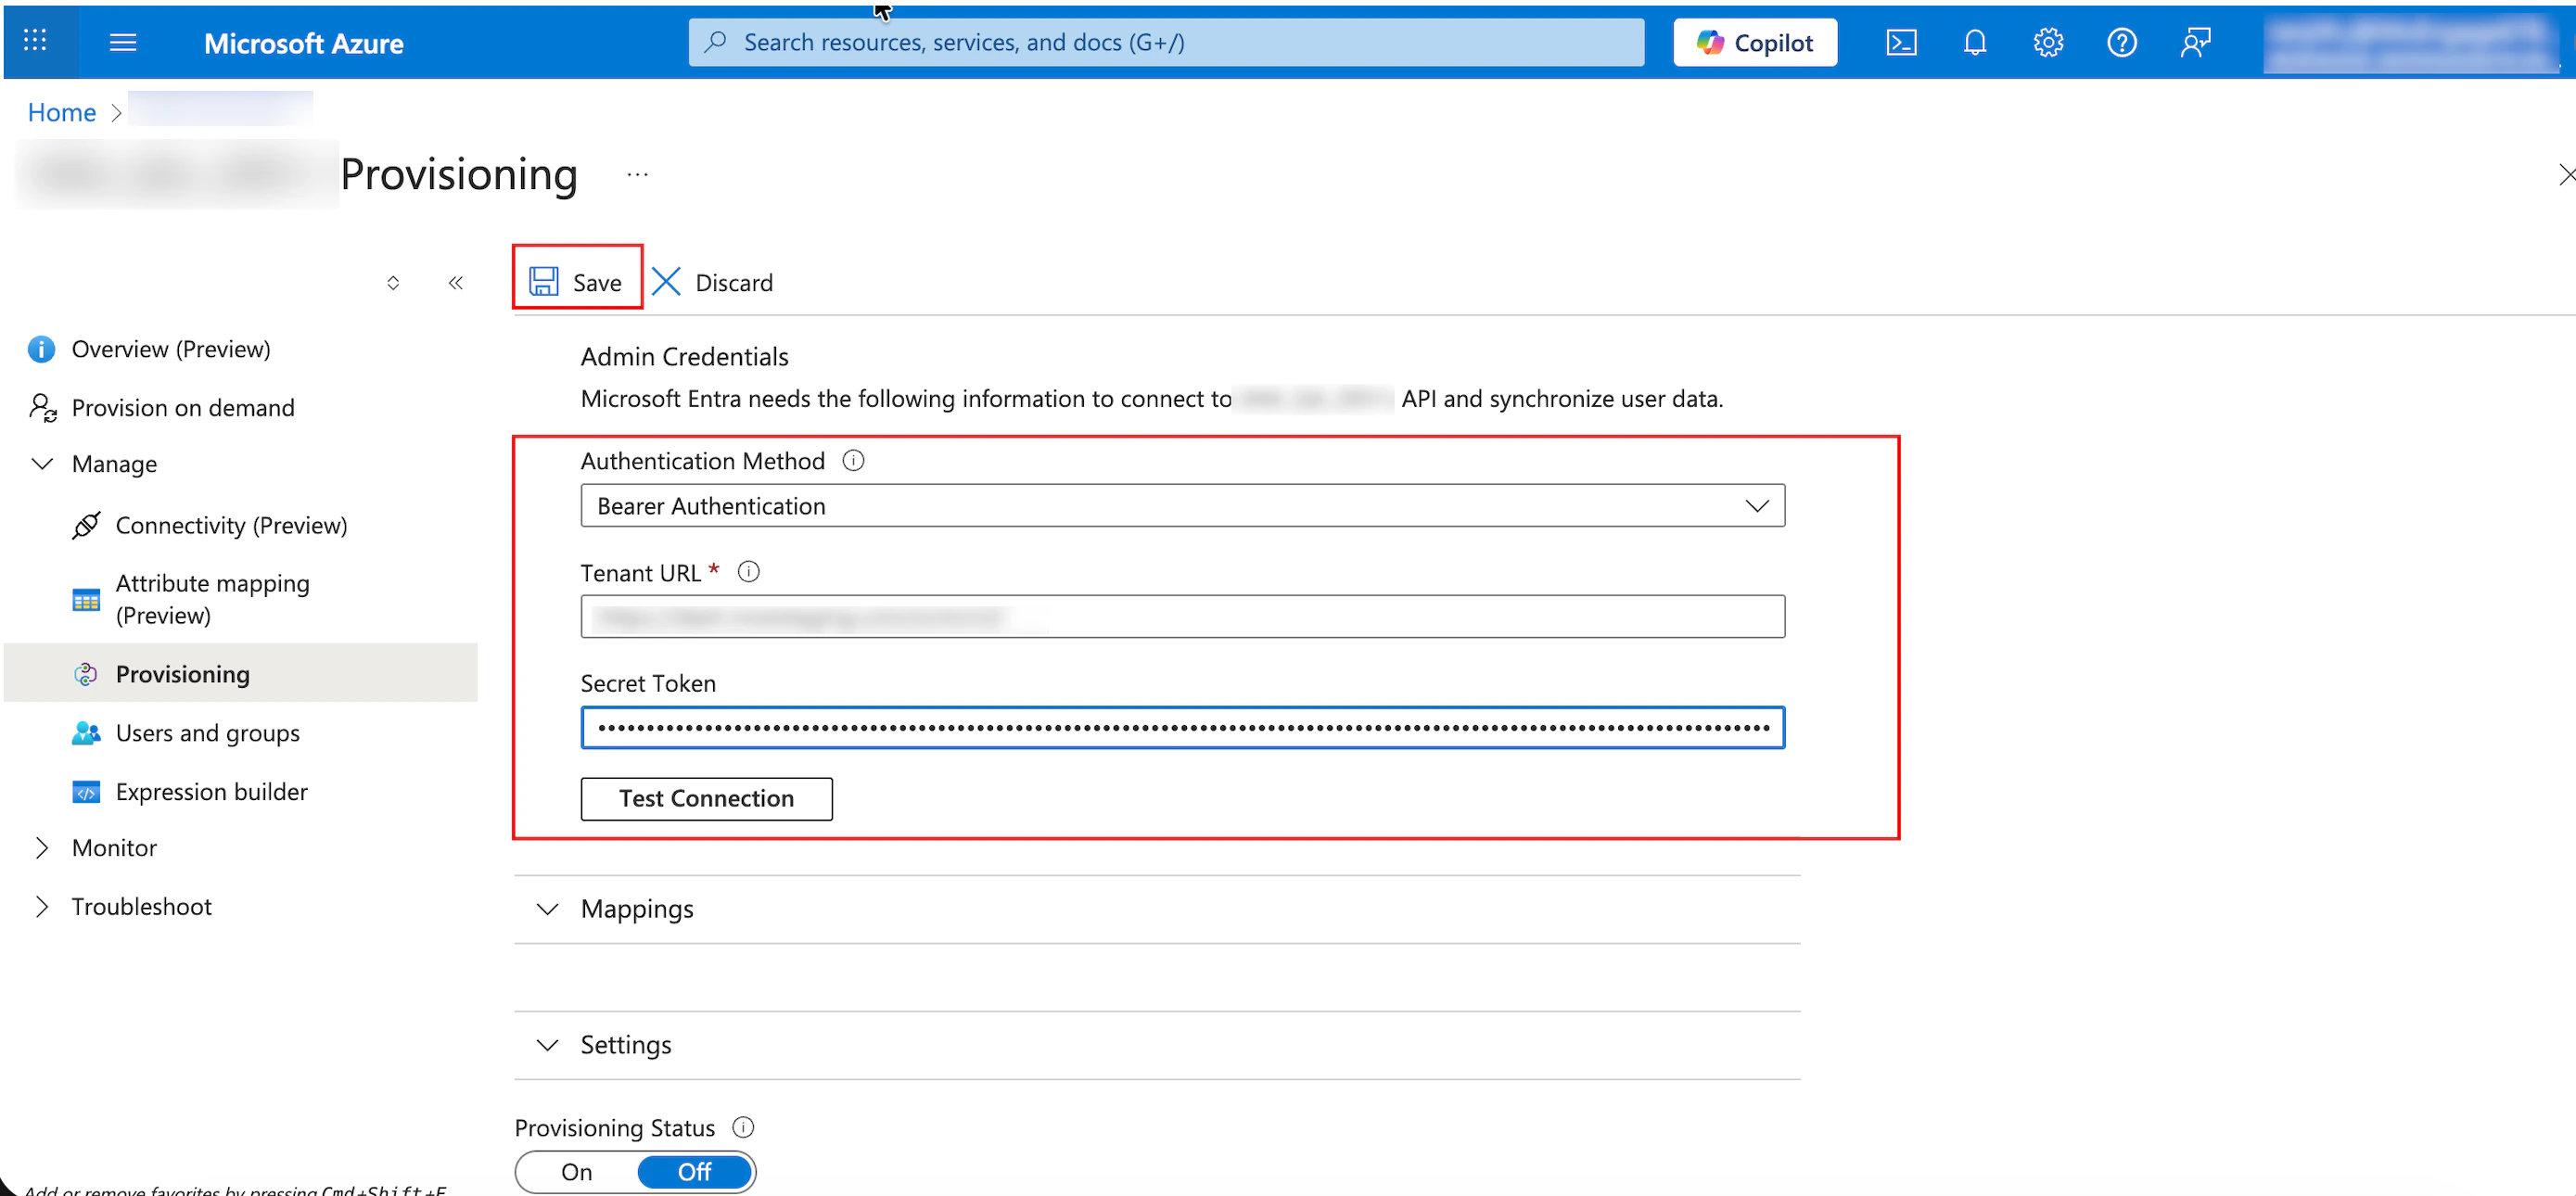 ## Step 4: Configure Attribute Mappings
**Information**
To ensure MoEngage provisions users with the correct permissions, you must grant write permissions to Azure and map the custom role attribute. Since Microsoft Entra ID does not include a MoEngage-compatible "role" field by default, you must manually extend the attribute list before you can map the roles.
### Step 4.1: Create Attribute List
To add the MoEngage role extension to the attribute list, perform the following steps:
1. Access the **Attribute Mapping** page using one of the following options:
* In the **Provisioning** section of your Azure application, expand **Mappings** and click **Attribute mapping (Preview)**.
## Step 4: Configure Attribute Mappings
**Information**
To ensure MoEngage provisions users with the correct permissions, you must grant write permissions to Azure and map the custom role attribute. Since Microsoft Entra ID does not include a MoEngage-compatible "role" field by default, you must manually extend the attribute list before you can map the roles.
### Step 4.1: Create Attribute List
To add the MoEngage role extension to the attribute list, perform the following steps:
1. Access the **Attribute Mapping** page using one of the following options:
* In the **Provisioning** section of your Azure application, expand **Mappings** and click **Attribute mapping (Preview)**.  OR
* From the left navigation, click **Attribute mapping (Preview)**.
* Under the **Name** column, click **Provision Microsoft Entra ID Users**.
OR
* From the left navigation, click **Attribute mapping (Preview)**.
* Under the **Name** column, click **Provision Microsoft Entra ID Users**. 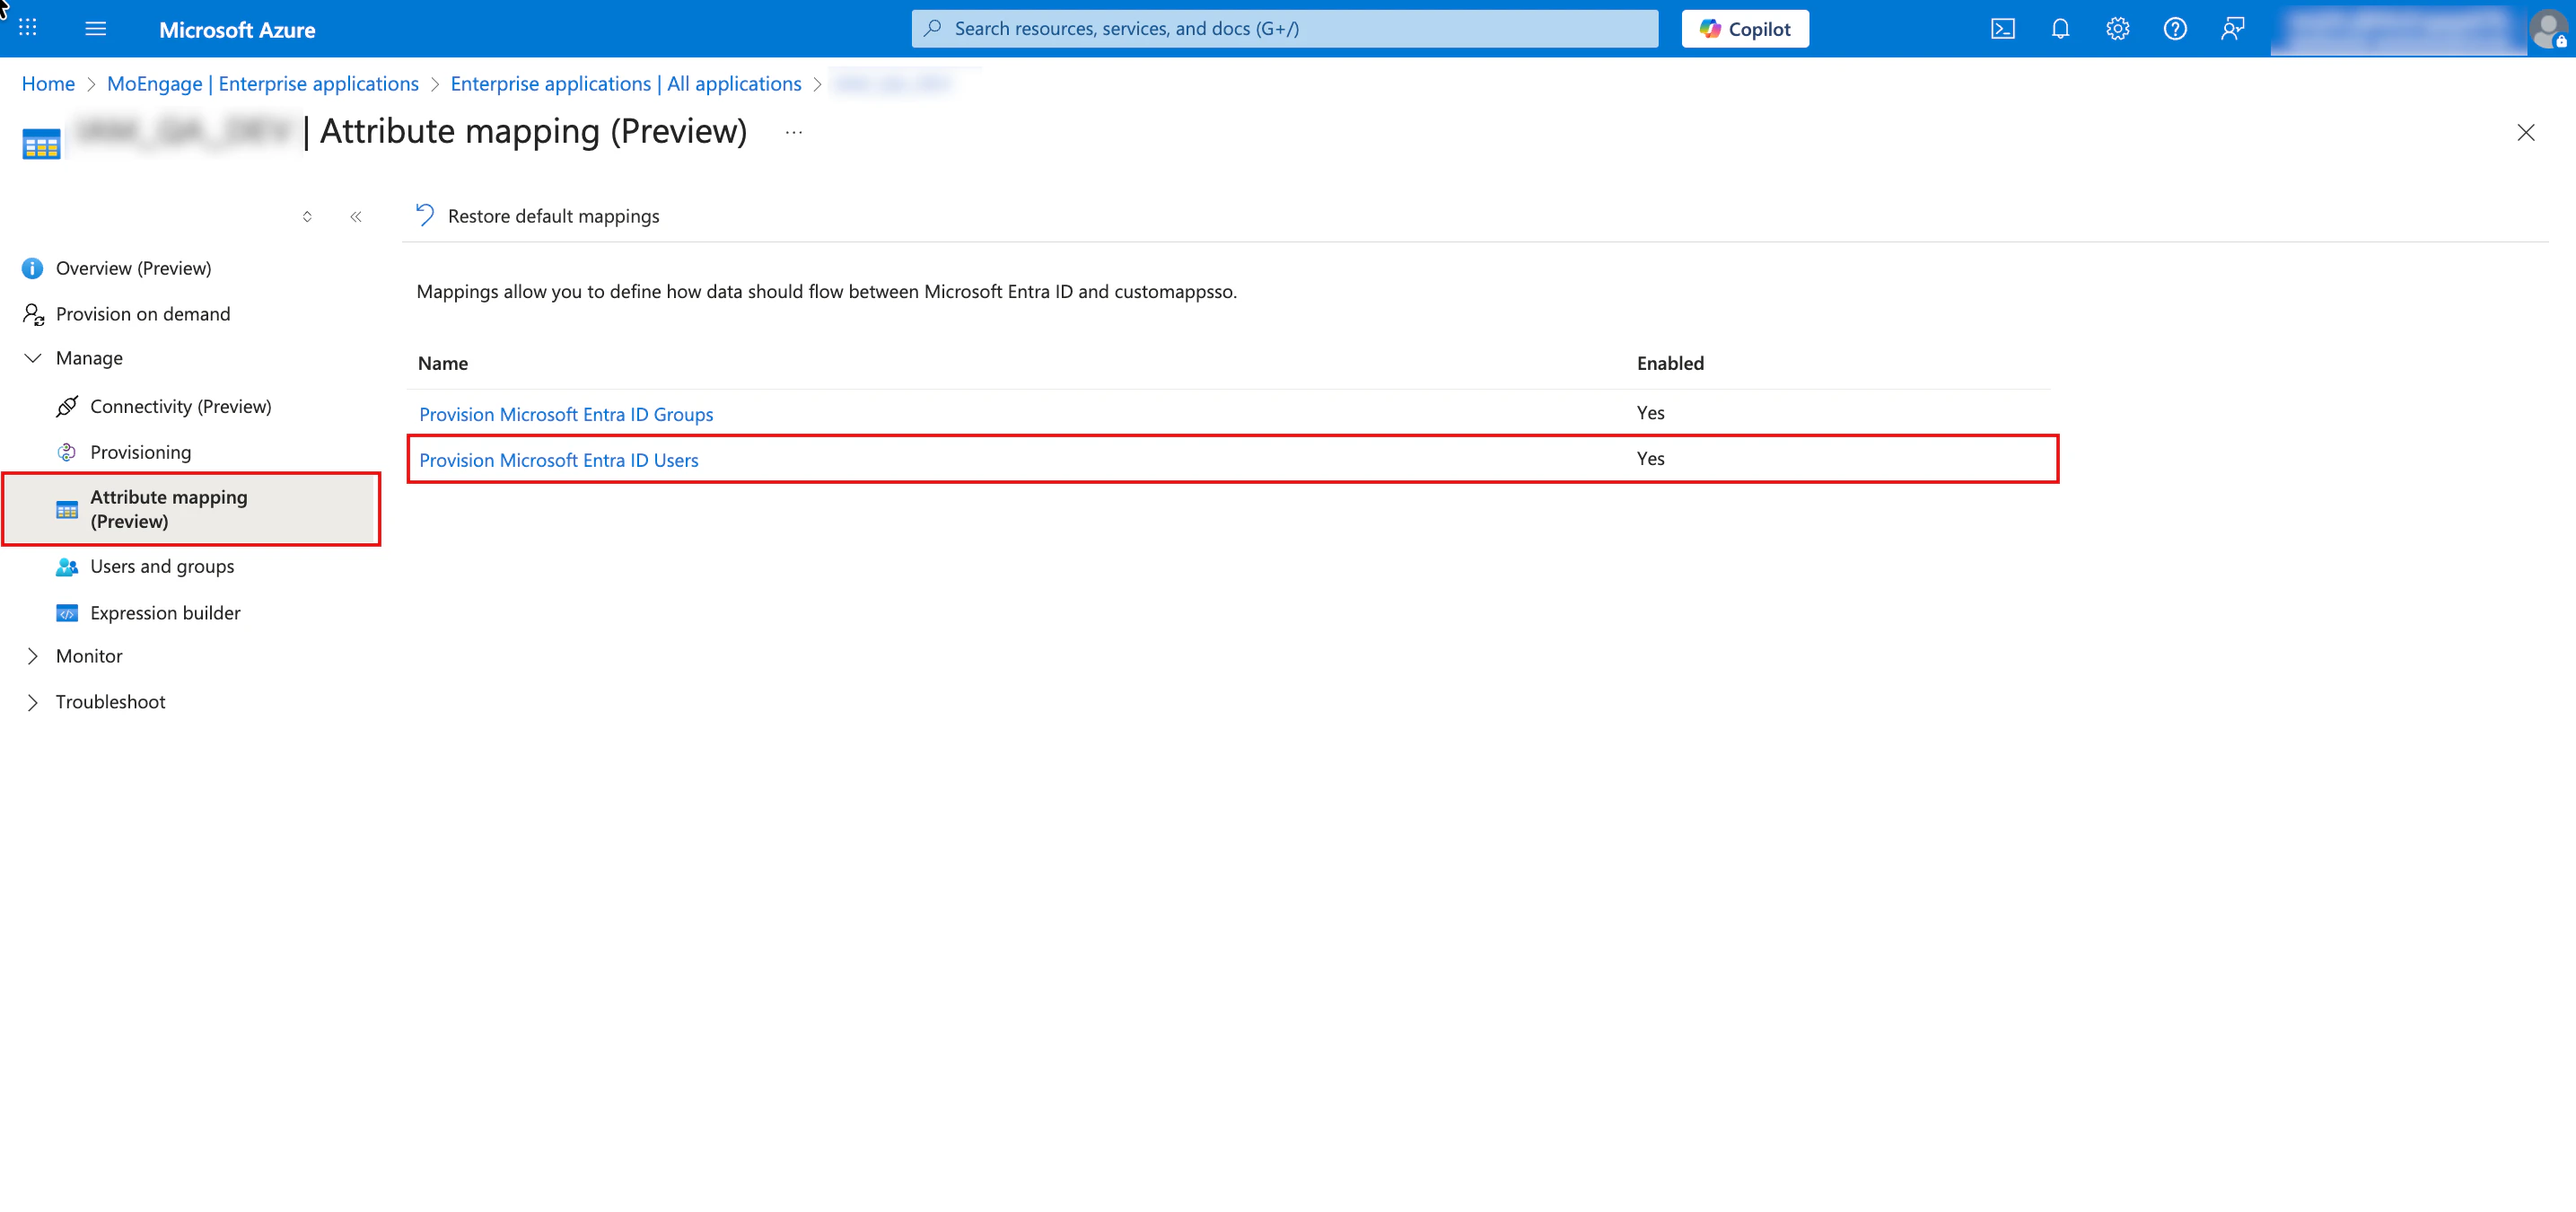 2. Scroll to the end of the Attribute Mapping page and select the **Show advanced options** check box.
3. Click **Edit attribute list for (your app name)**.
2. Scroll to the end of the Attribute Mapping page and select the **Show advanced options** check box.
3. Click **Edit attribute list for (your app name)**. 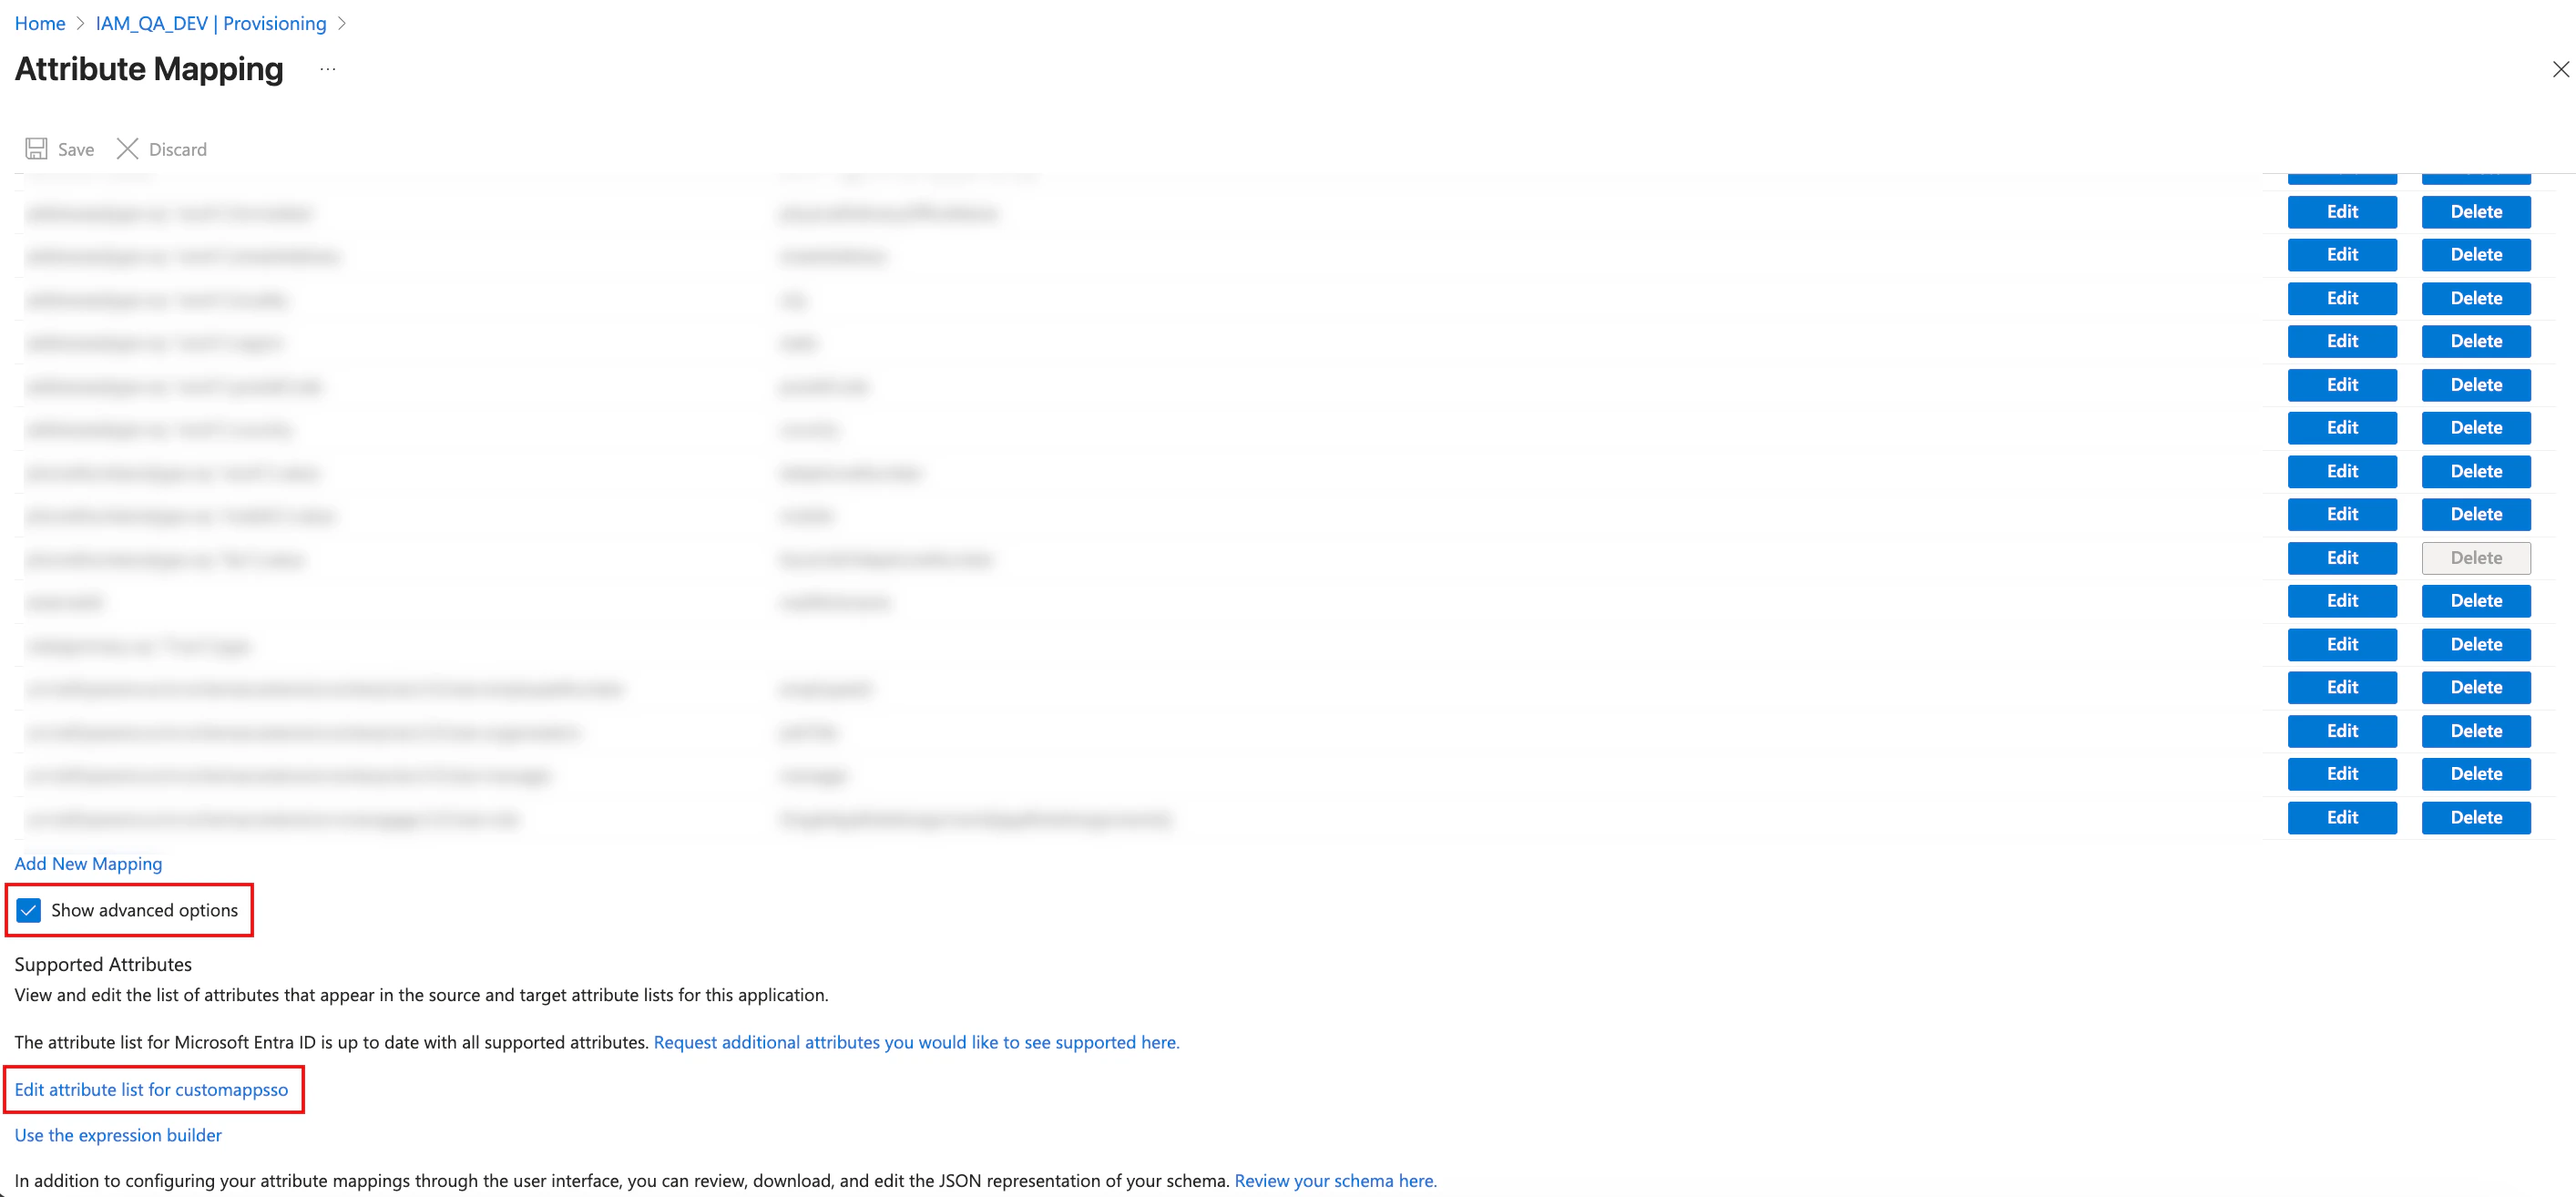 4. In the **Edit Attribute List** window, scroll to the bottom of the table to add a new row with the following technical values:
* **Name**: Enter the attribute name. *urn:ietf:params:scim:schemas:extension:moengage:2.0:User:role*
* **Type**: Click **String** in the drop-down list.\
**Note**: Before entering the attribute name, verify if the MoEngage role extension already exists in the list. If you attempt to add an attribute name that is already present, Microsoft Entra ID will display an error stating that the attribute name must be unique.
5. Click **Save** at the top of the pane.
4. In the **Edit Attribute List** window, scroll to the bottom of the table to add a new row with the following technical values:
* **Name**: Enter the attribute name. *urn:ietf:params:scim:schemas:extension:moengage:2.0:User:role*
* **Type**: Click **String** in the drop-down list.\
**Note**: Before entering the attribute name, verify if the MoEngage role extension already exists in the list. If you attempt to add an attribute name that is already present, Microsoft Entra ID will display an error stating that the attribute name must be unique.
5. Click **Save** at the top of the pane. 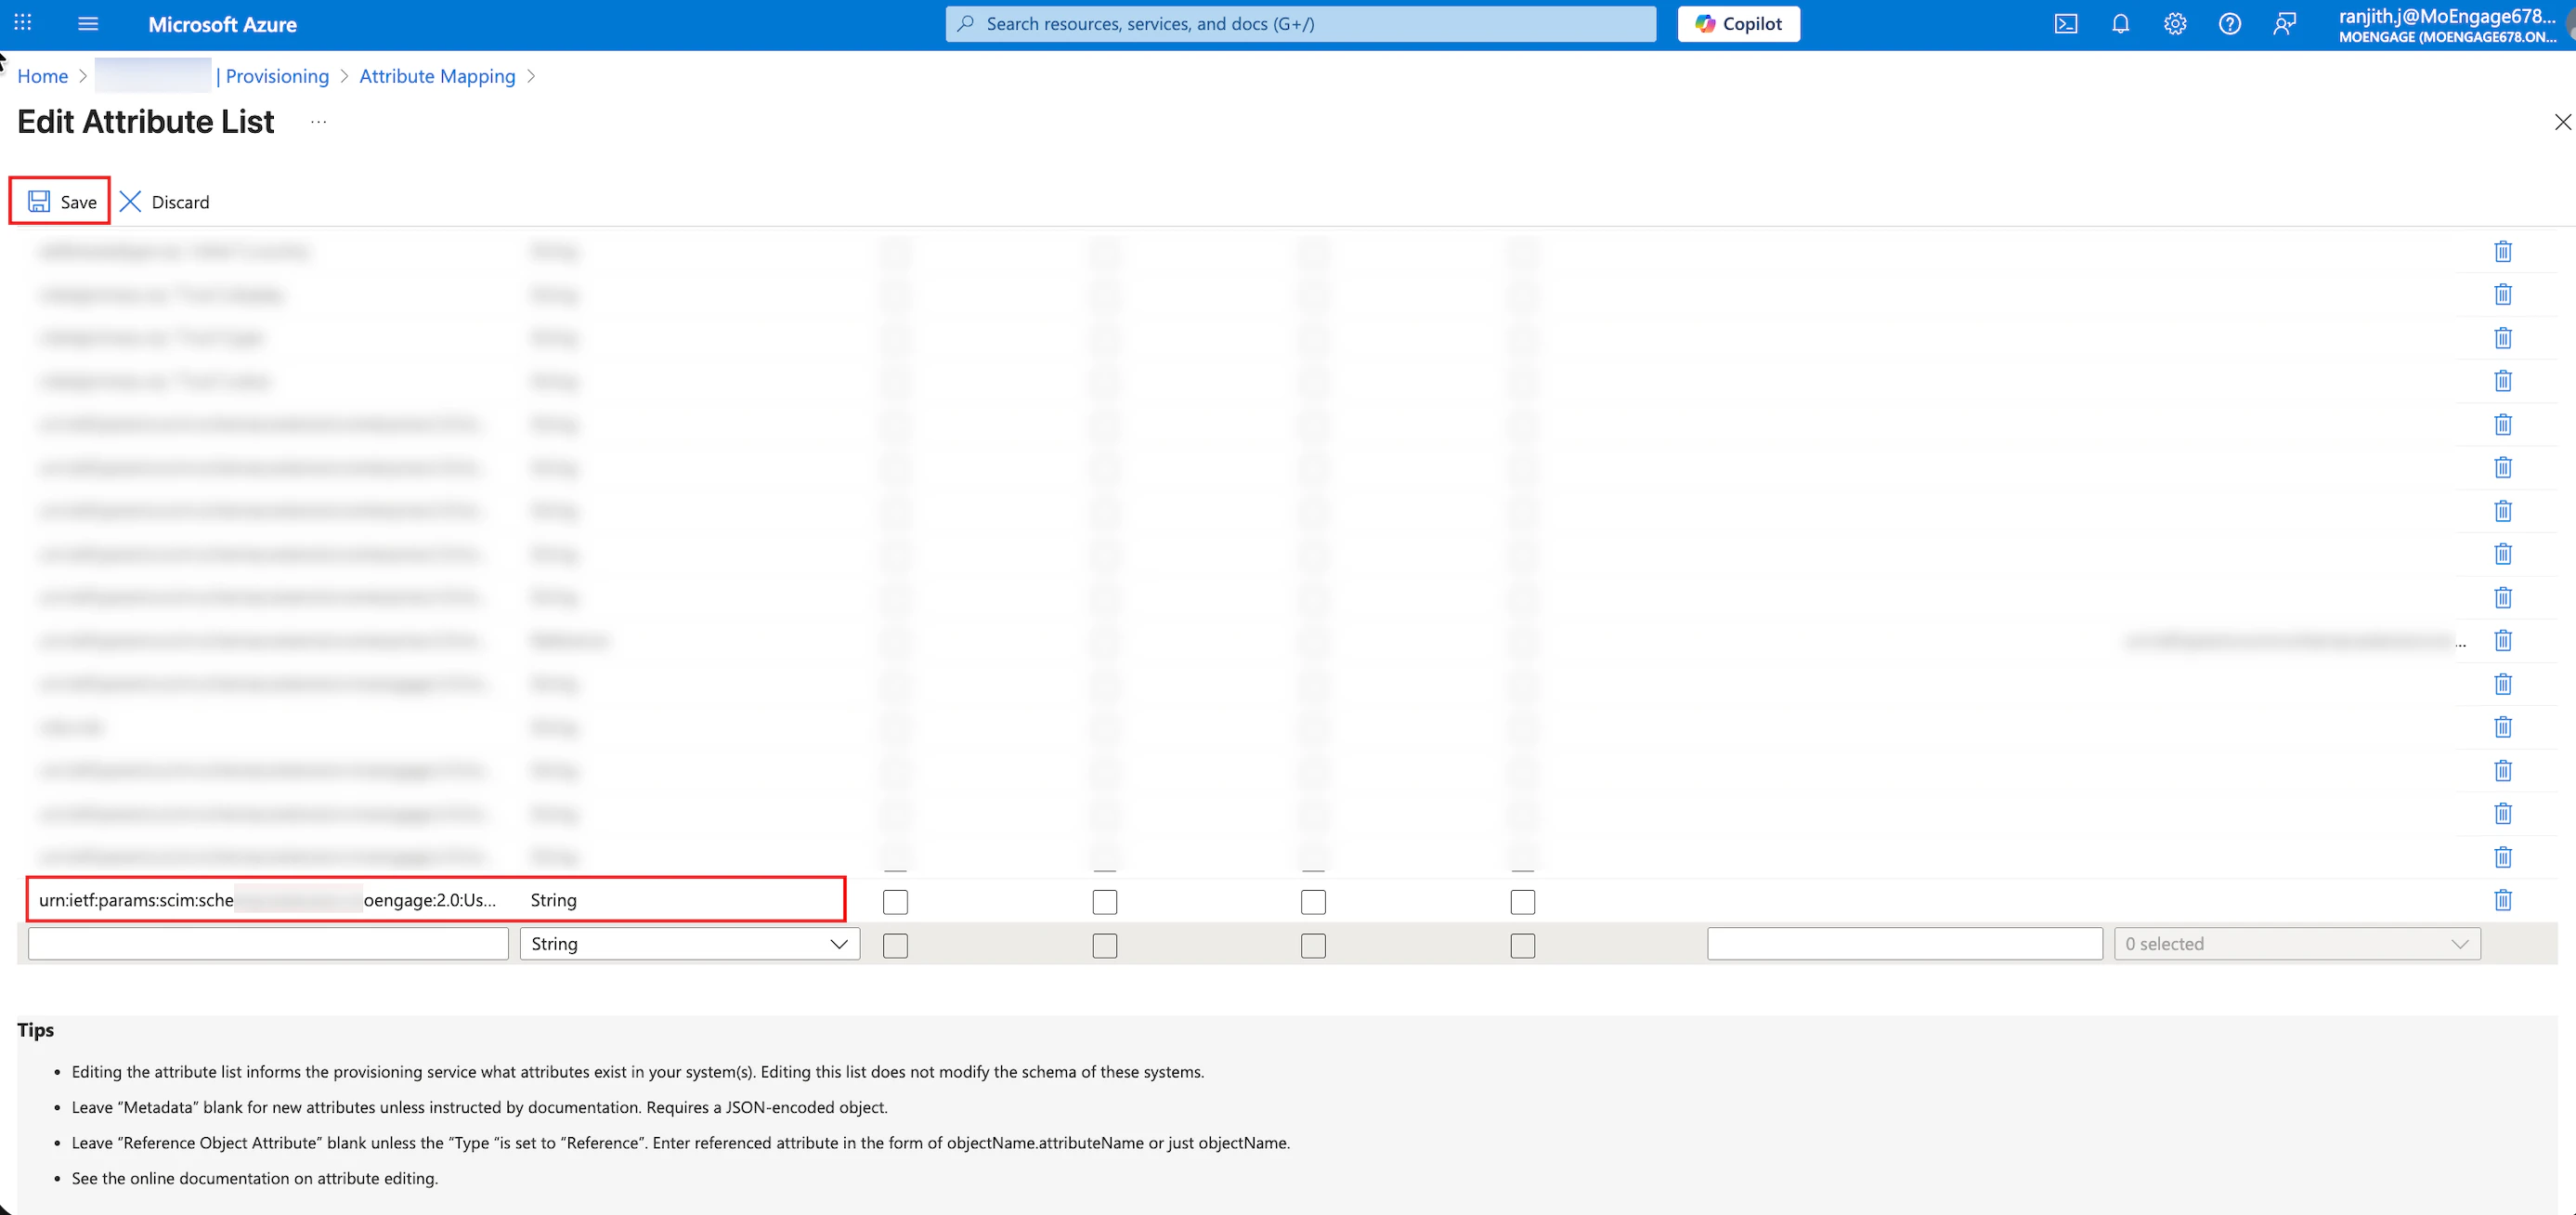 6. Click \*\*Yes \*\*on the confirmation box.\
After Microsoft Entra ID successfully updates the provisioning settings, the \*\*Updating user provisioning settings \*\*success message appears.
### Step 4.2: Map the User Role Attribute
After the attribute is added to the list, you must map it using an expression to link Azure App Roles to MoEngage and perform the following steps:
1. On the **Attribute Mapping** page, click **Add New Mapping.**
6. Click \*\*Yes \*\*on the confirmation box.\
After Microsoft Entra ID successfully updates the provisioning settings, the \*\*Updating user provisioning settings \*\*success message appears.
### Step 4.2: Map the User Role Attribute
After the attribute is added to the list, you must map it using an expression to link Azure App Roles to MoEngage and perform the following steps:
1. On the **Attribute Mapping** page, click **Add New Mapping.** 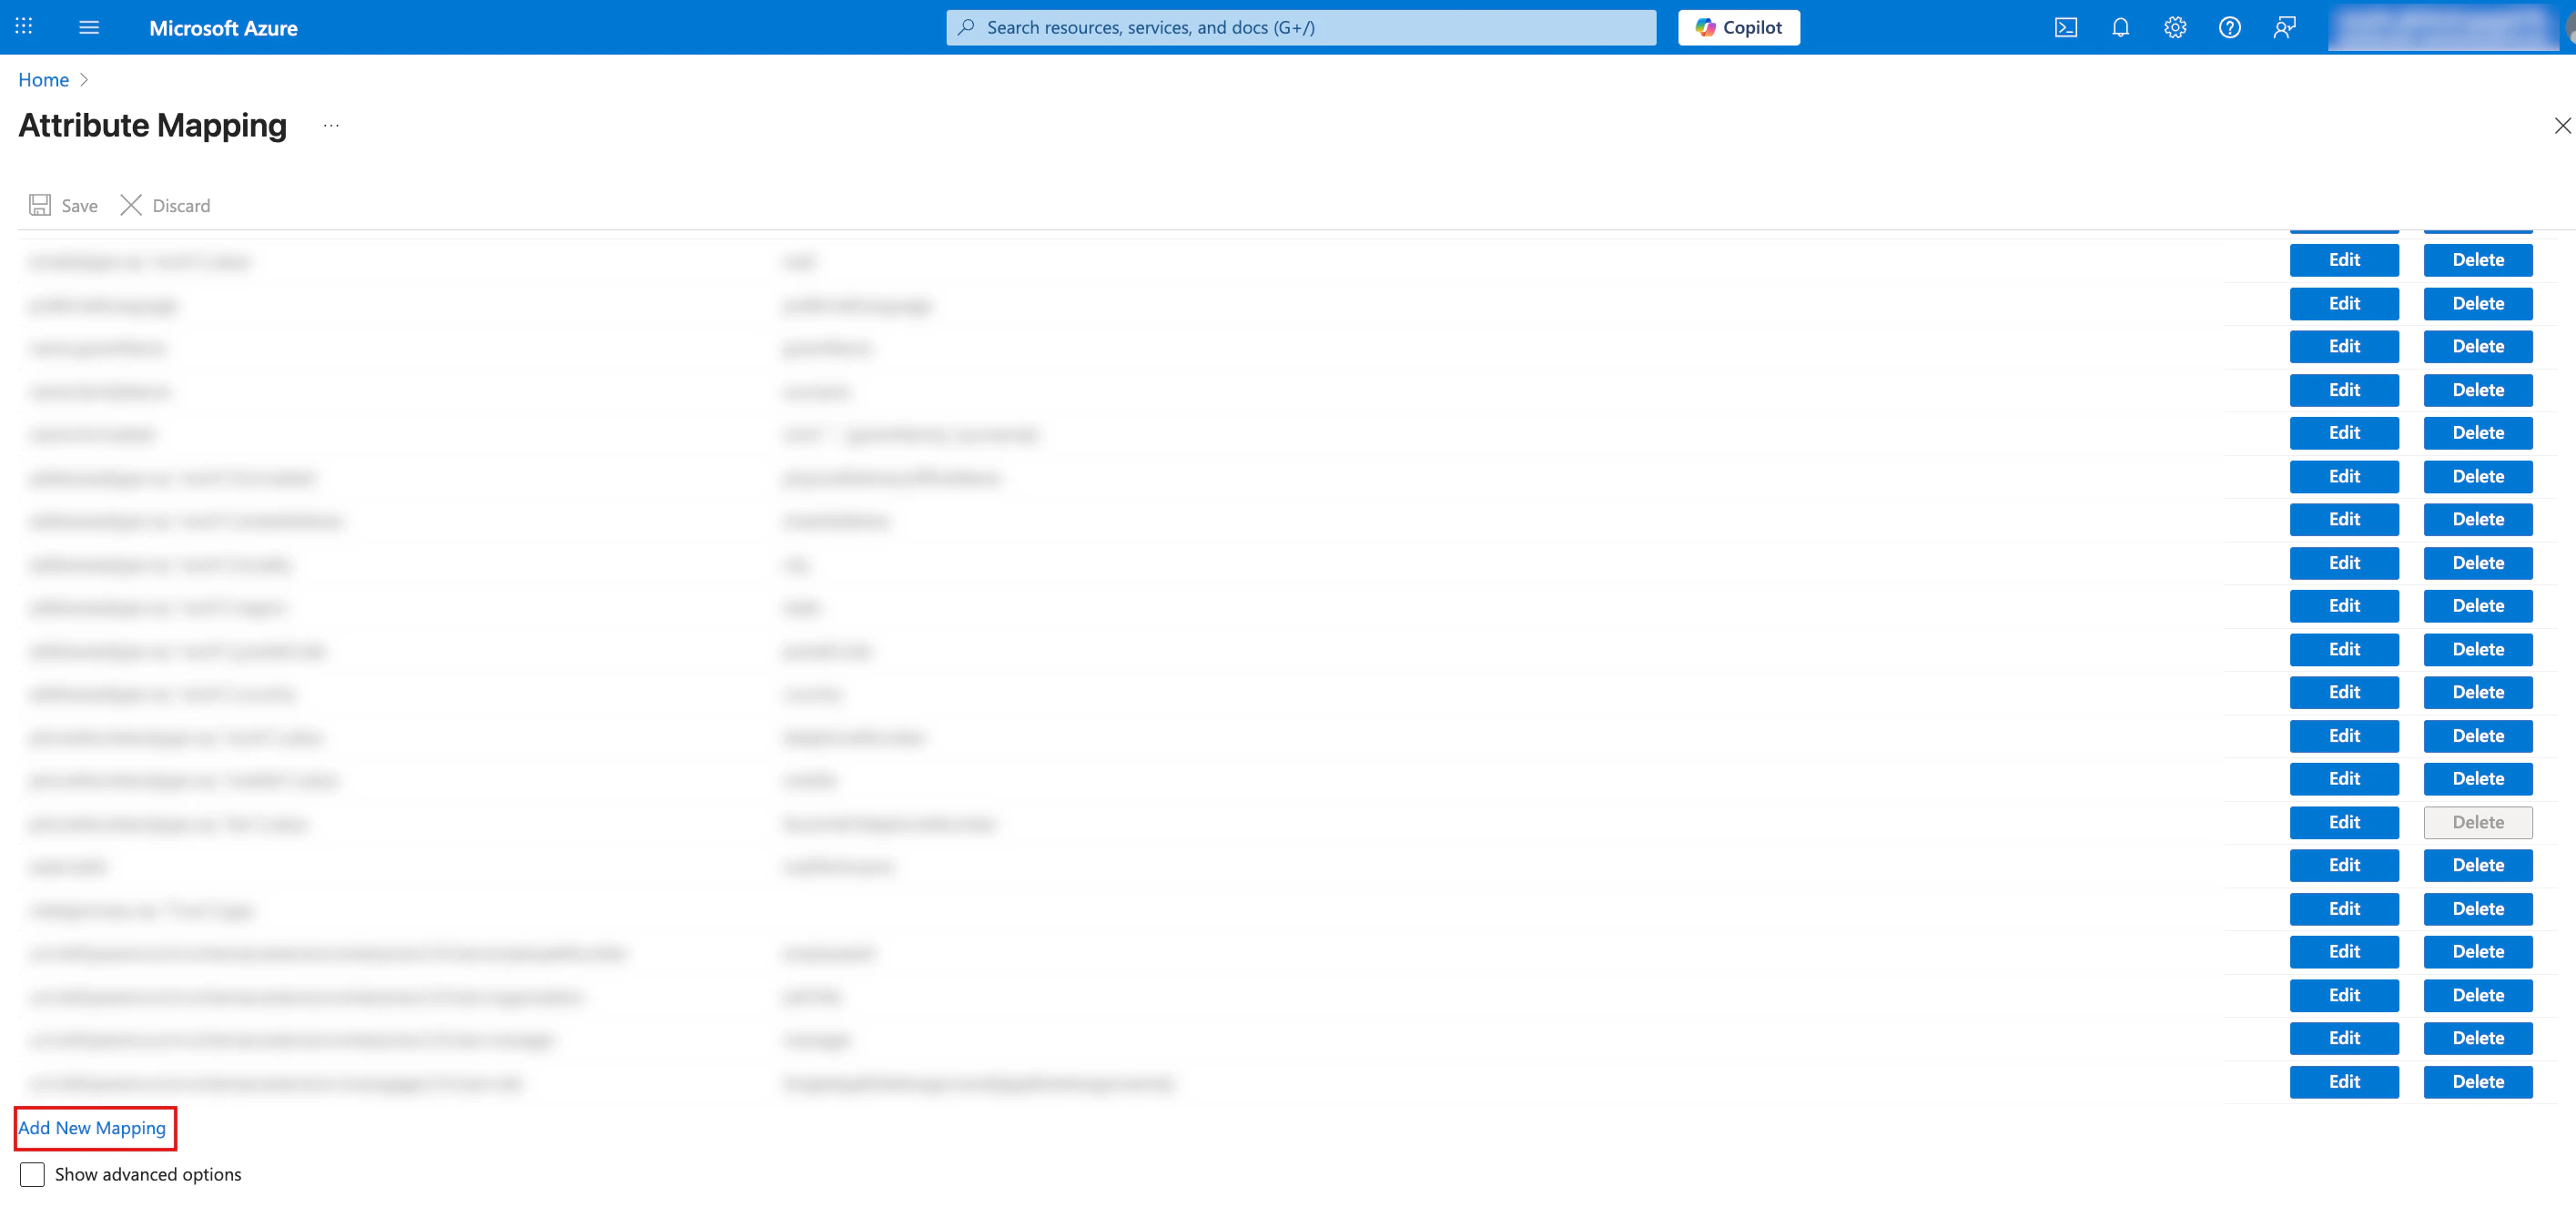 2. In the \*\*Edit Attribute \*\*section, configure the following details:
1. In the **Mapping Type**list, click **Expression**.
2. In the **Expression** box, type the expression **SingleAppRoleAssignment(\[appRoleAssignments**\
**Note**: Type this expression manually. Copying and pasting may include hidden, unsupported characters that cause errors.
3. In the **Target Attribute** list, click the attribute that you created in [Step 4.1](/user-guide/settings/account/security/system-for-cross-domain-identity-management-scim#step-4-1-create-attribute-list).
4. In the \*\*Apply this mapping \*\*list, click **Always**.
3. Click **OK**.
2. In the \*\*Edit Attribute \*\*section, configure the following details:
1. In the **Mapping Type**list, click **Expression**.
2. In the **Expression** box, type the expression **SingleAppRoleAssignment(\[appRoleAssignments**\
**Note**: Type this expression manually. Copying and pasting may include hidden, unsupported characters that cause errors.
3. In the **Target Attribute** list, click the attribute that you created in [Step 4.1](/user-guide/settings/account/security/system-for-cross-domain-identity-management-scim#step-4-1-create-attribute-list).
4. In the \*\*Apply this mapping \*\*list, click **Always**.
3. Click **OK**. 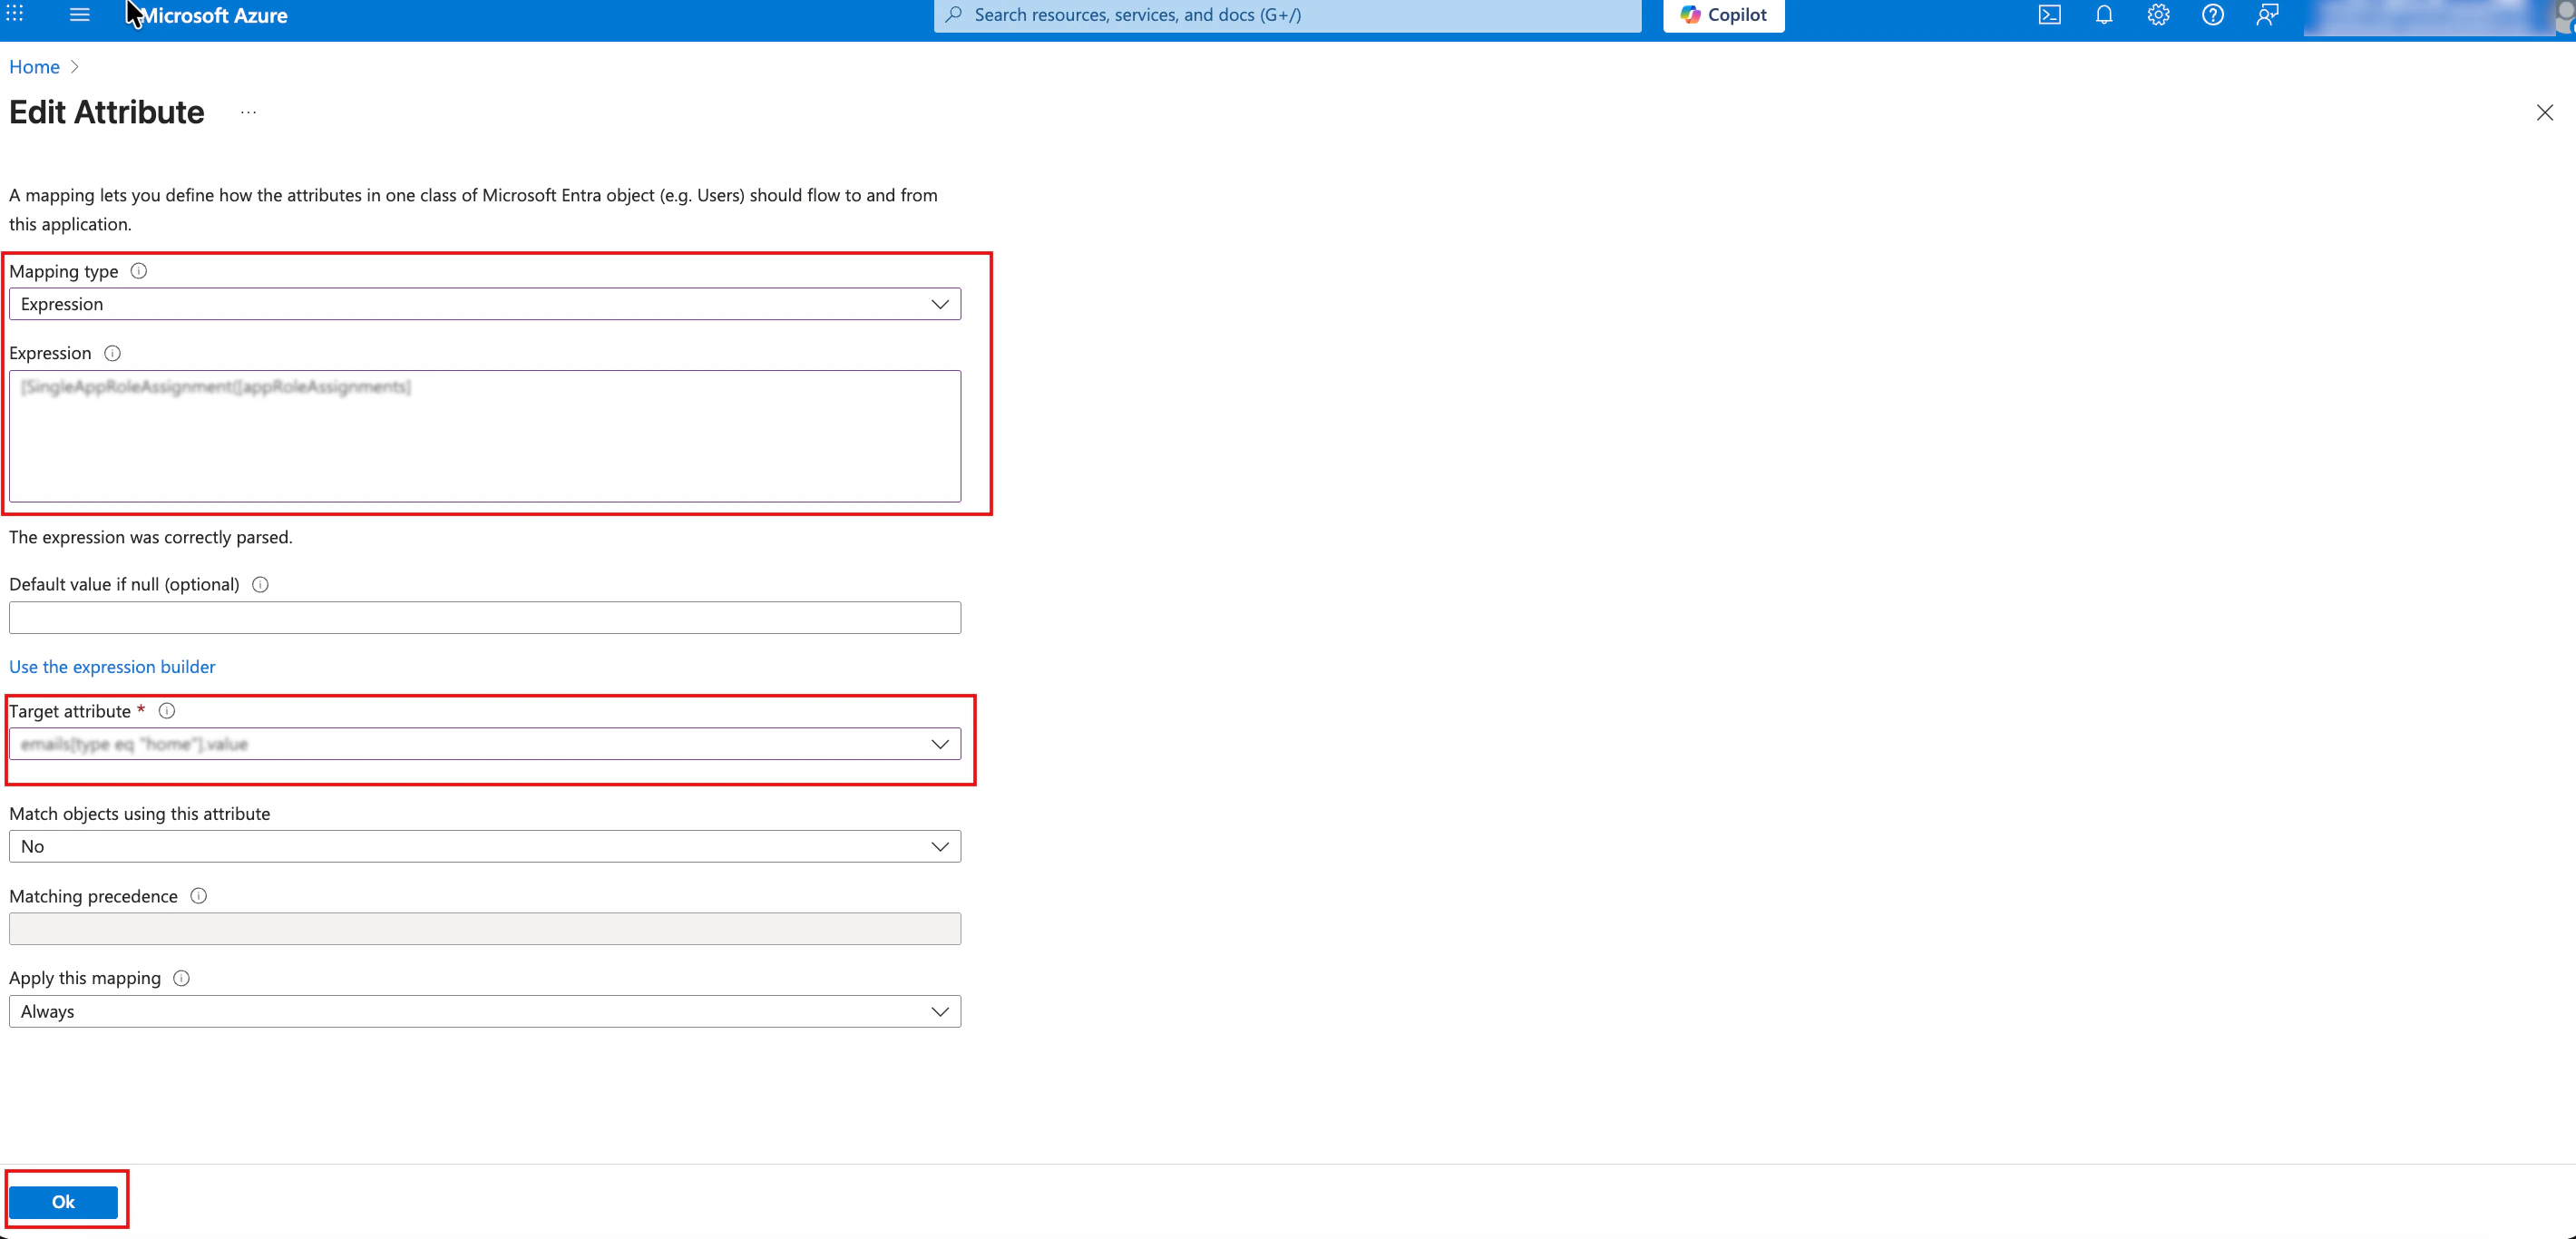 4. Click **Save** at the top.
## Step 5: Role Creation
Roles must be established at the global directory level before they can be assigned to users and synchronized with MoEngage.
### Step 5.1: Create App Roles
To create the necessary roles that correspond with the MoEngage workspace permissions, perform the following steps:
1. Navigate to **Home** > **Microsoft Entra ID** > **Manage** > **App registrations**.
2. Click the **All Applications** tab and select your application.
4. Click **Save** at the top.
## Step 5: Role Creation
Roles must be established at the global directory level before they can be assigned to users and synchronized with MoEngage.
### Step 5.1: Create App Roles
To create the necessary roles that correspond with the MoEngage workspace permissions, perform the following steps:
1. Navigate to **Home** > **Microsoft Entra ID** > **Manage** > **App registrations**.
2. Click the **All Applications** tab and select your application. 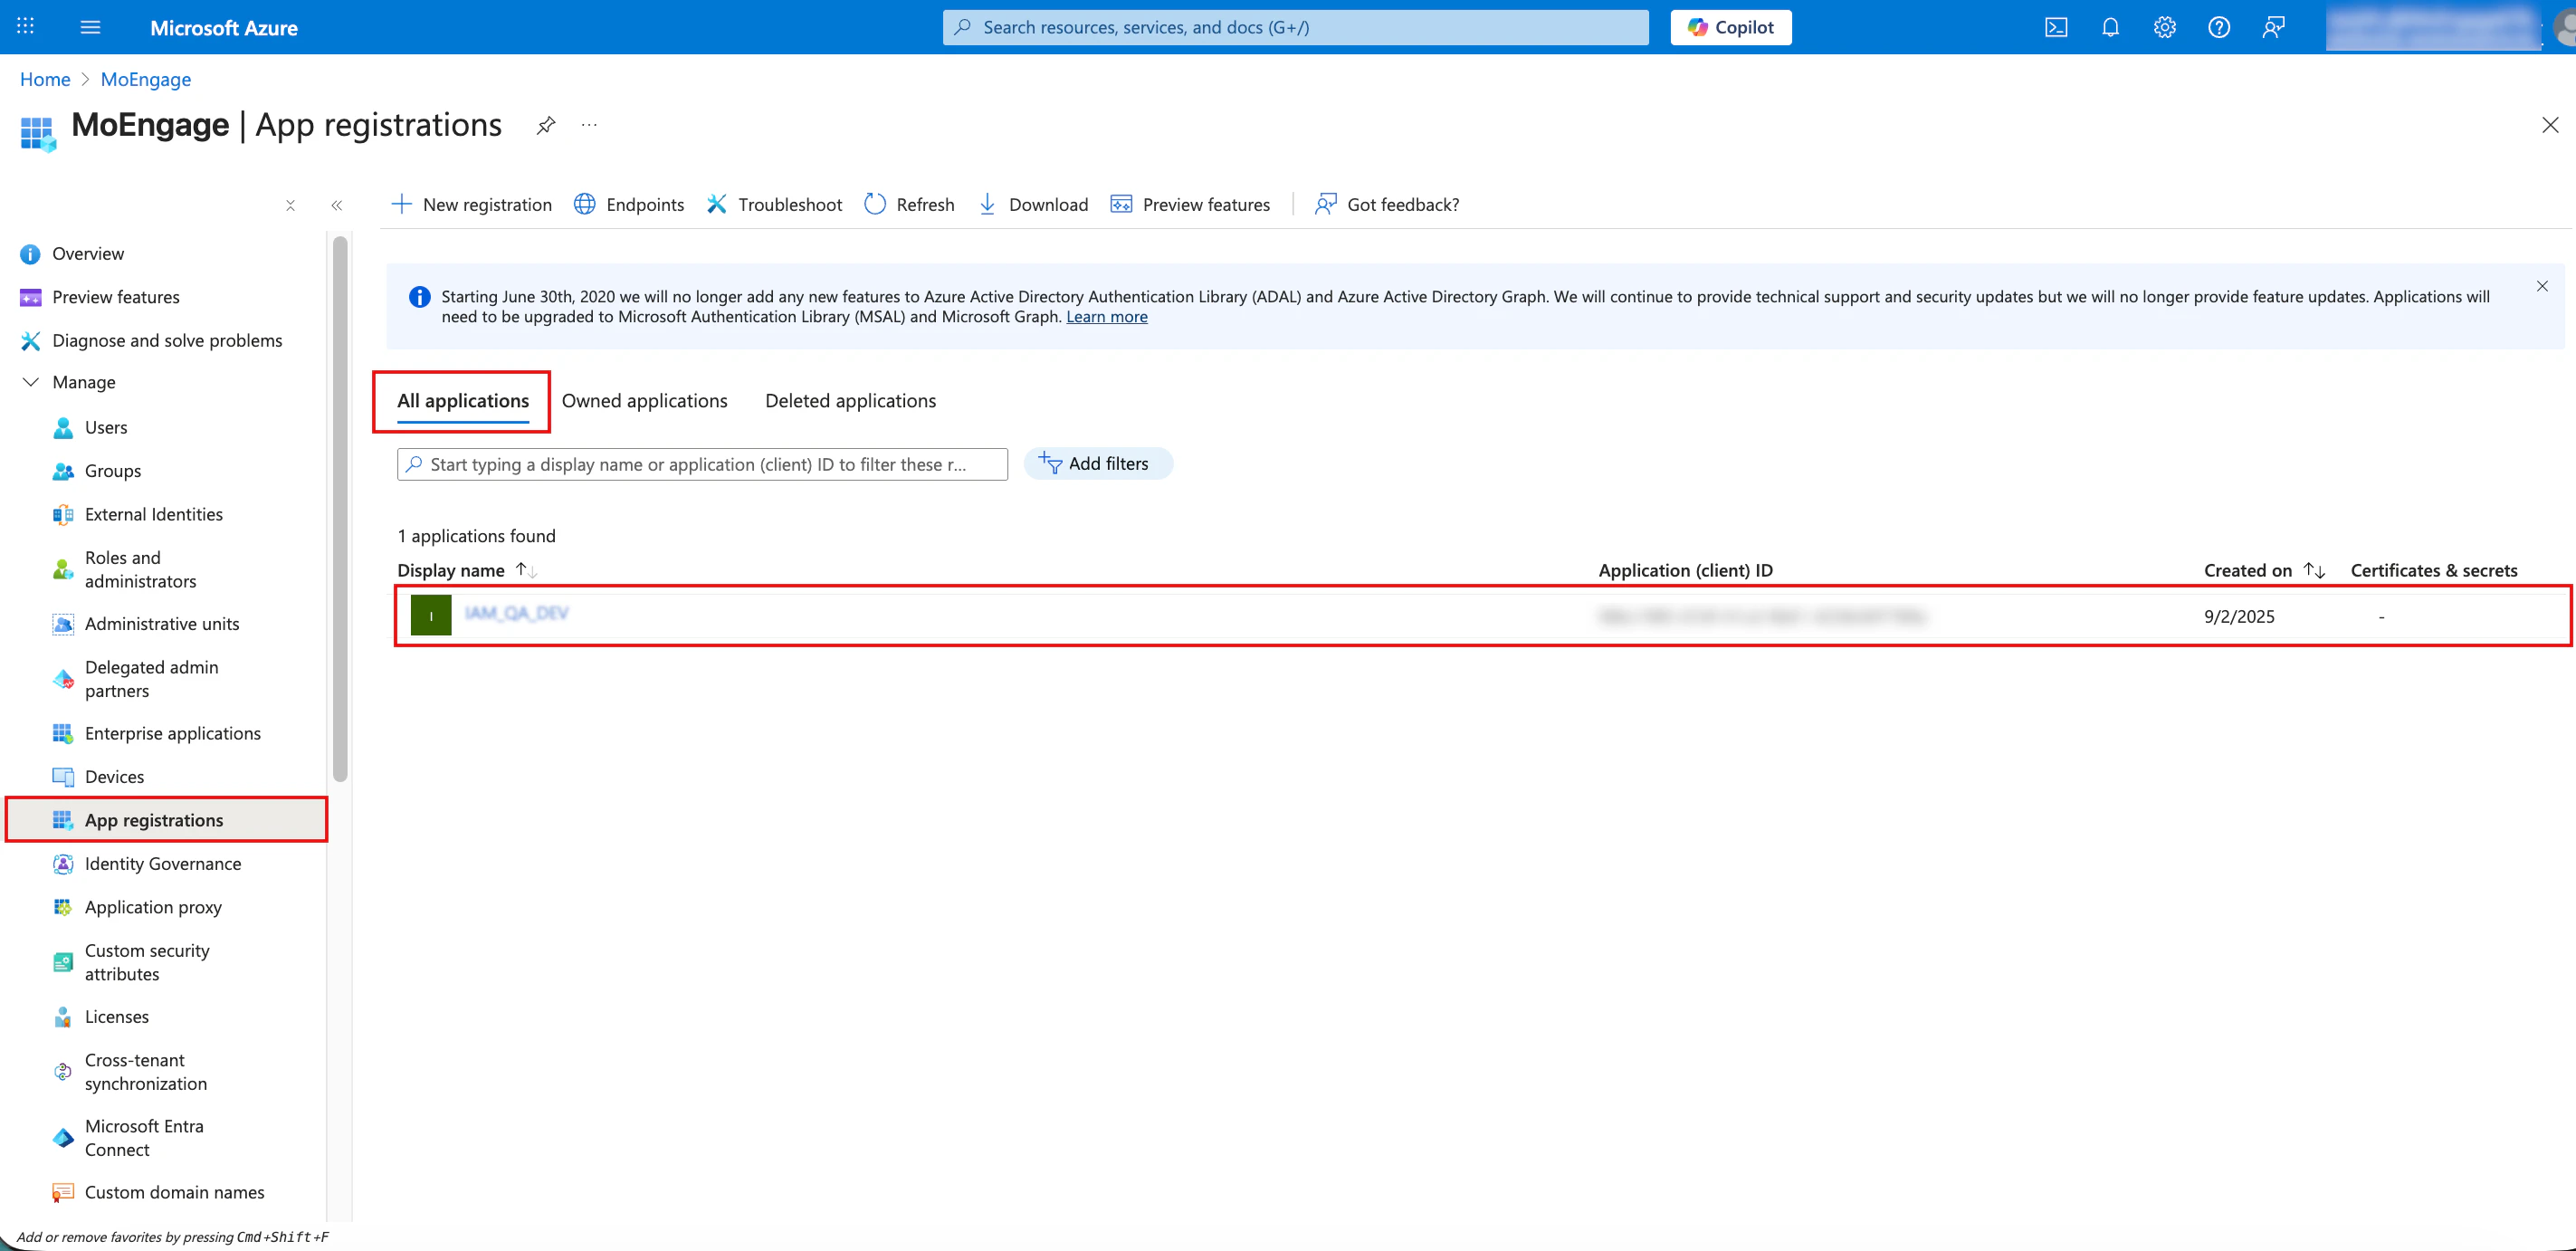 3. In the left navigation menu, click **Manage** > **App roles**.
4. Click the **+ Create app role**.
3. In the left navigation menu, click **Manage** > **App roles**.
4. Click the **+ Create app role**. 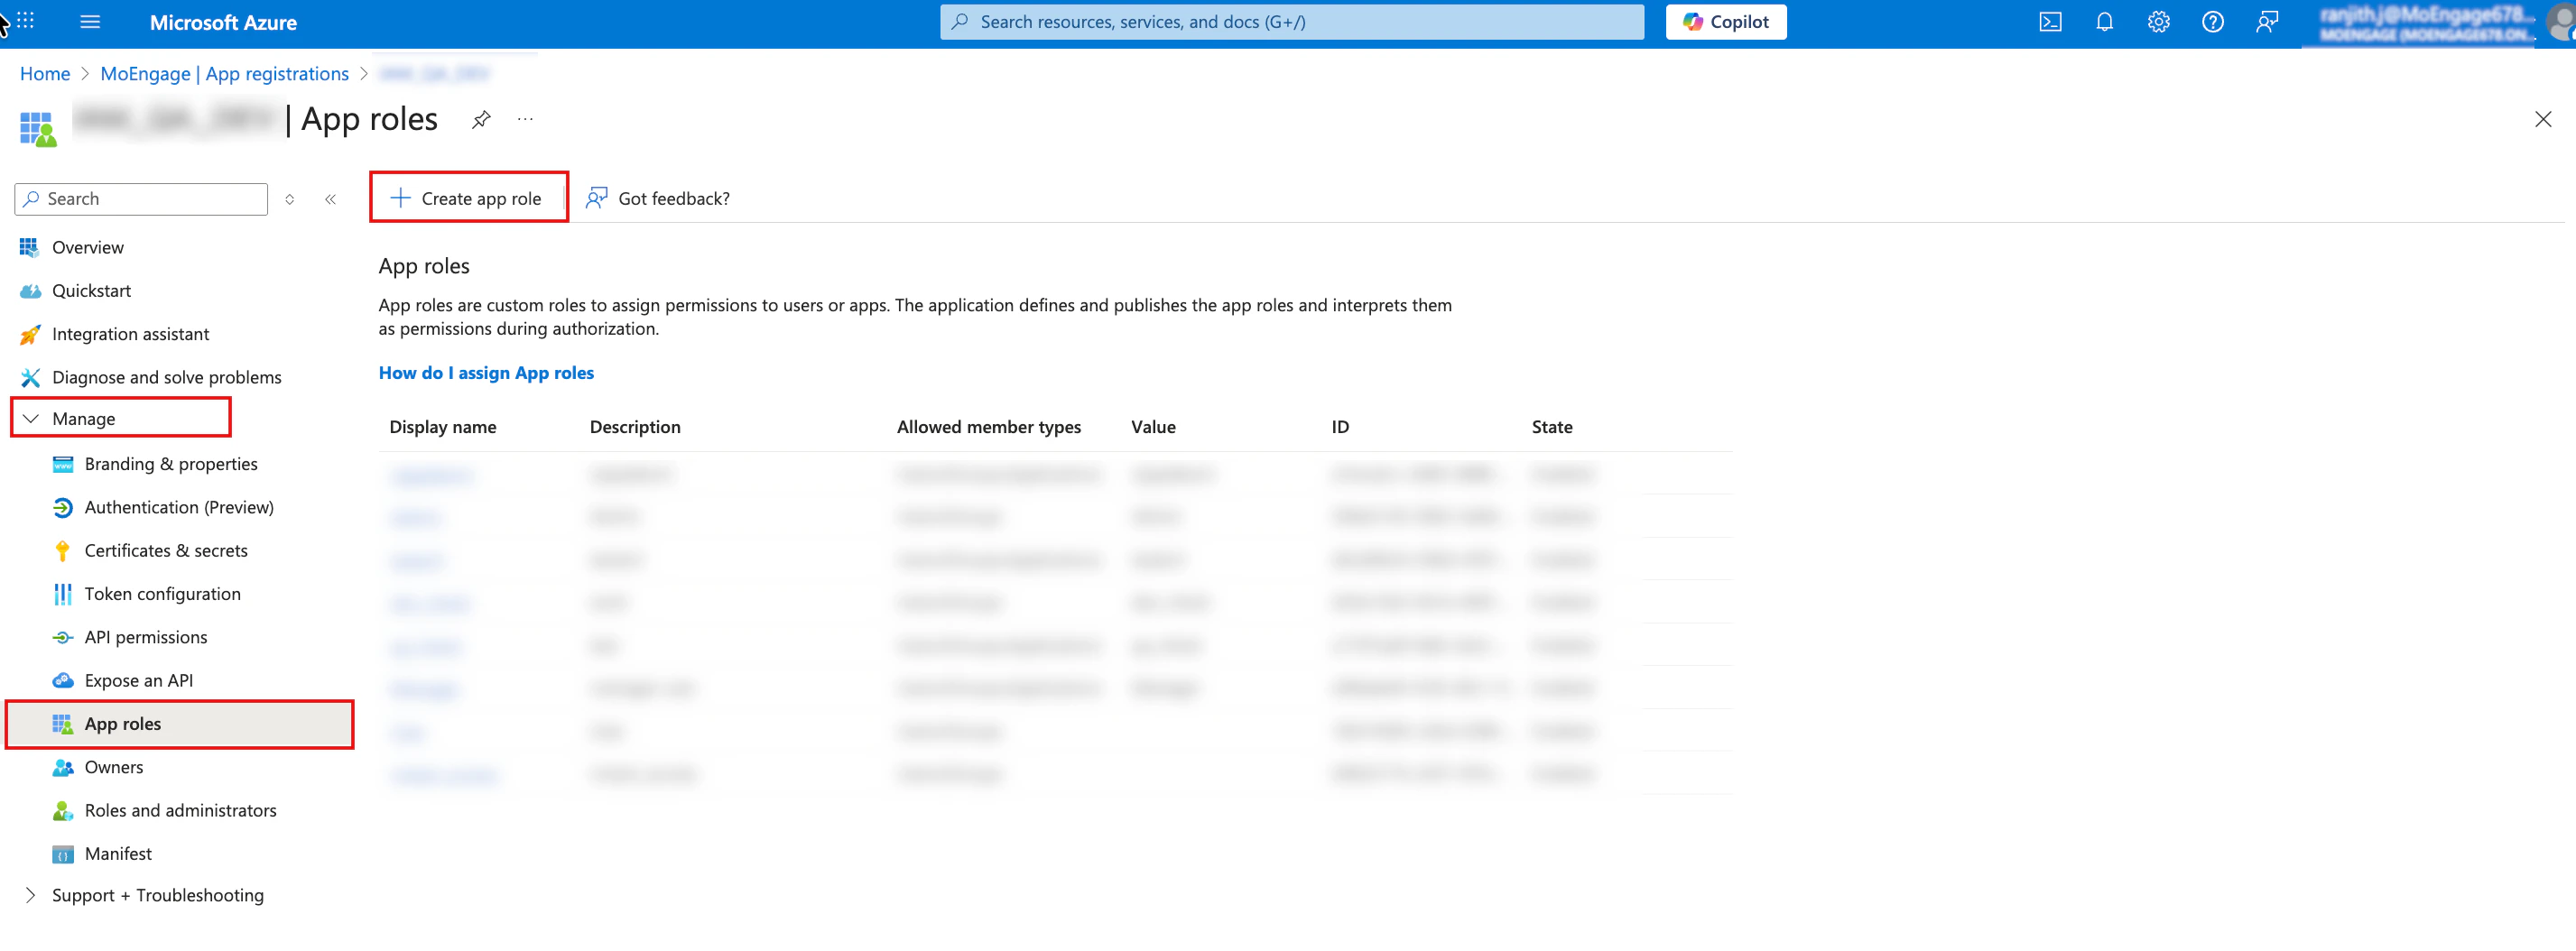 5. Configure the following details:
1. In the **Display name box**, type the role name (for example, Analyst).
2. In the \*\*Allowed member types \*\*section, click the **(Users/Groups)** check box.
3. In the **Value** box, enter the MoEngage role value.\
**Note**: When entering the Value for the role, ensure it matches the exact role name defined in your MoEngage workspace. Microsoft Entra ID uses this value to pass the correct permission data during the SCIM handshake.
4. In the **Description** box, type a brief description of the permissions this role provides.
5. Select the **Do you want to enable this app role?** check box.
6. Click **Apply** at the bottom of the pane.
5. Configure the following details:
1. In the **Display name box**, type the role name (for example, Analyst).
2. In the \*\*Allowed member types \*\*section, click the **(Users/Groups)** check box.
3. In the **Value** box, enter the MoEngage role value.\
**Note**: When entering the Value for the role, ensure it matches the exact role name defined in your MoEngage workspace. Microsoft Entra ID uses this value to pass the correct permission data during the SCIM handshake.
4. In the **Description** box, type a brief description of the permissions this role provides.
5. Select the **Do you want to enable this app role?** check box.
6. Click **Apply** at the bottom of the pane. 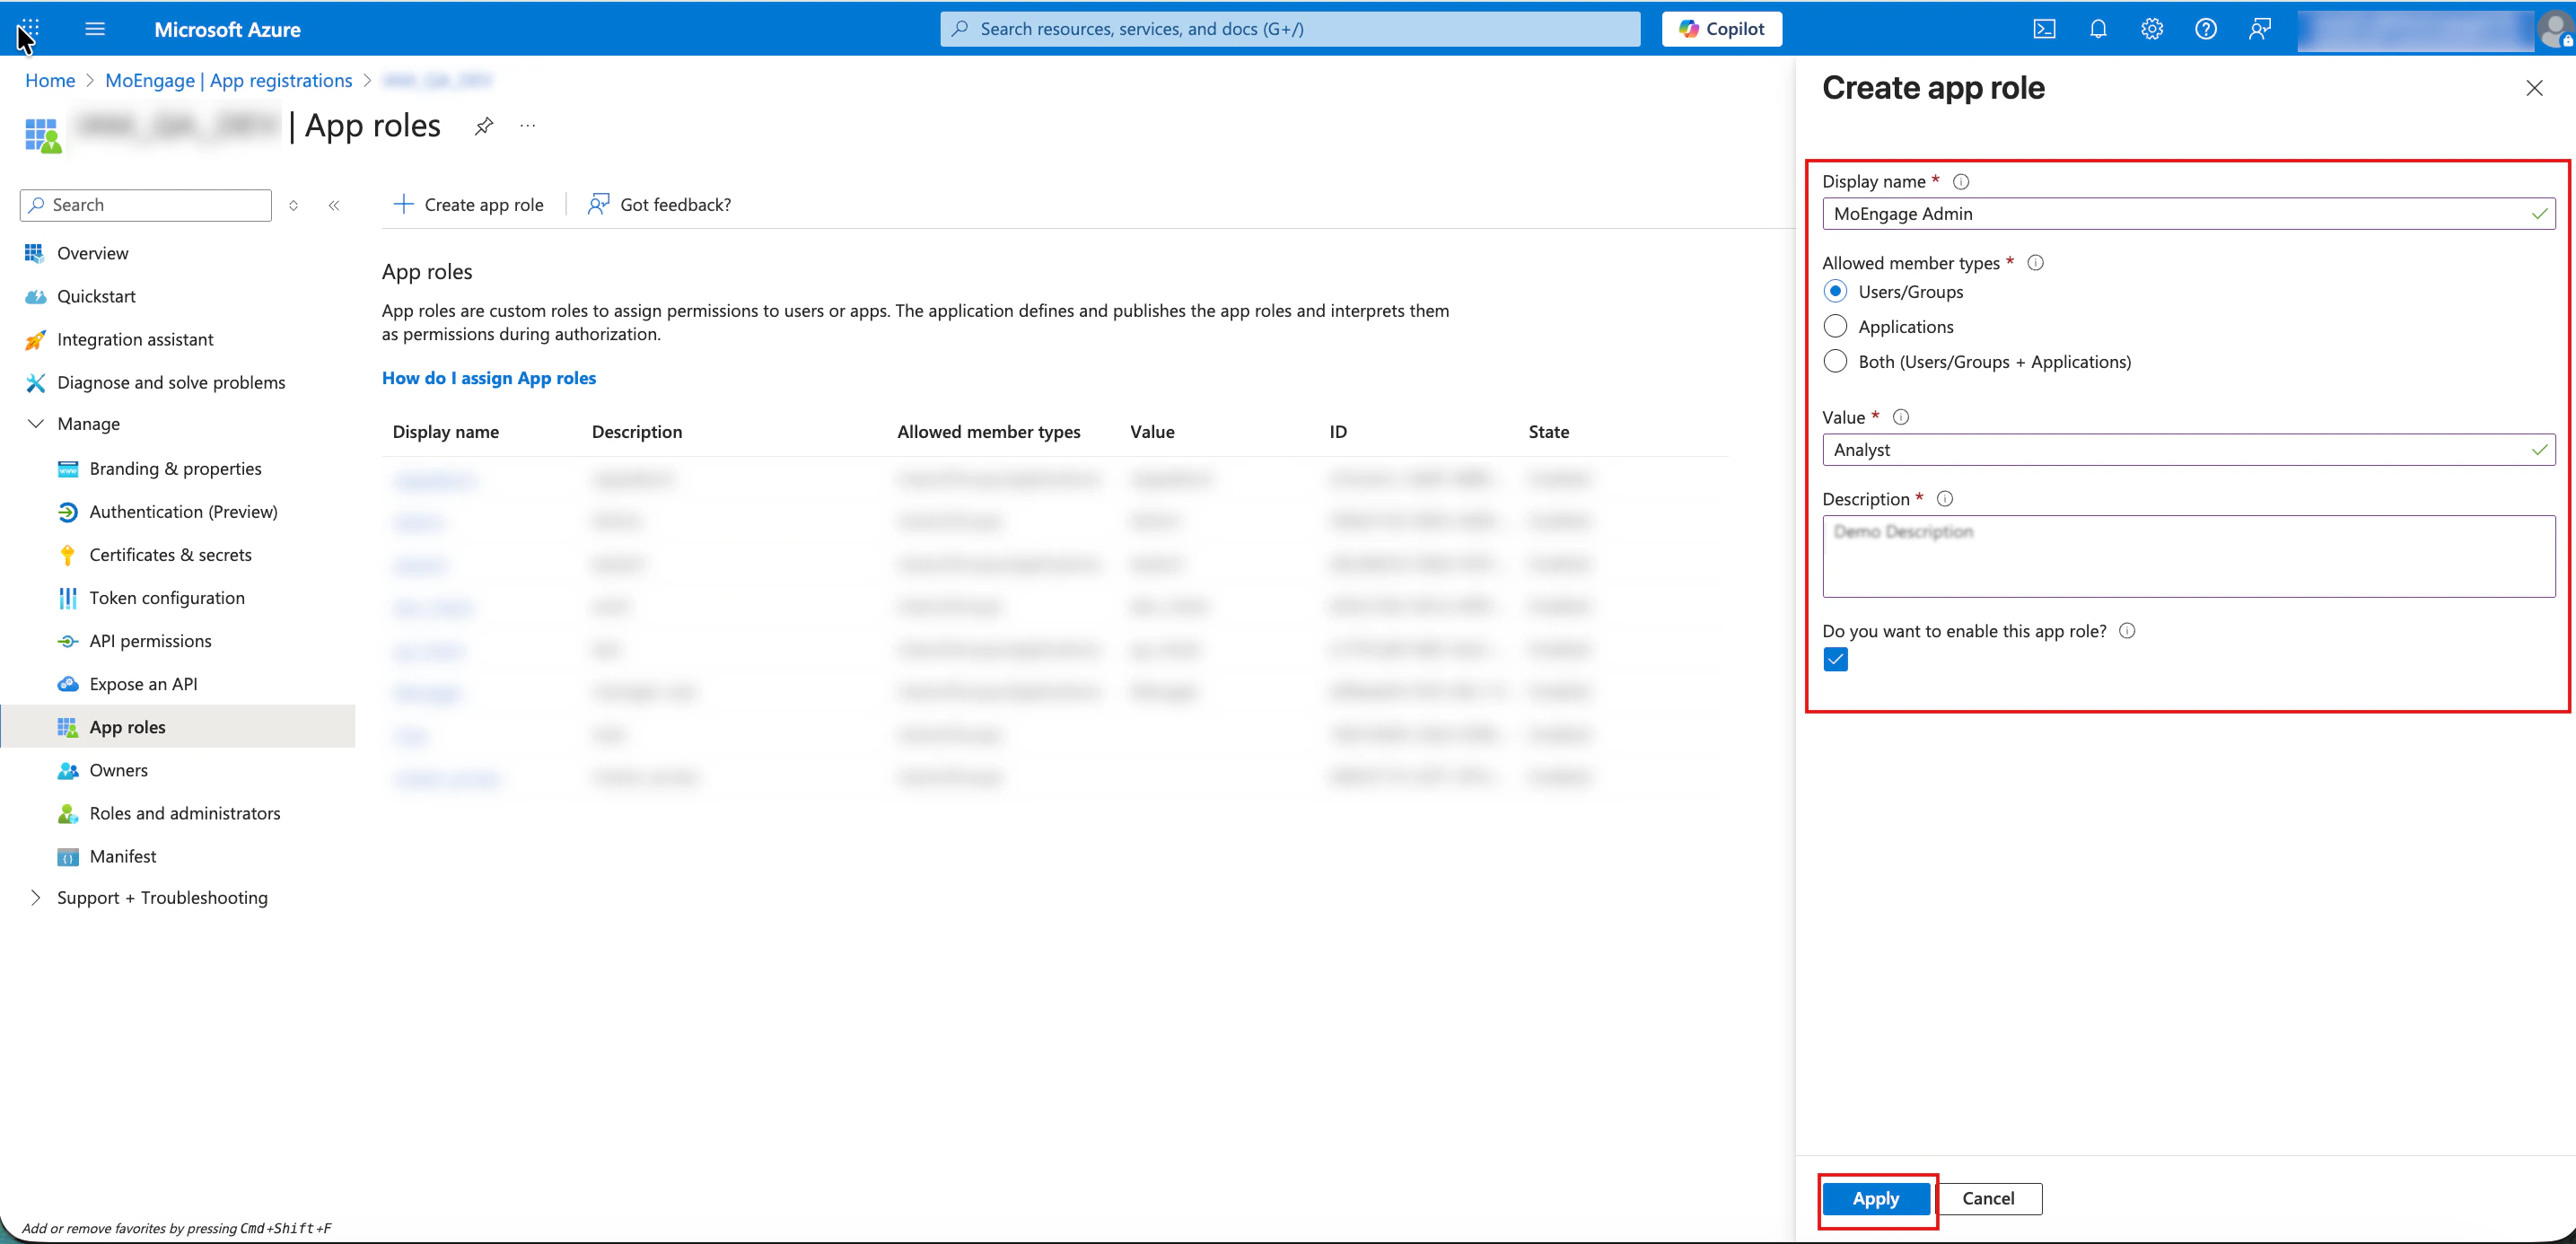 ### Step 5.2: Assign App Roles to Users
After the roles are created, you must assign them to specific users within the Enterprise application and perform the following steps:
1. Navigate to **Home** > **Microsoft Entra ID** > **Manage** > **Enterprise applications** and select your application.
2. In the **Getting started** section, in the **Assign users and groups** tile, click the **Assign users and groups** link.
### Step 5.2: Assign App Roles to Users
After the roles are created, you must assign them to specific users within the Enterprise application and perform the following steps:
1. Navigate to **Home** > **Microsoft Entra ID** > **Manage** > **Enterprise applications** and select your application.
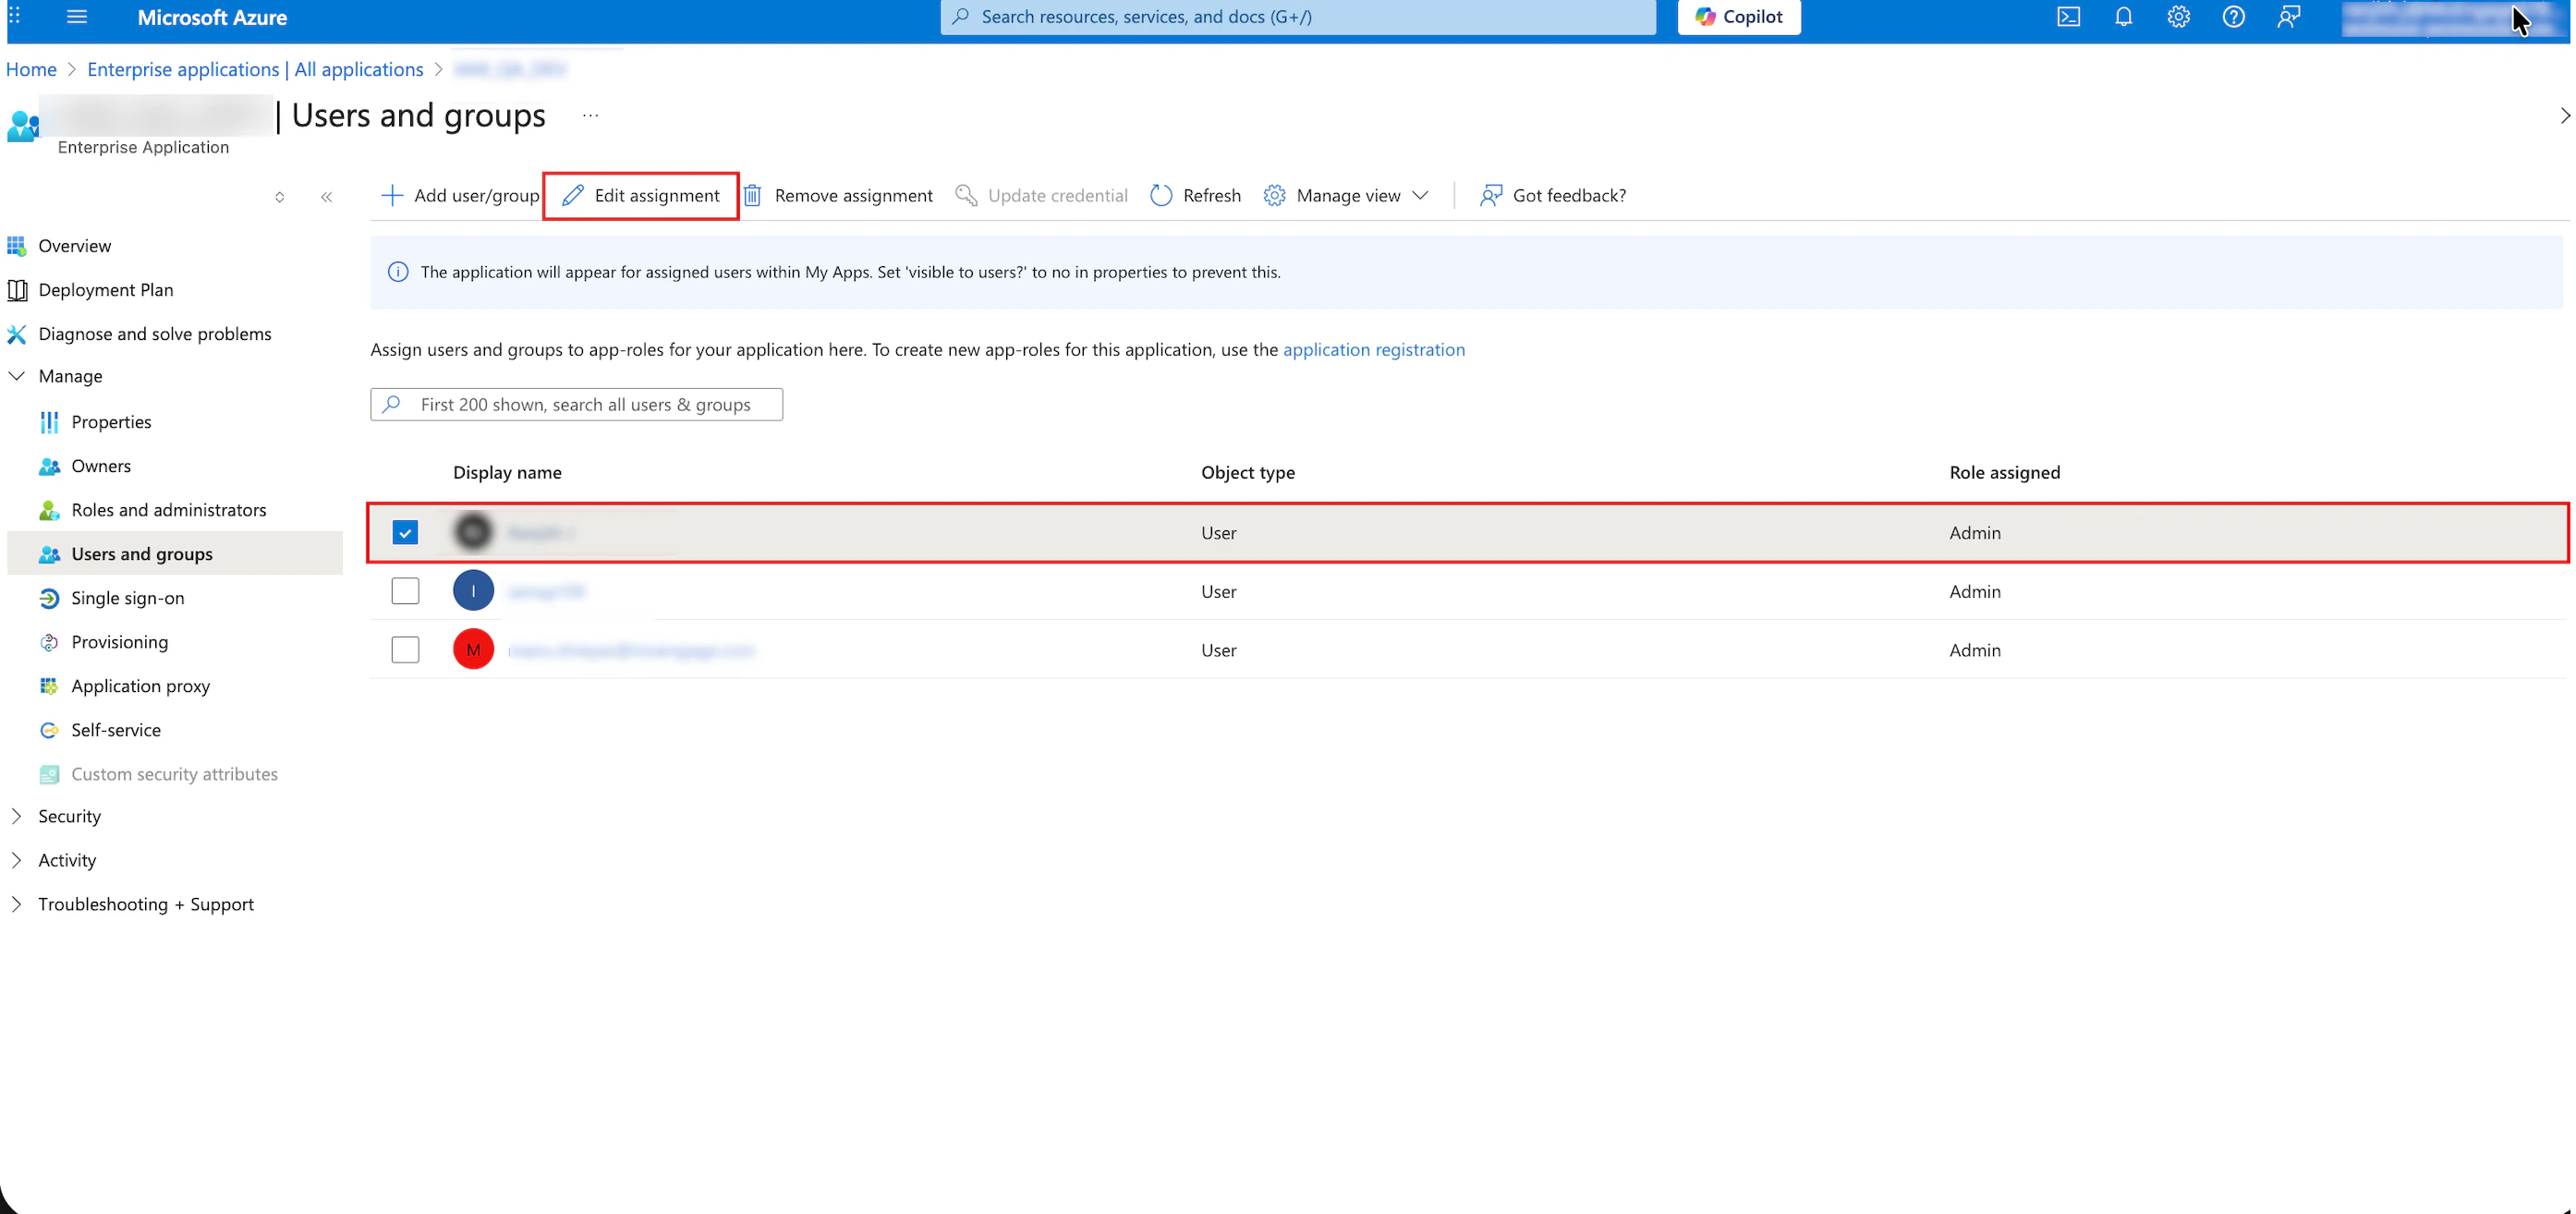
2. In the **Getting started** section, in the **Assign users and groups** tile, click the **Assign users and groups** link. 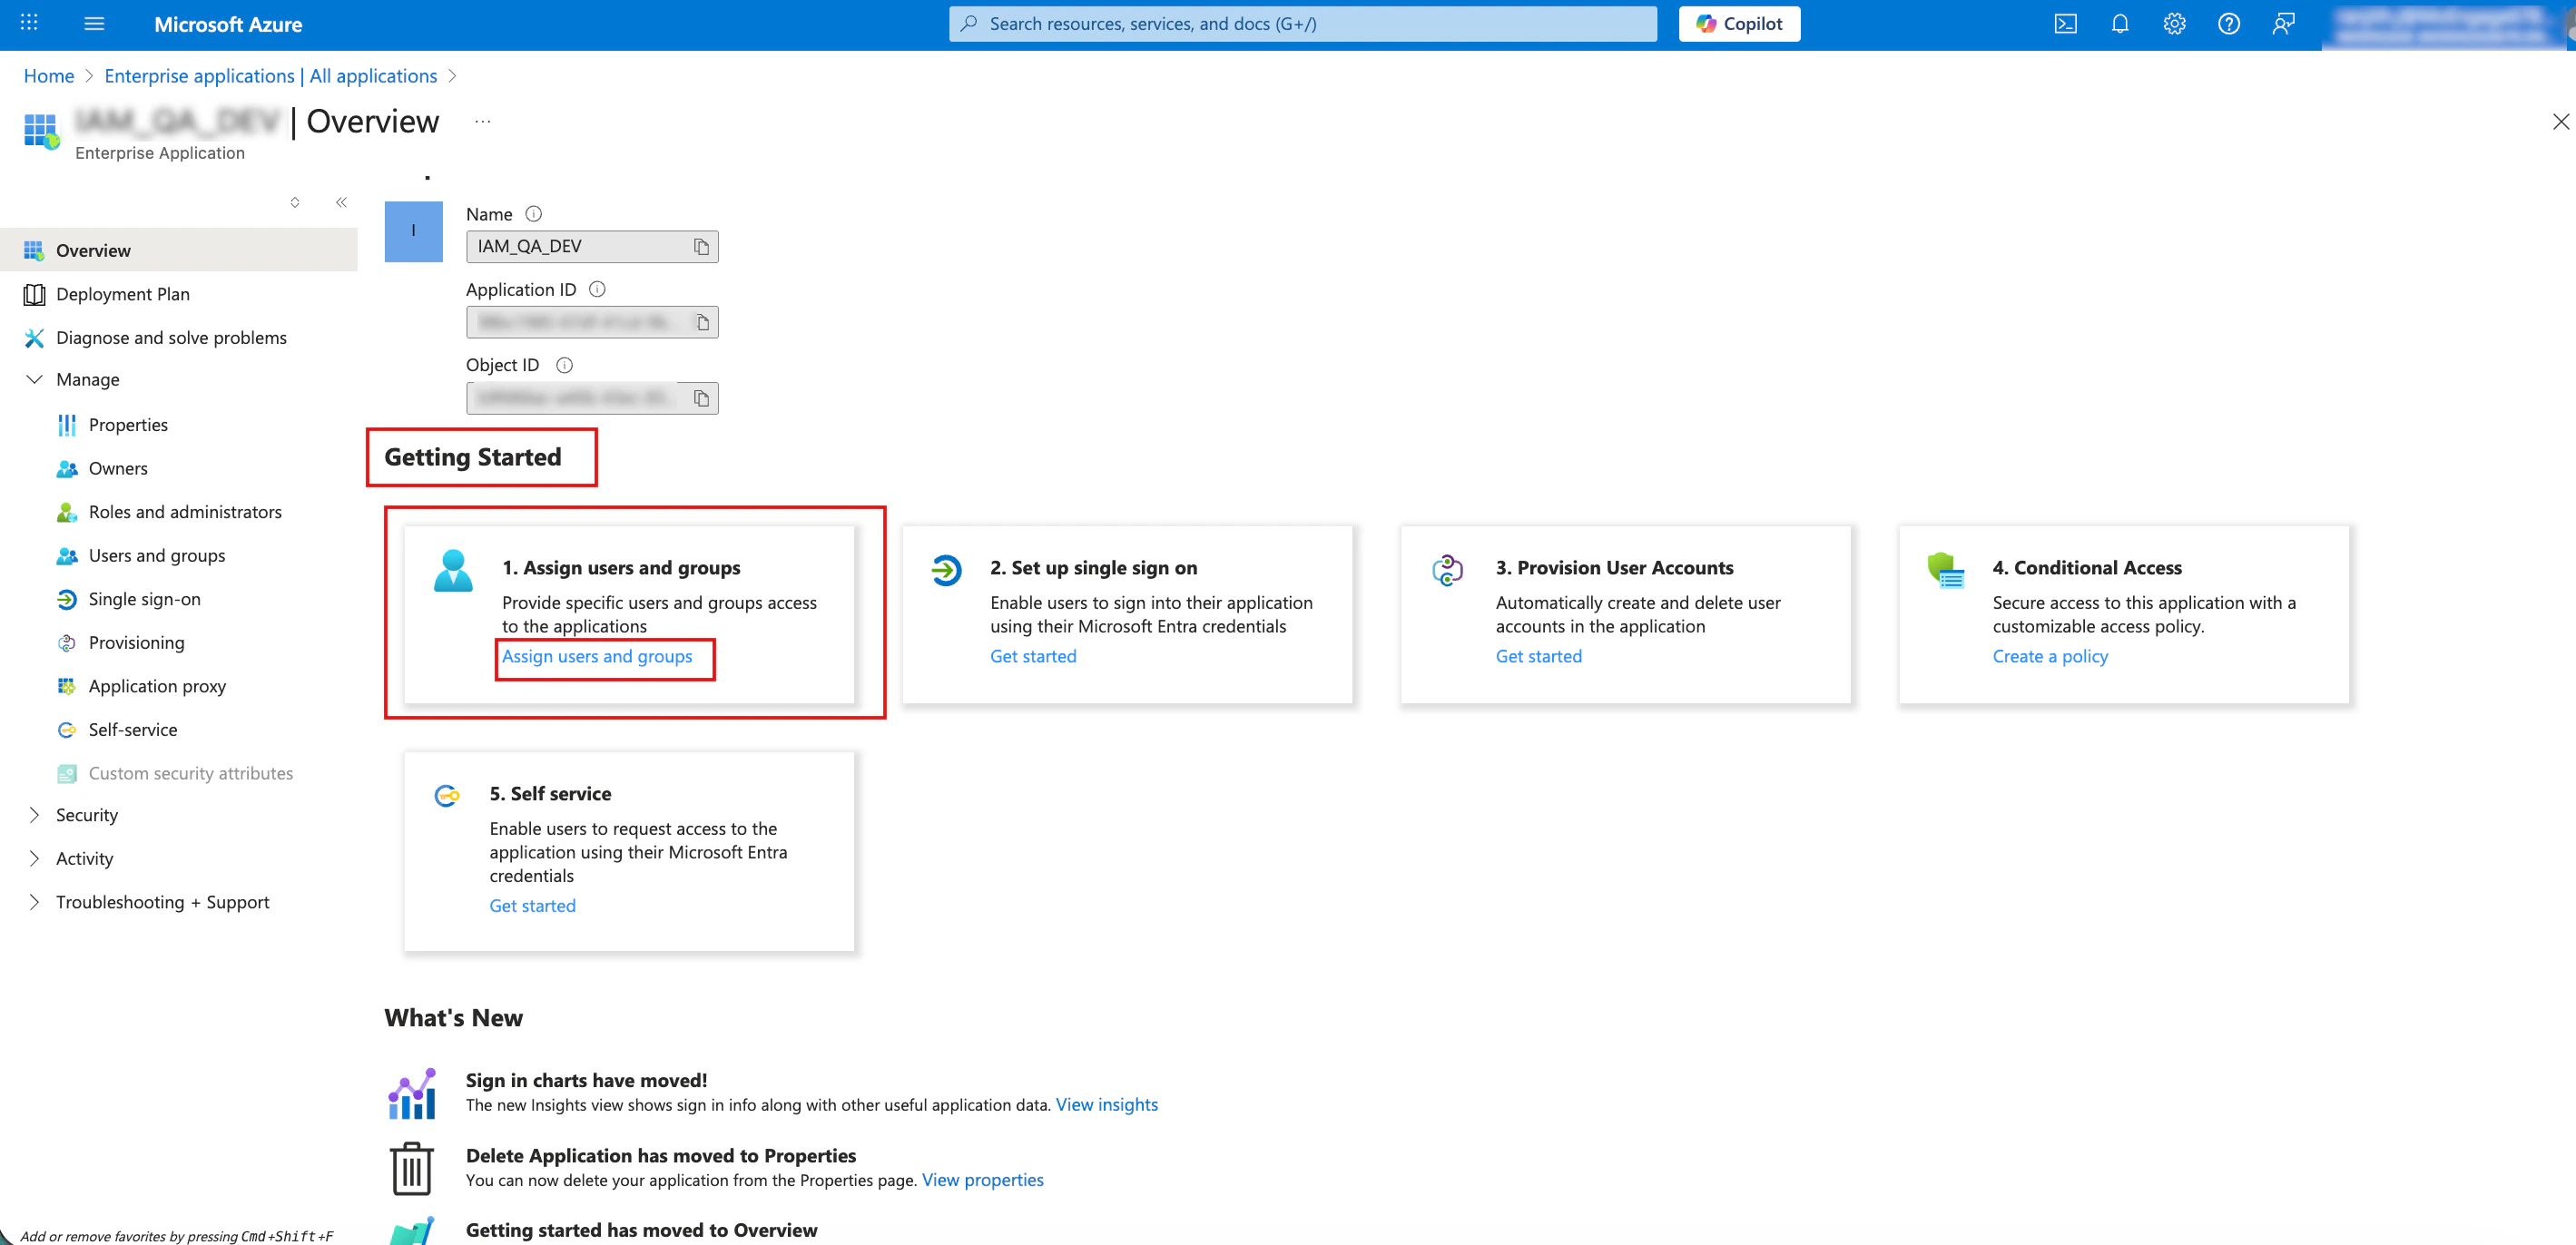 3. Select the check box for the user you want to update and click the **Edit assignment** icon in the top menu bar.
  4. On the left side, under **Select a role**, click the **None Selected** link.\
The **Select a role** dialog box pane appears on the right side. A list appears displaying the custom App Roles created in \[Step 5.1.]\(/user-guide/settings/account/security/system-for-cross-domain-identity-management-scim#step-5-1-create-app-roles)
5. Select the appropriate role from the list and click **Select**.\
**Note**: Ensure you do not leave the role as Default Access. Microsoft Entra ID requires a specific role value to pass the correct permission data to MoEngage during the SCIM synchronization.
4. On the left side, under **Select a role**, click the **None Selected** link.\
The **Select a role** dialog box pane appears on the right side. A list appears displaying the custom App Roles created in \[Step 5.1.]\(/user-guide/settings/account/security/system-for-cross-domain-identity-management-scim#step-5-1-create-app-roles)
5. Select the appropriate role from the list and click **Select**.\
**Note**: Ensure you do not leave the role as Default Access. Microsoft Entra ID requires a specific role value to pass the correct permission data to MoEngage during the SCIM synchronization. 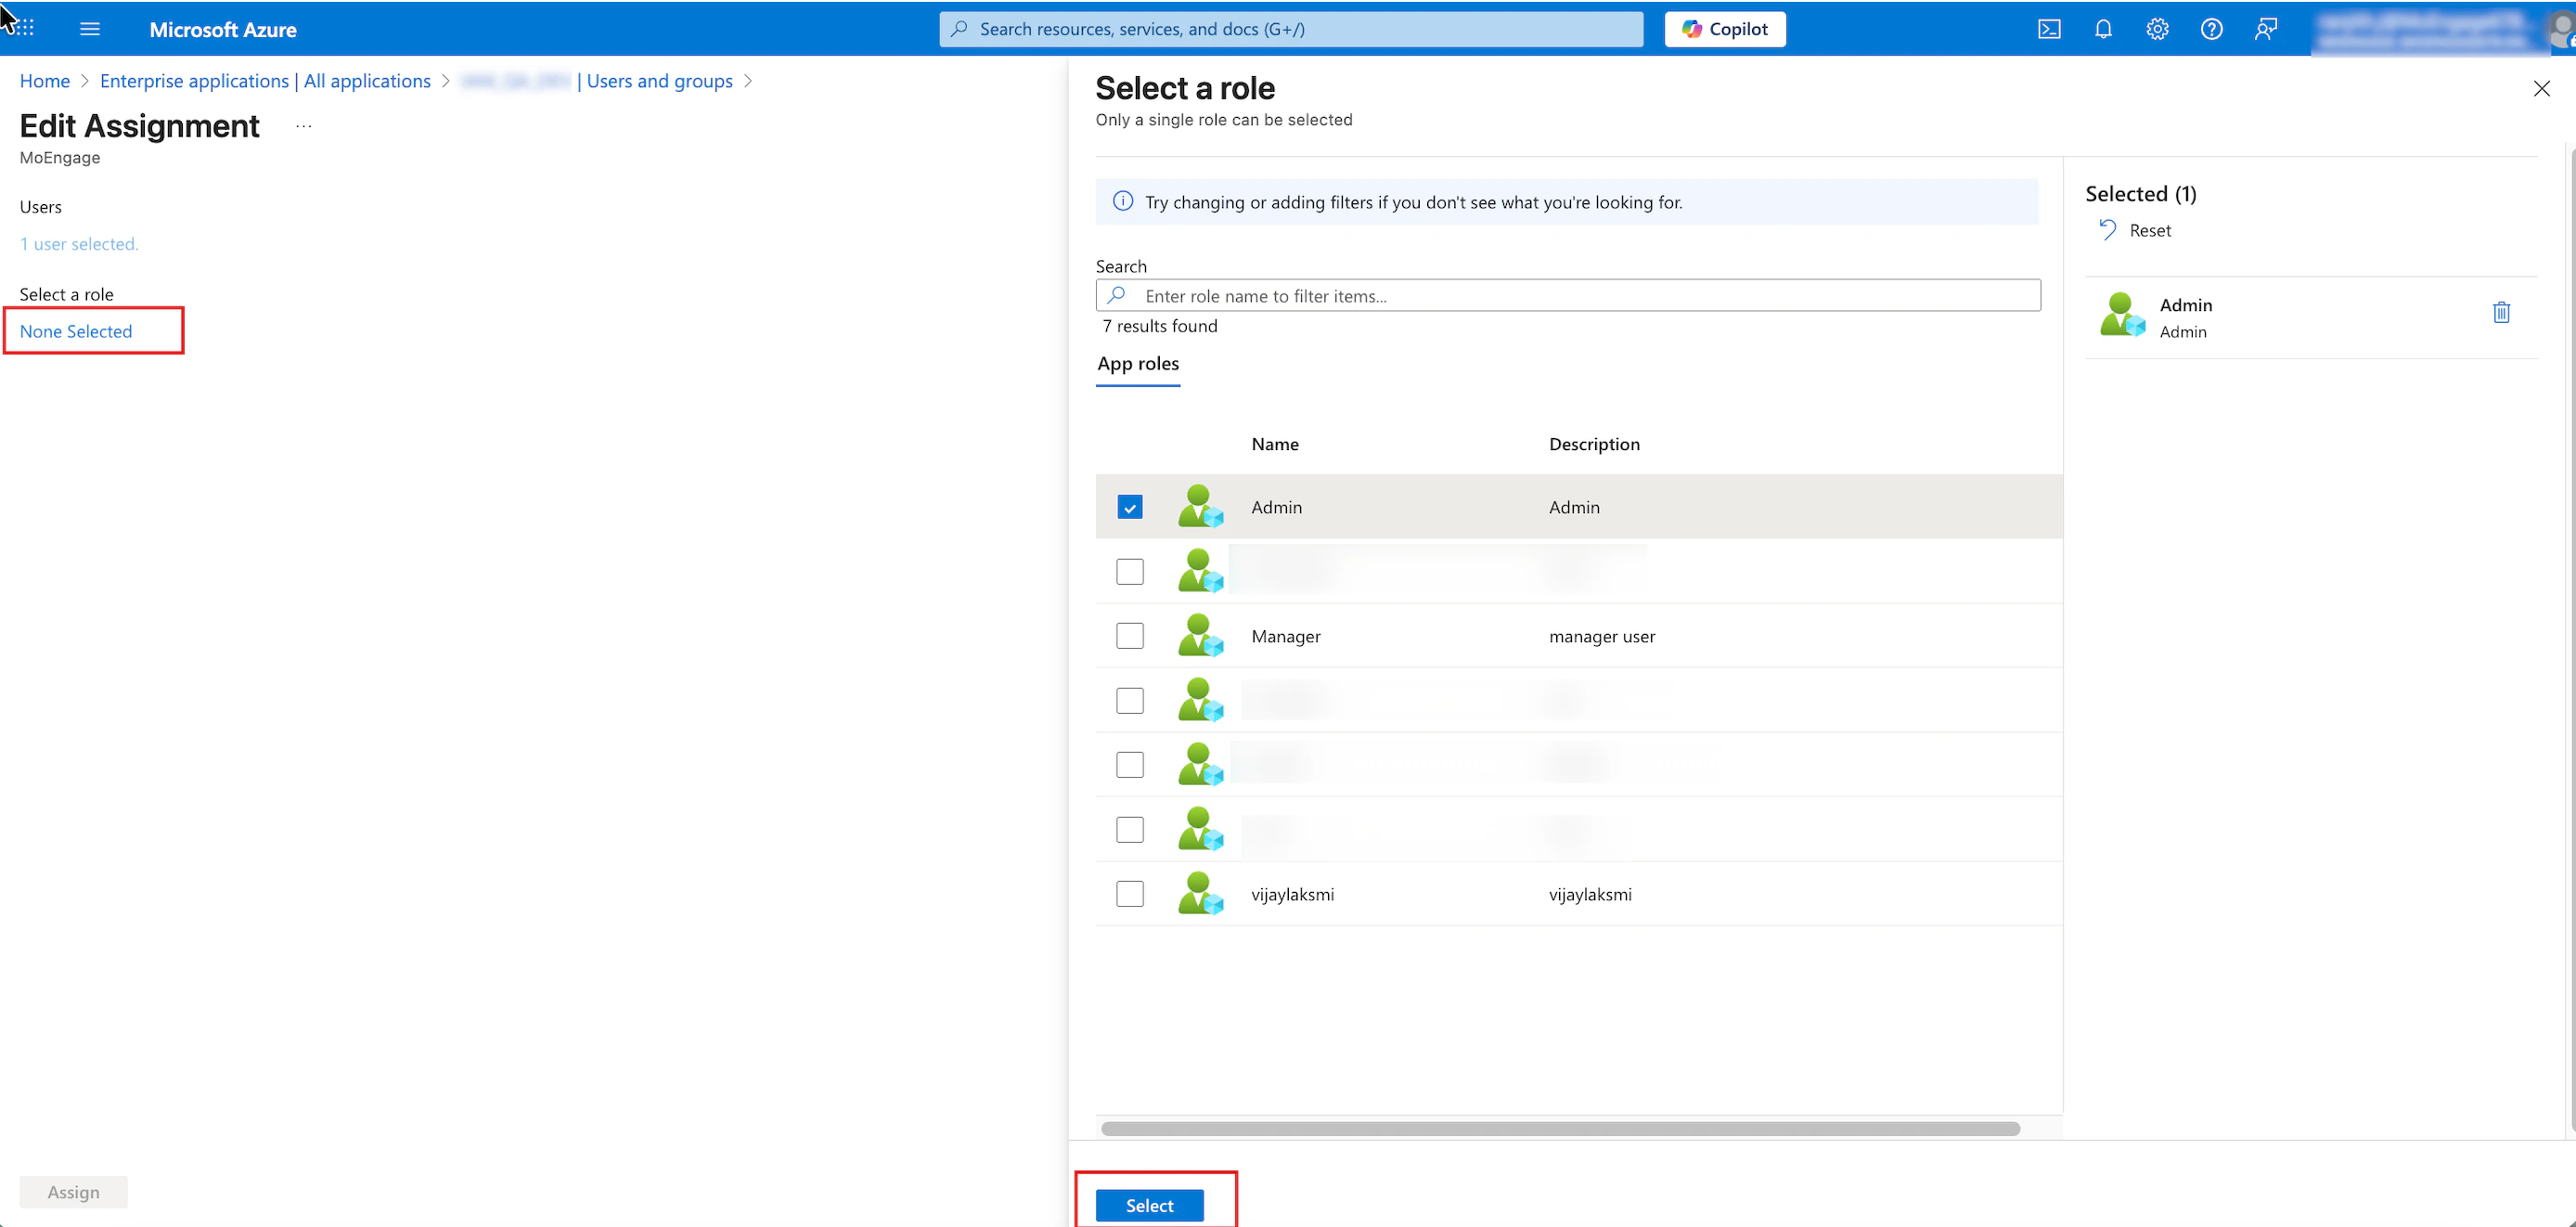 6. Click **Assign** at the bottom of the **Edit Assignment** page.
  After Microsoft Entra ID successfully updates the user, the *Application assignment succeeded* message appears in the upper-right corner.
7. To verify the assignment, click the user's name to open their **Overview** page. The **Basic info** section displays the user's **User principal name** and confirms that the number of **Assigned roles** is now updated.
After Microsoft Entra ID successfully updates the user, the *Application assignment succeeded* message appears in the upper-right corner.
7. To verify the assignment, click the user's name to open their **Overview** page. The **Basic info** section displays the user's **User principal name** and confirms that the number of **Assigned roles** is now updated. 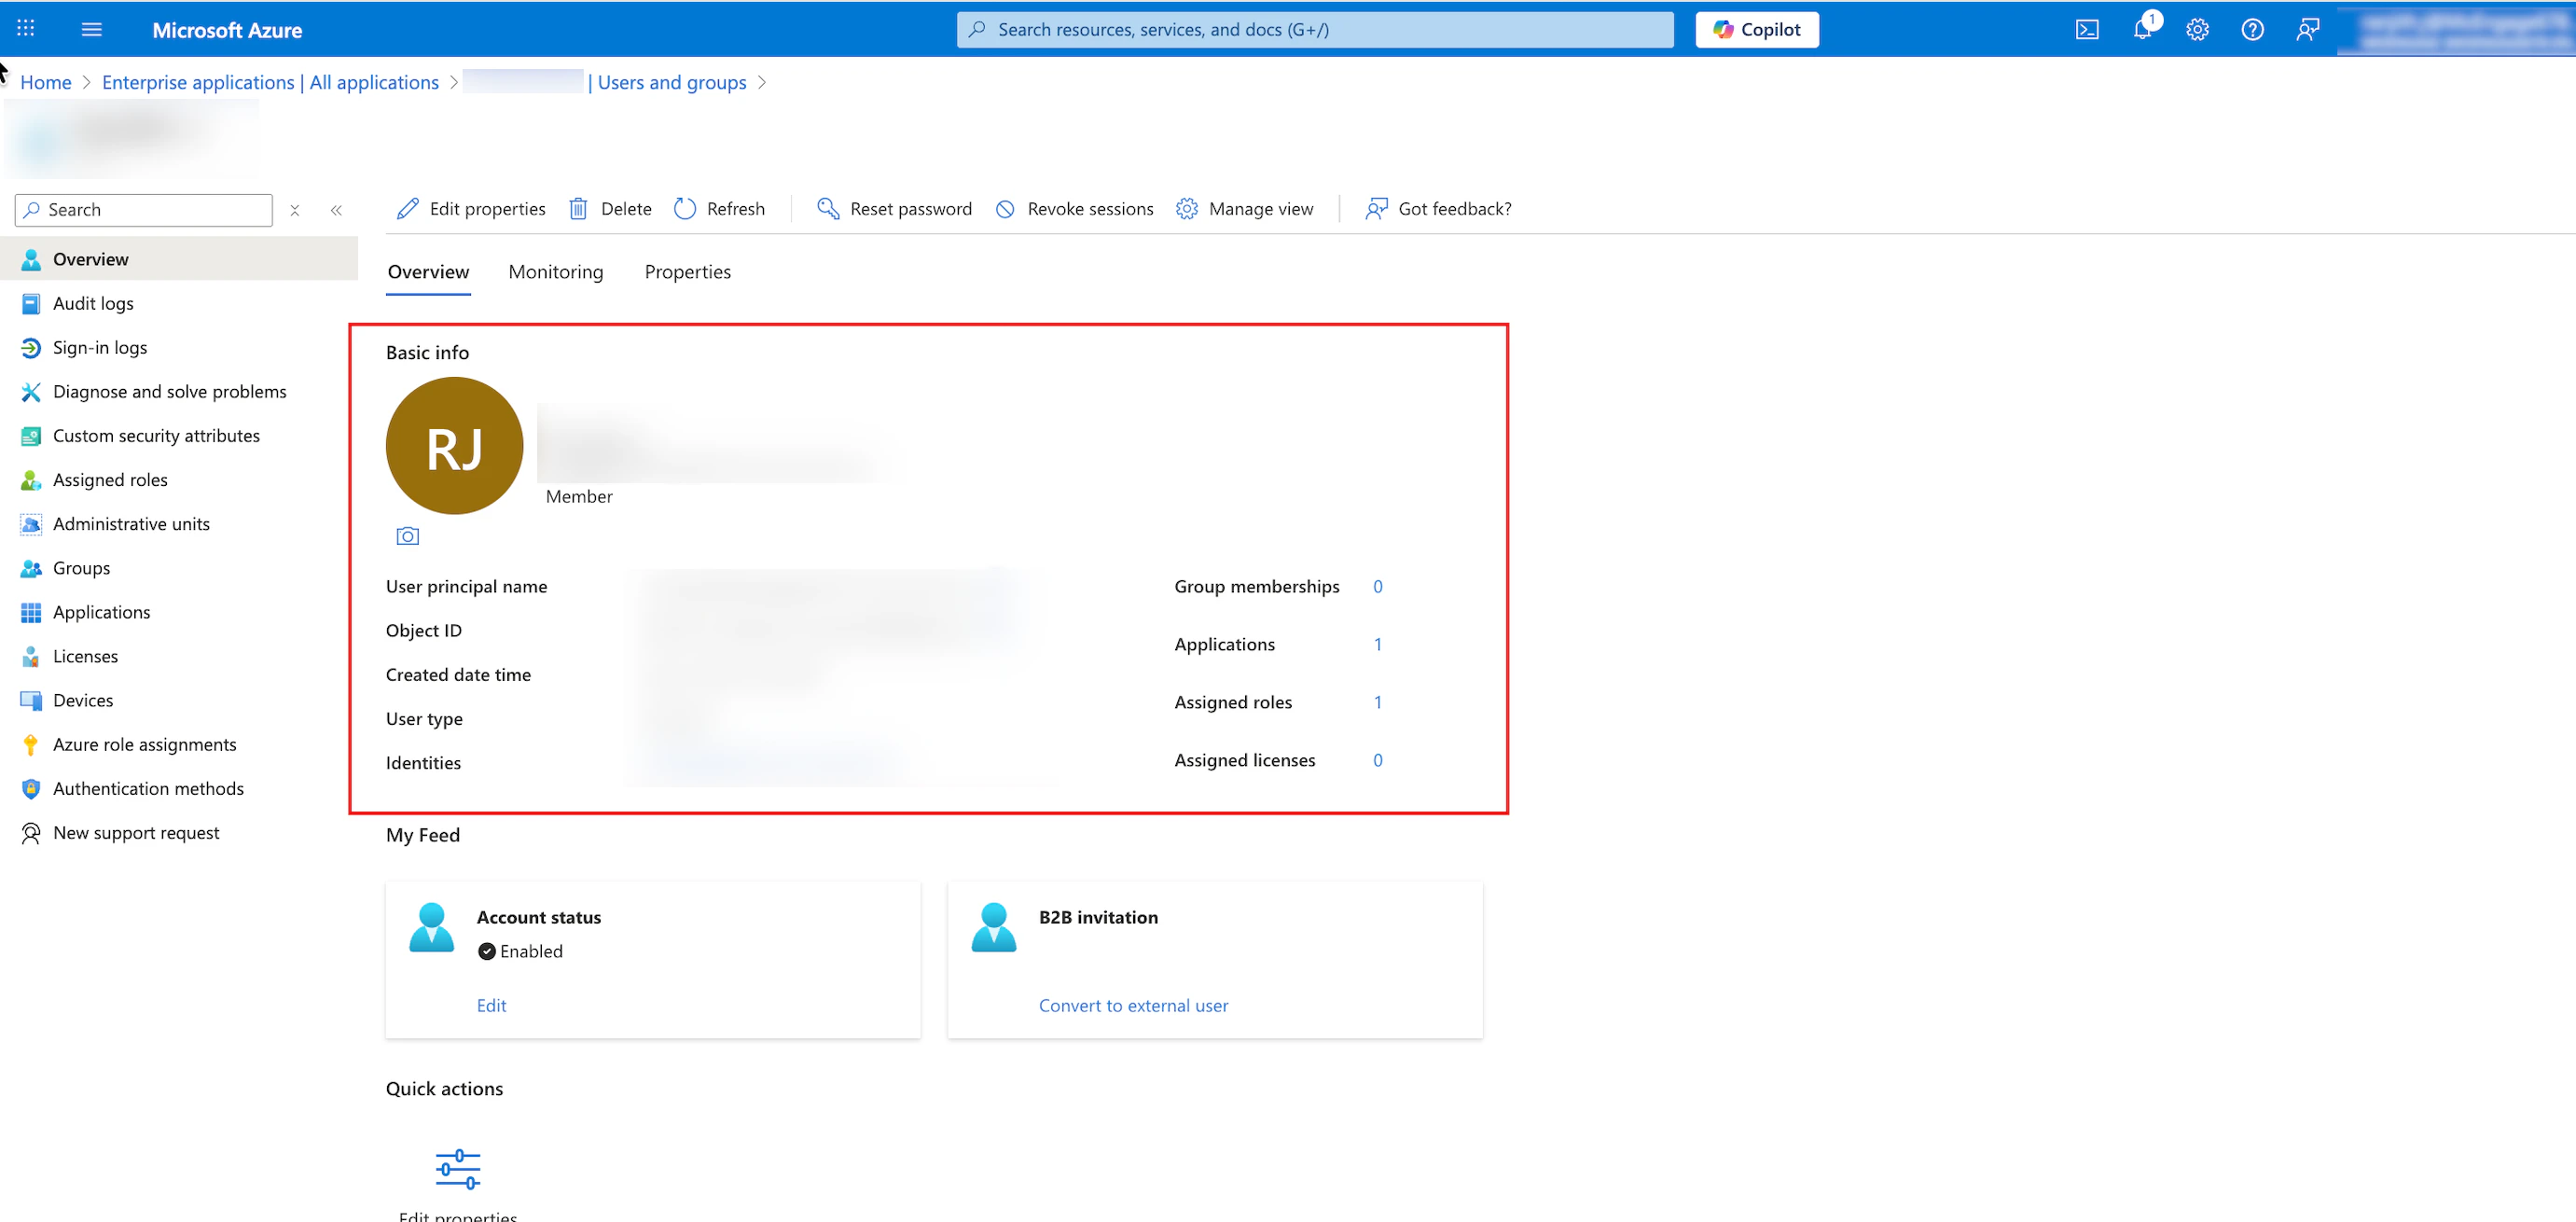 ## Step 6: Synchronization
Microsoft Entra ID automatic synchronization cycles can be inconsistent, often taking between 40 minutes and 1 hour to reflect changes. To push user profile updates or role changes to the MoEngage workspace immediately, use the Provision on demand feature.
1. Return to the Azure application, on the **Overview** page, go to the left navigation menu, and click **Manage** > **Provisioning**.
2. In the top menu bar, click **Provision on demand**.
## Step 6: Synchronization
Microsoft Entra ID automatic synchronization cycles can be inconsistent, often taking between 40 minutes and 1 hour to reflect changes. To push user profile updates or role changes to the MoEngage workspace immediately, use the Provision on demand feature.
1. Return to the Azure application, on the **Overview** page, go to the left navigation menu, and click **Manage** > **Provisioning**.
2. In the top menu bar, click **Provision on demand**. 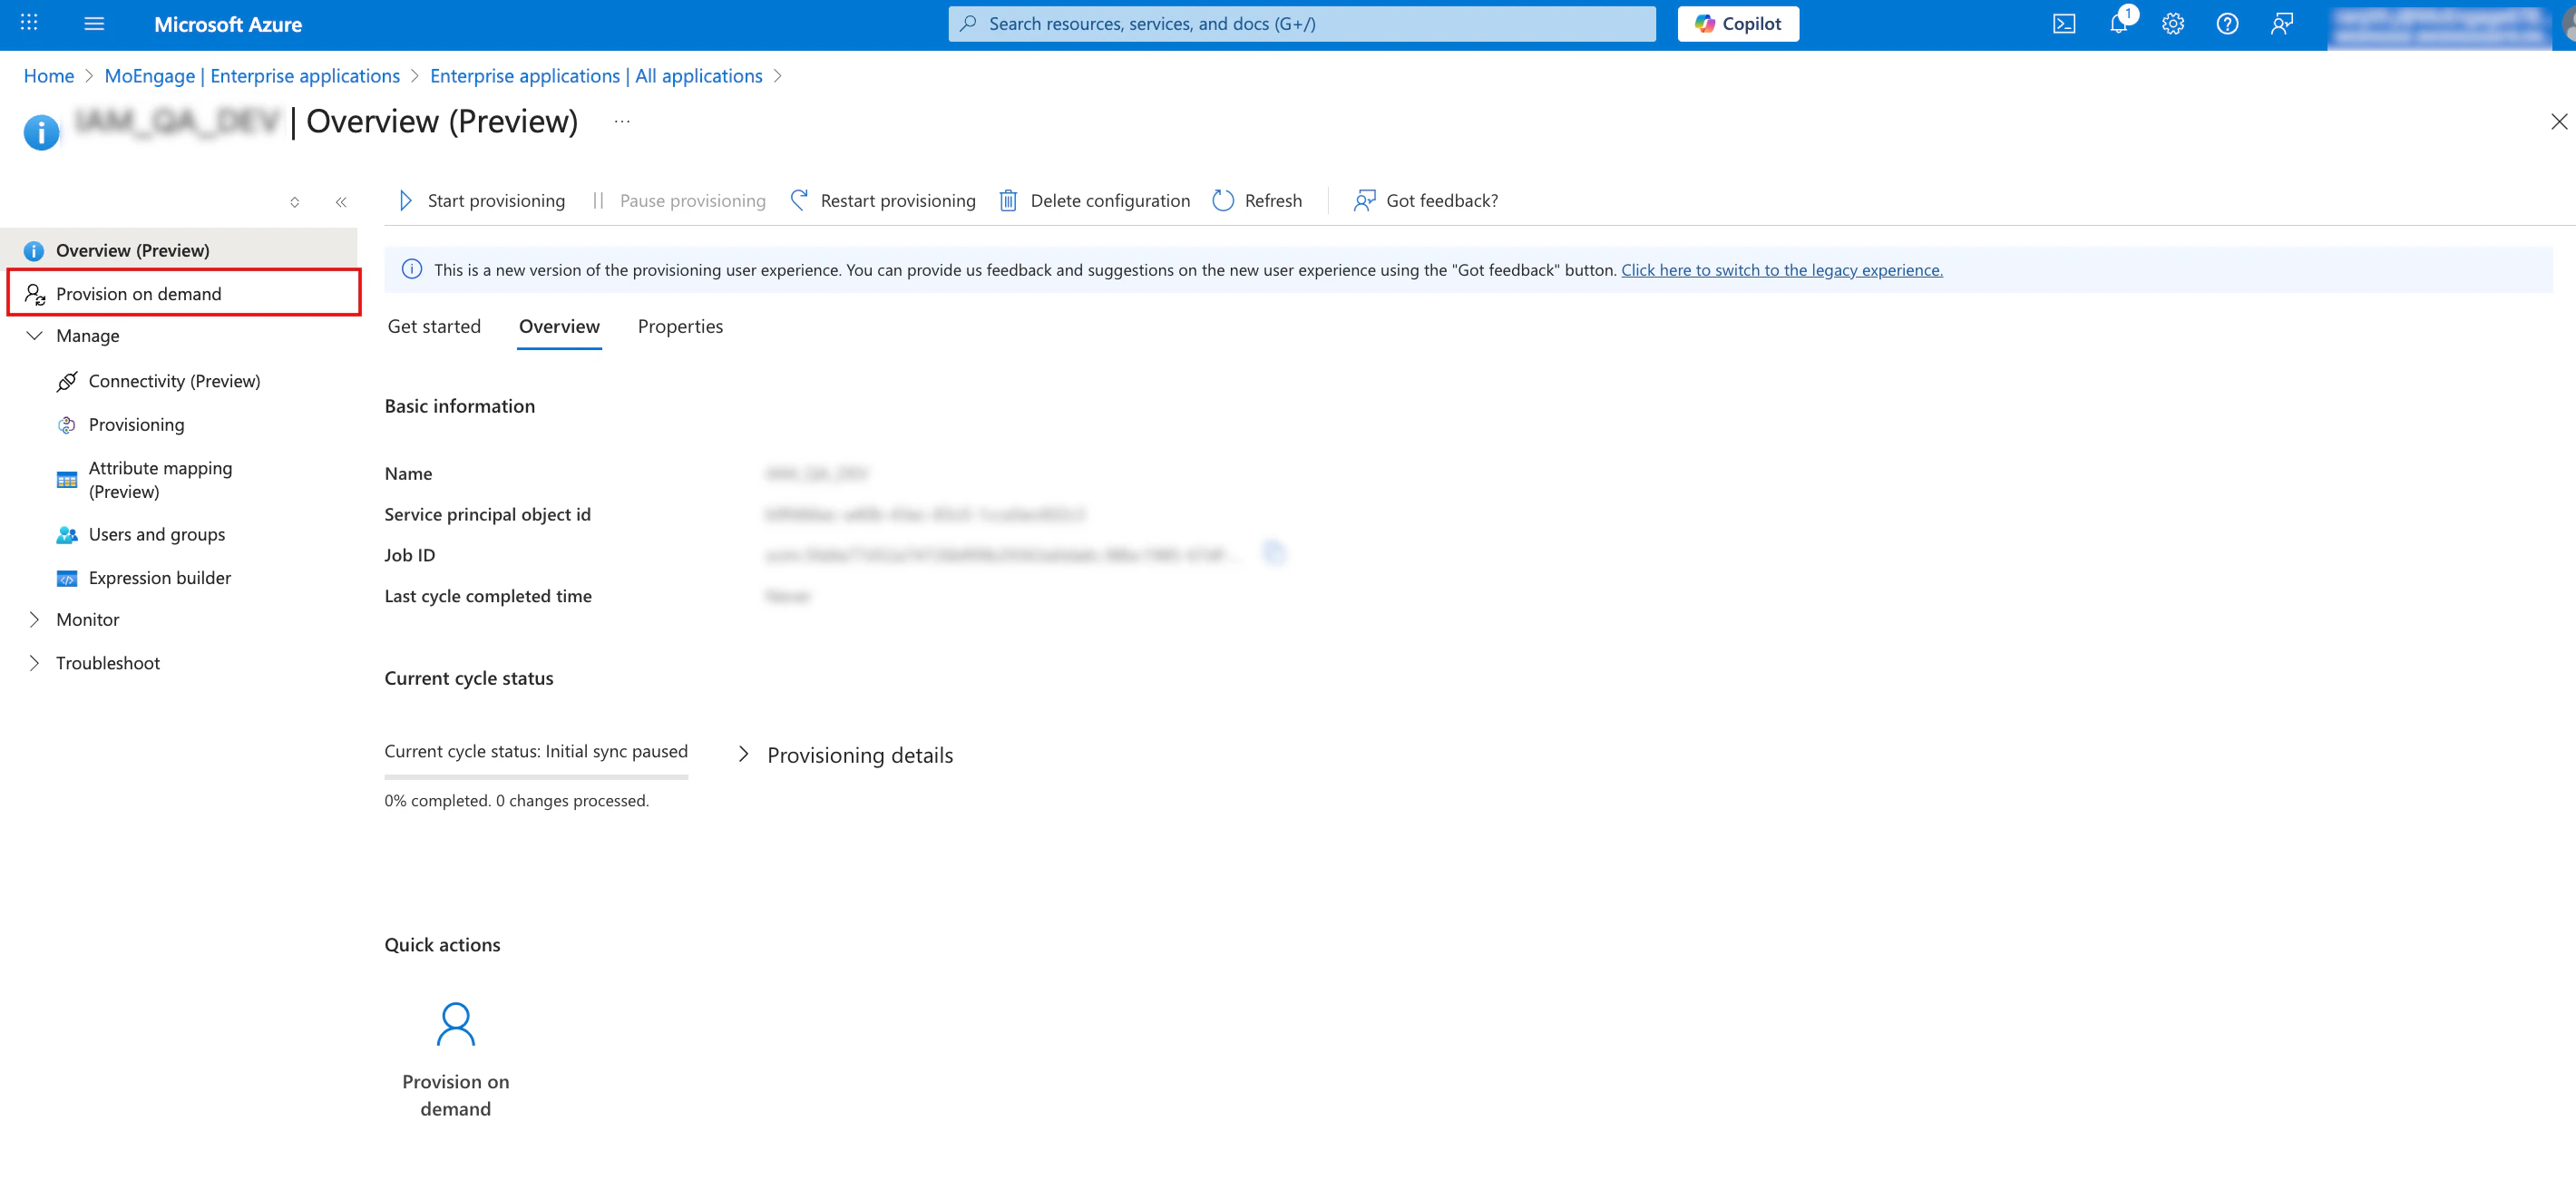 3. In the **Search for a user or group** box, type the name or email address of the user you assigned in [Step 5.2](/user-guide/settings/account/security/system-for-cross-domain-identity-management-scim#step-5-2-assign-app-roles-to-users).
4. Select the user from the search results.
5. Click **Provision** at the bottom of the page. Microsoft Entra ID initiates an immediate "force push" of the user identity, including the custom MoEngage role mapping.\
**Note**: After the process completes, a success message appears with details of the exported attributes. The SCIM status in your MoEngage workspace will now reflect these updates.
3. In the **Search for a user or group** box, type the name or email address of the user you assigned in [Step 5.2](/user-guide/settings/account/security/system-for-cross-domain-identity-management-scim#step-5-2-assign-app-roles-to-users).
4. Select the user from the search results.
5. Click **Provision** at the bottom of the page. Microsoft Entra ID initiates an immediate "force push" of the user identity, including the custom MoEngage role mapping.\
**Note**: After the process completes, a success message appears with details of the exported attributes. The SCIM status in your MoEngage workspace will now reflect these updates. 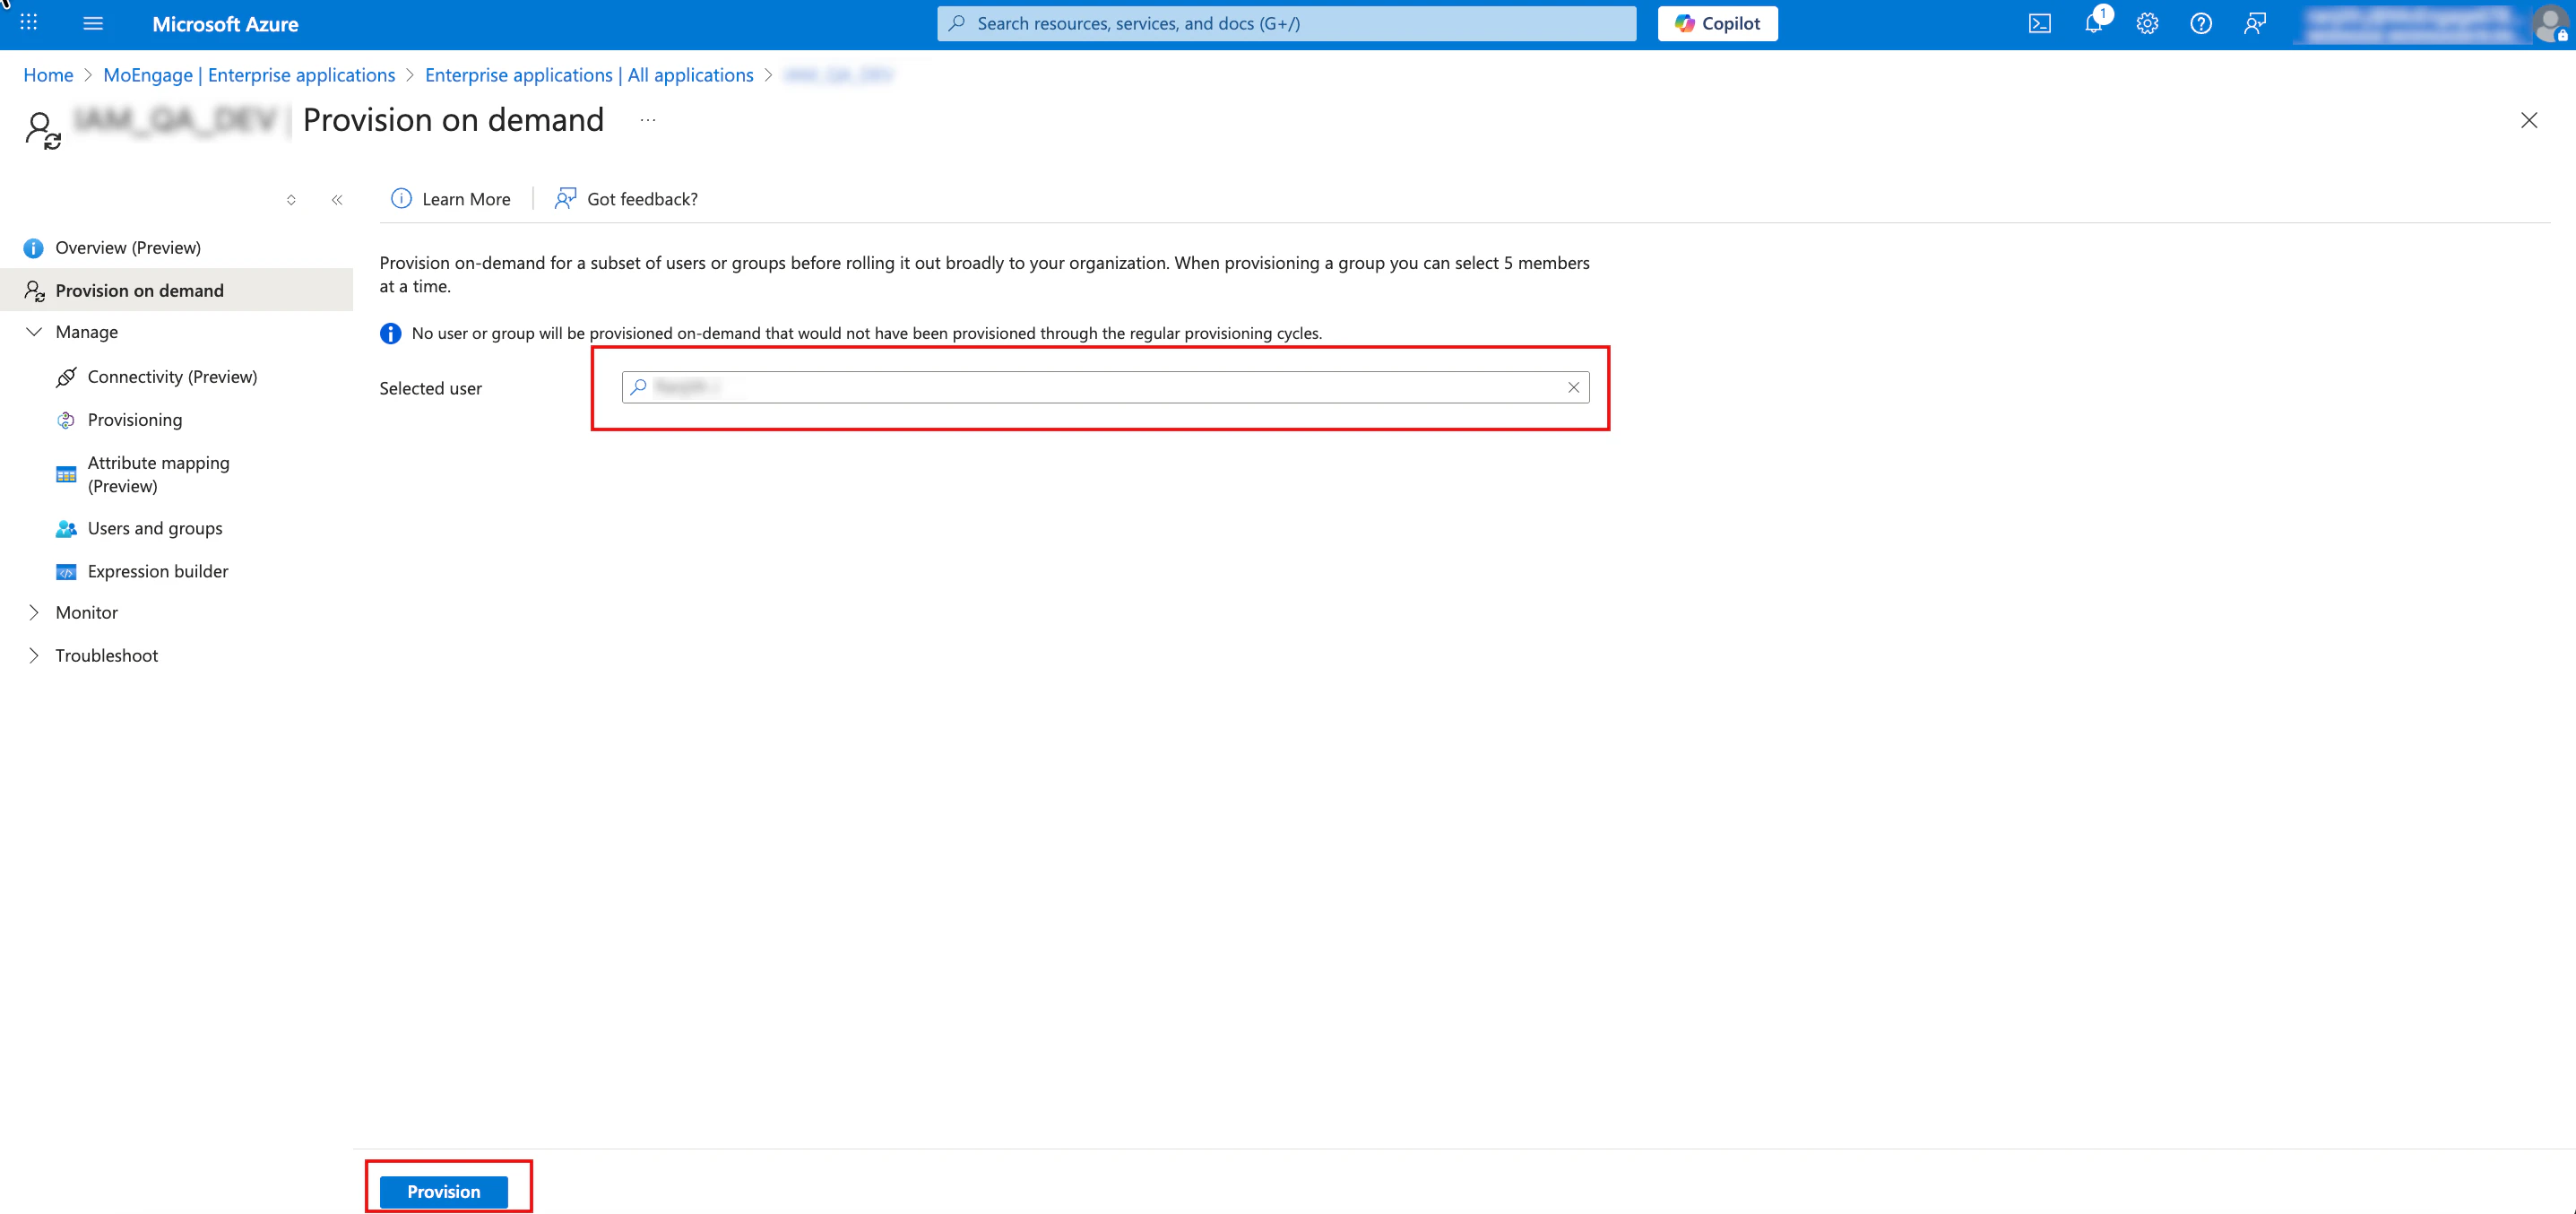 ## Step 7: Validation
Verify the following in the MoEngage workspace (**Settings** > **Account** > **Team Management**):
1. **User Invitation**: Confirm the user is successfully invited and the status is Joined.
## Step 7: Validation
Verify the following in the MoEngage workspace (**Settings** > **Account** > **Team Management**):
1. **User Invitation**: Confirm the user is successfully invited and the status is Joined.
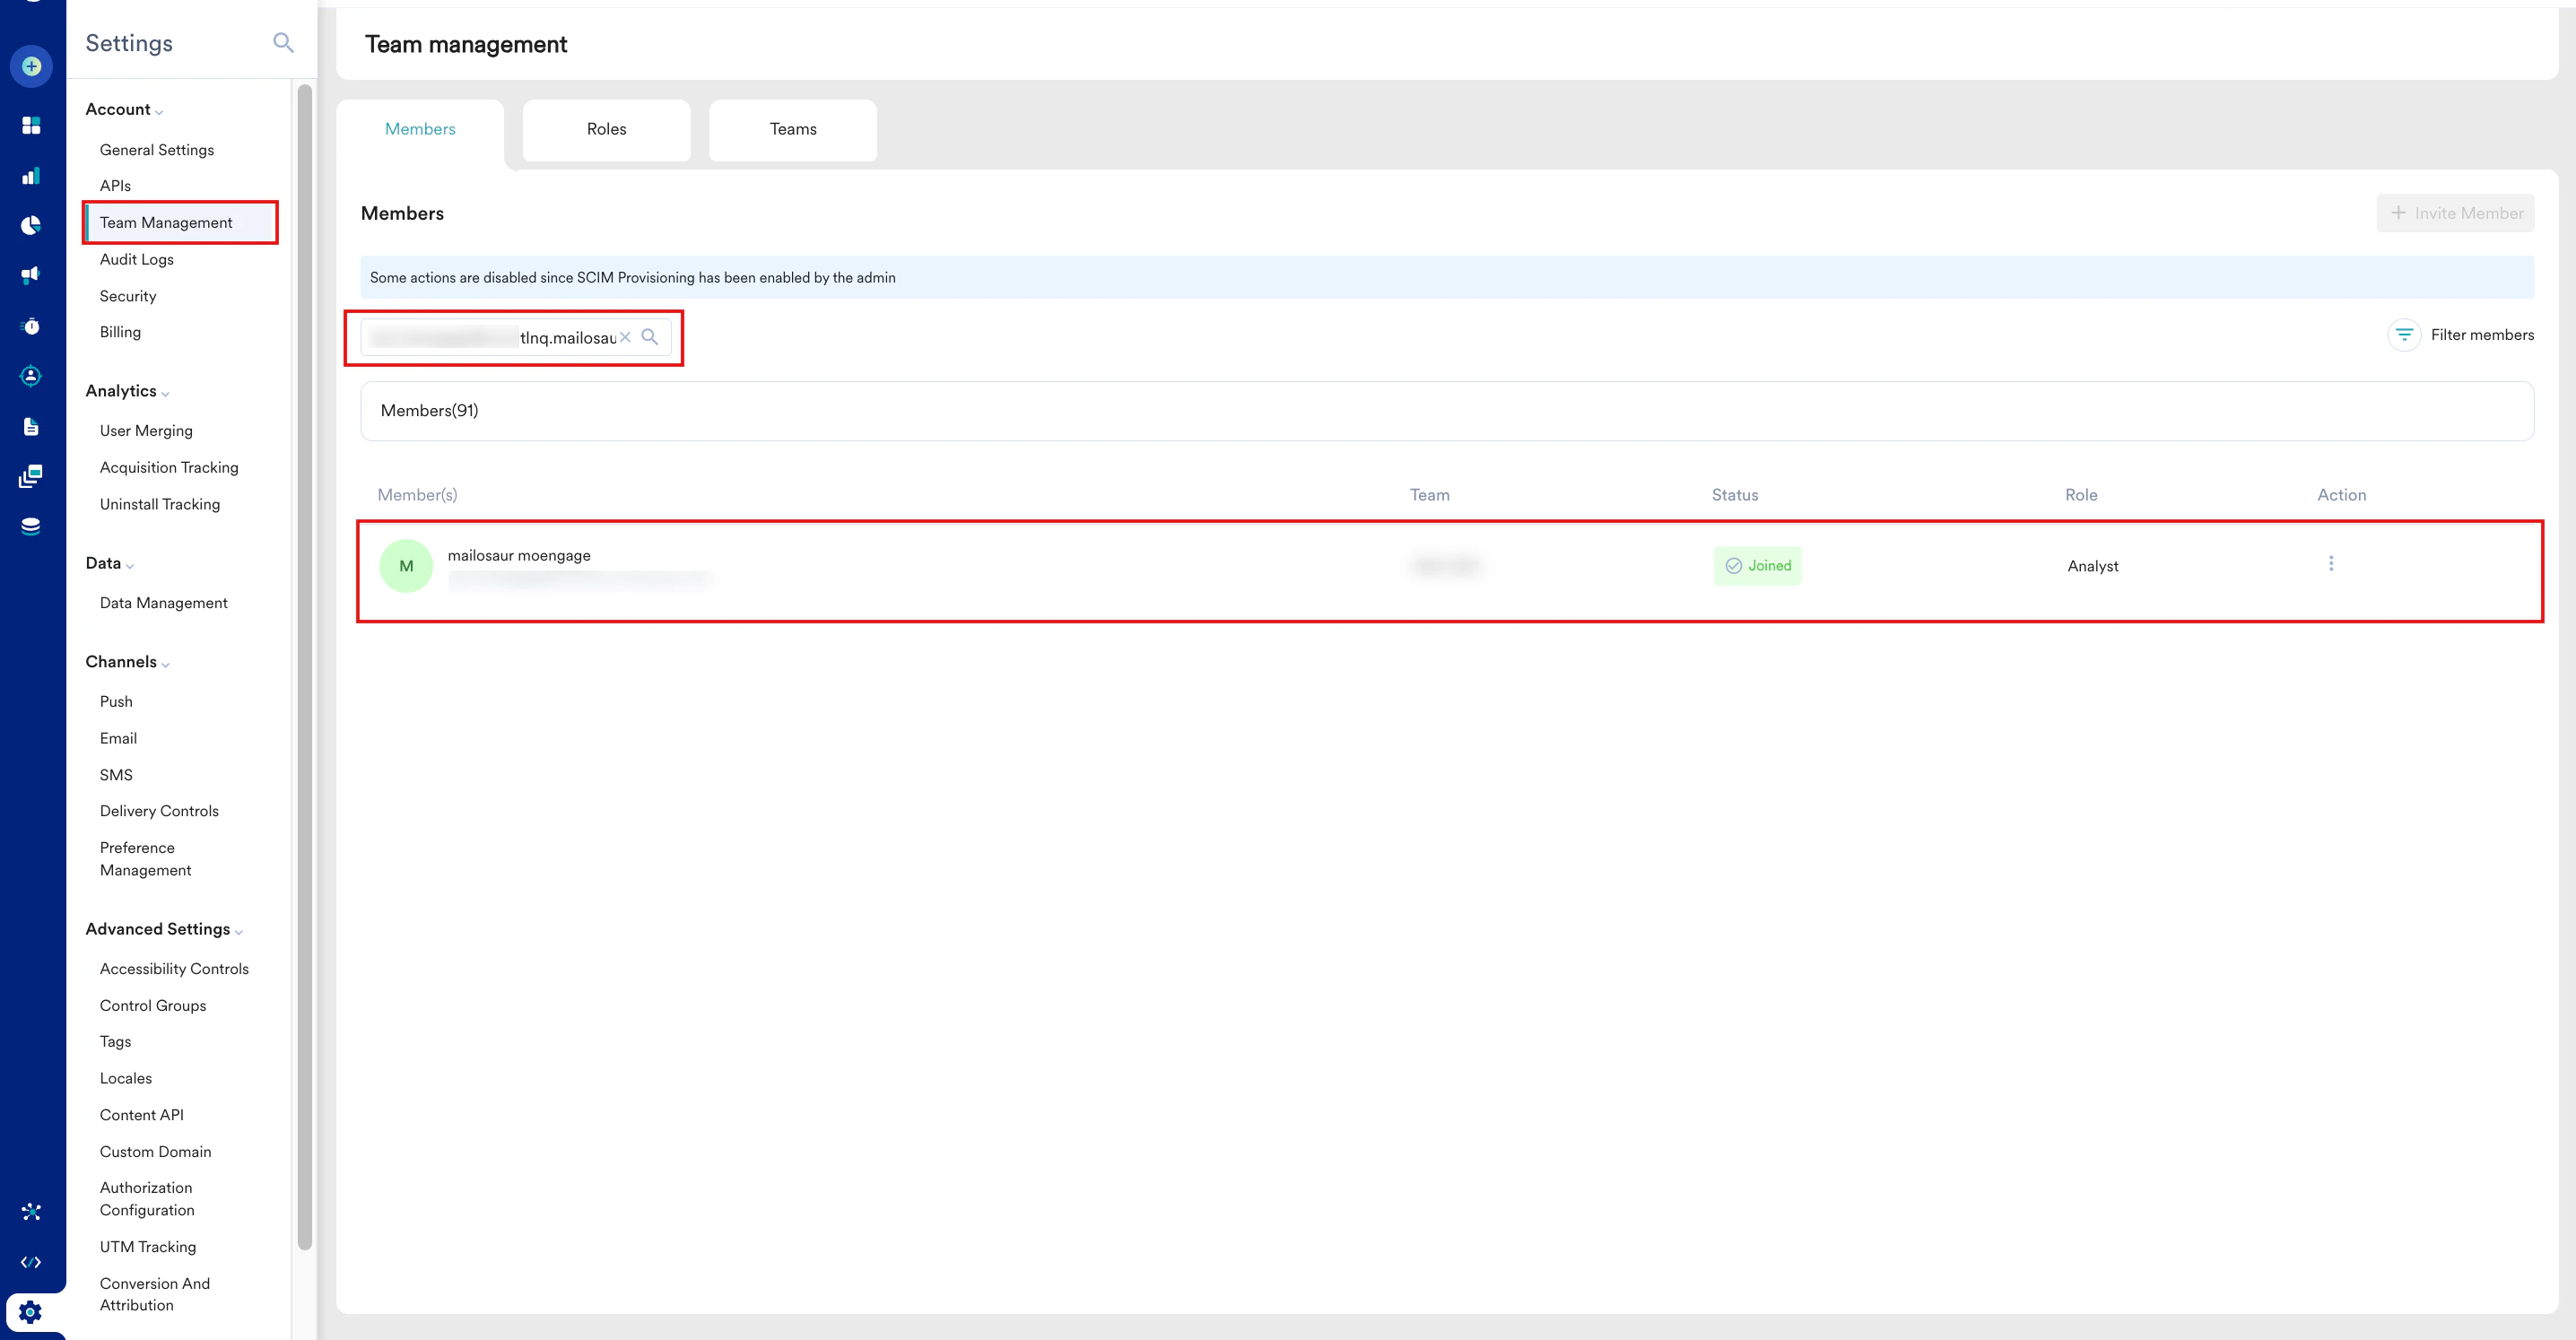 2. **Default Role Update**: Confirm that if no specific role was passed from Microsoft Entra ID, the system correctly assigned the Default Role configured in [Step 3](/user-guide/settings/account/security/system-for-cross-domain-identity-management-scim#step-3-configure-provisioning-credentials-in-azure).
3. **Role Accuracy**: Confirm that the specific role sent from Microsoft Entra ID (based on app role mapping) matches the assigned role in the workspace.
2. **Default Role Update**: Confirm that if no specific role was passed from Microsoft Entra ID, the system correctly assigned the Default Role configured in [Step 3](/user-guide/settings/account/security/system-for-cross-domain-identity-management-scim#step-3-configure-provisioning-credentials-in-azure).
3. **Role Accuracy**: Confirm that the specific role sent from Microsoft Entra ID (based on app role mapping) matches the assigned role in the workspace.
 # Operations (Attribute Information)
The following tables detail the attributes used for SCIM operations. Use this information to understand the data exchange between your identity provider and MoEngage to ensure consistency and proper configuration.
These tables are provided for reference purposes.
### Create User
When you create a user through SCIM, your identity provider sends a request to MoEngage with a specific set of attributes. The following table defines the parameters you can include in the user-creation request:
| Parameter | Required | Updatable | Description |
| ---------- | -------- | --------- | ------------------------------------------------------------------------------------------------------ |
| userName | Yes | Yes | The user's email address. This field is required by the SCIM protocol and must match the emails value. |
| givenName | Yes | No | The first name of the user as it appears in the MoEngage UI |
| familyName | Yes | No | The user's last name as it appears in the MoEngage UI. |
| emails | Yes | No | The user's email address, which acts as the primary identifier in MoEngage. |
| role | Yes | Yes | The user's role in MoEngage. This value is case-sensitive and must already exist in the platform. |
### Update or Revoke User Access
When you update or revoke user access, your identity provider sends a request to MoEngage. A single API handles this process by updating user information or revoking access by changing the active attribute.
| Parameter | Required | Updatable | Description |
| ---------- | -------- | --------- | --------------------------------------------------------------------------------------------------------------------------------------------------------------------------- |
| userName | Yes | No | The user's email address. This field is required by the SCIM protocol and must match the emails value. |
| givenName | Yes | No | The user's first name as it appears in MoEngage. |
| familyName | Yes | No | The user's last name as it appears in MoEngage. |
| emails | Yes | No | The user's email address, which acts as the primary identifier on MoEngage. |
| role | Yes | Yes | The user's role in MoEngage. This value is case-sensitive and available on MoEngage. |
| active | Yes | Yes | This value determines whether the user can access MoEngage. When the user is created, this value is set to *true* by default. To revoke a user's access, set it to *false*. |
# FAQs
Ensure that the **External namespace** is set to **role** and the **Attribute required** setting is enabled (set to True).
This occurs if the identity provider passes two "role" attributes in the schema. MoEngage prioritizes the custom attribute role over the default attribute. Review the identity provider logs and schema to resolve the conflict. If both attributes are required, ensure they contain identical role values.
Ensure the user account is created in MoEngage before the group (role) is assigned or created in MoEngage.
# Operations (Attribute Information)
The following tables detail the attributes used for SCIM operations. Use this information to understand the data exchange between your identity provider and MoEngage to ensure consistency and proper configuration.
These tables are provided for reference purposes.
### Create User
When you create a user through SCIM, your identity provider sends a request to MoEngage with a specific set of attributes. The following table defines the parameters you can include in the user-creation request:
| Parameter | Required | Updatable | Description |
| ---------- | -------- | --------- | ------------------------------------------------------------------------------------------------------ |
| userName | Yes | Yes | The user's email address. This field is required by the SCIM protocol and must match the emails value. |
| givenName | Yes | No | The first name of the user as it appears in the MoEngage UI |
| familyName | Yes | No | The user's last name as it appears in the MoEngage UI. |
| emails | Yes | No | The user's email address, which acts as the primary identifier in MoEngage. |
| role | Yes | Yes | The user's role in MoEngage. This value is case-sensitive and must already exist in the platform. |
### Update or Revoke User Access
When you update or revoke user access, your identity provider sends a request to MoEngage. A single API handles this process by updating user information or revoking access by changing the active attribute.
| Parameter | Required | Updatable | Description |
| ---------- | -------- | --------- | --------------------------------------------------------------------------------------------------------------------------------------------------------------------------- |
| userName | Yes | No | The user's email address. This field is required by the SCIM protocol and must match the emails value. |
| givenName | Yes | No | The user's first name as it appears in MoEngage. |
| familyName | Yes | No | The user's last name as it appears in MoEngage. |
| emails | Yes | No | The user's email address, which acts as the primary identifier on MoEngage. |
| role | Yes | Yes | The user's role in MoEngage. This value is case-sensitive and available on MoEngage. |
| active | Yes | Yes | This value determines whether the user can access MoEngage. When the user is created, this value is set to *true* by default. To revoke a user's access, set it to *false*. |
# FAQs
Ensure that the **External namespace** is set to **role** and the **Attribute required** setting is enabled (set to True).
This occurs if the identity provider passes two "role" attributes in the schema. MoEngage prioritizes the custom attribute role over the default attribute. Review the identity provider logs and schema to resolve the conflict. If both attributes are required, ensure they contain identical role values.
Ensure the user account is created in MoEngage before the group (role) is assigned or created in MoEngage.