

Overview
The All Campaigns page is the central hub for viewing, organizing, and managing every campaign in your MoEngage account. From this page you can search for specific campaigns, filter and sort the campaign list, customize which information you see, and perform actions on one or many campaigns at once. This guide covers every element on the page, including the new Views, Dynamic Columns, Filters, and Bulk Actions capabilities, along with step-by-step navigation instructions and common use cases.The capabilities such as Views, Dynamic Columns, Advanced Filters, Bulk Actions, Recent Search and Multi-Team Selection are part of the new All Campaigns page and are being rolled out in phases. If you don’t see these capabilities on your dashboard, reach out to MoEngage Support or your Customer Success Manager (CSM) to enable it.
Use Cases
The All Campaigns page supports several recurring business needs for teams that run campaigns at scale:- Focus on the campaigns that matter to you: When you own only a subset of channels or campaigns, a general list adds noise. Saved Views let you keep a personal, always-ready slice of the campaign list so you spend less time reapplying the same filters every day.
- Keep a team aligned on the same set of campaigns: Sharing a Public view across one or more teams gives everyone a common, consistent picture of the campaigns they’re responsible for, without each member recreating it.
- Tailor the information to a role: Different roles care about different data. Dynamic Columns let each user surface the metrics relevant to their work and hide the rest, making the table easier to scan and act on.
- Land on the right place every time: Setting a Default view removes repetitive navigation, so the campaigns you monitor most are the first thing you see when you open the page.
- Prepare for reviews and stakeholder updates quickly: Bulk Tag, Download, and Report actions turn a large campaign list into a shareable summary or a detailed performance report in a few clicks, supporting recurring reporting cycles.
- Manage many campaigns safely at scale: Bulk Pause, Stop, and Resume apply an operation across many campaigns at once while respecting each campaign’s eligibility, reducing manual, one-by-one effort and the risk of acting on the wrong campaign.
- Declutter your workspace: Pinning, unpinning, and reordering views keeps daily navigation focused on the tabs each user actually uses.
Access the All Campaigns Page
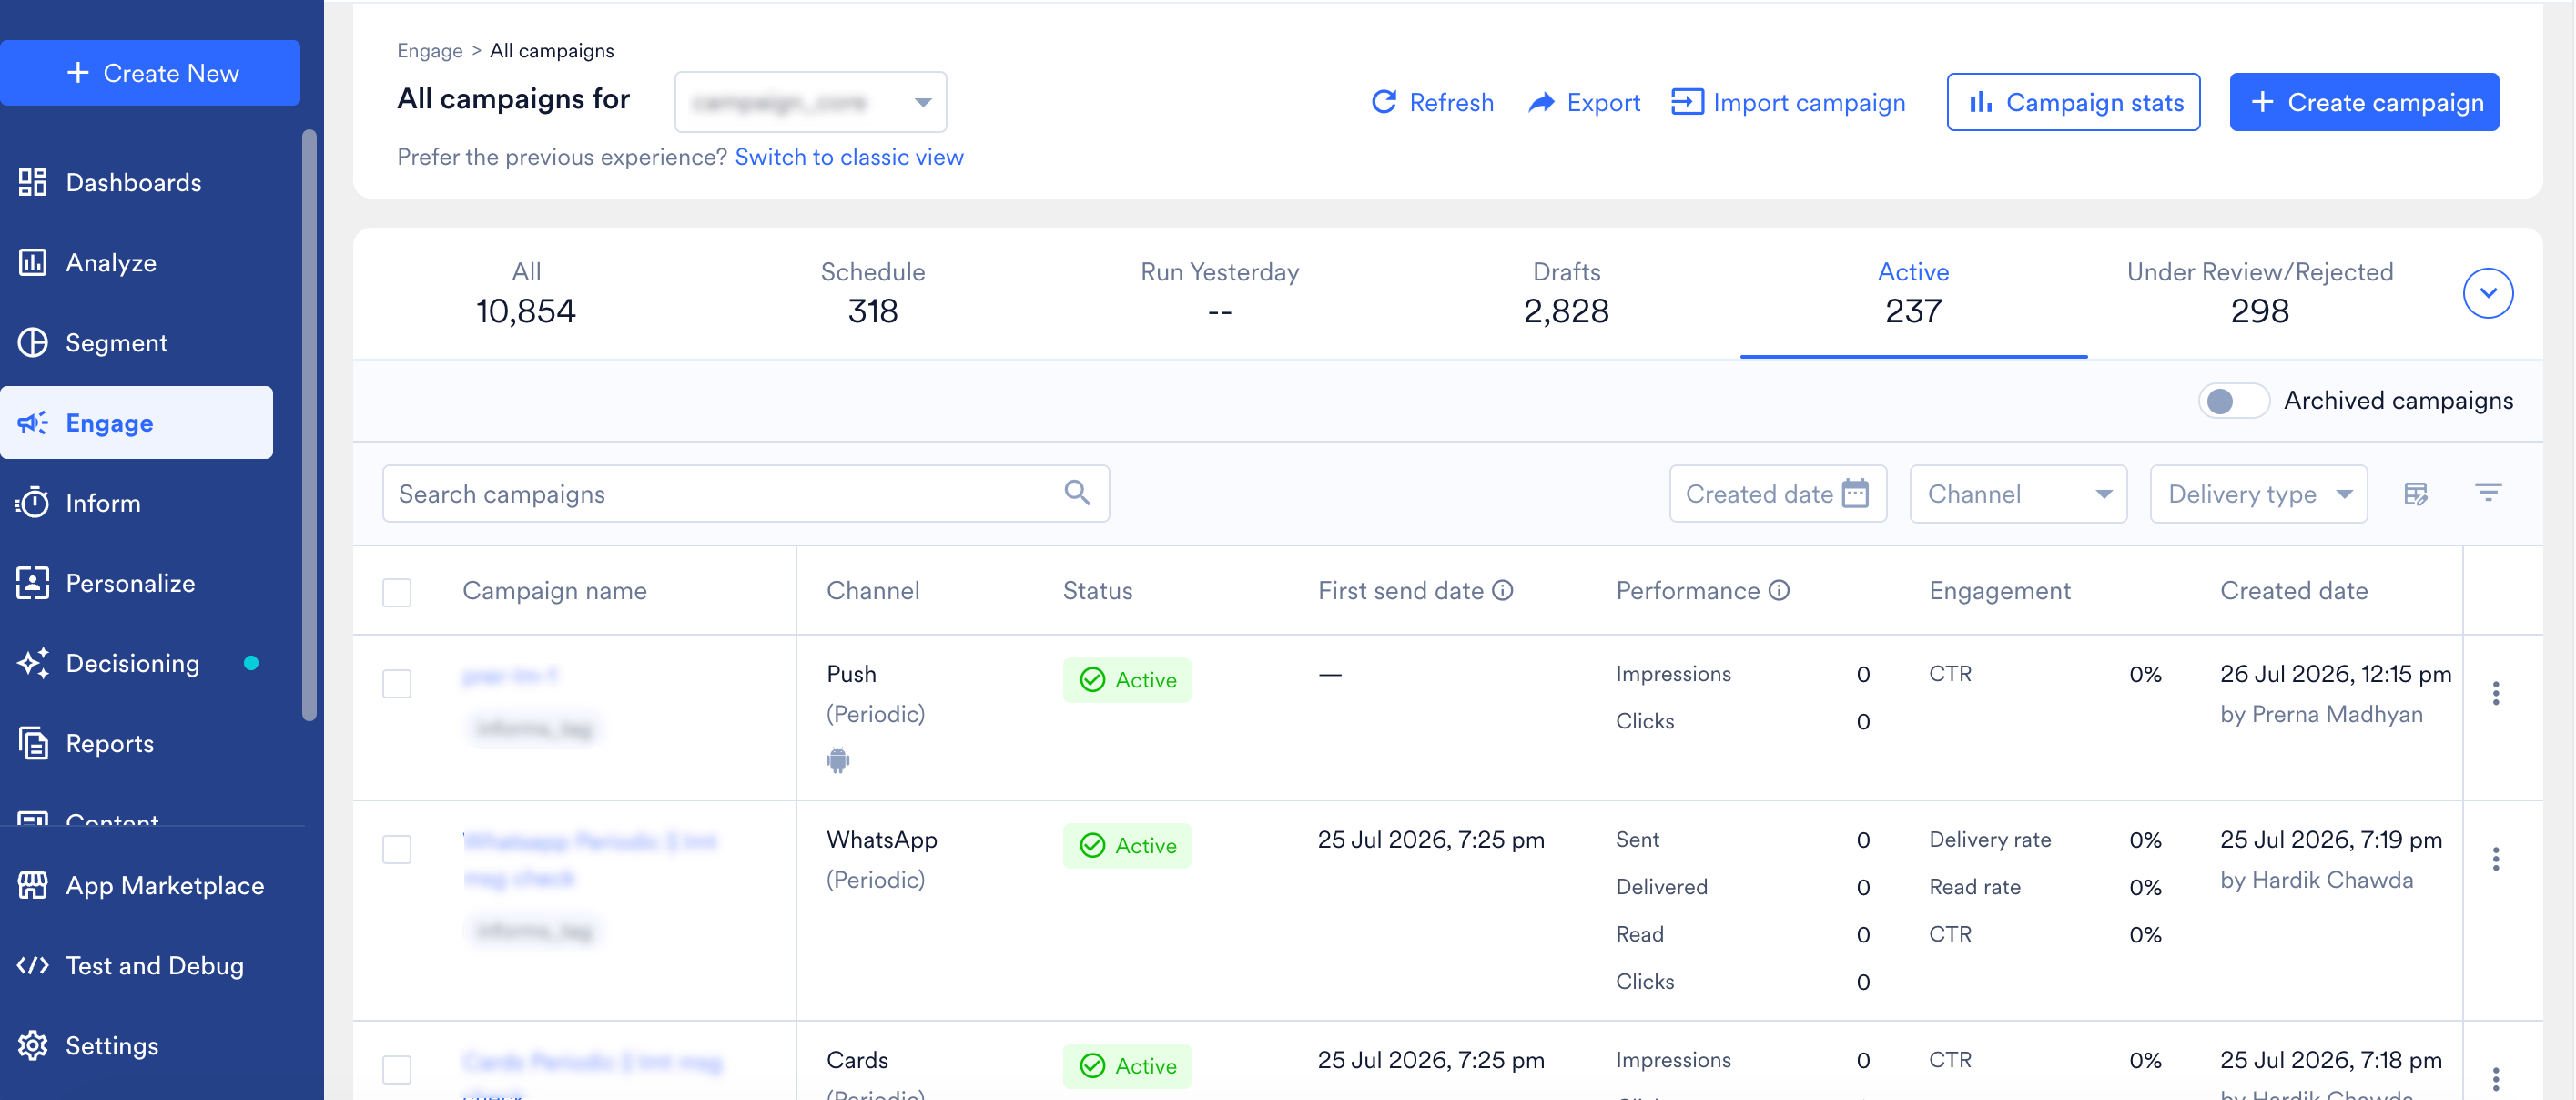
- Log in to your MoEngage dashboard.
- From the left navigation, go to Engage > All Campaigns.
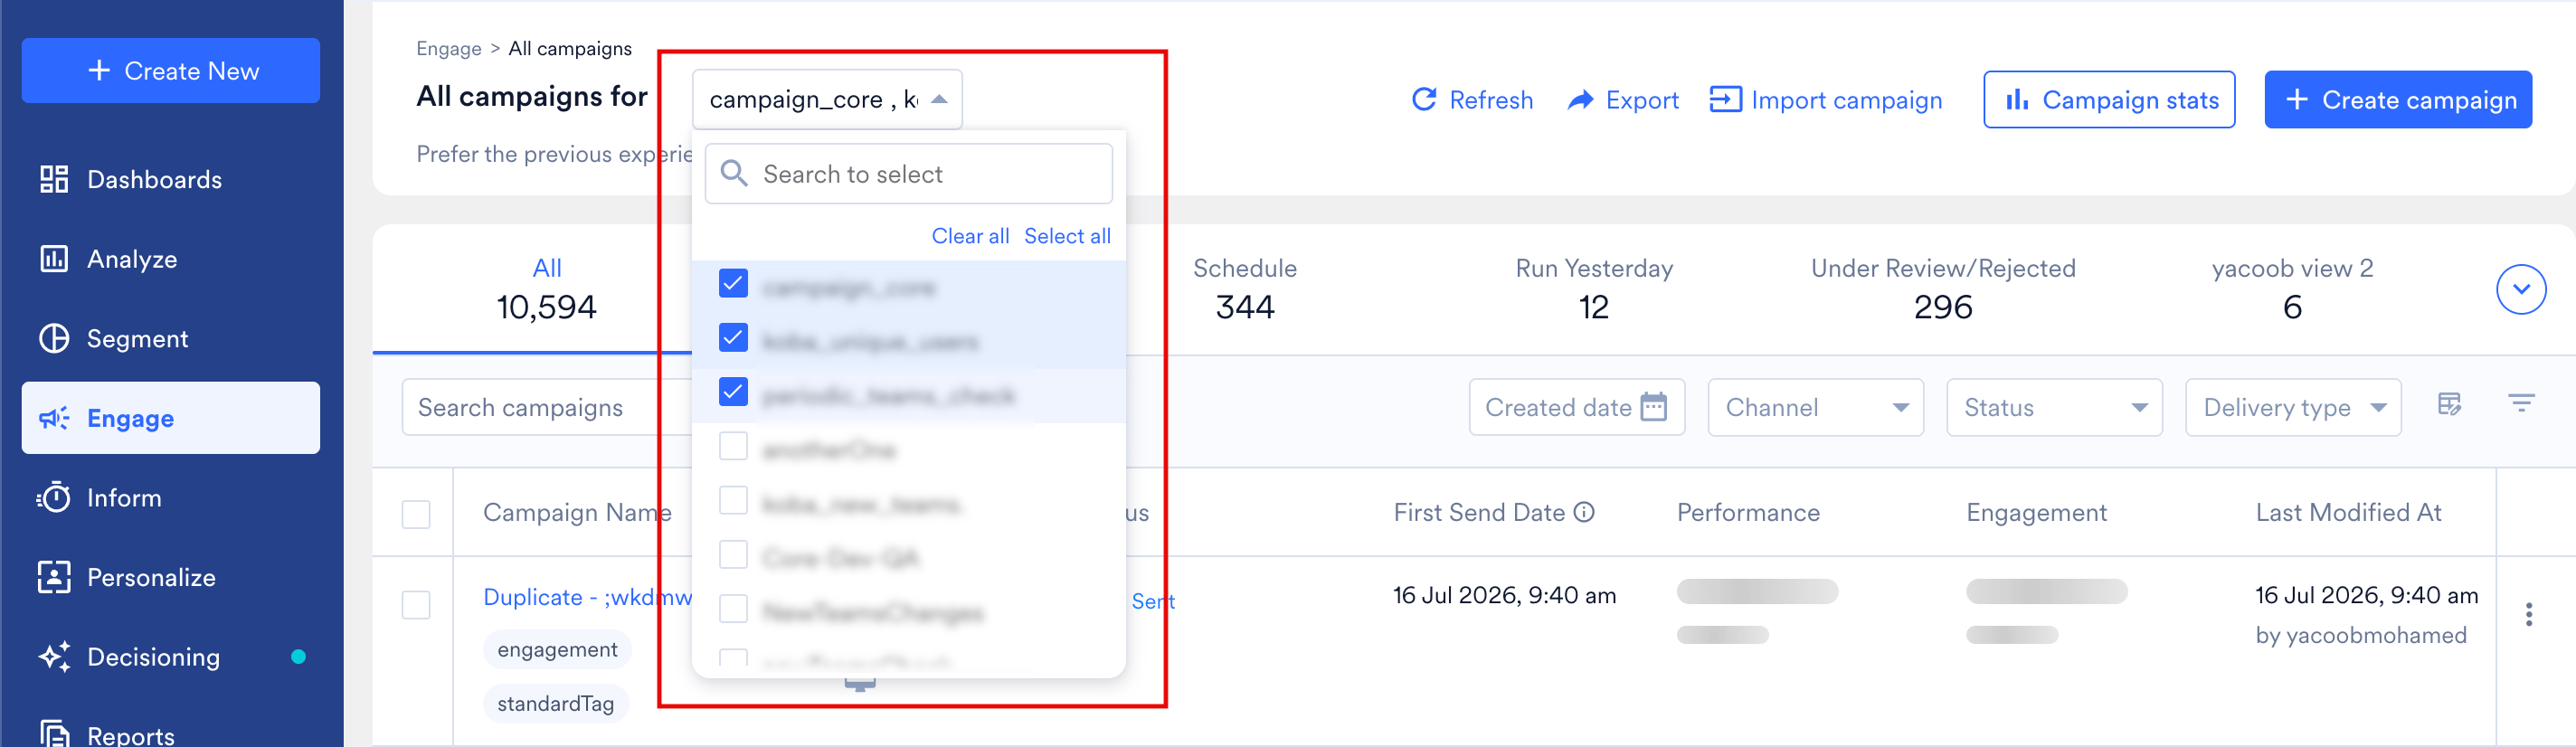
- If you have multiple teams configured, use the Teams selector dropdown next to the page title to switch between teams. The campaign list refreshes to show data for the selected team.
If you prefer the older layout, click Switch to classic view, located below the page title. This link is only shown to accounts that previously used the classic experience.
Page Layout
At the top of the page you’ll find the following elements: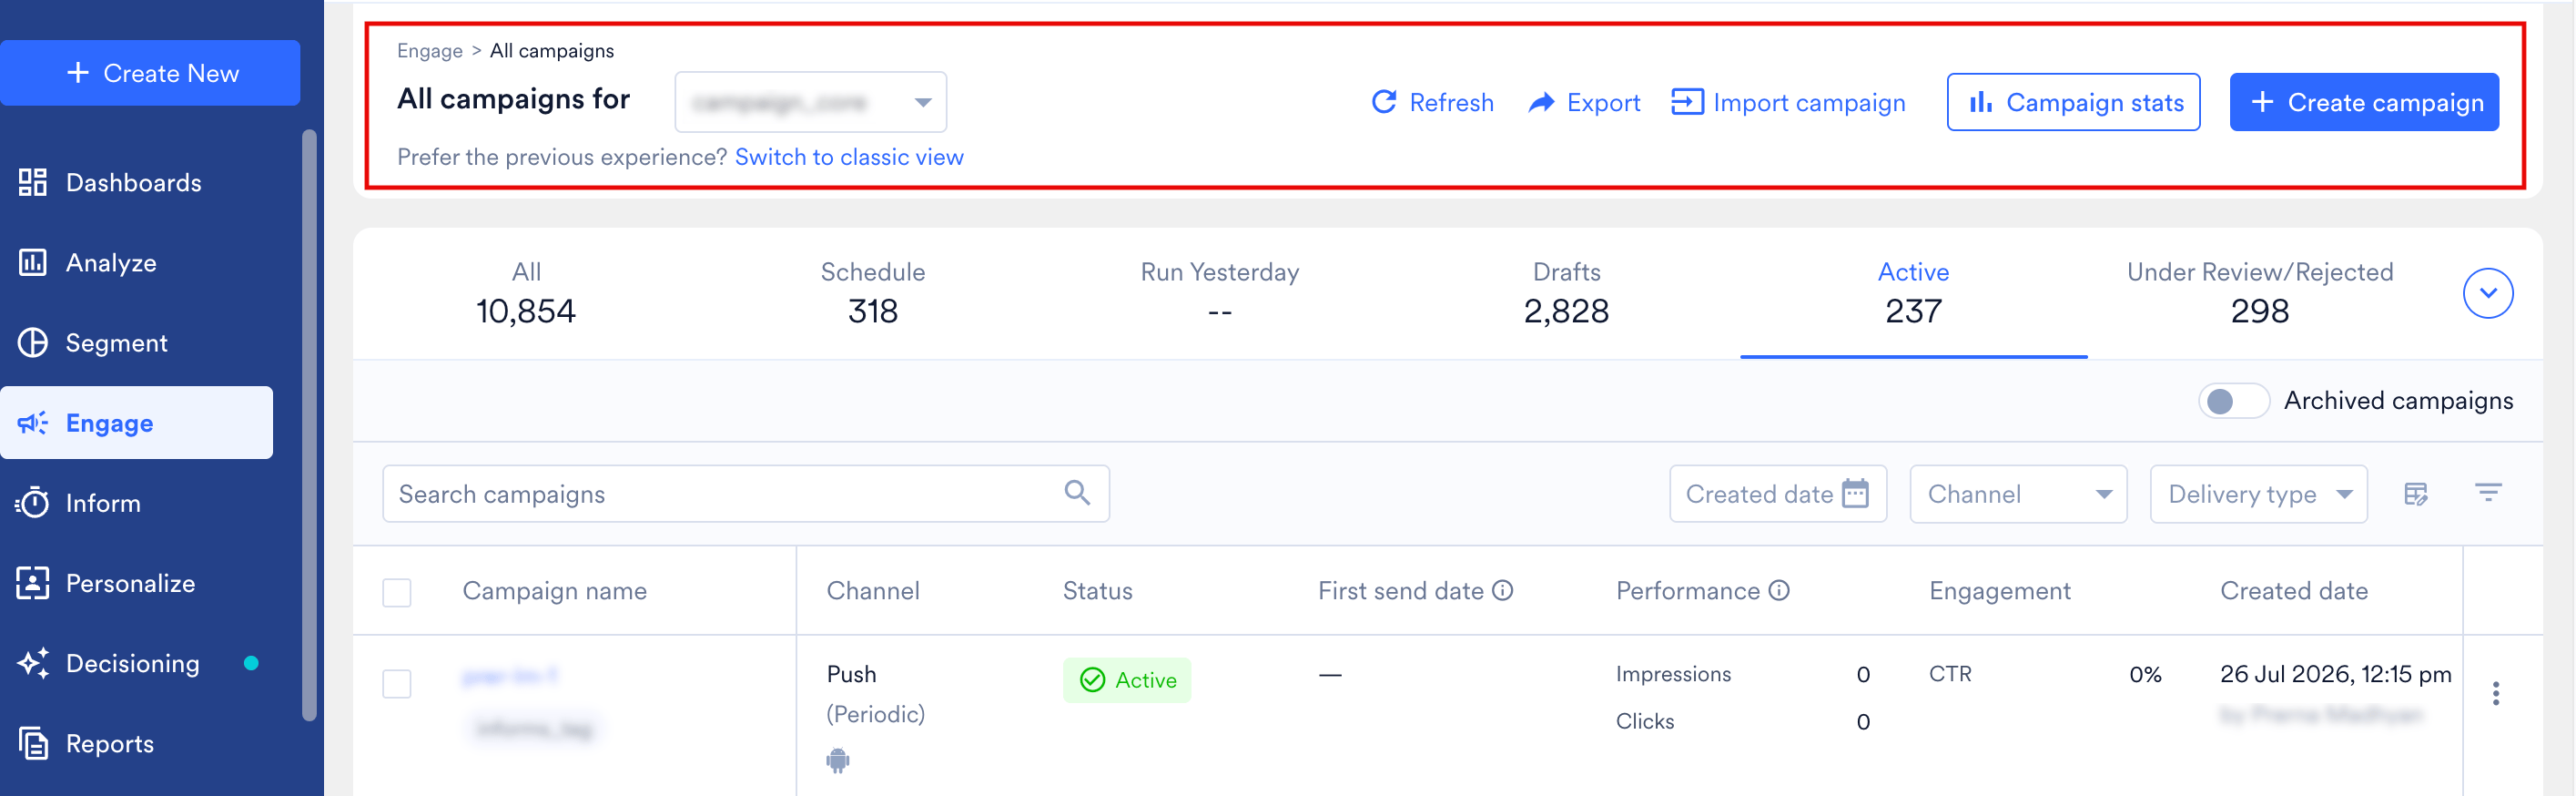
Below this, the page shows tabs (a row of numbers such as All, Active, Schedule, Run Yesterday, Drafts) — these are your Views, explained in detail below.
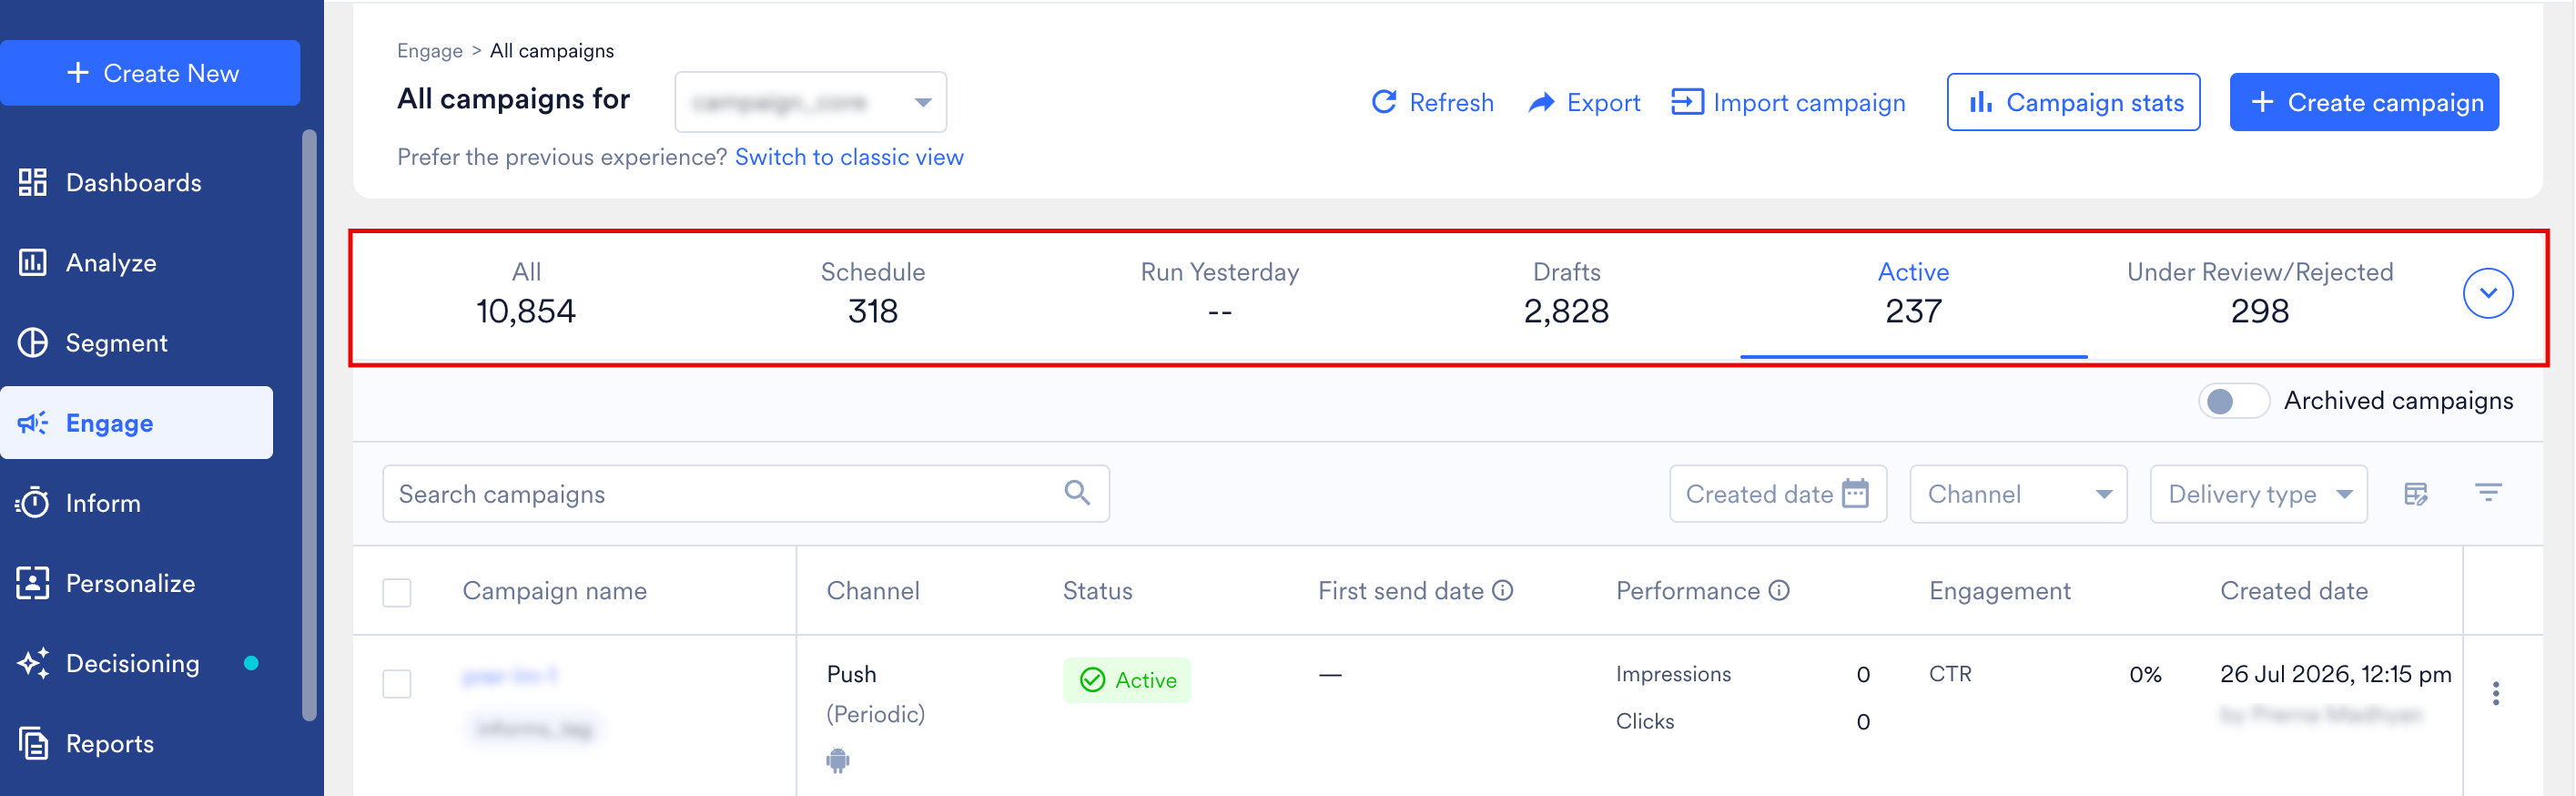
Views
What Is a View?
A View is a saved combination of filters + columns + search term + visibility setting that lets you define your own way of looking at the campaign list. Instead of re-applying the same filters every time you visit the page, you save them once as a View and select it whenever you want to see that specific slice of campaigns. For example, a marketer who only cares about their own active Push and Email campaigns can create a View that always shows exactly that, without touching a filter again.System (Default) Views
When you load the All Campaigns page for the first time, MoEngage provides a set of built-in system views:- All: every campaign, regardless of status.
- Active: campaigns currently running.
- Schedule: campaigns that are scheduled to send in the future.
- Drafts: campaigns saved but not yet activated.
- Under Review/Rejected: campaigns pending approval or rejected during review, if Campaign Approval Workflow is enabled for your workspace.
View Ownership: Private vs. Public
Views are created at the individual user level, every user can build their own set of views, and each view can be marked as one of two visibility types:- Private: only visible to and editable by the user who created it. No one else in the workspace can see it.
- Public (Team-based): shared with one or more teams. Every member of the selected team(s) will see this view appear on their own All Campaigns page.
If your workspace is not team-based, marking a view as Public shares it with everyone in the workspace.
Create a View
There are two ways to create a view: Method 1: Create from an existing filter- Go to any tab (for example, the All tab).
- Apply your desired filters, search term, and/or column selection.
- Click Save as view. You’ll be prompted to configure the view (view the steps below).
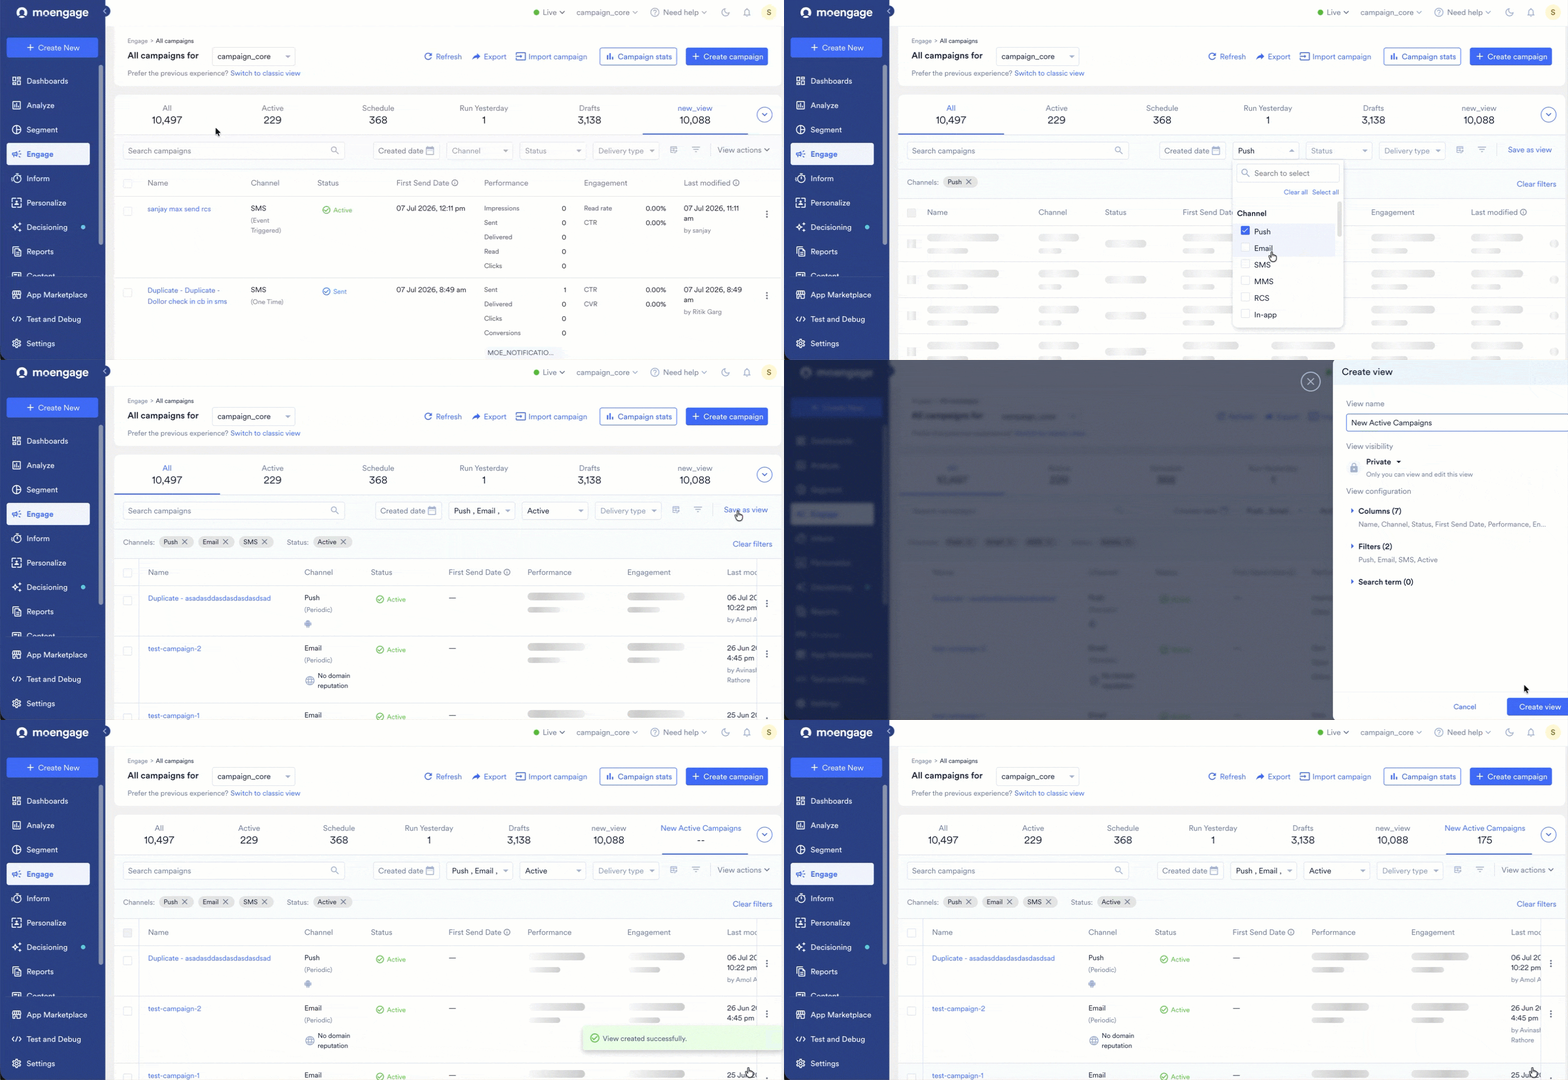
- Click the views dropdown (the down-arrow icon next to your tabs) and select + New view.
- This opens the Create view panel with a blank/default configuration.
- Configure your filters, columns, and search term as needed, exactly as you would from an existing tab.
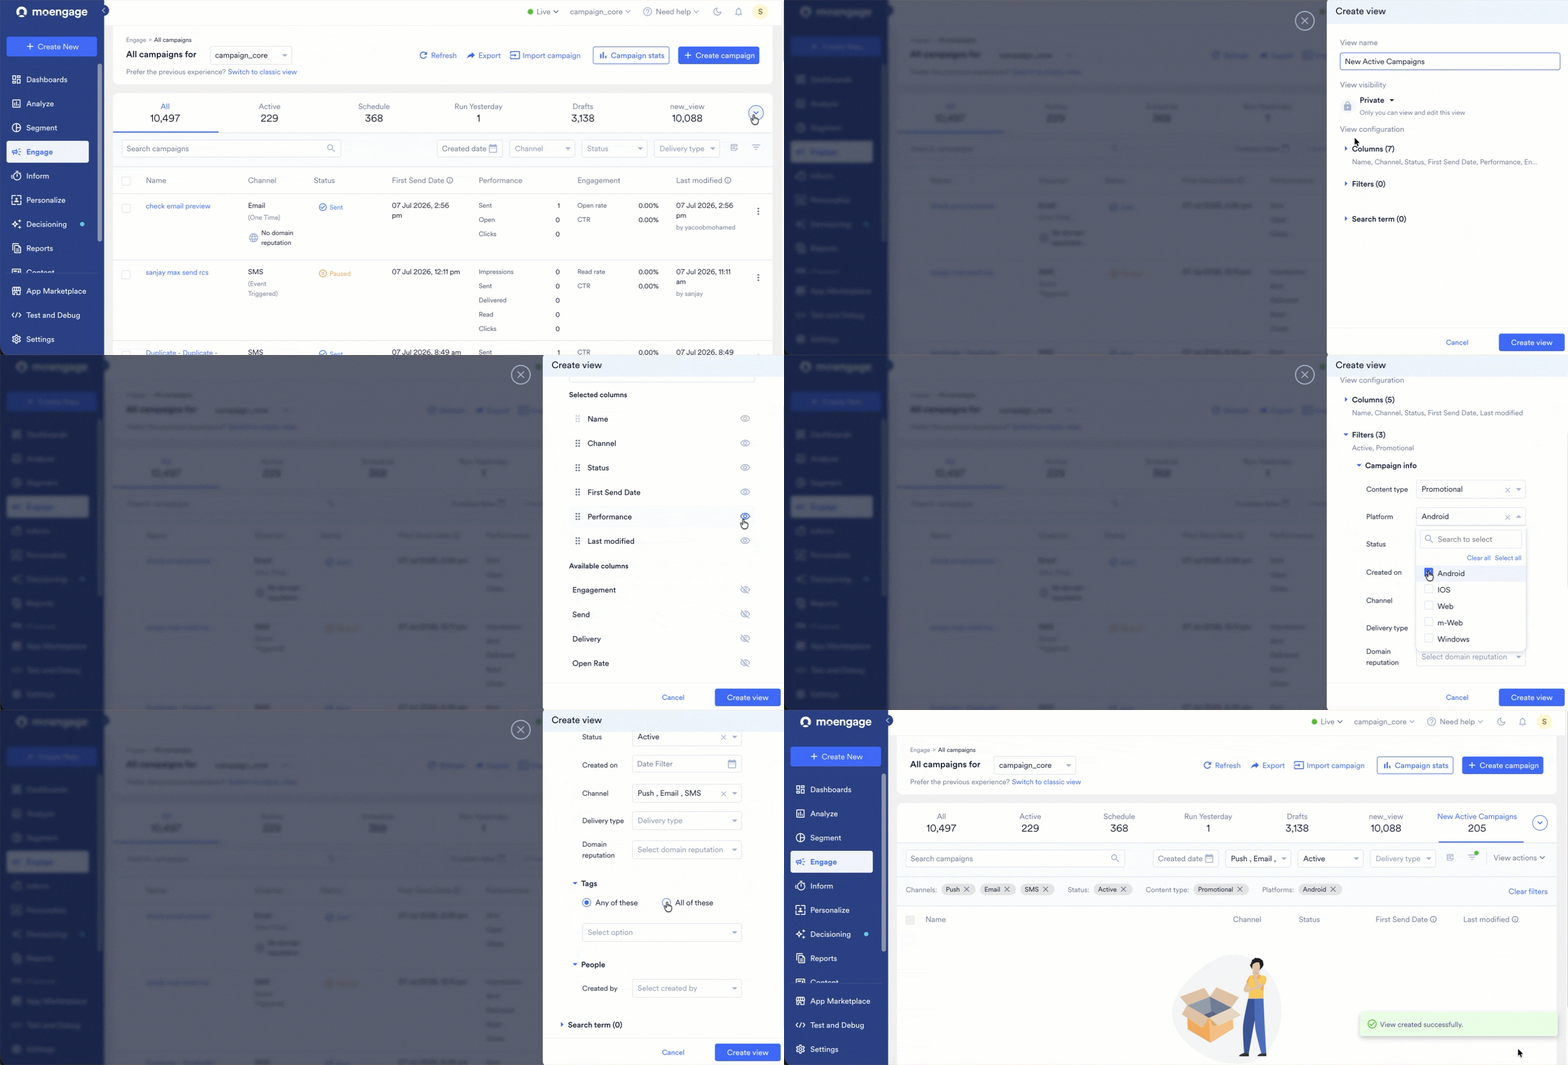
Configure the View (both methods)
In the Create view panel, add the following details: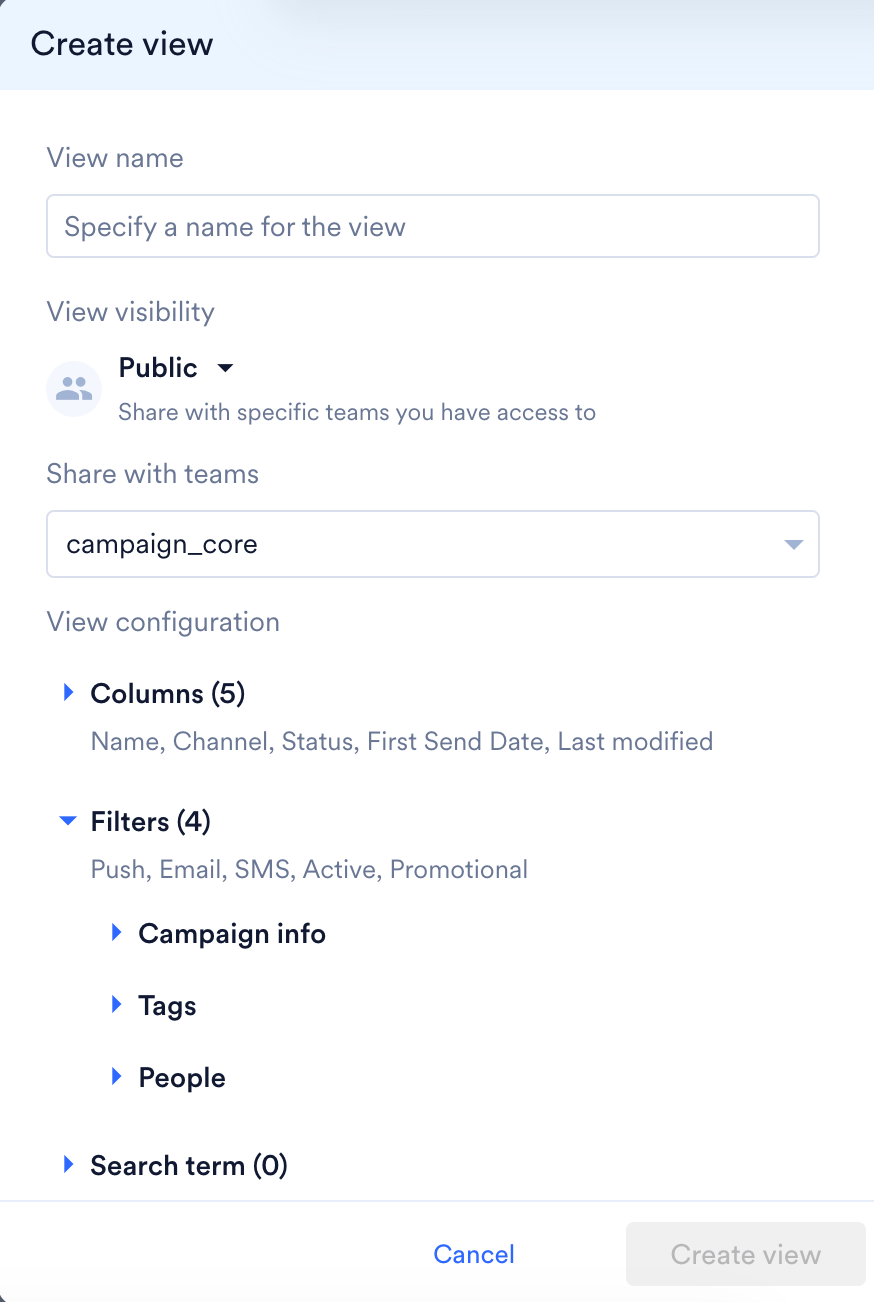
Filters available inside Create View
When you expand the Filters section in the Create View panel, filters are grouped into the following categories:
| Category | Field | Description |
|---|---|---|
| Campaign info | Content type | Filter by the type of content used in the campaign. 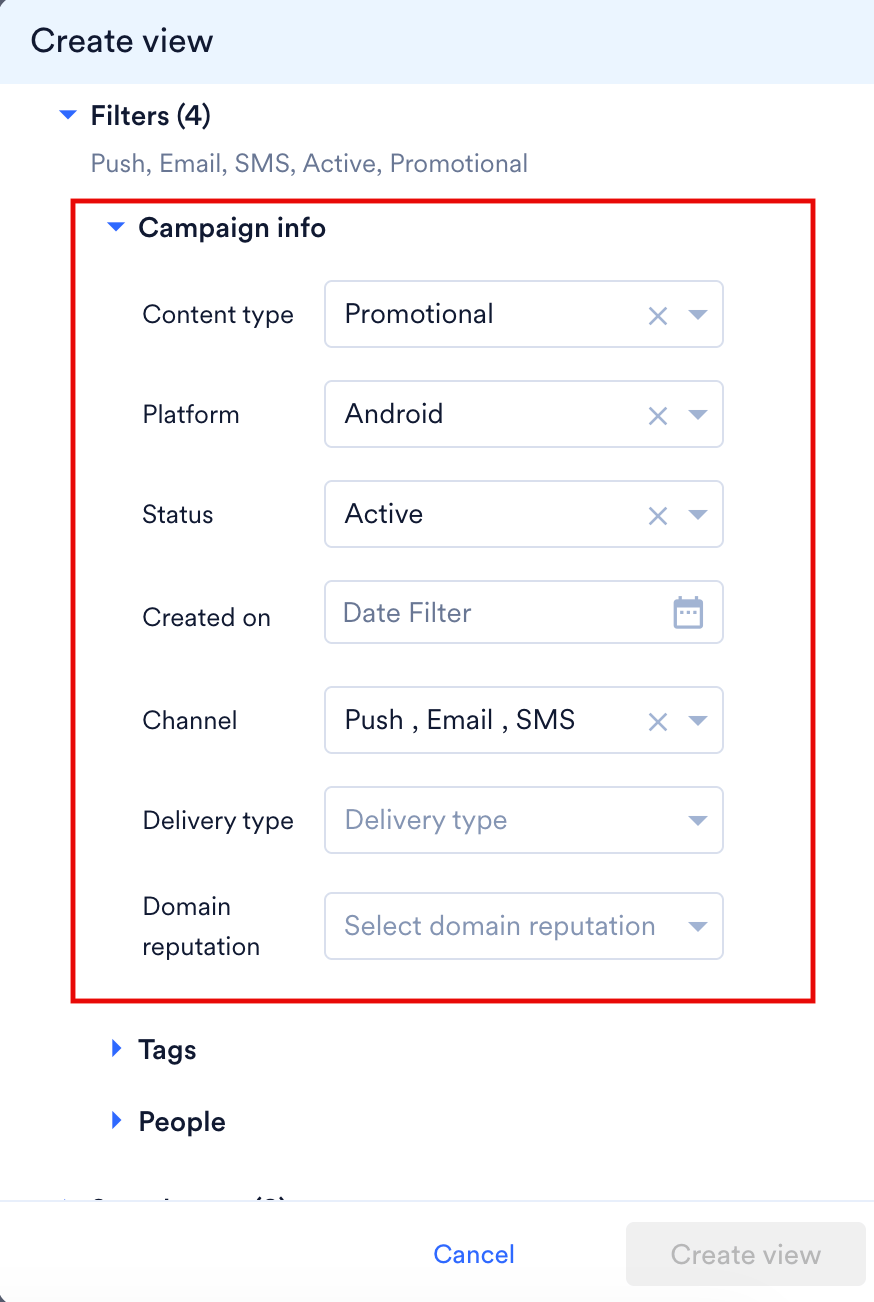 |
| Platform | Filter by target platform. | |
| Status | Filter by campaign status (e.g., Active, Scheduled, Sent, Draft). | |
| Created on | Filter by the date the campaign was created, using a date picker. | |
| Channel | Filter by campaign channel (e.g., Email, SMS, Push). | |
| Delivery type | Filter by delivery type (e.g., One Time, Event Triggered, Recurring). | |
| Domain reputation | Filter by the sending domain’s reputation status. | |
| Tags | Any of these / All of these | Choose whether a campaign must match at least one selected tag (Any) or every selected tag (All). 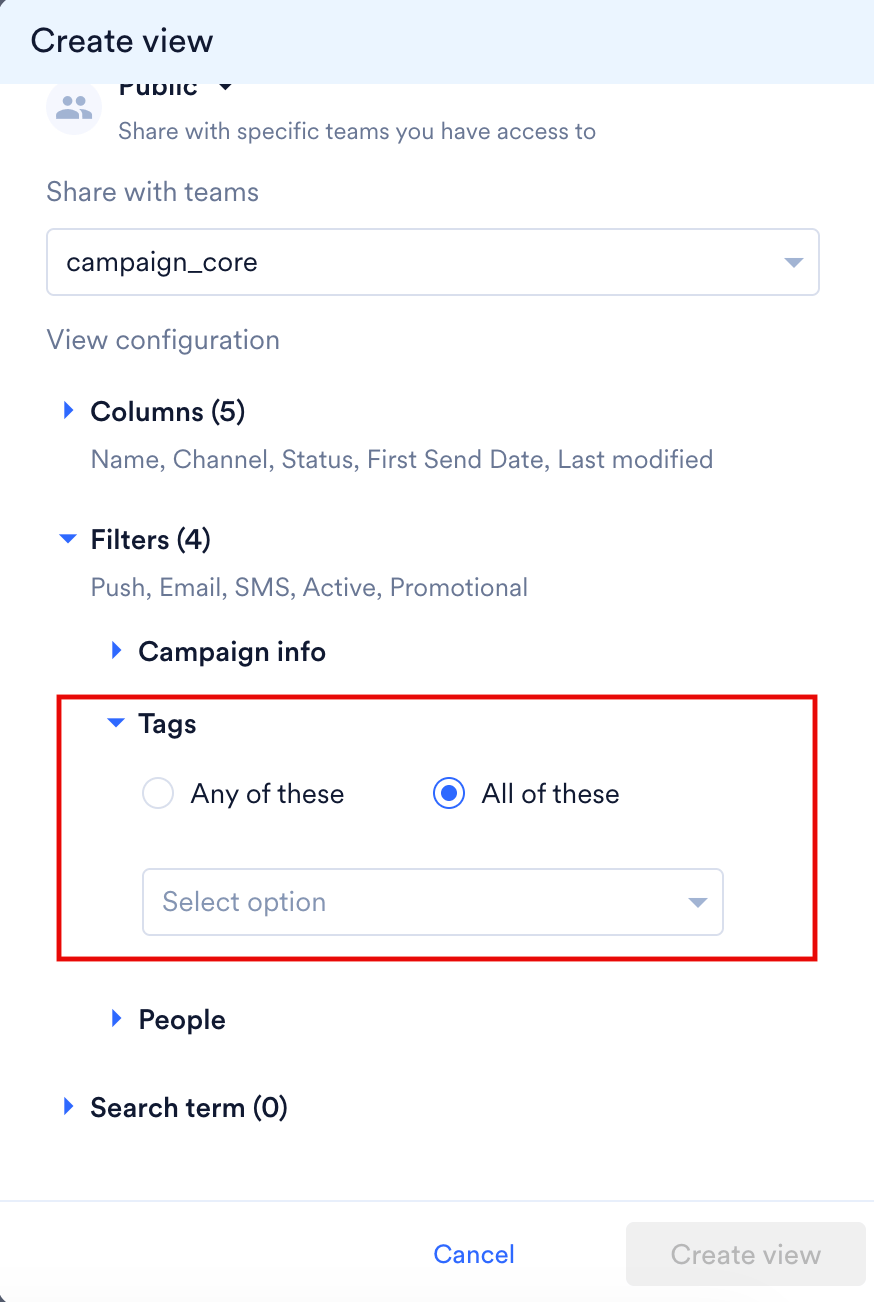 |
| Select option | Choose the specific tag(s) to filter by. | |
| People | Created by | Filter campaigns by the user who created them. 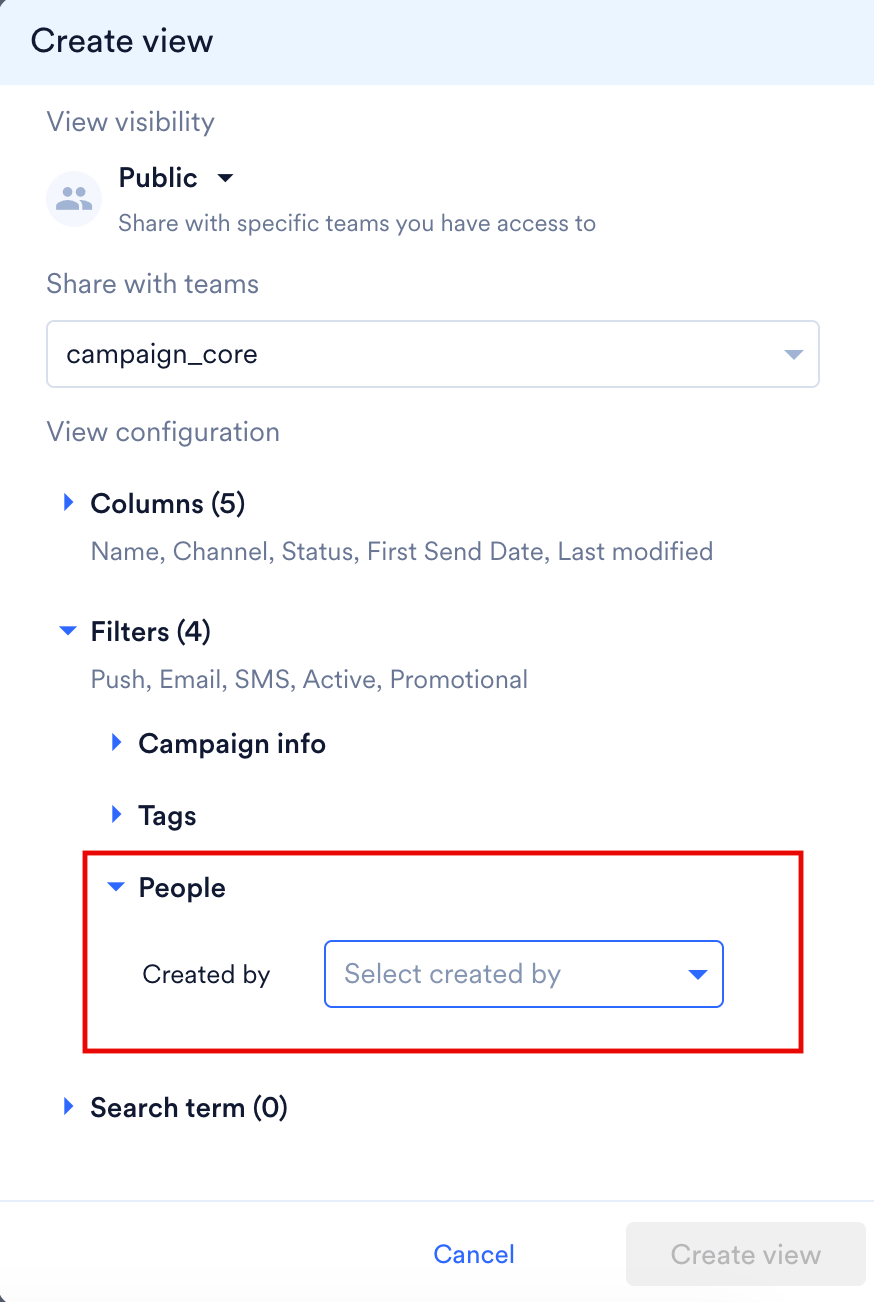 |
These are the same filter categories available in the standalone Filters side panel. For more information, refer to Advanced Filters Panel. When creating or editing a view, they’re presented inline within the Create View panel so the whole view configuration (columns, filters, search) can be set up in one place.
- Once configured, click Create view.
- The view is created and automatically loads, showing:
- The view’s name
- The filters that are applied
- The total number of campaigns matching the view
Refresh rateThe system (default) views (All, Active, Schedule, Drafts, Under Review/Rejected) refresh their campaign counts every 1 minute. Custom views that you create refresh every 60 minutes. This is because a custom view can include many filters, and running those queries against the database in real time, at scale, could slow down performance for everyone. If the campaign count in your custom view looks out of date, it should catch up within 60 minutes.
Manage Views
Click Manage views (found in the views dropdown) to open a panel where you can control every view available to you — private, team-shared, and system views.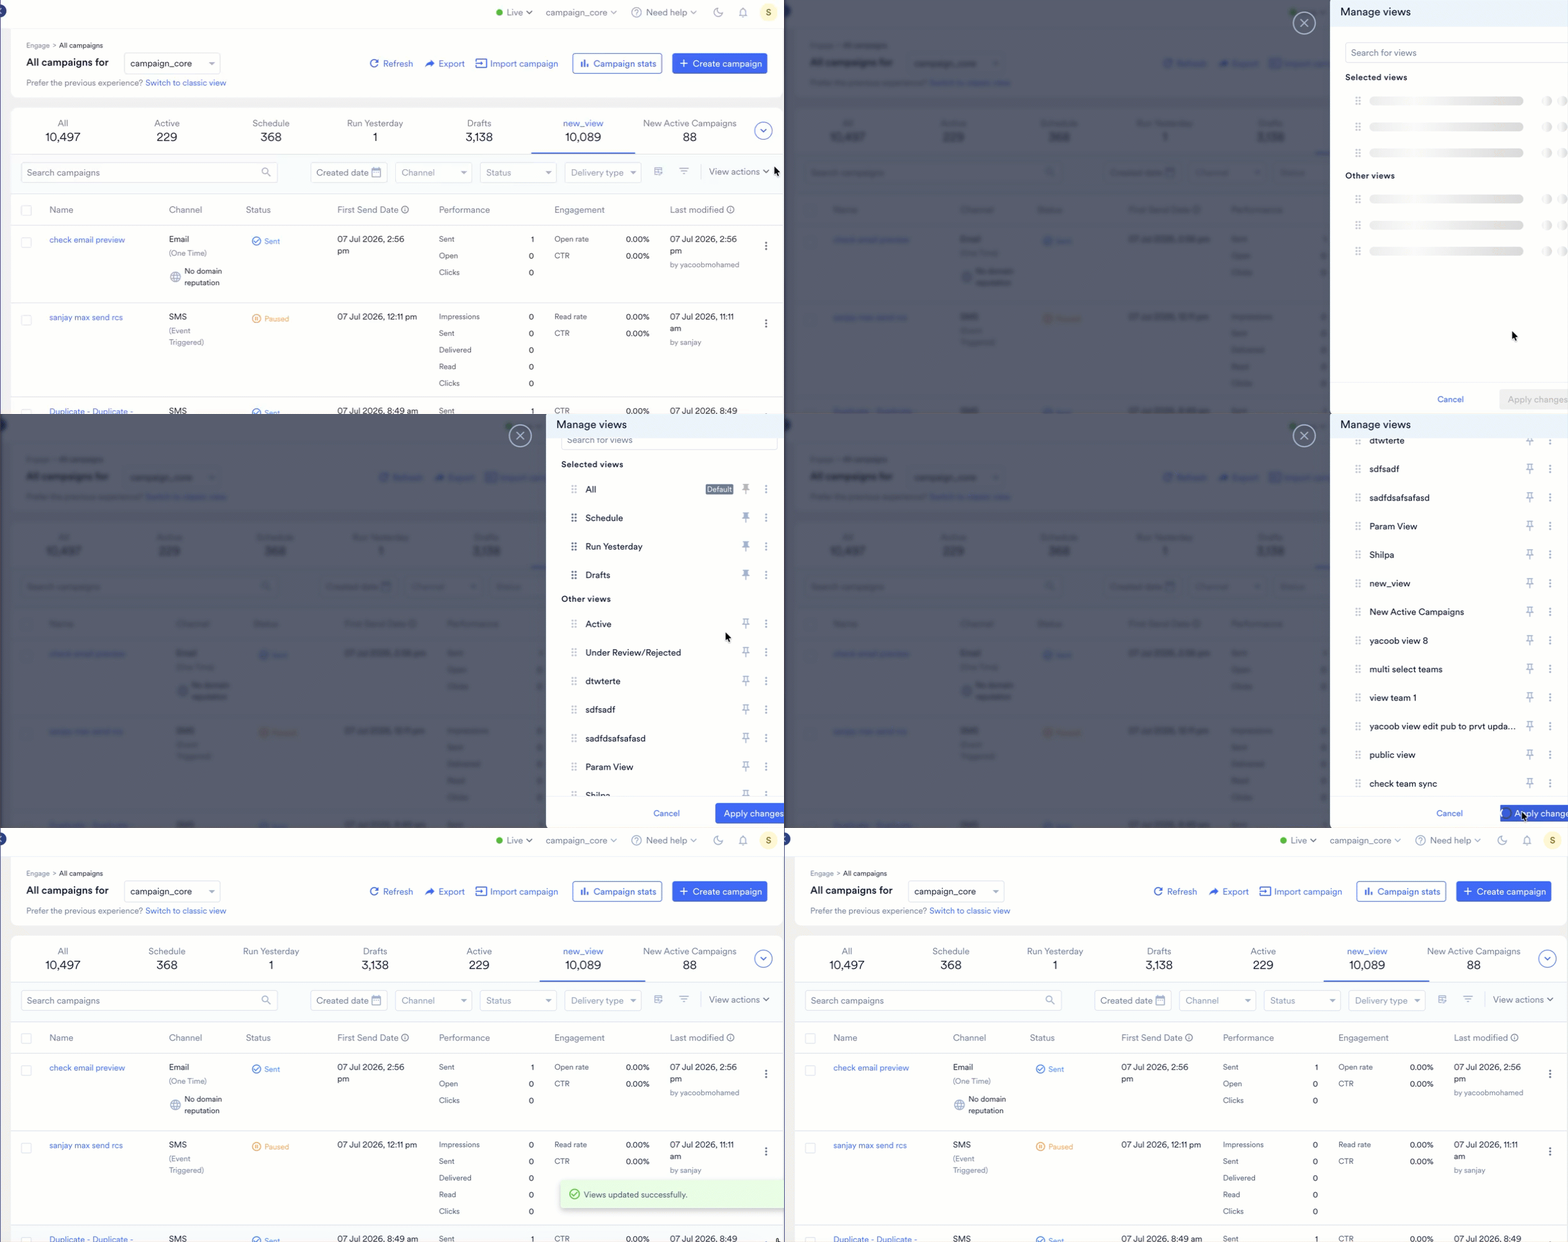
All view management actions described below (creating, editing, pinning, reordering, and setting a default) apply at the individual user level, not at the workspace level. Each user manages their own set of views independently, so changes you make here won’t affect what other users see or how their views are configured.
- Search for a view using the search box at the top.
- Reorder views: drag views using the handle icon to change the order in which they appear as tabs. This ordering is personal to you.
- Pin/unpin views: views under Selected views are the ones currently pinned as tabs on your main page. Views under Other views exist but are not pinned. Click the pin icon to move a view in or out of your pinned tab bar.
- The All view is always pinned and cannot be unpinned.
- All other views (including system views like Under Review/Rejected) can be freely pinned or unpinned based on your preference.
- Set a default view: use the three-dot (⋮) menu next to a view to mark it as Default. The default view is the one that automatically loads every time you navigate to the All Campaigns page (for example, after navigating away and returning). The current default is indicated with a Default badge. A view must be pinned before it can be set as your default, if a view is unpinned, the option to mark it as default won’t be available.
- Edit a view: use the three-dot menu to modify a view’s filters, columns, or visibility. System views cannot be edited.
- Delete a view: also available from the three-dot menu. You can only delete views that you created yourself; system views and views created by other users cannot be deleted.
- Click Apply changes to save your pinning/reordering updates, or Cancel to discard them.
Pinned views vs. session views: If you temporarily bring up a view that isn’t pinned (for instance, by applying a one-off filter), it will appear in your tab bar only for that session. Once you navigate away to another page and come back, only your pinned views (and your default view) will be shown again.
Editing an Existing View (View Actions)
If you modify the filters or columns of a view you’ve already saved (without creating a brand-new one), a View actions option appears with three choices: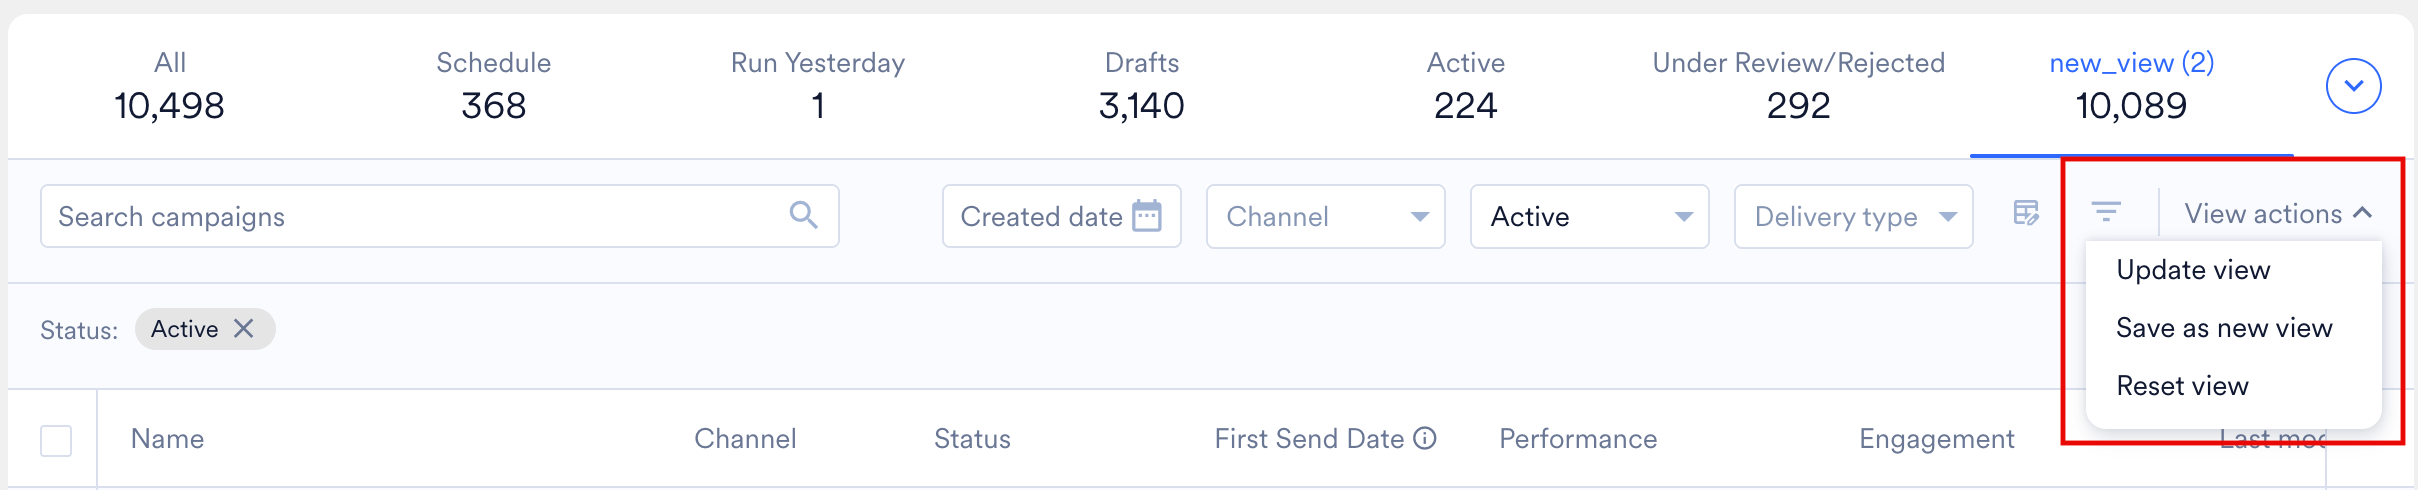
Change Visibility (Private ↔ Public)
You can change a view’s visibility at any time:- Open Manage views.
- Select the view and choose to edit it.
- Change the View visibility setting:
- Private → Public: If your workspace uses teams, you’ll need to select which team(s) to share it with. The Share with teams only lists the teams associated with that specific view, not every team you belong to. If there are no teams, the view becomes visible to the entire workspace.
- Public → Private: The view becomes visible only to you again; other users lose access.
- When switching to Public in a team-based workspace, all currently selected teams are pre-selected by default. You can deselect any team you no longer want to share the view with.
View Limits
- A workspace can have a maximum of 100 views in total, combined across all users.
- Once this limit is reached, no user in the workspace can create a new view until an existing one is deleted. You’ll see a message indicating the workspace’s view limit has been exhausted.
Multi-Team Selection
With multi-team selection, you can:- Select multiple specific teams (rather than only “one” or “all”) to filter the campaign list down to exactly the teams you care about. This is especially useful when building a view for a specific group of teams. For example, selecting Team A and Team B together, then saving that combination as a shared view for those teams.
Show Archived Campaigns
At the top of the campaign list, a Show archived campaigns toggle lets you decide whether archived campaigns appear alongside your other campaigns.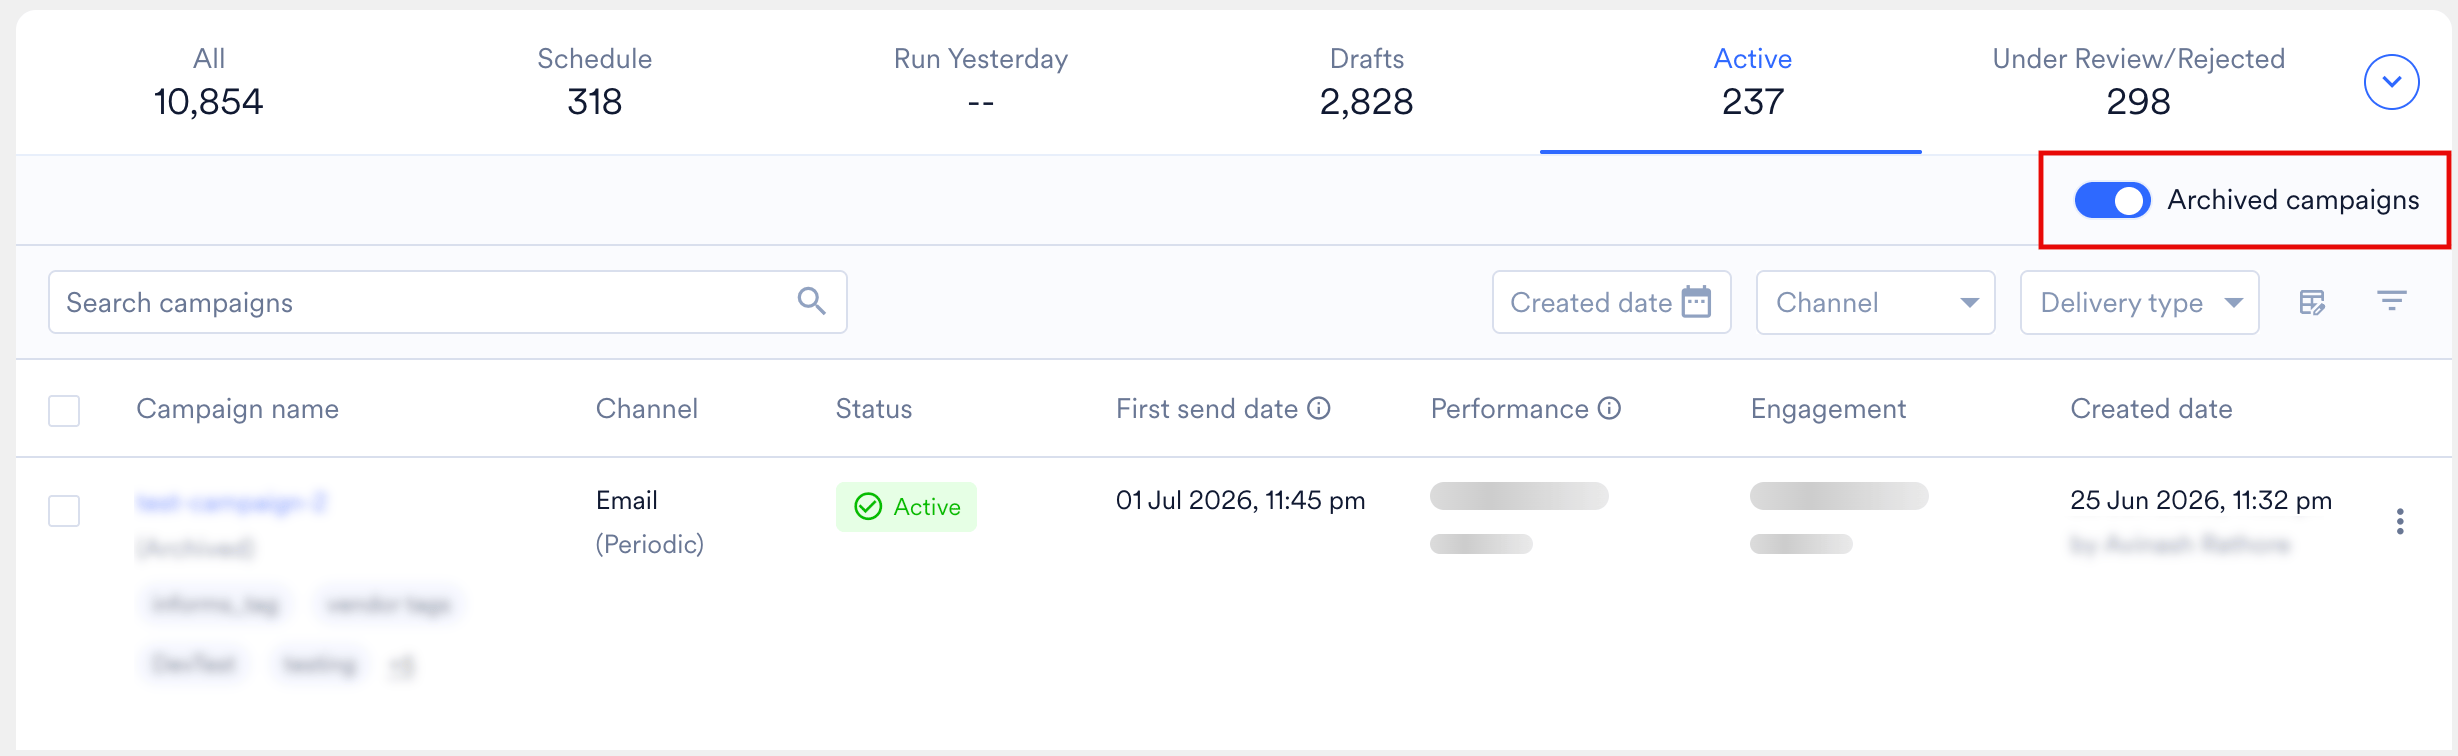
- Toggle ON: Archived campaigns are included in the campaign list along with your other campaigns (Sent, Scheduled, Active, Draft, and so on). They aren’t shown in a separate group, they appear inline with the rest of the campaigns and follow the same default sorting (last Created, newest first). Because archived campaigns often haven’t been modified recently, they may appear lower down the list, or higher up if they were archived recently.
- Toggle OFF: Archived campaigns are hidden from the list.
- The Show archived campaigns toggle affects only the visibility of archived campaigns in the current list. It does not archive or unarchive any campaign on its own.
- Card campaigns cannot be archived. For more information, refer to Cards Overview.
Auto-archival of Campaigns in Final States
Campaigns that reach a final state are automatically moved to the Archive state 6 months after the date they entered that state. The final states covered by auto-archival are:- Sent
- Stopped
- Expired
- Auto-archival applies only to campaigns in the Sent, Stopped, or Expired states. Campaigns in Active, Scheduled, Draft, or Under Review states are not affected.
- If you rely on Sent campaigns being visible in your reports or views, make sure to turn on Show archived campaigns when reviewing older campaigns (older than 6 months from their final-state date).
Search and Filters
Below the views/tabs row, the All Campaigns page provides several ways to narrow down the campaign list:Quick Filter Bar
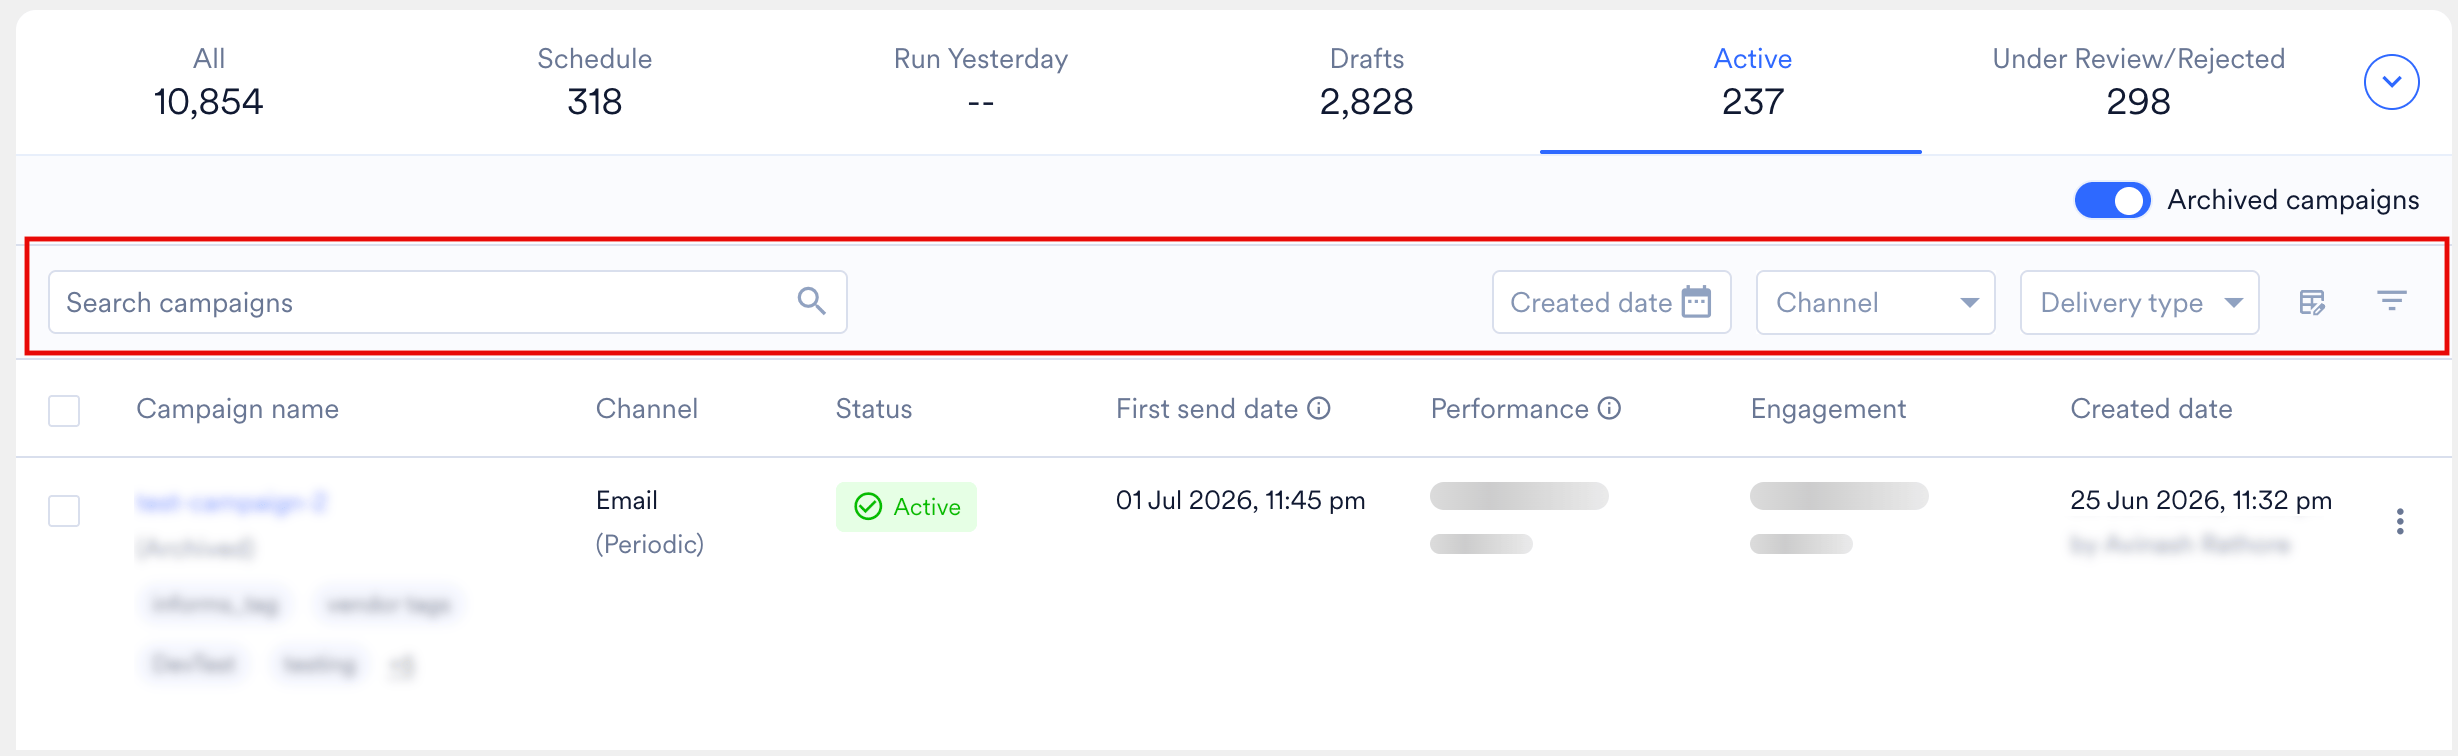
Recent Searches
When you click into the Search campaigns box, a dropdown shows your recent search terms, so you can quickly reapply a past search without typing it again.
- Personal to you: Recent searches are tracked on a per-user basis. The terms shown come from your own search activity only, they aren’t shared with or visible to other users, even within the same team.
- Up to 5 terms: The dropdown shows your 5 most recent search terms. Once you perform a new search, the oldest entry is dropped so the list always reflects your last 5 searches.
- Only successful searches are saved: A search term is added to your Recent searches list only if that search returned at least one matching campaign. If a search returns zero results, the term is not saved to your recent search history.
You can’t remove an entry from the Recent searches list manually. The list updates automatically as you perform new, successful searches.
Advanced Filters Panel
Click the filter () icon to open the full Filters side panel. Filters here are organized into expandable categories — more categories and filters will be added over time as new filtering needs arise. Currently available categories: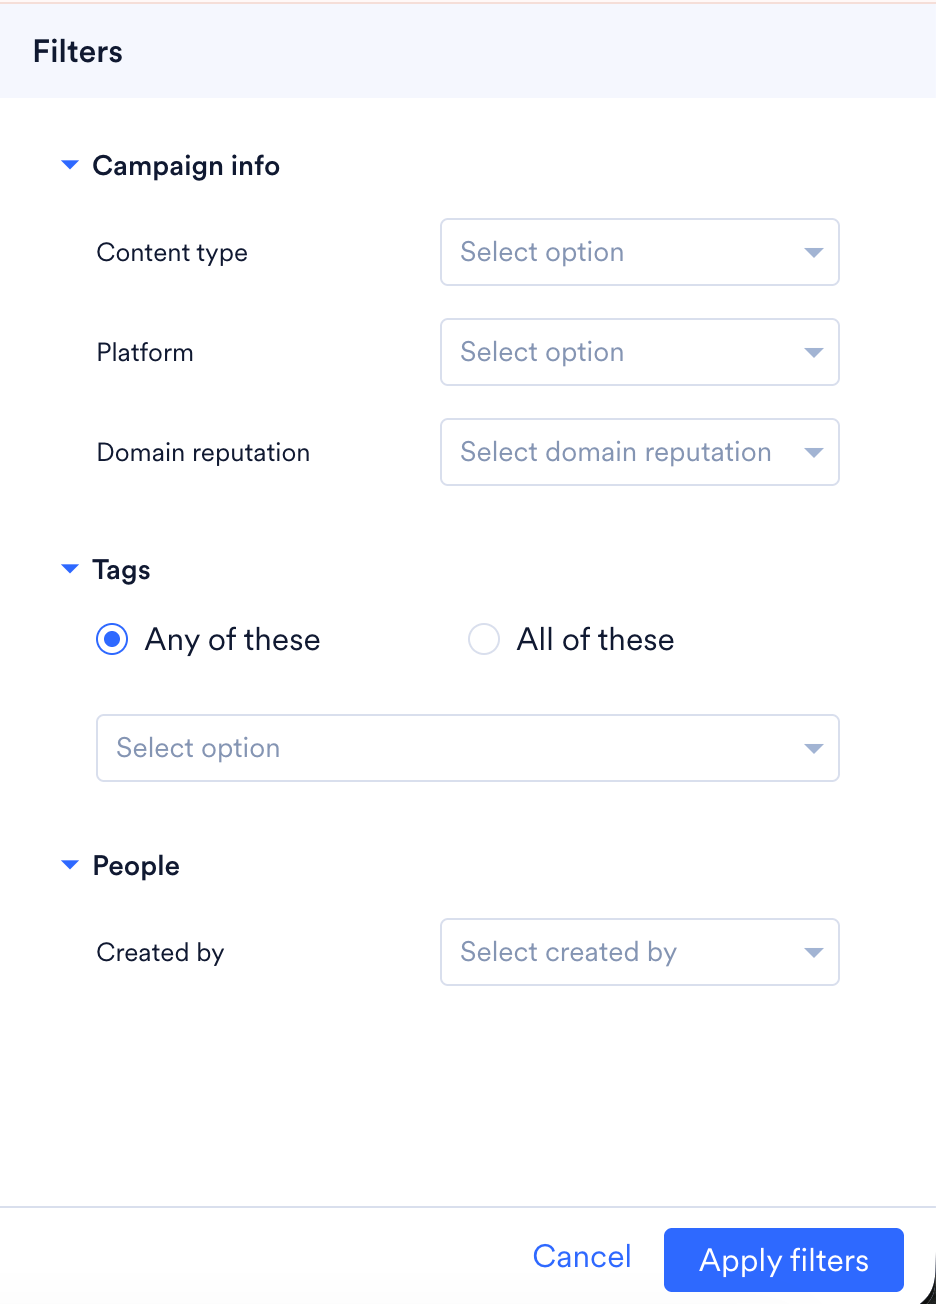
Tags
People
After you’ve set your desired filters, click Apply filters to update the campaign list, or Cancel to discard.
Dynamic Columns
Previously, every user saw the same fixed set of columns on the All Campaigns page. Dynamic Columns lets each user personalize exactly which data points they want displayed. This is a per-user setting.
Manage Columns
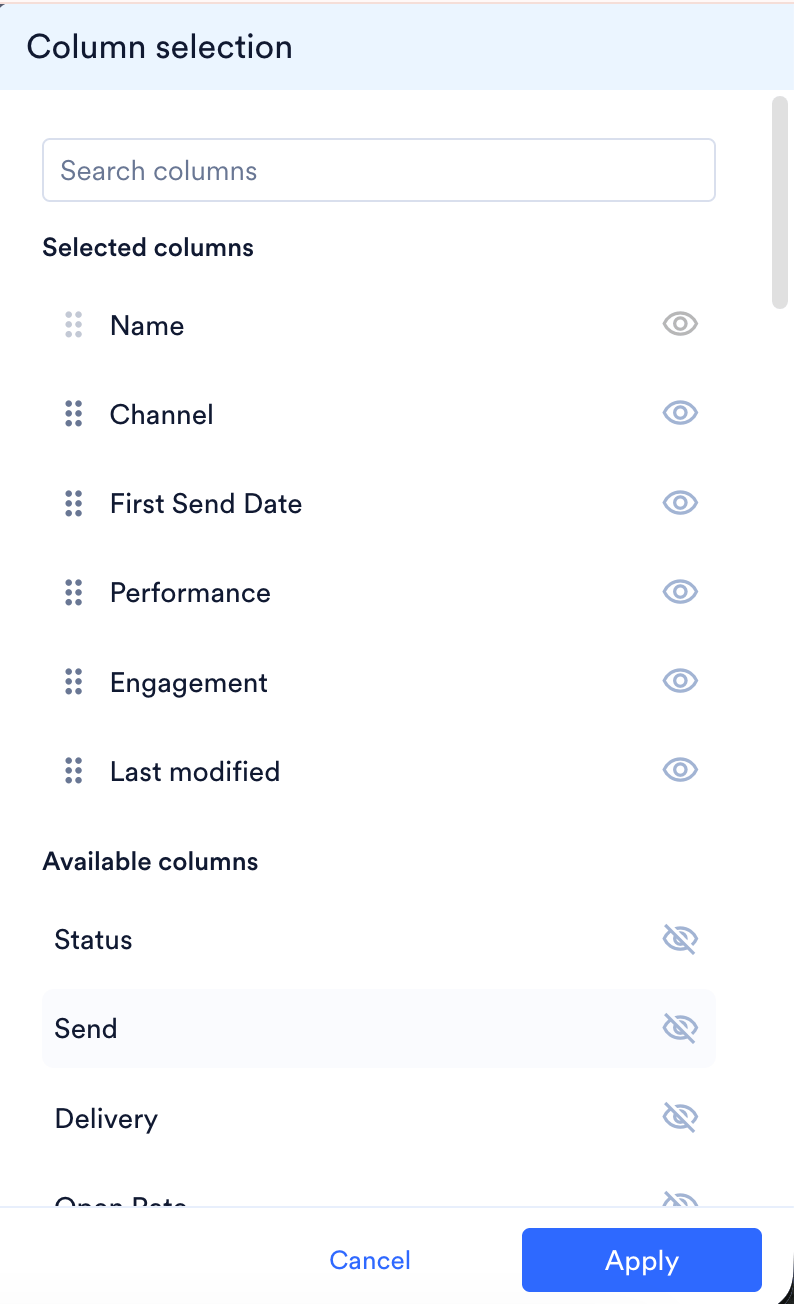
- Click the column selection icon near the filter bar to open the Column selection panel.
- The panel is split into two lists:
- Selected columns: currently visible on your table. Each has:
- A drag handle (⠿) to reorder columns, the order here determines the left-to-right order in the table.
- An eye icon: click to hide (remove) that column from the view. Once removed, the column moves to Available columns.
- Available columns: columns not currently shown. Each has a crossed-out eye icon: click to add (show) that column,which moves it into Selected columns.
- Selected columns: currently visible on your table. Each has:
- Use the Search columns box to quickly find a specific column by name.
- Click Apply to save your column selection to the current view, or Cancel to discard changes.
Available Column Options
Depending on your data, columns you can add include (non-exhaustive): Campaign name, Channel, Status, First send date, Performance, Engagement, Created date, Send, Delivery, Open Rate, Conversions, Approved by, Trigger event name, Custom segment, Scheduled on, Created on, Estimated audience count, and Team (visible only in team-based workspaces).Default Columns per Tab
Each system tab now ships with a different, tab-relevant default column set, rather than one identical set across all tabs. This makes each tab more readable and surfaces only the information that matters for that campaign state.- If you don’t want the tailored column sets, you can toggle back to a simpler, unified view using the Switch to classic view provided at the top of the table.
- Estimated audience count refreshes every 24 hours and reflects an estimate, not the exact audience size at send time. If you need an accurate count, check this closer to when the campaign is scheduled to go out.
- For a periodic (recurring) campaign, hover over its First Send Date to see when the next instance is scheduled to go out and when the last instance was sent. This hover detail is only available for periodic campaigns.
Understanding the Data Table Fields
The main table lists your campaigns as rows. Below is an explanation of the fields you may encounter (the exact columns shown depend on your active view/tab — see Dynamic Columns):
Default Sorting
All views, system (default) views and any custom views you create, are sorted by Created Date by default.Bulk Actions
Bulk Actions let you perform the same operation on multiple campaigns at once, instead of opening each campaign individually.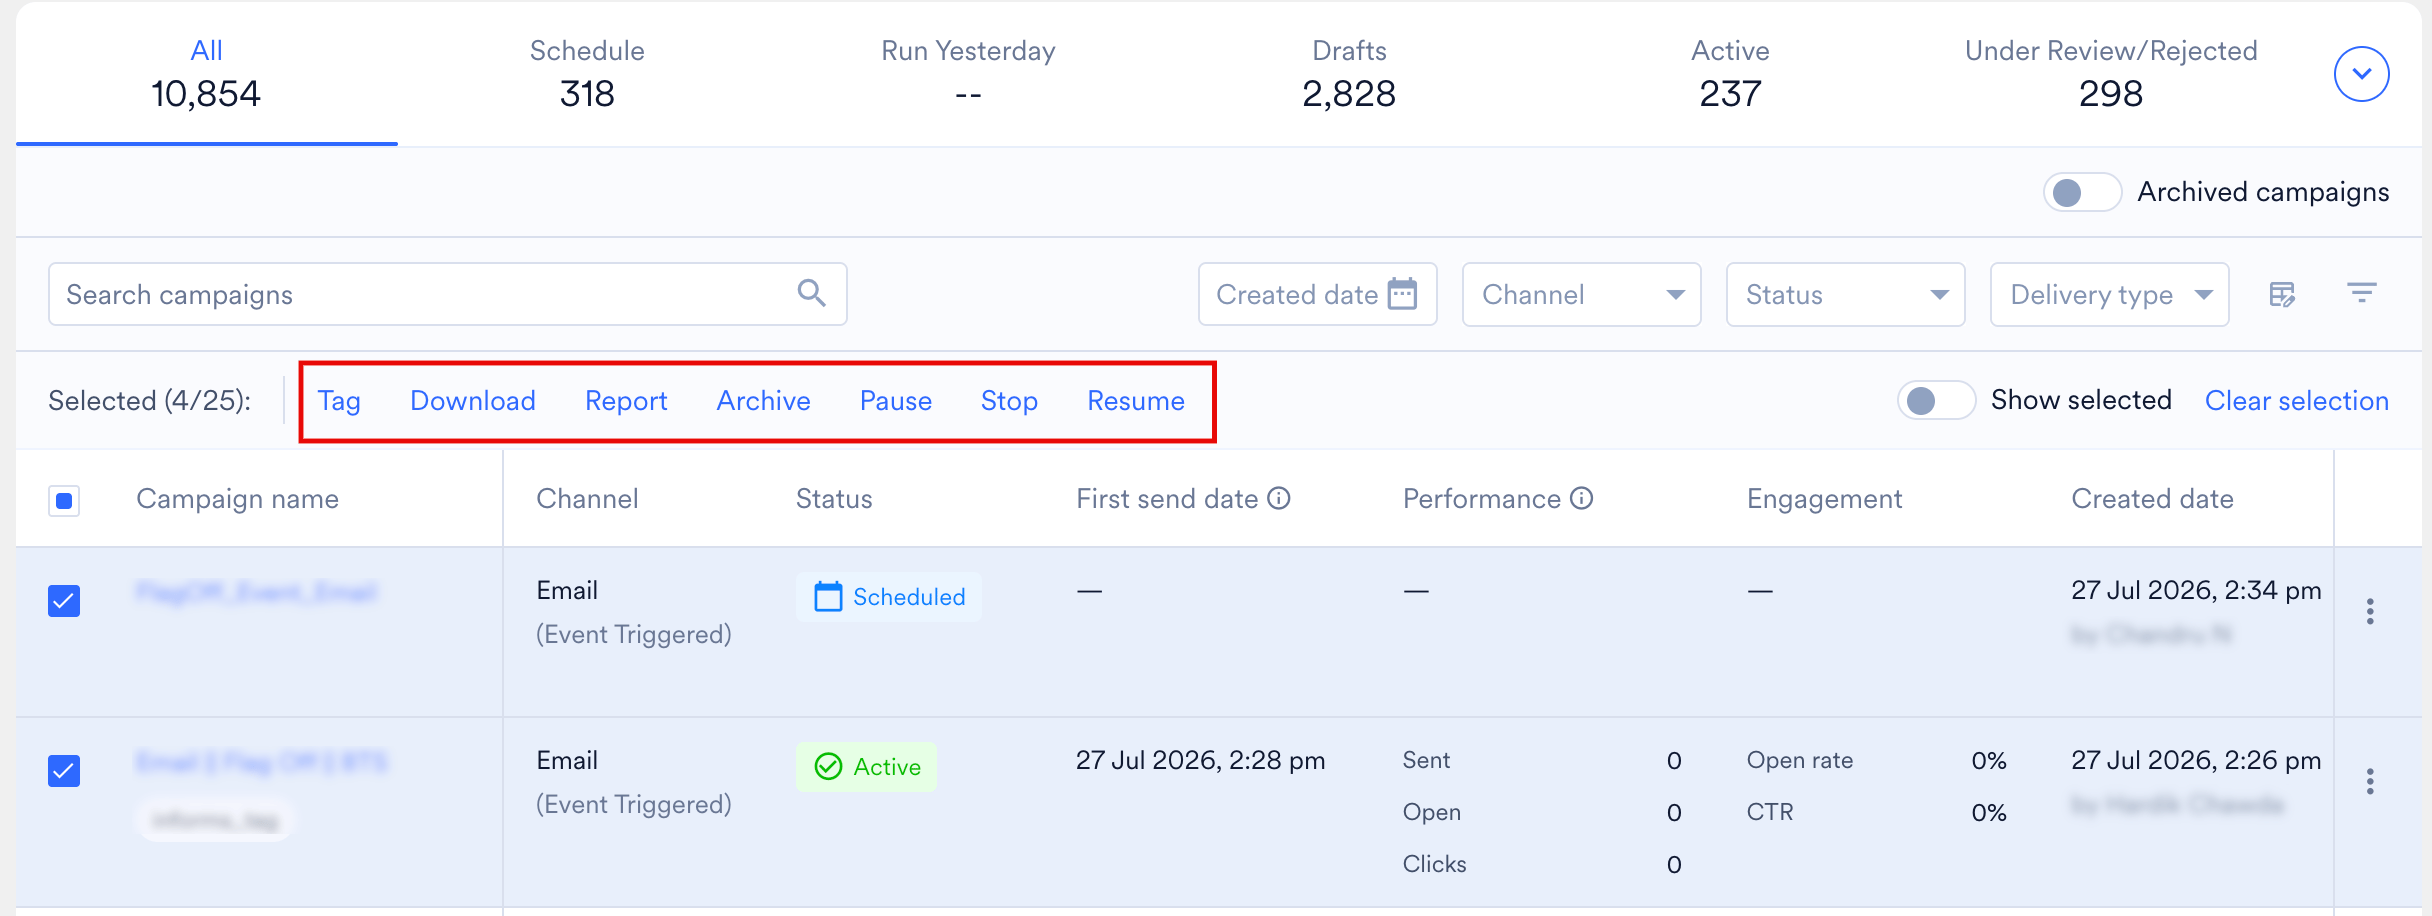
You can select up to 50 campaigns at a time for a bulk action. If you need to act on more than 50 campaigns, run the bulk action in multiple batches (for example, split 100 campaigns into two batches of 50).
Select Campaigns
- Use the checkboxes on the left of each row to select one or more campaigns.
- Once at least one campaign is selected, an action bar appears showing Selected (X/Total) along with the available actions.
- Use Show selected (toggle) to filter the table down to only the campaigns you’ve currently selected. This is useful for reviewing your selection before running an action.
- Use Clear selection to deselect all campaigns and reset the action bar.
Available Bulk Actions
| Action | Description |
|---|---|
| Tag | Apply one or more tags to all selected campaigns at once. |
| Download | Downloads a CSV file containing the columns currently visible on your screen, for the selected campaigns. This is a quick export of only the on-screen data. |
| Report | Navigates you to the Reports page with the selected campaigns and their channels pre-loaded — no need to reselect campaigns. Reports include a much more detailed set of columns than Download, such as content and delivery-funnel details. |
| Archive | Archives all eligible selected campaigns. Campaigns not eligible for archiving are skipped. |
| Pause | Pauses all eligible selected campaigns (e.g., active campaigns). If some selected campaigns can’t be paused (for example, they’re already sent), only the eligible ones are paused, and you’re shown how many will be affected before confirming (e.g., “3 of 6 campaigns can be paused”).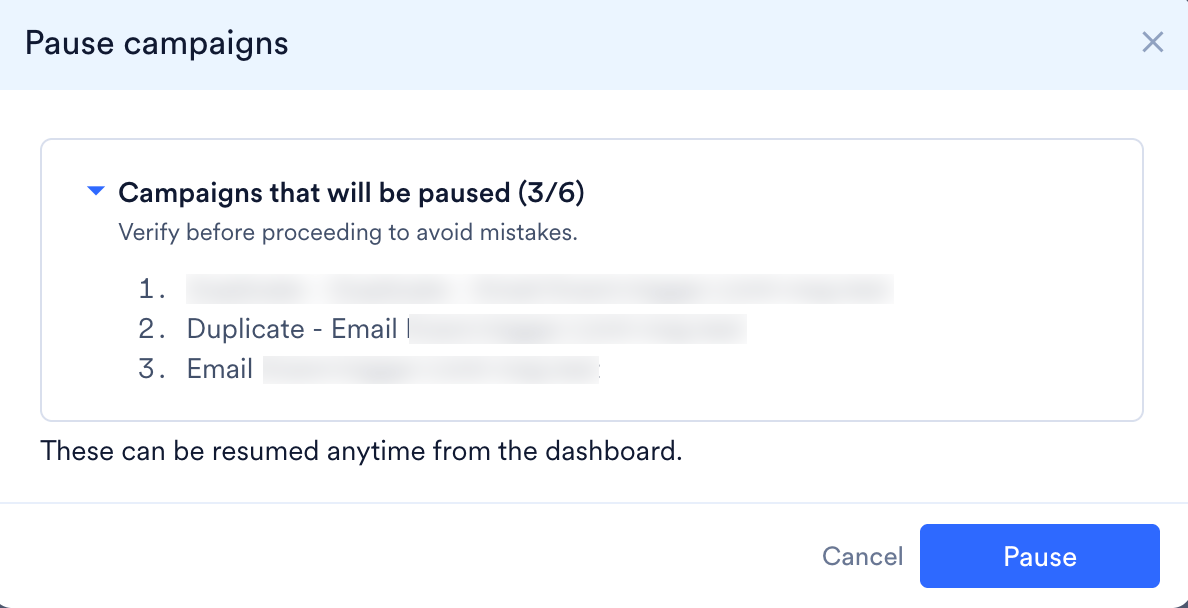 |
| Stop | Stops all eligible selected campaigns, following the same eligibility logic as Pause. |
| Resume | Resumes previously paused campaigns, where eligible. |
Tab-Dependent Availability
The set of bulk actions shown in the action bar changes depending on which tab (view) you’re in, since not every action makes sense for every campaign state. For example, Resume never appears in the Schedule tab because a scheduled campaign hasn’t started yet, and Delete only appears in the Drafts tab because it’s the only tab where all campaigns are safely removable. The table below shows which bulk actions are available in each system tab:- On the All tab, every bulk action is available. Eligibility is evaluated per campaign at execution time — for example, if you select a mix of Sent and Active campaigns and click Pause, only the Active ones are paused, and you’re shown a confirmation like “3 of 6 campaigns can be paused” before running.
- On tabs that contain only one class of campaigns (Schedule, Drafts, Under Review/Rejected), the action bar is narrowed to just the actions that make sense for that state. For instance, Report doesn’t appear on the Schedule tab because scheduled campaigns haven’t sent yet and have no reporting data.
- Delete is only exposed as a bulk action on the Drafts tab, in line with the row-level menu.
- Download gives you the basic set of columns you already see on the UI, in CSV format.
- Report gives you a full, detailed report including content and delivery-funnel information for the selected campaigns and channels.
Row Level Actions
The three-dot menu shows a different set of actions depending on the campaign’s current status:- Stop, Pause, and Resume are mutually exclusive — you’ll only see one at a time based on the campaign’s current status (Scheduled → Stop, Active → Pause, Paused → Resume).
- Delete is only available for Draft campaigns. Once a campaign is scheduled or activated, it can no longer be deleted; use Stop and Archive instead.
- Edit is not available once a campaign has entered an approval or terminal state (Under Review, Sent, Stopped, Rejected). Use Duplicate to create a new campaign based on the original.
- Sent, Stopped, and Rejected campaigns all show the same set of read-only actions: View, Copy Link, Duplicate, and Archive.
Permissions and Roles
The actions available to you on the All Campaigns page — both in the ⋮ menu on individual campaigns and in the Bulk Actions bar — depend on your role in the workspace. If your role doesn’t have permission for an action, the action will not appear. There are two categories of roles:- System roles: pre-defined roles that ship with MoEngage (Admin, Manager, Marketer, Developer, Analyst). Their permissions are fixed and cannot be modified.
- Custom roles: roles configured by your workspace’s Admin with a specific set of permissions. What a user with a custom role can do depends entirely on which permissions were granted when that role was set up. For more information on roles and how to configure them, refer to Access Roles.
Permissions by System Role
The table below maps each row-level and bulk action to the system roles that can perform it.*If the Campaign Approval Workflow (CAF) is enabled for your workspace, Marketers cannot publish campaigns directly — they must submit campaigns through the approval flow instead. Admins and Managers continue to publish directly.
Users with a custom role see actions based on the specific permissions granted when the role was created. If a permission is not enabled for the role, the corresponding action will not appear in the ⋮ menu or Bulk Actions bar.
Frequently Asked Questions
Why don't I see Views, Dynamic Columns, or Multi-Team Selection on my All Campaigns page?
Why don't I see Views, Dynamic Columns, or Multi-Team Selection on my All Campaigns page?
These capabilities are being rolled out in phases and may not be available on your account yet. Reach out to your Customer Success Manager (CSM) to request access.
Why does the campaign count on my custom view look outdated?
Why does the campaign count on my custom view look outdated?
Out-of-the-box system views refresh their counts every 1 minute, while custom views refresh every 60 minutes. This is intentional: custom views can include many filters, and running those queries in real time at scale would slow down the page for everyone. Give it up to 60 minutes to catch up.
Can other users see or be affected by changes I make to my views?
Can other users see or be affected by changes I make to my views?
No. Views and view management (creating, editing, pinning, reordering, setting a default) are scoped to your individual user account, unless you explicitly share a view as Public with a team. Your default view and pinned tabs are personal to you.
Why can't I set a view as my default?
Why can't I set a view as my default?
A view must be pinned before it can be set as your default. Pin the view first from Manage Views, then use the three-dot menu to mark it as Default.
How many campaigns can I select for a bulk action?
How many campaigns can I select for a bulk action?
You can select up to 50 campaigns per bulk action. For larger batches, split your selection and run the action multiple times.
Is the estimated audience count on the Schedule tab exact?
Is the estimated audience count on the Schedule tab exact?
No. It’s an estimate that refreshes every 24 hours, not the exact audience size at send time. Check closer to send time if you need precise numbers.
Why don't I see Edit, Stop, or Delete on a campaign?
Why don't I see Edit, Stop, or Delete on a campaign?
Two things determine which actions appear in the ⋮ menu on a campaign row: the campaign’s current status and your role’s permissions. For example, Edit doesn’t appear once a campaign is Sent or Under Review, Delete only appears for Drafts, and Stop only appears for Scheduled campaigns. If the action still isn’t showing on a campaign where you expect it, your role may not have permission for it. See Row Level Actions and Permissions and Roles for the full mapping.
Why don't all my past searches show up in Recent searches?
Why don't all my past searches show up in Recent searches?
A search term is only saved to Recent searches if it returned at least one matching campaign. Searches that return zero results aren’t added to the list, and only your 5 most recent successful searches are kept.