Interactive Walkthrough
To create an On-Site Messaging (OSM) campaign, perform the following steps:
- On the sidebar menu in MoEngage, hover over the Engage menu item
 . The Engage menu appears.
 - Click + New Campaign.
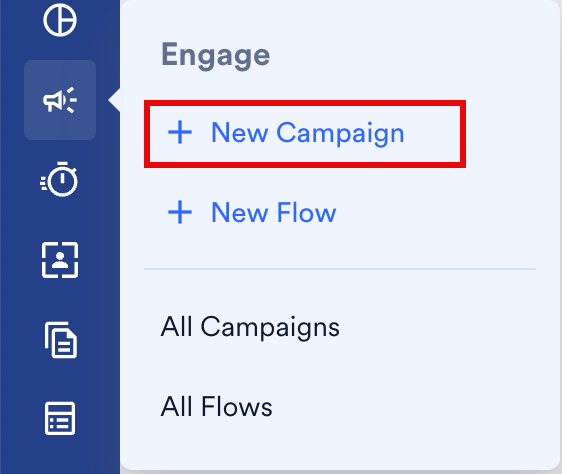
- You can also click All Campaigns on the Engage menu and then click + Create campaign on the All campaigns page.
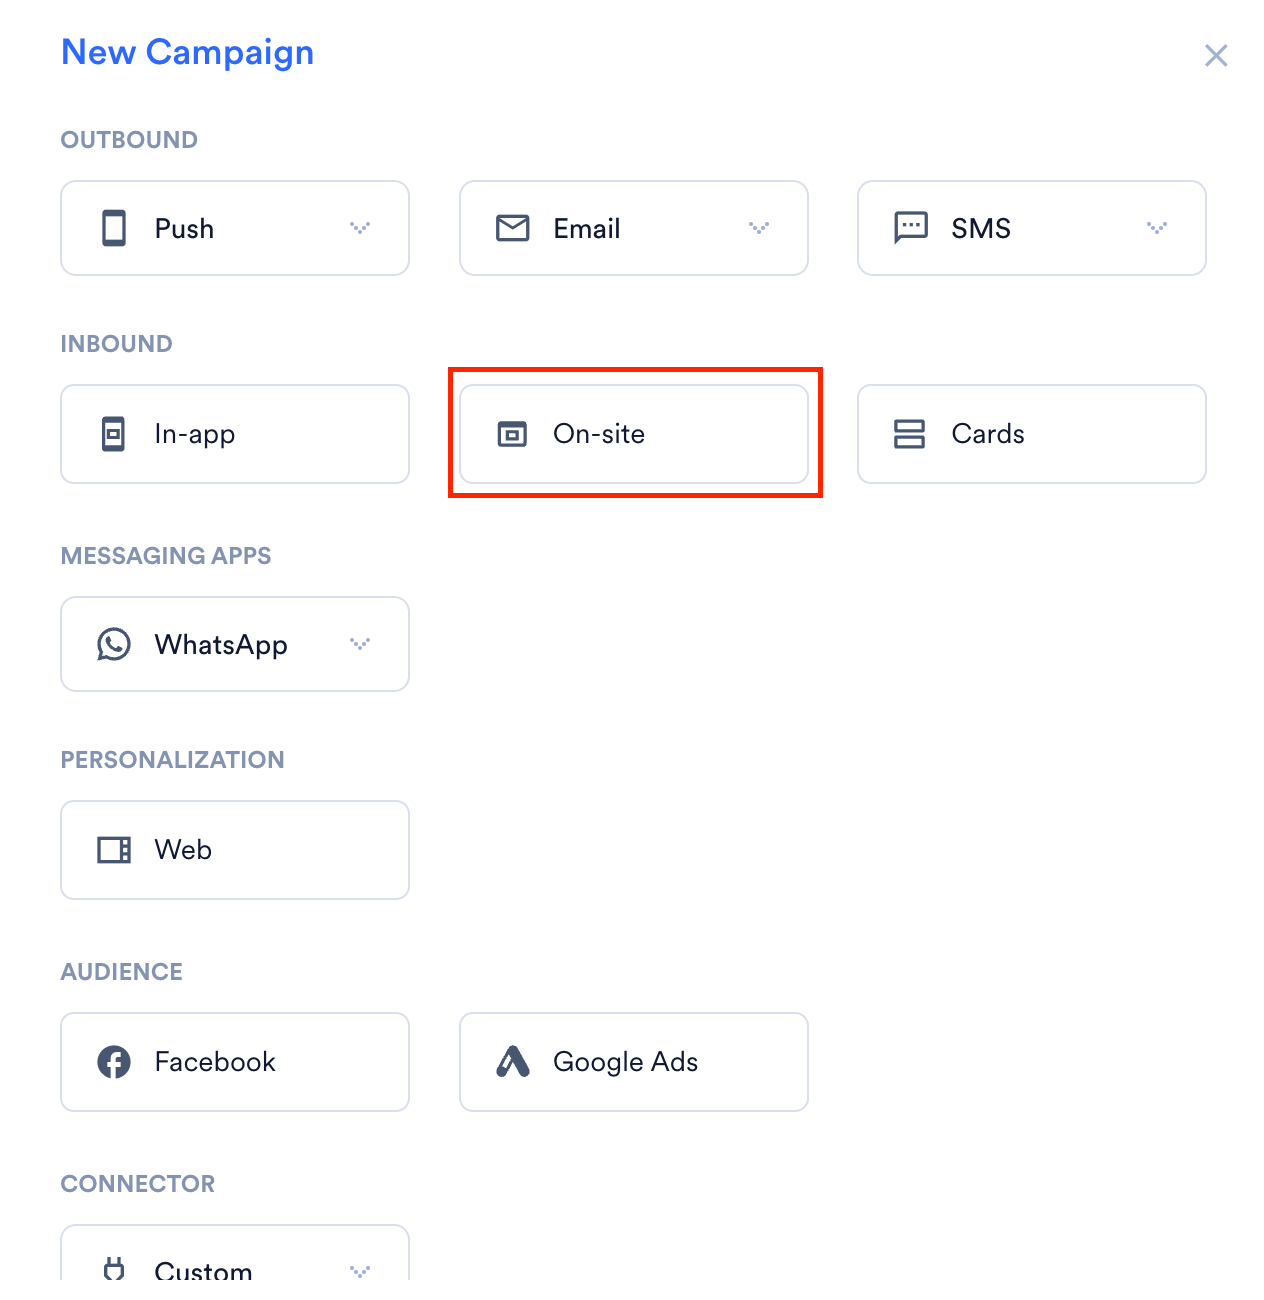
- On the New Campaign dialog box, under Inbound, click On-site.
Steps to Create an OSM Campaign
There are three steps to creating an OSM campaign, and they are:- Target users: Define the target audience for the campaign
- Content: Define the content of the push notification to be sent
- Schedule and Goals: Define the campaign’s delivery schedule and goals
Step 1: Target Users
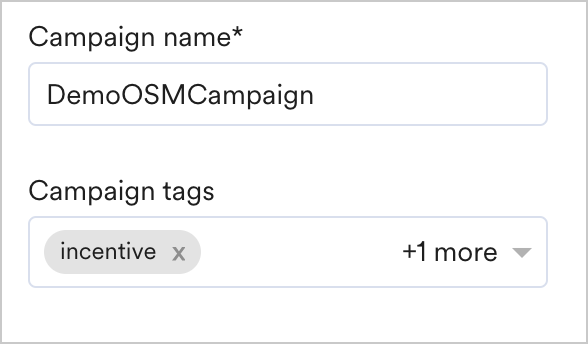
This section contains the following:Campaign details
The campaign details section contains the following fields:
|  |
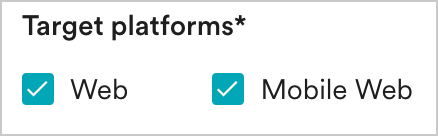
Target Platforms
This section lets you choose the target platforms for your campaign. The following options are available:
|  |
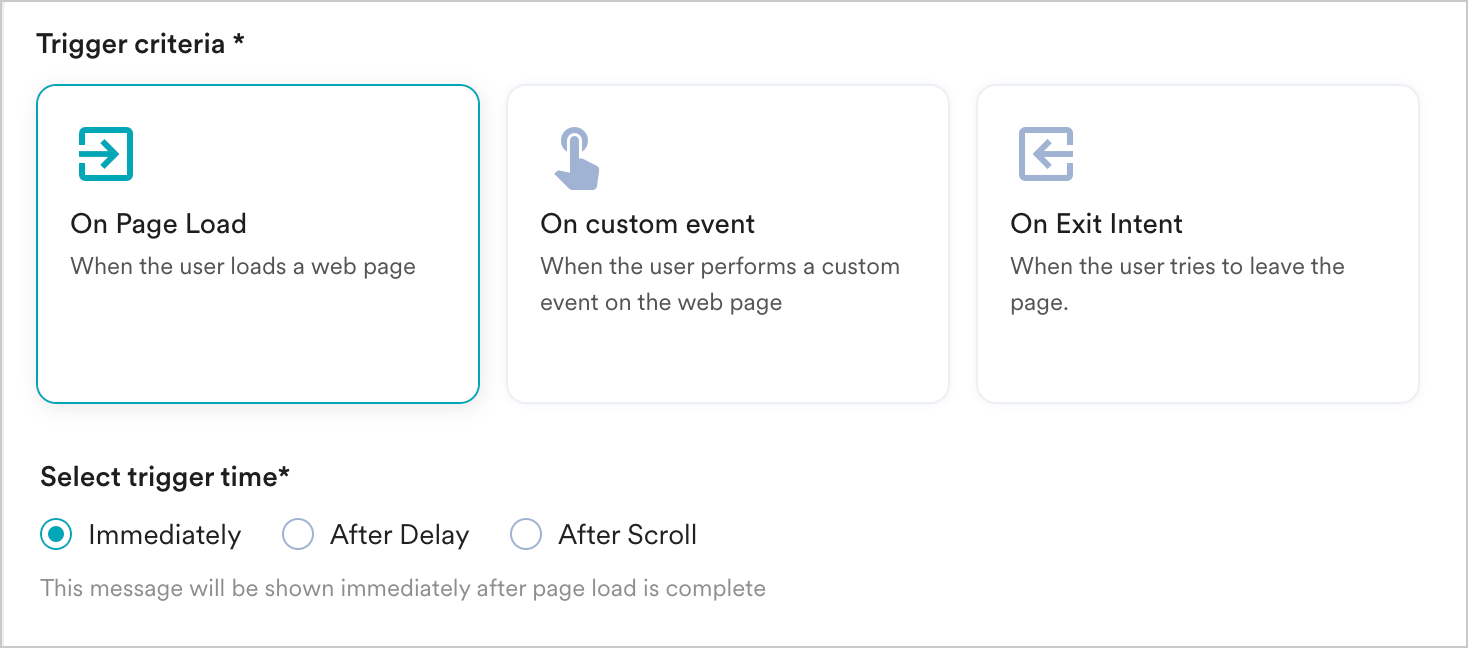
Trigger Criteria
On Page Load
Choose this option if you want to show the message as soon as the page loads on your website for the user. The following options are available:- Immediately - This option will show the OSM as soon as the page loads for the user.
- After Delay - This option will show the OSM with the specified delay. For example, if the delay is specified as 2 seconds, the OSM will be shown 2 seconds after the page load.
- After Scroll - This option will show the OSM once the user has scrolled the website by about x%. If you specify the scroll percentage as 30, the OSM will be displayed after the user has scrolled 30% of your website.
On Custom Event
You can display the On-site messages when the user performs the custom event. You can send the message immediately or after a delay using the Trigger the message option.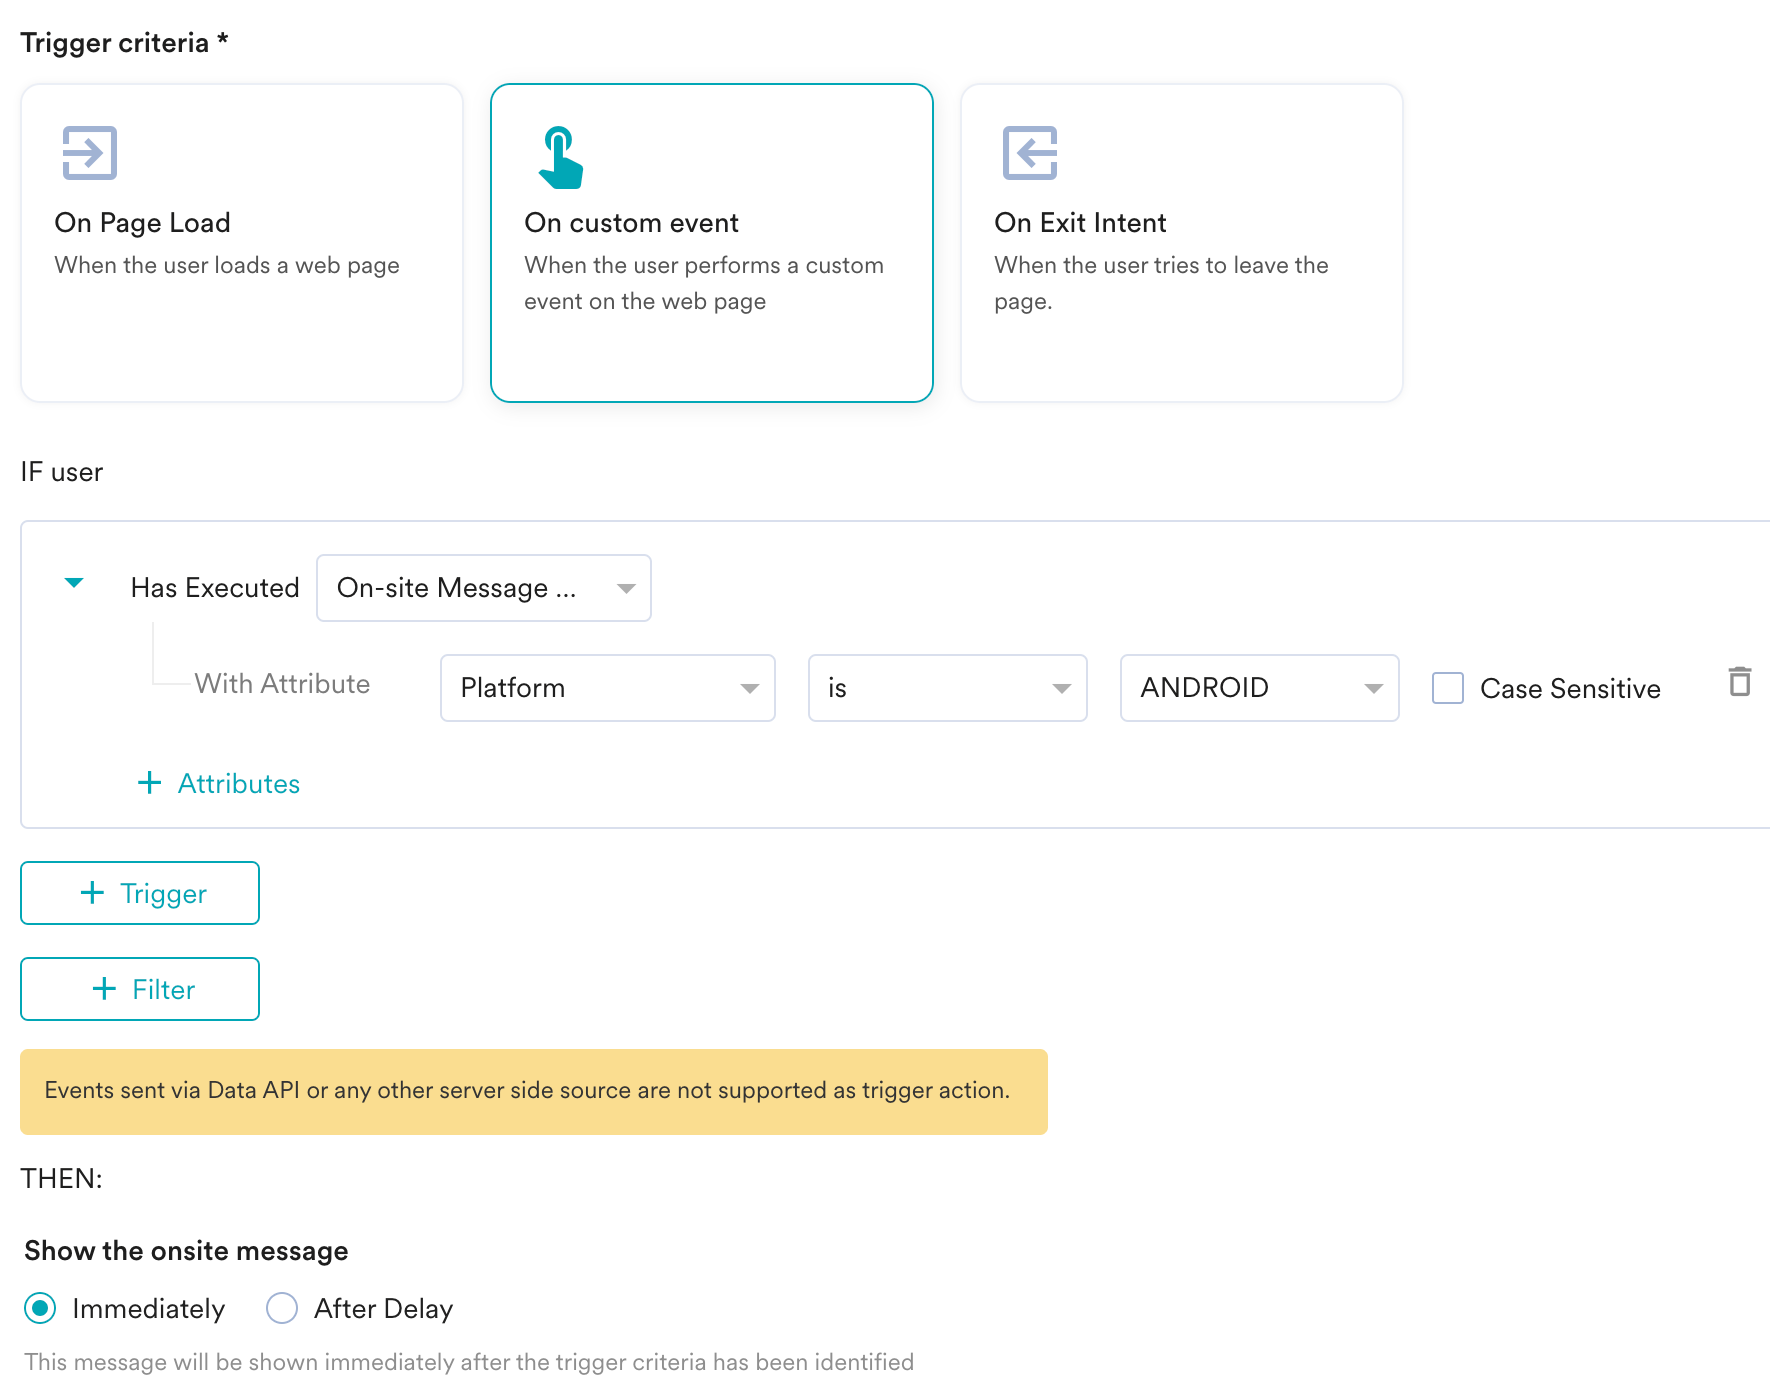
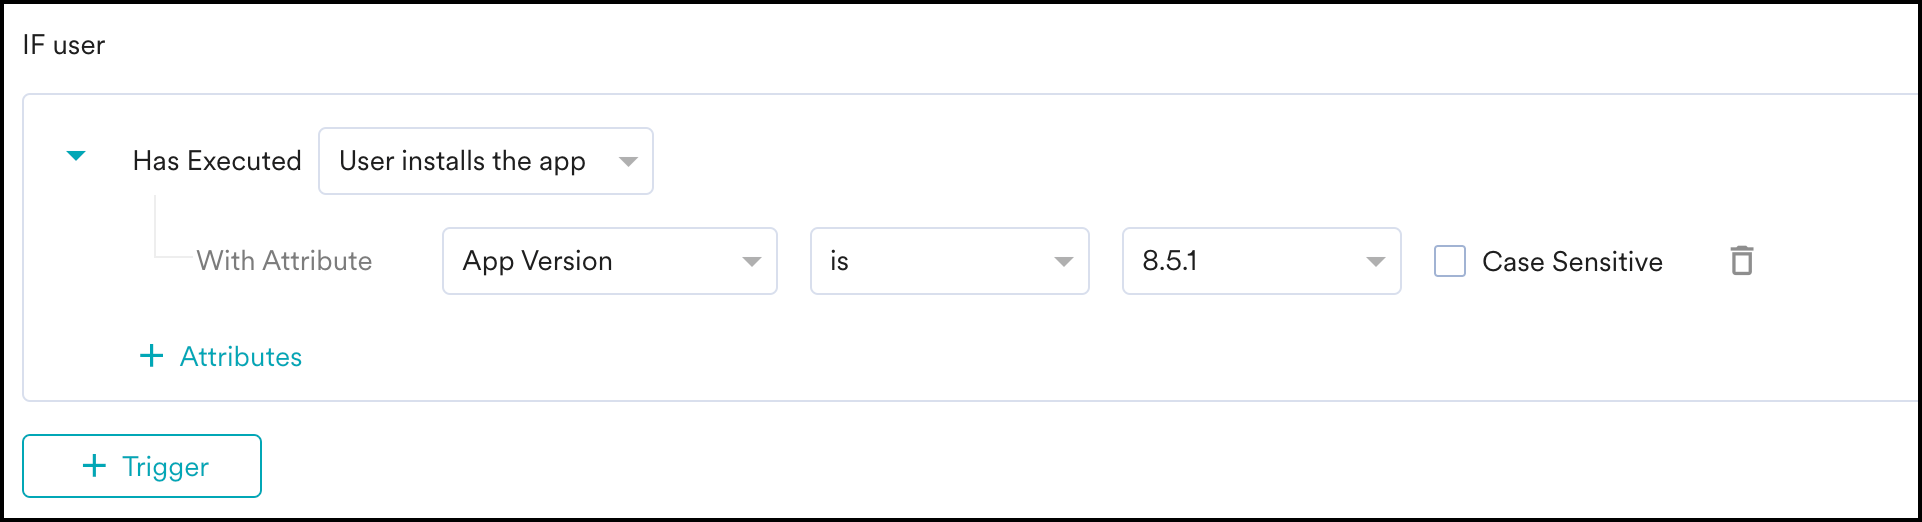
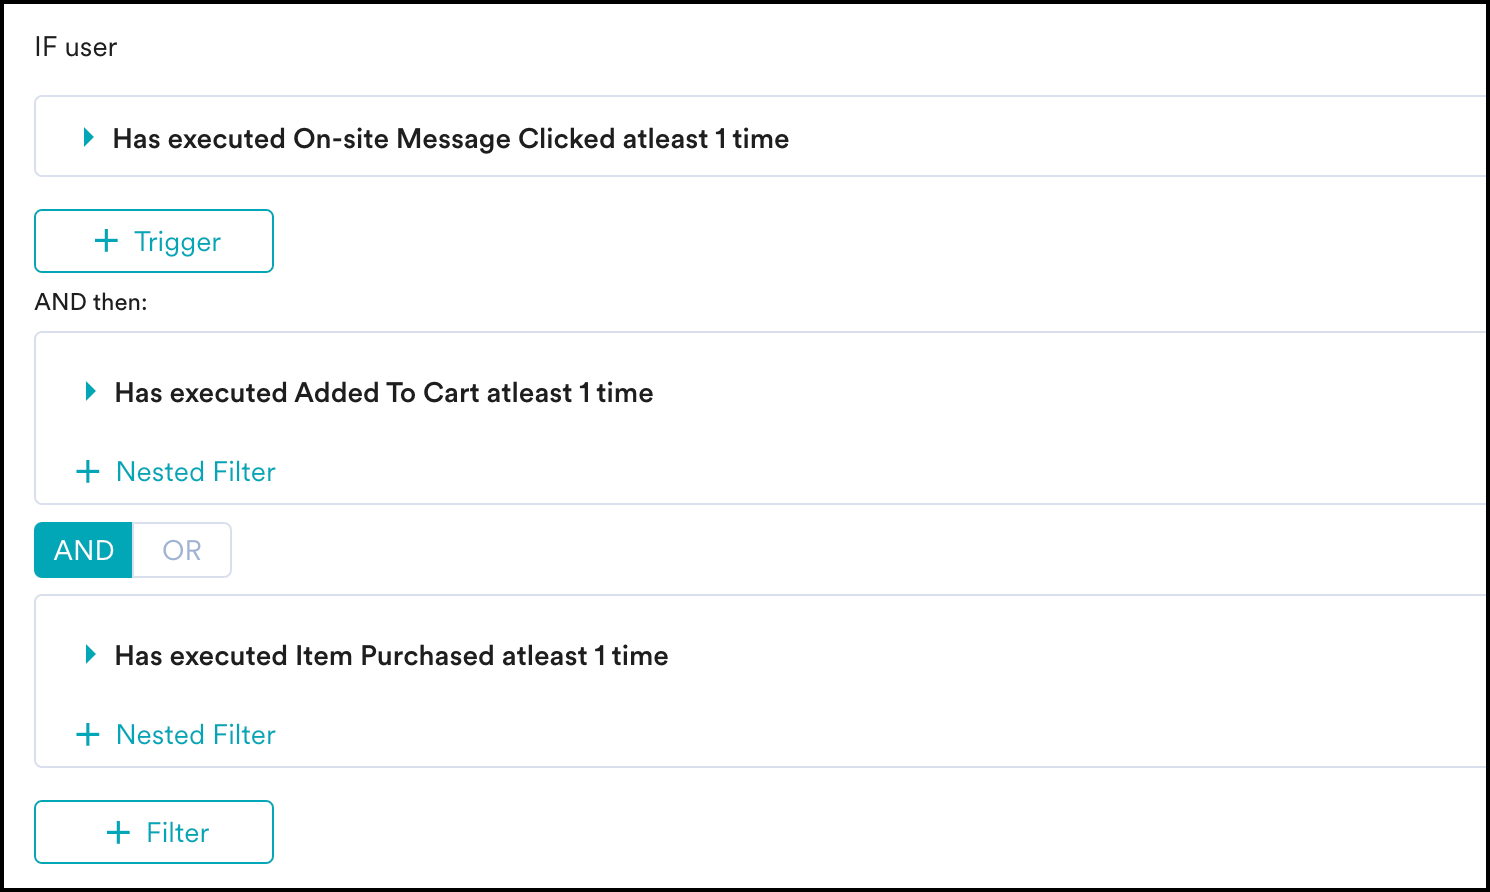
IF user
The IF usersection allows you to select an event. In the case of a single event chosen in the IF condition, if a user performs this event, then the message will get sent. However, you can add multiple events and attributes along with the IF condition. In the IF user section, do the following:- From the Select an Event drop-down, select the event.
- You can also refine the event. To do so:
- Click the Attribute button to add attributes to the filter and select the logical drop-downs for the attribute.
- To add more attributes, do the following
- Click + Attribute button
- Click AND or OR
- From the Attribute drop-down, select the respective attributes and the logical drop-downs for the selected attribute.
AND then
You can now have more customization with the And/ Then feature. In addition to the + Triggeroption, the + Filterbutton allows you to string multiple events together. For instance, you can select the On-site Message Clicked event and then use the **AND then **option to add the Added to Cart event. By doing this, the On-site message will be shown to users who have clicked on an On-site message campaign at least once and then proceeded to add an item to their cart at least once.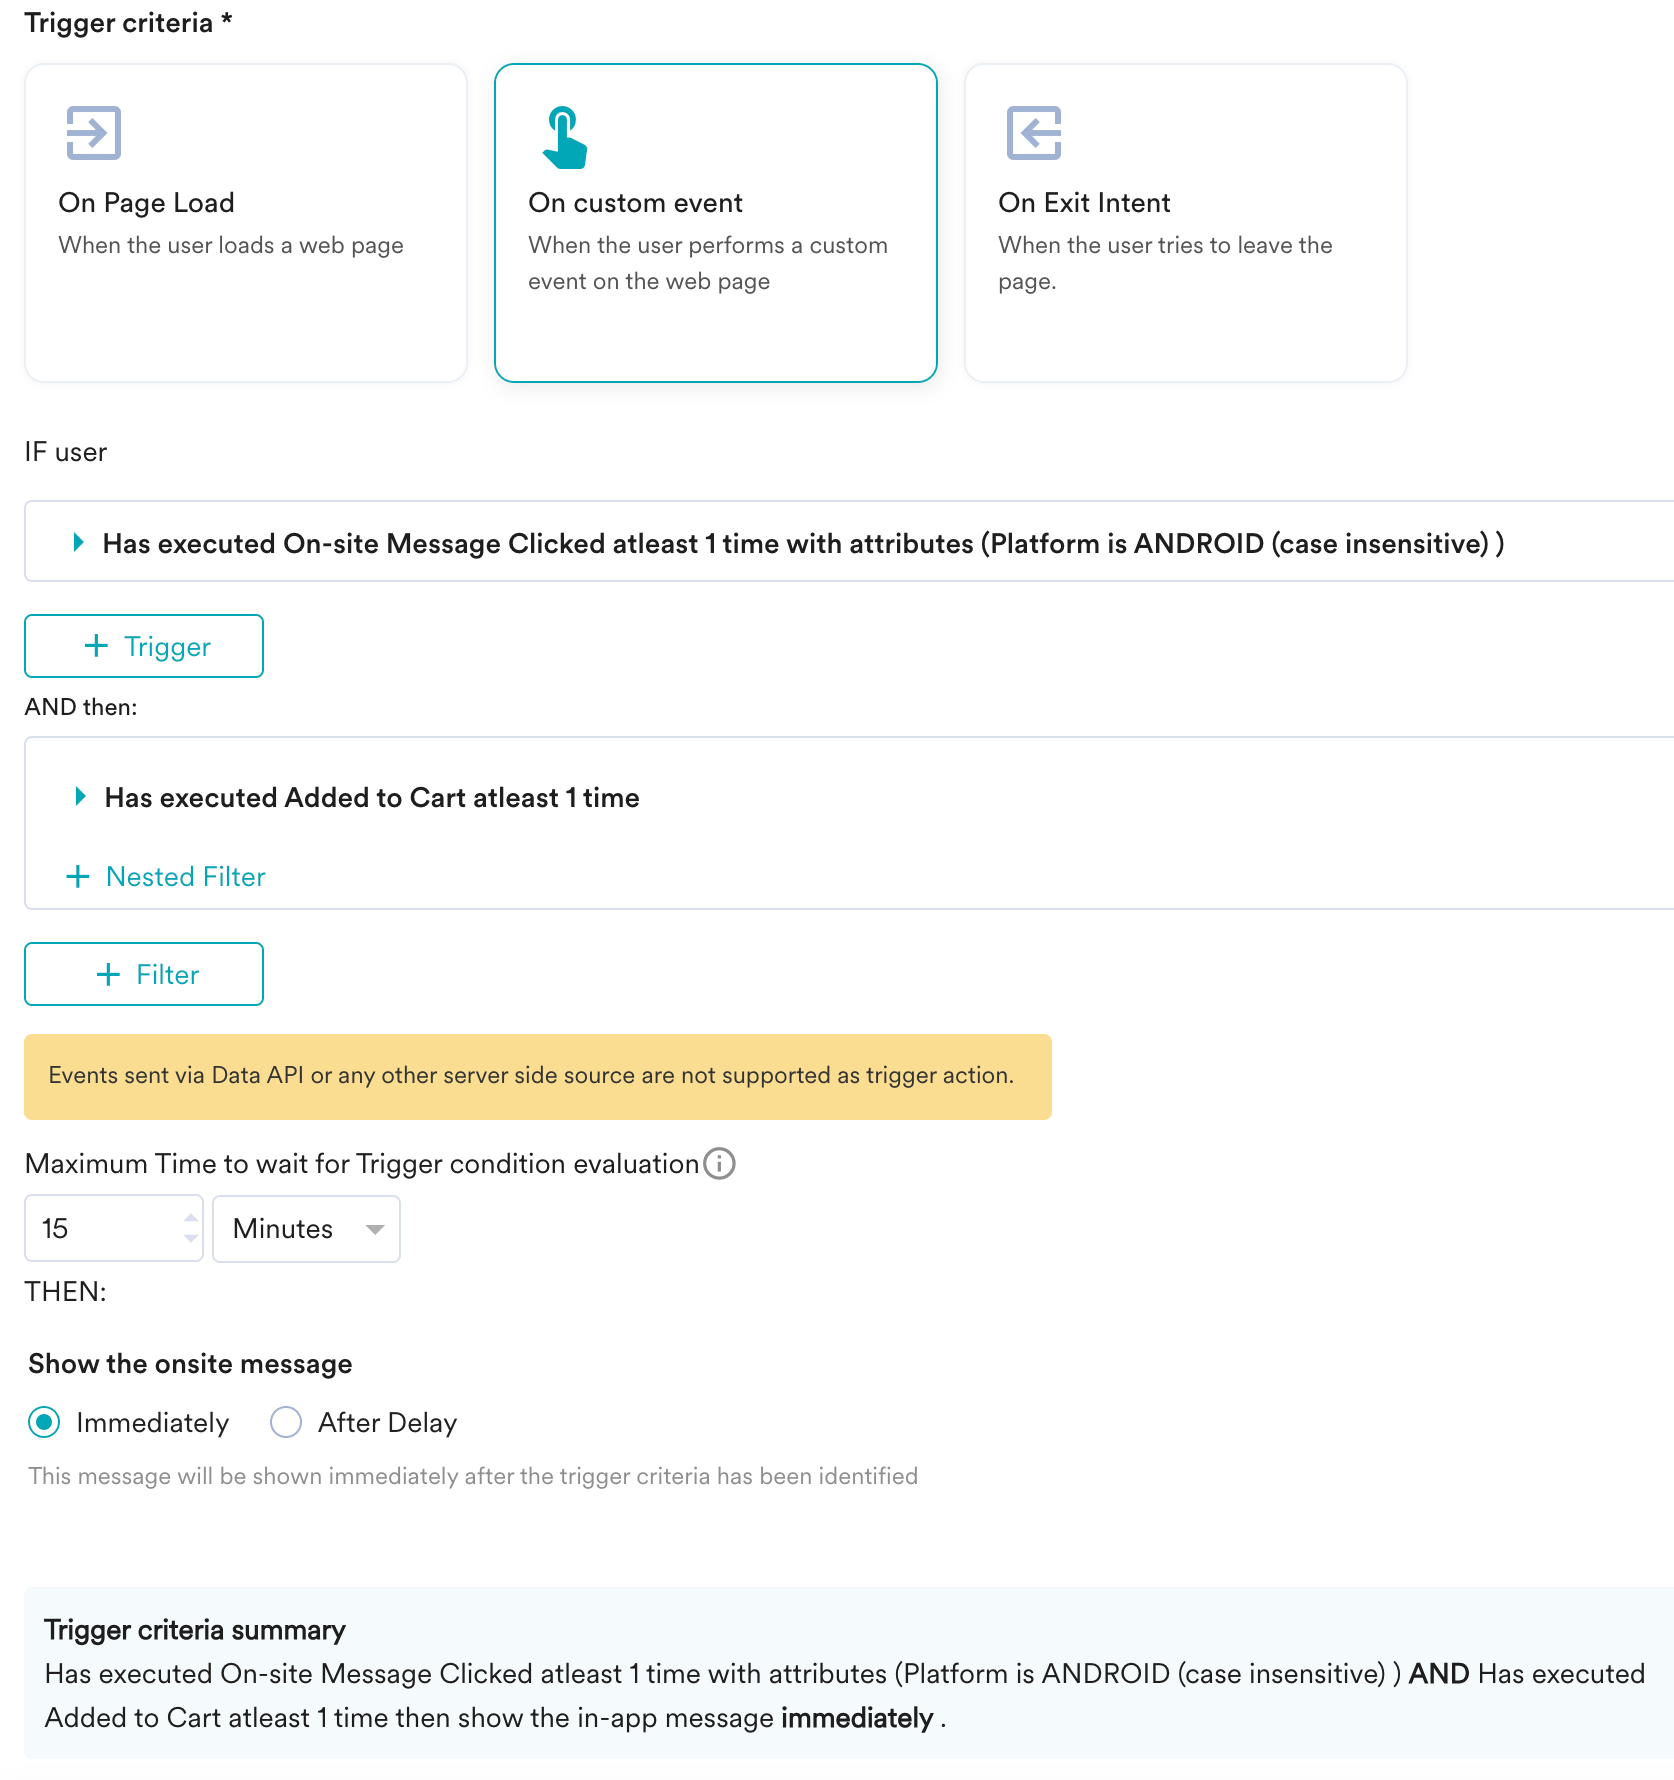
- The maximum delay that you can set here is 24 hours, and the minimum delay is 1 minute.

THEN
In the THEN section, under Trigger the message, select an option to define when to show the message. The available options are:- Immediately: The message will be shown immediately after the trigger criteria have been identified.
- After Delay: The message will be shown after the defined delay. For example, if the delay is specified as 2 seconds, the OSM will be shown 2 seconds after the page load.
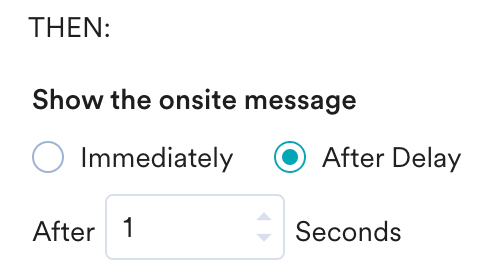
When After Delay is selected, a maximum delay of 1 day (86400 seconds) and a minimum of 1 second delay can be set.

On Exit Intent
Choose this option if you want to trigger a message when the user is trying to exit your website. For more information, refer to Exit Intent Technology.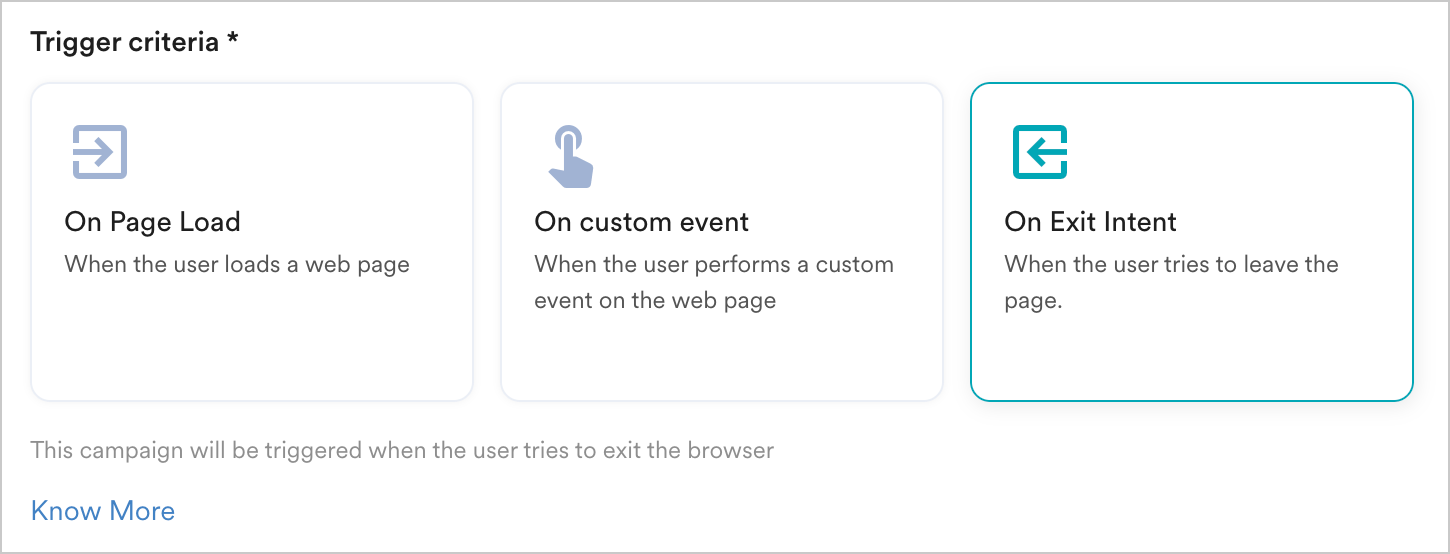
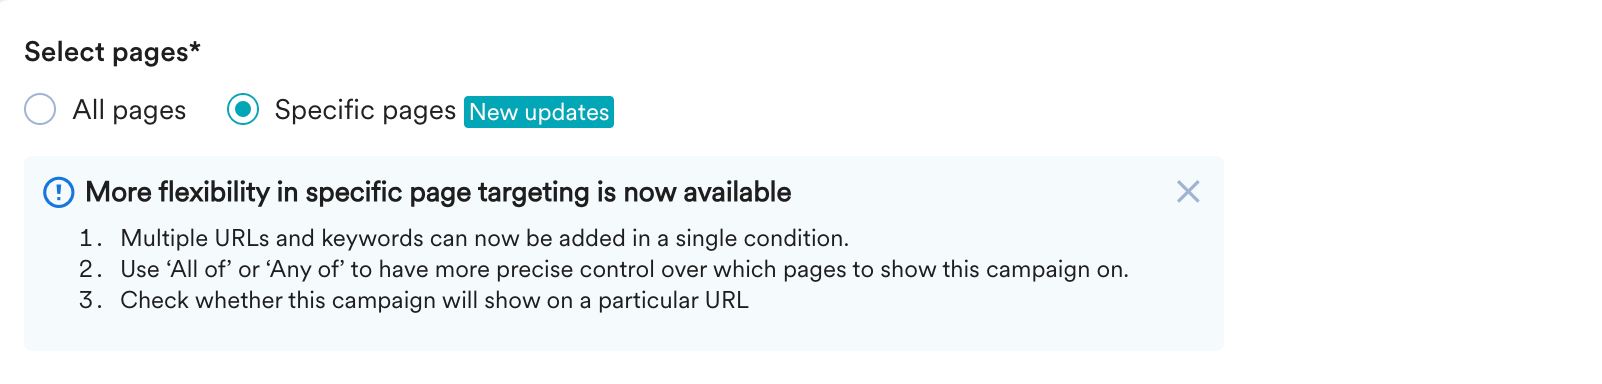
Select Pages
This section allows you to choose the web pages where you want to display a campaign to the user. You can select one of the following:- All pages: This option would show the campaign on all website pages.
- Specific pages: This option would show the campaign on specific website pages. You can select the page you want to show or hide the campaign by defining the URL rules
-
Click Specific pages.

-
Under If URL, select any condition in the Select Option list, as shown below:
 The following table lists the available conditions:
-
In the box adjacent to the Select Option list, enter one or more URLs as shown below:
 Information
- You can manually add multiple URLs and keywords by pressing Enter.
- You can also copy and paste the list of URLs from CSV in the input box.
- Click + Filter.
- Select the And or Or operator, and then select a condition in the Select Option list.
-
Enter the keywords within the box adjacent to the Select Option list.

-
To add multiple rules, repeat steps 4 through 6.

-
To delete a specific rule, click the delete icon (
 ).
).
- Enter the URL in the Check page targeting box to verify the provided URL meets the defined condition.
-
Click Check.

- If the provided URL meets the defined condition, a Passed notification is displayed as shown below

- If the provided URL fails to meet the defined condition, a Failed notification is displayed, as shown below. Follow the error instructions specified in the notification.
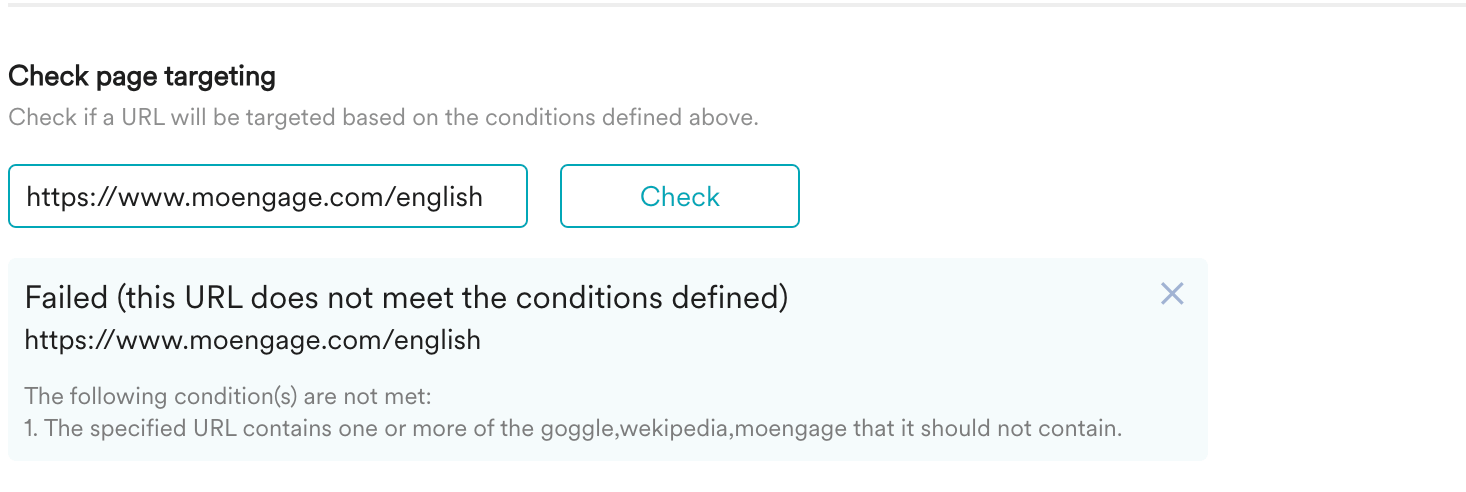
- If the provided URL meets the defined condition, a Passed notification is displayed as shown below
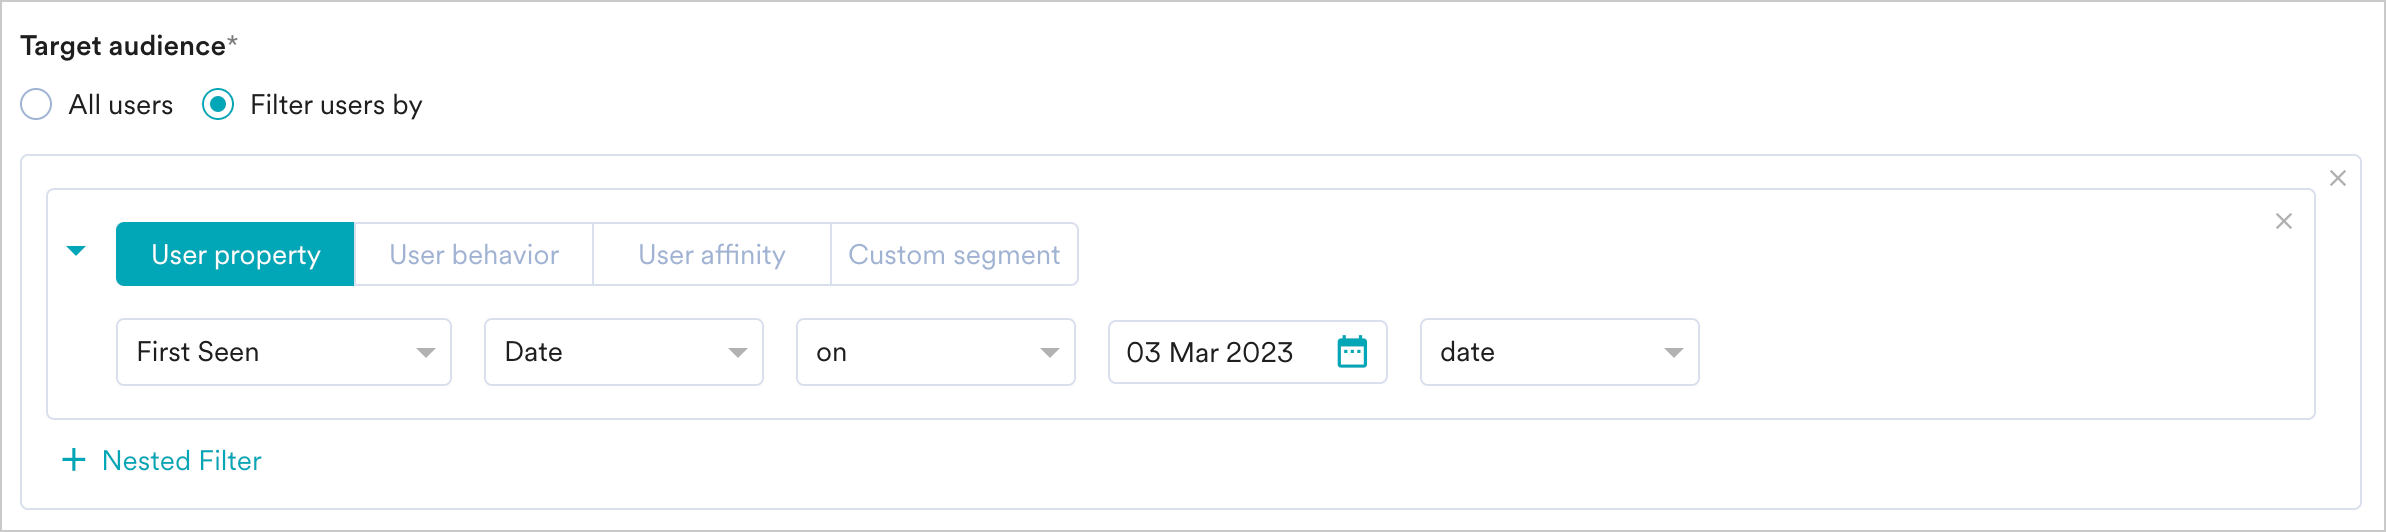
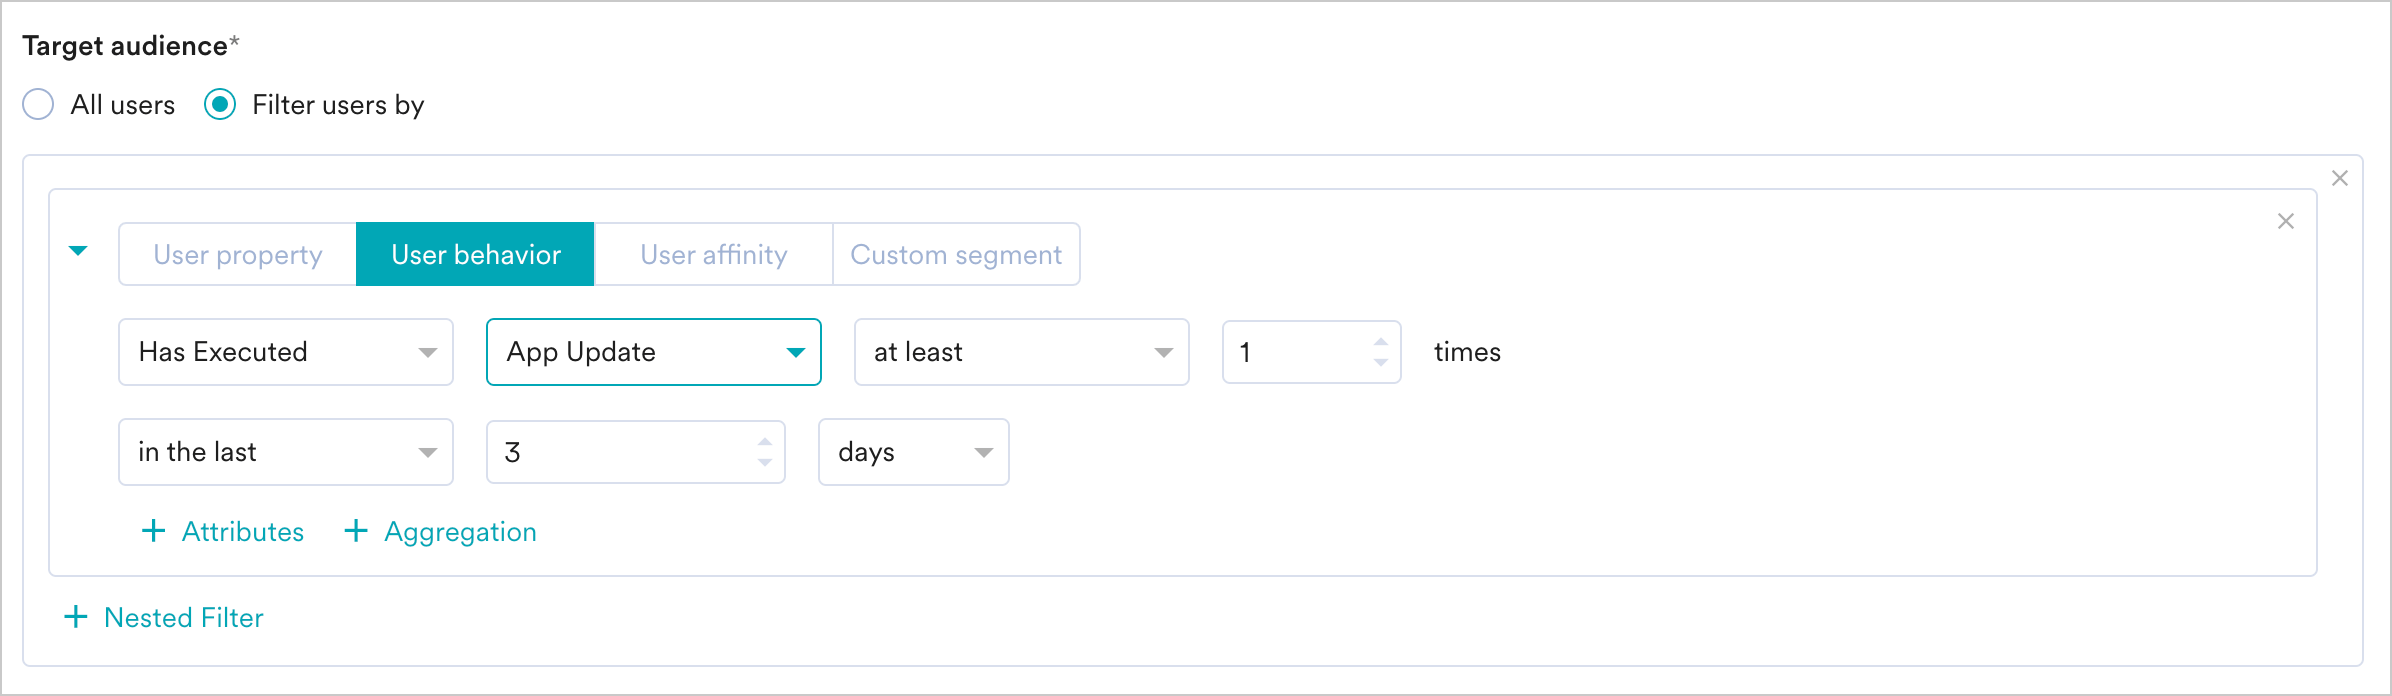
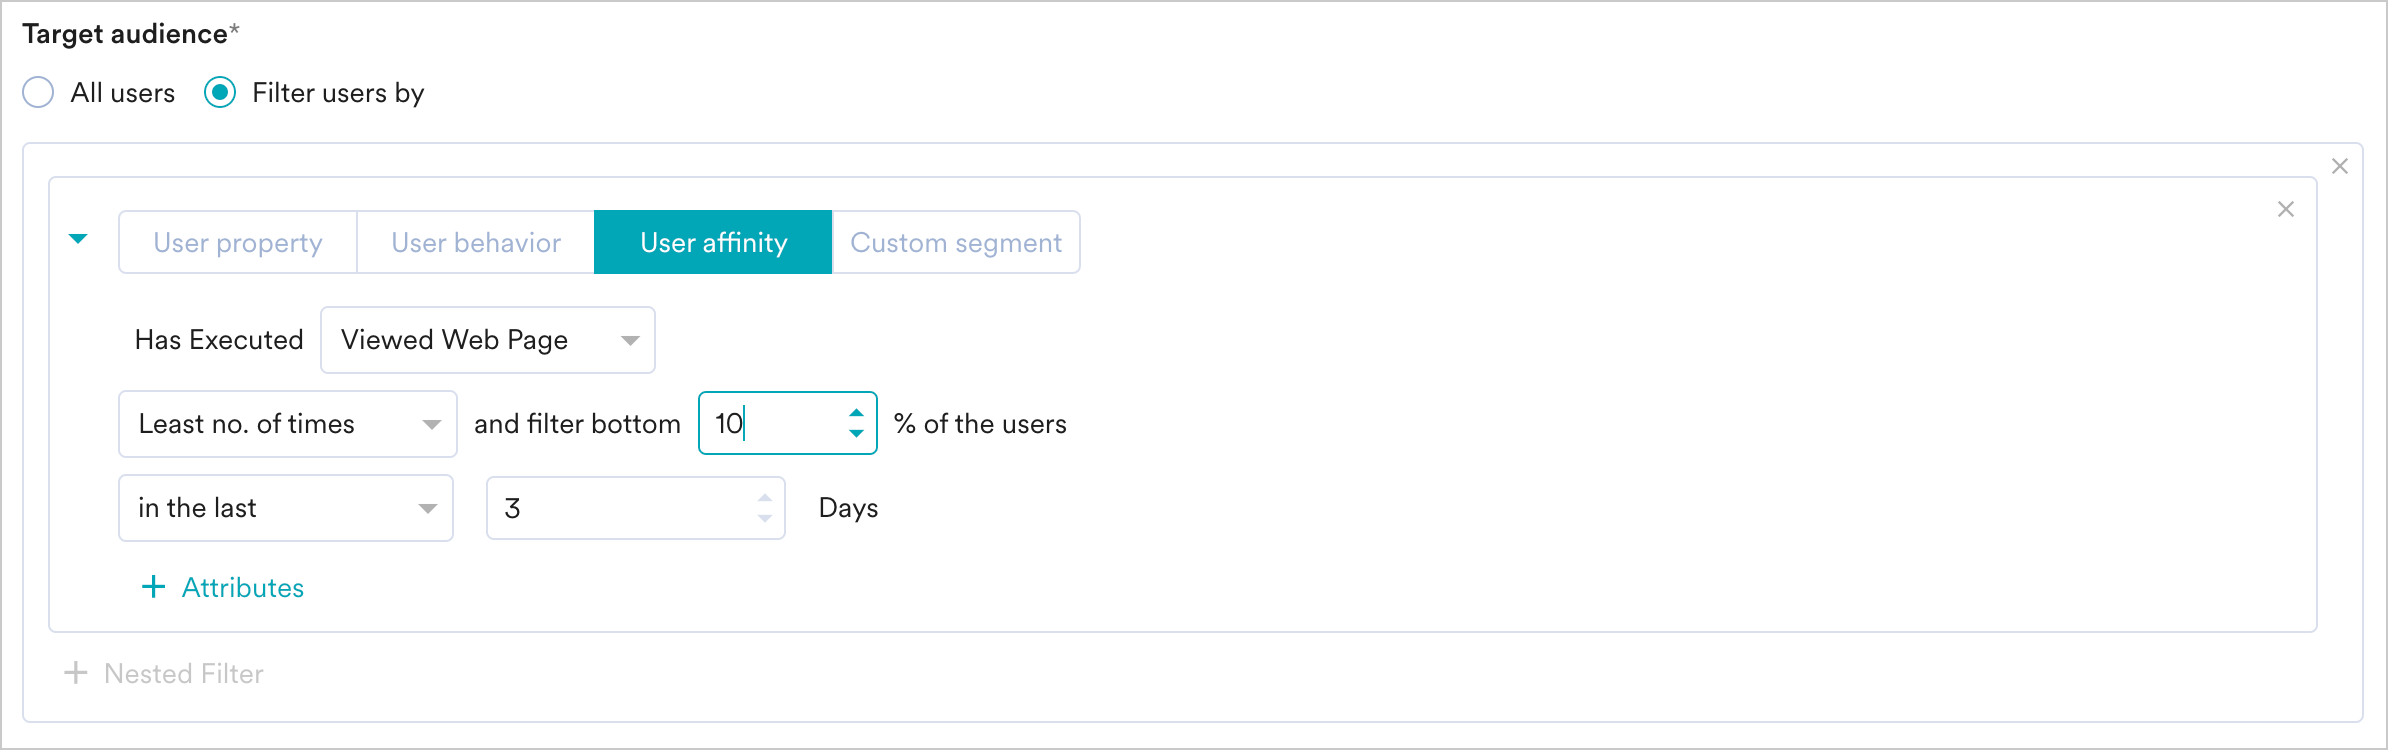
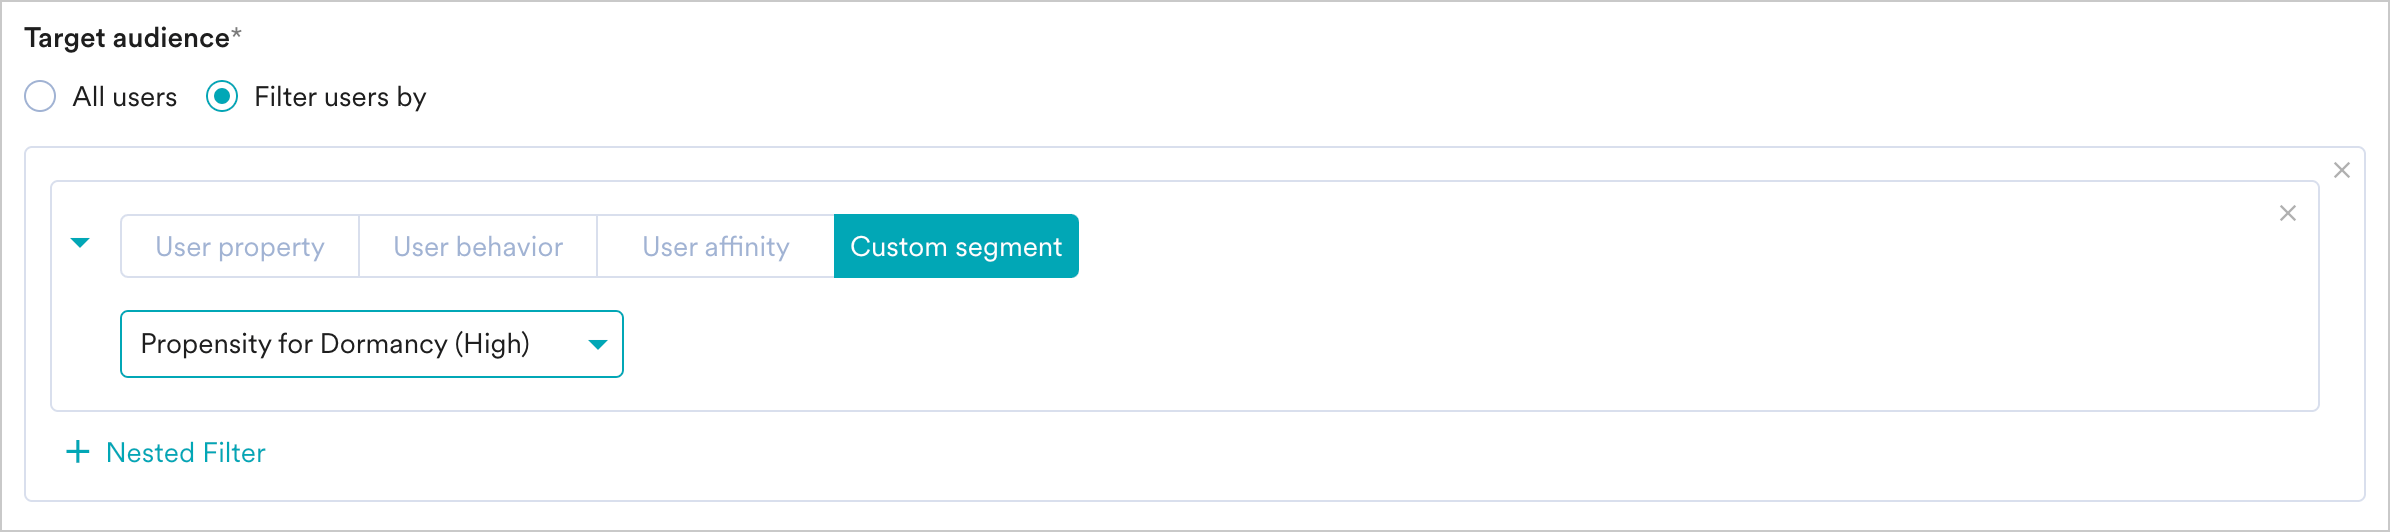
Target audience
This section contains segmentation filters that help you choose the target audience for your campaign. The following options are available:- All Users
- Filter by User Property
- Filter by User Behavior
- Filter by User Affinity
- Filter by Custom Segment
This filter option allows you to send the campaign to all the app users. When you use this option, you cannot add multiple filters.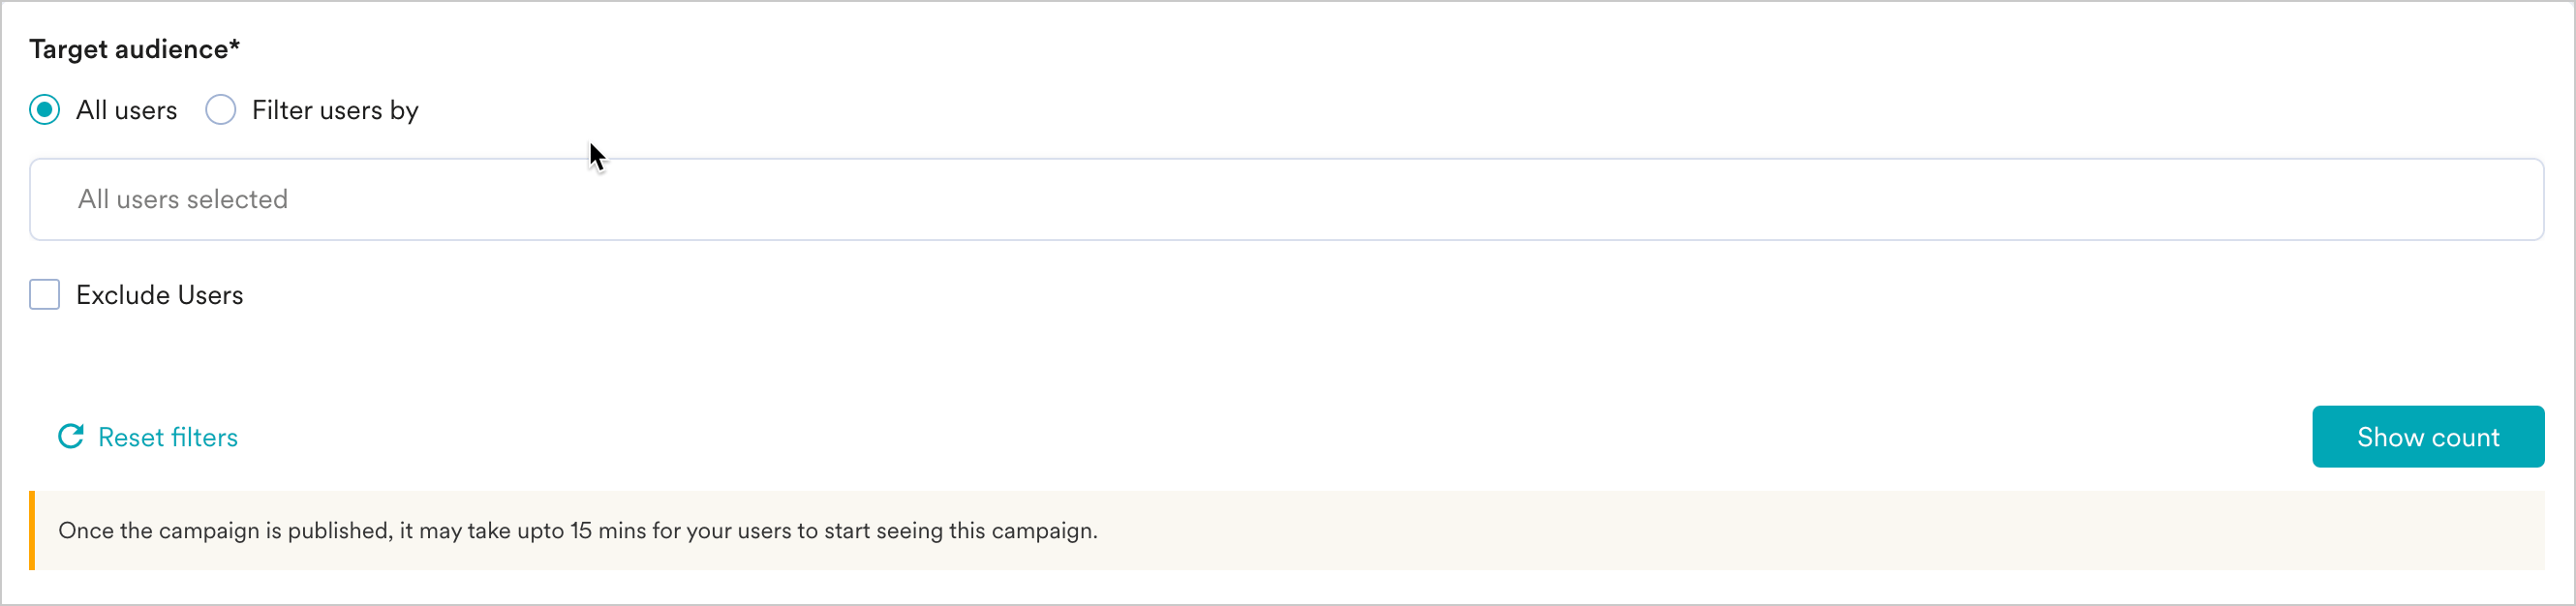
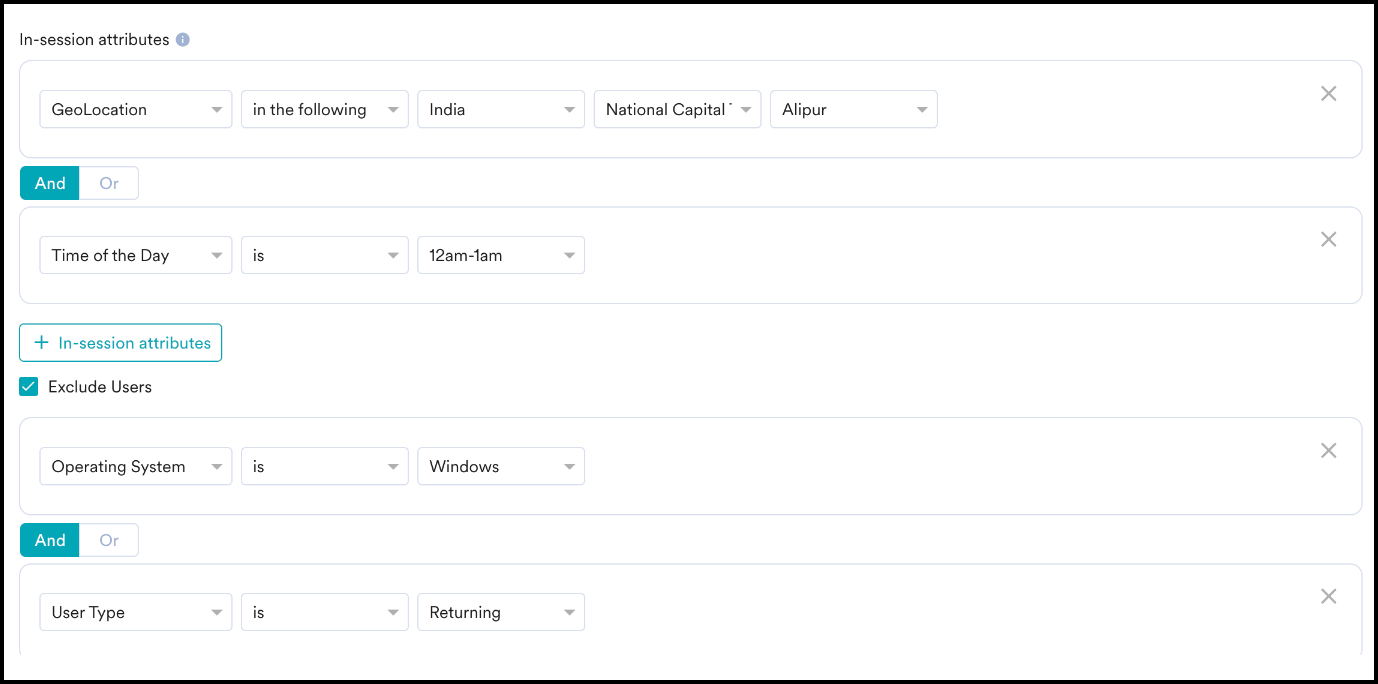
In-Session Attributes
In-session attributes allow you to group and target their users based on their actions within their current session on your website. For instance, if a user is in India, you can show them a personalized pop-up that you created for users based in India. This will help deliver a personalized experience to them immediately in the same session. To add an In-session attribute, click on the + In-session attributes button.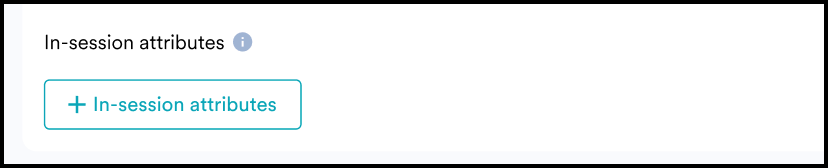
- Query Parameter: This field lets you segment users based on the query parameters in the URL. Typically, users would land on your personalized URL by clicking an advertisement on any Social Media platform.
- You can use UTM parameters like Source, Medium, Content, Campaign, etc., to segment users based on the source from where they are visiting, the campaign from which they’ve landed on this URL, and so on.
- UTM parameters like utm_source, utm_campaign, etc., are used to identify the campaigns driving users to websites. You can use UTM and custom parameters to segment users and personalize the website experience.
- User Type: This field lets you segment users based on whether they are new or returning users. The Web SDK stores user details (unique_id) for each user in the browser storage. If those details are present in the storage, the user is a returning user. If not, the user is a new user.
- Hence, if the browser cache is cleared, the user gets treated as new.
- Note:
- If two users are using the same device and user 2 logs in after user 1, they would be considered a returning user
- If a user logs in from the mobile browser and then logs in again from a desktop browser, the login from the desktop would be considered a new user.
- Day of the Week: This field lets you segment users based on the day of the week on which they visit your website.
- Time of the Day: This field lets you segment users based on the hour of the day on which they visit your website. You can choose from any of the one-hour slots in a day available in the dropdown.
- Geolocation: This field lets you segment users based on the geolocation from where they visit your website. You can choose the Country, State/Region, and City where the user is located or exclude a specific Country.
- Device Type: This field lets you segment users based on the device with which they visit your website. You can include or exclude one or a combination of the following: Mobile, Desktop, or Tablet.
- Operating System: This field lets you segment users based on the Operating System of the device with which they visit your website. You can include or exclude one or a combination of the following: Android, iOS, Windows, Mac, Linux, or others.
- Browser Type: This field lets you segment users based on the browser with which they visit your website. You can include or exclude one or a combination of the following: Chrome, Safari, Firefox, Opera, or others.
Campaign Audience Limit
This feature empowers you to control campaign reach and expenditure by capping the number of users who receive it based on engagement metrics like sends, impressions, and conversions. It allows you to set total, daily, or instance-level limits to campaigns. For more information, refer to Campaign Audience Limit.
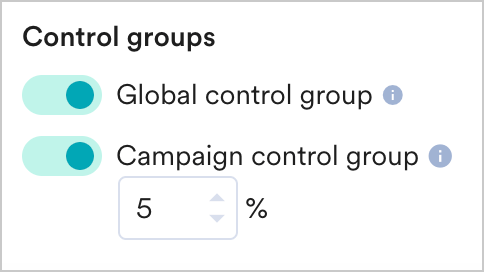
Control Groups
This section contains information about control groups for the campaign. To exclude users in the control groups, do the following:
|  |
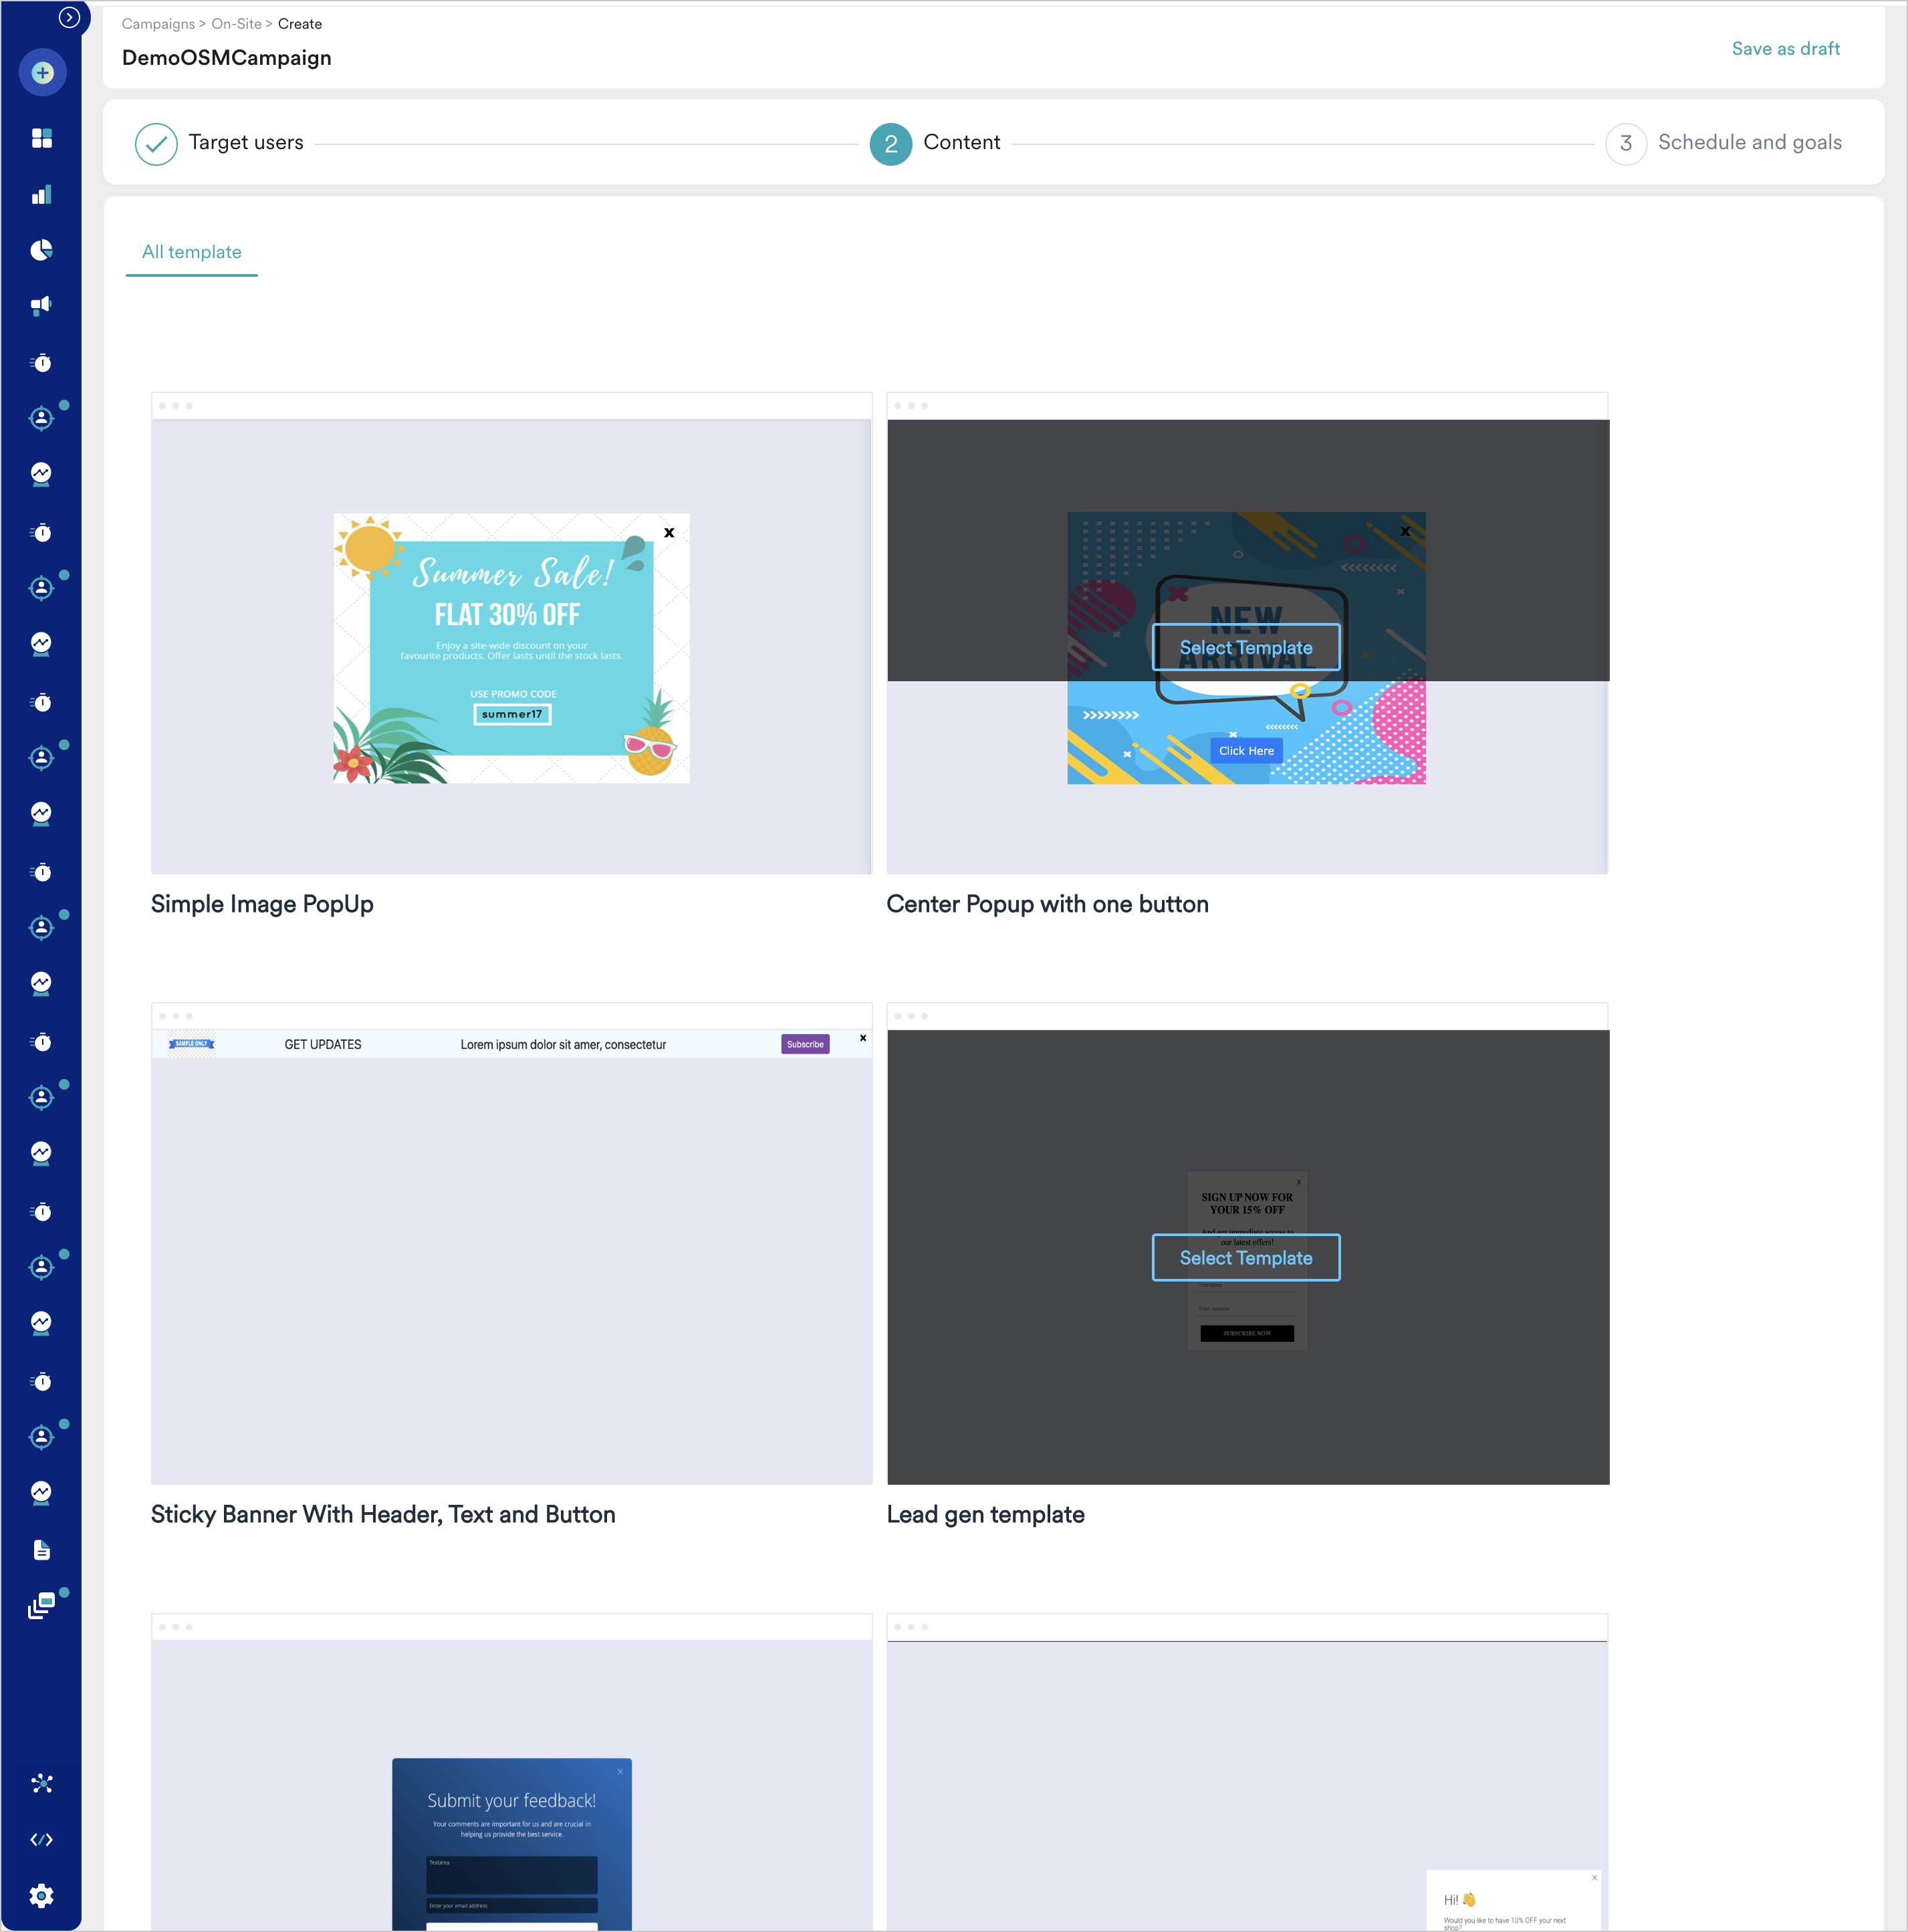
Step 2: Define Content
You can create the content for your OSM campaigns using two options here:- Create the content using the new editor
- Create content using the old editor
- Create content with the new editor
- Create content using the old editor
The following template types are available: icon on the left pane of the editor.Editing/Styling Options -Click the
  icon at the top right corner of the template to add the following styling elements to the template:

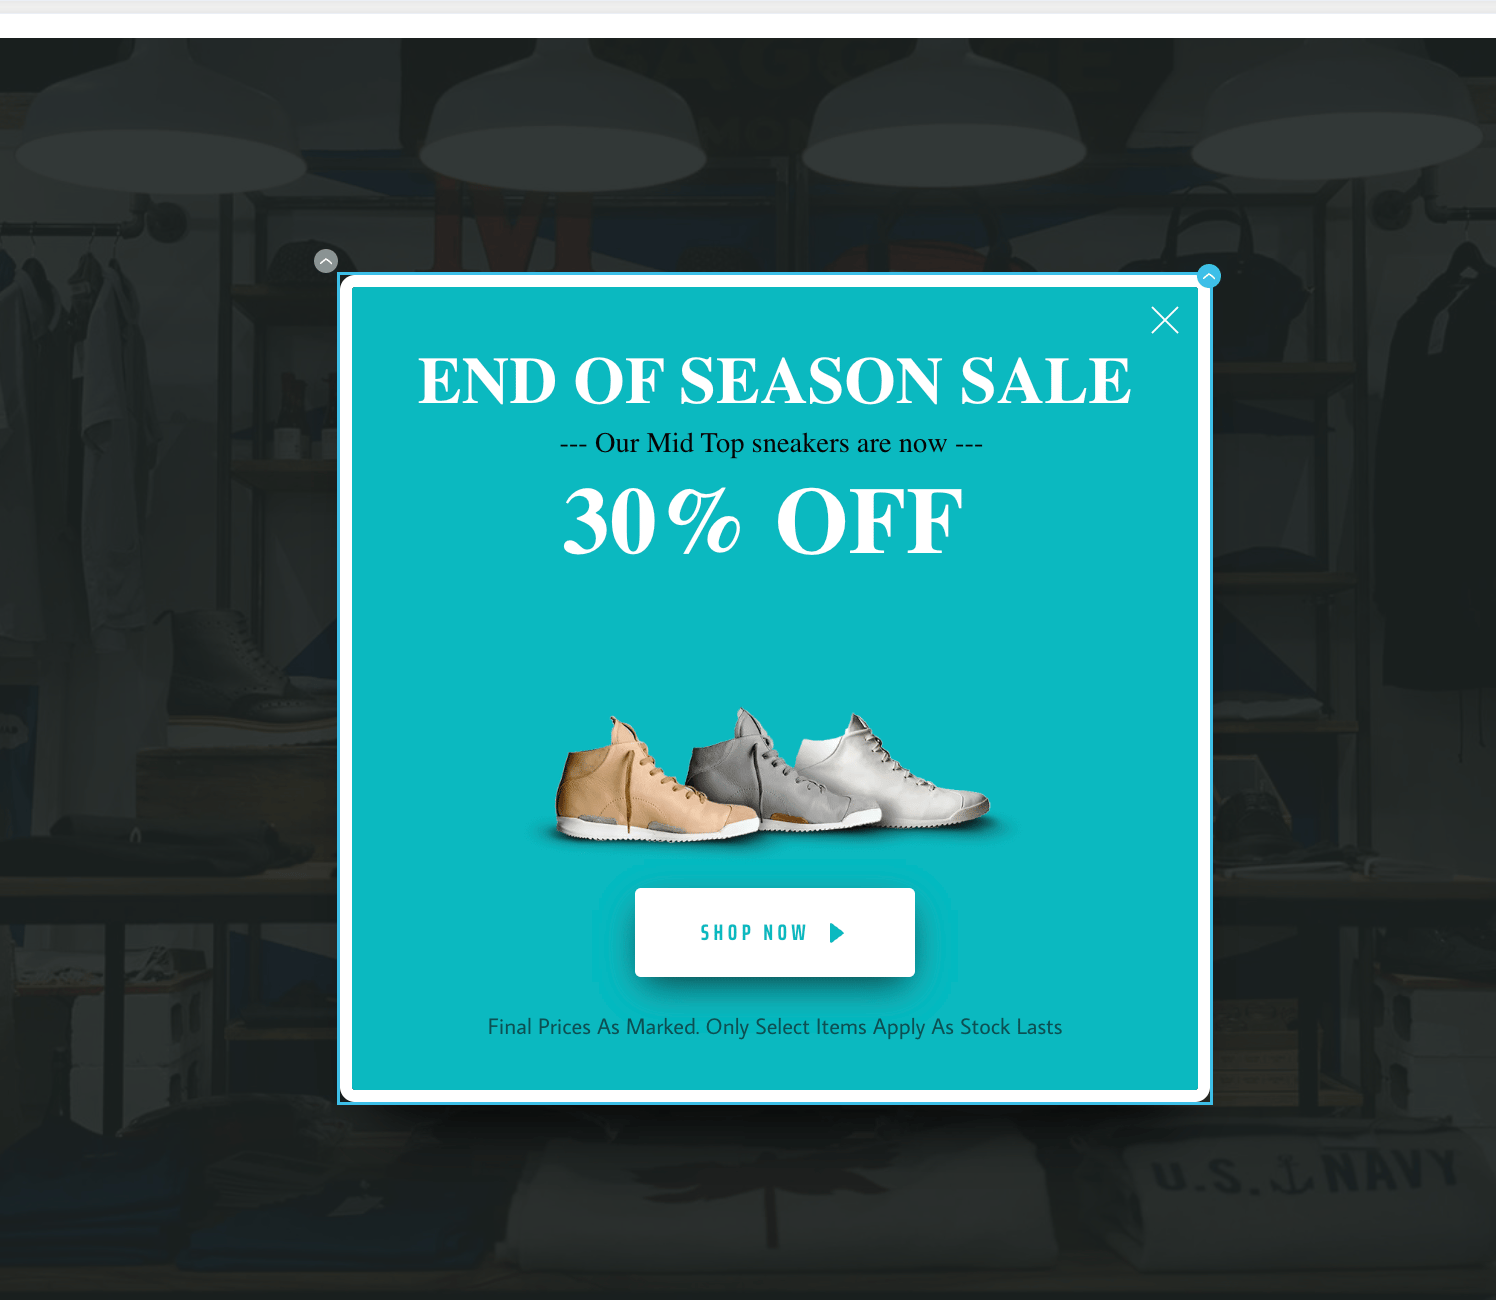
- Banner - these templates can be used to show banners on the website while customers browse or perform actions on it. Banners can be used for the following:
- show countdown timers
- show cookie information and seek customer content for the same
- show notifications with information about seasonal sales and ongoing offers
- Nudge - these templates can be used to show non-intrusive information to customers. Nudges can be used for the following:
- show countdown timers
- add a call to action information
- show notifications
- ask for subscriptions and opt-ins
- used for lead generation
- used to capture feedback at the time of delivery of service/product
- Popup - these templates can be used to communicate with customers in an intrusive manner. Popups can be used for the following:
- display information about sales and direct customers to relevant web pages
- seek feedback from customers
- lead generation
- preventing customers from churning
You can create your on-site message using a blank template or choose from the available templates for each template type. You can also look up a template using the search option or click on the template of your choice.Blank Template - Hover on the Blank Template and click Popup to create a popup template from scratch. Click on the ’+’ icon to open the editor and add elements to the template. For more information, refer to OSM Editor.Other Templates- The following template types are available: Offers and Announcements Templates, Lead Generation Templates, and Typeform Survey Templates. For more information, refer to OSM Templates.Once you’ve loaded the template of your choice, the template loads in the OSM editor. The following options are available:Add elements - You can add elements to the template by clicking the
icon at the top right corner of the template to add the following styling elements to the template:| Editing/Styling Option | Description |
|---|---|
| Display Close Button | This option lets you specify whether there should be a close button for users to dismiss the message. By default, the close button is displayed. You can hide it by turning off the toggle. |
| Background Image/Filters | This option lets you add background images to the message. To upload an image, click on  icon and upload the image in the Image section. You can add filters to the image using the Filters tab. icon and upload the image in the Image section. You can add filters to the image using the Filters tab. |
| Background Color | This option lets you add a background color to the message. By default, the background is black. You can change it by clicking on the  icon and choosing the background color of your choice. icon and choosing the background color of your choice. |
| Popup positioning | This option lets you move the popup bidirectionally. To move the popup through the length of the page, click the  icon and position the popup at the top, middle, or bottom of the webpage. To move the popup through the width of the page, click the icon and position the popup at the top, middle, or bottom of the webpage. To move the popup through the width of the page, click the  icon and position the popup to the left, center, or right end of the website. icon and position the popup to the left, center, or right end of the website. |
| Customizing the width and height of the popup | This option lets you specify the width and height of the popup. To do so, click the  icon, and specify the width and height. icon, and specify the width and height. |
| Adding CSS options to the popup | This option lets you add a custom CSS to add customized styling options for your message. To do so, click the icon, and click the  icon to add the CSS code and custom attributes. icon to add the CSS code and custom attributes. |
- Preview Options - Click the
 icon on the left panel to preview the template. There are three preview options:
- Desktop - This option shows you how the template will look on a website opened in a desktop browser.
- Tablet - This option shows you how the template will look on a website opened in a tablet browser.
- Mobile - This option shows you how the template will look on a website opened in a mobile browser.
Display Settings
The following options are available:Test Campaign (Optional)
Test Campaign (Optional)
Test campaigns enable previewing the campaign on a test URL to ensure that your on-site message is conveyed in the manner that you desire. You can test the campaign you created by entering a test URL. Click Test to display the on-site message on the URL. For more information, refer to Testing your OSM campaign.
Step 3: Scheduling and Goals
This section contains the following:- Delivery Schedule - Choose when the campaign should be delivered to your users.
- Conversion Goals - Choose the conversion goals and revenue metrics to be tracked for the campaign.
- Campaign Priority and Delivery Controls- Choose the priority of the campaign and choose the global and local delivery control options, such as auto dismiss, the minimum delay between notifications, and the frequency of messages to be shown.
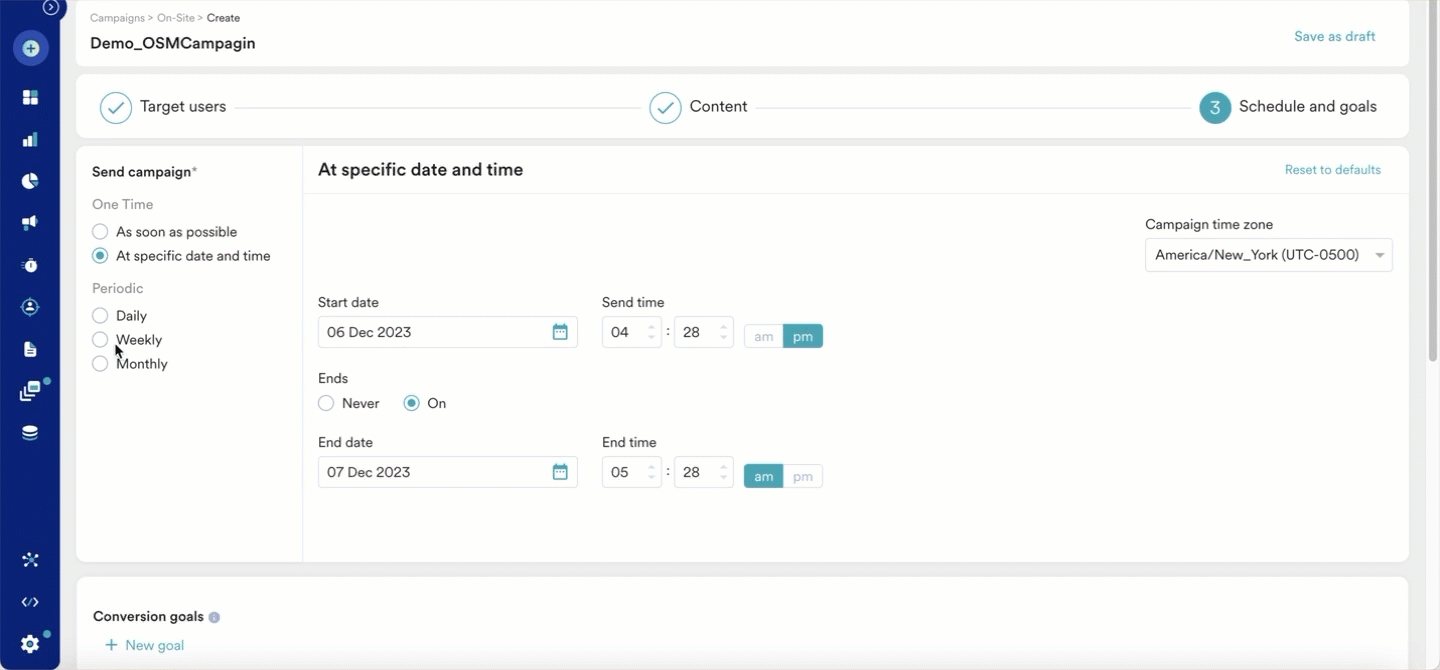
Delivery Schedule
The following delivery schedule options are available for OSM Campaigns:- One Time
- Periodic
Choose this option to send the campaign immediately or at a specified time to the target users.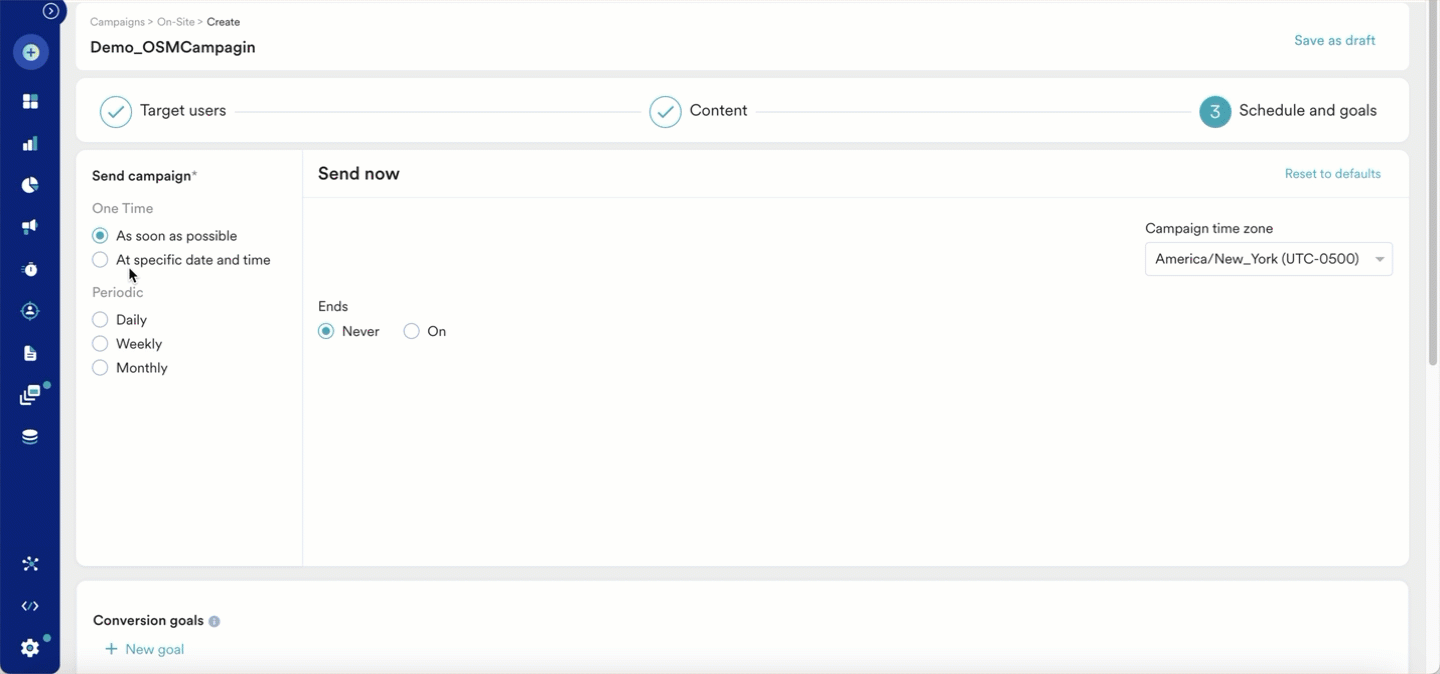
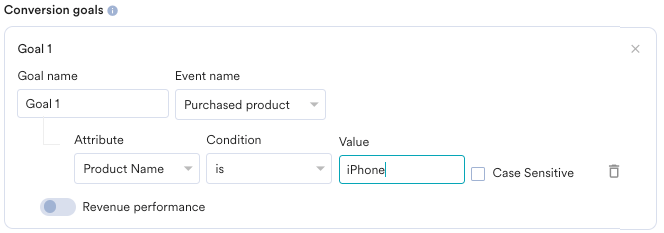
Conversion Goals
You can add conversion goals to track the business metrics for your campaigns. You can track up to five conversion goals. You can choose any app event as a conversion goal activity and set more than one conversion goal. The first goal will be treated as a primary goal. For example, if you want to track the number of customers who’ve purchased an iPhone after your campaign was sent. (Event - purchase event, Product - iPhone). Your conversion goal set-up might look similar to the image shown below with the following details:- Goal Name - iPhonePurchase
- App Event you wish to track - Made Purchase
- Event Attribute/Property - product is event attribute/property
- Value of Event Attribute/Property - iPhone
- How many users have viewed the product page?
- How many of them added that product to the cart?
- How many of them made a successful order?
Tracking Revenue Performance (Optional)
Tracking Revenue Performance (Optional)
With MoEngage, you can track the revenue generated by your campaigns. For example, you can track the revenue generated by your product after sending a communication. To track revenue performance, enable the Revenue Performance toggle for the conversion goal for which you want to track the revenue.
| In the example here, to track revenue for _orderSuccessful _events, the Revenue performance toggle needs to be enabled. After choosing the goal, you can select the numeric attribute that captures the order’s total monetary value. In the example below, cartValue contains the total order value. You can also choose the currency in which your monetary value is being reported. | 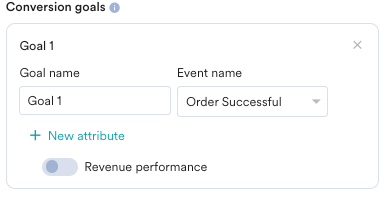 |
| After you choose the goal, you can choose the numeric attribute that captures the total monetary value of the order. In the example, cartValue contains the total order value. You can also choose the currency in which your monetary value is being reported. | 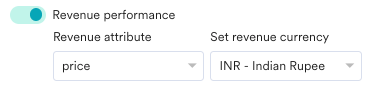 |
| Set Attribution window - You can set an attribution window ( a time period or window calculated from the time the user has received the campaign for which you want to attribute the conversion goals to a specific campaign.) As a default, it is set for 36 hours. Say, for the example above, we set it to 5 hours. | 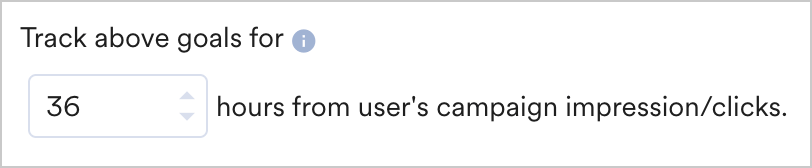 |
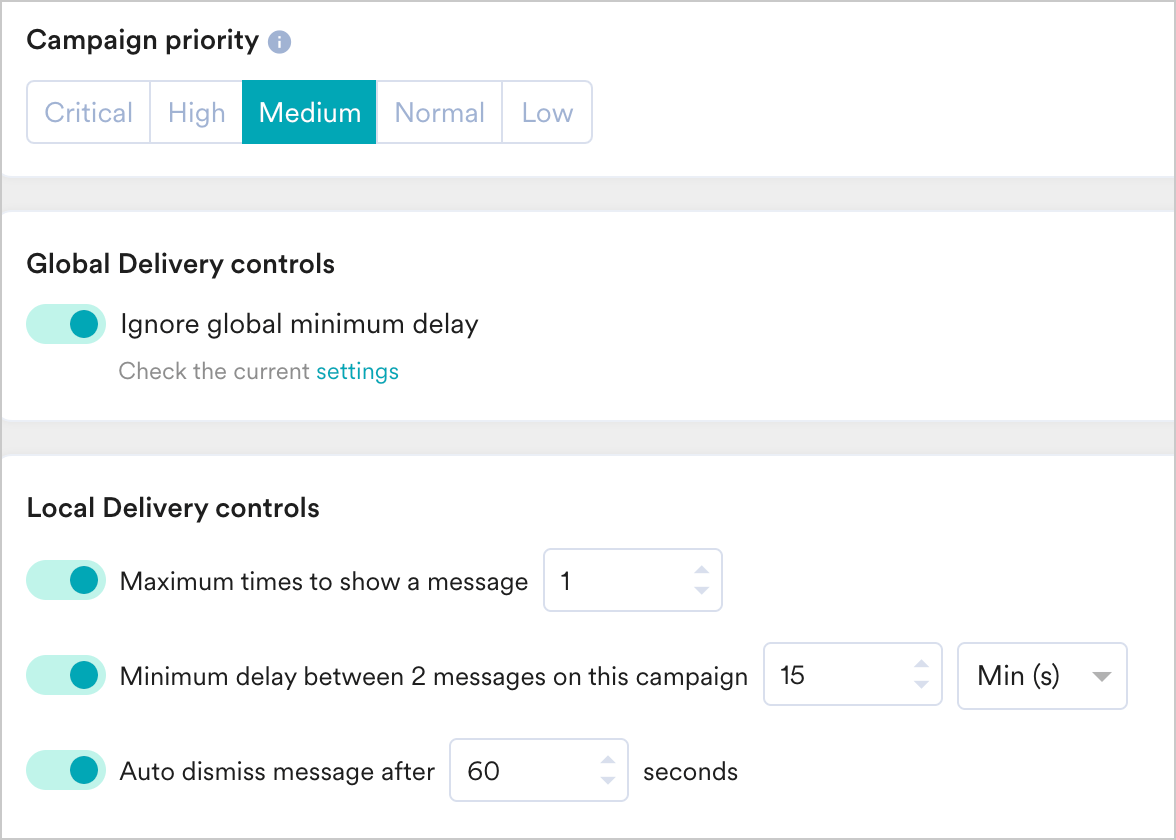
Campaign Priority and Delivery Controls
This section contains the following options:- Campaign Priority - Set one of the following campaign priorities: Critical, High, Medium, Normal, and Low. The campaign with the higher priority will be shown when a user is eligible to see two campaigns at the same time. In case both campaigns are of the same priority, the campaign created recently will be shown first.
- Global Delivery Control - This section lets you specify if you can Ignore global minimum delay set for the On-site messaging channel. Enable this toggle to ignore the settings for the minimum delay set for on-site messages.

- Local Delivery Controls - This section contains options that let you specify the delivery controls that pertain to this campaign. The following options are available here:
- Maximum times to show a message - lets you specify the maximum number of times to show the on-site message from the same campaign for a user. This is tracked using the On-site Message Shown event in the User Profile. For example, if the maximum times to show a message is turned off initially when the campaign is published and later edited to one time. If a user was shown the message already before editing the campaign and the user visits the site again, they will not be shown the message again as the On-site Message Shown would be available in their User Profile already and the message will not be shown to them again.
- Minimum delay between 2 messages on this campaign - lets you specify the minimum time gap between two on-site messages from the same campaign.
- Auto dismiss message after ‘x’ seconds - lets you specify the time after which the on-site message will be removed from the URL.
FAQs
How to use a custom font in the OSM editor?
Integrating custom fonts into your OSM templates can enhance the visual appeal and maintain brand consistency across your campaigns. Follow these steps to use custom fonts in your templates:1. Host Your Font File
Ensure that your custom font file is hosted on a secure domain or a publicly accessible URL. For example:https://yourdomain.com/fonts/yourfont.ttf
For demonstration purposes, you can use the following Roboto font link: https://fonts.gstatic.com/s/roboto/v30/KFOmCnqEu92Fr1Mu5mxKKTU1Kvnz.woff2
Clicking the URL should start a download, confirming the font file is correctly hosted.
2. Prepare Your Template
Select the template you want to customize within OSM Pro.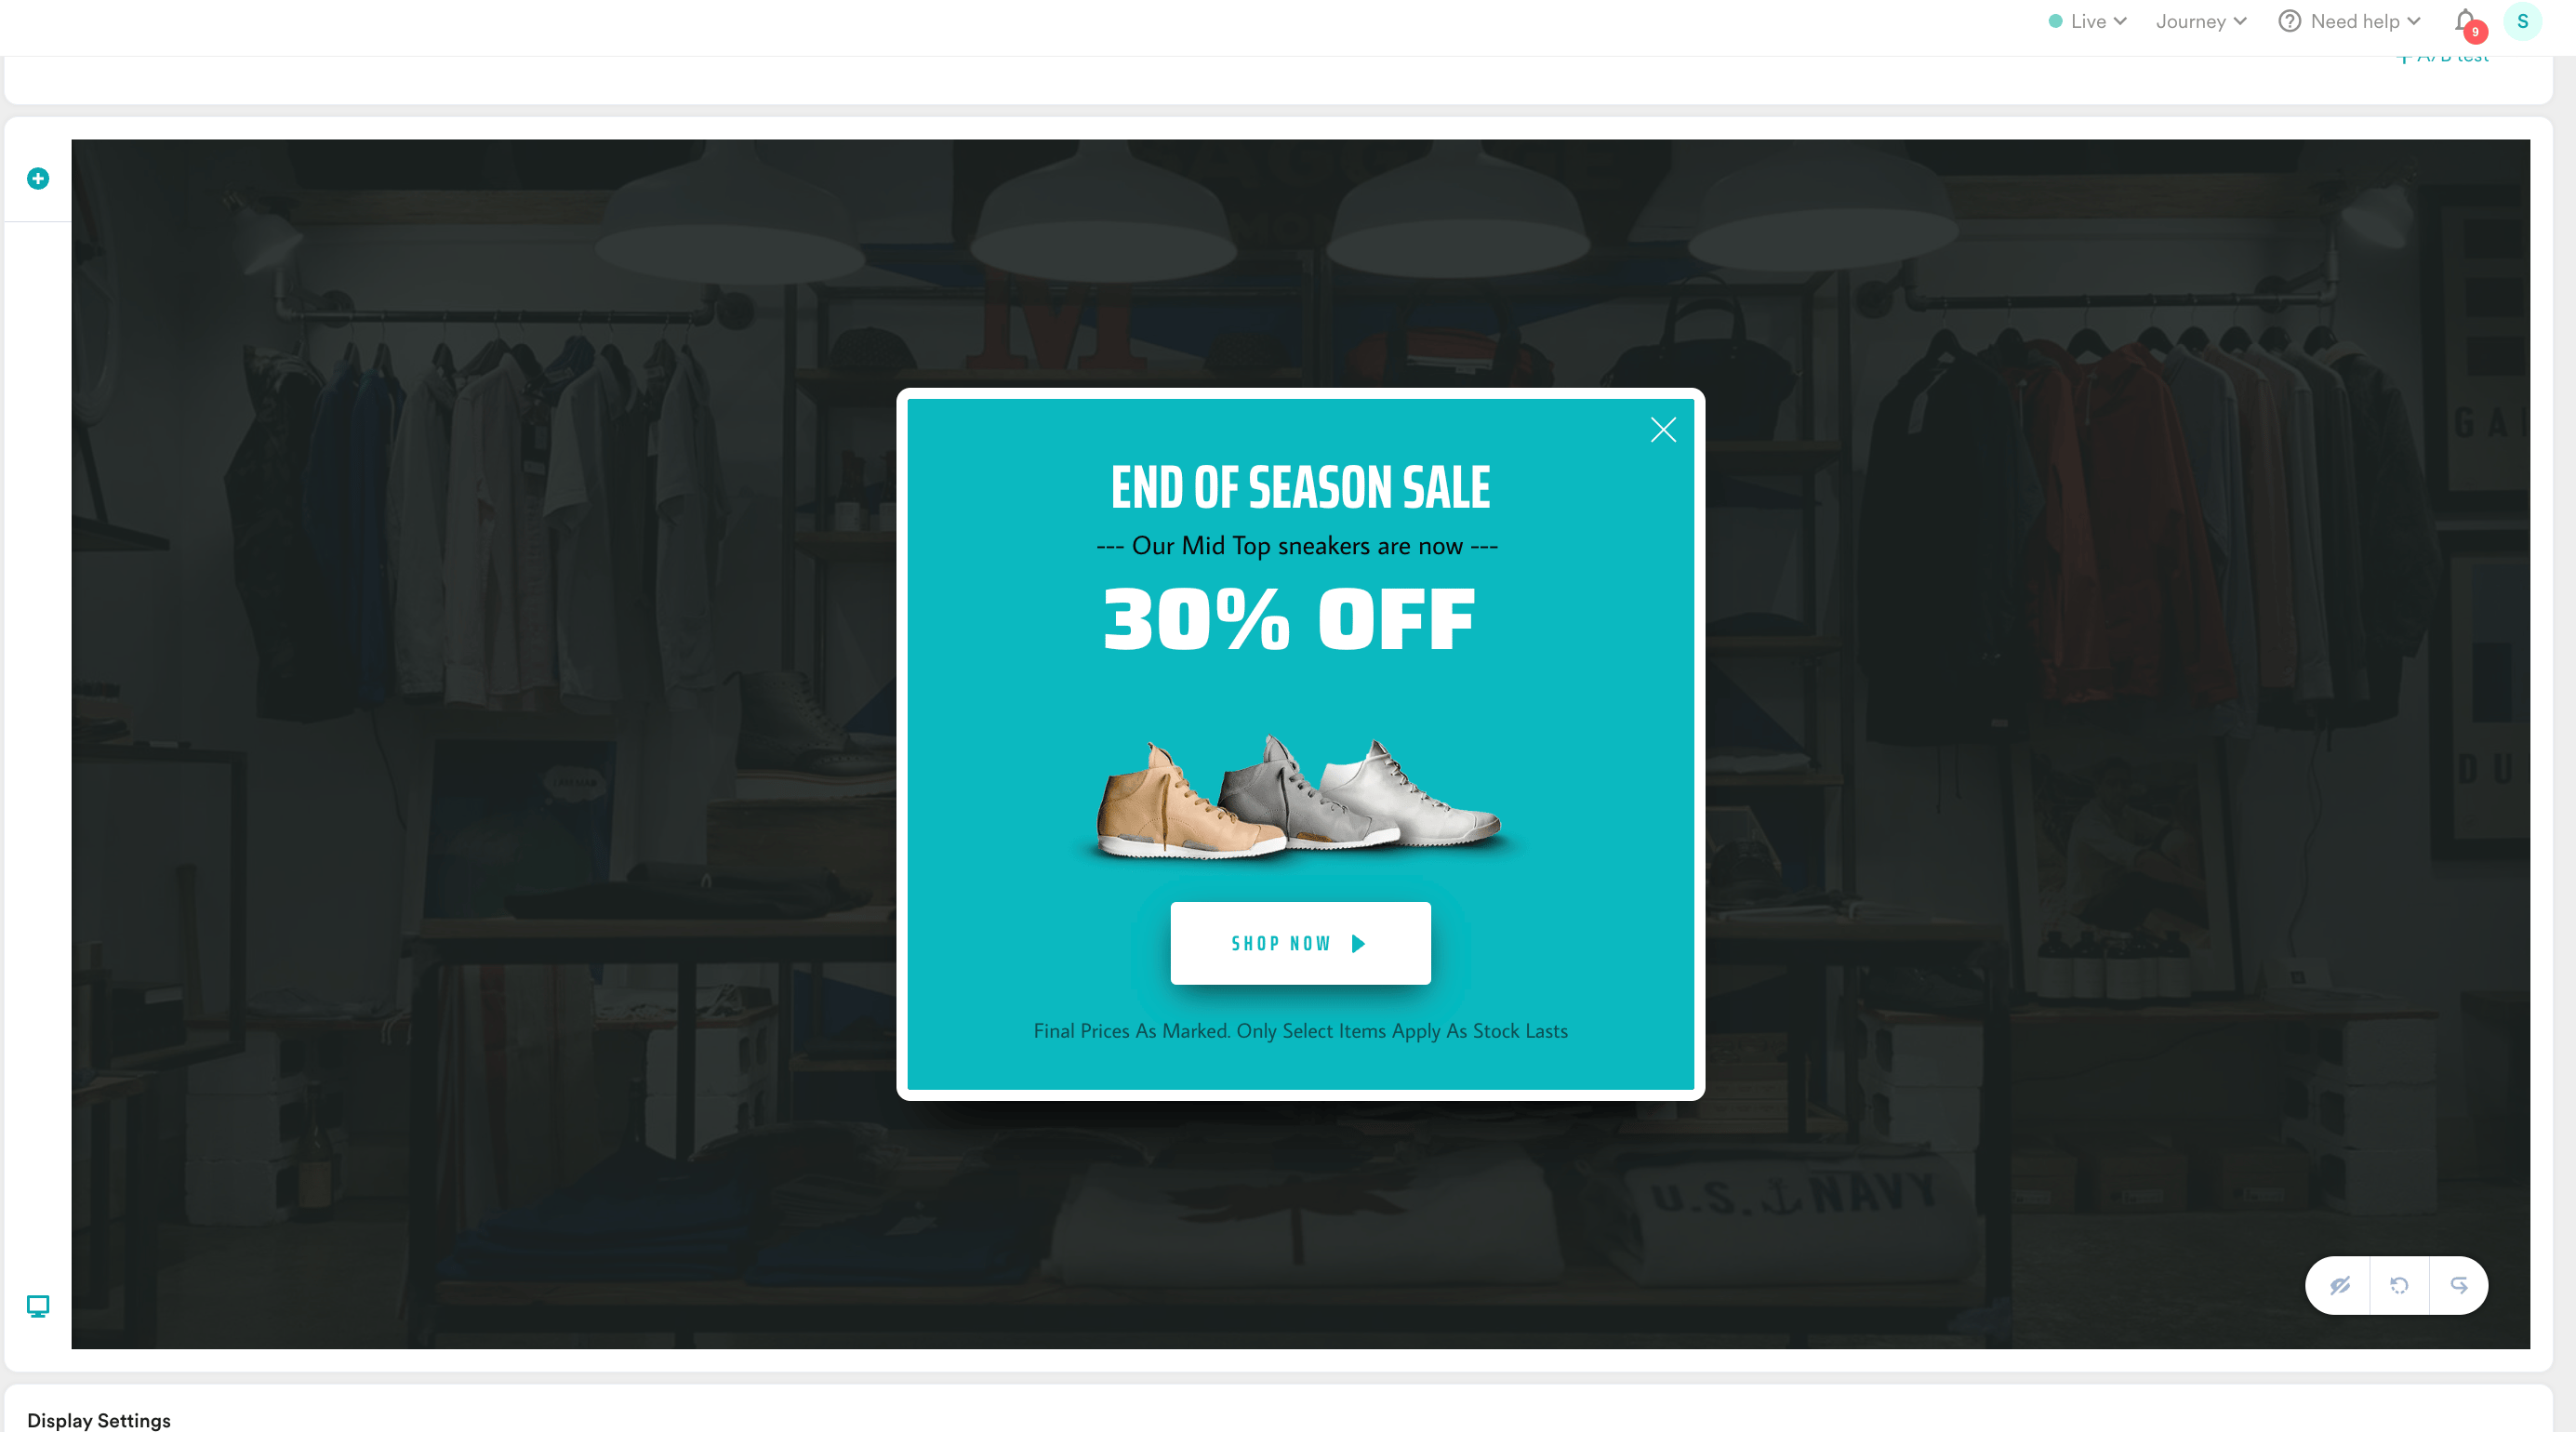
3. Modify Text Settings
Click on the text element intended for the custom font:- Click the settings icon, then select the styling icon.

- Switch to the ‘Advanced’ tab.

- In the ‘CSS Id’ field, enter a unique identifier, such as
text_id1.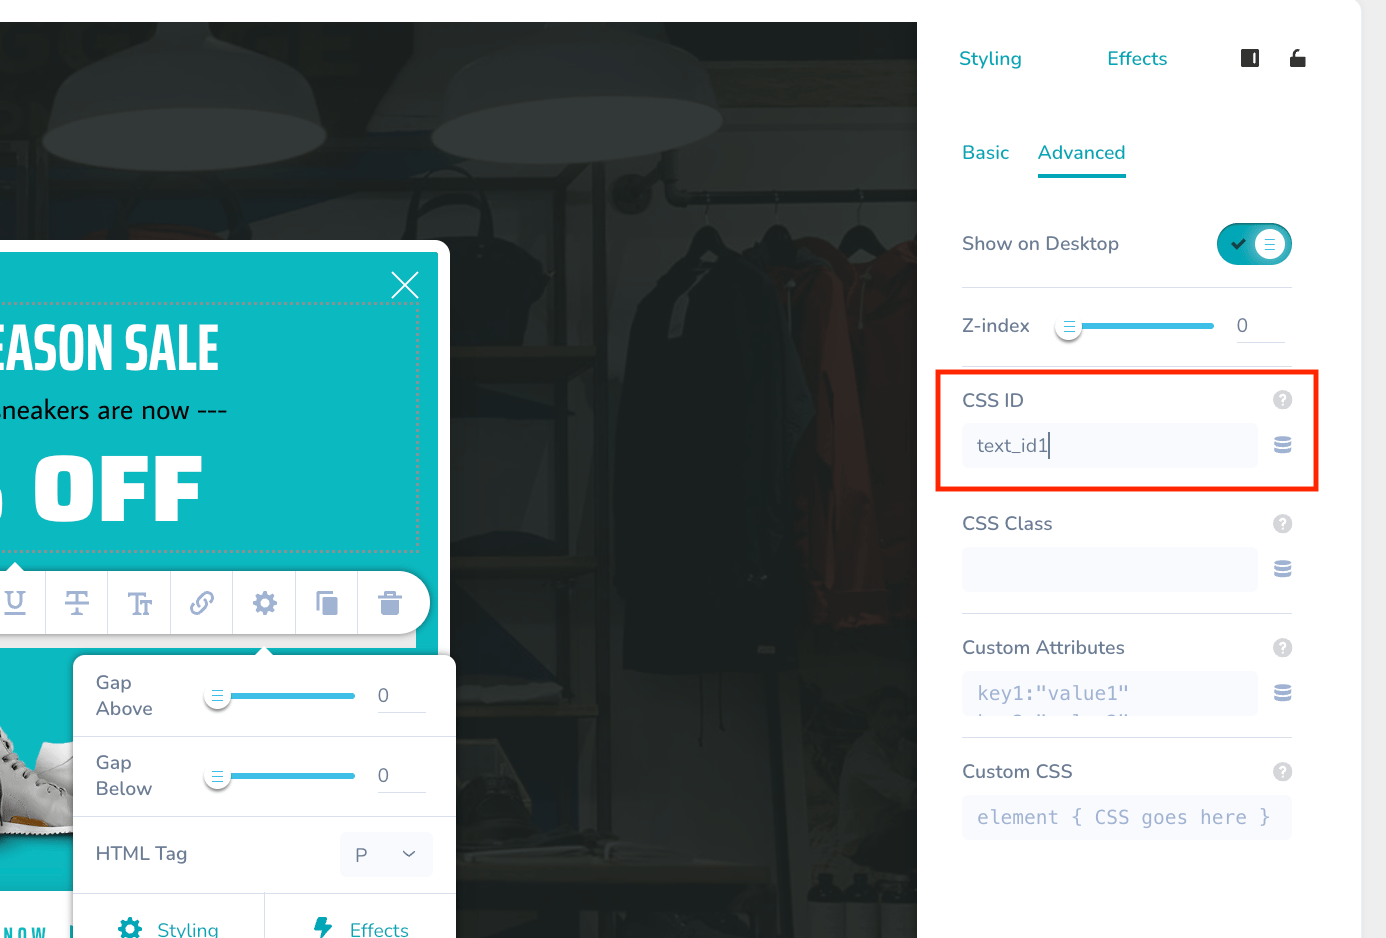
4. Add an Embed Element
Insert an embed element into your template. Note that this embed element will not be visible to the user and we will use it to only modify the font style within the template.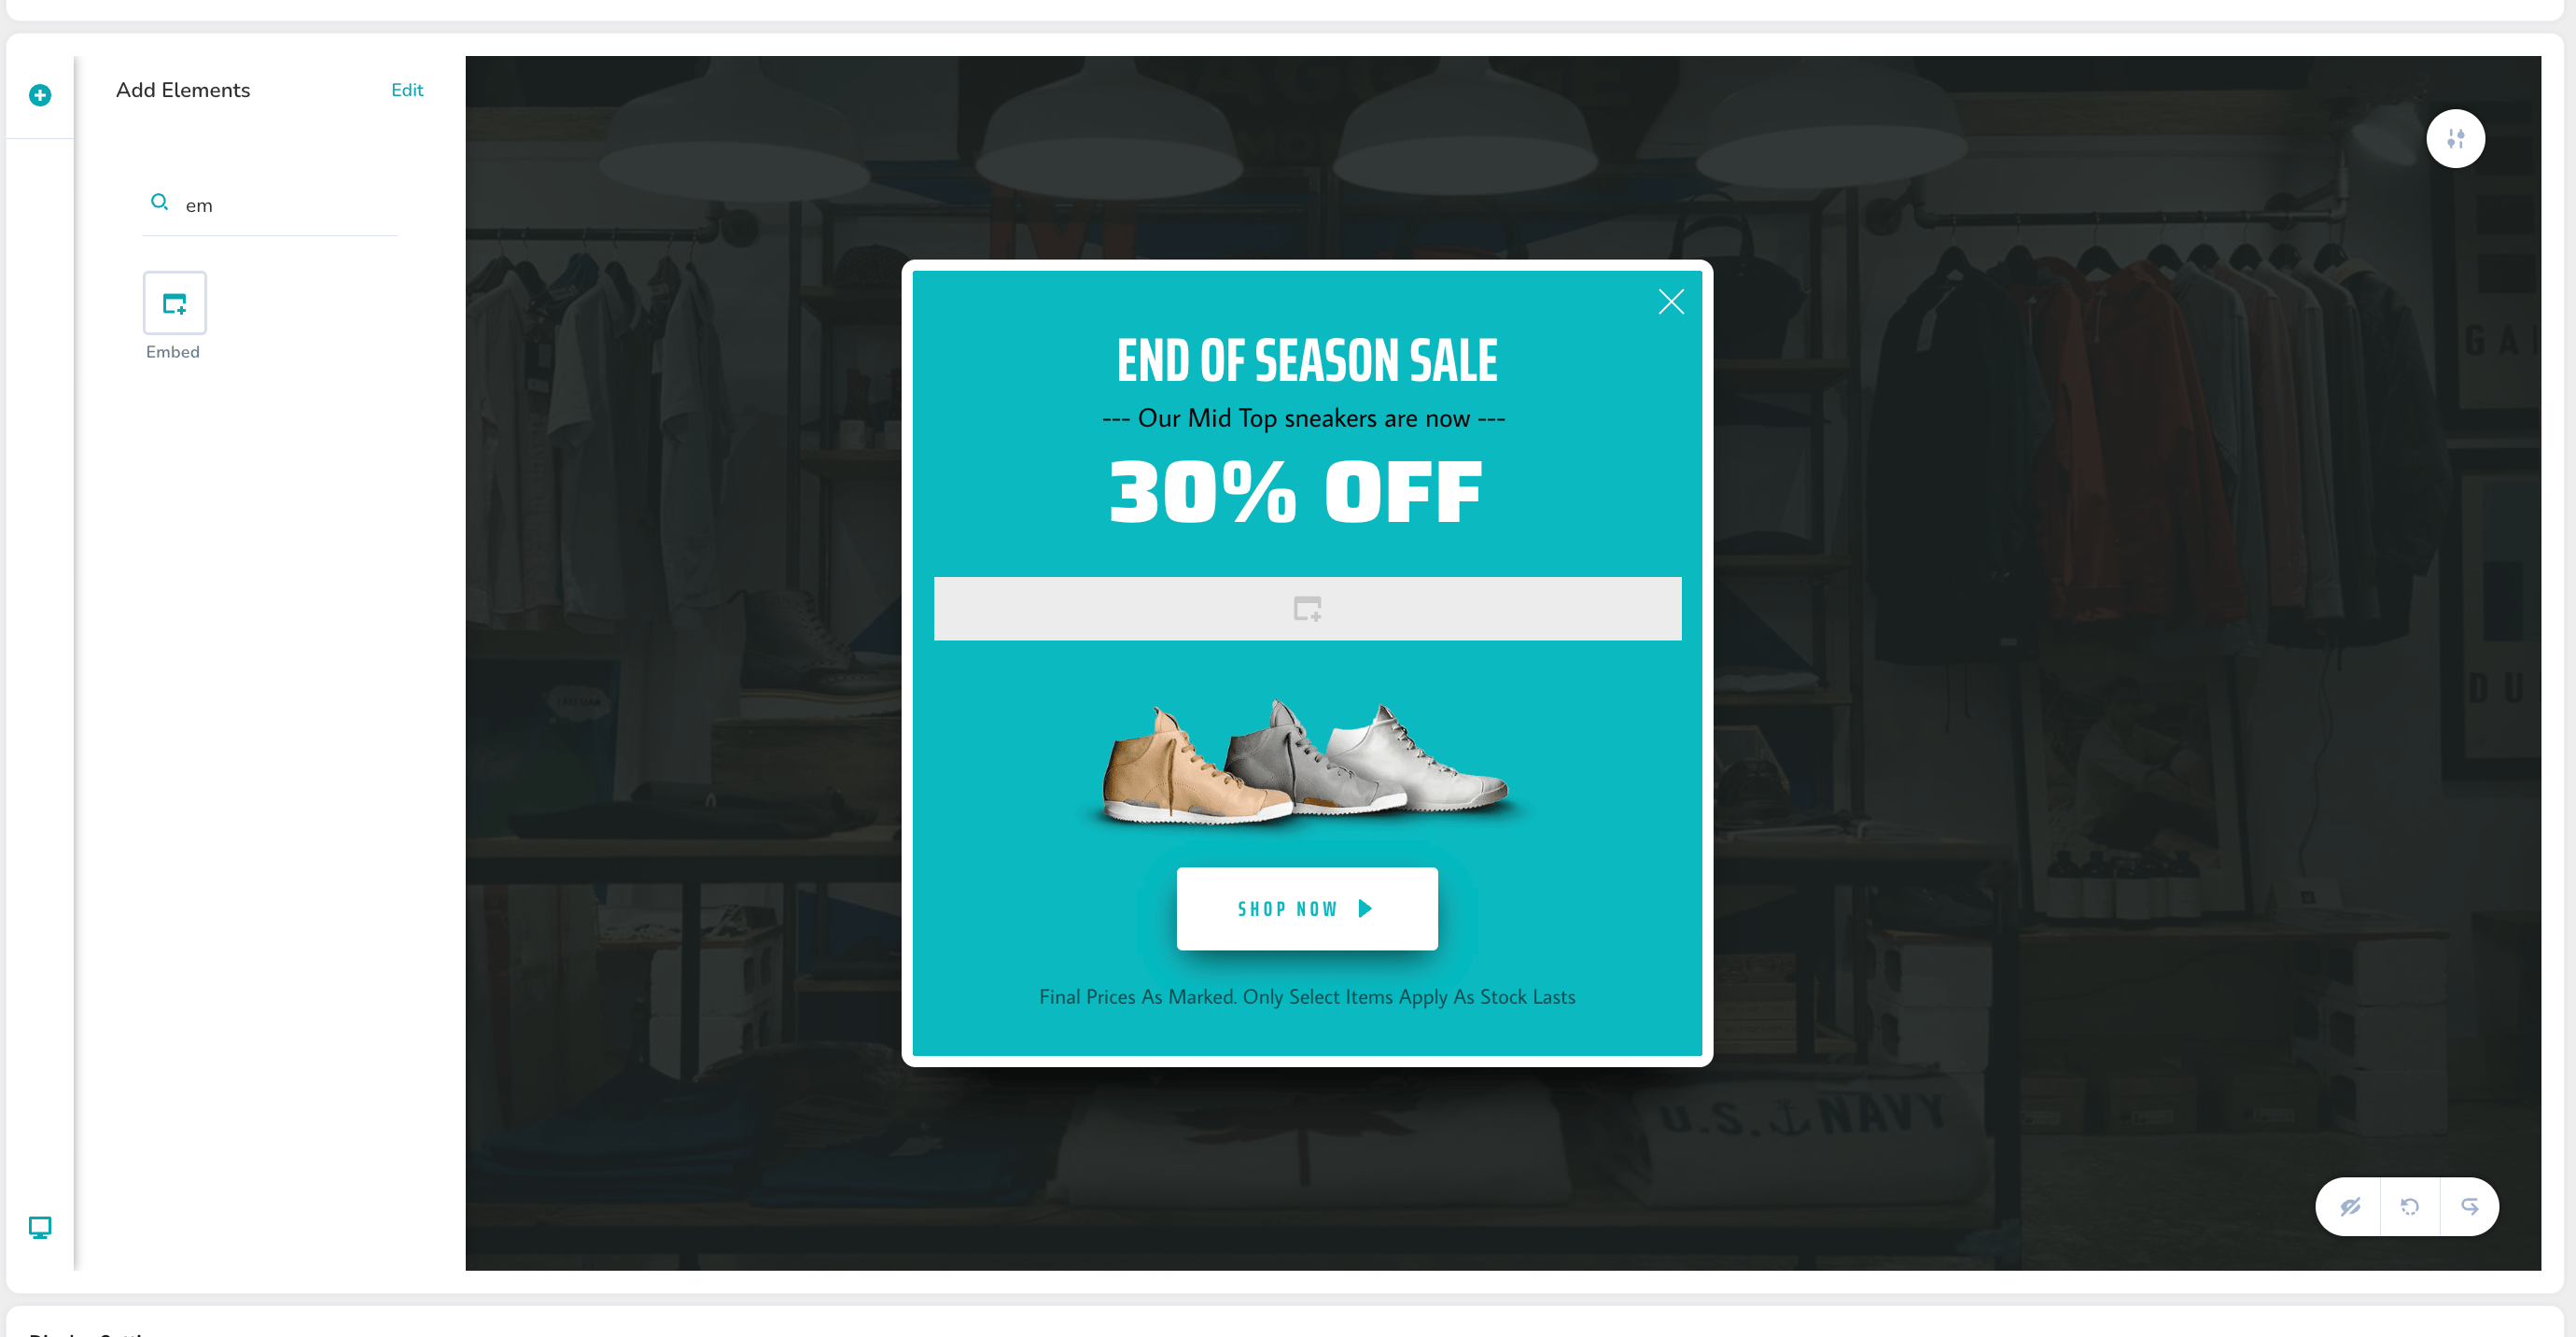
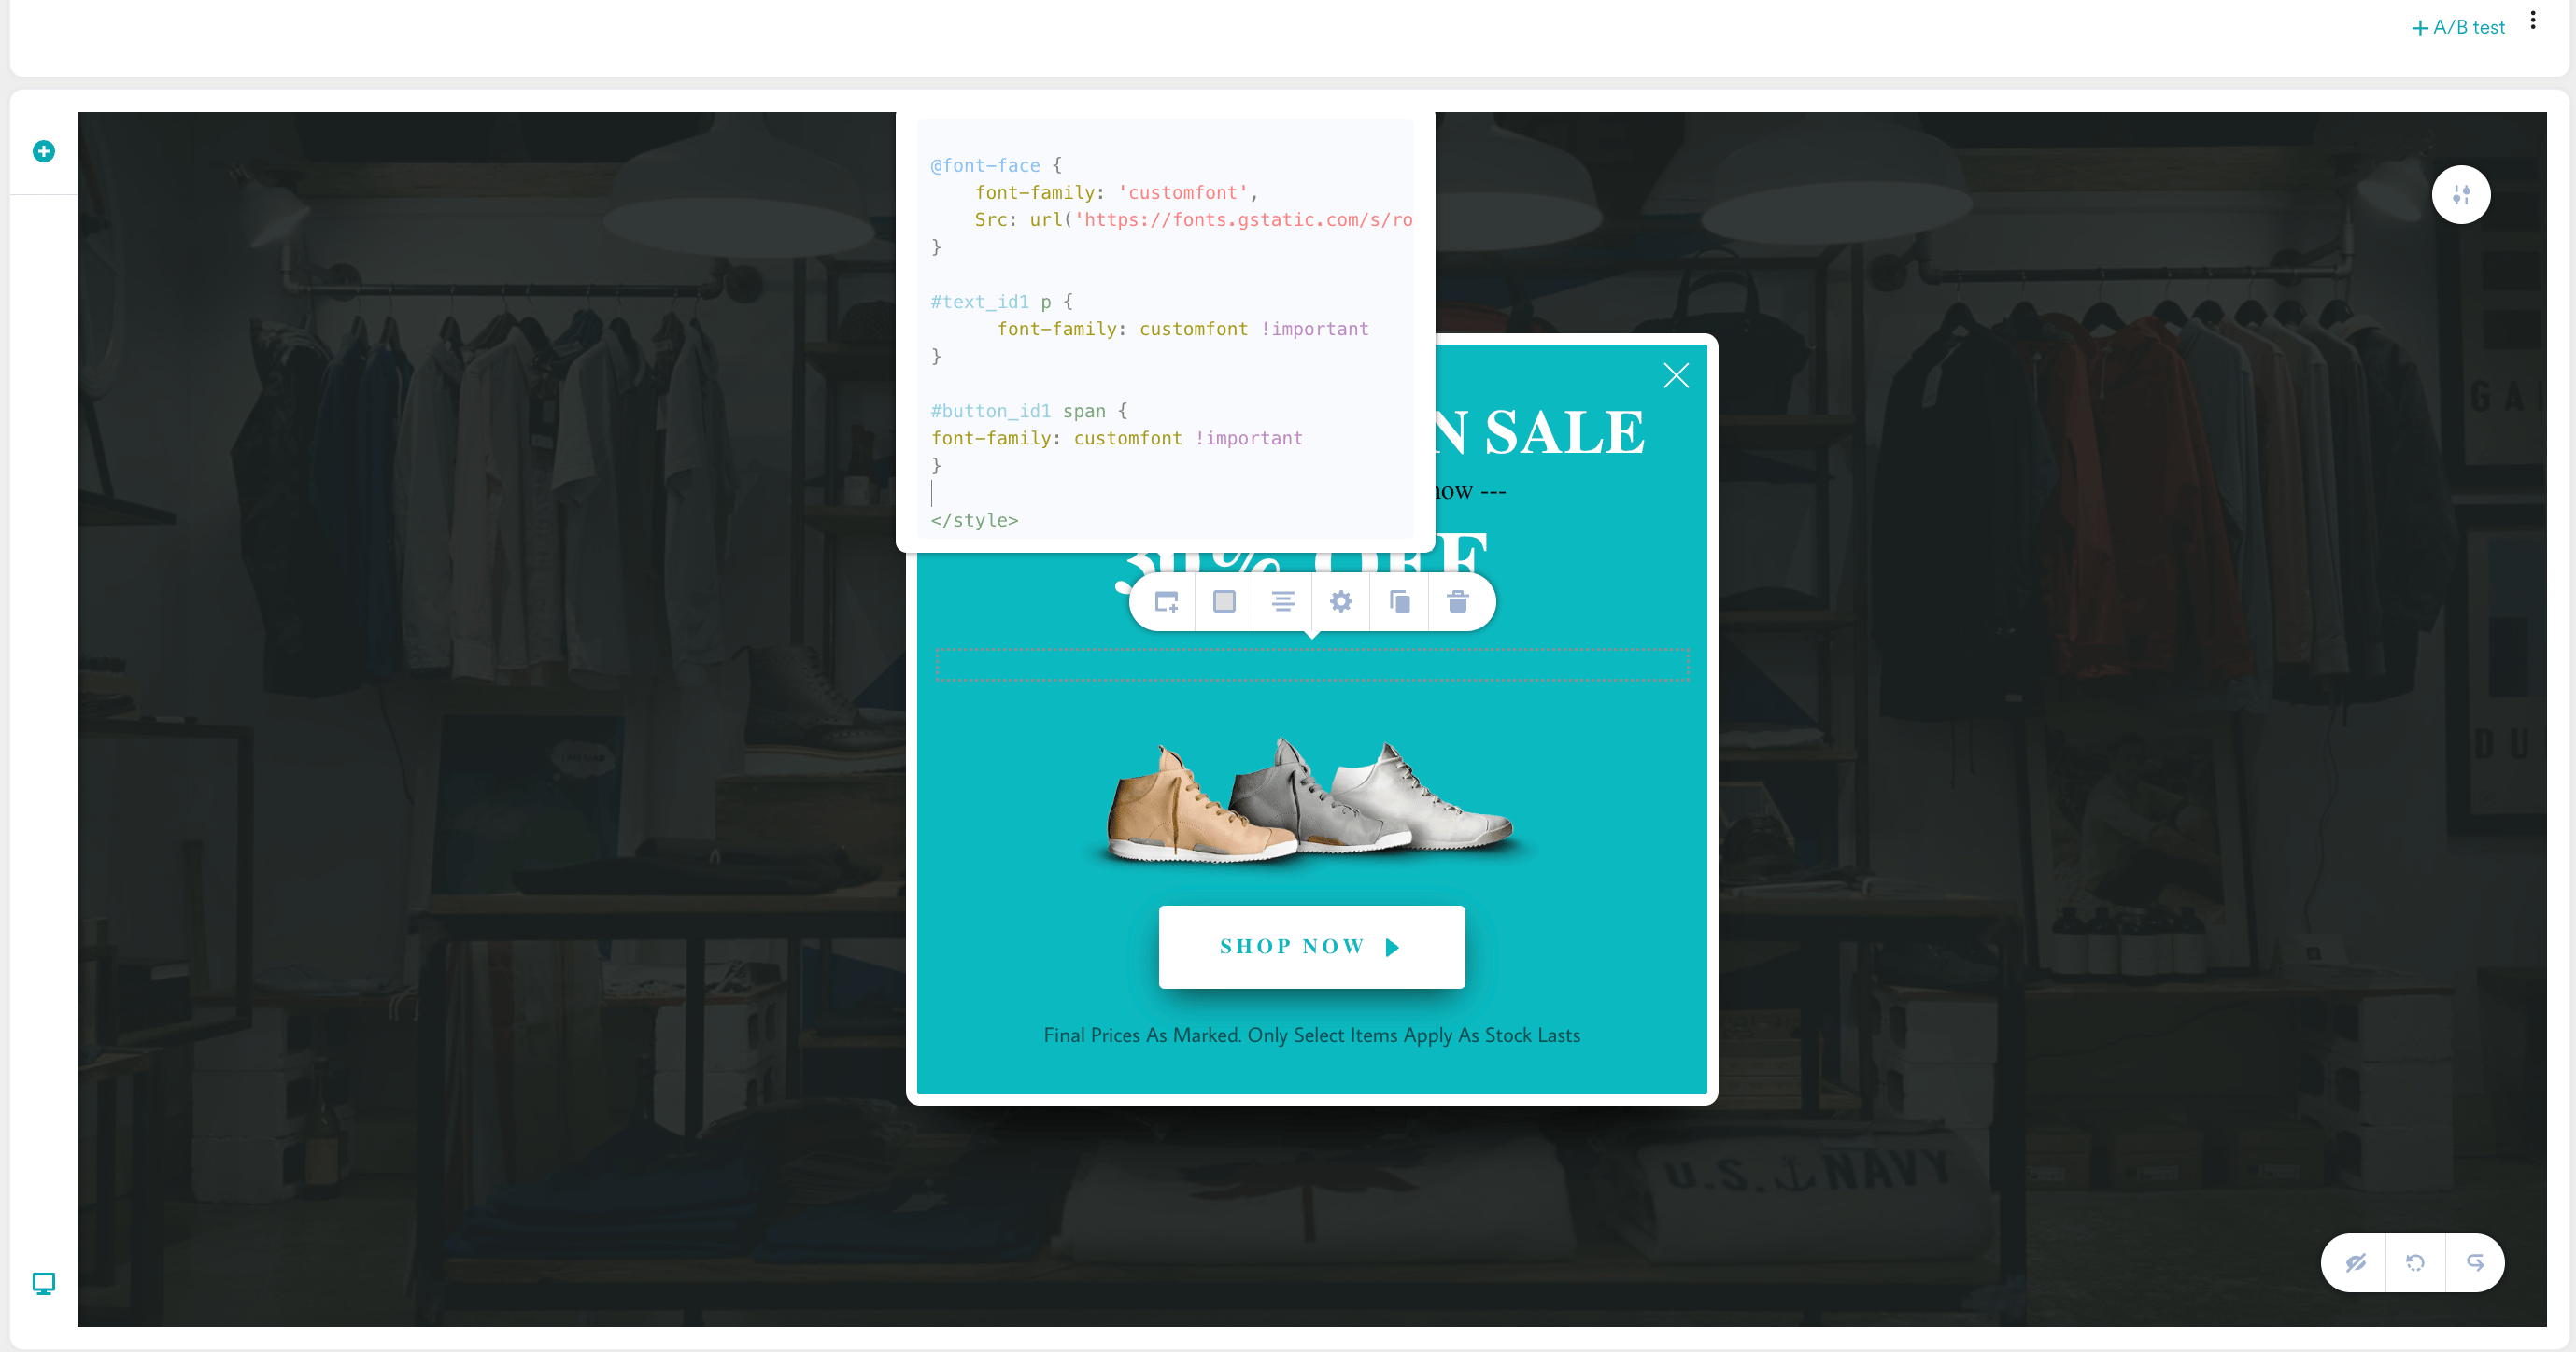
5. Insert Custom Font Code
Click on the previously added embed element and input the following CSS: HTMLtext_id1.
6. Customize Additional Elements
To change the font for other elements, such as buttons:- Assign a unique ID to the button as we did above for the text element, for example,
button_id1.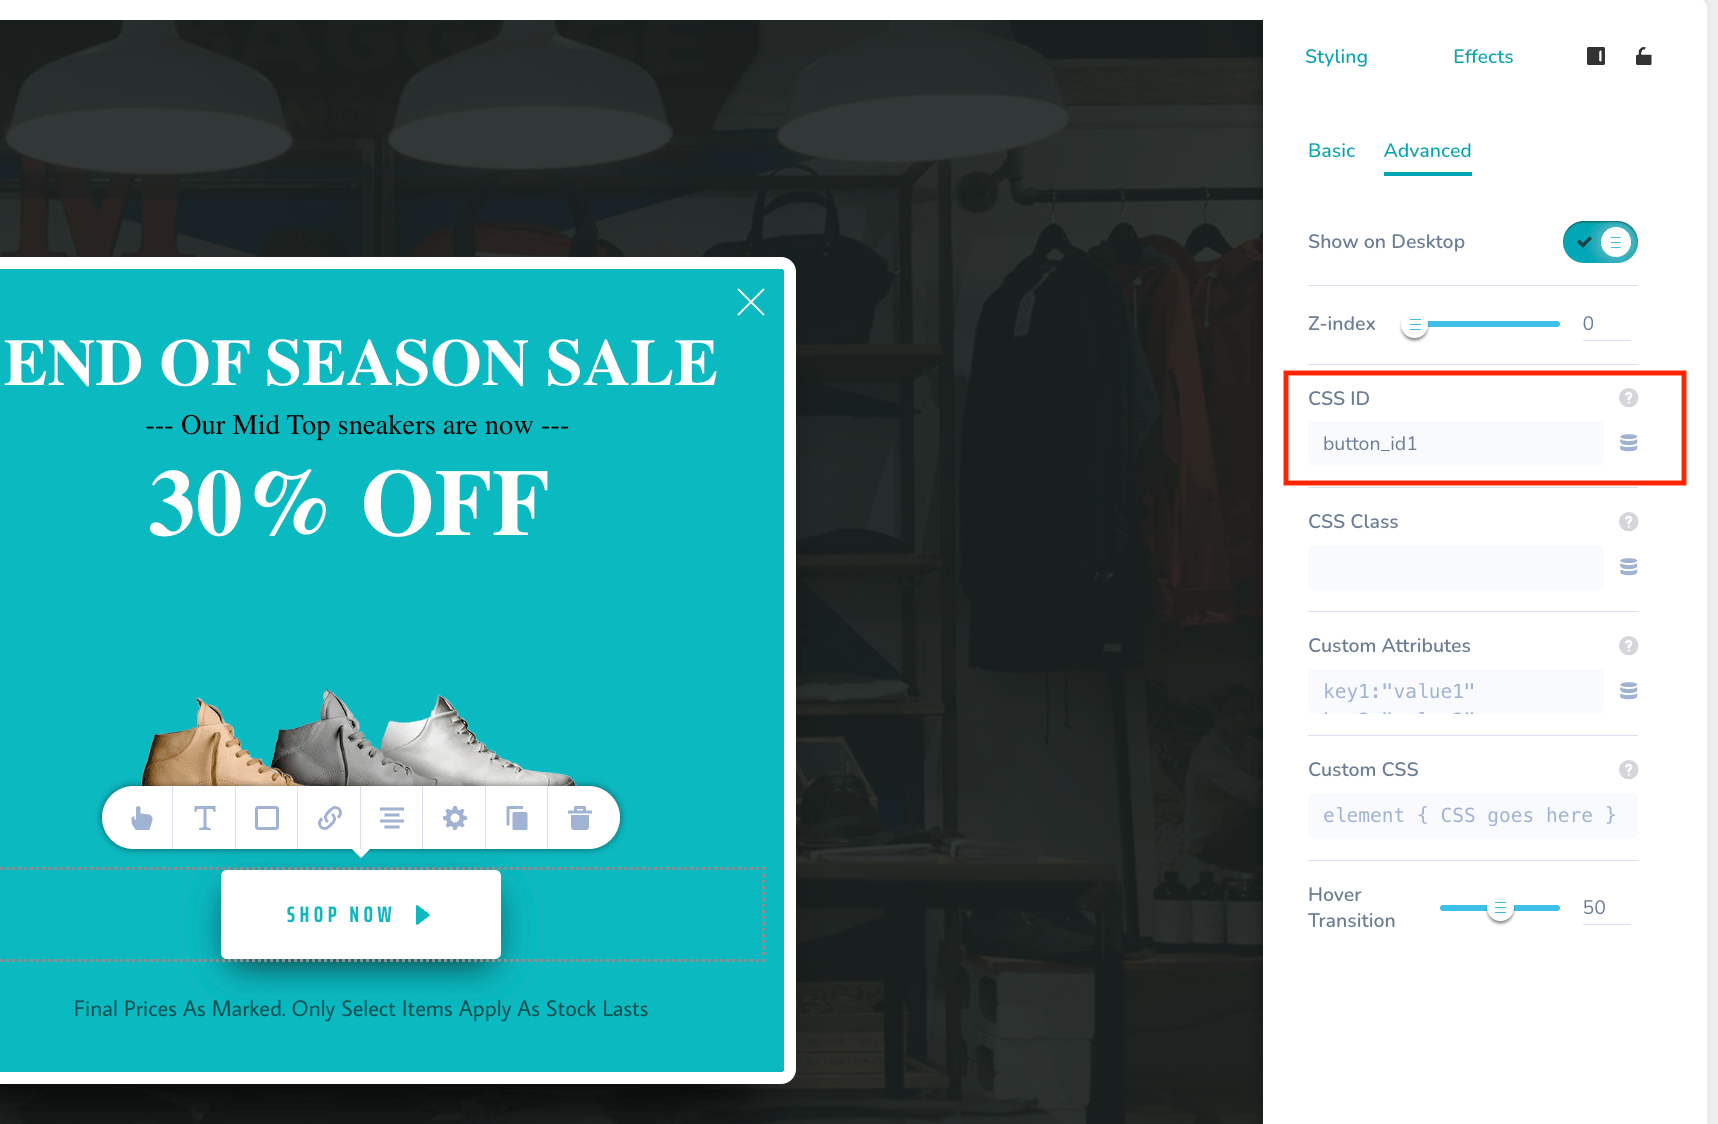
- Modify the CSS code to include the button ID:
#text_id1 and #button_id1, ensuring the custom font is used regardless of other styles.
7. Preview and Publish
After adding the CSS, preview your template to confirm that the font displays correctly. Once verified, you can publish your campaign.