Overview
You would often want to split your users based on certain conditions within a flow to personalize the experience or split your users randomly to experiment. MoEngage offers the following ways to split your users:Use Cases
Split Users Based on Conditions
The following are the use cases for splitting users on conditions:- Want to split your users based on their preferred languages? Add a Conditional Split to help you achieve the same.
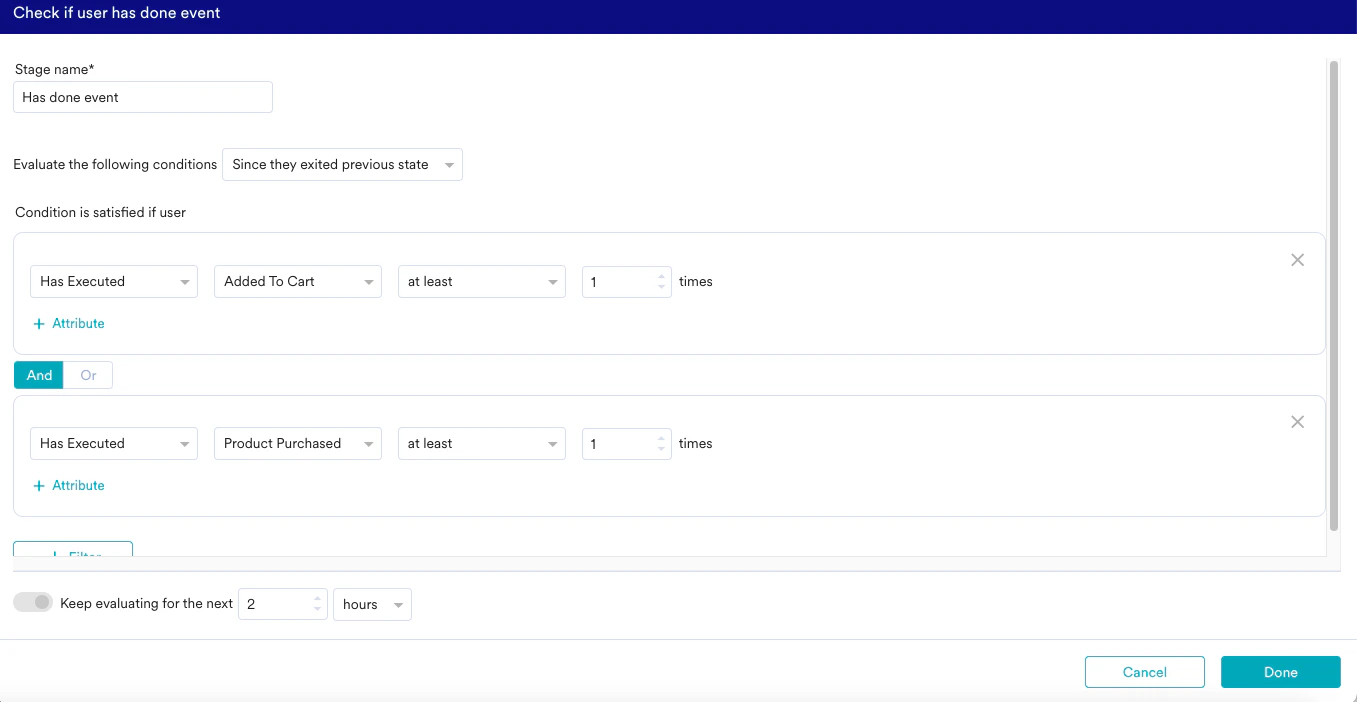
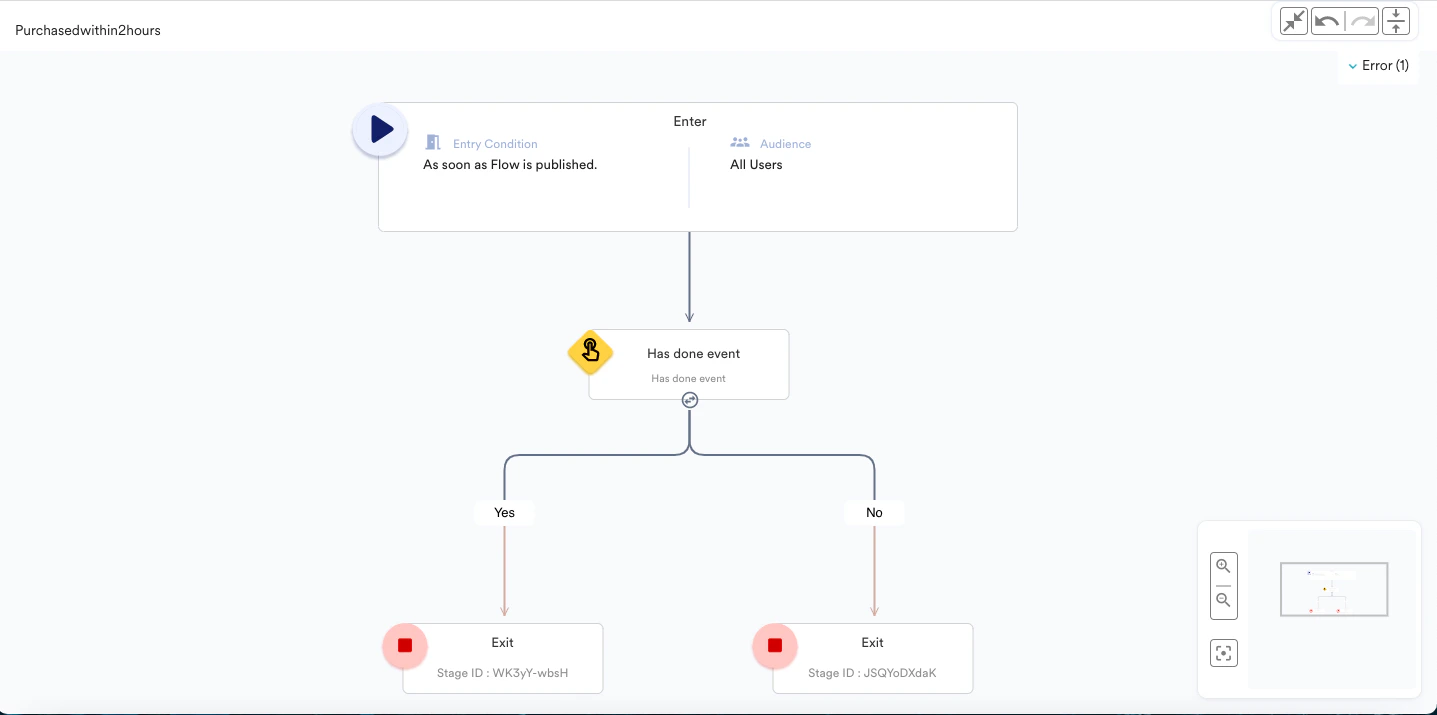
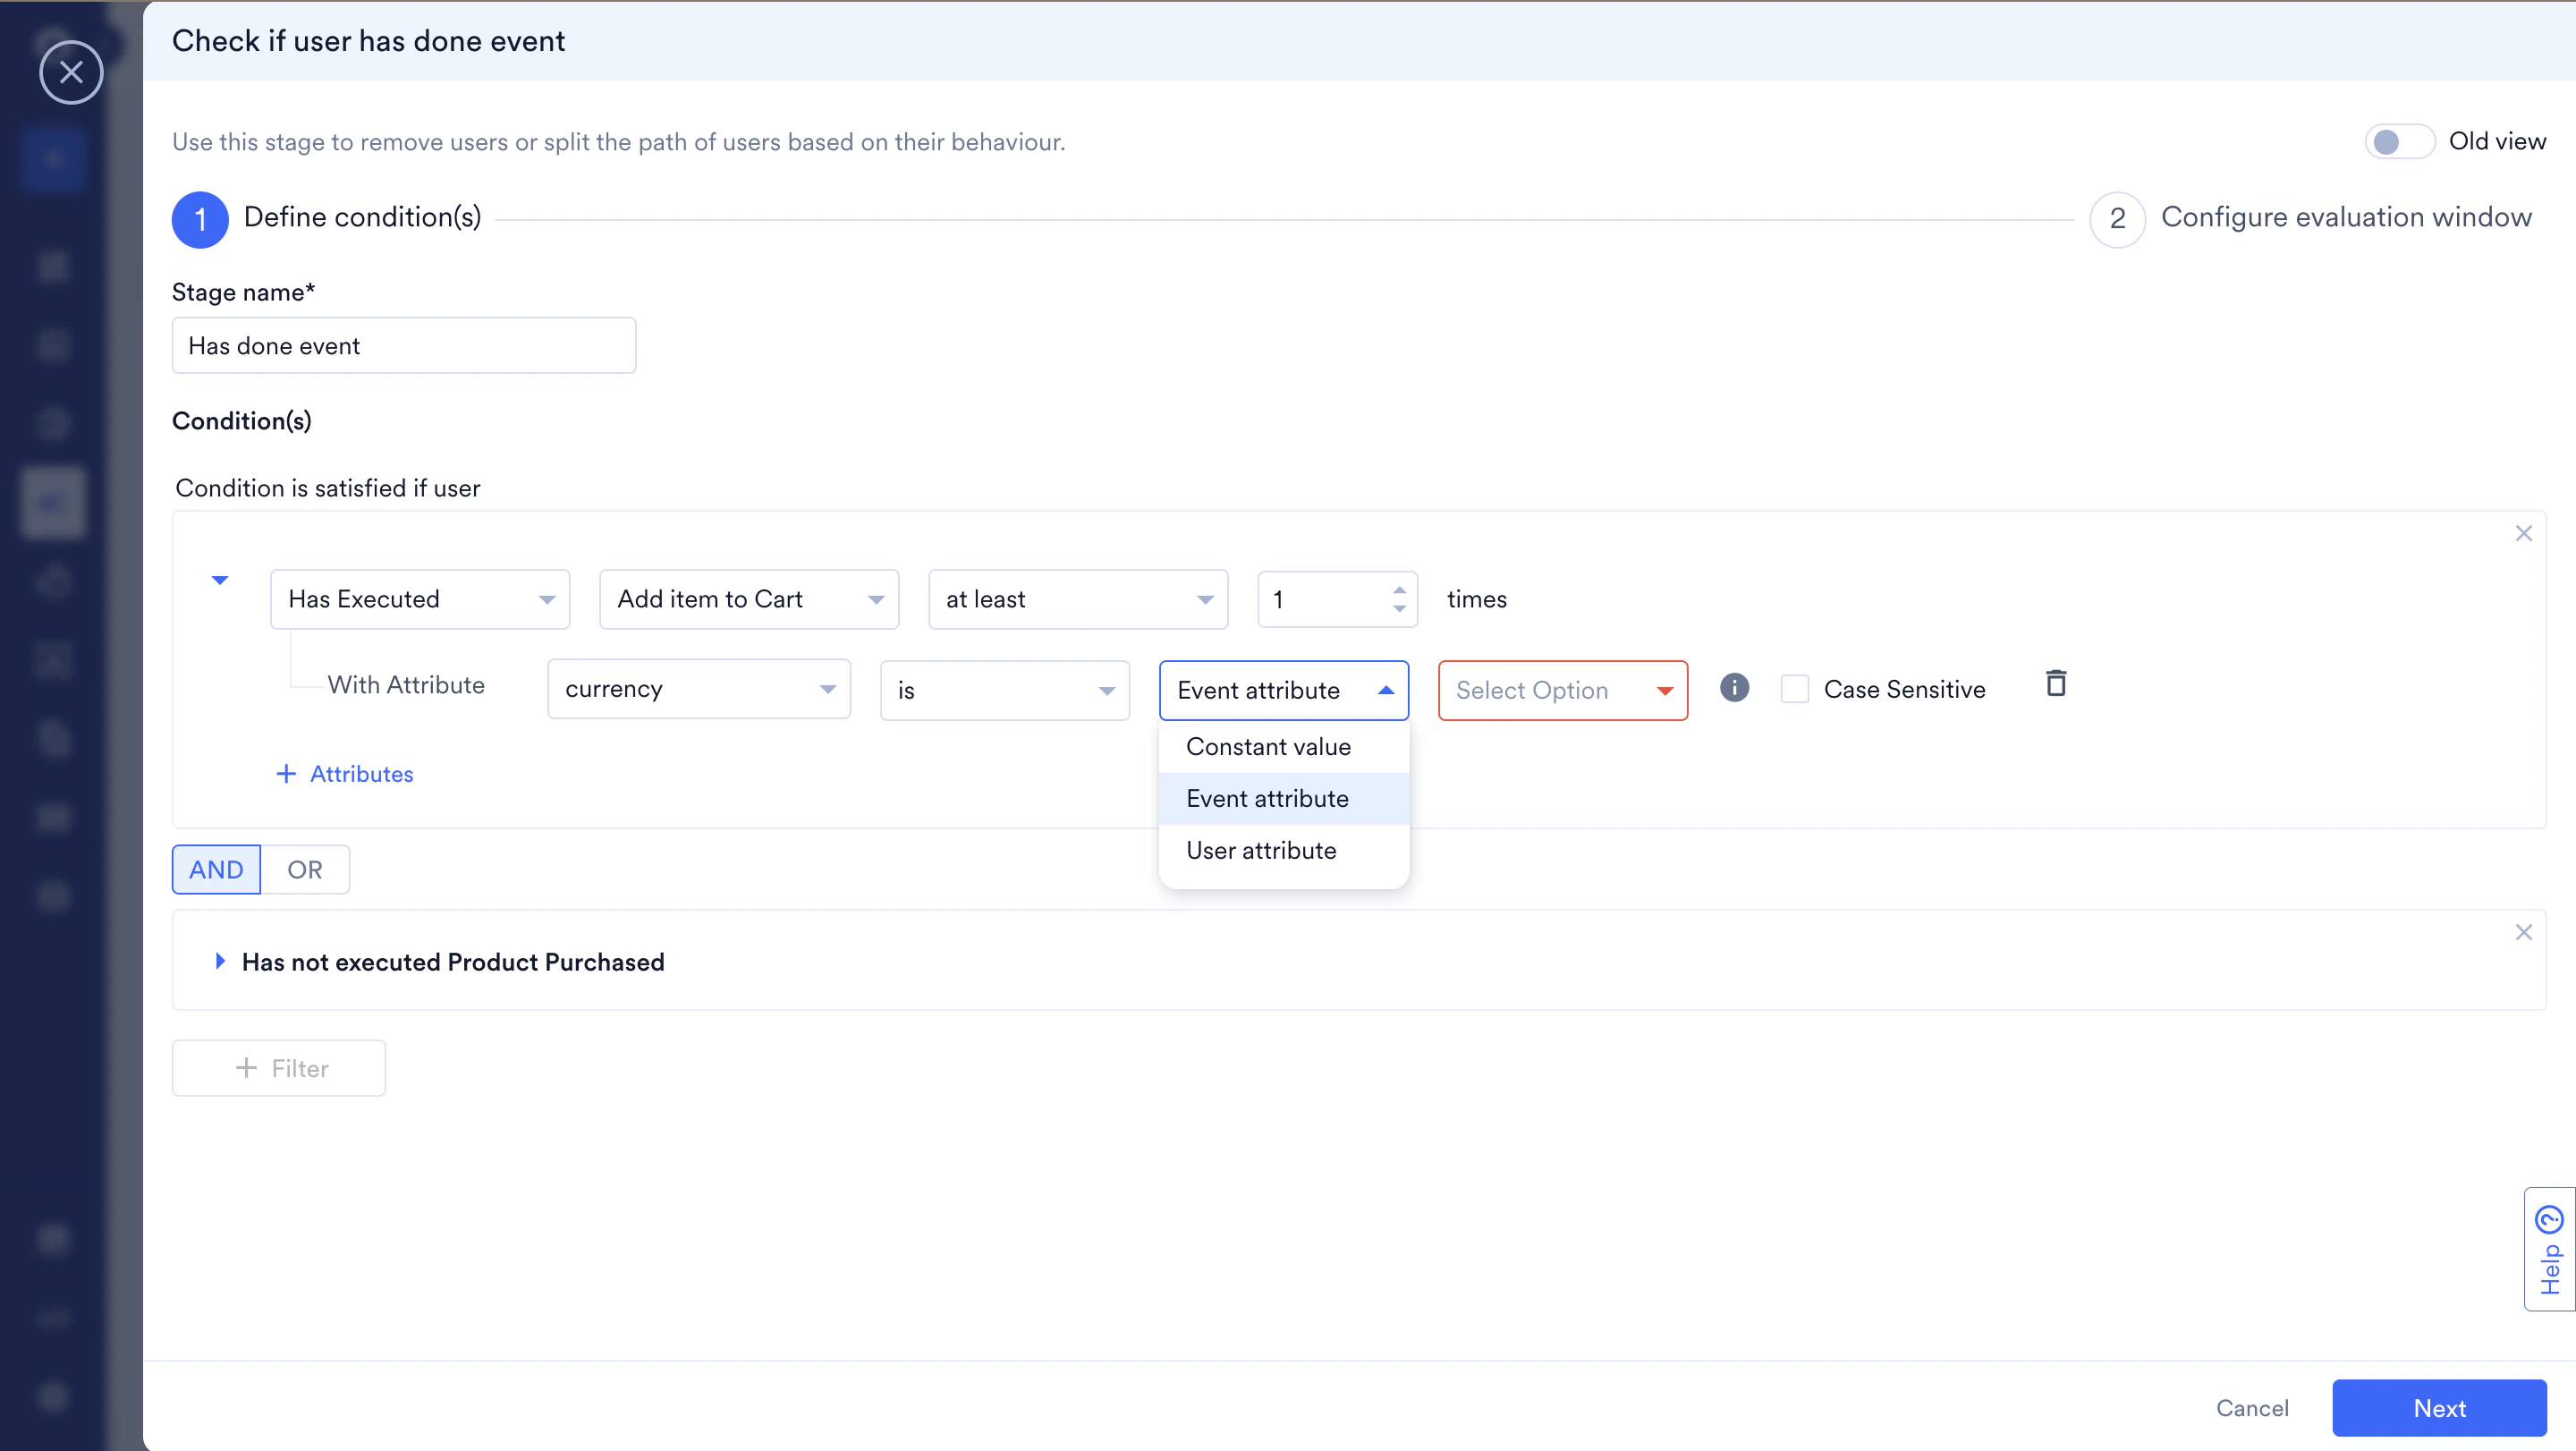
- Want to exit users who have done a specific action? Add a Has Done Event stage to help you achieve the same.
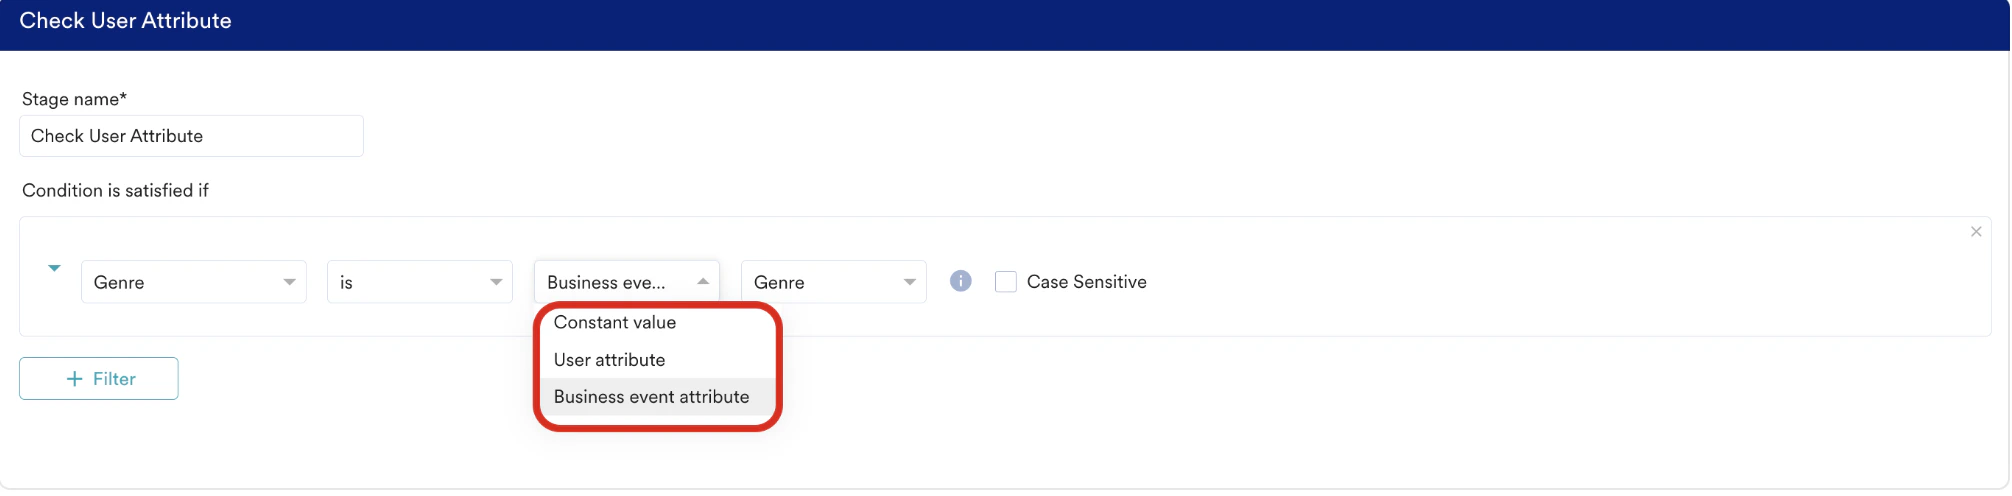
- Want to exit users whose user property meets a specific value? Add a Check User Attribute stage to help you achieve the same.
- Want to split users based on whether the last email was sent to the users? Add an On Send Email Message stage to help you achieve the same.
Split Users Randomly
The following is the use case for splitting users randomly:- Want to split users randomly to find the channel type that works for my user base? Add an A/B split stage to help you achieve the same.
When you want to divide your users based on the Entry Criteria, add a Conditional Split or a Has Done Event Stage and select the option under the Flow Entry Events Category. When this option is selected, MoEngage considers the event that allowed the user to enter the flow while deciding the path for the user.
Add Condition Stages
Perform the following steps to add condition stages:- On the MoEngage Canvas, click +.
- In the Add stage dialog box, do one of the following:
- In the search bar, search for the stage directly. From the search result, click the option you want to add. For example, if you search for “conditional”, the Conditional Split option is displayed.
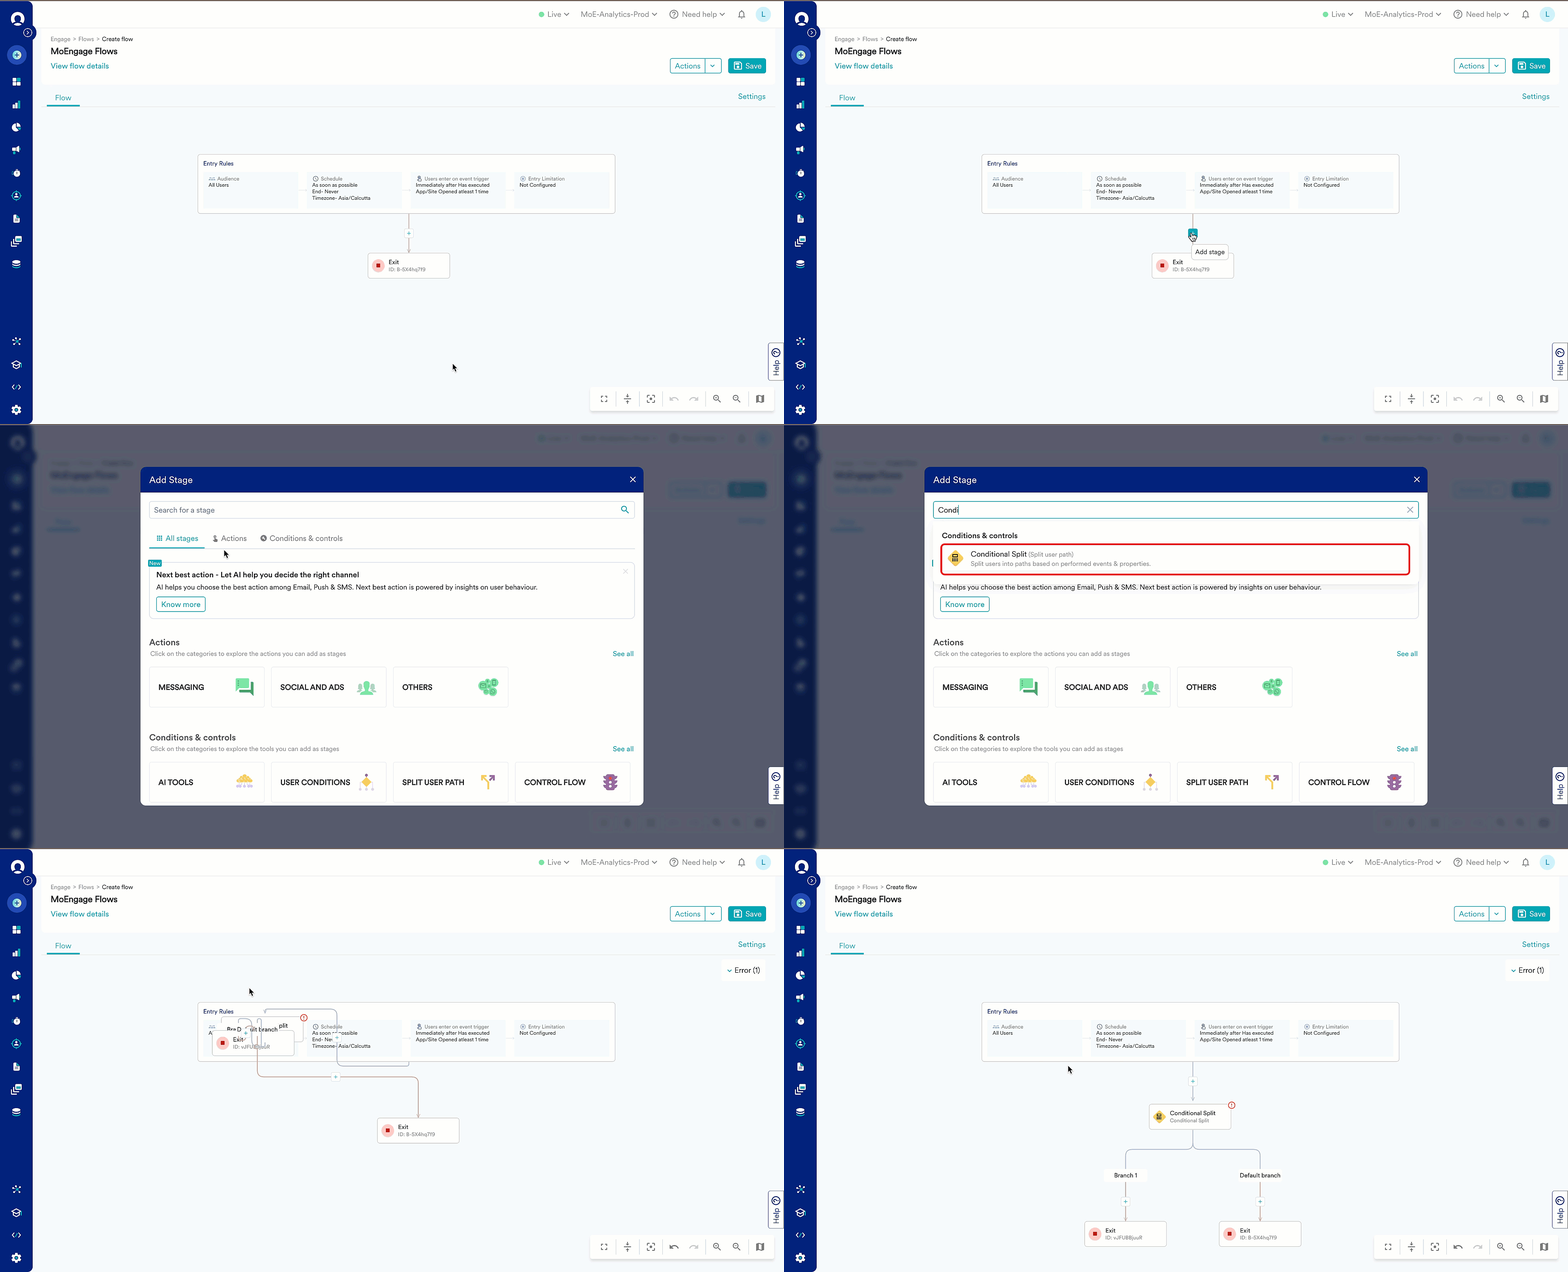
- On the All stages tab:
- Under Conditions & controls, click the category to explore the condition stages you can add:
- Click the stage you want to add.
 The five frequently used stages are displayed under the Frequently Used section on the All stages tab. The list of available stages changes dynamically based on your workspace. Click the required stage to add it to the flow.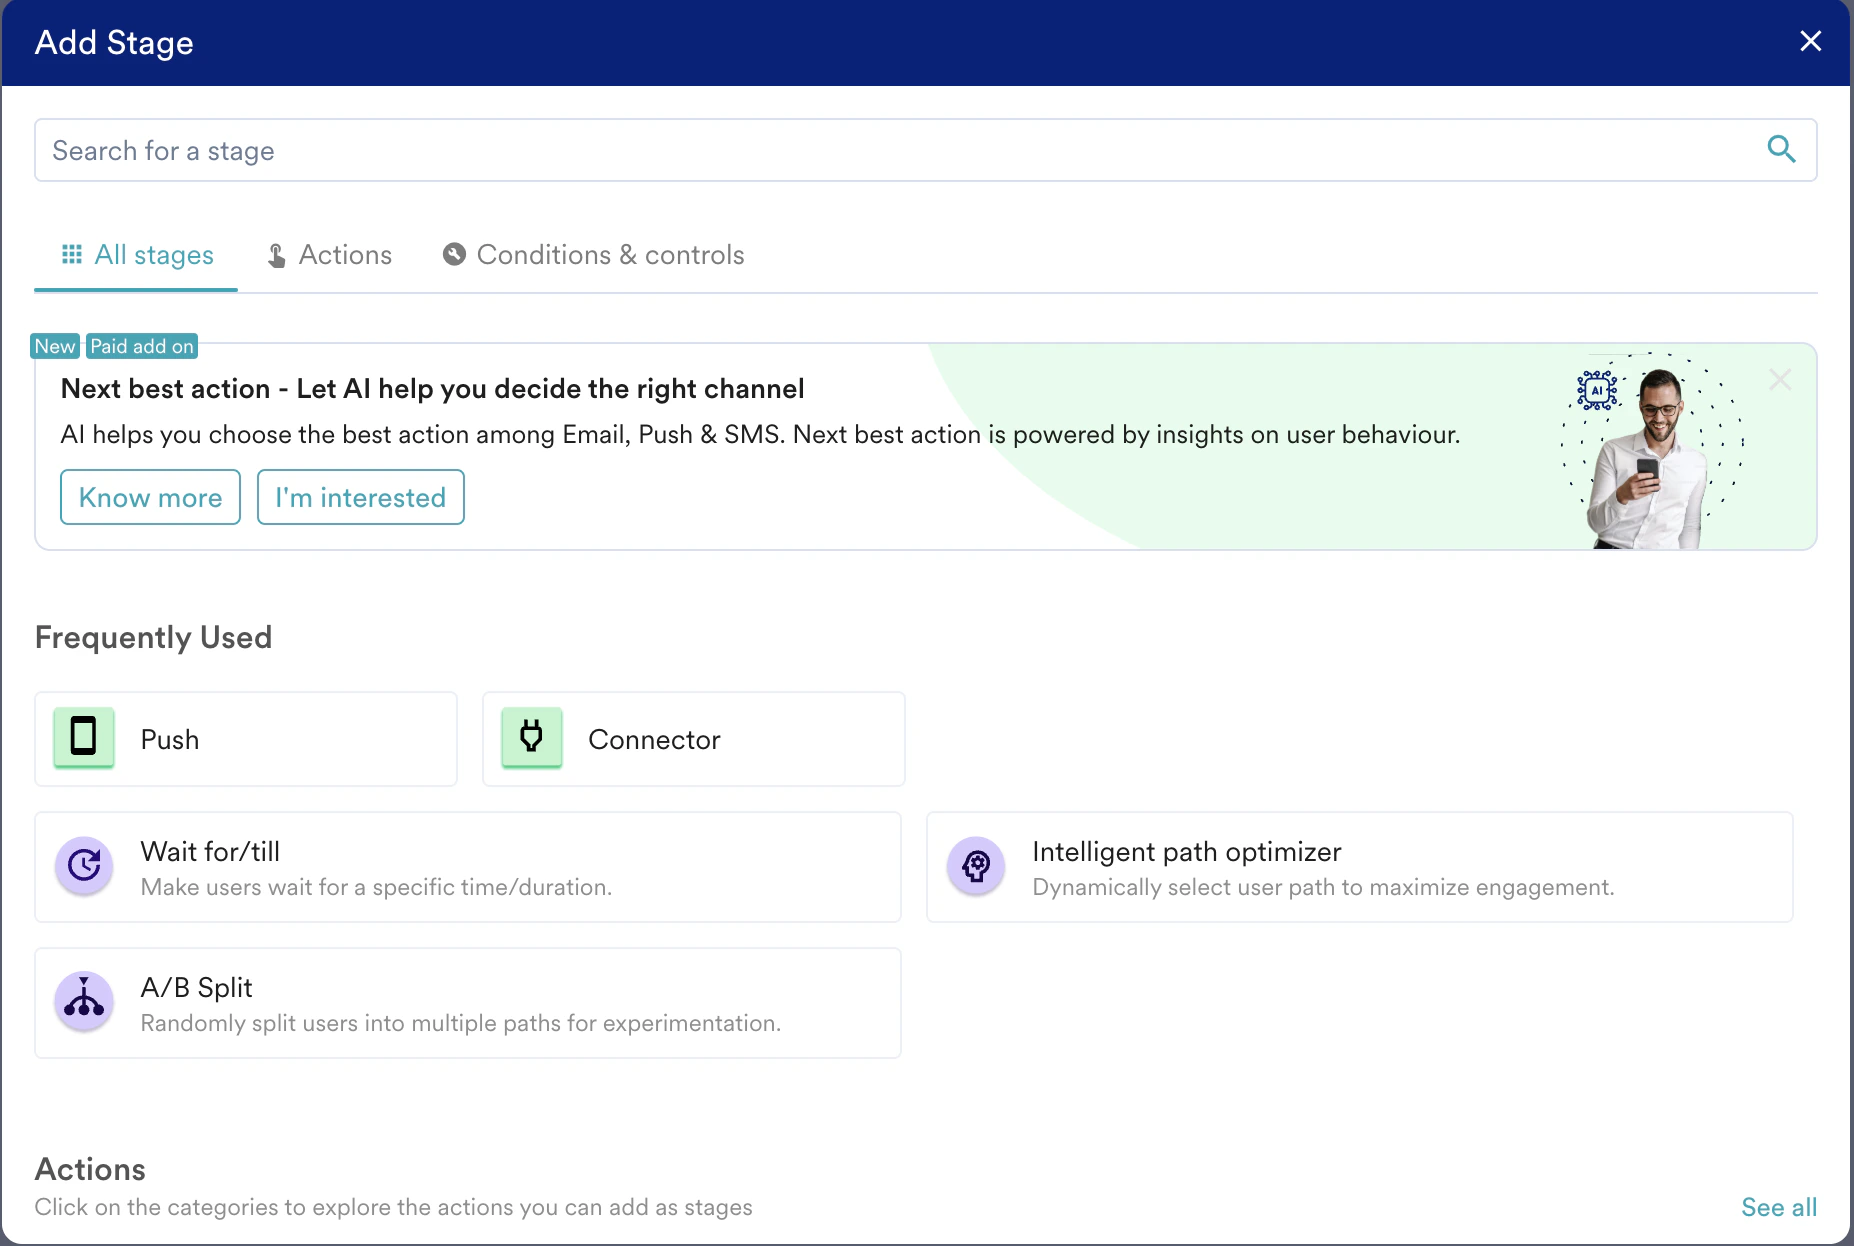
- Under Conditions & controls, click the category to explore the condition stages you can add:
- On the Conditions & controls tab, click the stage you want to add.
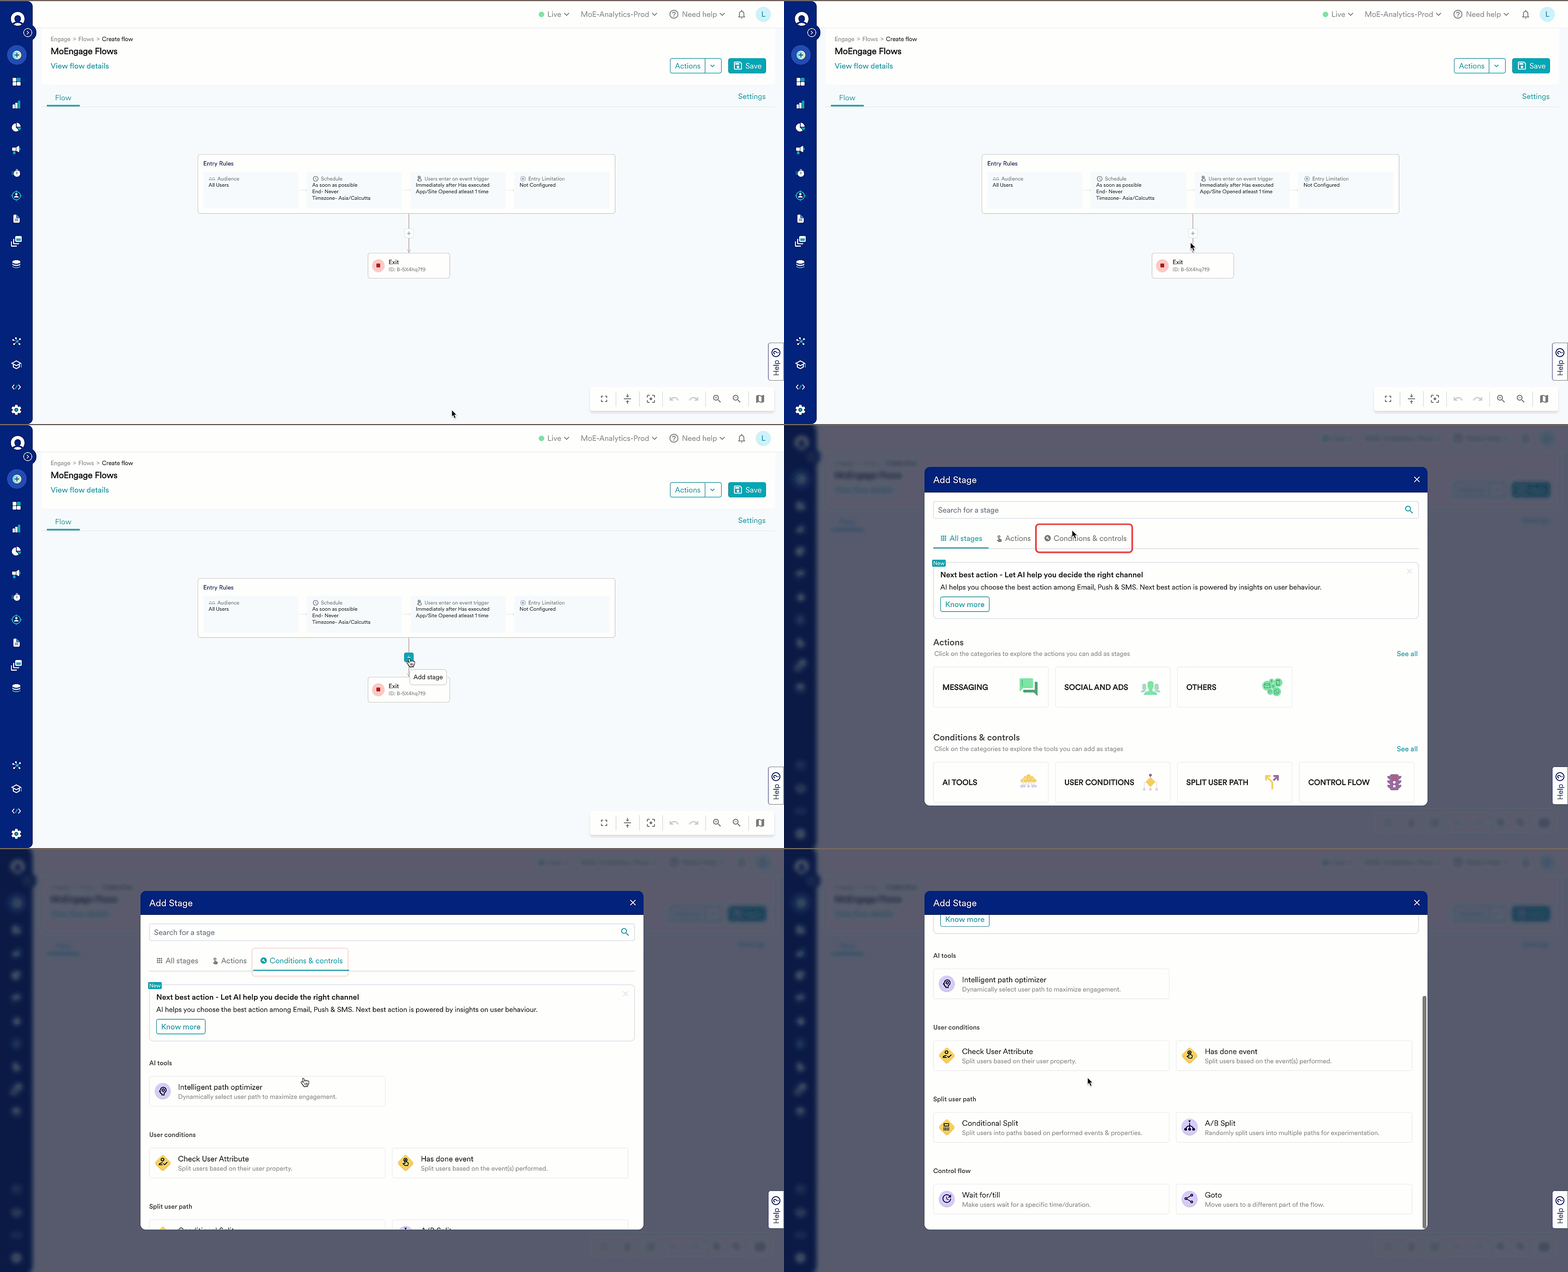
- In the search bar, search for the stage directly. From the search result, click the option you want to add. For example, if you search for “conditional”, the Conditional Split option is displayed.
Configure Condition Stages
Split Users on Conditions
- Conditional Split
- Check user property
- Has done event
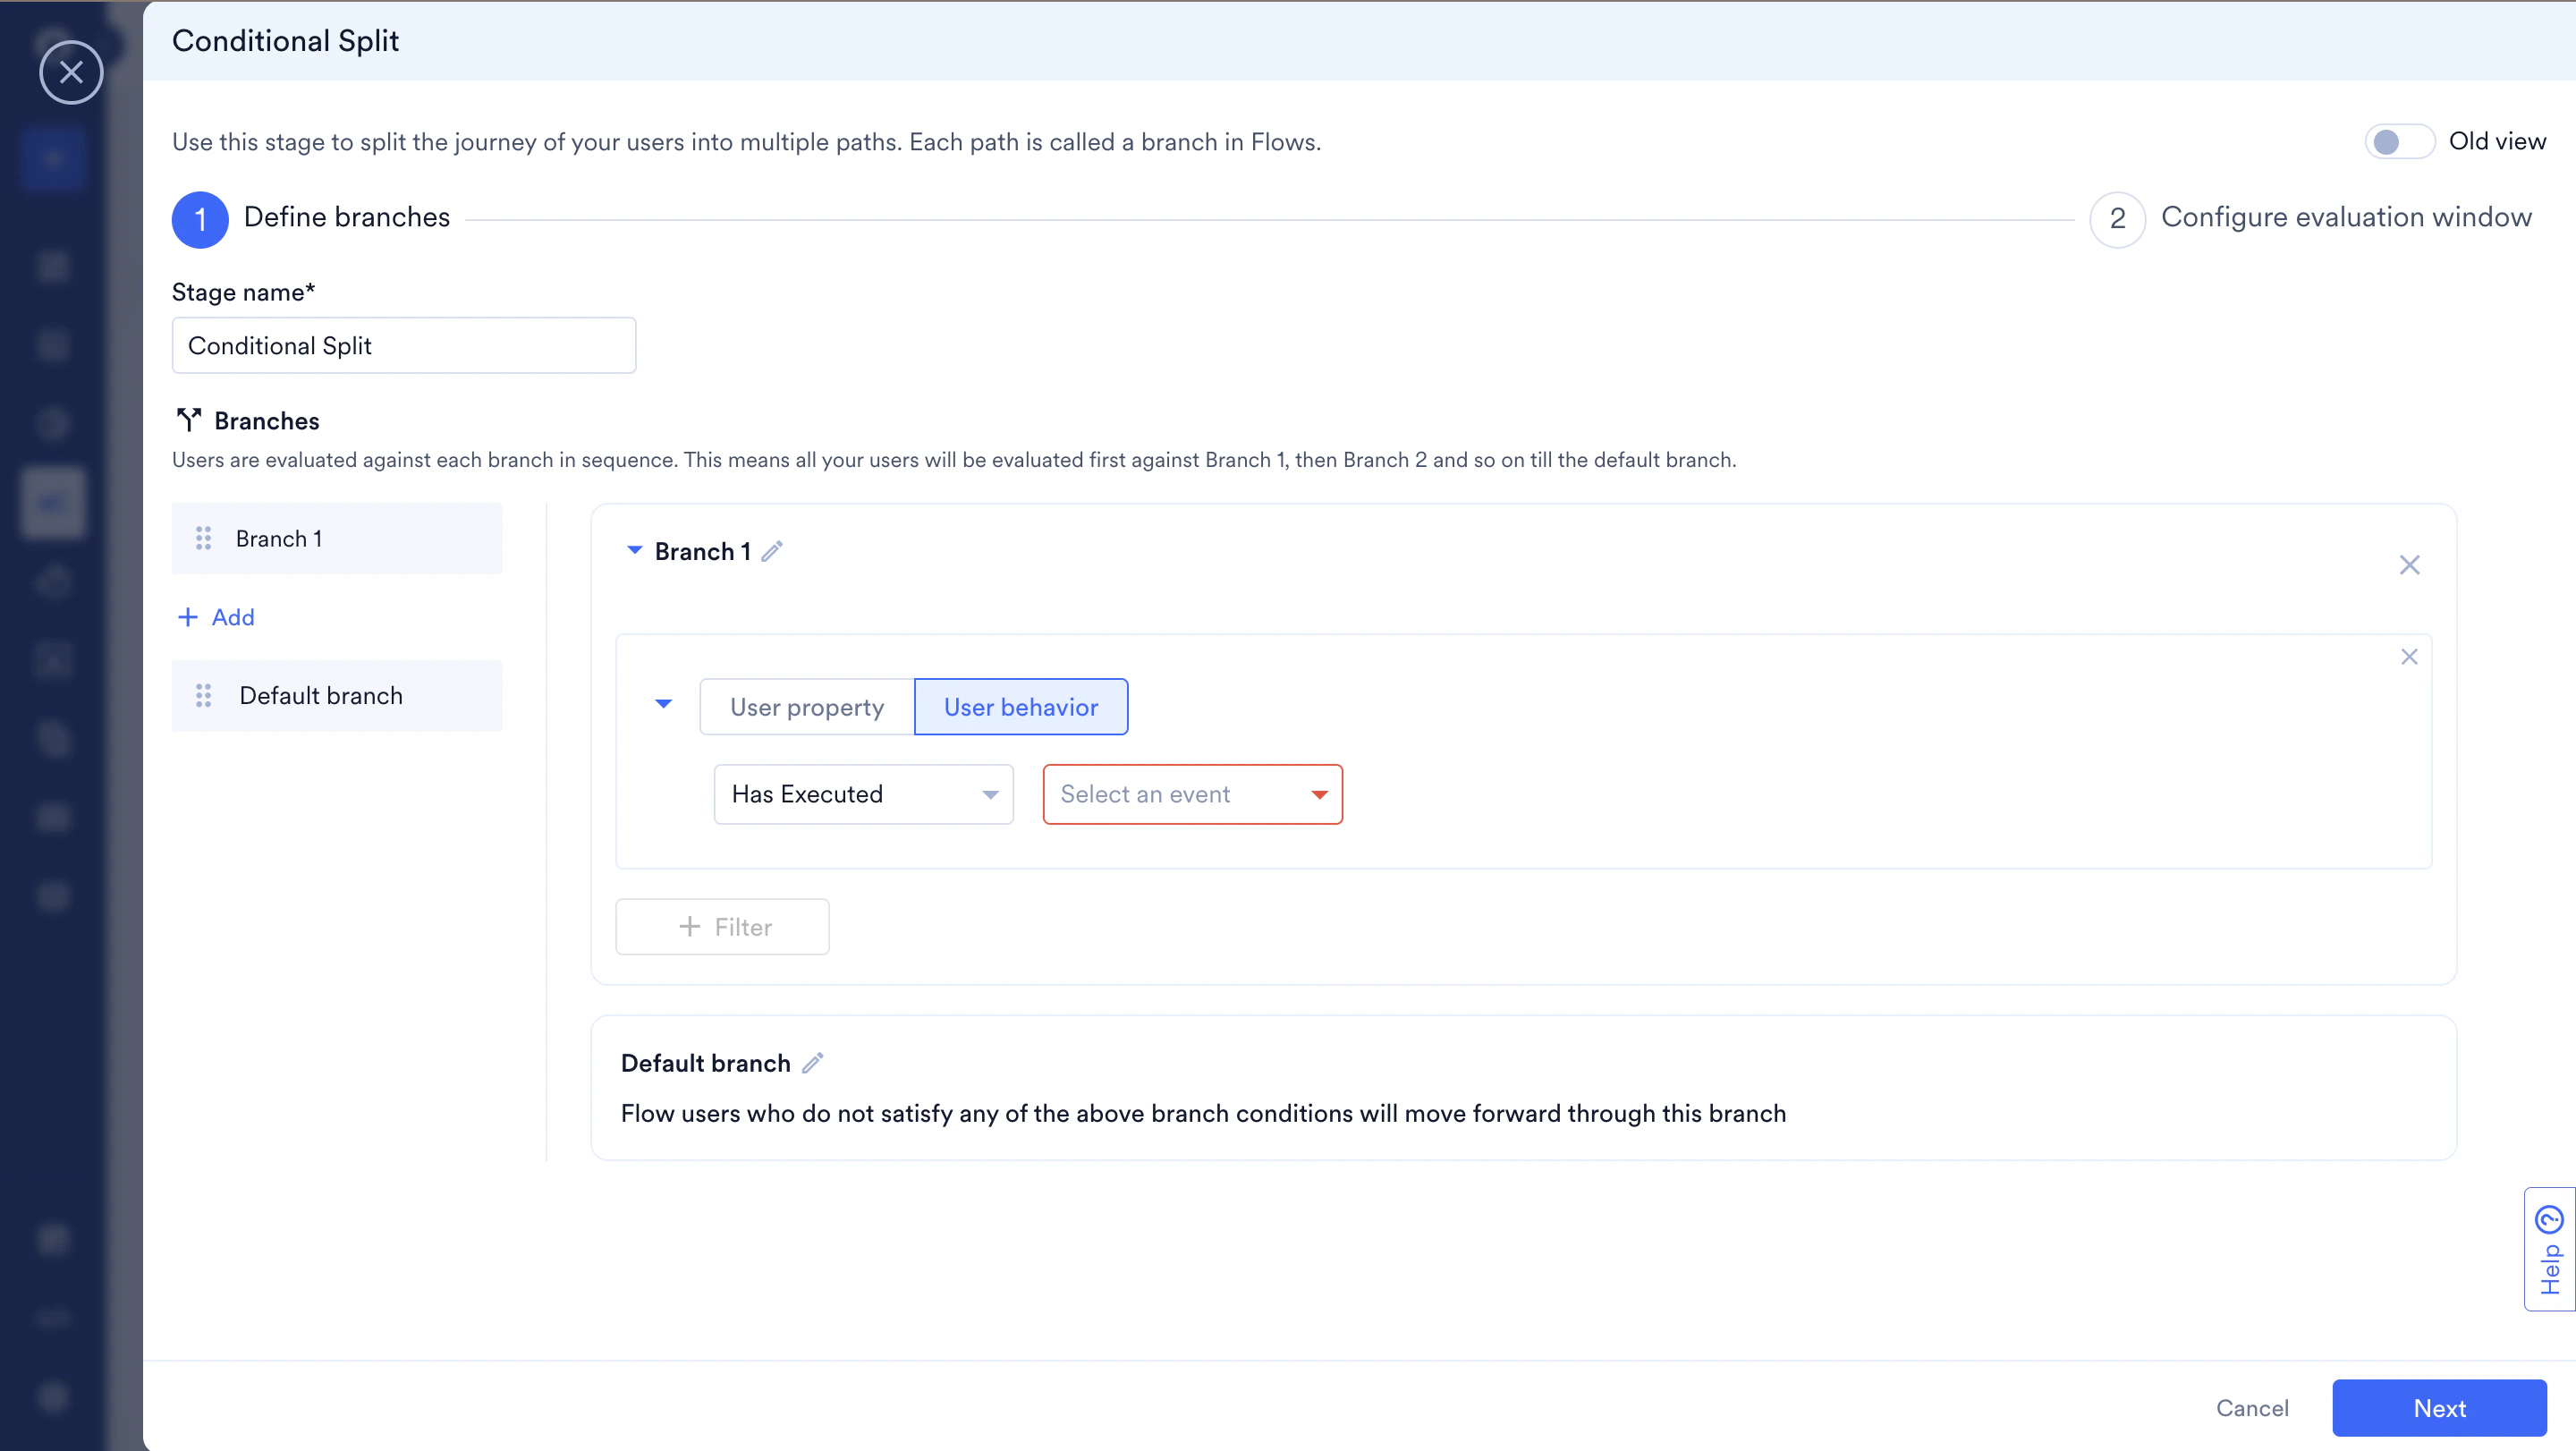
After adding a Conditional Split stage, perform the following steps to configure it:
When you edit a published flow having a conditional split, the following are applicable:
This is an Early Access feature. To enable it for your account, please contact your MoEngage Customer Success Manager (CSM) or the Support team.
Step 1: Define Branches
| Field | Description |
|---|---|
| Stage name | Enter a name for the stage to manage and identify the condition. |
| Branches | Users are evaluated against each branch in sequence. All users are evaluated first against Branch 1, then Branch 2, and so on, until the default branch.
|
| +Filter |
|
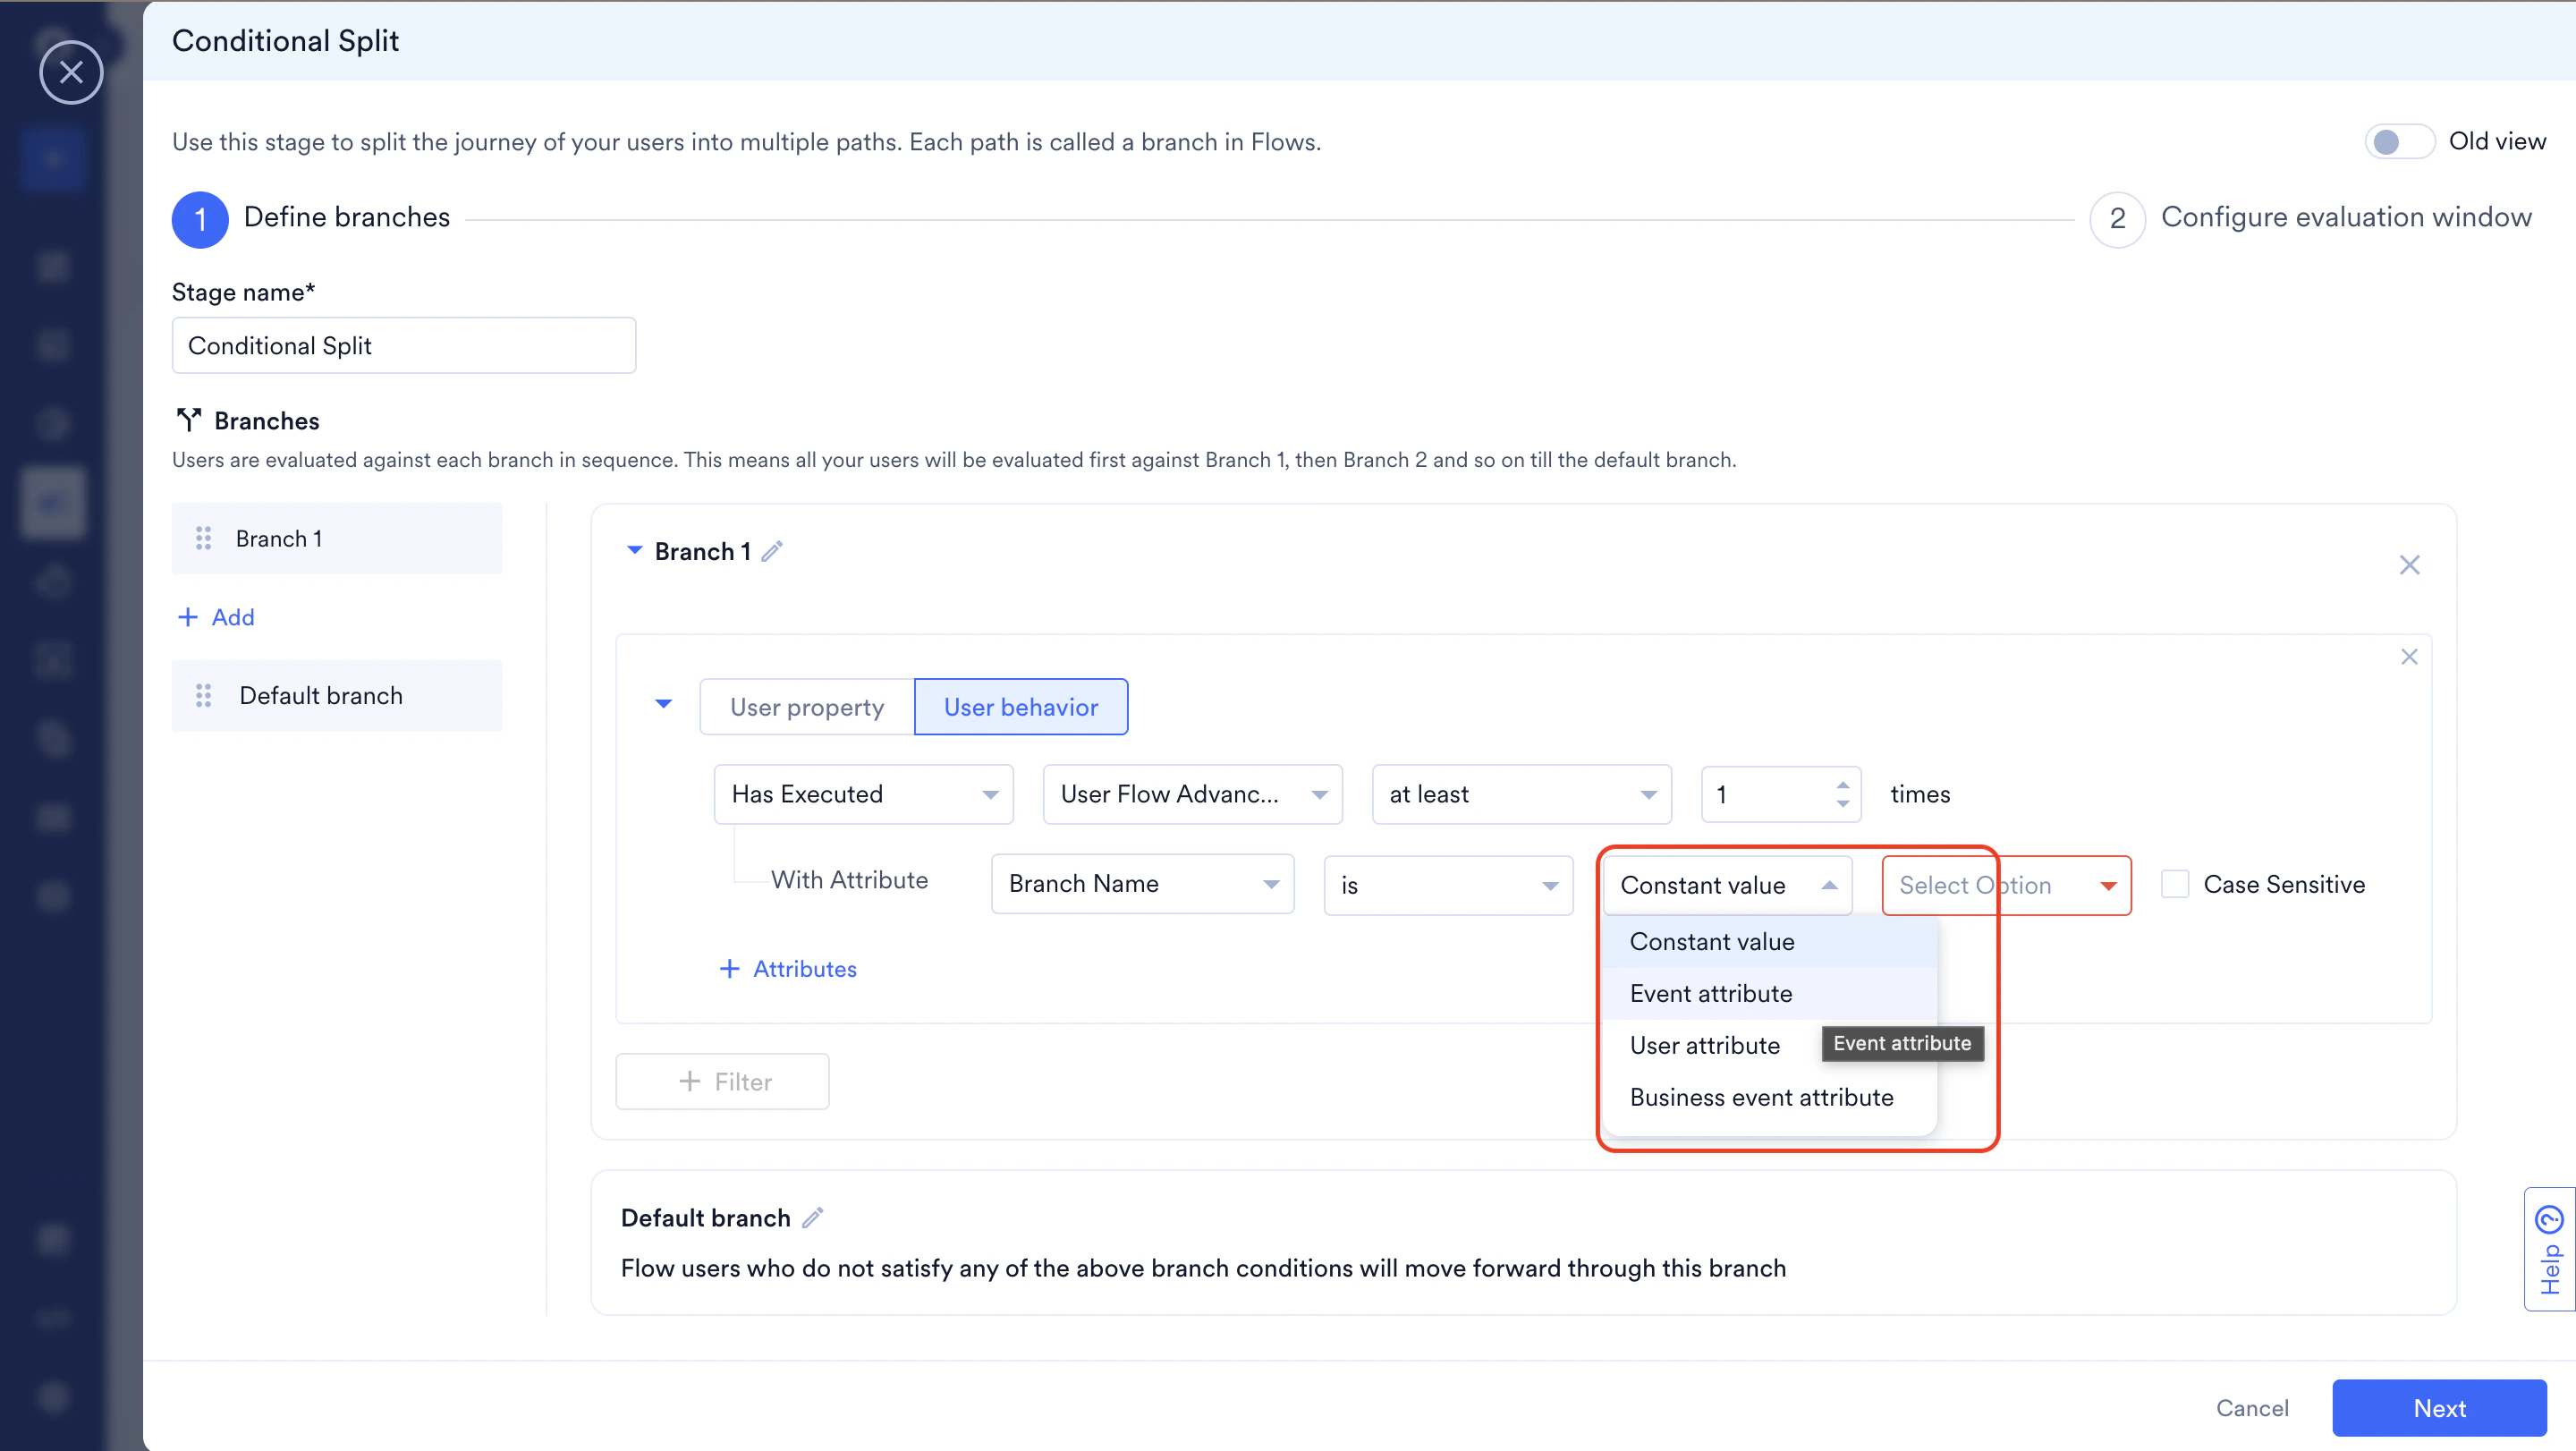
- Click + Add to include more branches as part of the conditional split stage.
- Branches are evaluated in sequence. Branch 1 has the highest priority, which decreases as you move down the list. The Default branch has the lowest priority.
- For example, when there is a conditional split where a user matches both branch 1 and branch 2 conditions, they move down Branch 1 because of its highest priority. So, in a conditional split, where the user matches more than one branch’s criteria, the order of the branches matters.
- To delete a branch within Conditional Split or to duplicate the branch, hover over the list of branches mentioned on the left side.
- Click Duplicate to create a copy of a branch. The new branch is automatically named “Copy of Branch
<x>” - Similarly, click Delete to remove a branch from the stage.
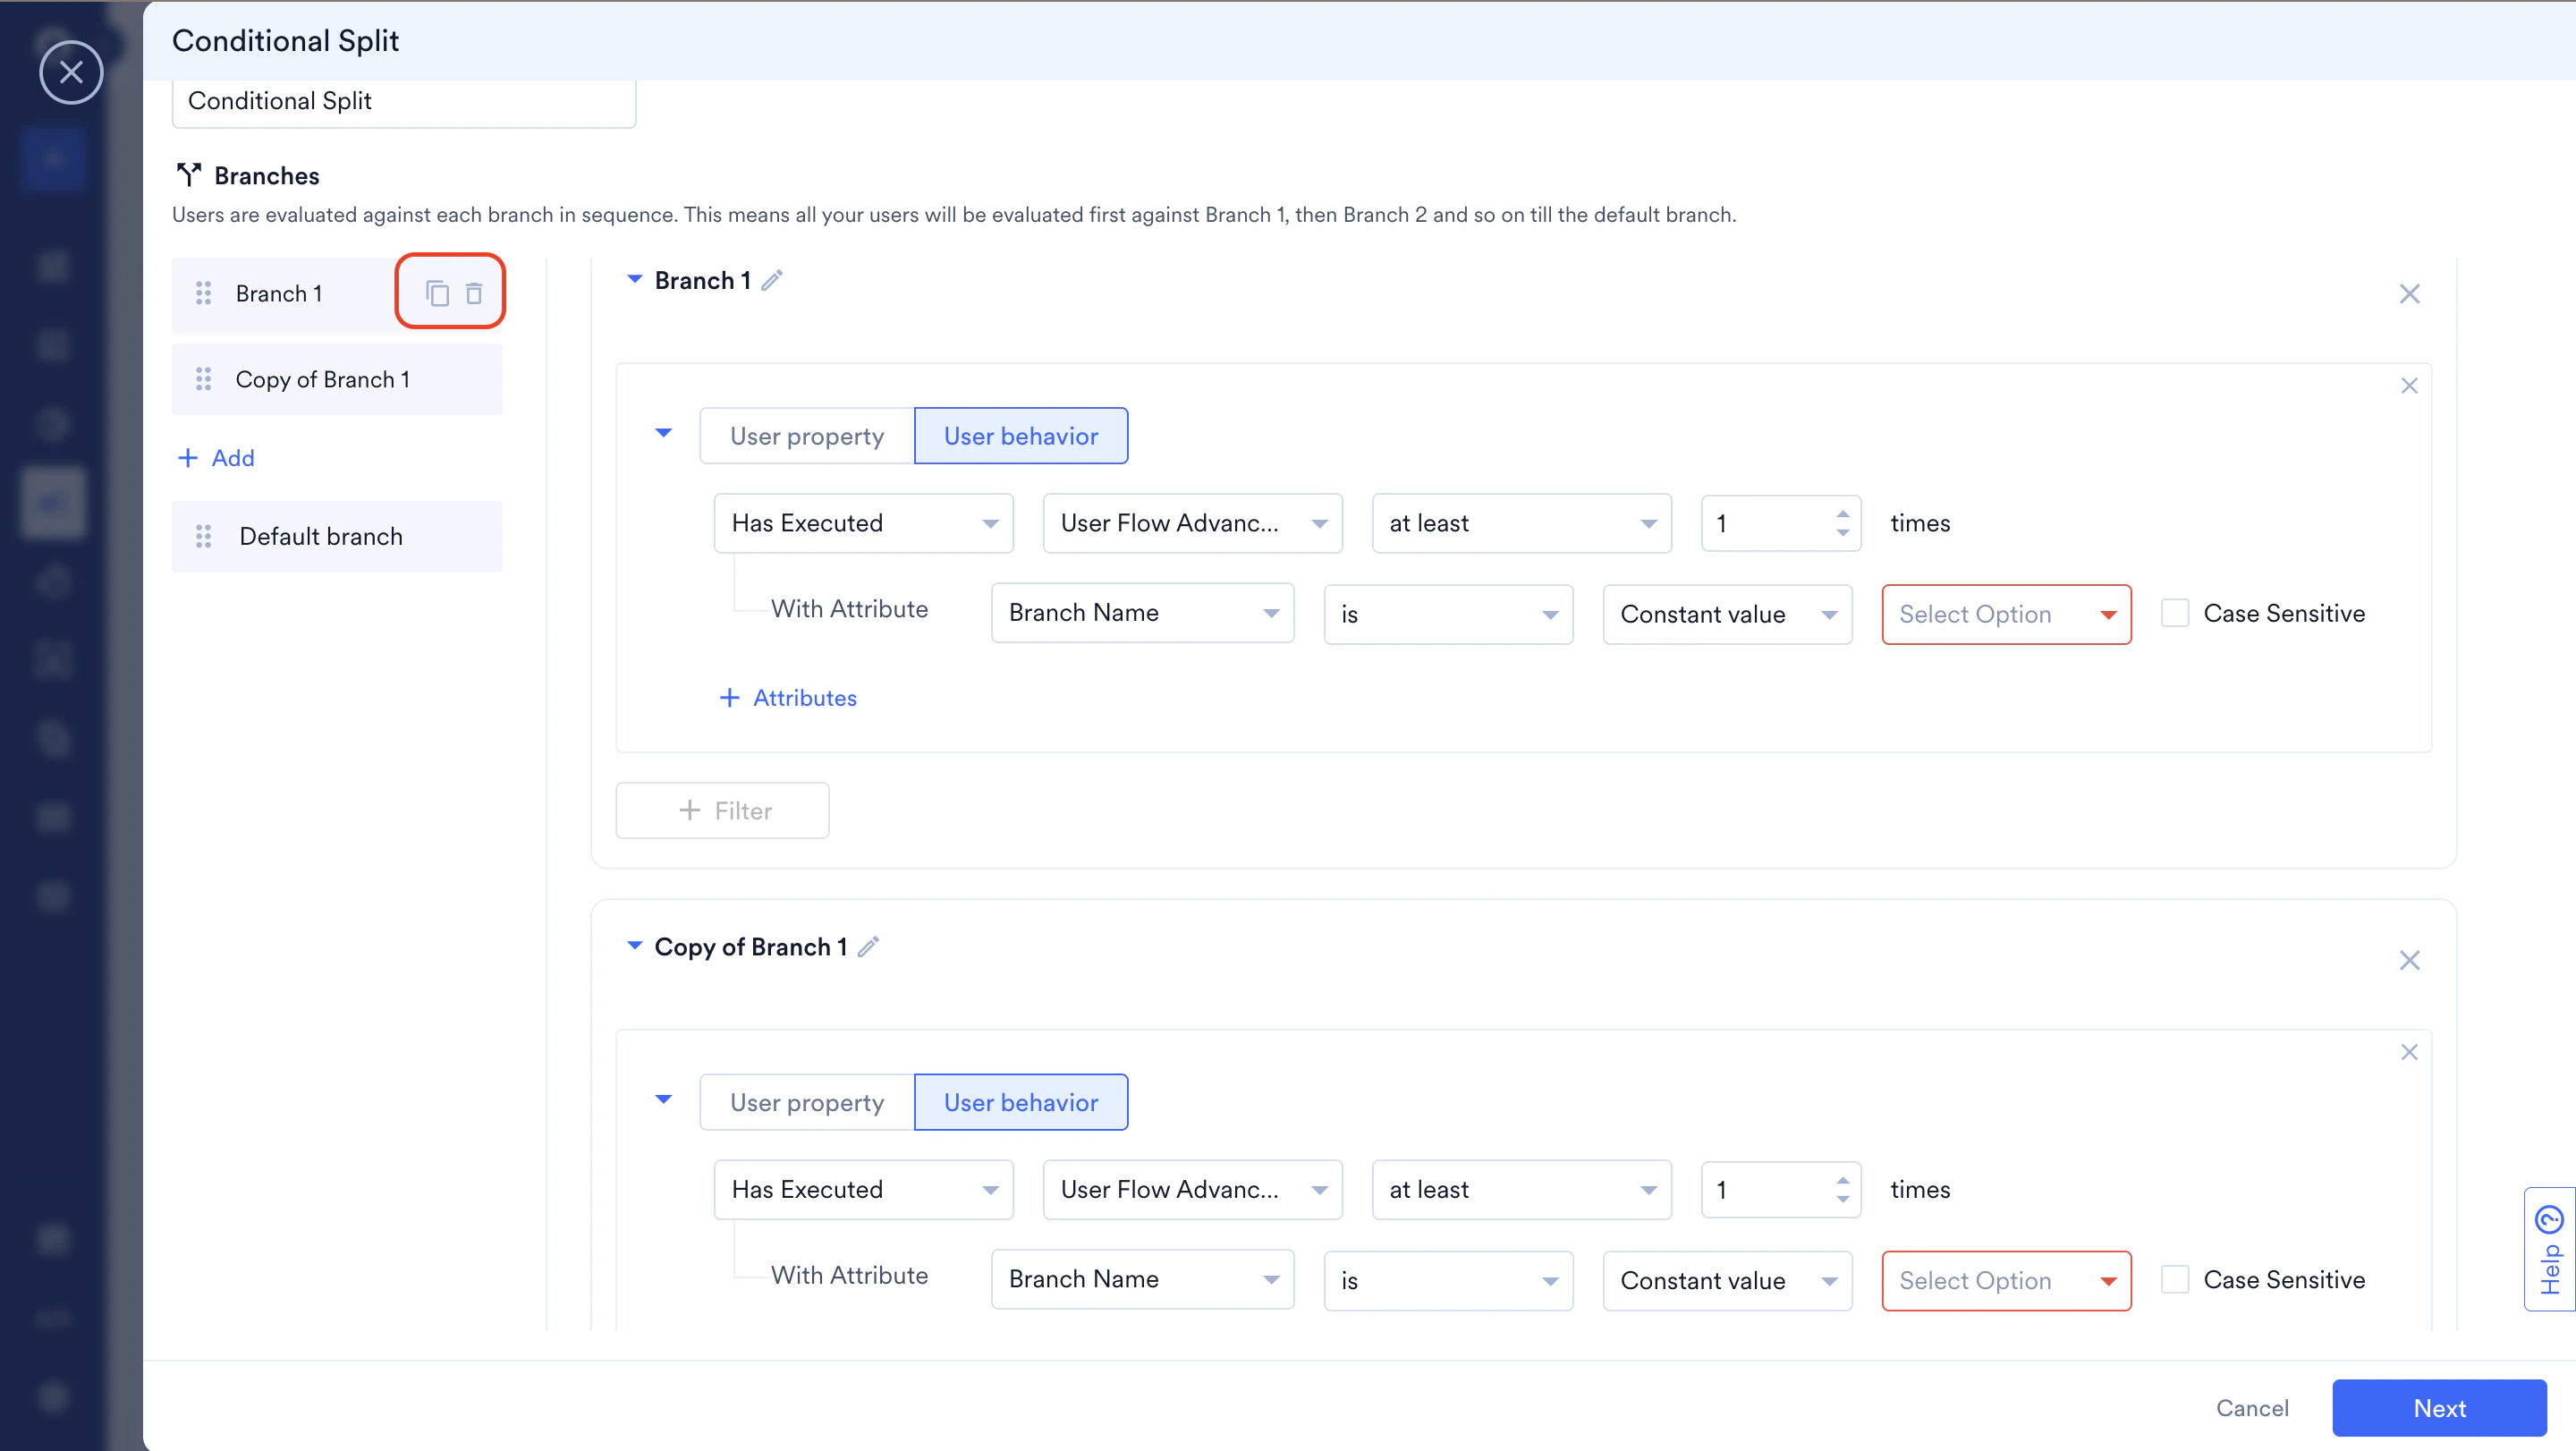
- Click Duplicate to create a copy of a branch. The new branch is automatically named “Copy of Branch
- To reposition branches, drag and move branches.
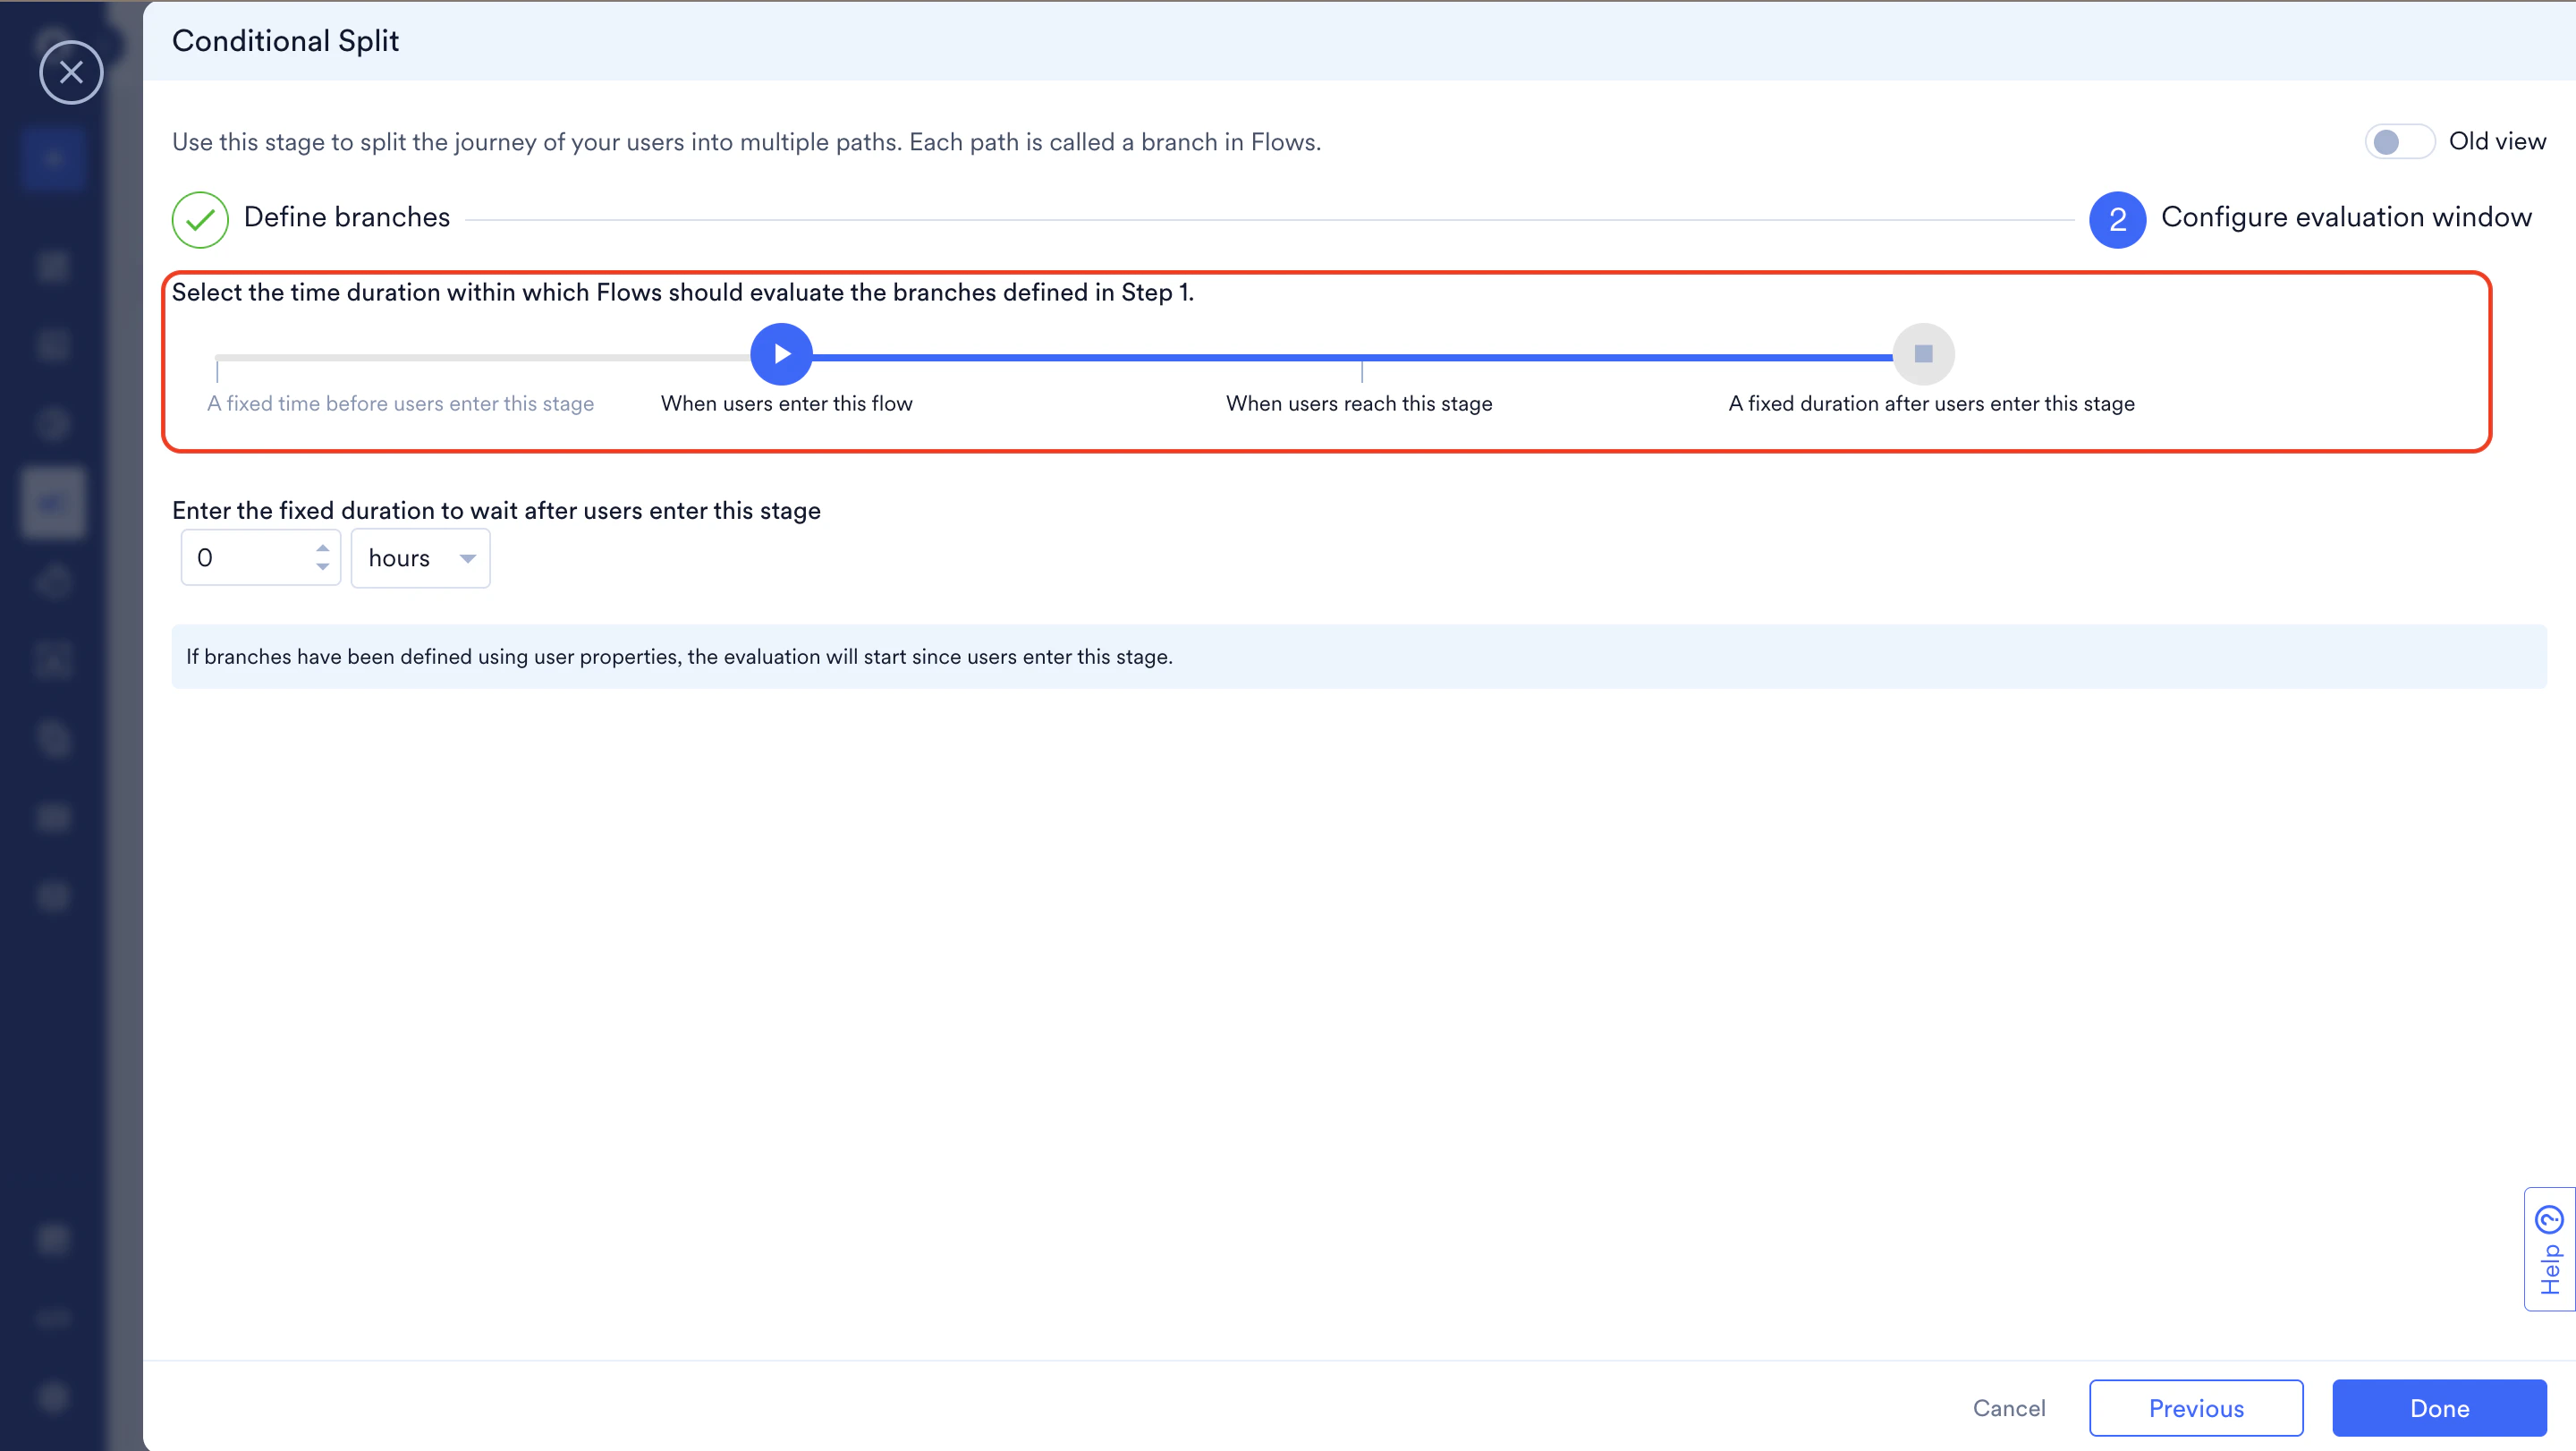
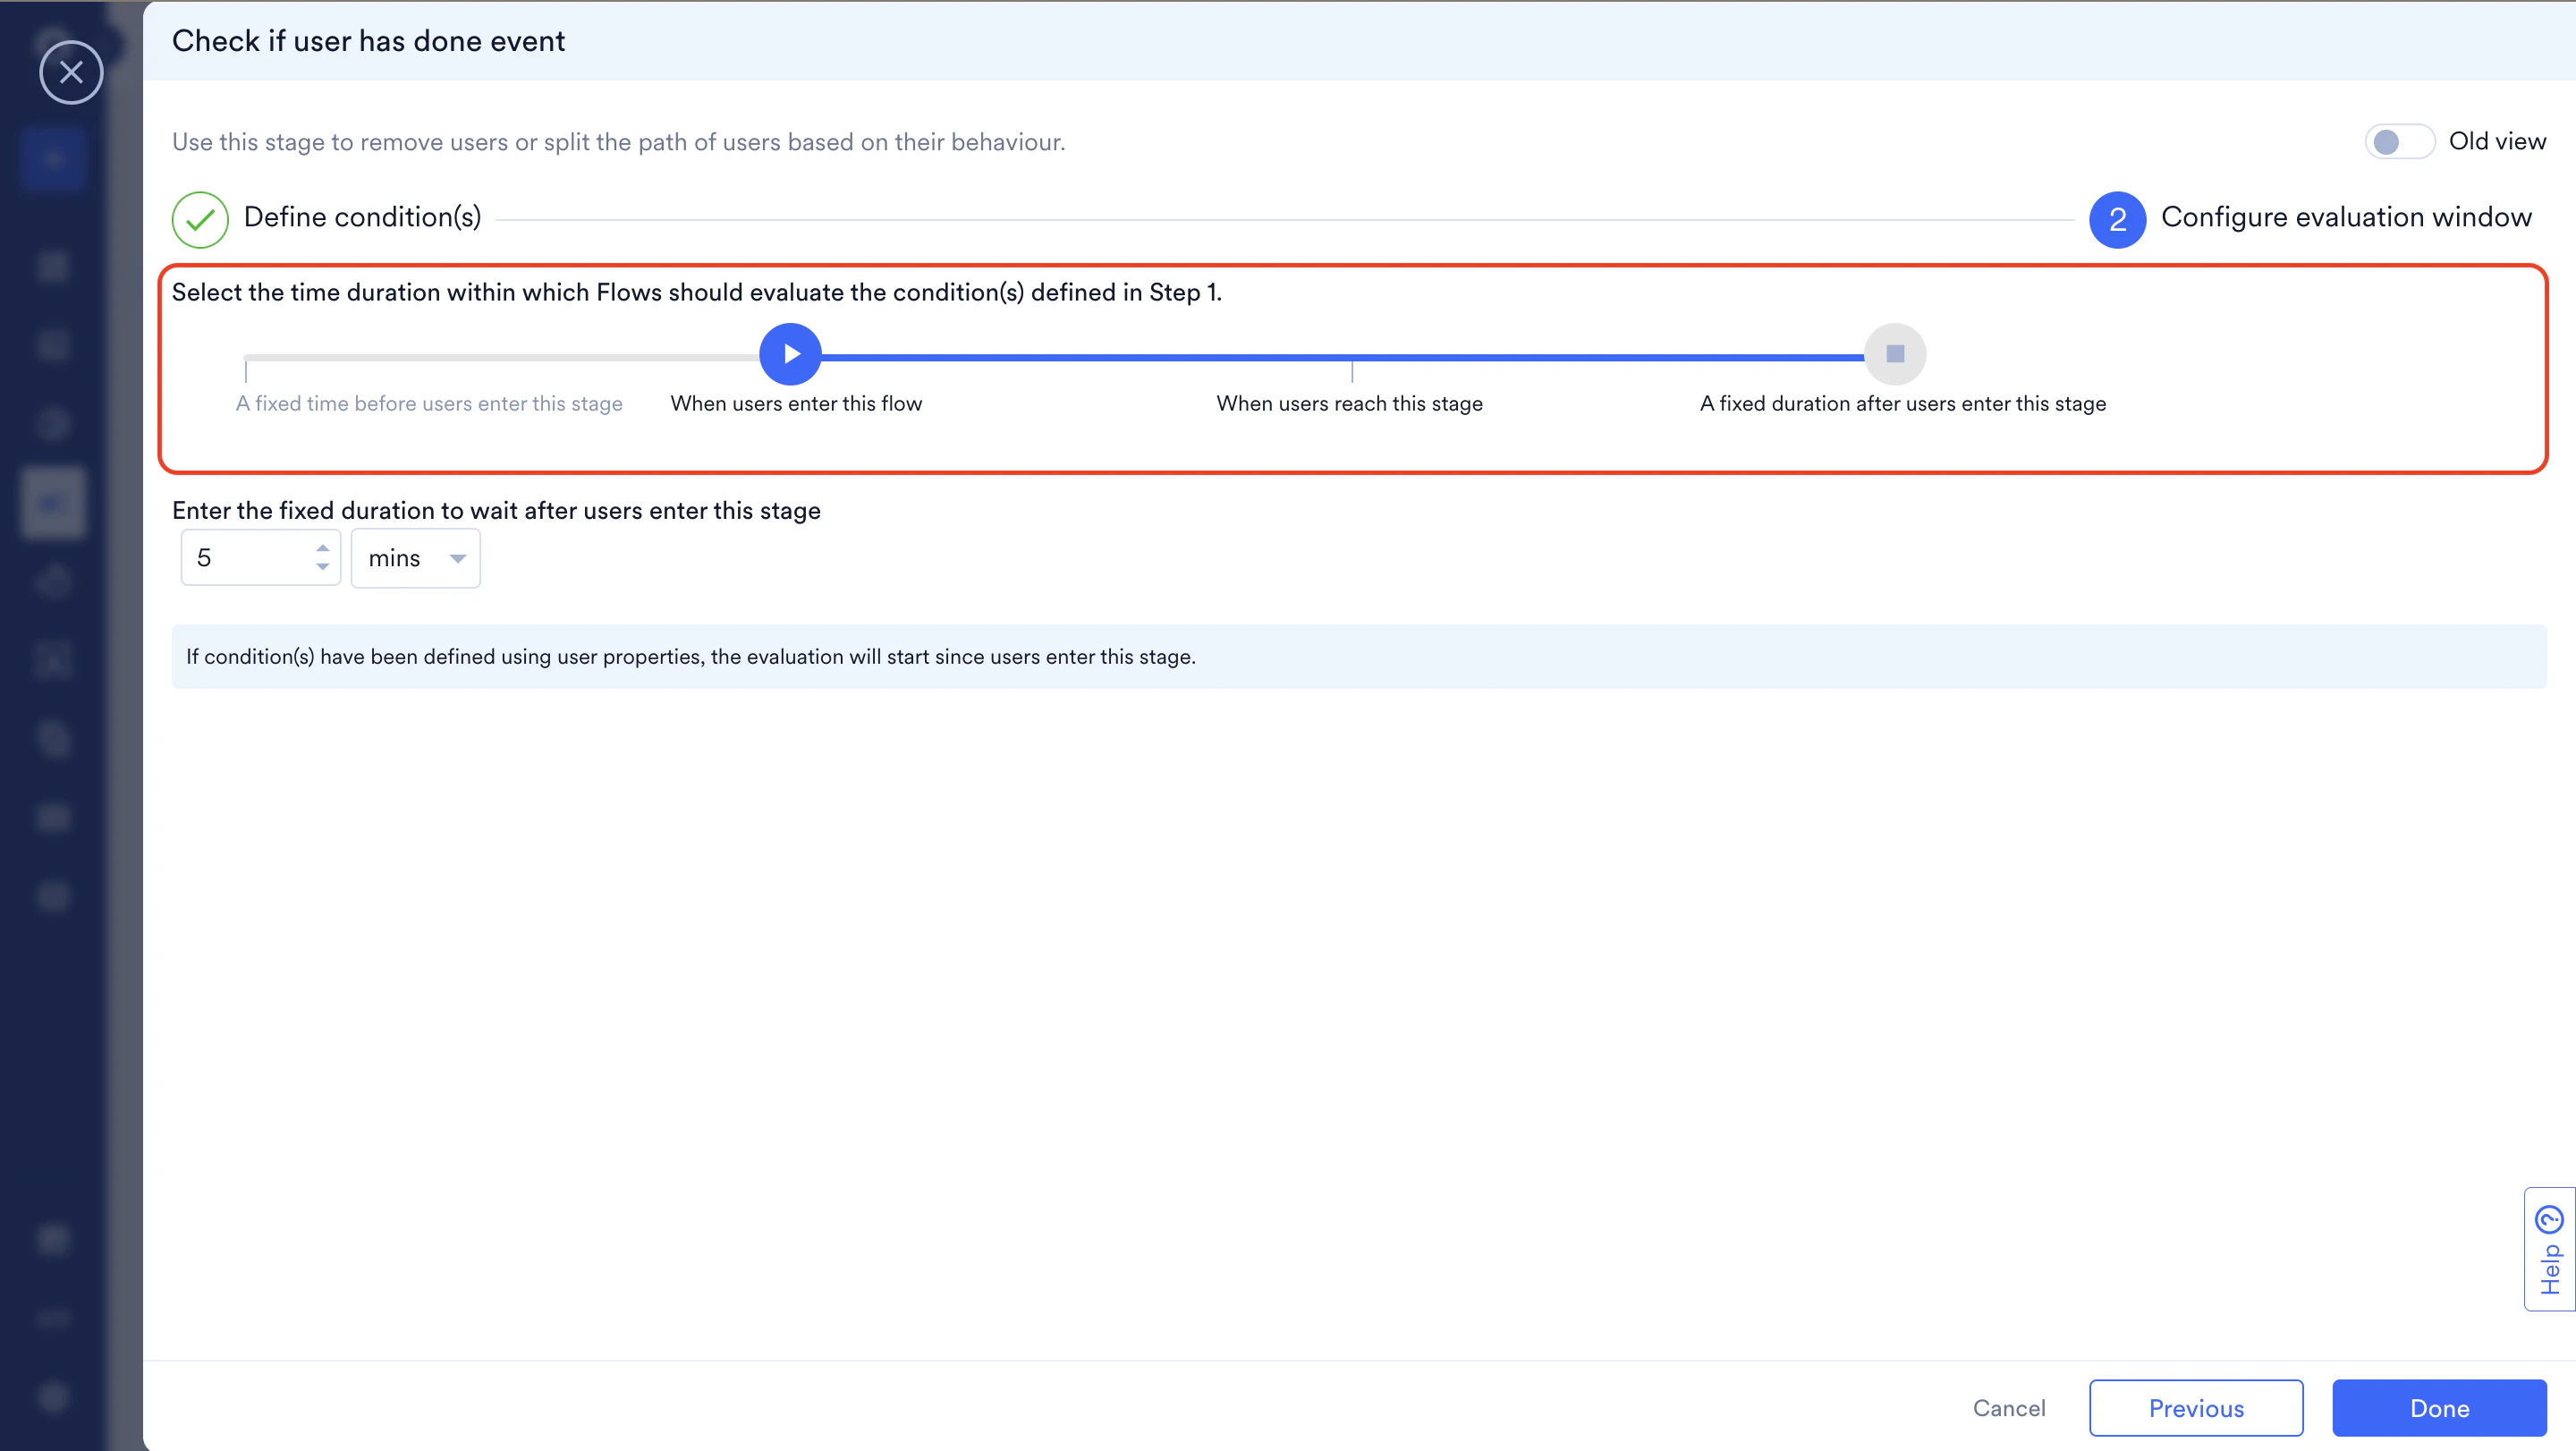
Step 2: Configure Evaluation Window
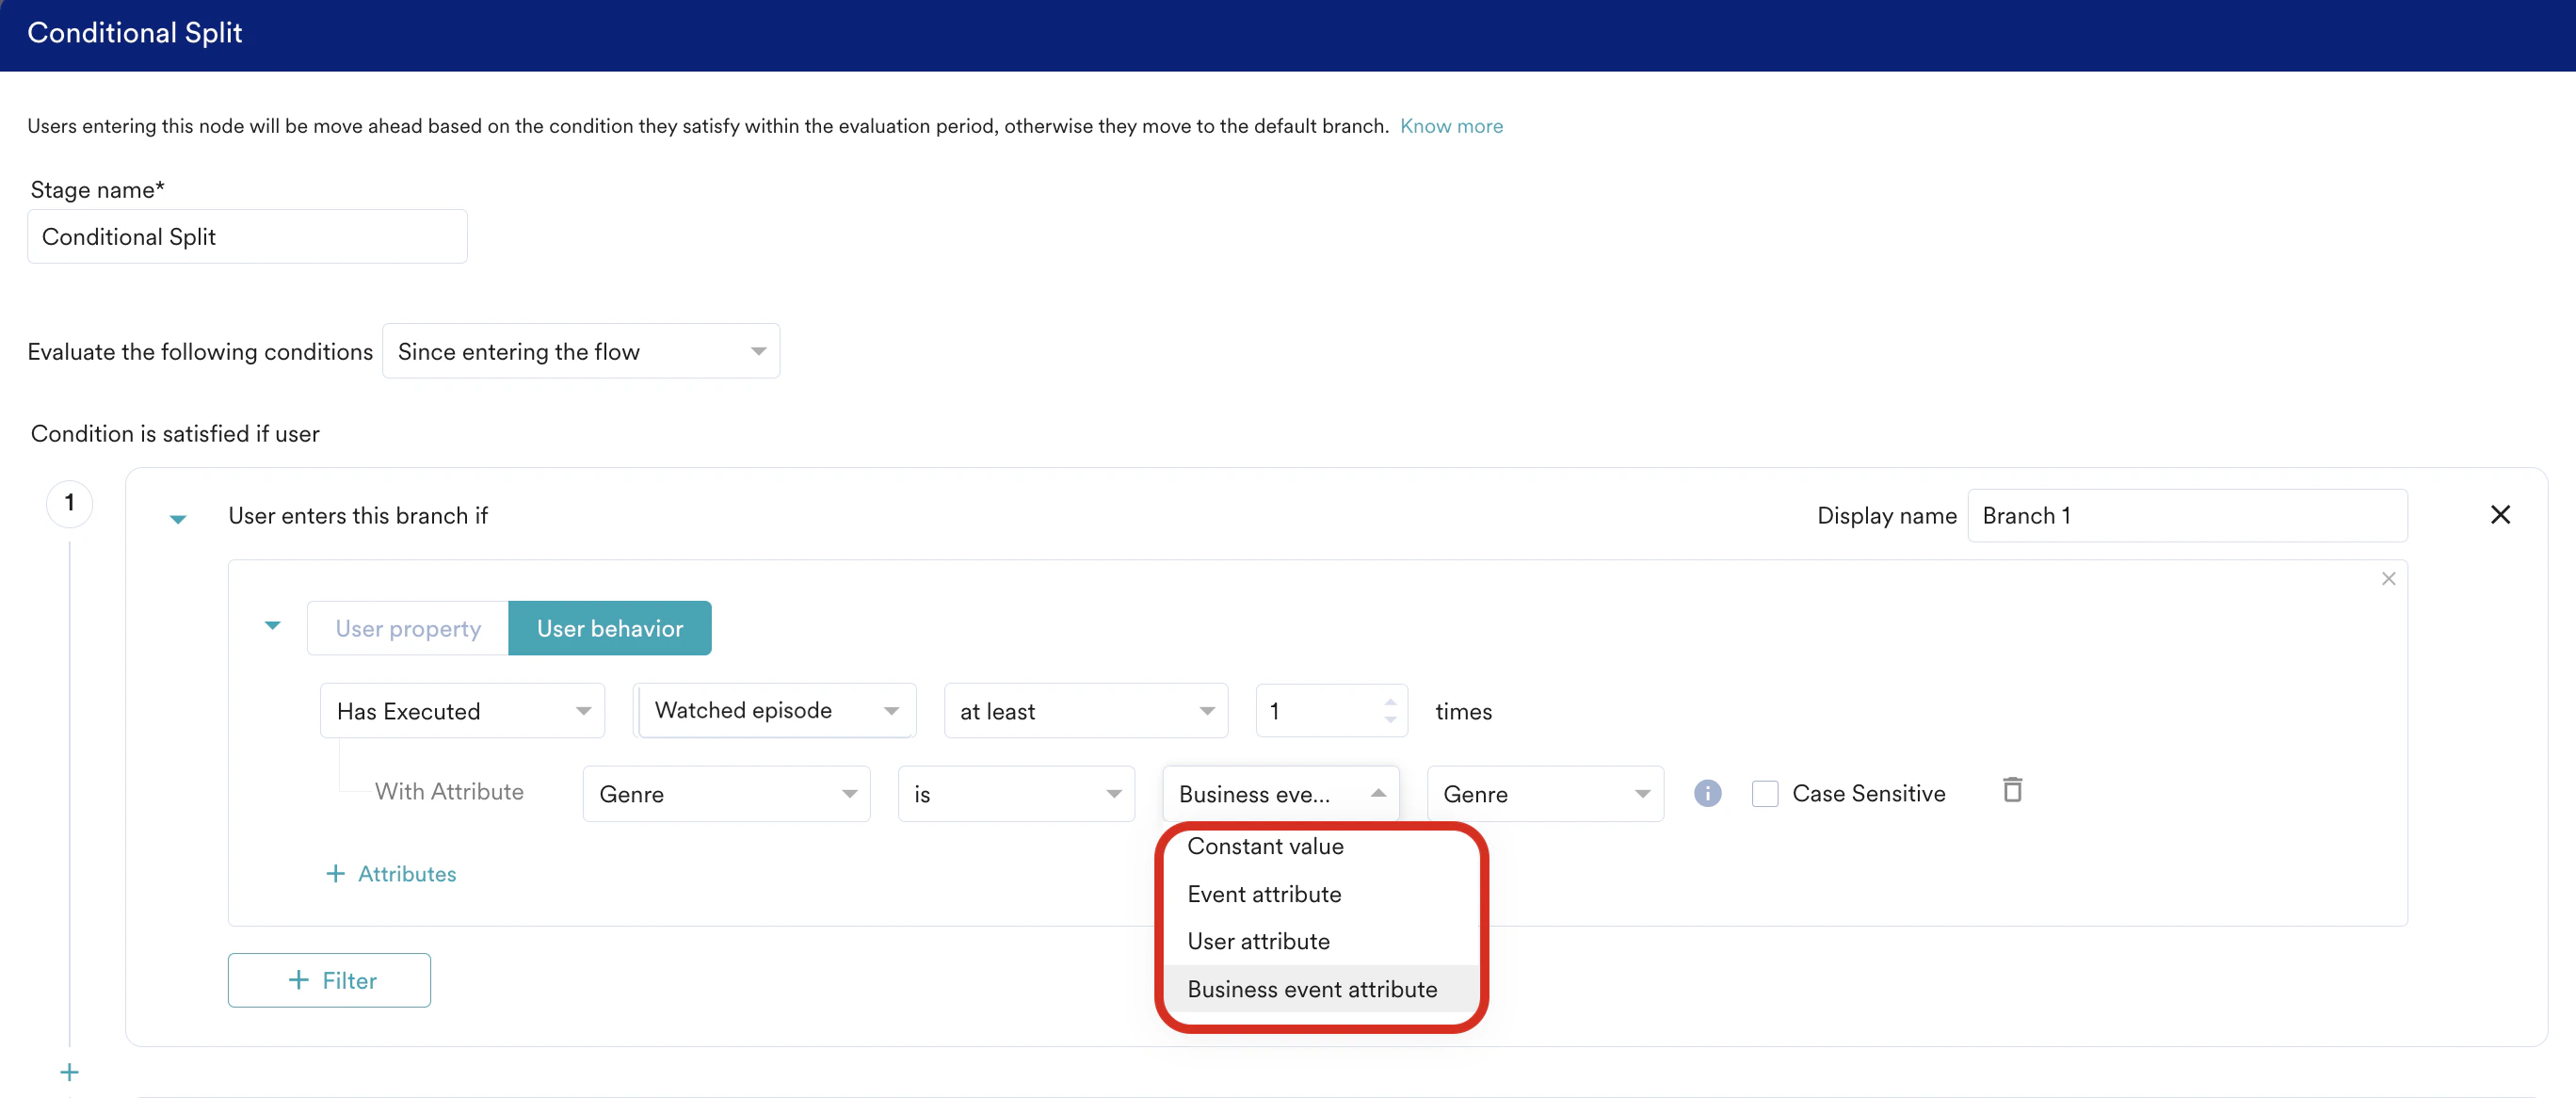
In this step, define the time window for evaluating the condition by setting a start point (using the timeline slider) and an end point (using the wait duration).- Click the pen icon to edit the condition.
- Do the following:
| Field | Description |
|---|---|
| Stage name | Type to modify the condition’s name to manage and identify the condition. |
| Evaluate the following conditions | In the list, click an option to choose the start of your evaluation window:
|
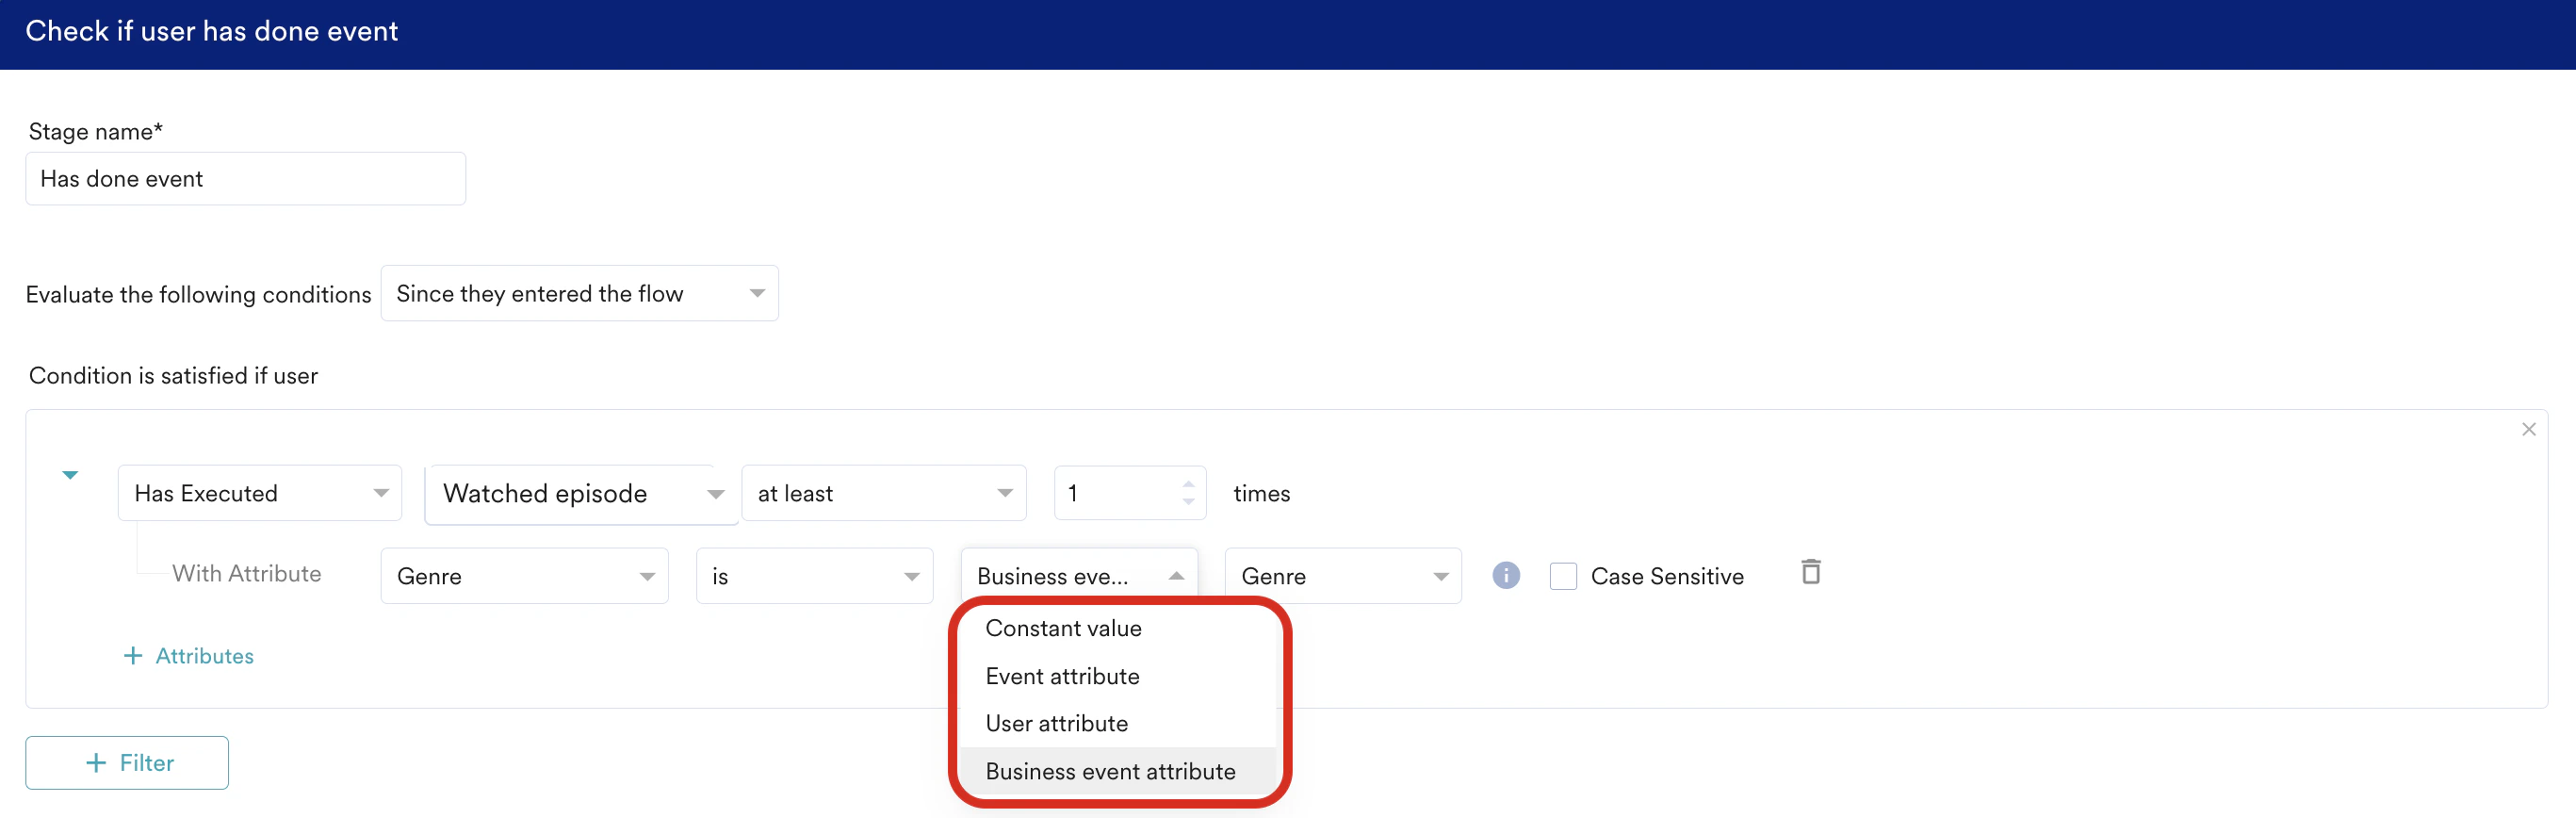
| Condition is satisfied if the user |
|
| + Filter |
|
| Keep evaluating for the next |
|
- Use the + icon to add more branches as part of the conditional split stage. Branch 1 has the highest priority, and the priority reduces as you progress down. Default branch has the least priority. For example, when there is a conditional split where a user X matches both branch 1 and branch 2 conditions, the user moves down Branch 1 as that has the highest priority. So, for a conditional split, the order of branches plays an important role where the user moves provided they match more than one branch’s criteria.
- The default branch does not have any conditions.
- You can add personalized and dynamic conditional checks based on the previous user actions with Linked Conditions.
- Users navigate to the default branch when they do not meet the conditions applied in the conditional split.
- The order of branches will influence which branch path the user takes in a conditional split, because the priority of the branches decreases from the first branch to the last branch or the default branch.
- Users meeting the primary branch will leave as soon as they meet the criteria. Meanwhile, in the other branches, they will leave only after the completion of the evaluation period.
- Users navigate the branch and follow the branch after meeting the evaluation criteria.
- Change the display name.
- Change the branch evaluation conditions.
- Cannot add a new branch.
- Cannot delete a branch.
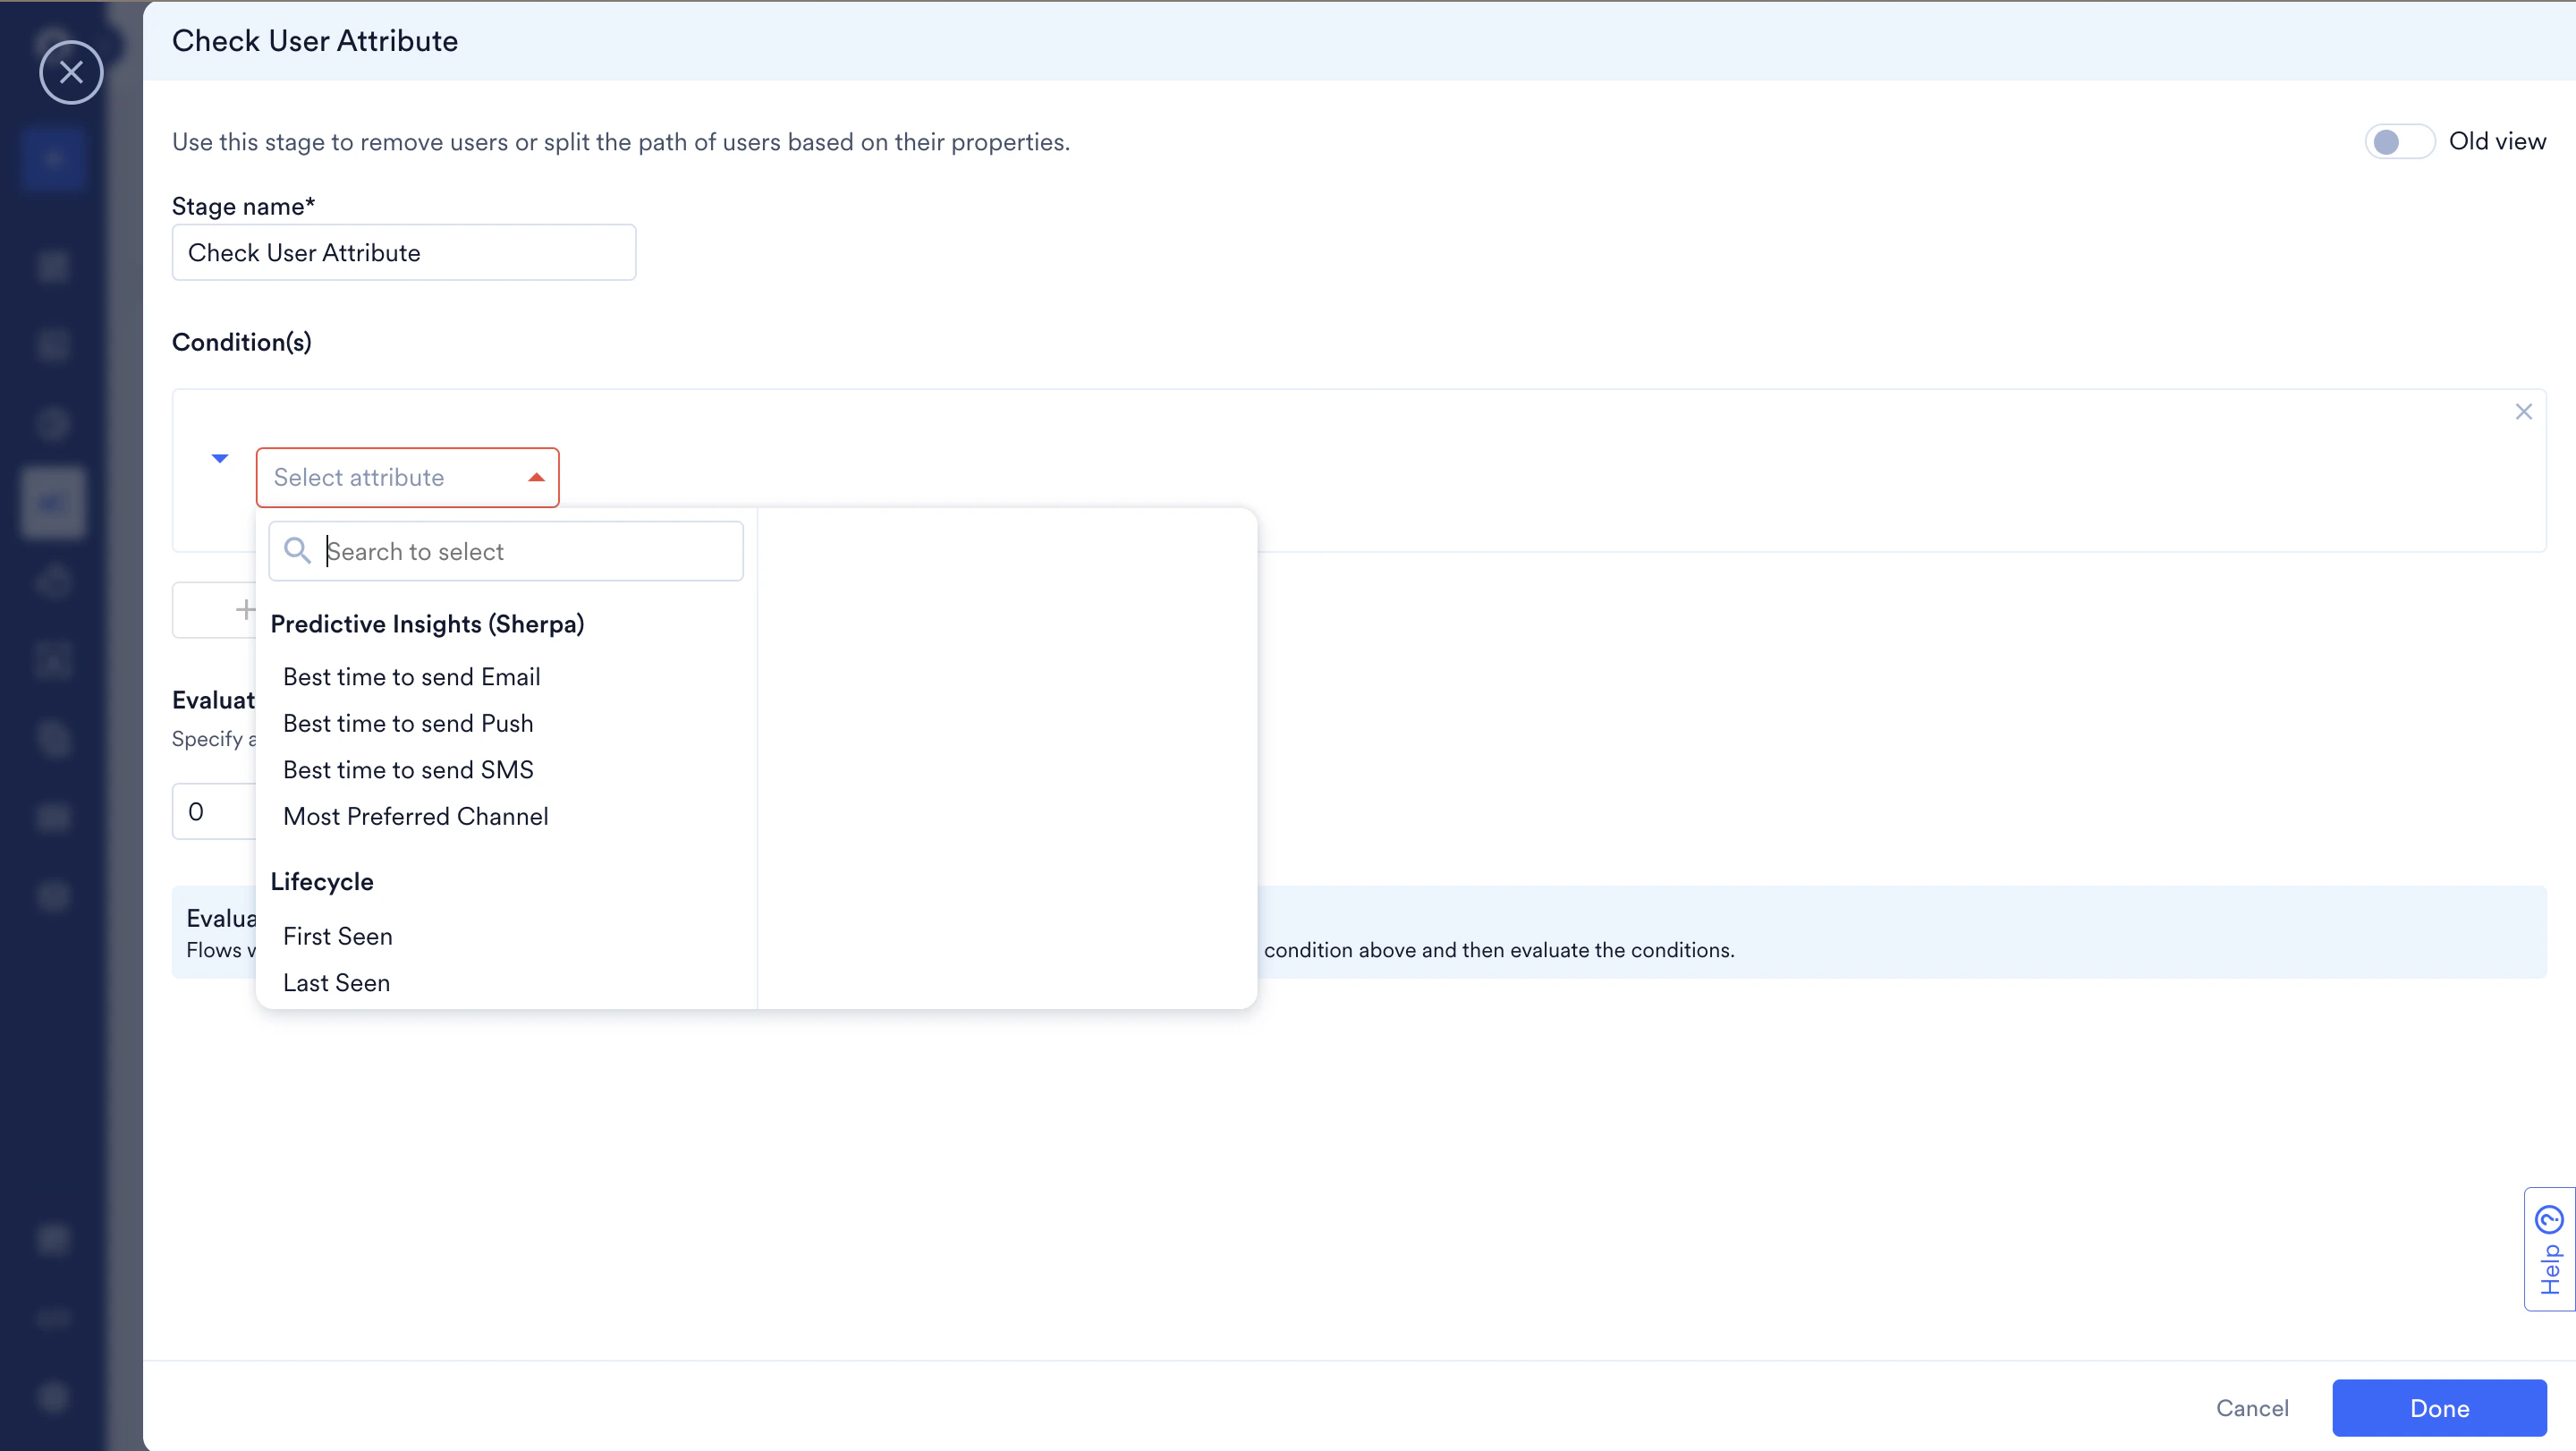

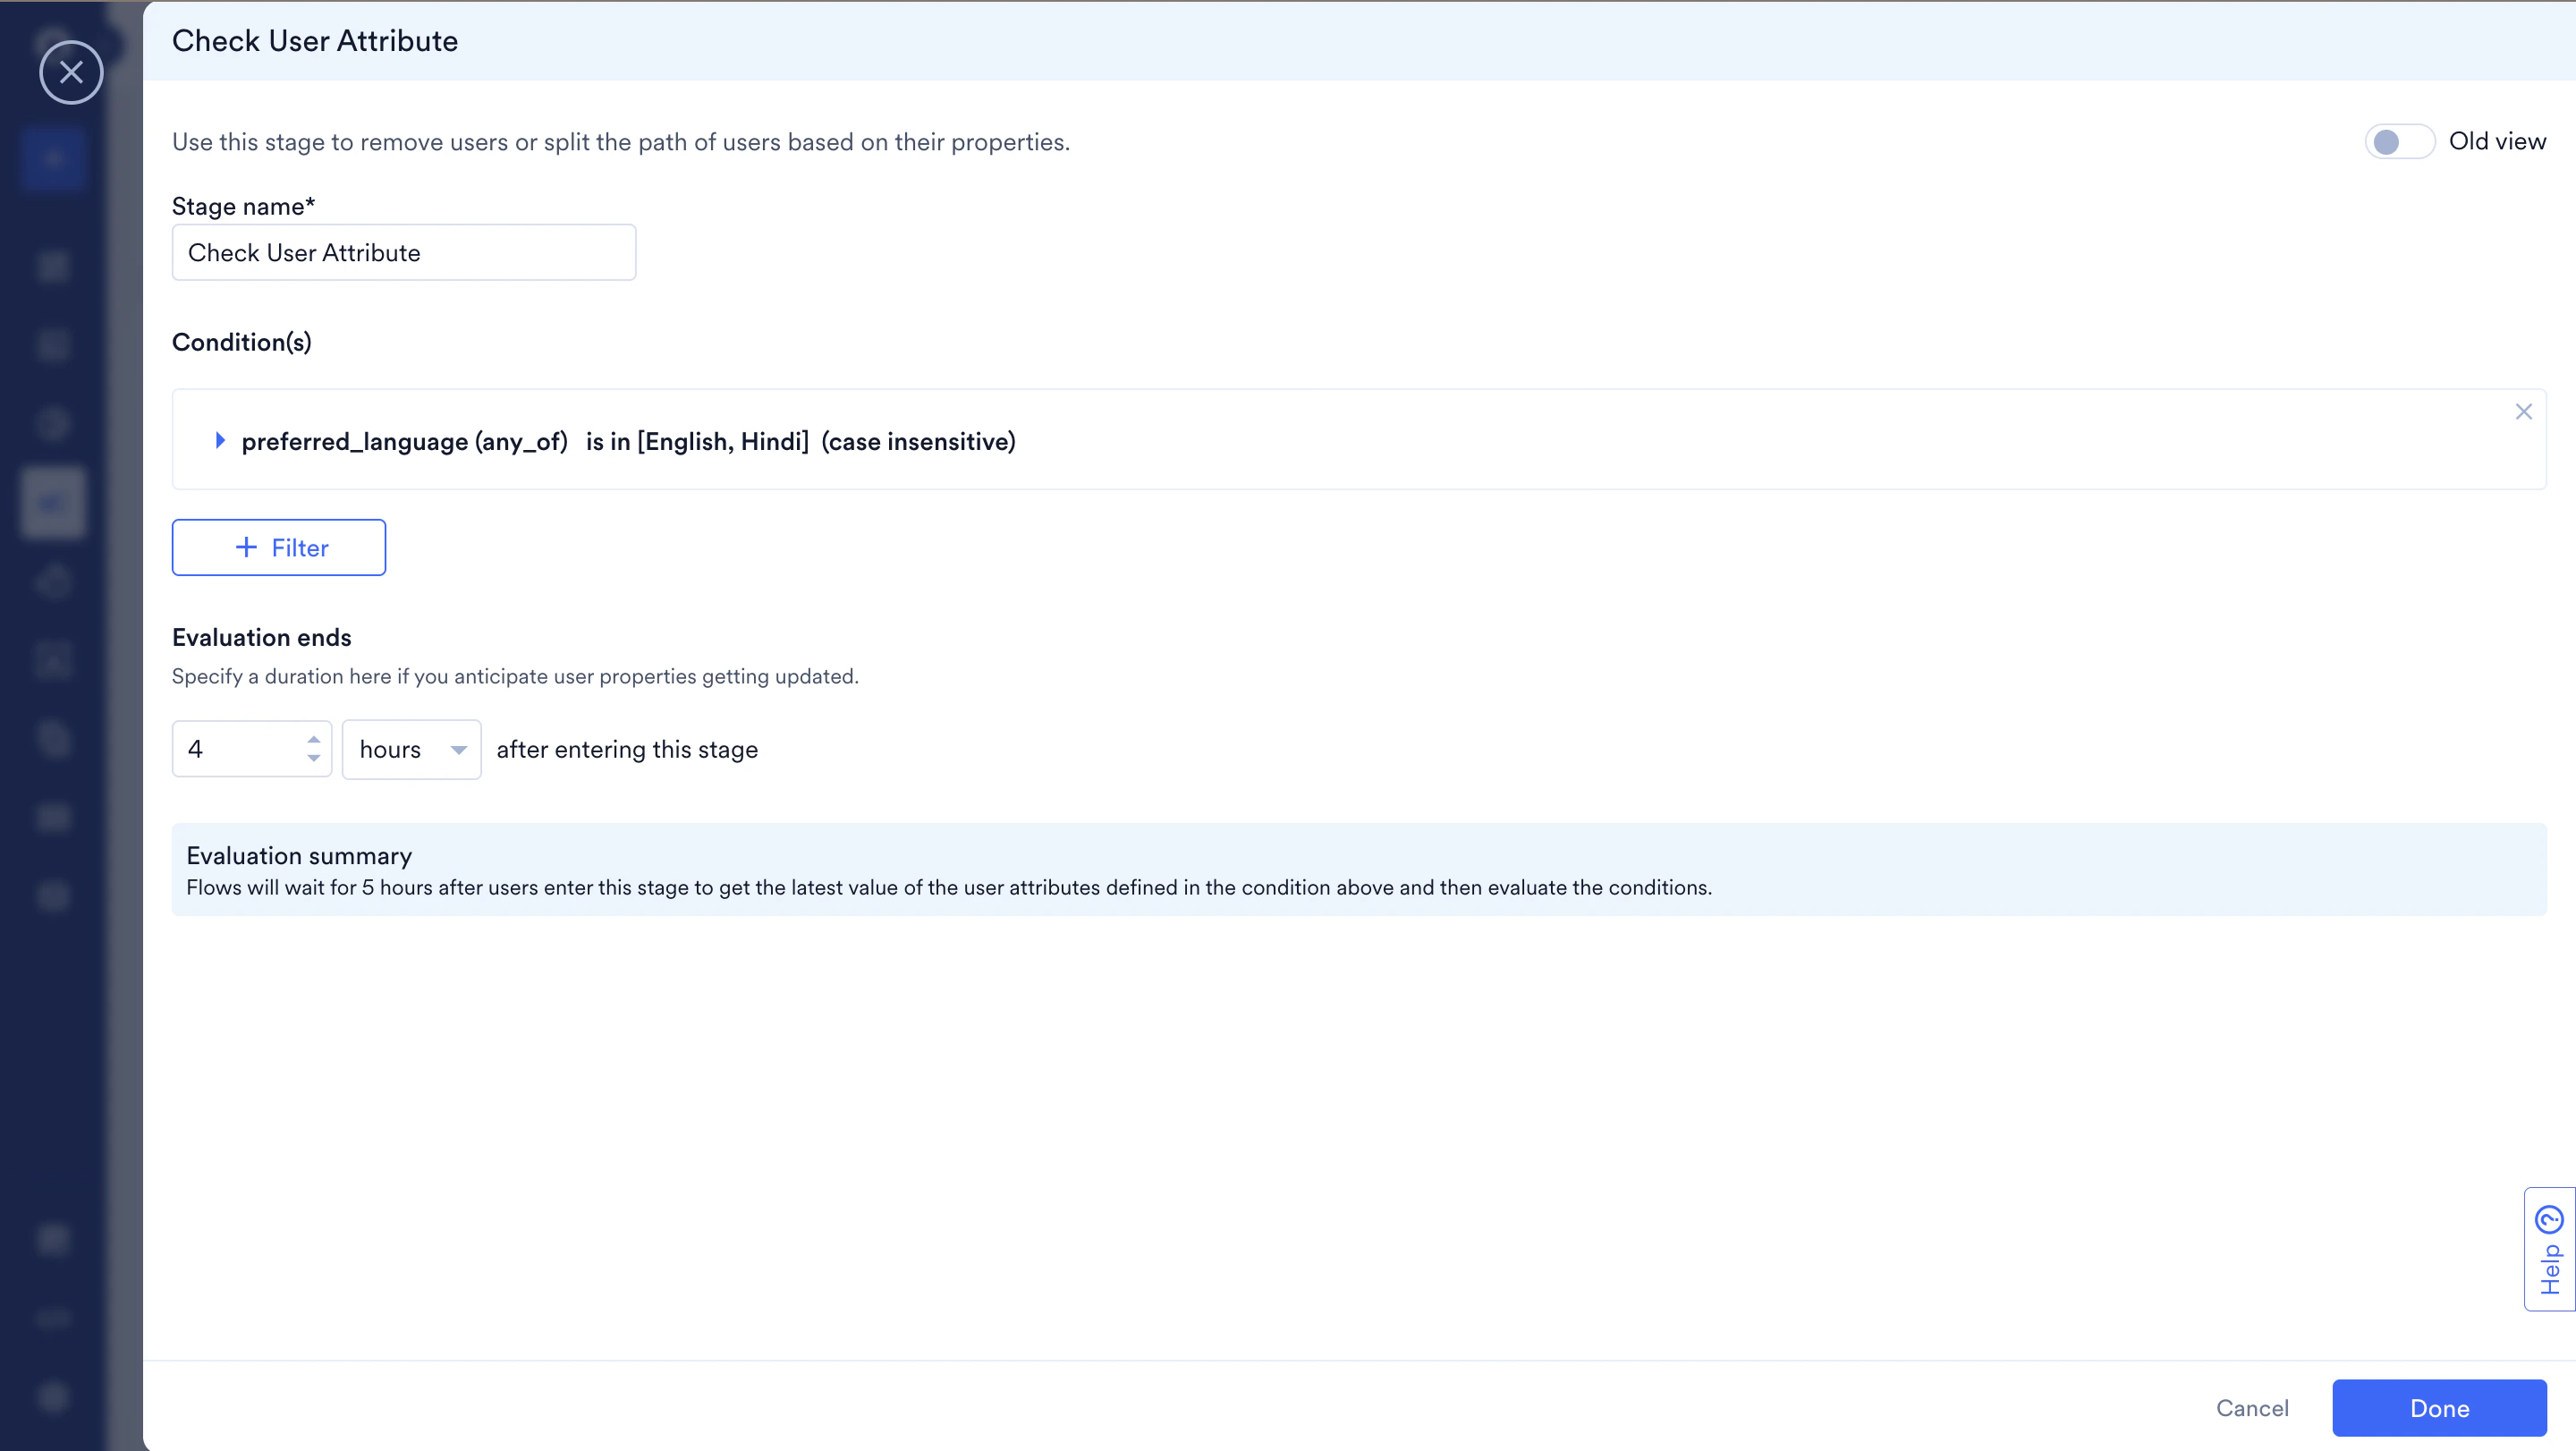
Campaign-Based Conditions
The following are the types of campaign-based conditions provided by MoEngage:Email
Perform the following steps for an email campaign:
- Select one of the following conditions:
- Check for event occurrence.
- Type or use the up and down buttons to set the time.
- In the list, select minutes, hours, or days.
- Click Done to add the action or Cancel to cancel the action.
The evaluation will be done for the mentioned timeframe since the user has entered the stage.
Connector
Connector
Perform the following for the Connector campaign:
- Select Connector sent successfully to check whether the connector is sent to the user.
- Check for event occurrence.
- Type or use the up and down buttons to set the time.
- In the list, select minutes, hours, or days
- Click Done to add the action or click Cancel to cancel the action.
The evaluation will be done for the mentioned timeframe since the user has entered the stage.
Push
Push
Perform the following for the push campaign:
- Select one of the following conditions:
- Check for event occurrence
- Type or use the up and down buttons to set the time.
- In the list, select minutes, hours, or days
- Click Done to add the action or Cancel to cancel the action.
The evaluation will be done for the mentioned timeframe since the user has entered the stage.
SMS
SMS
Perform the following for the SMS campaign:
- Select SMS sent successfully to check whether the SMS is sent to the user.
- Check for event occurrence
- Type or use the up and down buttons to set the time.
- In the list, select minutes, hours, or days.
- Click Done to add the action or Cancel to cancel the action.
The evaluation will be done for the mentioned timeframe since the user has entered the stage.
On-Site Messaging
On-Site Messaging
Perform the following for the On-site Messaging campaign:
- Select one of the following conditions:
- Check for event occurrence.
- Type or use the up and down buttons to set the time.
- In the list, select minutes, hours, or days.
- Click Done to add the action or Cancel to cancel the action.
The evaluation will be done for the mentioned timeframe since the user has entered the stage.
In-App Messaging
In-App Messaging
Perform the following for the In-app Messaging campaign:
- Select one of the following conditions:
- Check for event occurrence.
- Type or use the up and down buttons to set the time.
- In the list, select minutes, hours, or days.
- Click Done to add the action or Cancel to cancel the action.
The evaluation will be done for the mentioned timeframe since the user has entered the stage.
Cards
Cards
Perform the following for the Card campaign:
- Select one of the following conditions:
- Check for event occurrence.
- Type or use the up and down buttons to set the time.
- In the list, select minutes, hours, or days.
- Click Done to add the action or Cancel to cancel the action.
The evaluation will be done for the mentioned timeframe since the user has entered the stage.
WhatsApp
Do the following for the WhatsApp campaign:
- Select one of the following conditions:
- Check for event occurrence
- Type or use the up and down buttons to set the time.
- In the list, select minutes, hours, or days.
- Click Done to add the action or Cancel to cancel the action.
The evaluation will be done for the mentioned timeframe since the user has entered the stage.
Facebook
Do the following for the Facebook campaign:
- Select Facebook audience synced successfully to check whether the users of Facebook campaigns are synced with MoEngage.
- Check for event occurrence
- Type or use the up and down buttons to set the time.
- In the list, select minutes, hours, or days.
- Click Done to add the action or Cancel to cancel the action.
The evaluation will be done for the mentioned timeframe since the user has entered the stage.
Google Ads Audience
Google Ads Audience
Do the following for the Google Ads Audience campaign:
- Select Google Ads audience synced successfully to check whether the users of Google Ads campaigns are synced with MoEngage.
- Check for event occurrence
- Type or use the up and down buttons to set the time.
- In the list, select minutes, hours, or days.
- Click Done to add the action or Cancel to cancel the action.
The evaluation will be done for the mentioned timeframe since the user has entered the stage.
Split Users Randomly
- A/B Split
- Intelligent path optimizer
A/B Split allows you to test up to five flow paths variations to determine which is the best-performing option. You can experiment with different channels, different messages on the same channel, and different message frequencies across these flow paths.You can configure the experiment and, after analyzing the performance of each branch on publishing the flow, change the user distribution in favour of the winning branch. This enables most users entering the flow to go forward with the best-performing branch.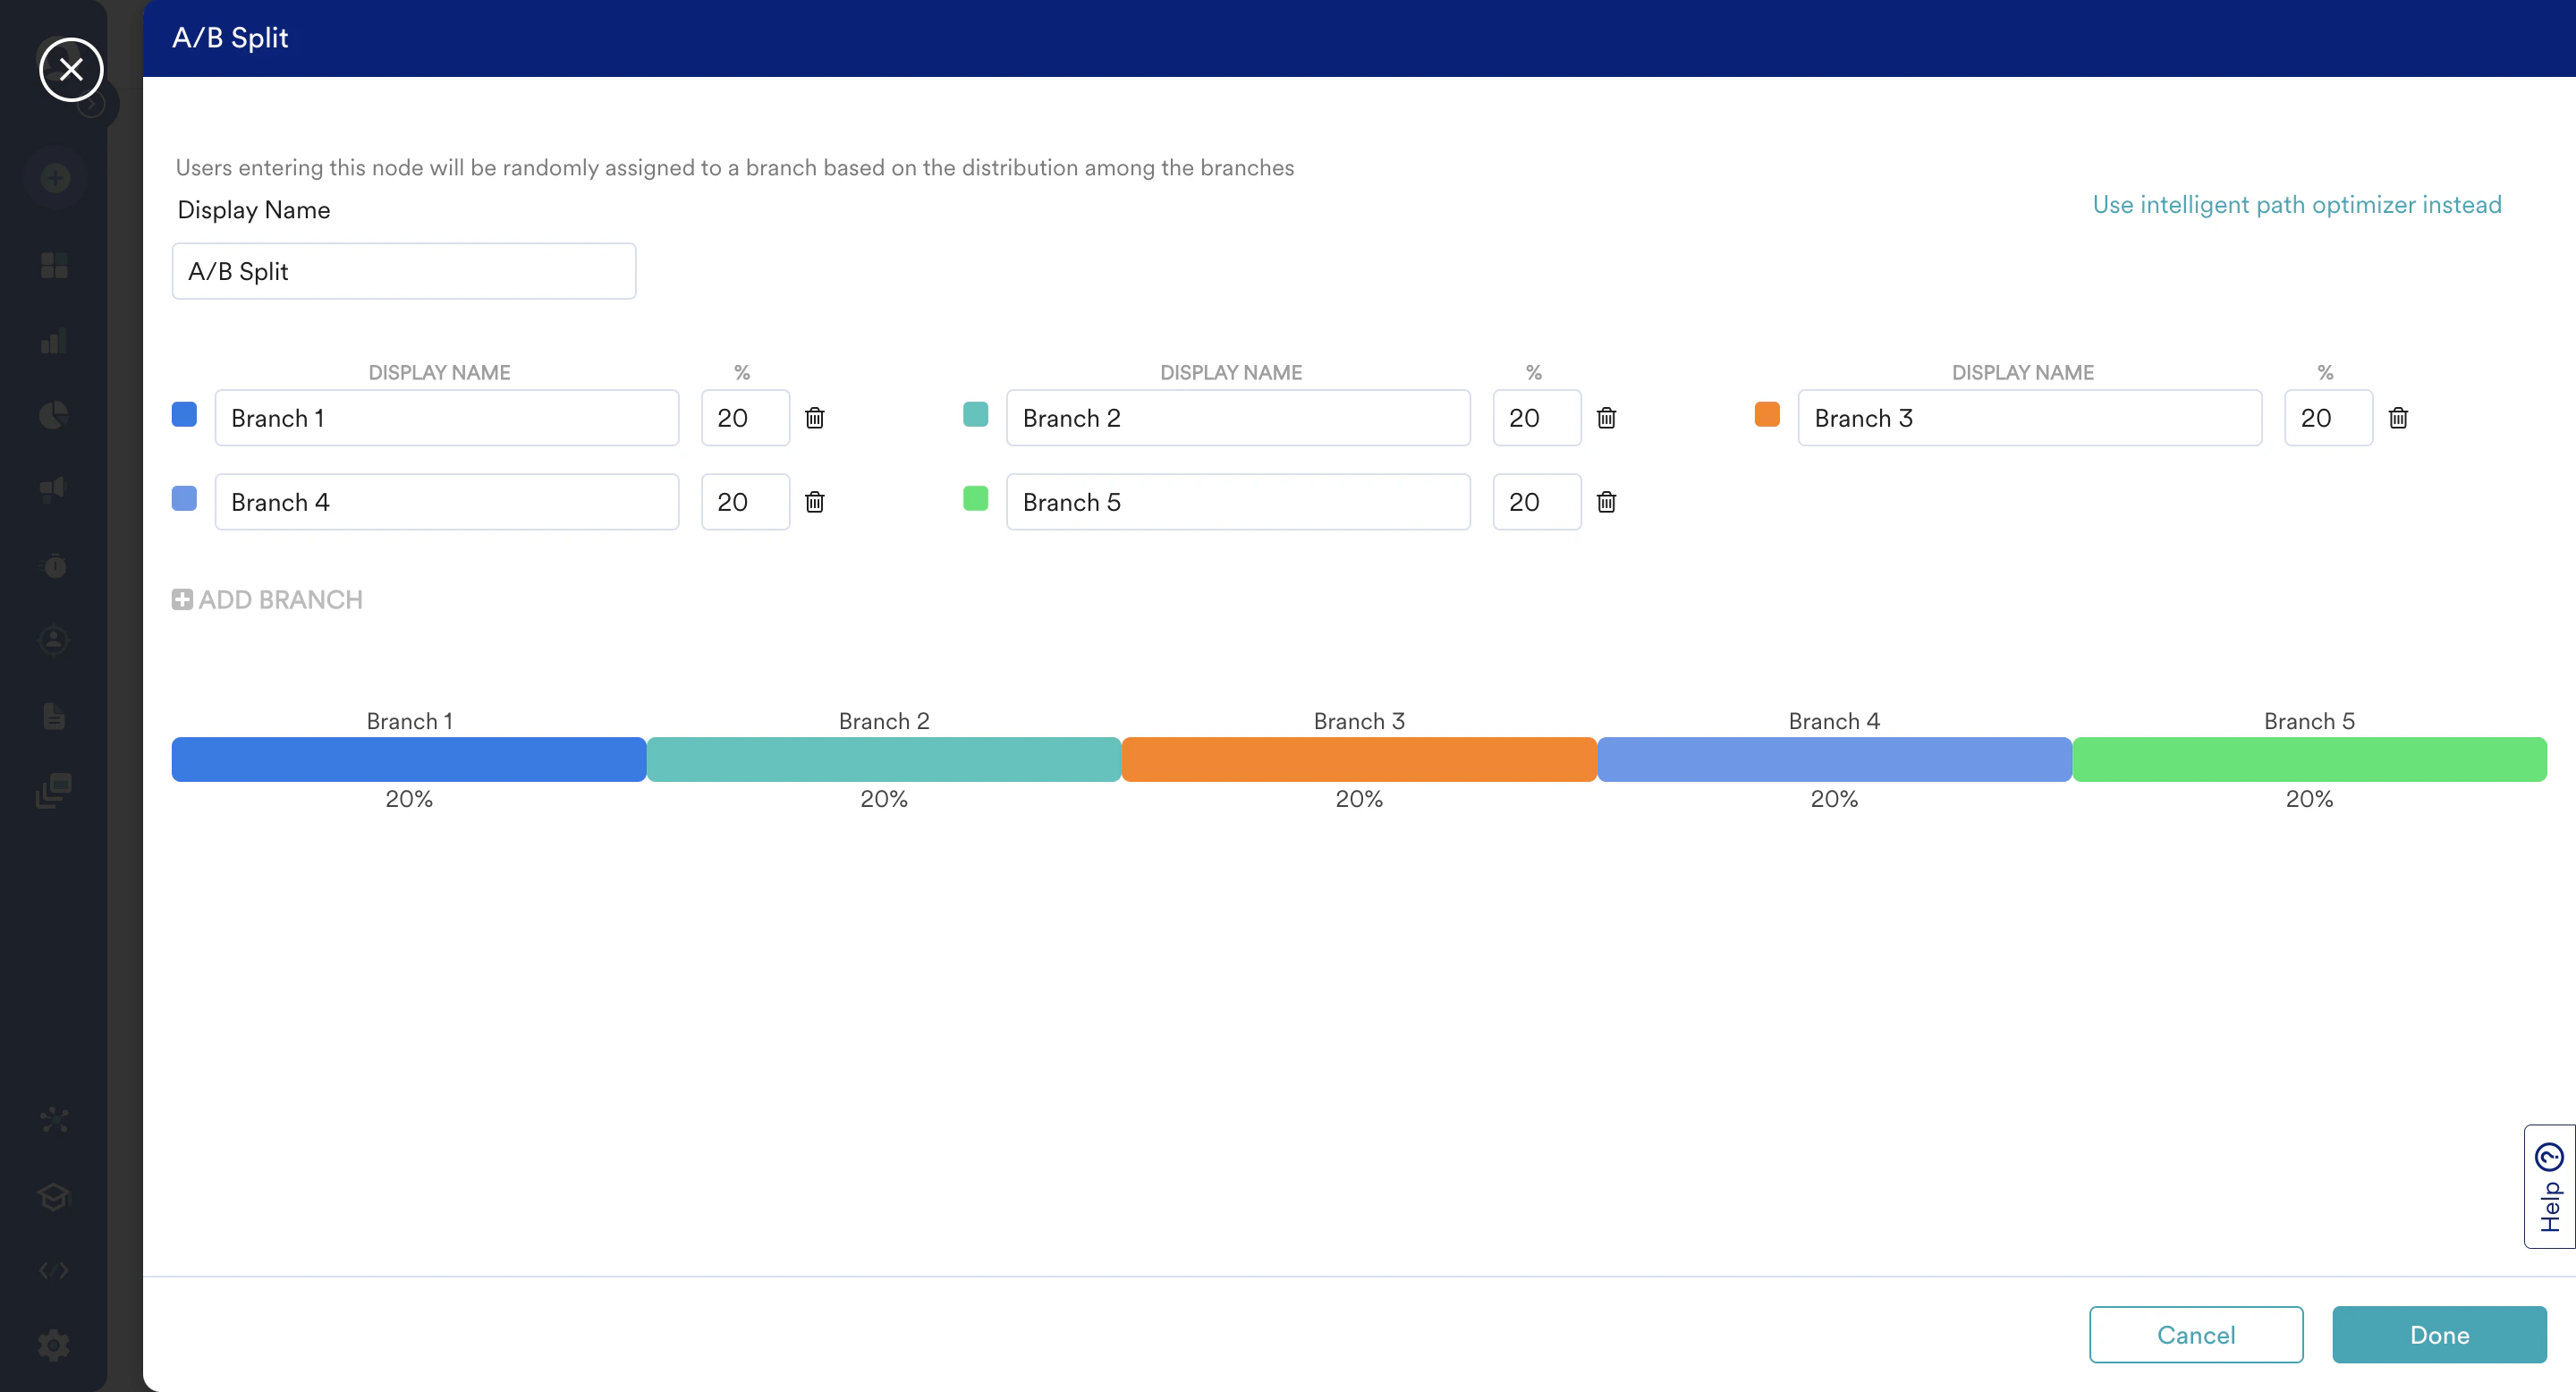

Opt for intelligenceYou can configure MoEngage Flows to automatically adjust the user attribution in favor of the best-performing branch as more and more users enter the flow.For more information, refer to Intelligent Flow Path optimizer.
Test Setup
Add A/B Split at any part of your flow from the control category of flow stages.- Add the number of branches you want to experiment with. You can add up to five branches in one A/B split stage.
- Configure the user distribution split for each branch. The variation percentage can be between 0-100 for each branch.
- Make sure that the sum of all the branch variation percentages is 100.
Understand the Performance
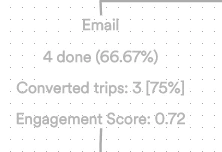
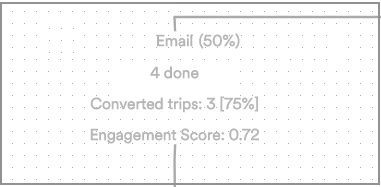
As users enter the flow, each branch’s performance keeps updating on the canvas.- Email (50%) denotes the display name of the branch and the configured user distribution for the branch, which is 50 in this example.
- 4 Done is the number of flow trips that have gone through this branch.
- Converted trips are the number of branch trips that resulted in at least one conversion. 75% is the conversion rate for the branch in the example above.
- The Engagement Score is a derived metric reflecting the engagement of the branch. The higher the number, the better the engagement. For more information on how the engagement score is calculated, refer here.
What is a branch?
- All the action stages from an A/B split node to the flow exit stage are included in tracking the branch’s performance.
- If the branch splits into multiple branches, the resulting branches are considered part of the parent branch.
- If a branch merges into another branch at some point, the common flow path is considered a part of both the merging branches.
Find a Winner
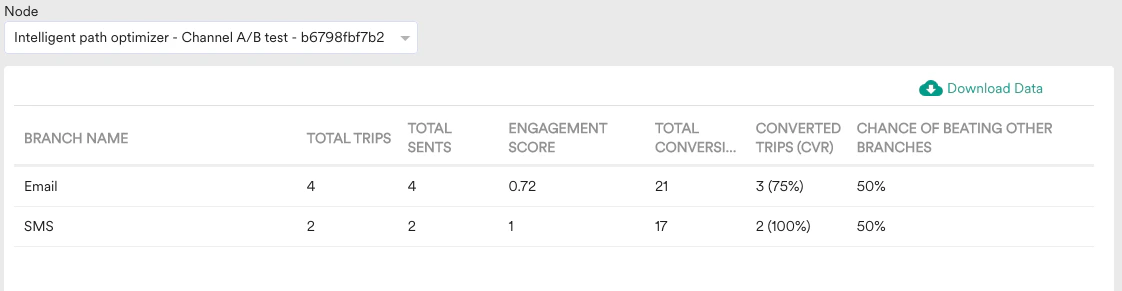
You can analyze and compare the branches’ performances in the report for your split node. You can click the report option hovering over the stage on canvas or go to the split node stats section in the flow’s detailed stats page and filter on a particular split node from the list.