

Overview
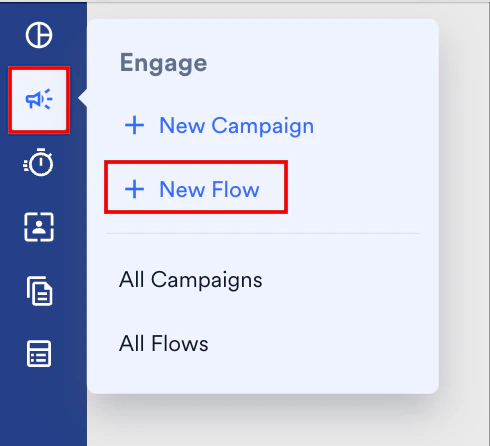
MoEngage Flows is a series of Cross-channel (across the channels such as Email, Push, SMS, and so on) Lifecycle campaigns that will be sent to your customers based on their actions or in-actions on your app or website. To create a flow, perform the following steps:- On the sidebar menu in MoEngage, hover over the Engage menu item
 . The Engage menu appears.
 - Click + New Flow.
- On the Create new flow dialog box, click + Start with a blank canvas.
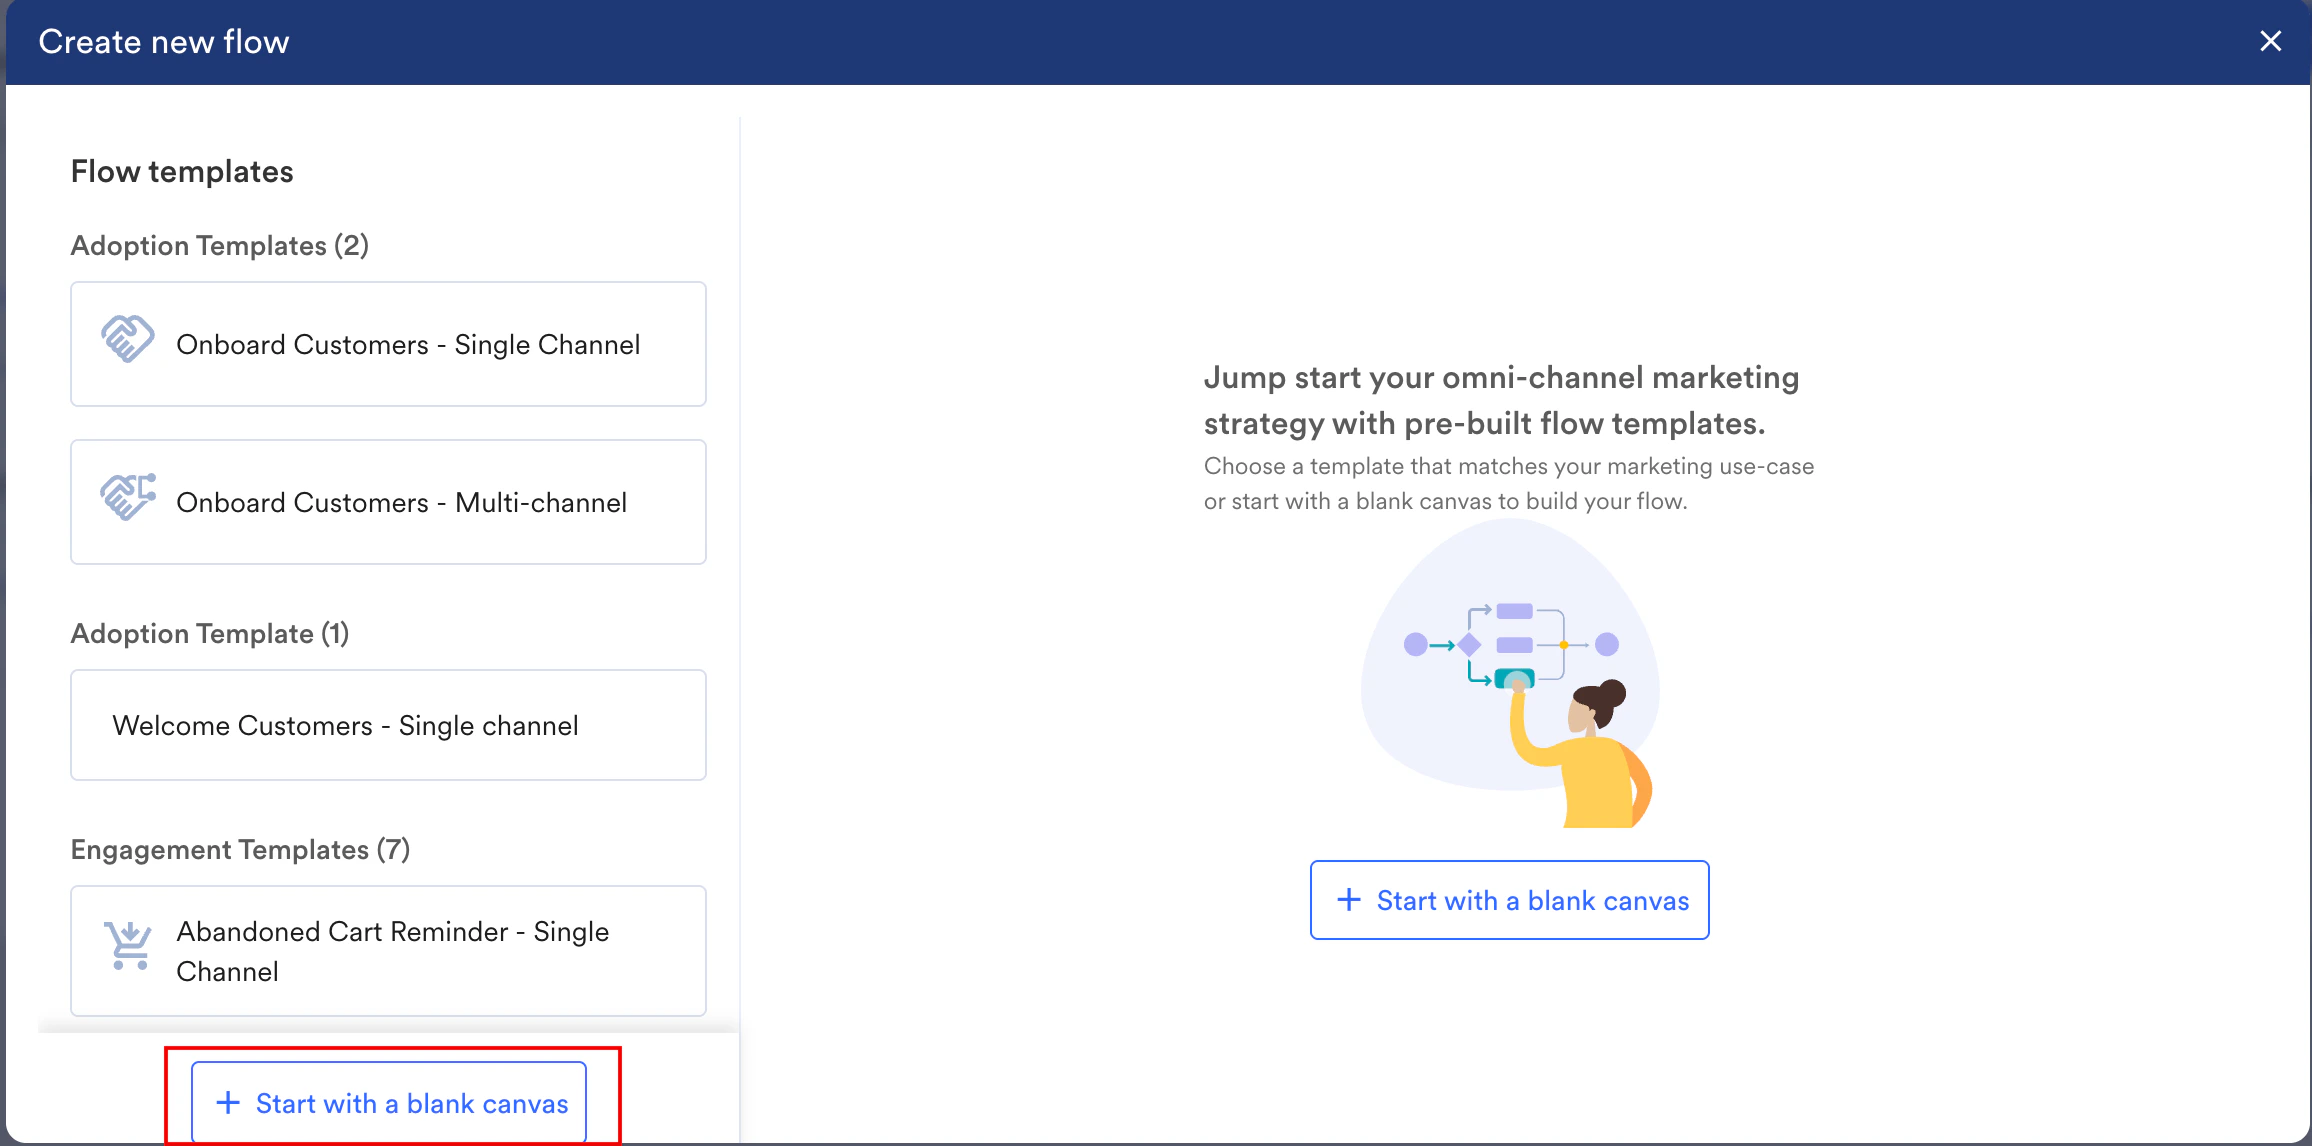
- From the resulting pop up, use one of the following options to create a flow:
Option 1: Create a Flow Using a Flow Template
Flow templates provide you with inspiration for crafting your flows based on your goals - onboarding, incentivization, and engagement.You can create single-channel or multiple-channel flows for sending reminders for abandoned carts, reach out to customers who are a churn risk, and improve app/website engagement. The various Flow templates are discussed below :Template Types
There are two basic template types- Adoption: Adoption templates can be used for onboarding new customers and are available for a single channel and multiple channels.
- Engagement: Engagement templates are available for single, multiple, or specific channels such as the web and app. They can be used for improving app or website engagement, engaging with customers who have looked up certain offerings or added certain products to their carts and abandoned them, and reaching out to customers who are a churn risk.
Now that you know the types of templates, you can use them to create flows.
- You can edit the Flow template to add event checks wherever necessary and edit the campaign content.
- You can add or delete stages to the template as required.
Use a Template
- Select the flow template and click Use template.
- Add entry conditions, define the target audience, and conversion goal (if any) for the flows.
- Review the campaigns in the template and modify them as required.
- Add new stages or paths if necessary, as per the business use case.
- After the structure of your flow is ready, you can click Save to save it as a draft. To publish the flow, your next action depends on your account’s settings:
-
- If the Campaign Approval workflow is disabled, you can publish the flow directly.
- If the Campaign Approval workflow is enabled, you have the permission to create, manage, and publish campaigns, you can publish the flow directly .
- If the Campaign Approval workflow is enabled and you only have the Create & Manage permission, you must submit the flow for approval. For more information, refer here.
-
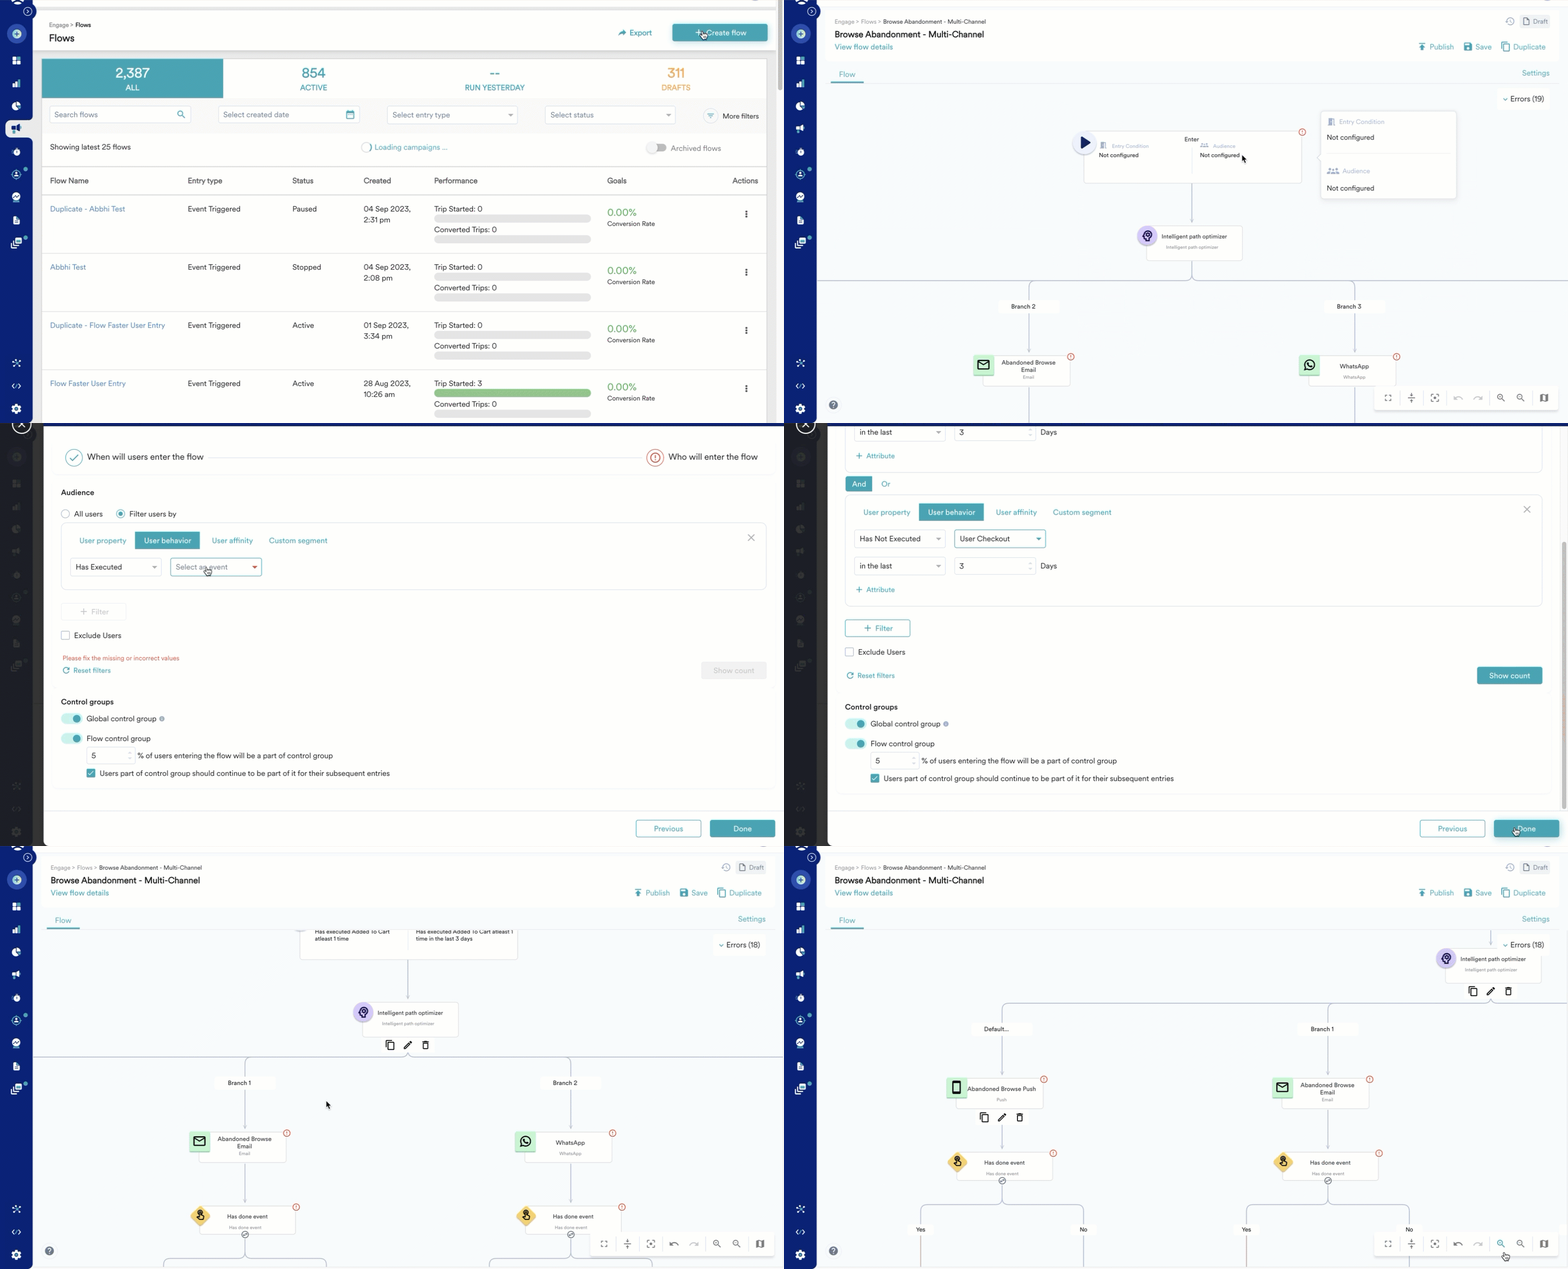
Option 2: Create a Flow from Scratch
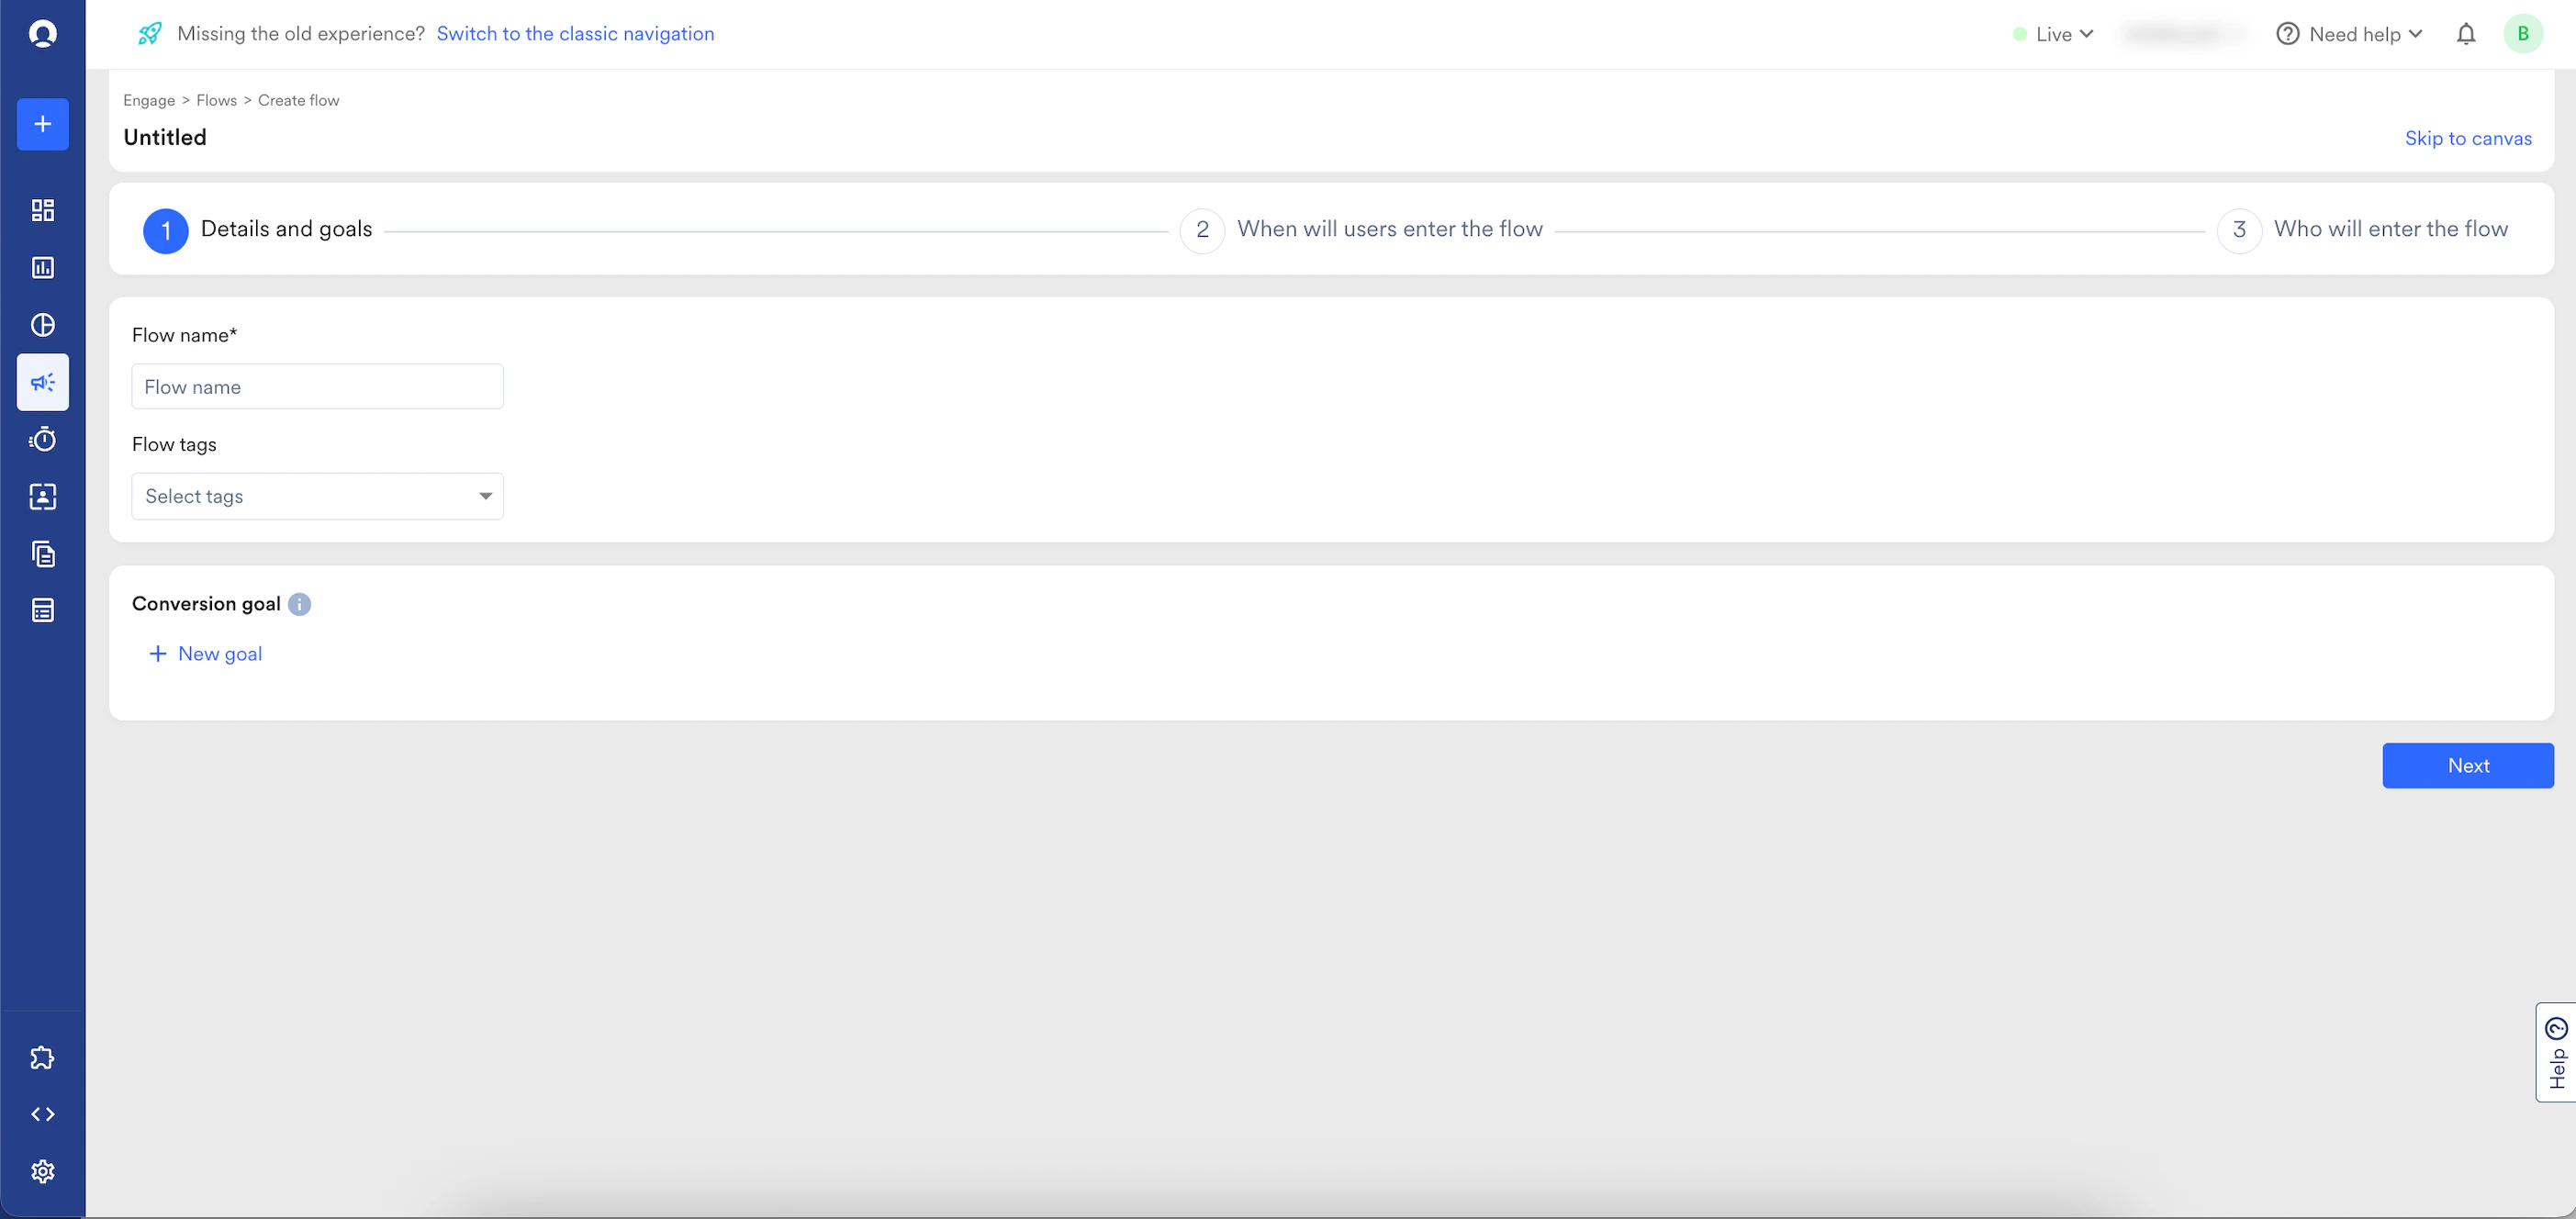
You can start with a blank canvas and build a flow of your choice. The following are the steps to create a flow from scratch:- Details and goals: Define the goal of the flow and add the required details.
- When will users enter the flow: Define when the users will enter the flow.
- Who will enter the flow: Define the audience of the flow.
You can directly enter the canvas from any step during flow creation. Click Skip to Canvas to open the MoEngage canvas.
Details and Goals
After you click + Start with a blank canvas, the Create flow page is displayed. This section contains the following:Flow Details
The flow details section contains the following fields:| - - Team: If your organization has Team enabled, in the Team list, select your team to associate with the flow. For more information, refer to Teams in MoEngage. - Flow name: Enter the name of the flow to manage and identify the flow. The flow name must have at least five characters, and the limit is 256. The flow name can contain special characters. - Flow tags: Select flow tags from the drop-down list to provide clarity to tags. You can select a maximum of five tags. For more information, refer to Tags in MoEngage. | 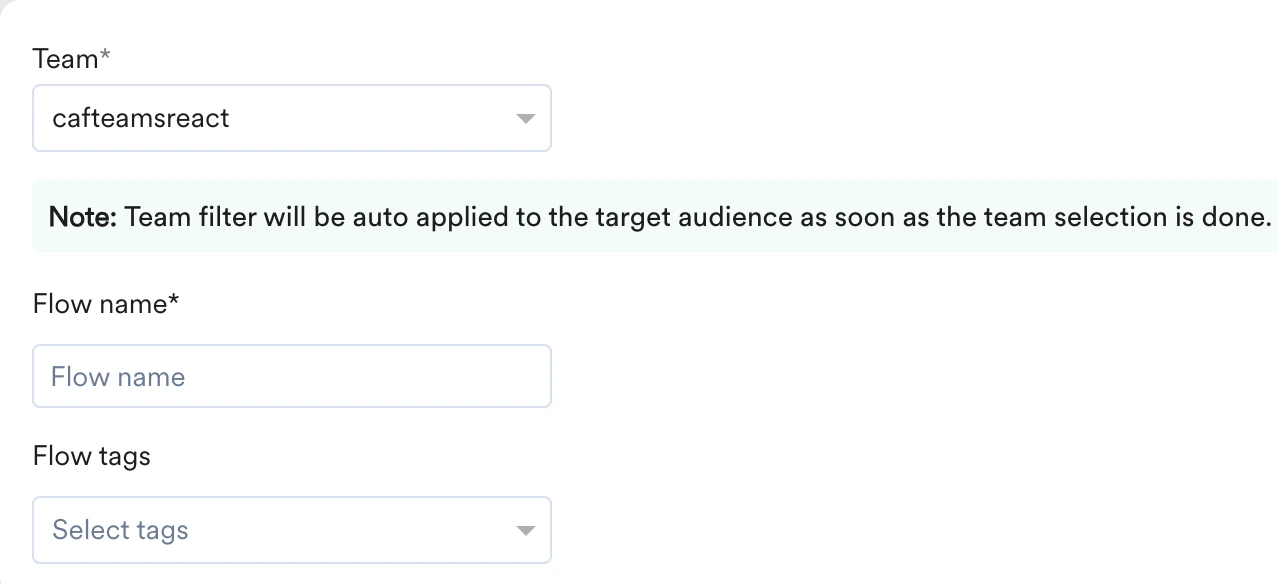 |
Conversion Goals
Define the conversion to track conversion for the flow. The conversion goal configured for the flow is treated as the conversion goal of all the campaigns part of the flow.- You can add five conversion goals for a single flow. For more information, refer to Add multiple goals to flows.
- You can publish the flow without any goals.
| Field | Description |
|---|---|
| Goal name | Type the name of the goal to manage and identify the goal. |
| Event name | Select from the drop-down the defined events based on which the goal is tracked. For more information, refer to Events and Attributes. |
| Attribute | Select from the drop-down the defined attributes, conditions, and values to filter or drill down the goal being tracked. For more information, refer to Events and Attributes. |
| Track above goal for | Set an attribution window that is the Time period for which conversion goals are tracked after an impression or clicks based on the attribution type. 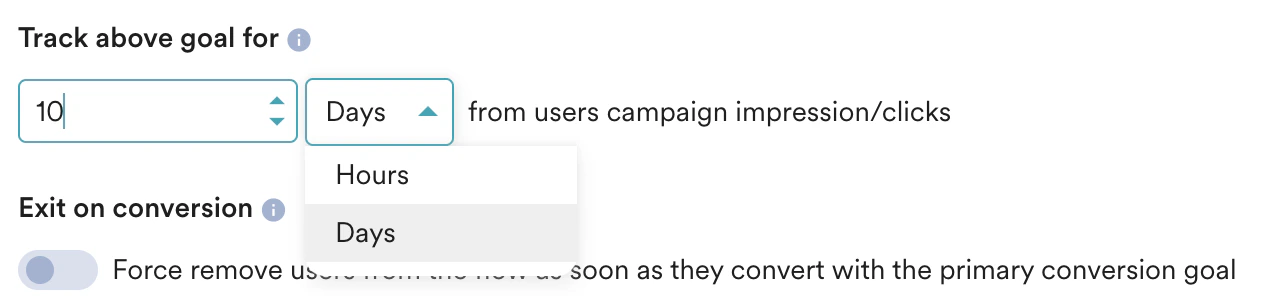 |
| Exit on conversion | Turn on this toggle to forcefully exit users from the flow as soon as they convert with the primary conversion goal.  |
You can change the goal, tags, and exiting users on conversion setting at any point in time before publishing the Flow by clicking Settings. For more information, refer to Flow Settings.
When Will Users Enter the Flow
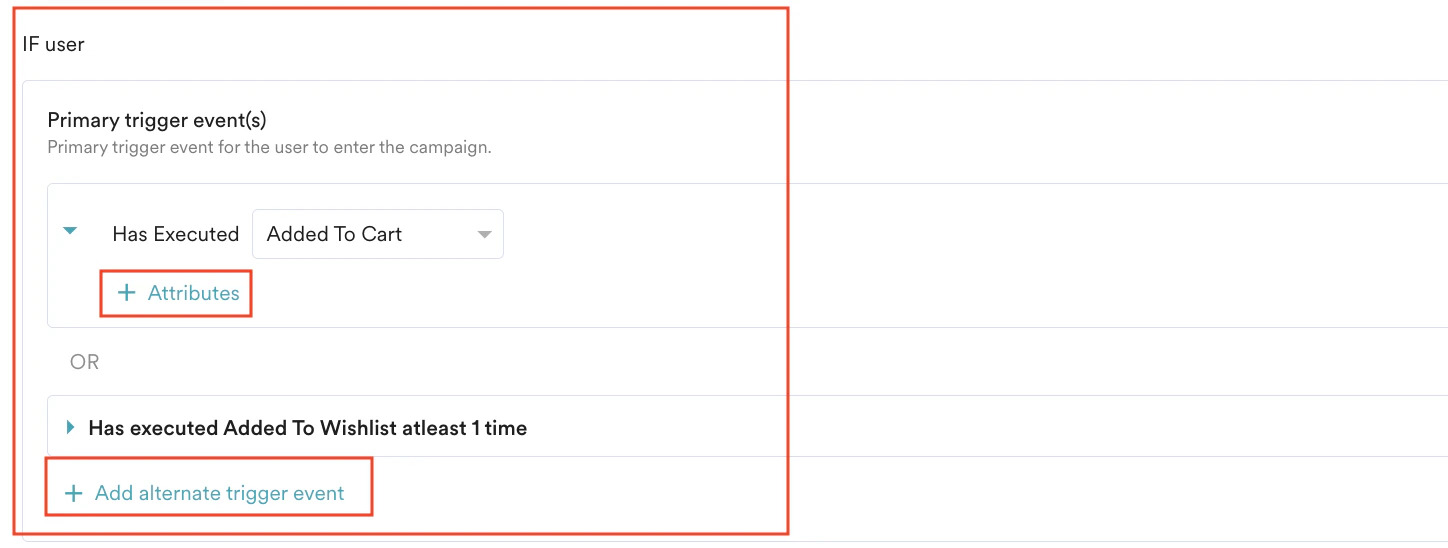
Select one of the following to define when the will user enter the flow. On Event TriggerAt fixed time On flow exit On business event trigger To define the trigger condition, do the following:- In the If user section,
- Under Primary trigger event (s), in the Has Executed field, Select an event from the list to define the primary trigger event for the user to enter the flow.
- Click + Add alternate trigger event to add multiple events under Primary trigger event(s). This will allow users to enter the flow if they perform any of the events defined in the Primary trigger event. (This is optional)
- Click + Attributes to add attributes to any of the added primary triggers. (This is optional)
-
In the AND section,
- Click + Add secondary trigger event.
- Under Secondary trigger event(s), select Has Executed or Has Not Executed based on your requirements select the event from Select an event list to define these secondary trigger events along with the primary trigger event for the user to enter the flow.
- Click + Add more trigger event to add multiple events under Secondary trigger event(s). (This is optional)
- Click + Attributes to add attributes to any of the added secondary triggers. (This is optional).
You can add personalized dynamic checks for users based on their previous actions. For more information, refer to Linked Conditions.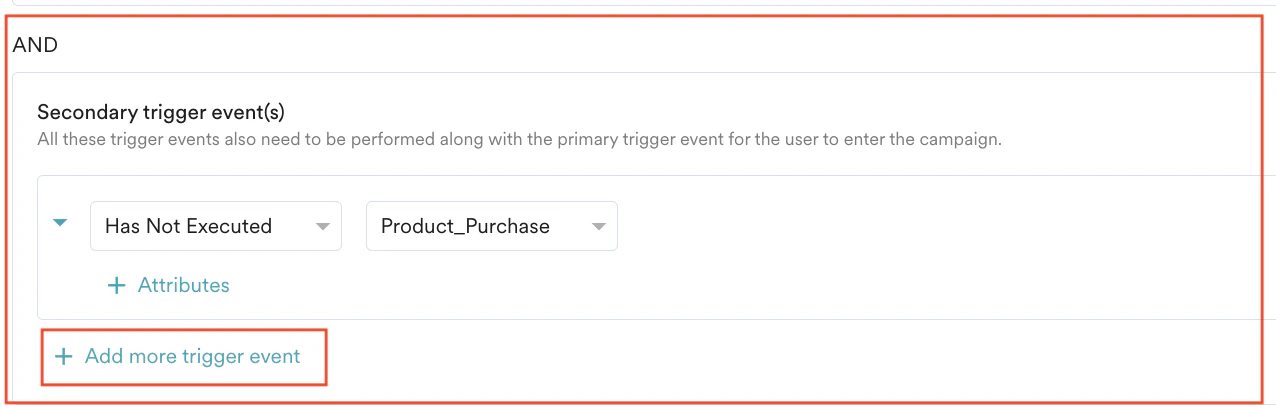
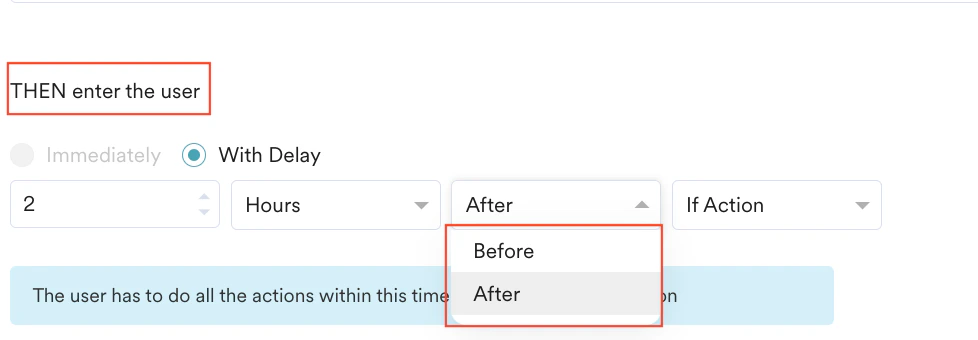
- In THEN enter the user section,
-
-
- Select Immediately to allow users to enter the user immediately.
This is applicable only when Primary triggers are defined for the flow. - Select With Delay to allow the user to enter the flow at a delayed time interval by providing the following details:
- Type the time value and select minutes, hours, or days. The entered value can range between 2 minutes and 30 days (both inclusive).
- Select Before or Afterto specify whether the user should enter the Flow before or after the specified time interval.
When you add multiple primary trigger events, only the After option is allowed to specify the time interval. However, when only one primary trigger event is added, both the Before and After options are allowed to personalize your delay.
- Select the attribute relative to which this time calculation has to be done. To learn more about this, click here.
- Select Immediately to allow users to enter the user immediately.
-
To schedule the flow at a fixed time, do the following:
Under User entry, select one of the following options to trigger the flow:
| Field | Action |
|---|---|
| As soon as possible | Select the option to ensure the user enters the flow one-time as soon as possible. 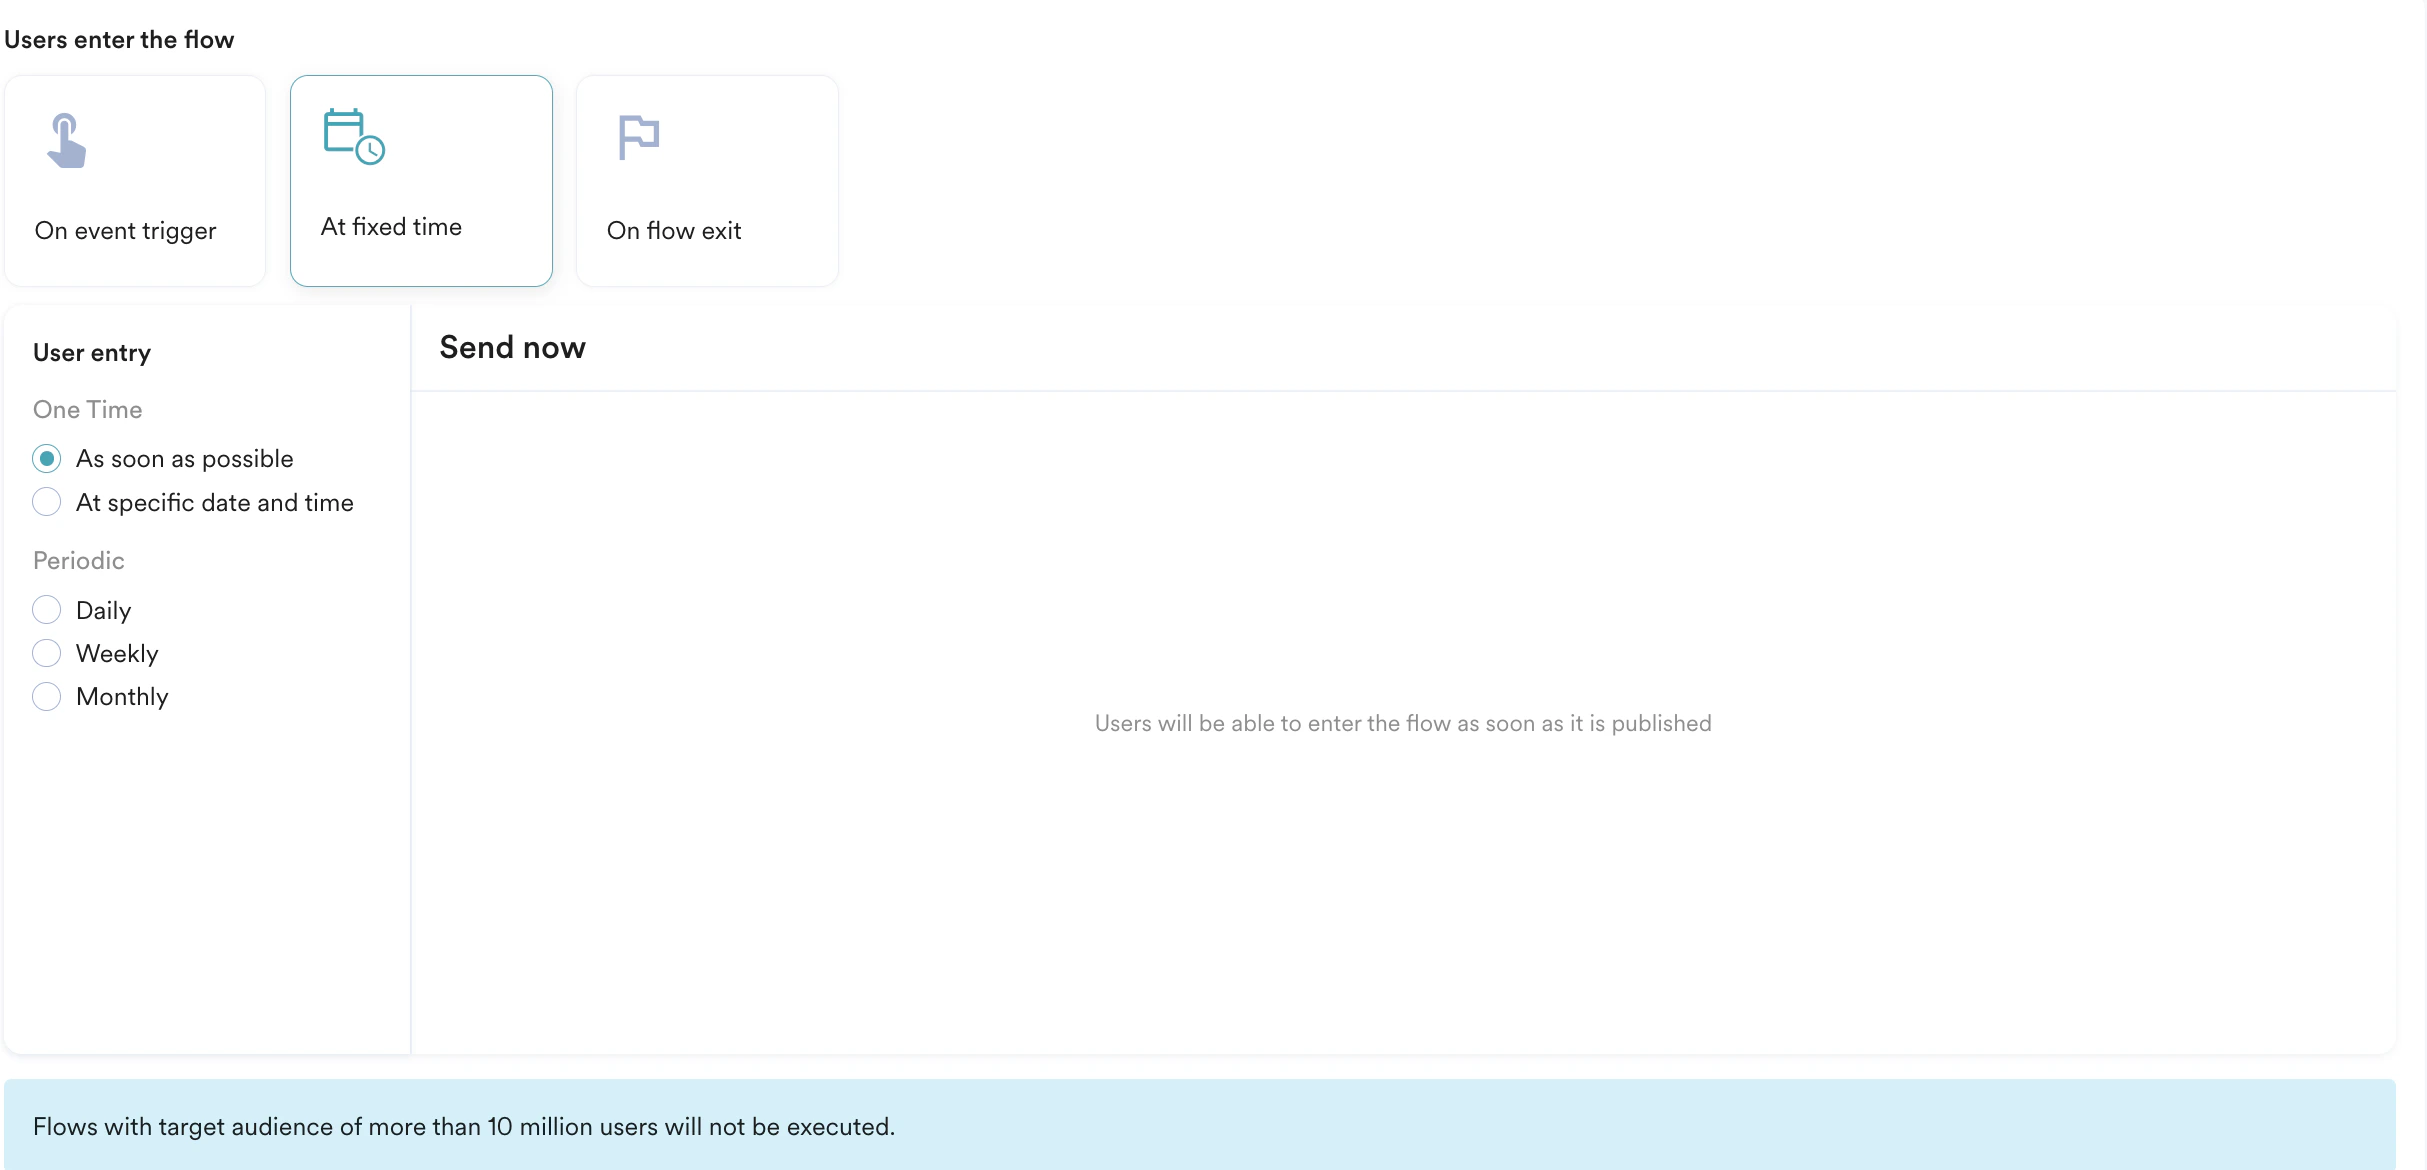 |
| At specific date and time | Follow these steps to allow the user to enter the flow one-time at the specified time and date: 1. Select the time zone. 2. Select the date from the calendar.  3. Type or use the up and down arrows to set the time. 4. Click am or pm. 3. Type or use the up and down arrows to set the time. 4. Click am or pm. |
| Daily | Follow these steps to allow the user to enter the flow at a Daily frequency starting from a specified time and date:  1. Select the time zone. 2. Select the start date from the calendar. 3. Type or use the up and down arrows to set the start time in hours and minutes. 4. Click am or pm. 5. Use Repeat Every to select the frequency of days on which the user is allowed to enter the flow. 6. Do one of the following to define the End time and date at which the system will stop new entries to the flow: 1. Click Never to ensure the user can always enter the flow. 2. Click On and select the end date from the calendar. Note: Ensure that the end date is greater than the start date. 3. Click After and select the number of occurrences after which the campaign ends. 1. Select the time zone. 2. Select the start date from the calendar. 3. Type or use the up and down arrows to set the start time in hours and minutes. 4. Click am or pm. 5. Use Repeat Every to select the frequency of days on which the user is allowed to enter the flow. 6. Do one of the following to define the End time and date at which the system will stop new entries to the flow: 1. Click Never to ensure the user can always enter the flow. 2. Click On and select the end date from the calendar. Note: Ensure that the end date is greater than the start date. 3. Click After and select the number of occurrences after which the campaign ends. |
| Weekly | Follow these steps to allow the user to enter the flow at a Weekly frequency starting from a specified time and date:  1. Select the time zone. 2. Select the start date from the calendar. 3. Type or use the up and down arrows to set the start time in hours and minutes. 4. Click am or pm. 5. Select the frequency at which the user is allowed to enter the flow using Repeat every and Repeat on option. 1. Select the days of the week on which the user is allowed to enter the flow every week in Repeat on;and 2. the frequency in weeks for which the flow should allow users to enter from Repeat every. For example, choosing Monday and Friday in the ‘Repeat on’ section, and 3 in the ‘Repeat every’ section means that the campaigns will be sent 3 weeks once on Monday and Friday of the week. 6. Do one of the following to define the End time and date at which the system will stop new entries to the flow: 1. Click Never to ensure the user can always enter the flow. 2. Click On and select the end date from the calendar. Note: Ensure that the end date is greater than the start date. 3. Click After and select the number of occurrences after which the campaign ends. 1. Select the time zone. 2. Select the start date from the calendar. 3. Type or use the up and down arrows to set the start time in hours and minutes. 4. Click am or pm. 5. Select the frequency at which the user is allowed to enter the flow using Repeat every and Repeat on option. 1. Select the days of the week on which the user is allowed to enter the flow every week in Repeat on;and 2. the frequency in weeks for which the flow should allow users to enter from Repeat every. For example, choosing Monday and Friday in the ‘Repeat on’ section, and 3 in the ‘Repeat every’ section means that the campaigns will be sent 3 weeks once on Monday and Friday of the week. 6. Do one of the following to define the End time and date at which the system will stop new entries to the flow: 1. Click Never to ensure the user can always enter the flow. 2. Click On and select the end date from the calendar. Note: Ensure that the end date is greater than the start date. 3. Click After and select the number of occurrences after which the campaign ends. |
| Monthly | Follow these steps to allow the user to enter the flow at a Monthly frequency starting from a specified time and date:   1. Select the time zone. 2. Select the start date from the calendar. 3. Type or use the up and down arrows to set the start time in hours and minutes. 4. Click am or pm. 5. Select the frequency at which the user is allowed to enter the flow using ‘Repeat on’ and ‘Repeat every’. - Days of month: Select the days of the month on which the user is allowed to enter the flow and the frequency in months from Repeat every option. - For example, choosing ‘7’ in the calendar in the ‘Repeat on’ section and ‘3’ months in ‘Repeat every’ means that the user will be allowed to enter the flow on the seventh of a month once every three months. Note: Multiple days can be selected in a month. - Days of week: Select the days of the week on which the user is allowed to enter the flow and the frequency in months from Repeat every option. - With this feature, users can be allowed to enter the flow on the first Mondays of every month or second Tuesdays and Wednesdays of every month and so on. 6. Do one of the following to define the End time and date at which the system will stop new entries to the flow: 1. Click Never to ensure the user can always enter the flow. 2. Click On and select the end date from the calendar. Note: Ensure that the end date is greater than the start date. 3. Click After and select the number of occurrences after which the campaign ends. 1. Select the time zone. 2. Select the start date from the calendar. 3. Type or use the up and down arrows to set the start time in hours and minutes. 4. Click am or pm. 5. Select the frequency at which the user is allowed to enter the flow using ‘Repeat on’ and ‘Repeat every’. - Days of month: Select the days of the month on which the user is allowed to enter the flow and the frequency in months from Repeat every option. - For example, choosing ‘7’ in the calendar in the ‘Repeat on’ section and ‘3’ months in ‘Repeat every’ means that the user will be allowed to enter the flow on the seventh of a month once every three months. Note: Multiple days can be selected in a month. - Days of week: Select the days of the week on which the user is allowed to enter the flow and the frequency in months from Repeat every option. - With this feature, users can be allowed to enter the flow on the first Mondays of every month or second Tuesdays and Wednesdays of every month and so on. 6. Do one of the following to define the End time and date at which the system will stop new entries to the flow: 1. Click Never to ensure the user can always enter the flow. 2. Click On and select the end date from the calendar. Note: Ensure that the end date is greater than the start date. 3. Click After and select the number of occurrences after which the campaign ends. |
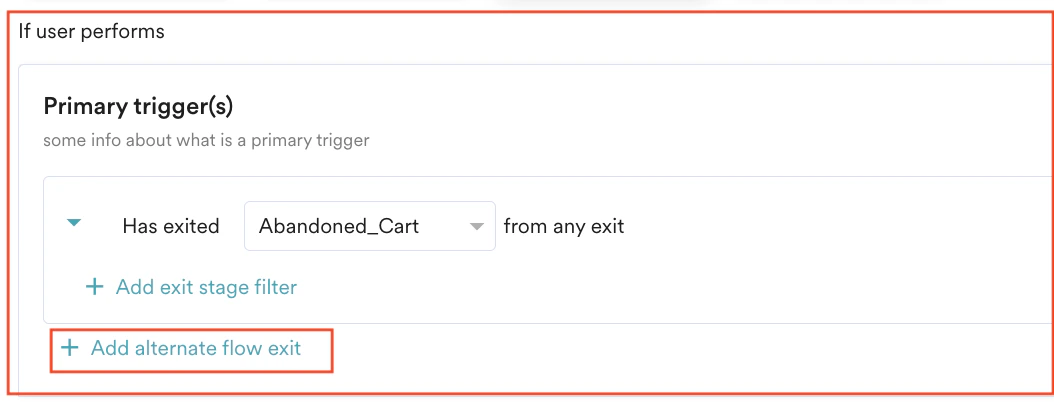
- In the If user performs section,
- Under Primary trigger(s), in the Has Exited list, select a flow in the Select by name list from which the user exits the flow.
- Click the + Add alternate flow exit to add multiple flow exits under Primary trigger (s). (This is optional)
- Click the + Add exit stage filter to add attributes to any of the added primary trigger events. (This is optional)
-
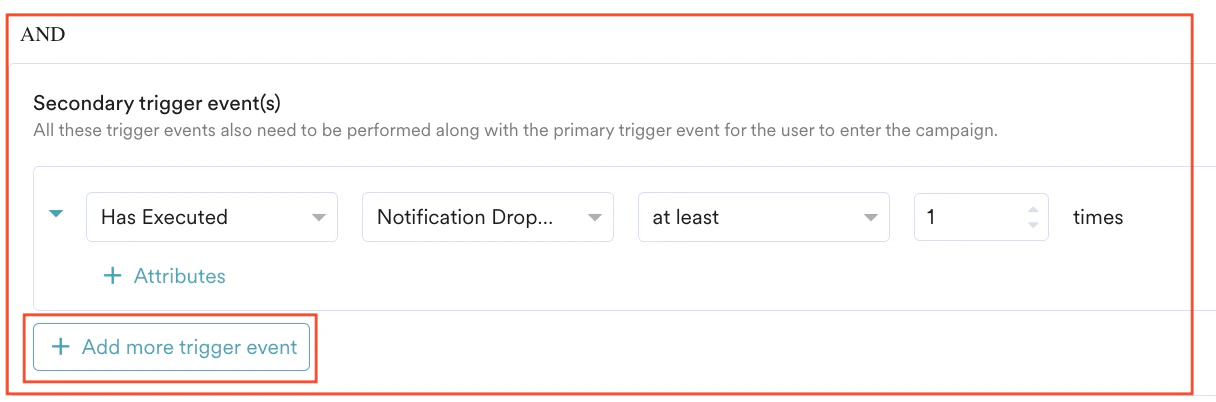
In the AND section,
- Click + Add secondary trigger event.
- Under Secondary trigger event(s), select Has Executed or Has Not Executed based on your requirements and select the flow in the Select an event list to define the secondary trigger events along with the primary trigger event for the user to enter the flow.
- Click the + Add more trigger event to add multiple flow exits under Secondary trigger event(s). (This is optional)
- Click the + Attributes to add attributes to any of the added secondary trigger events. (This is optional)
- In the THEN user enter the flow section,
- Select Immediately to allow the user to enter the flow within the next 30 to 60 seconds.
You can allow the user to enter the flow only if the condition is’ If’. - Select With Delay and provide the following details to define the delay after flow exit:
- Type the value of the time.
- Select minutes, hours, or days.
To make users enter the flow on a business event trigger, perform the following steps:
- In the Select Business Event list, click a business event (for example, Series Launched).
- Select one of the following options to define the Flow schedule:
| Field | Action |
|---|---|
| As soon as possible | Triggers the flow immediately. You can select: - Campaign time zone - the timezone in which the flow should start/ end. - Ends: You can choose the end time for the flow by selecting the End option to control when to stop new entries to the Flow. The following options are available: - Never: the flow never ends. - On: the Flow ends on the end date specified in the End date and End time fields. 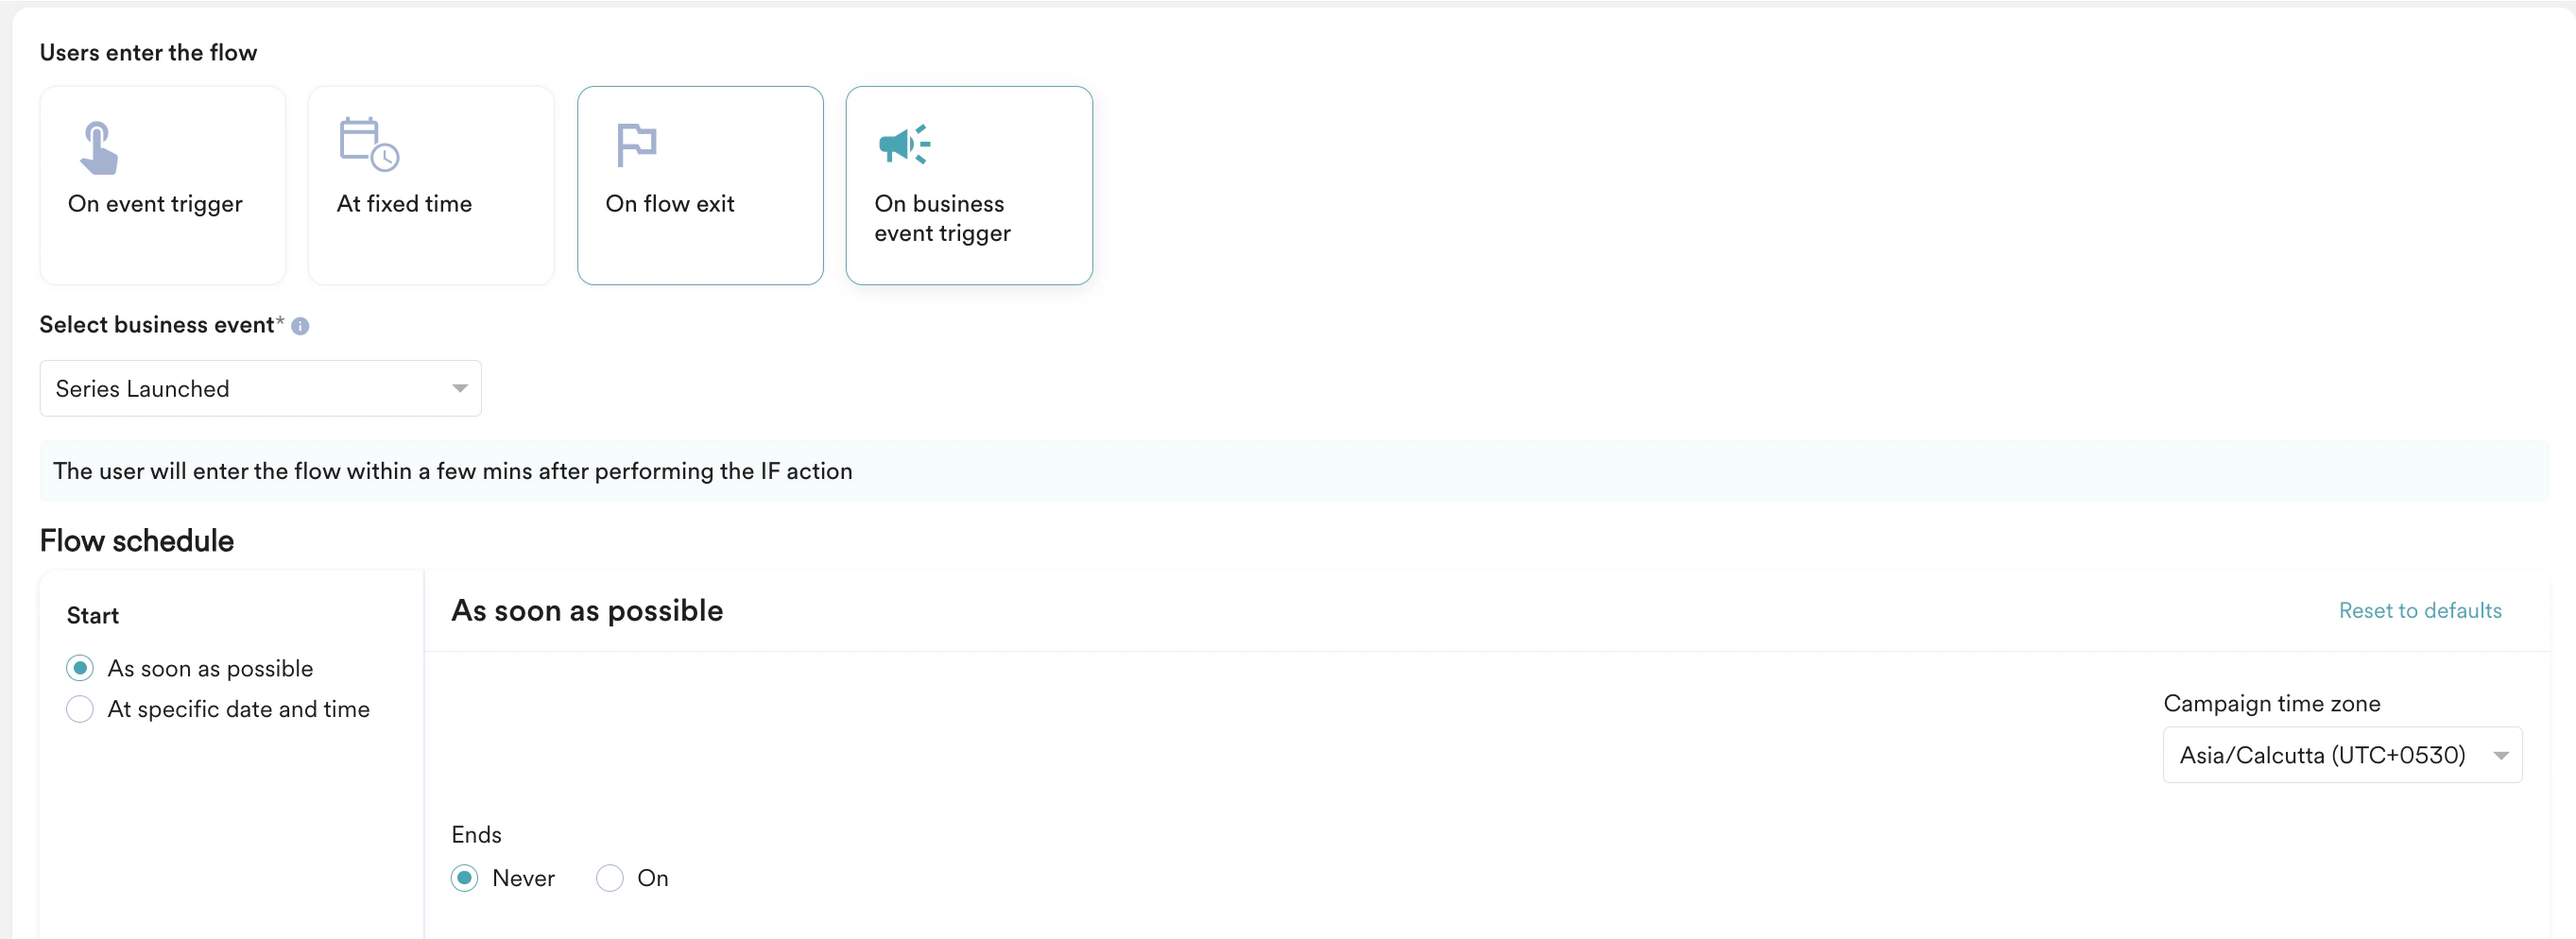 |
| At specific date and time | Triggers the flow at the specified time and time zone. This section helps you send the campaign on a specific date and time and contains the following fields: - Campaign time zone - the timezone in which the flow should start/end. - Start date - the date on which the campaign should be sent. - Send time - the time at which the campaign should be sent. Select am or pm depending on when the time of day at which the campaign should be sent. - Ends: You can choose the end time for the flow by selecting the End option to control when to stop new entries to the Flow. The following options are available: - Never: the flow never ends. - On: the Flow ends on the end date specified in the End date and End time fields. 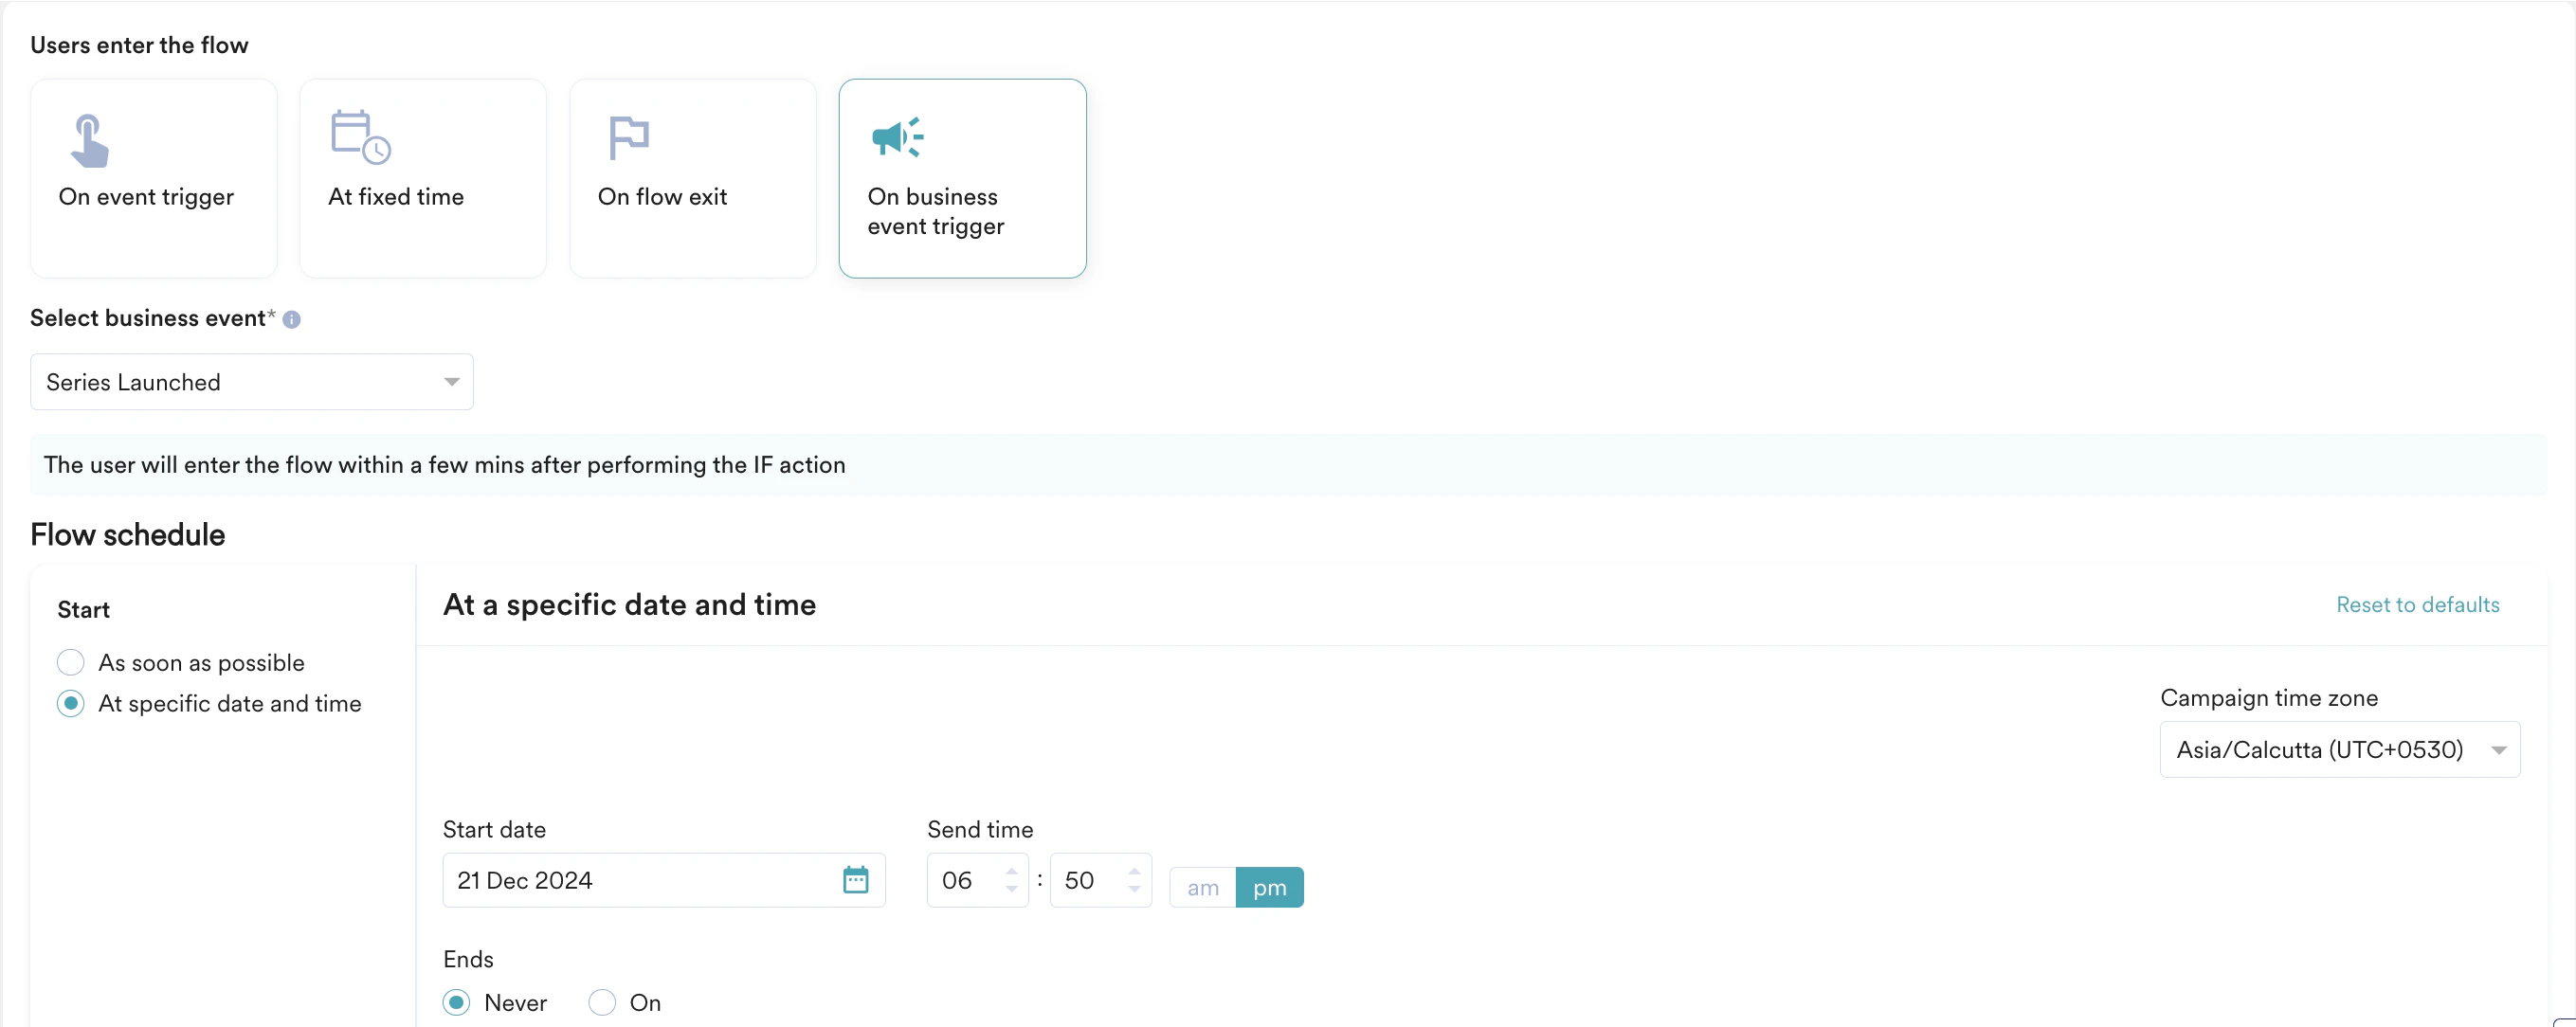 |
Limit User Entry Settings
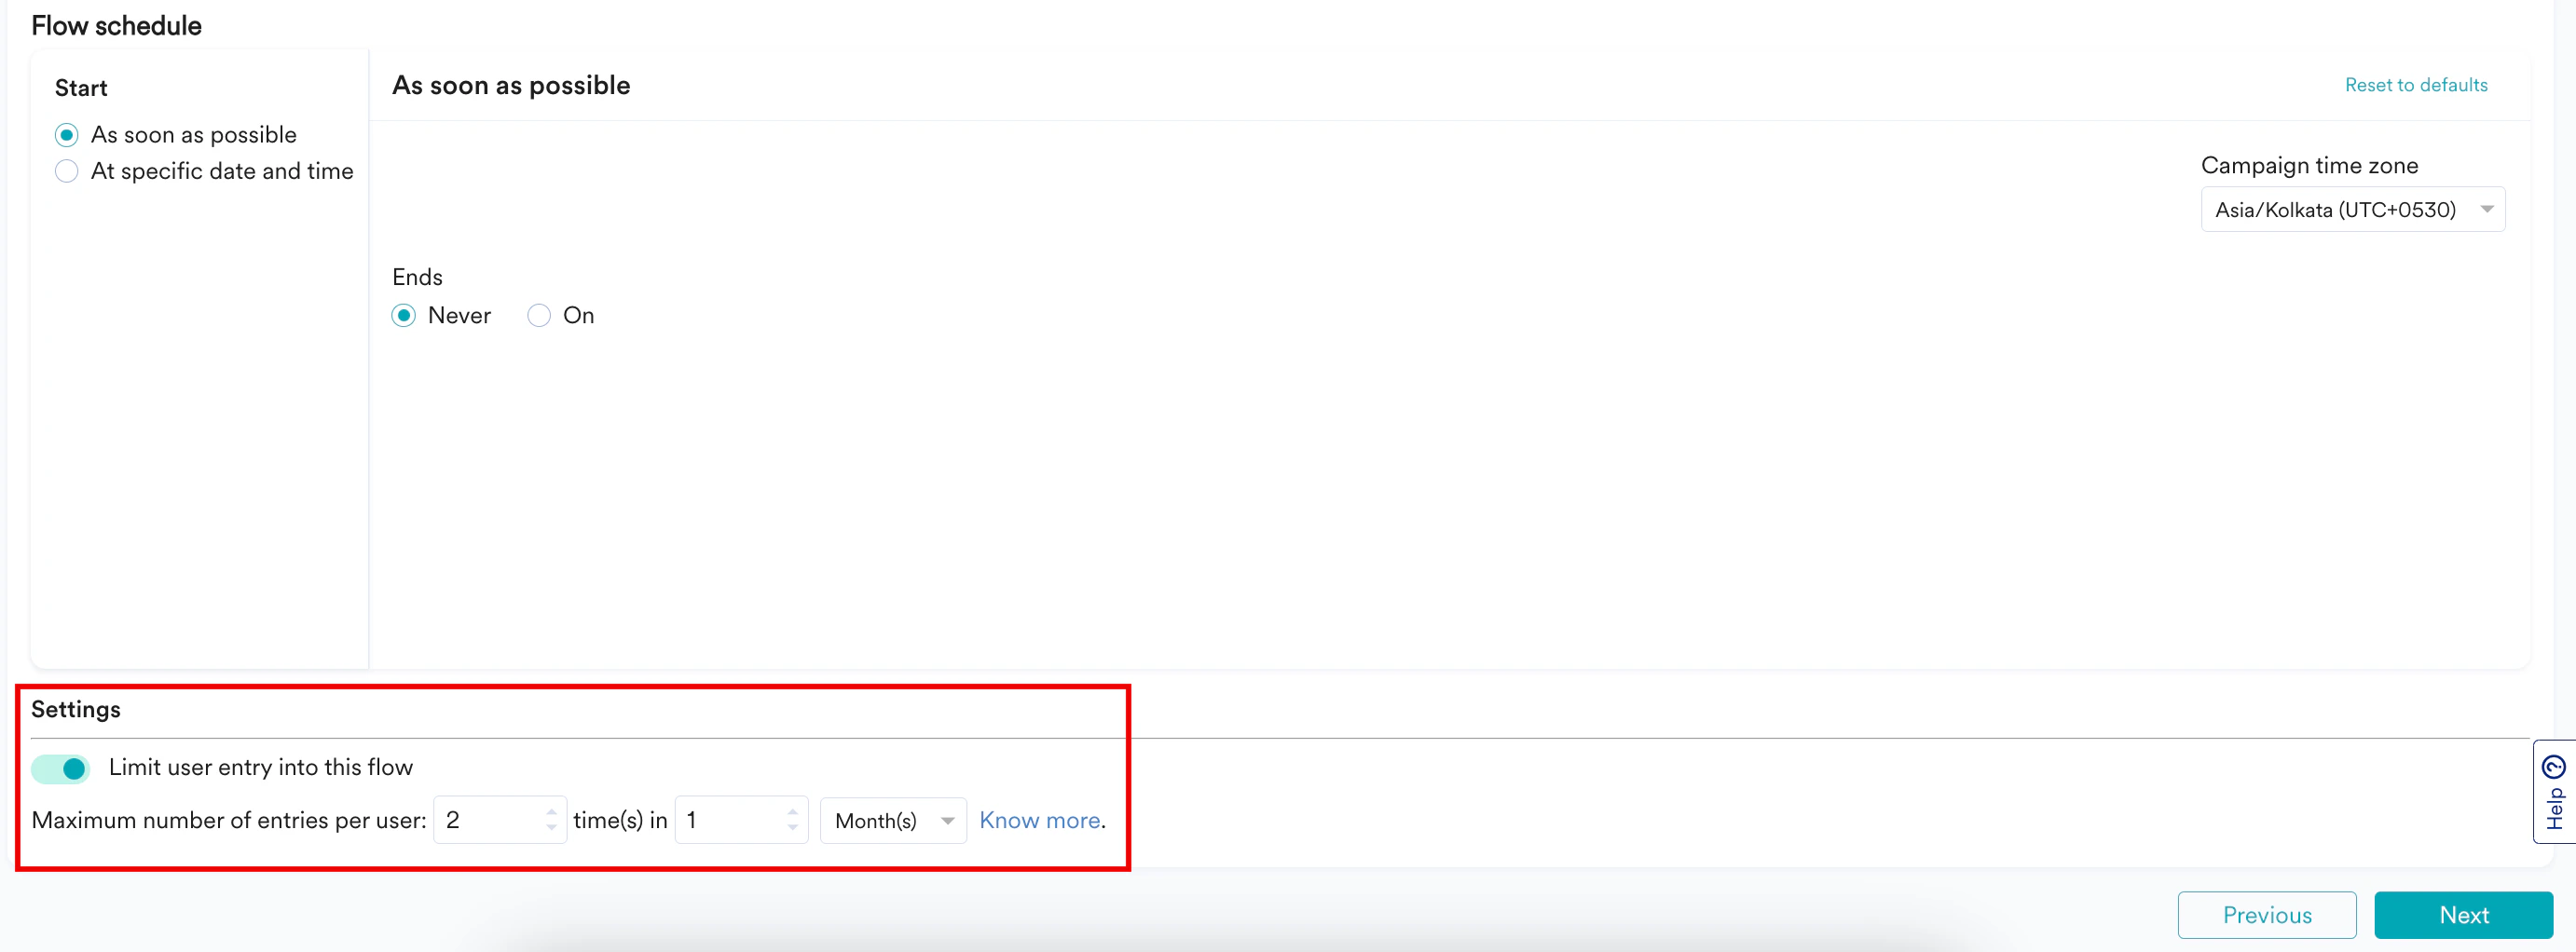
When you select At fixed time under the Users enter the flow section, the Limit user entry into this flowtoggle is visible only when you select a Periodic option.
- Define the maximum entry limit. For example, 2 times.
- Configure the frequency. For example, 1 month. The range can be from a minimum of 1 day to a maximum of 1 year (both inclusive).
Global Exit Criteria
Under Flow Exit, turn the Exit based on conditions toggle on to define flow exit conditions. When the users fulfill the conditions defined, MoEngage removes them from their last known position in the flow regardless of where they are. The exit criteria are applicable for all flow types (for example, On event trigger, At fixed time, On flow exit, and On business event trigger).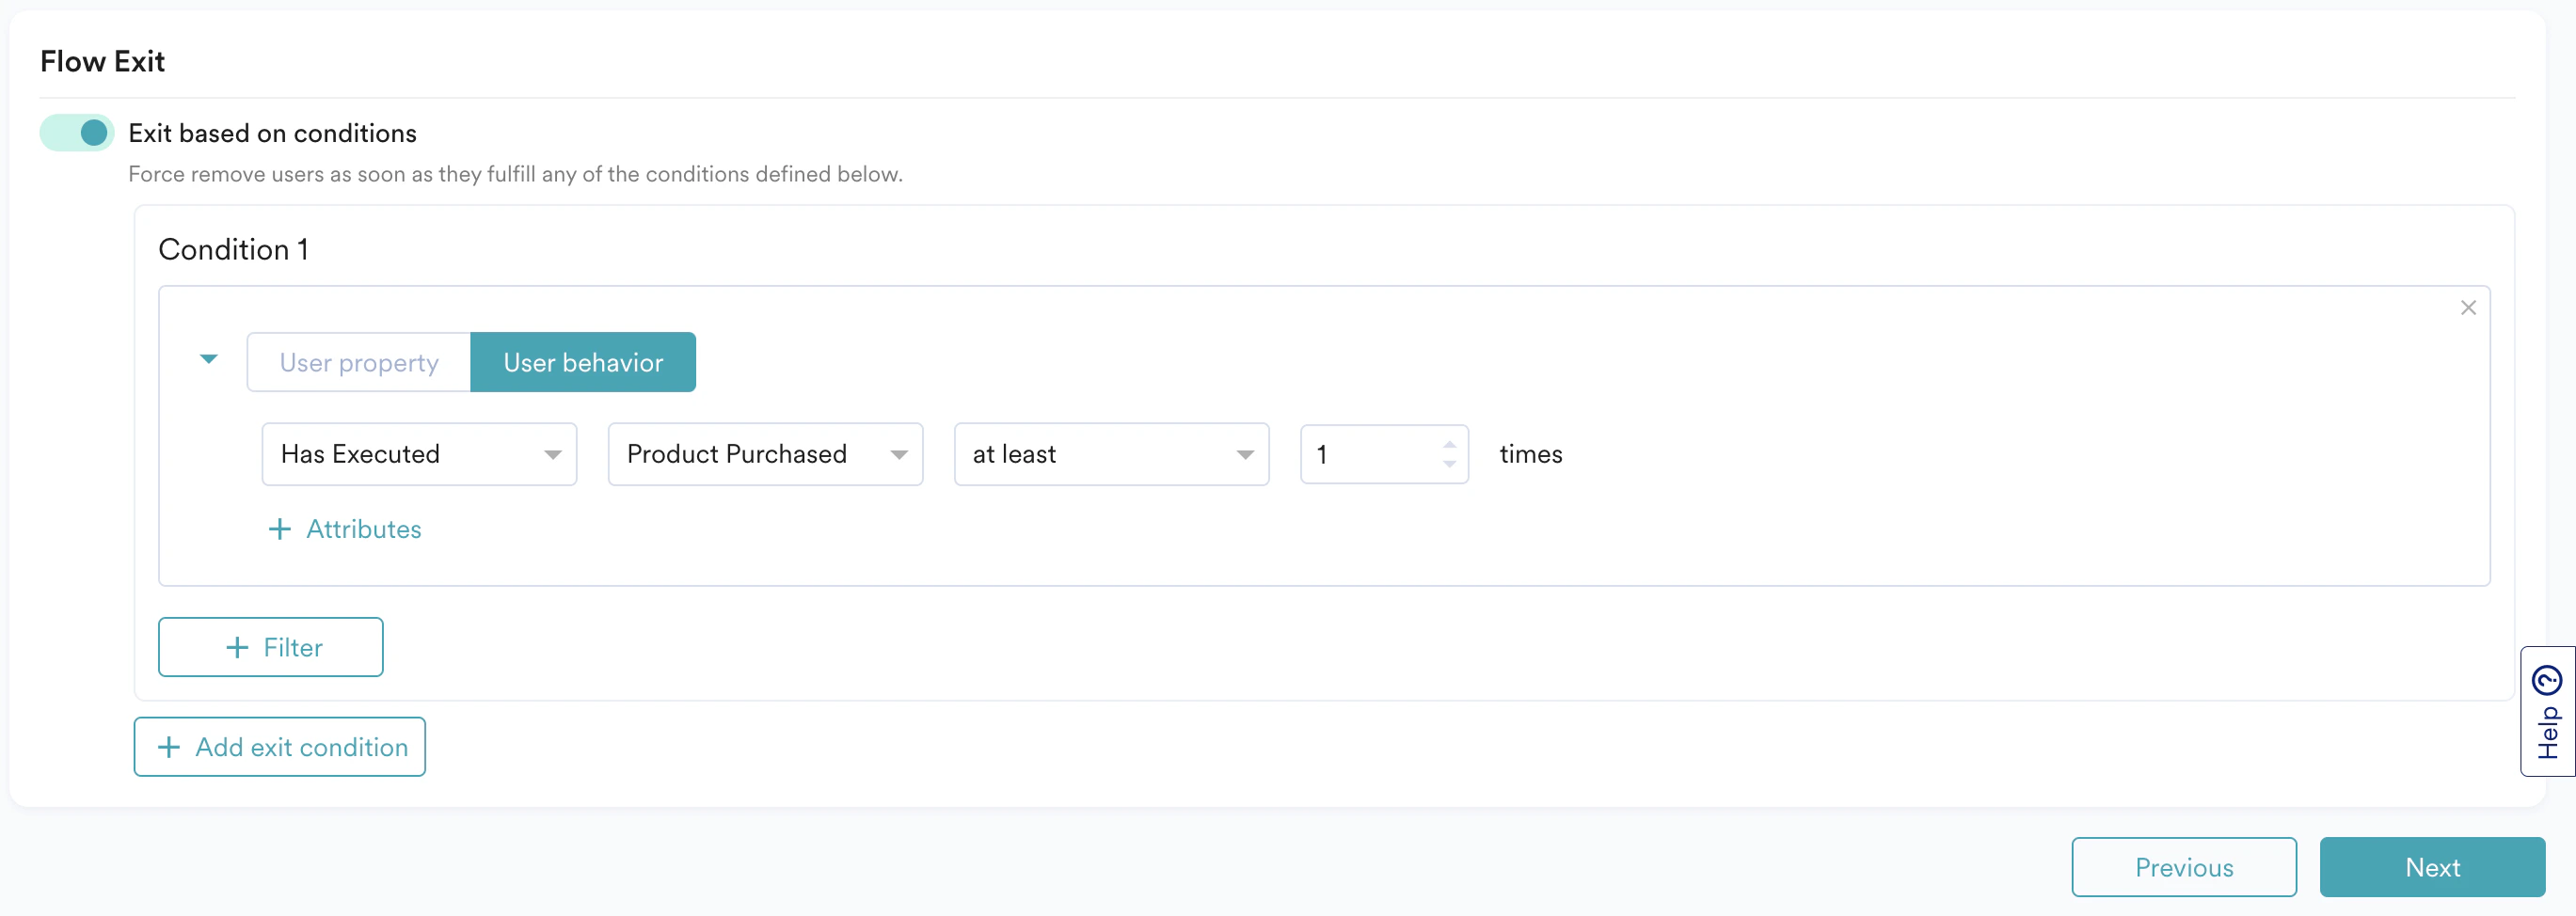
- Passing through an exit stage in the flow path
- Fulfilling the conditions in the exit criteria
- Achieving the conversion goal defined in the flow
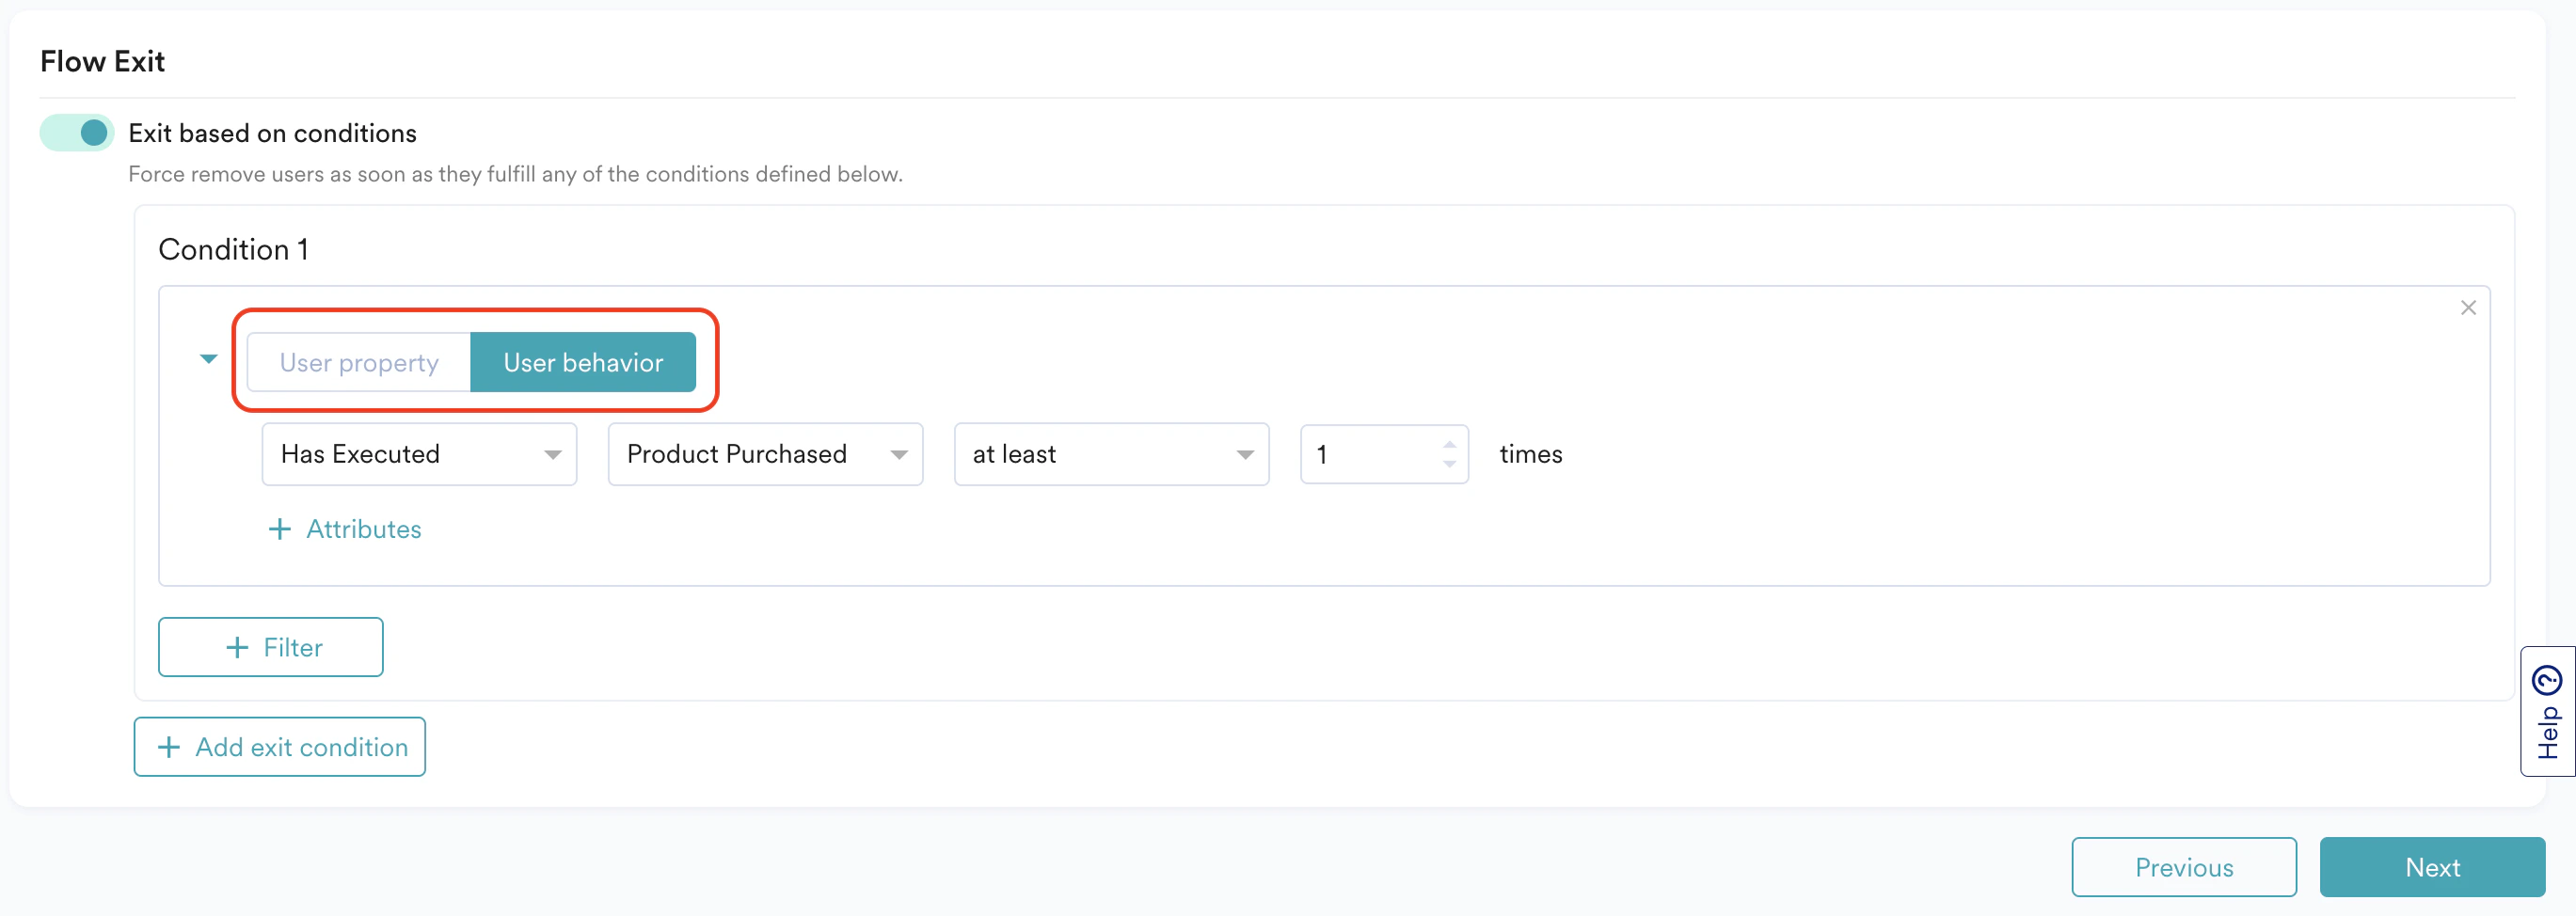
- User property: On the User property tab, you can define the exit criteria using user properties by specifying a value for a specific attribute. For example:
- Remove users when their membership is Gold (this can be used when the flow has a fixed agenda to convert users to Gold Membership).
- User behavior: On the User behavior tab, you can define the exit criteria using the list of events tracked in MoEngage.For example:
- Remove users when they have purchased any product after entering the flow
- Remove users when they have purchased the same product that they added to their cart after entering the flow
- You can achieve this and similar use cases by linking the primary trigger event and the Exit Condition. For more information, see Linked Conditions
- Remove users when they have purchased the same product that is now back in stock.
Supported Filters
You can define exit criteria only using conditions that are of string, integer, and Boolean data types.MoEngage does not support the conditions defined with following filters: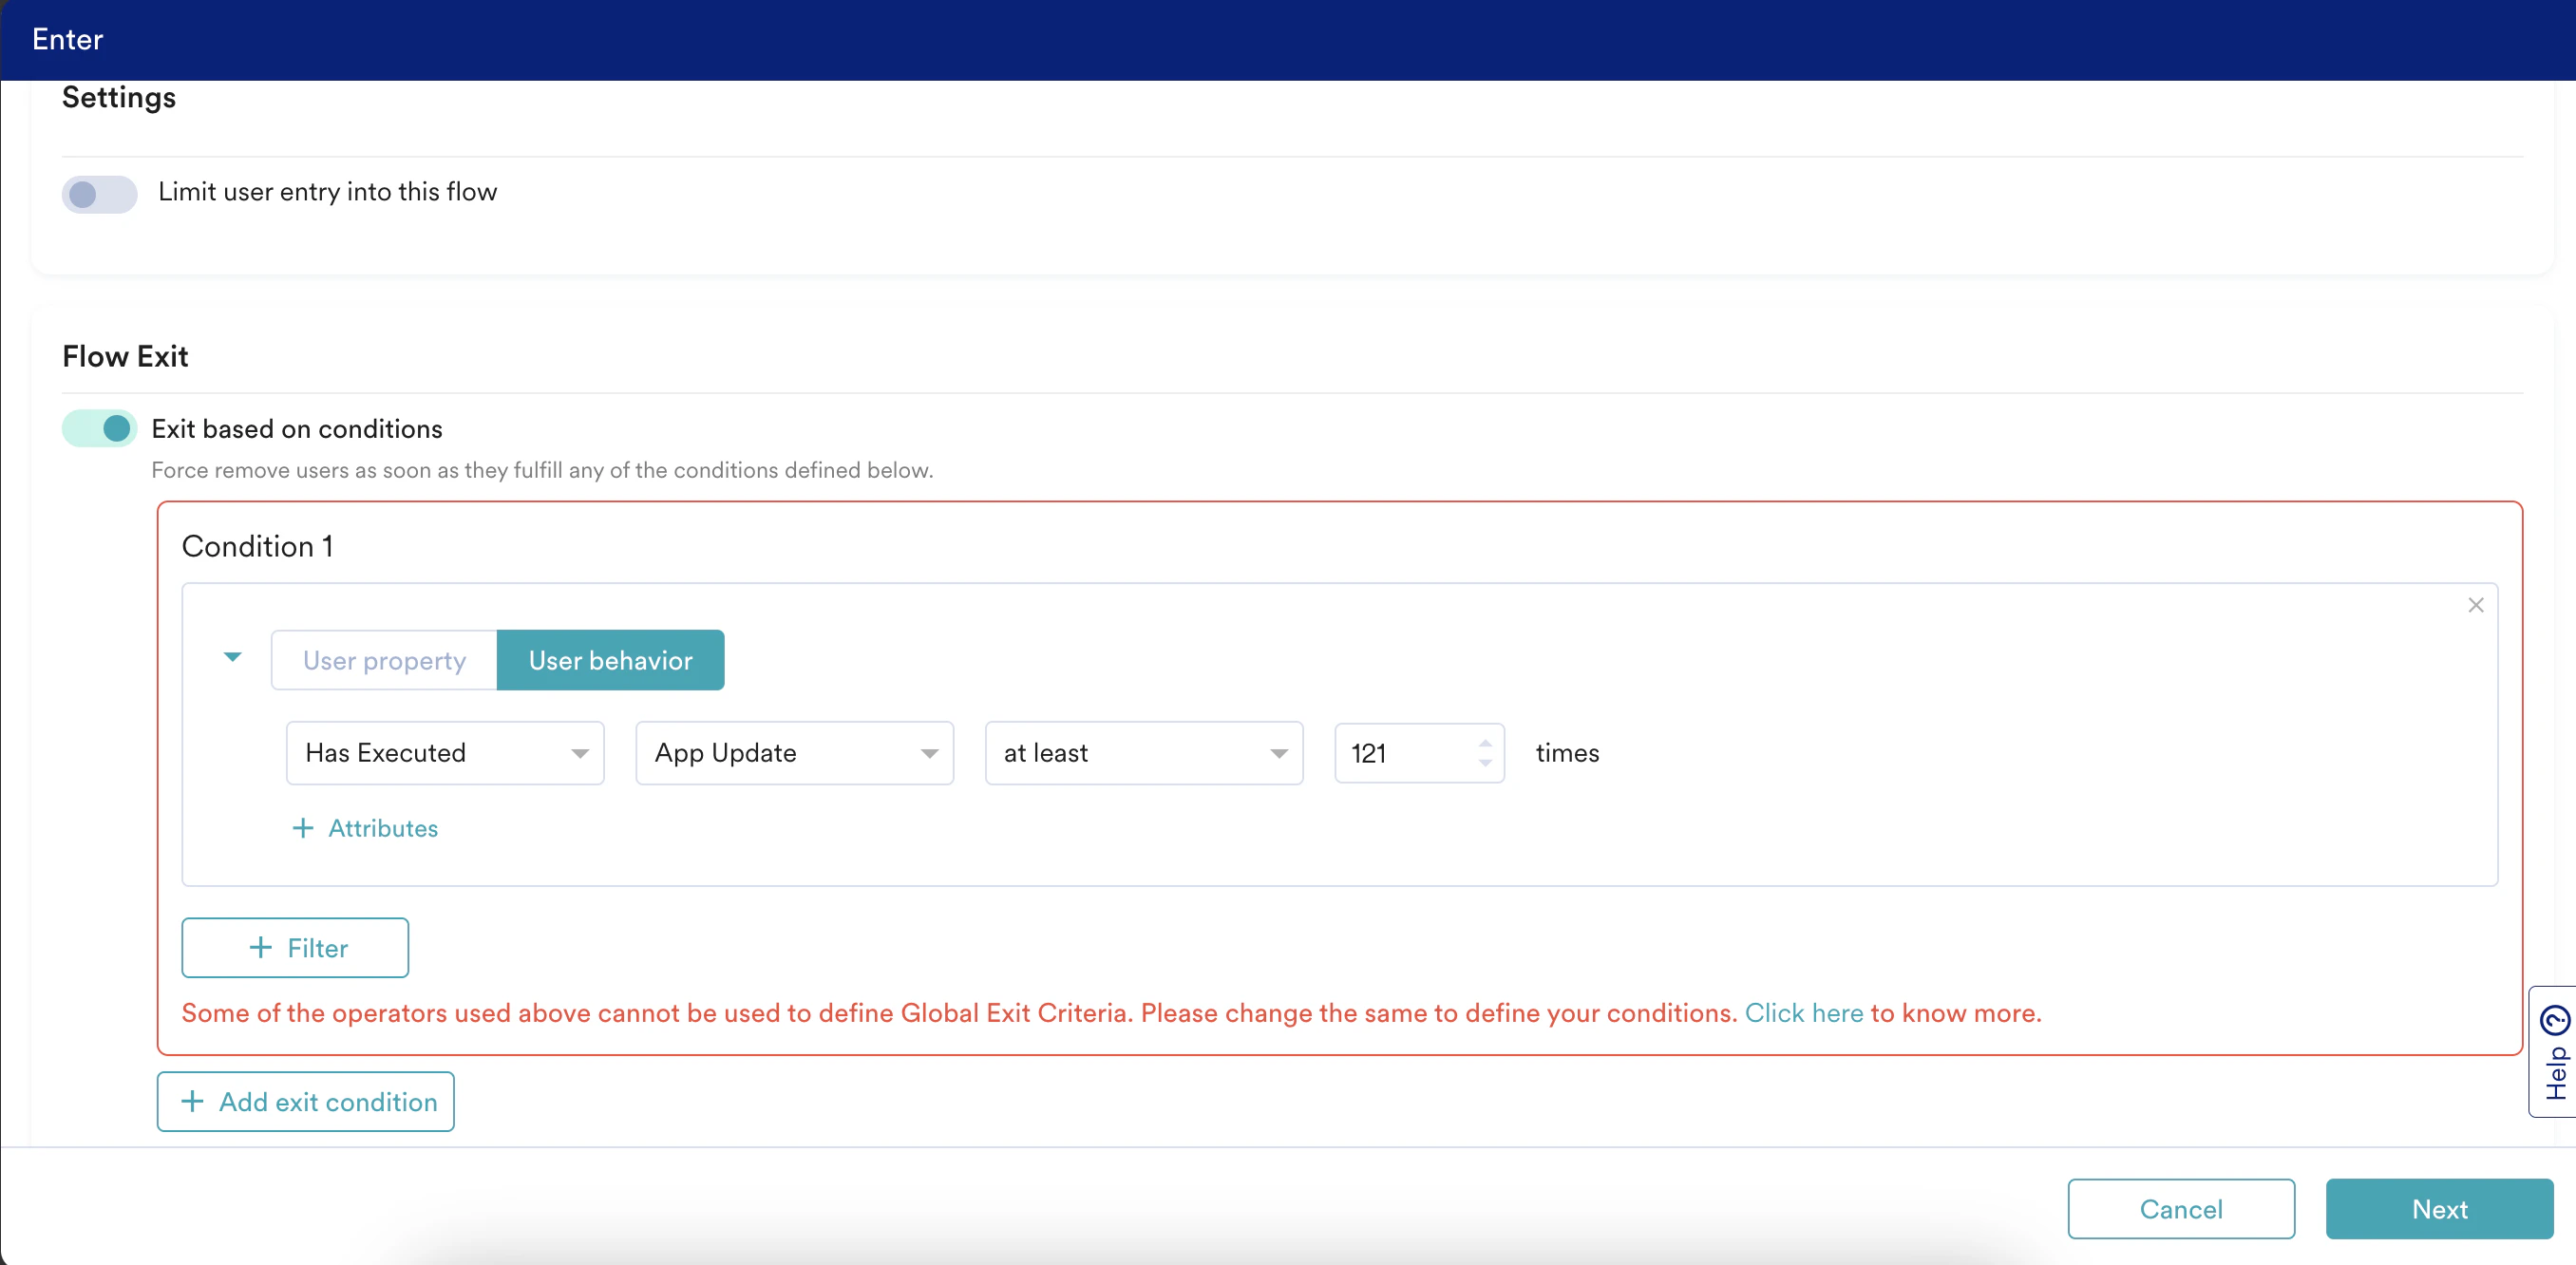
- Custom segments
- Affinity segments
- Array type and GeoPoint
- Special Date Filters (Daily where the hour, Weekly where the day, Monthly where the day, Yearly where the month, Yearly where the date)
- last n weeks, hours, months
- last n days where n> or equal to 30 days
- Merlin AI-based attributes

If there are multiple sub-conditions used in a condition, users must fulfill all sub-conditions within a 30-day period in any order to satisfy the exit condition. For example, in Condition 1, you have defined the following sub-conditions.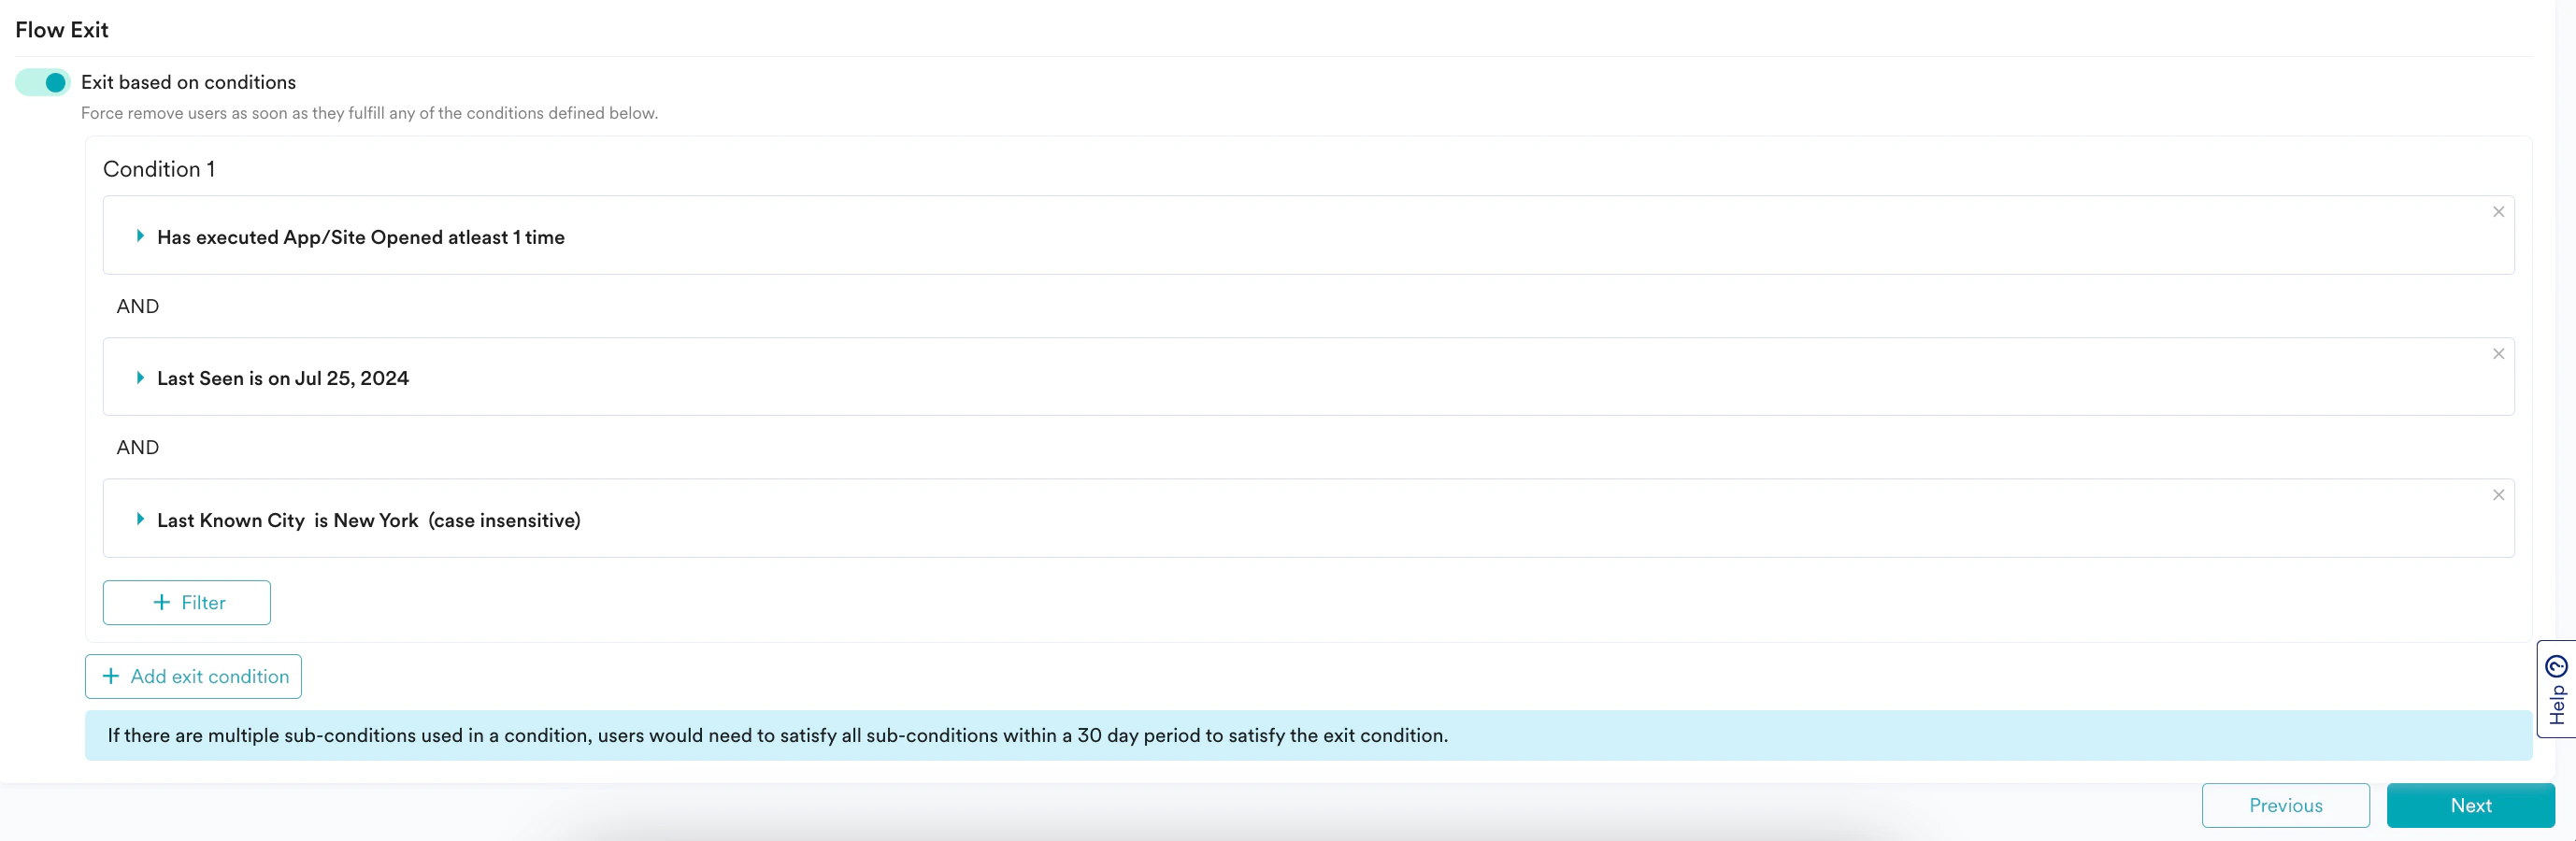
- Has Executed App/Site Opened at least 1 time
- Last Seen Date is on July 25, 2024
- Last Known City is New York
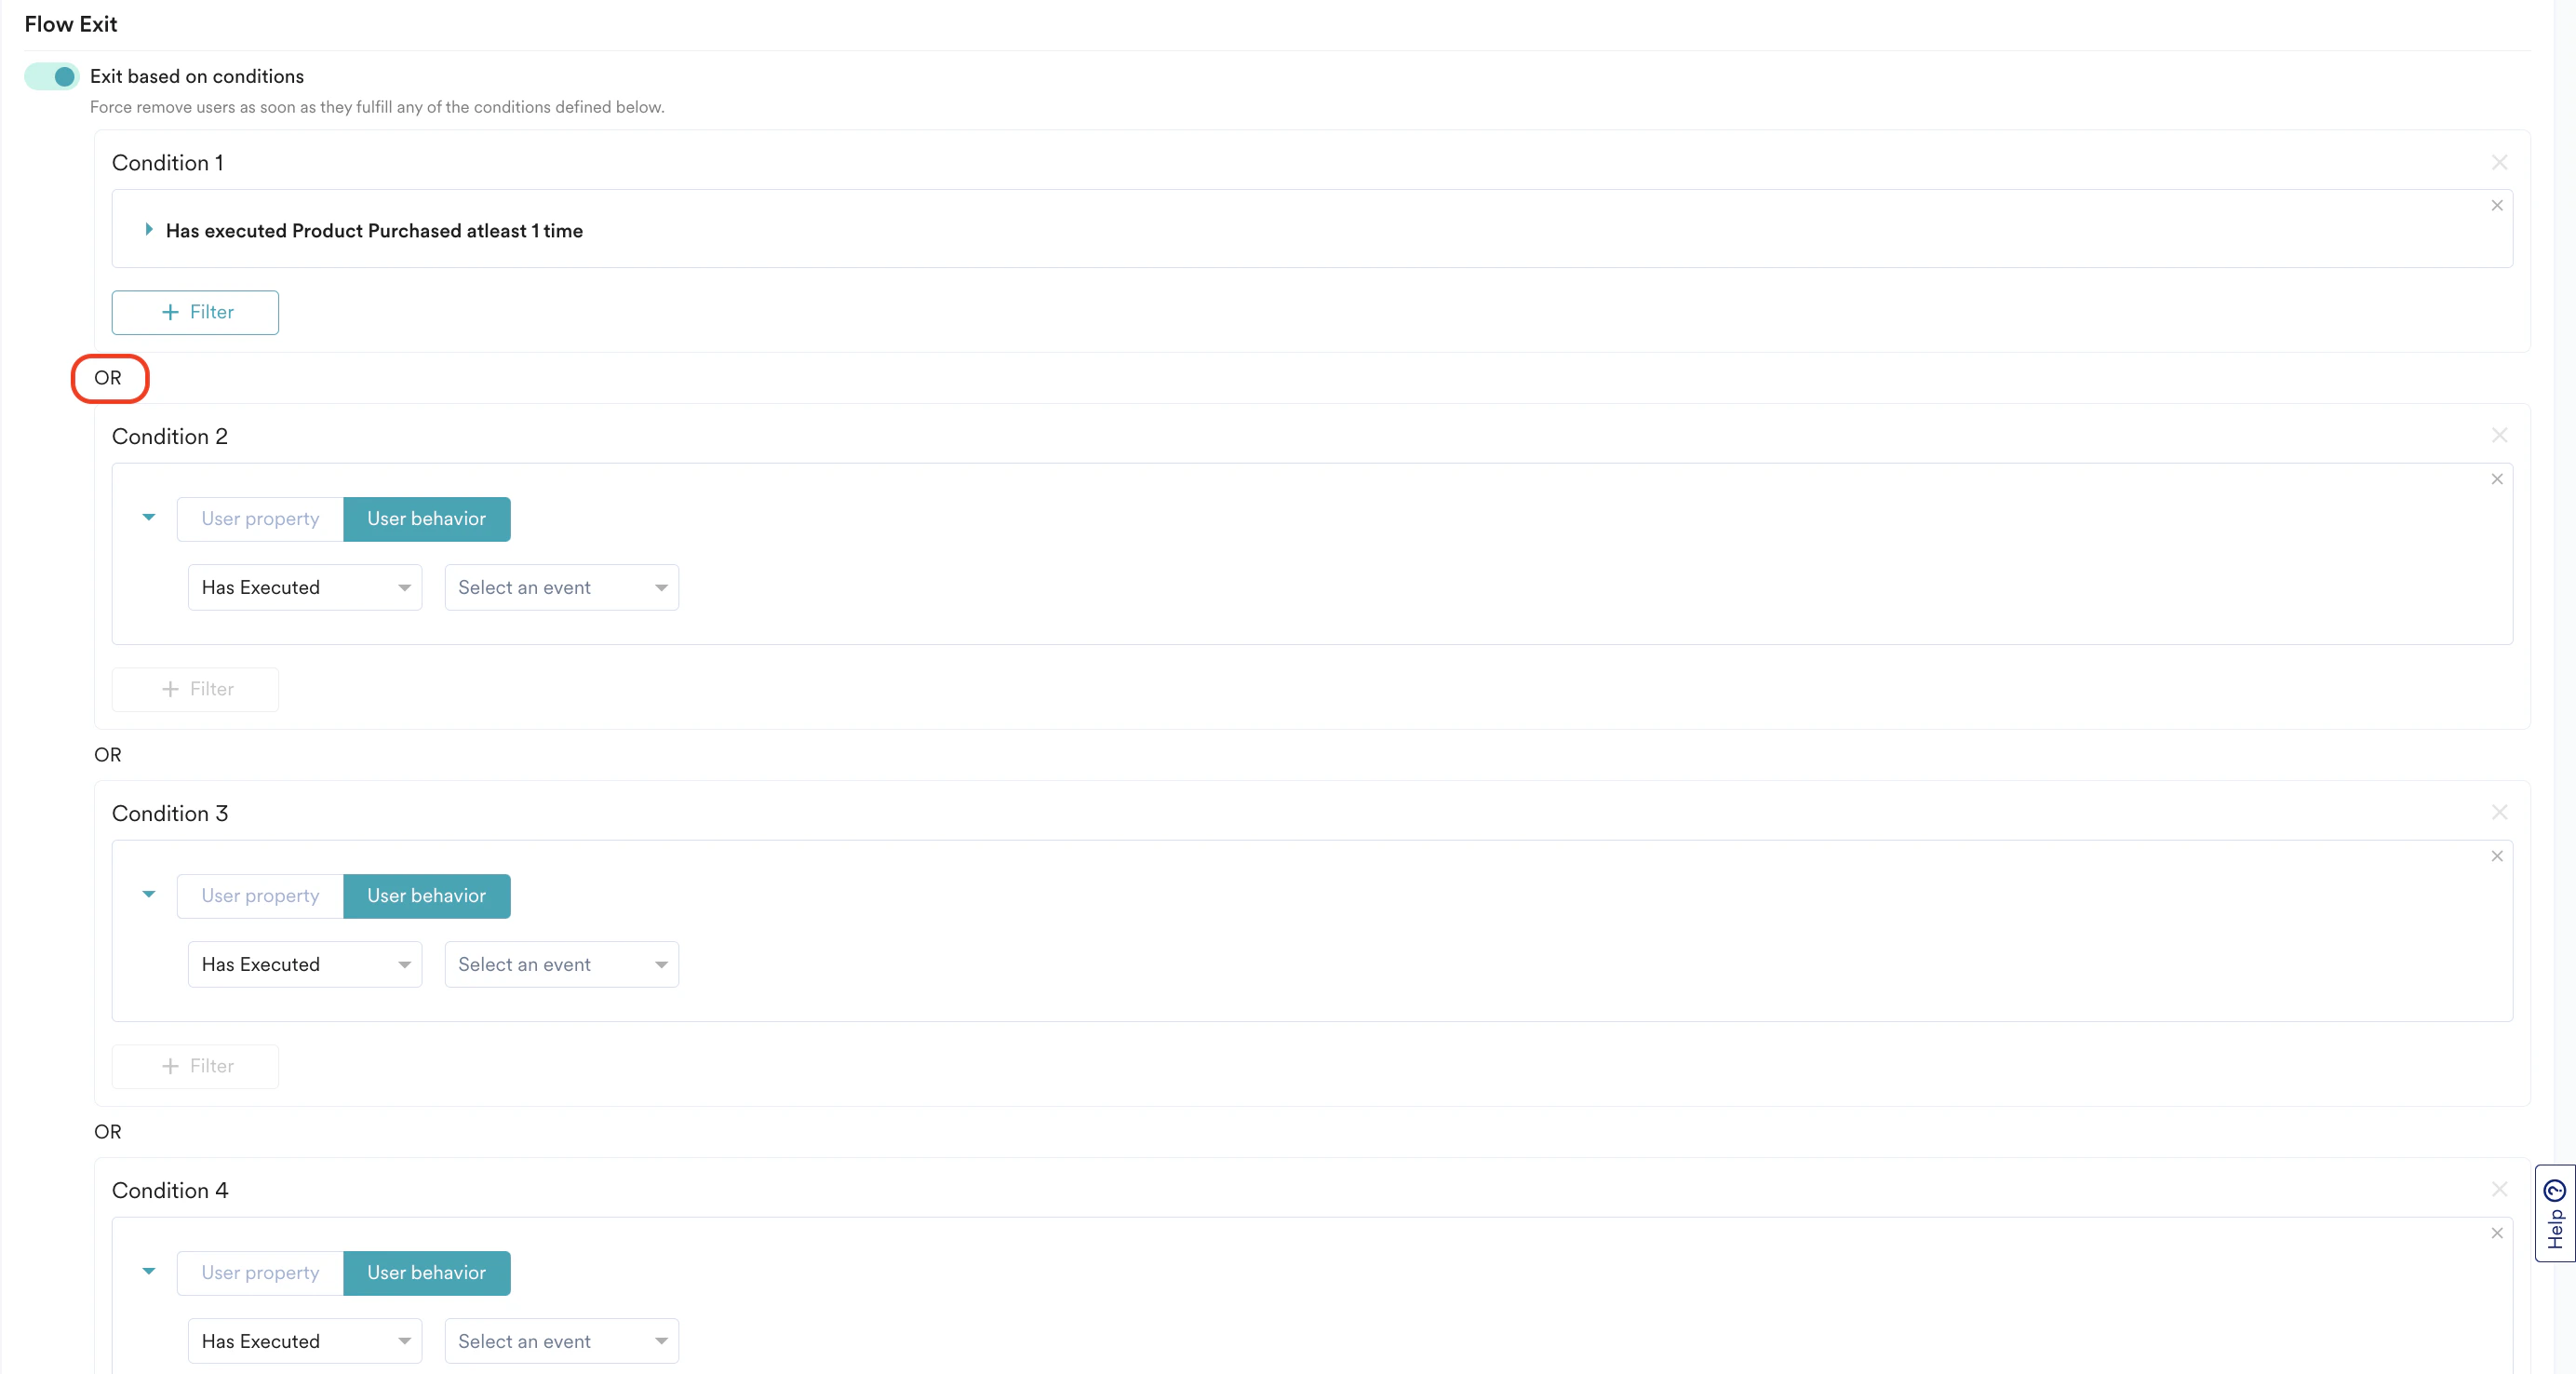
OR
Click Previous to navigate to the Details and Goalsstep.
Who Will Enter the Flow
Select the Target Audience or the target segment for the flow. You can use multiple filters to create the target audience.If your organization uses Teams 2.0, it automatically adds the team’s original targeting criteria to any new rules you create. For more information, refer here.
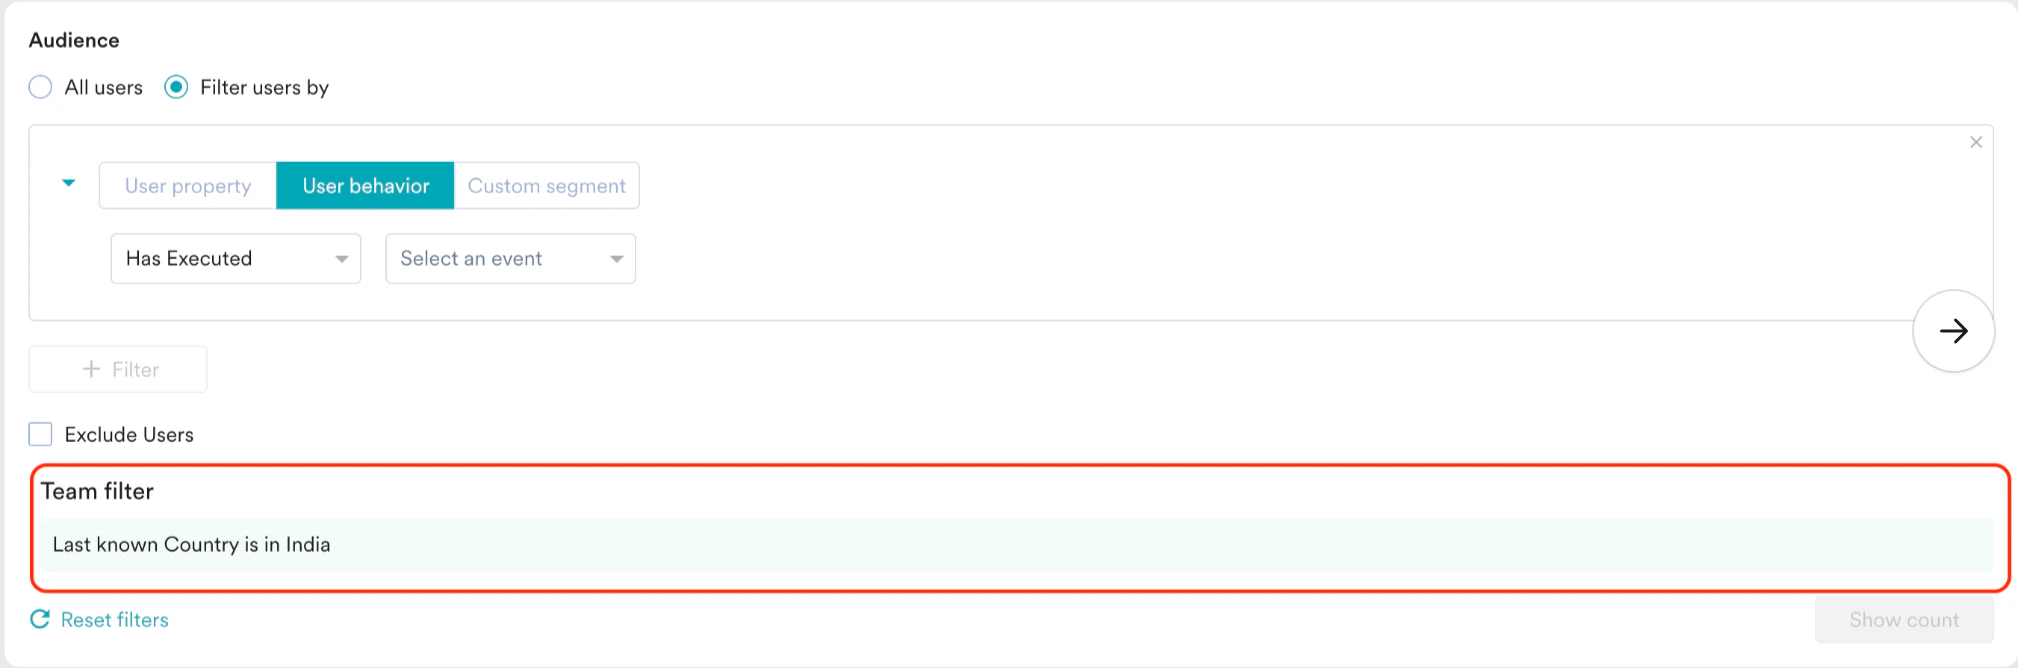
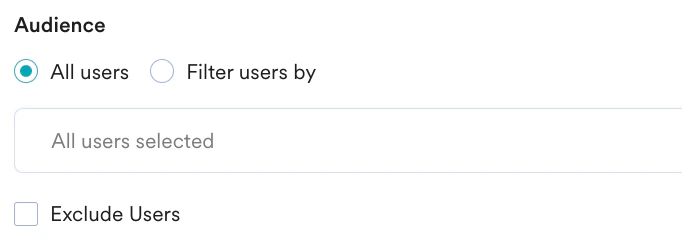
- Select the desired attribute in the Select attribute list. This enables filters based on the attributes selected.
- Select any filters with the conditions in the dropdown list. For example, string attributes can have filter conditions such as ‘is’ and ‘is not,’ while integer attributes can have different filters.
- The default Constant value helps you complete the filter with specific static values. The User attribute (applicable for all types of flows) or Business event attribute (only for Business Event Triggered flows) option, as shown below, allows you to define the conditions using a different user attribute or business event attribute.
For example, refer to the following screenshot to create a flow that announces the launch of a new Thriller series and targets users who have preferred the Thriller as the Genre.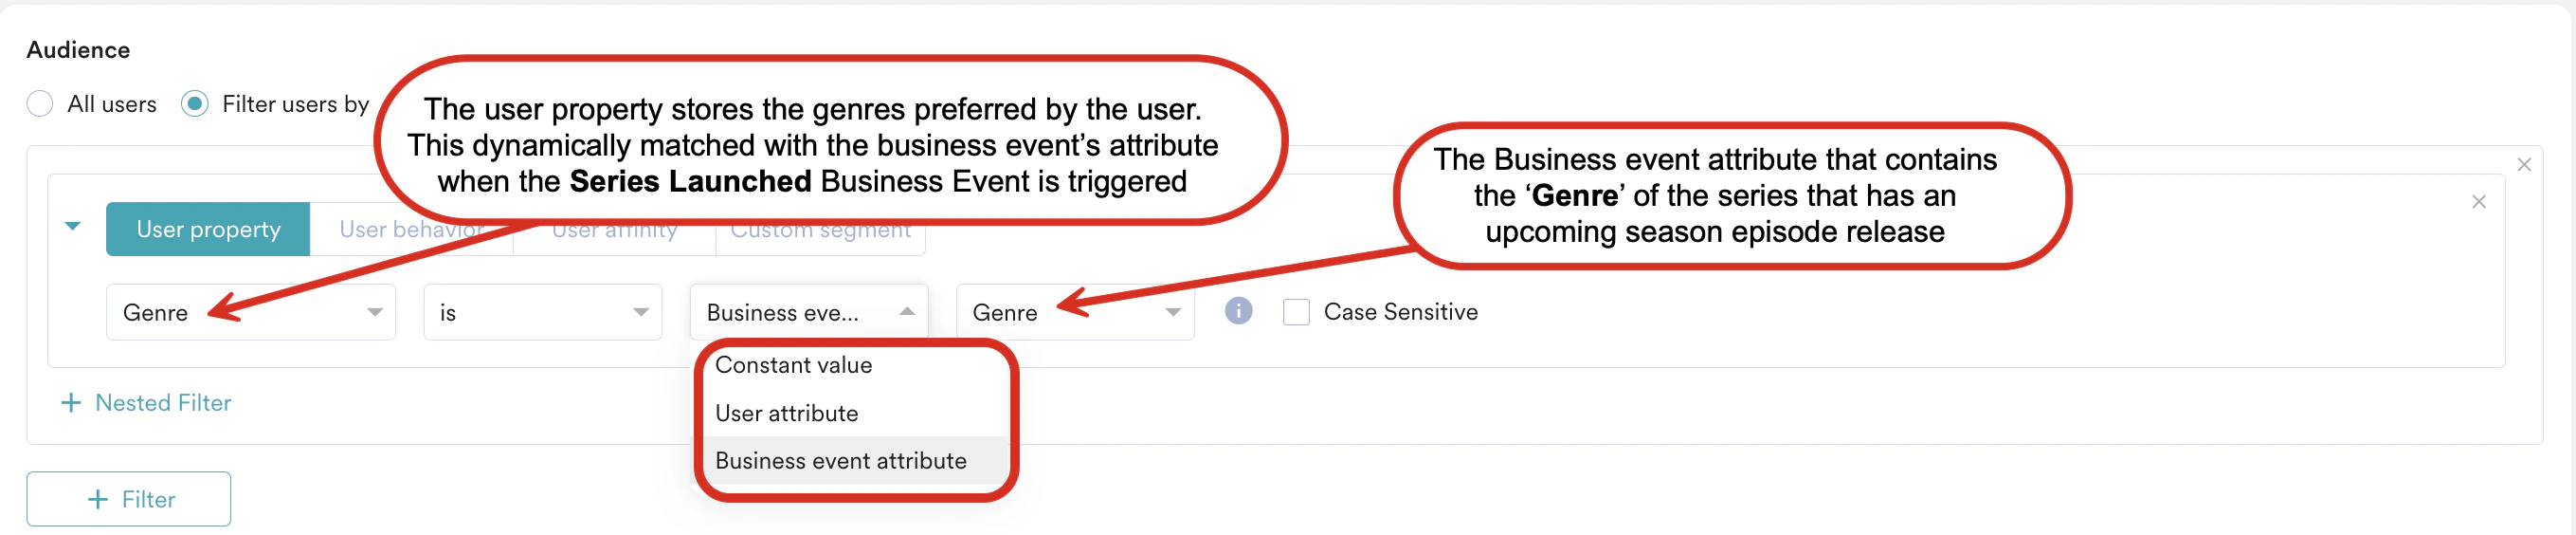
- Select the User Behaviour from the dropdown list.
- Select an event in the Select an event list.
- Enter the event frequency and time duration for the event execution.
- Click + Attributes and select the desired attribute in the Select attribute list. This enables filters based on the attributes selected. For example, string attributes can have filter conditions such as ‘is’ and ‘is not,’ while integer attributes can have different filters.
-
The default Constant value helps you complete the filter with specific static values. The User attribute (applicable for all types of flows) or Business event attribute (only for Business Event Triggered flows) option, as shown below, allows you to define the conditions using a different user attribute or business event attribute.For example, refer to the following screenshot to create a flow that announces the launch of a new Thriller series and targets users who have watched Thriller in the Genre at least once in the past 3 days:
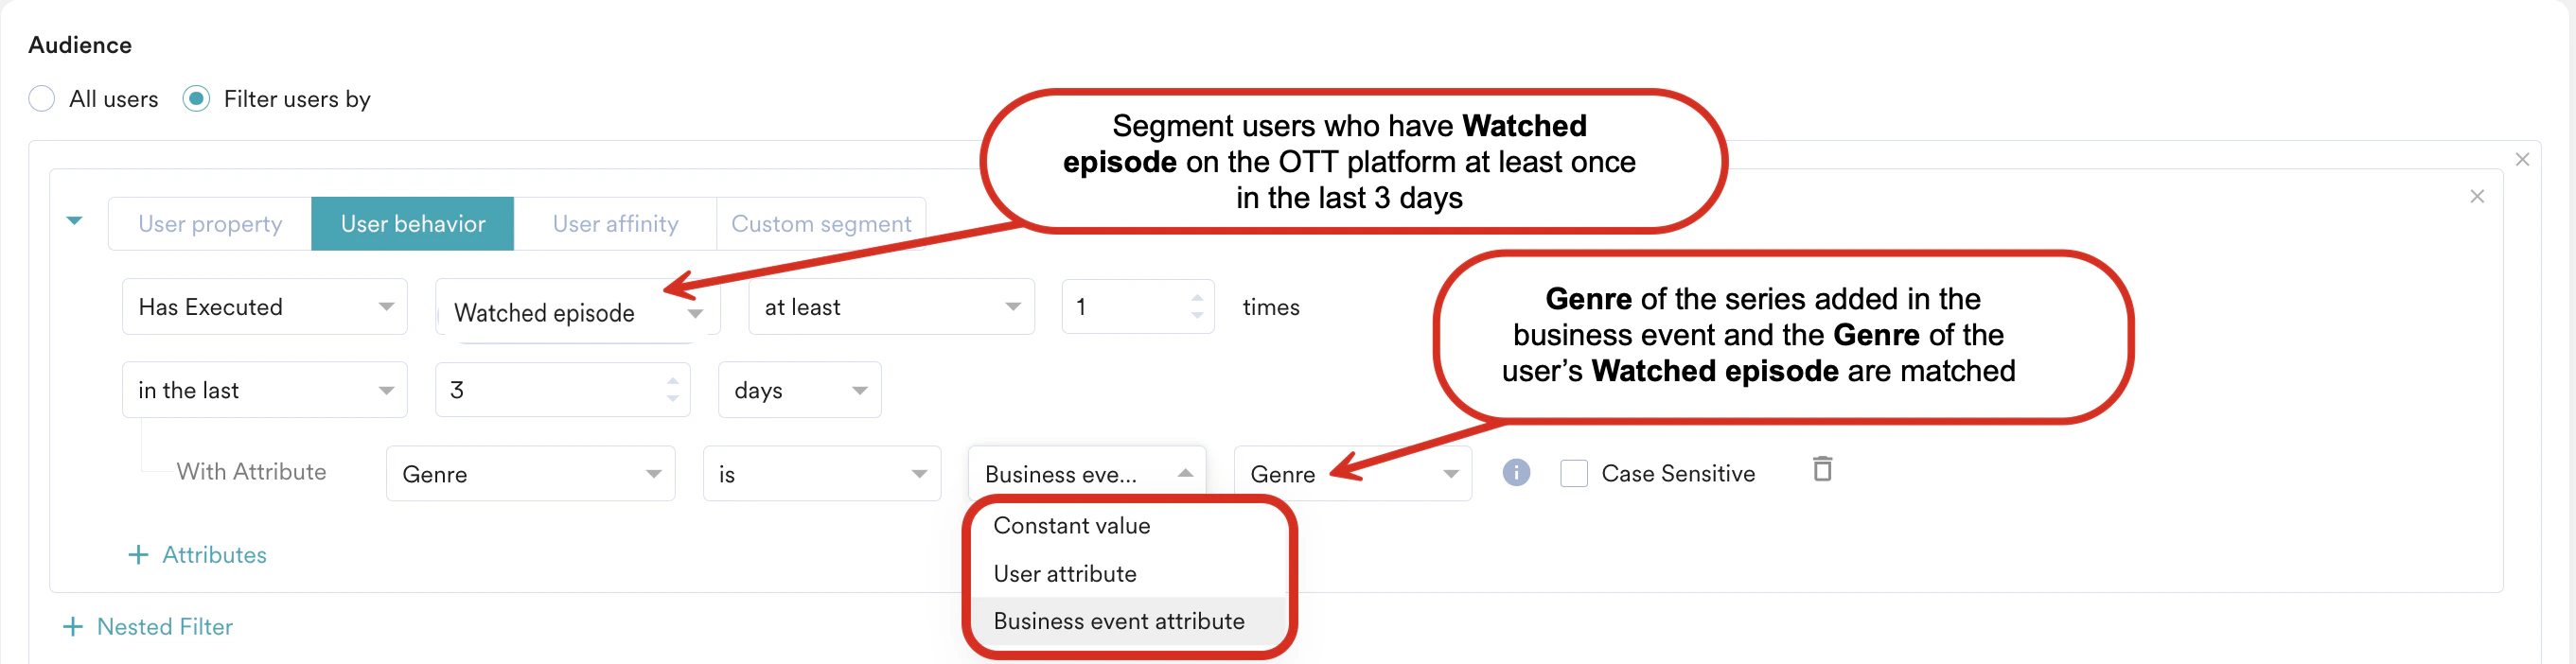
- Select the desired user event or attribute.
-
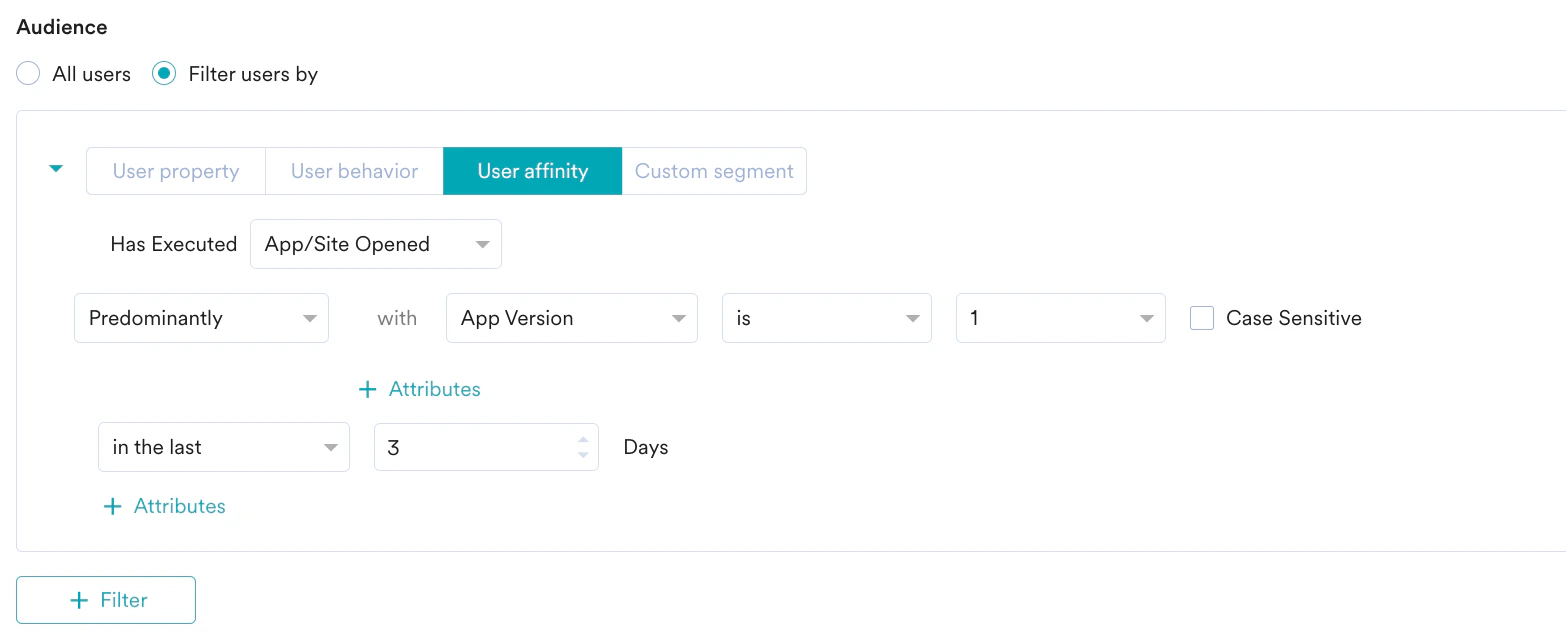
Select the user affinity parameter from the following:
- Predominantly: Select affinity attribute with a filter condition and provide the affinity values.
- For a minimum of: Select affinity attribute with a filter condition and provide the affinity values.
- Most no. of times: Enter a value or use the arrows to provide the top percentage of users.
- Least no. of times: Enter a value or use the arrows to provide the bottom percentage of users.
- Enter or use the arrows to provide the time duration for the event execution.
- Click + Attributes to add more attributes to the filter.
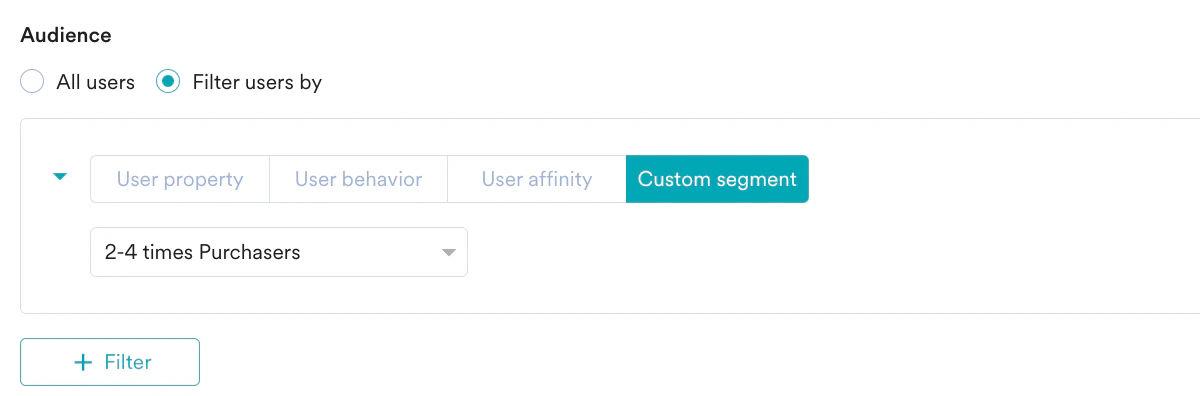

- Create Multiple Filters You can create and combine multiple user property rules, user activity rules, and custom segment rules to create a complex user segment using this option.
- Click + Filter.
- Click AND or OR.
- Select the attribute or event and define the filter conditions.
- Exclude Users: Select this checkbox to define the filter criteria for users to be excluded from the flow. For more information on excluding users, refer to Preference Management.
- Reset filters: Click this option to reset the segmentation filters.
- Show count: Click this button to display the total number of users who are currently in the configured segment.
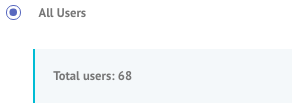
Control Group
You can enable the control groups to which you want to send the campaign. For more information about control groups, refer to Control Group.| In the Control groups section: - Turn the Global control group toggle on to not send the campaign to the list of users in the Global control group. Refer to here to know more. - Turn the Flow control group toggle on to not send the campaigns in this particular flow to a random subset of users. Refer here to know more. - Define the percentage of users to be marked as the Control group when they enter the flow. - Keep the selection of the “Users part of control group should continue to be part of it for their subsequent entries” checkbox to continue users who are part of the control group in their subsequent entries. For more information, refer to Control Group. | 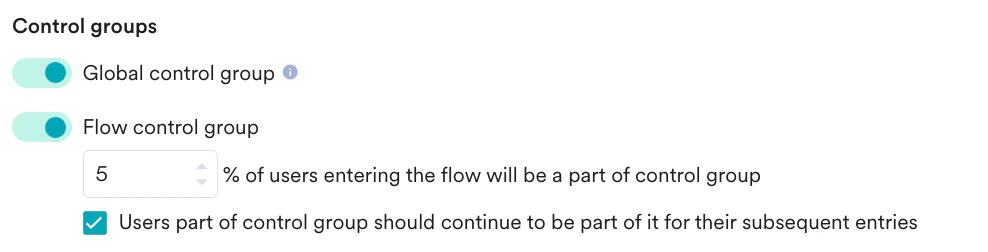 |
OR
Click Previous to go to the When will users enter the flow step.
Design and Publish Your Flow
- To design the structure of your flow, click + to add the following to the flows:
- After the structure of your flow is ready, click Save to save it as a draft. To publish the flow your next action depends on your account’s settings:
-
- If the Campaign Approval workflow is disabled, you can publish the flow directly.
- If the Campaign Approval workflow is enabled and you have the permission to create, manage, and publish campaigns, you can publish the flow directly.
- If the Campaign Approval workflow is enabled and you only have the Create & Manage permission, you must submit the flow for approval. For more information, refer here.
-
The Approval Flow
Creator Reviewer As a creator, to send the flow for approval, perform the following steps:- On the flow canvas page, select the Actions button on the right side.
- In the Actions list, select Send for Approval. The Send for approval pop-up window appears.
The MoEngage identifies any configuration errors in your flow which are displayed in the Error panel on the right side of the canvas.You must resolve all listed errors before you can send the flow for approval.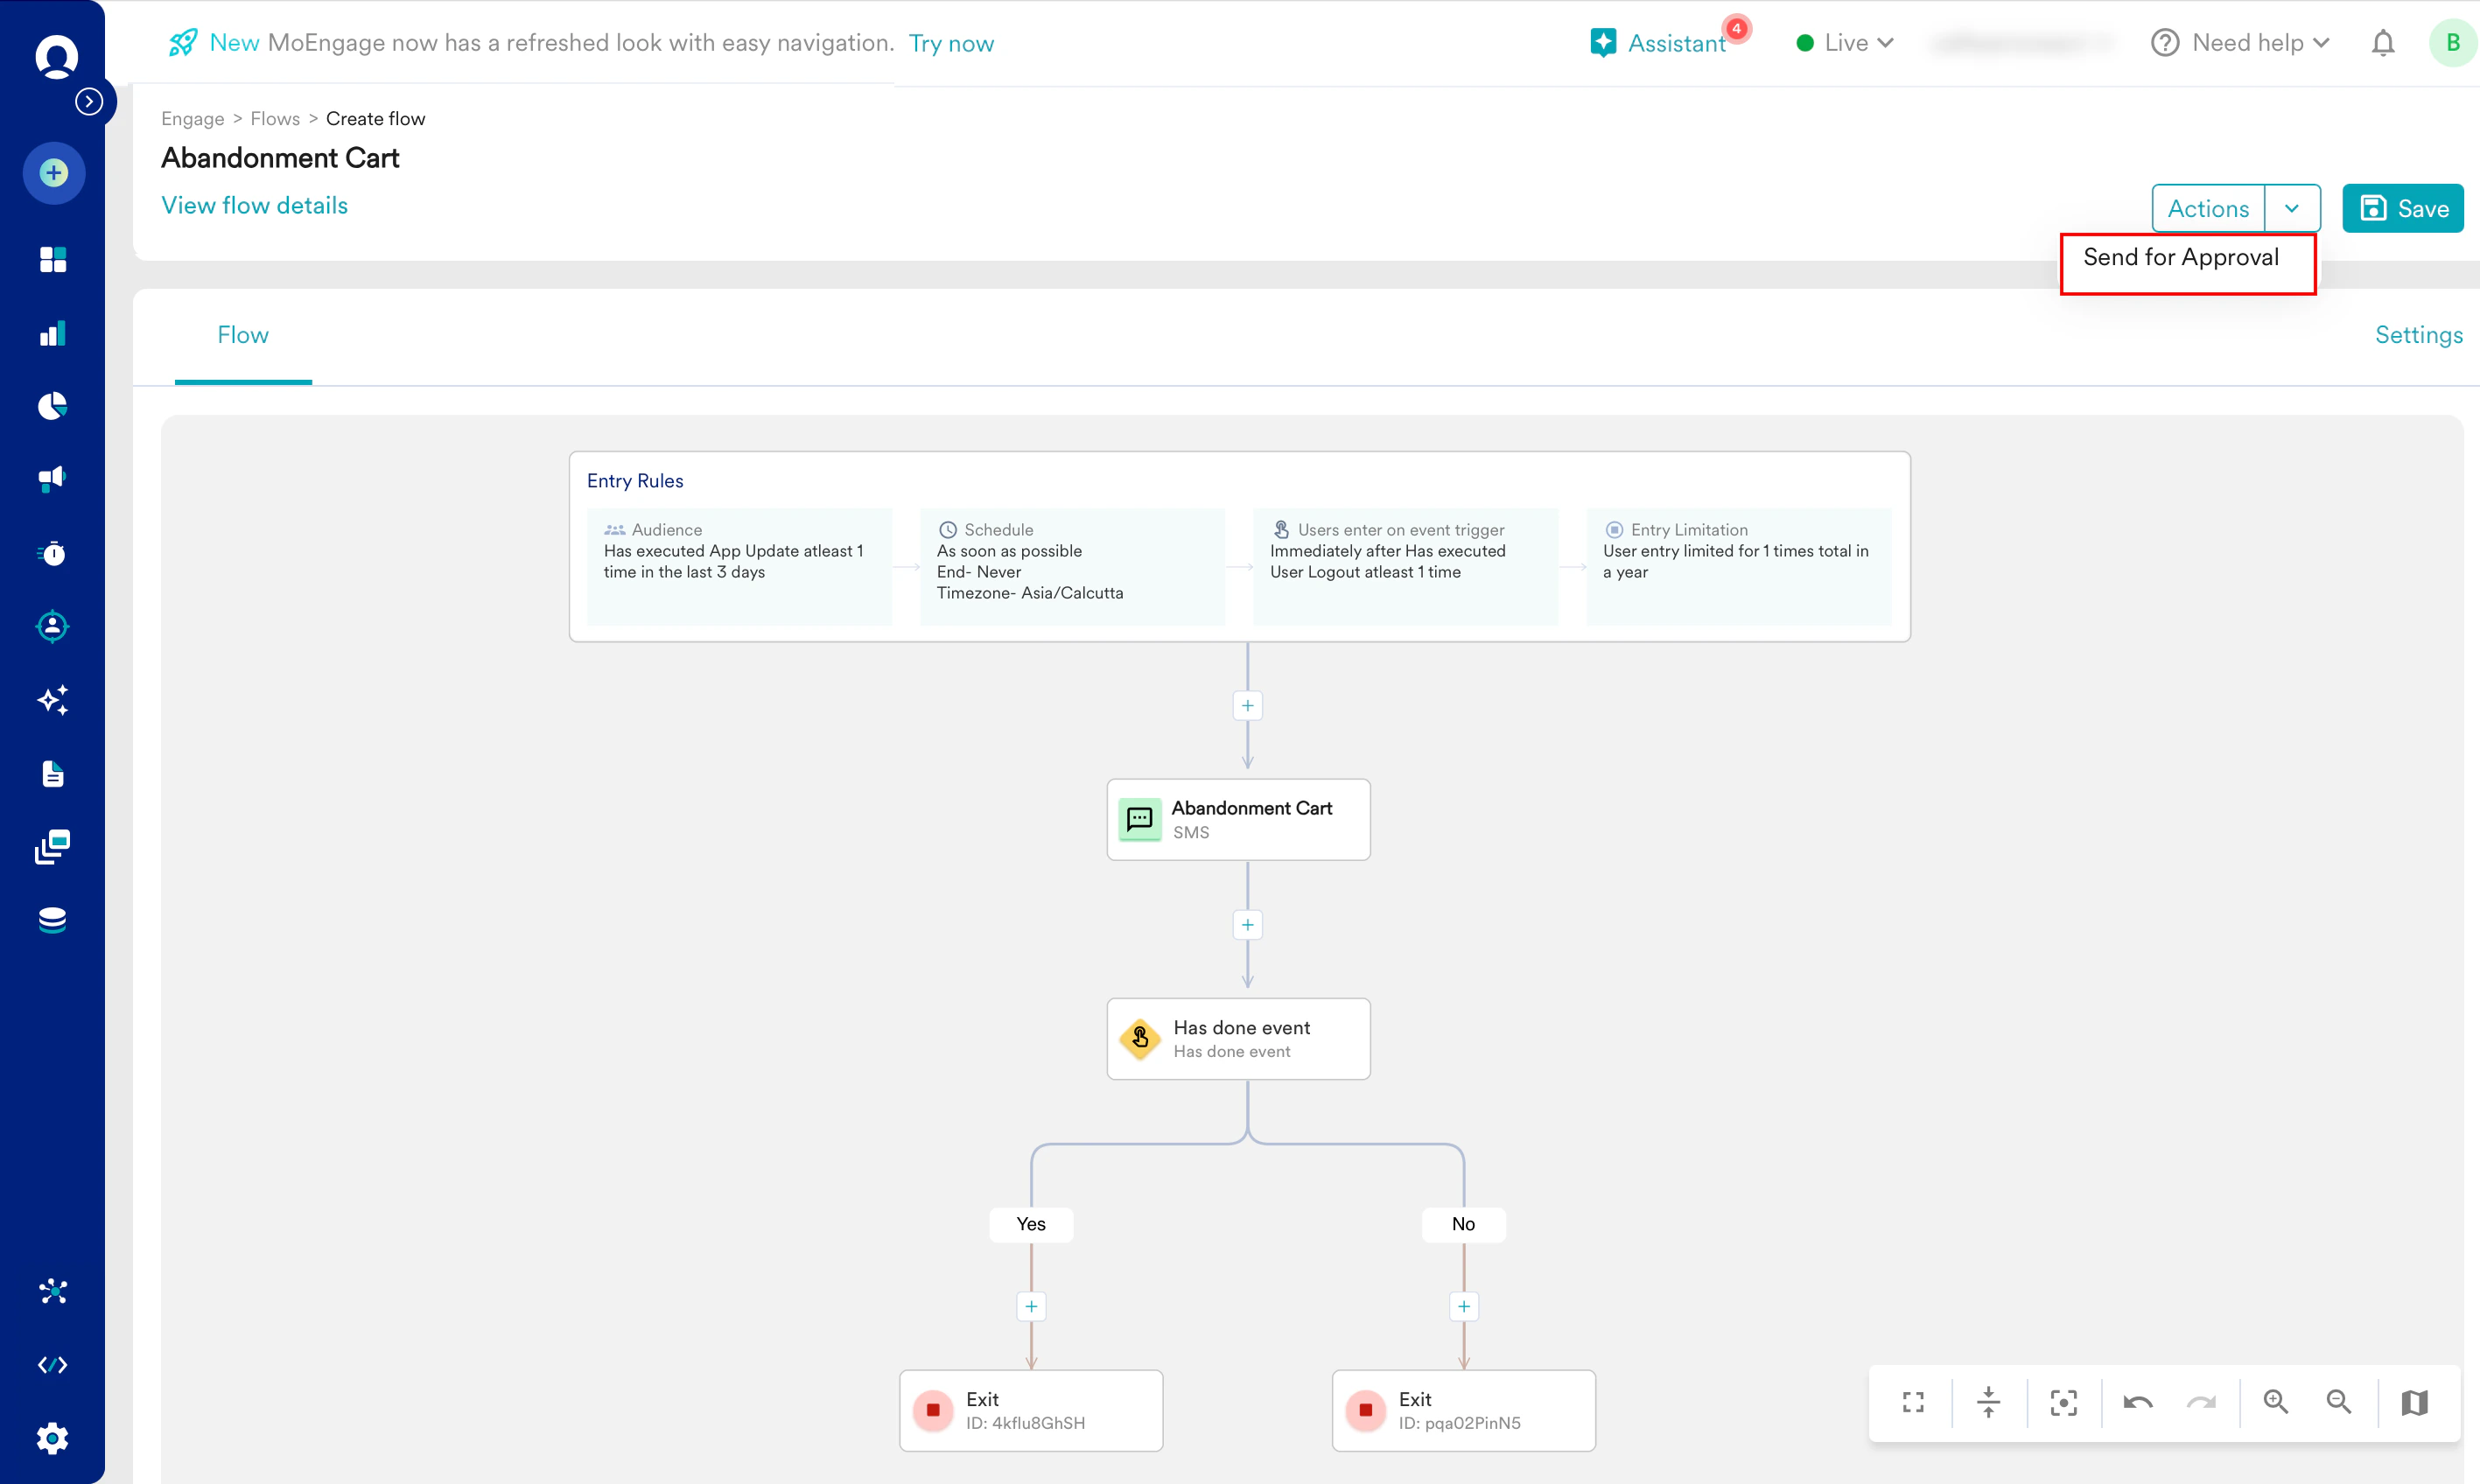
- You must select the users who would review and approve your flow.
- In the Start typing to filter approvers box, search for the users (Admins or Managers) from the team you selected in the Details and Goals step.
- Click + Add next to the name of each user you want to review the flow. The selected users appear in the Selected Approvers section on the right.
- In the Add yours comment here (optional) box, you can add comments to provide context, instructions, or notes for your approvers.
- Click Send for approval.
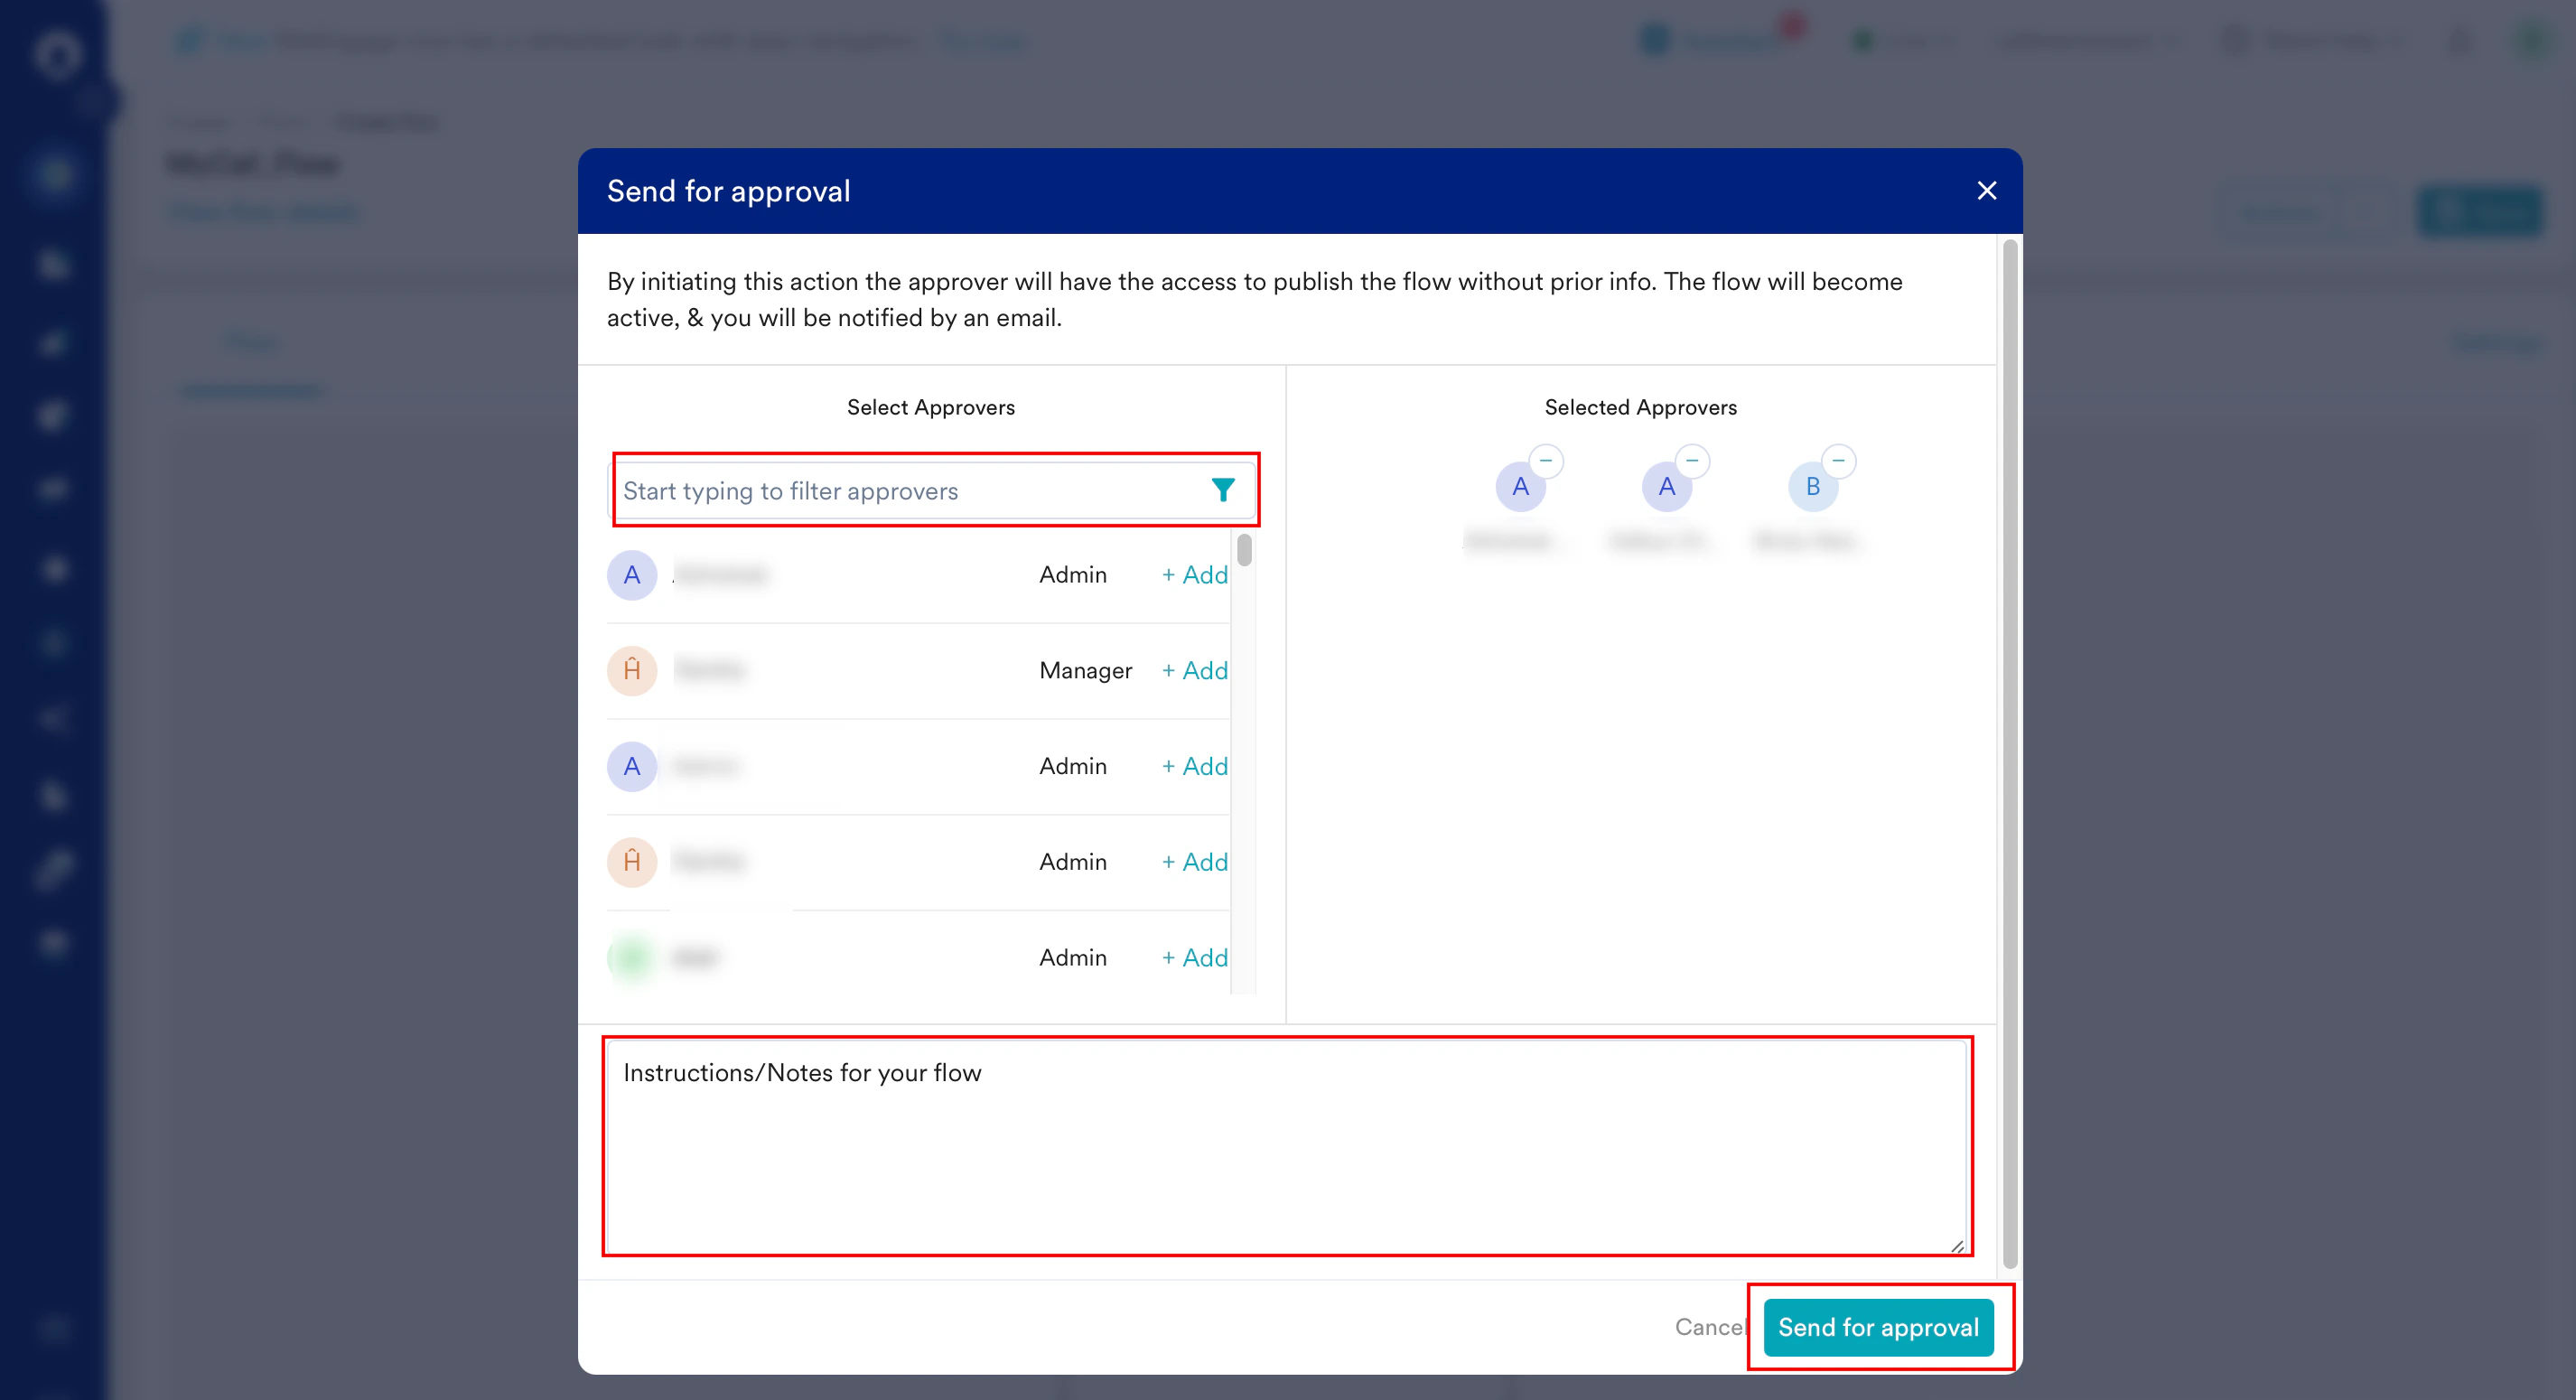
- The selected approvers receive an email notification informing them that the flow is awaiting their review. While the flow is in the Under Review state, you have the following options.
-
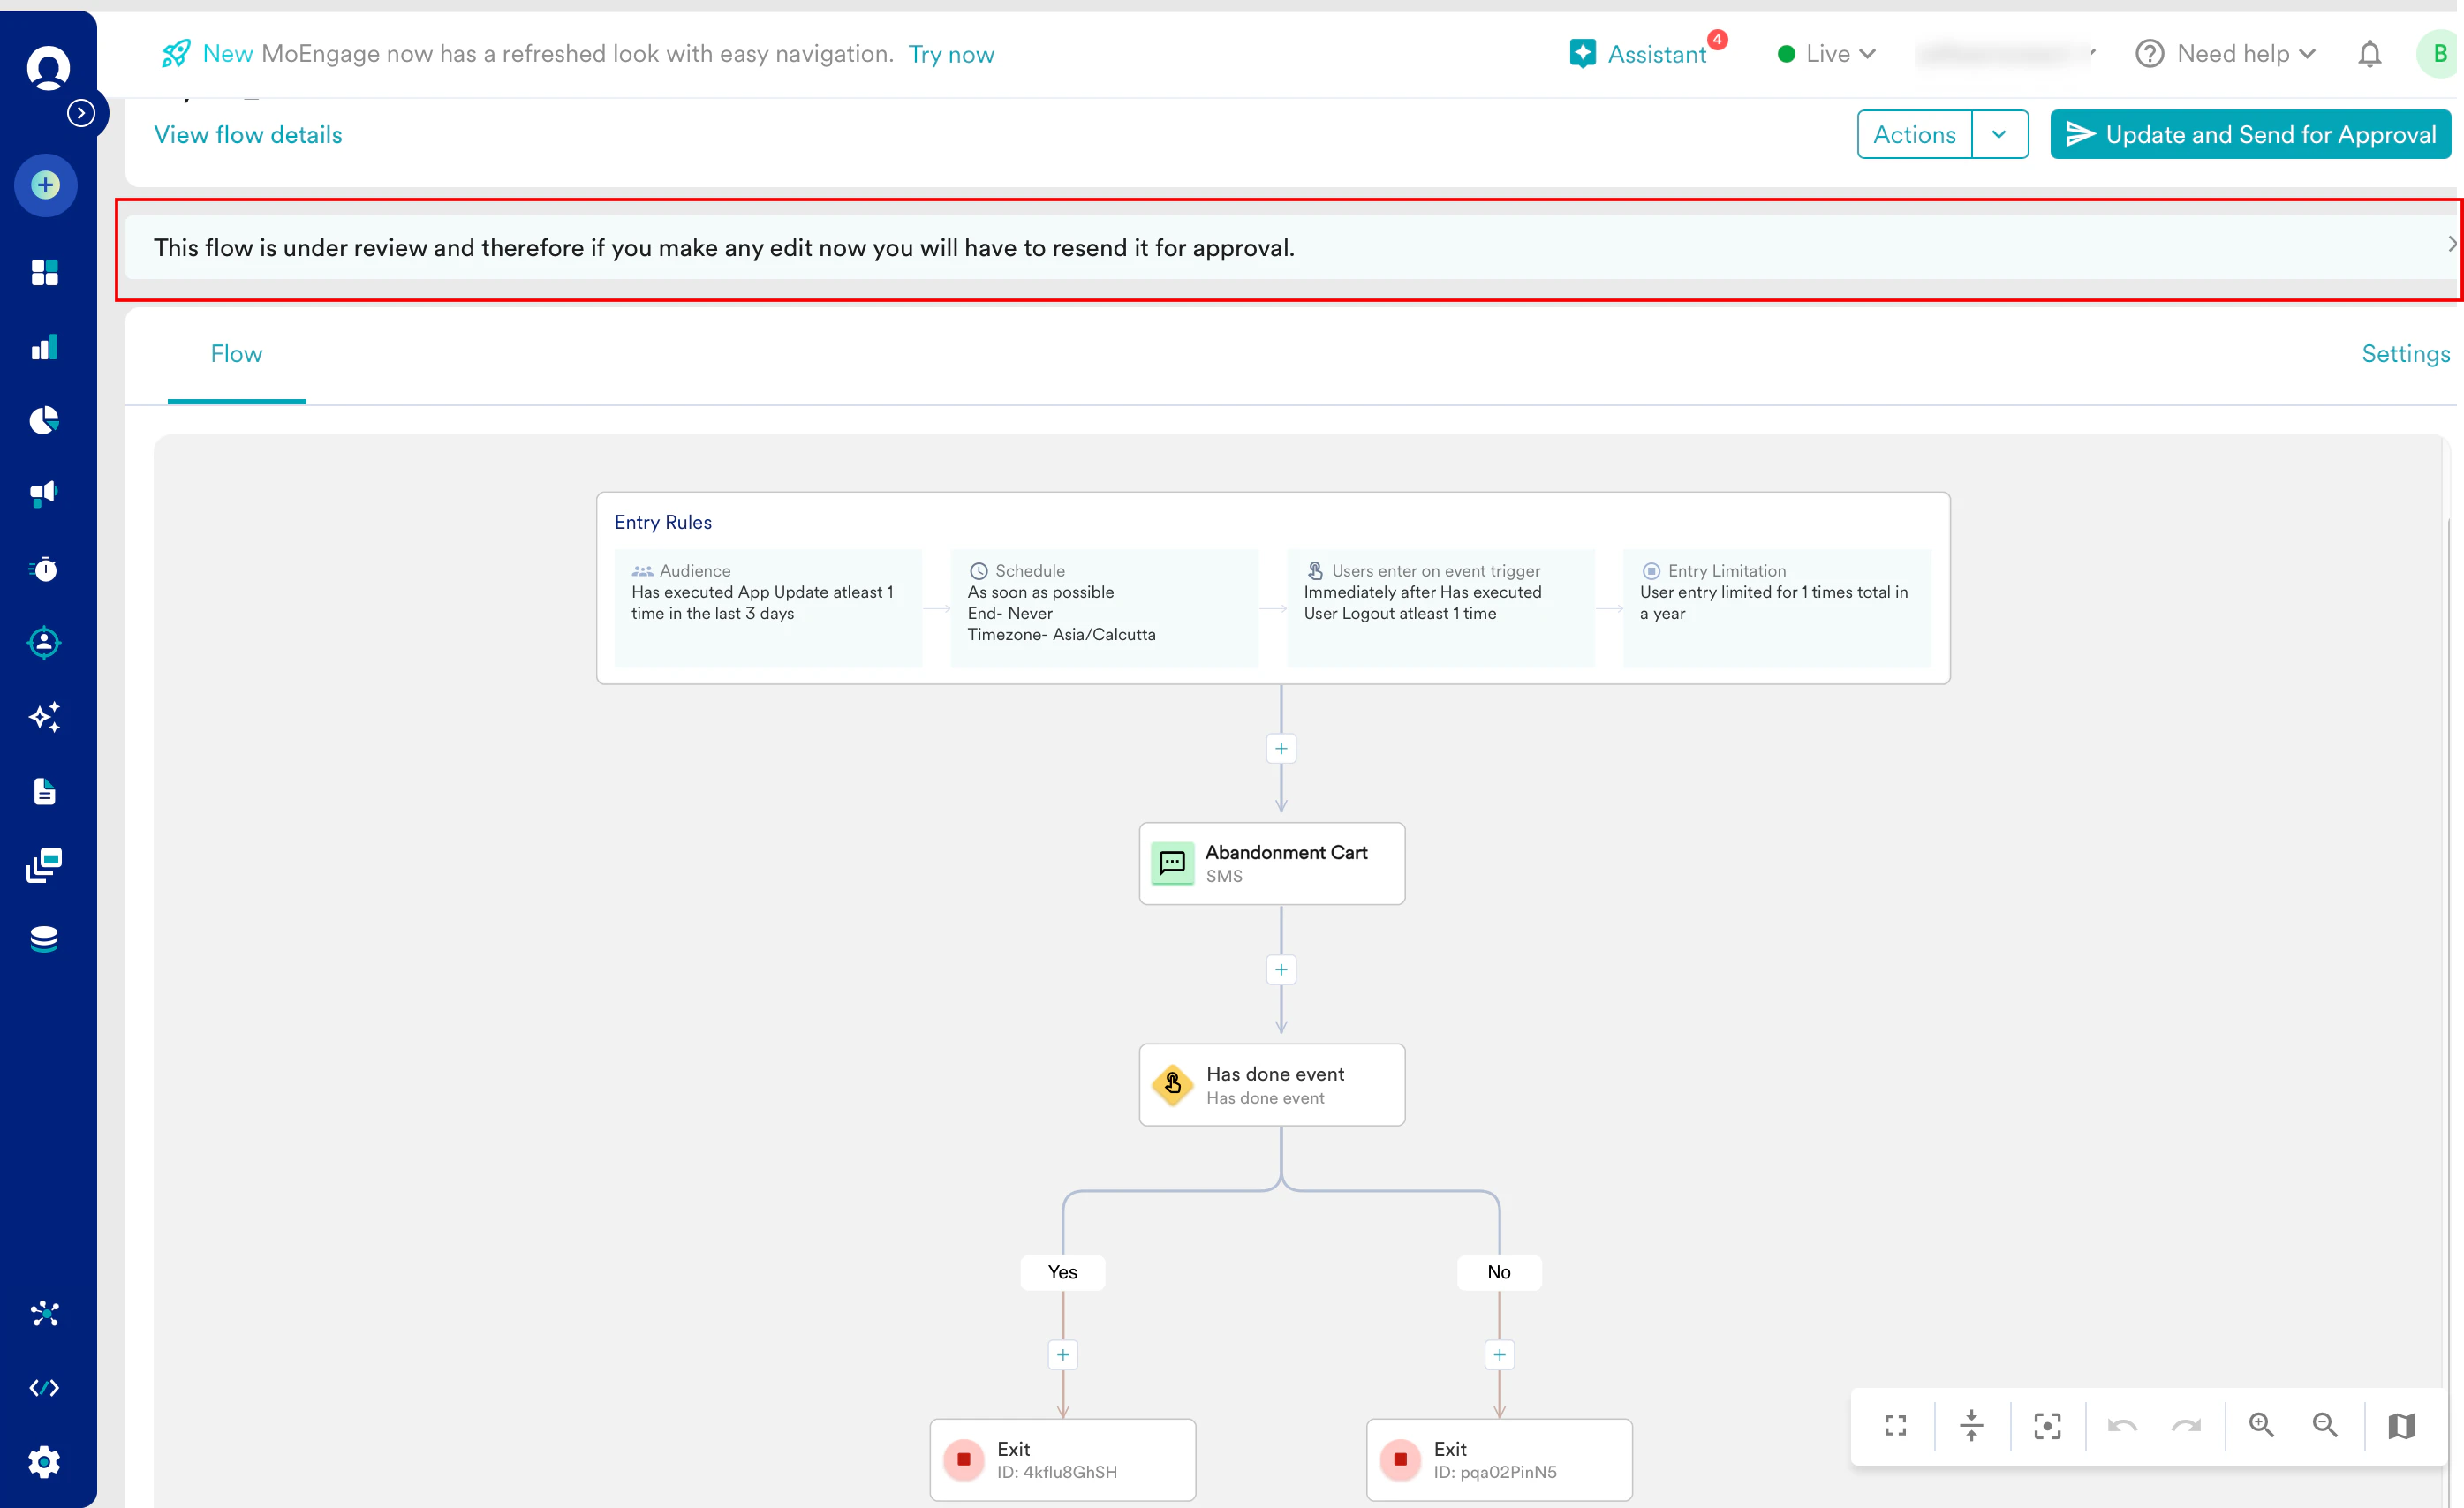
Edit the flow: You can edit a flow that is Under Review. After making the edits, you must resend the flow for another review by clicking Update and send for approval. Then, repeat steps 3 through 5.
-
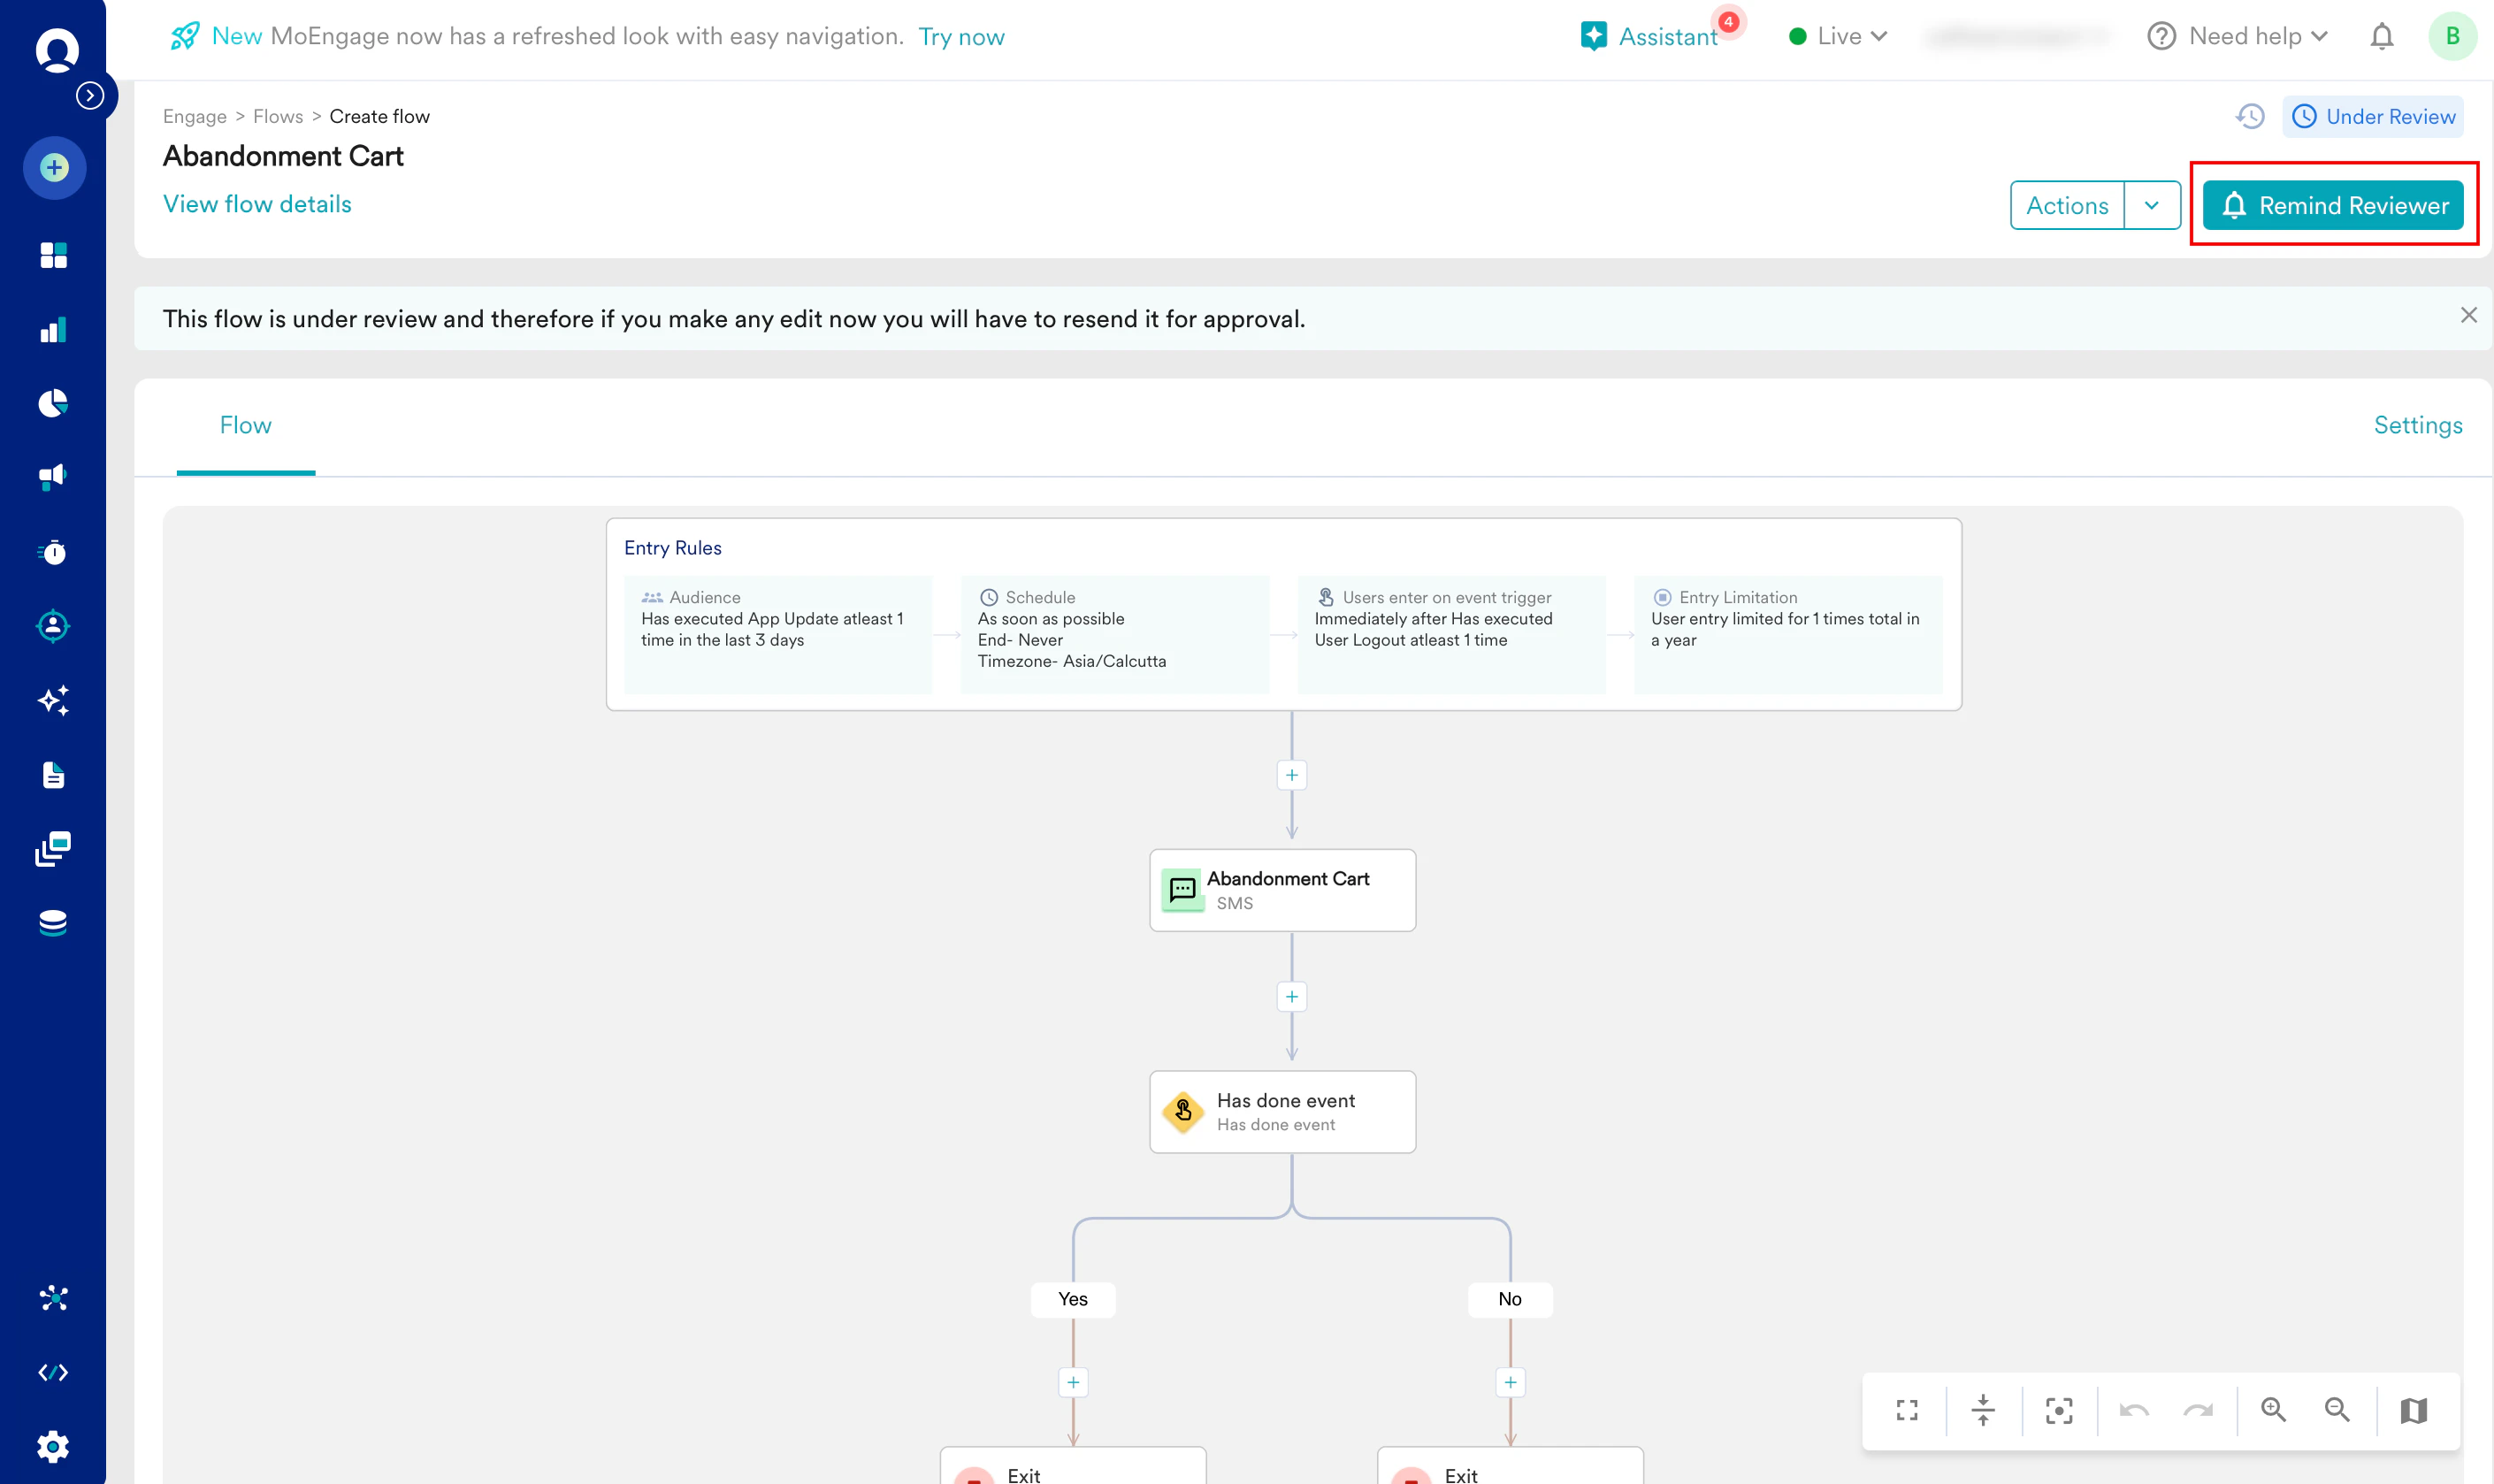
Follow up with approvers: To follow-up, click Remind Reviewers.The approvers receive a reminder notification.
-
Edit the flow: You can edit a flow that is Under Review. After making the edits, you must resend the flow for another review by clicking Update and send for approval. Then, repeat steps 3 through 5.
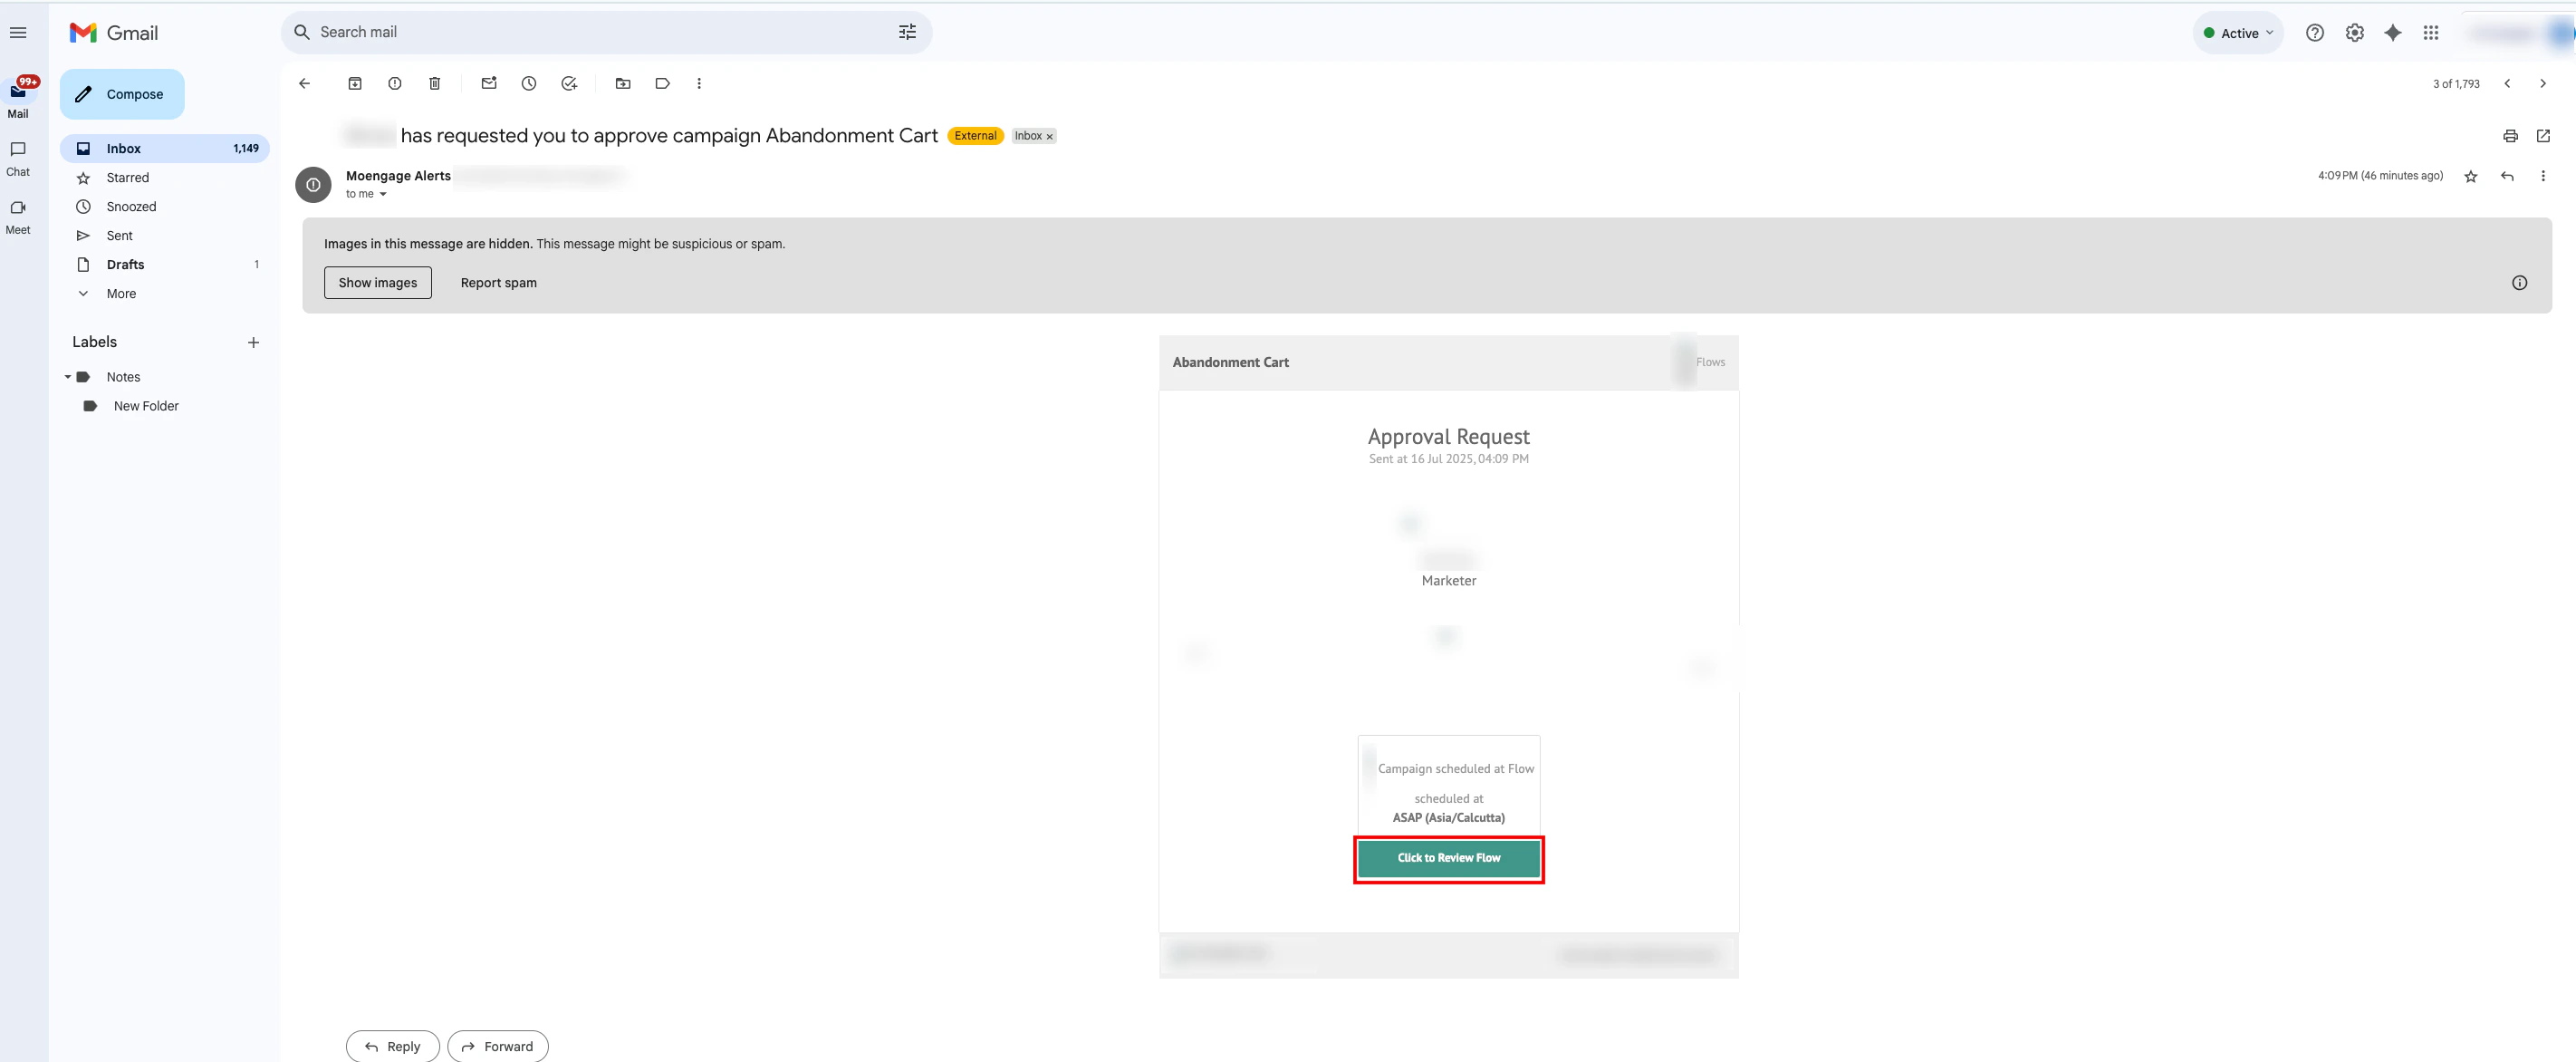
- Open the email you received from MoEngage and click Click to Review Flow.
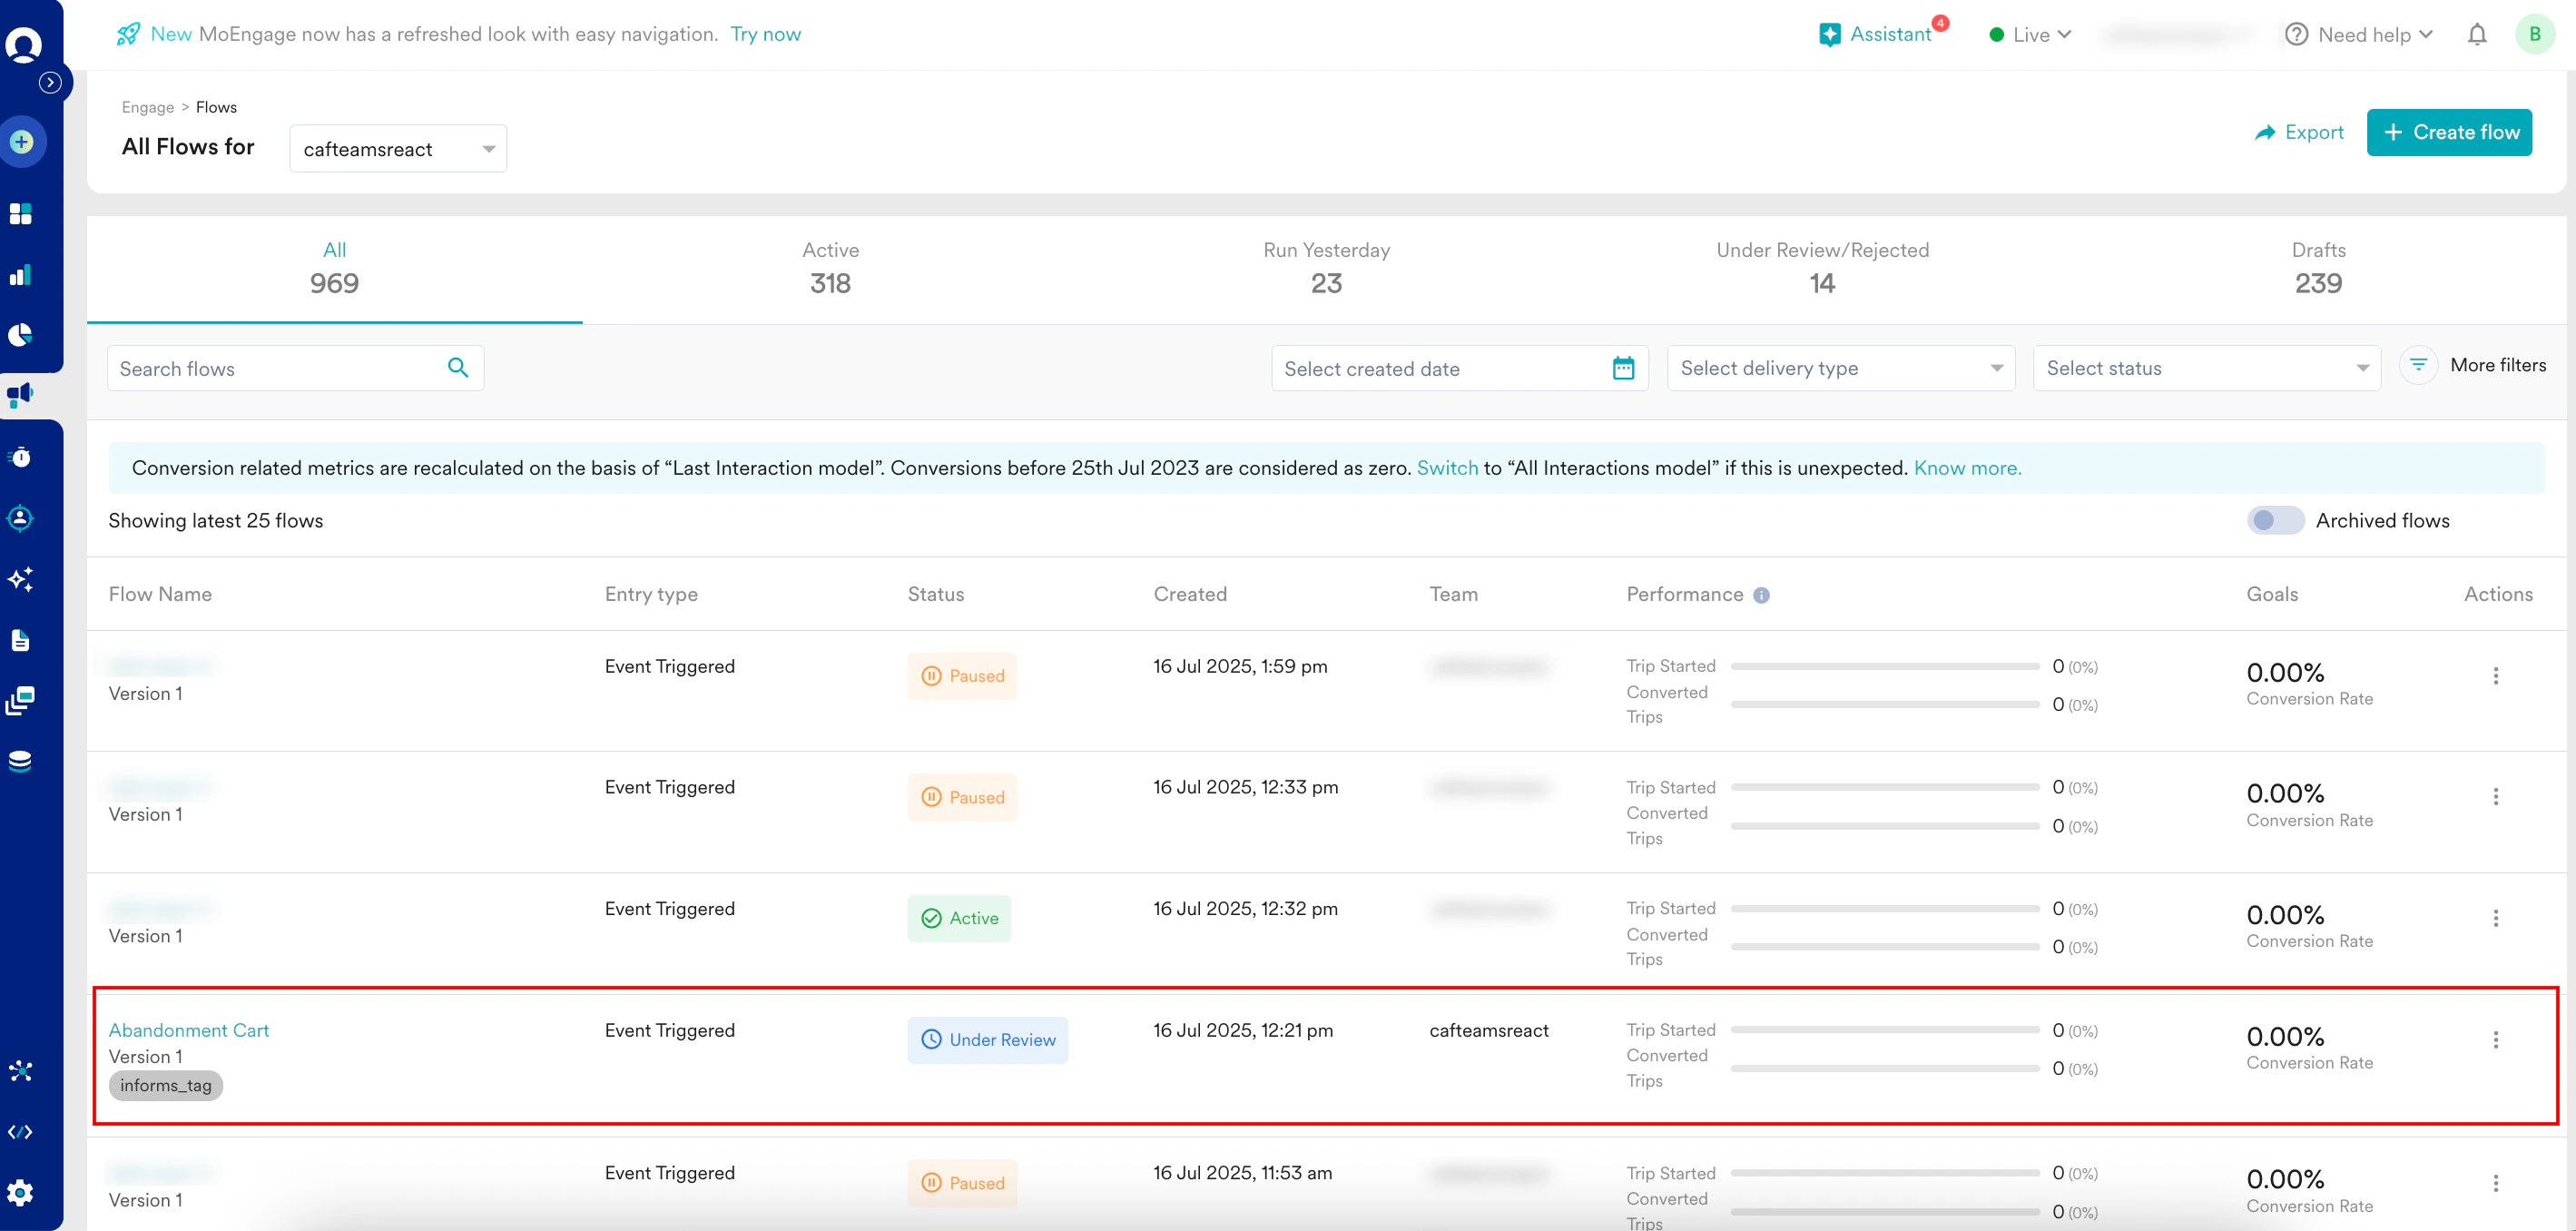
Navigate to the All Flows page. In the Select status filter select the Under Review checkbox.This provides the list of flows awaiting your approval. - Click the flow you want to open.
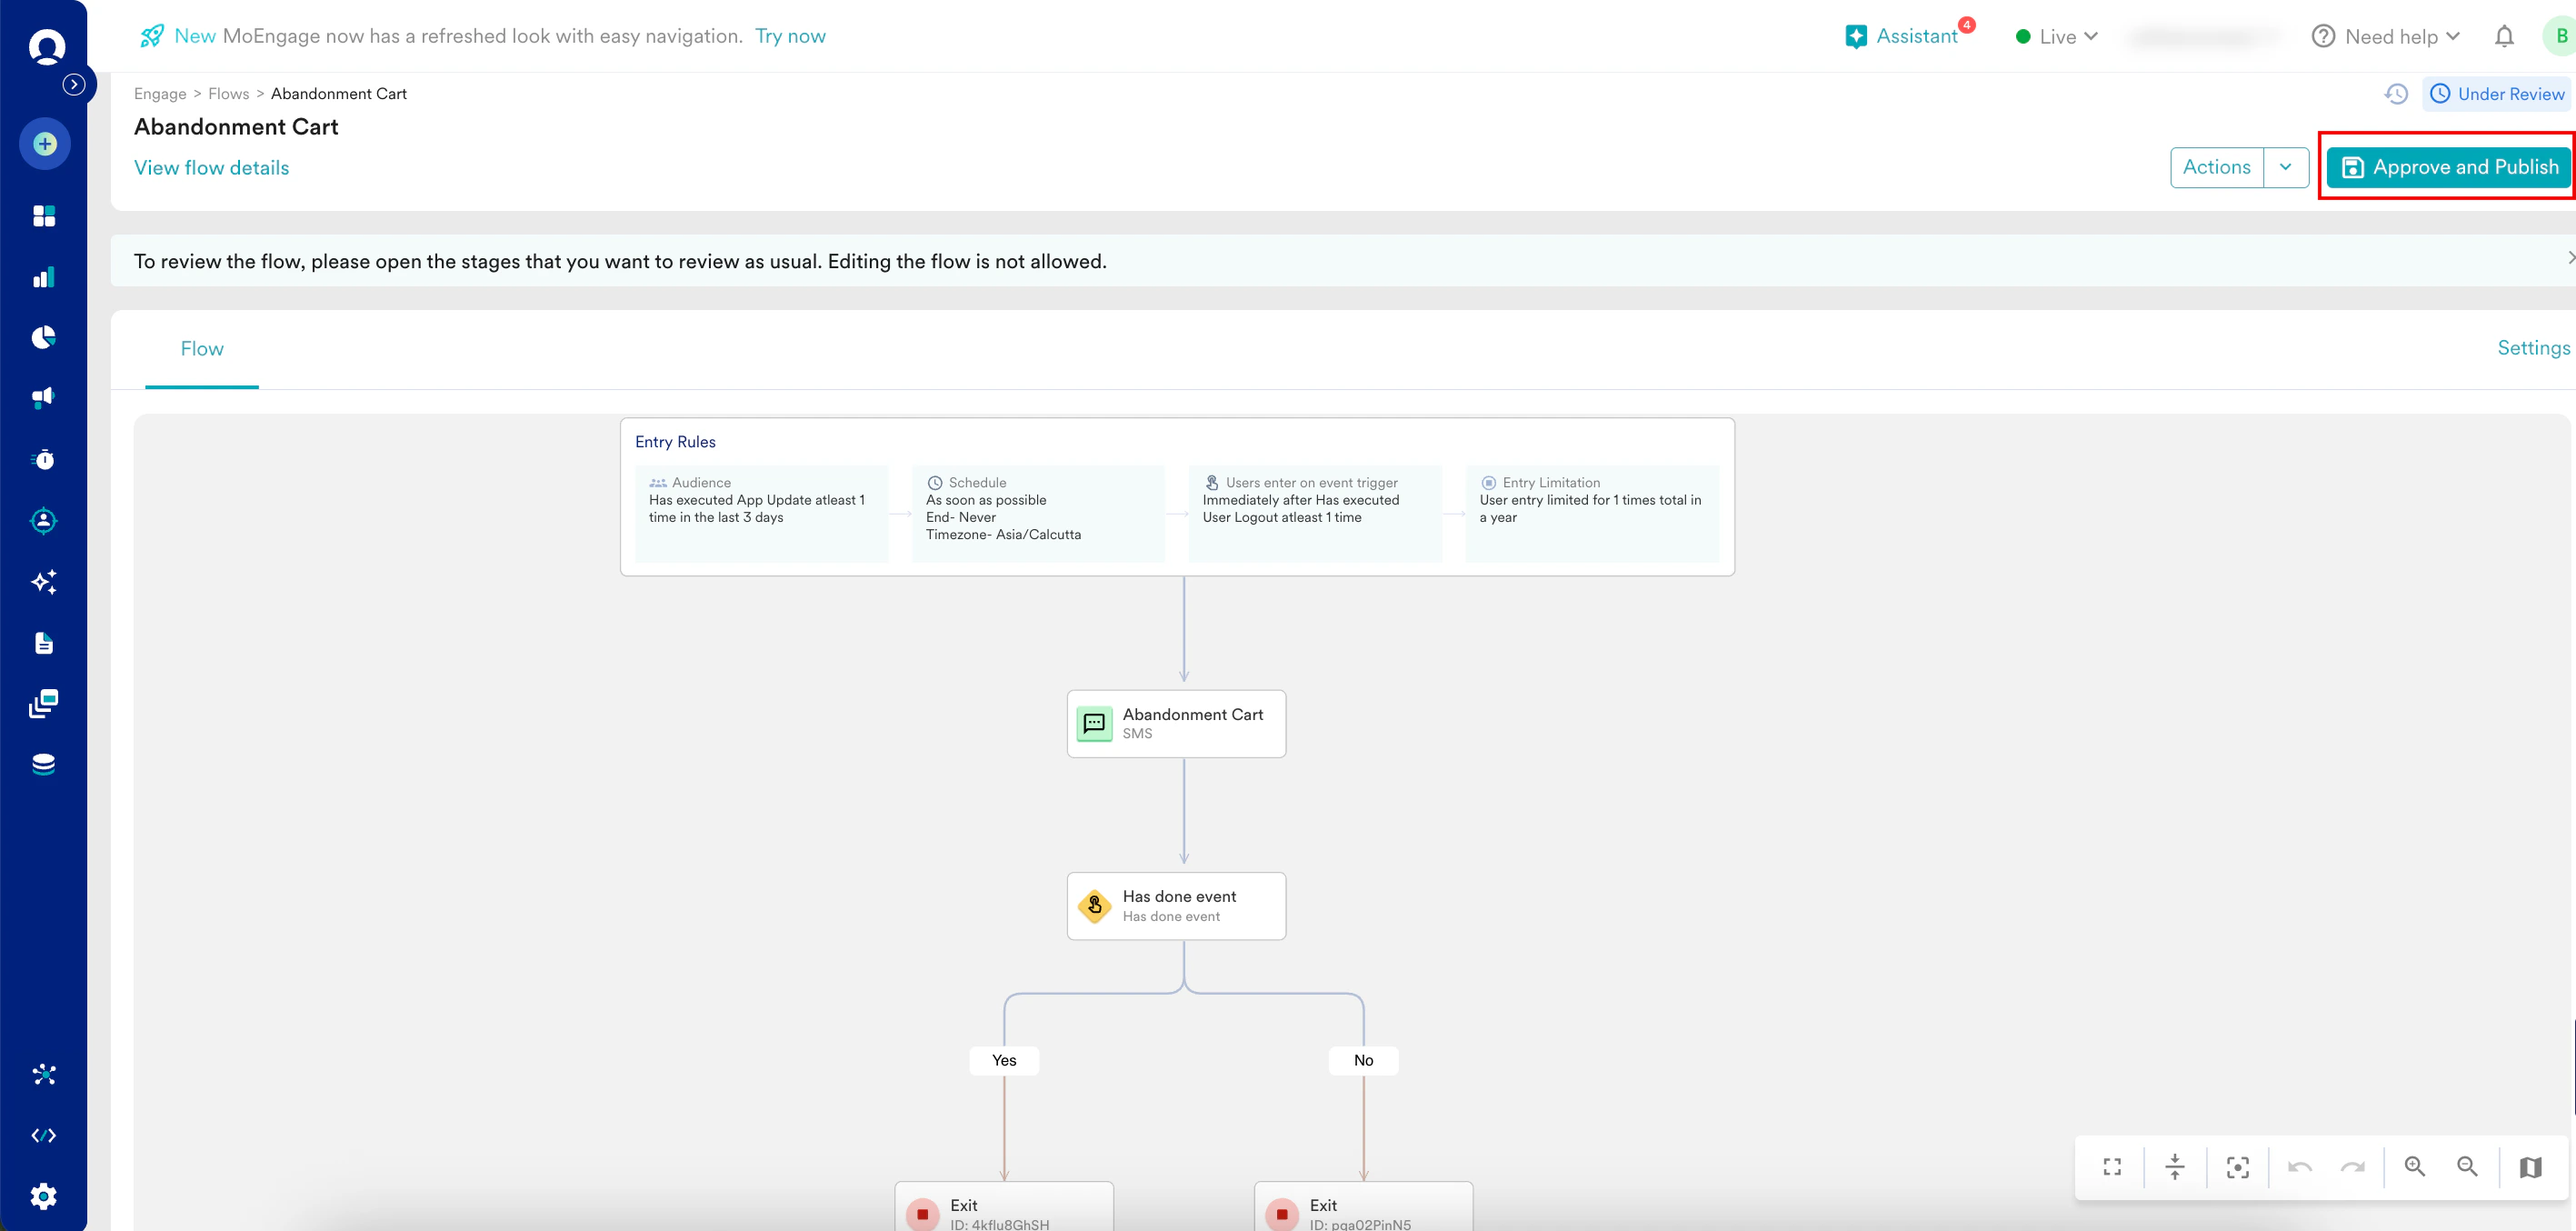
-
- On the flow canvas page, click Approve and Publish on the right side.
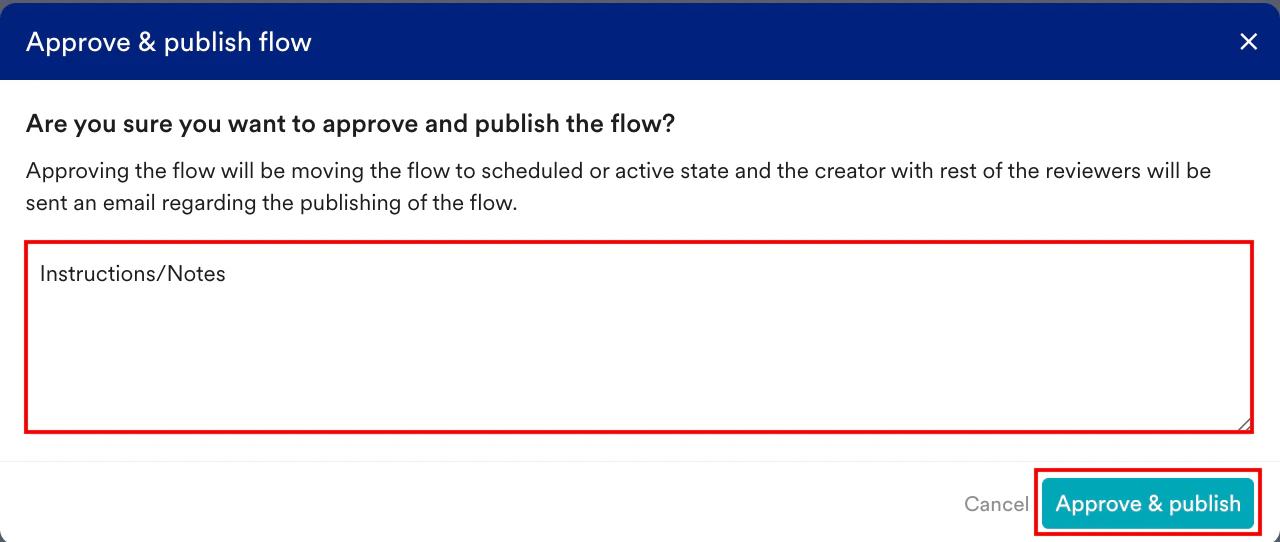
- In the Add yours comment here (optional) box, add the comments for the creator.
- Click Approve & publish.
- On the flow canvas page, click Approve and Publish on the right side.
- On the flow canvas page,select the Actions button on the right side.
- In the Actions list, select Reject.
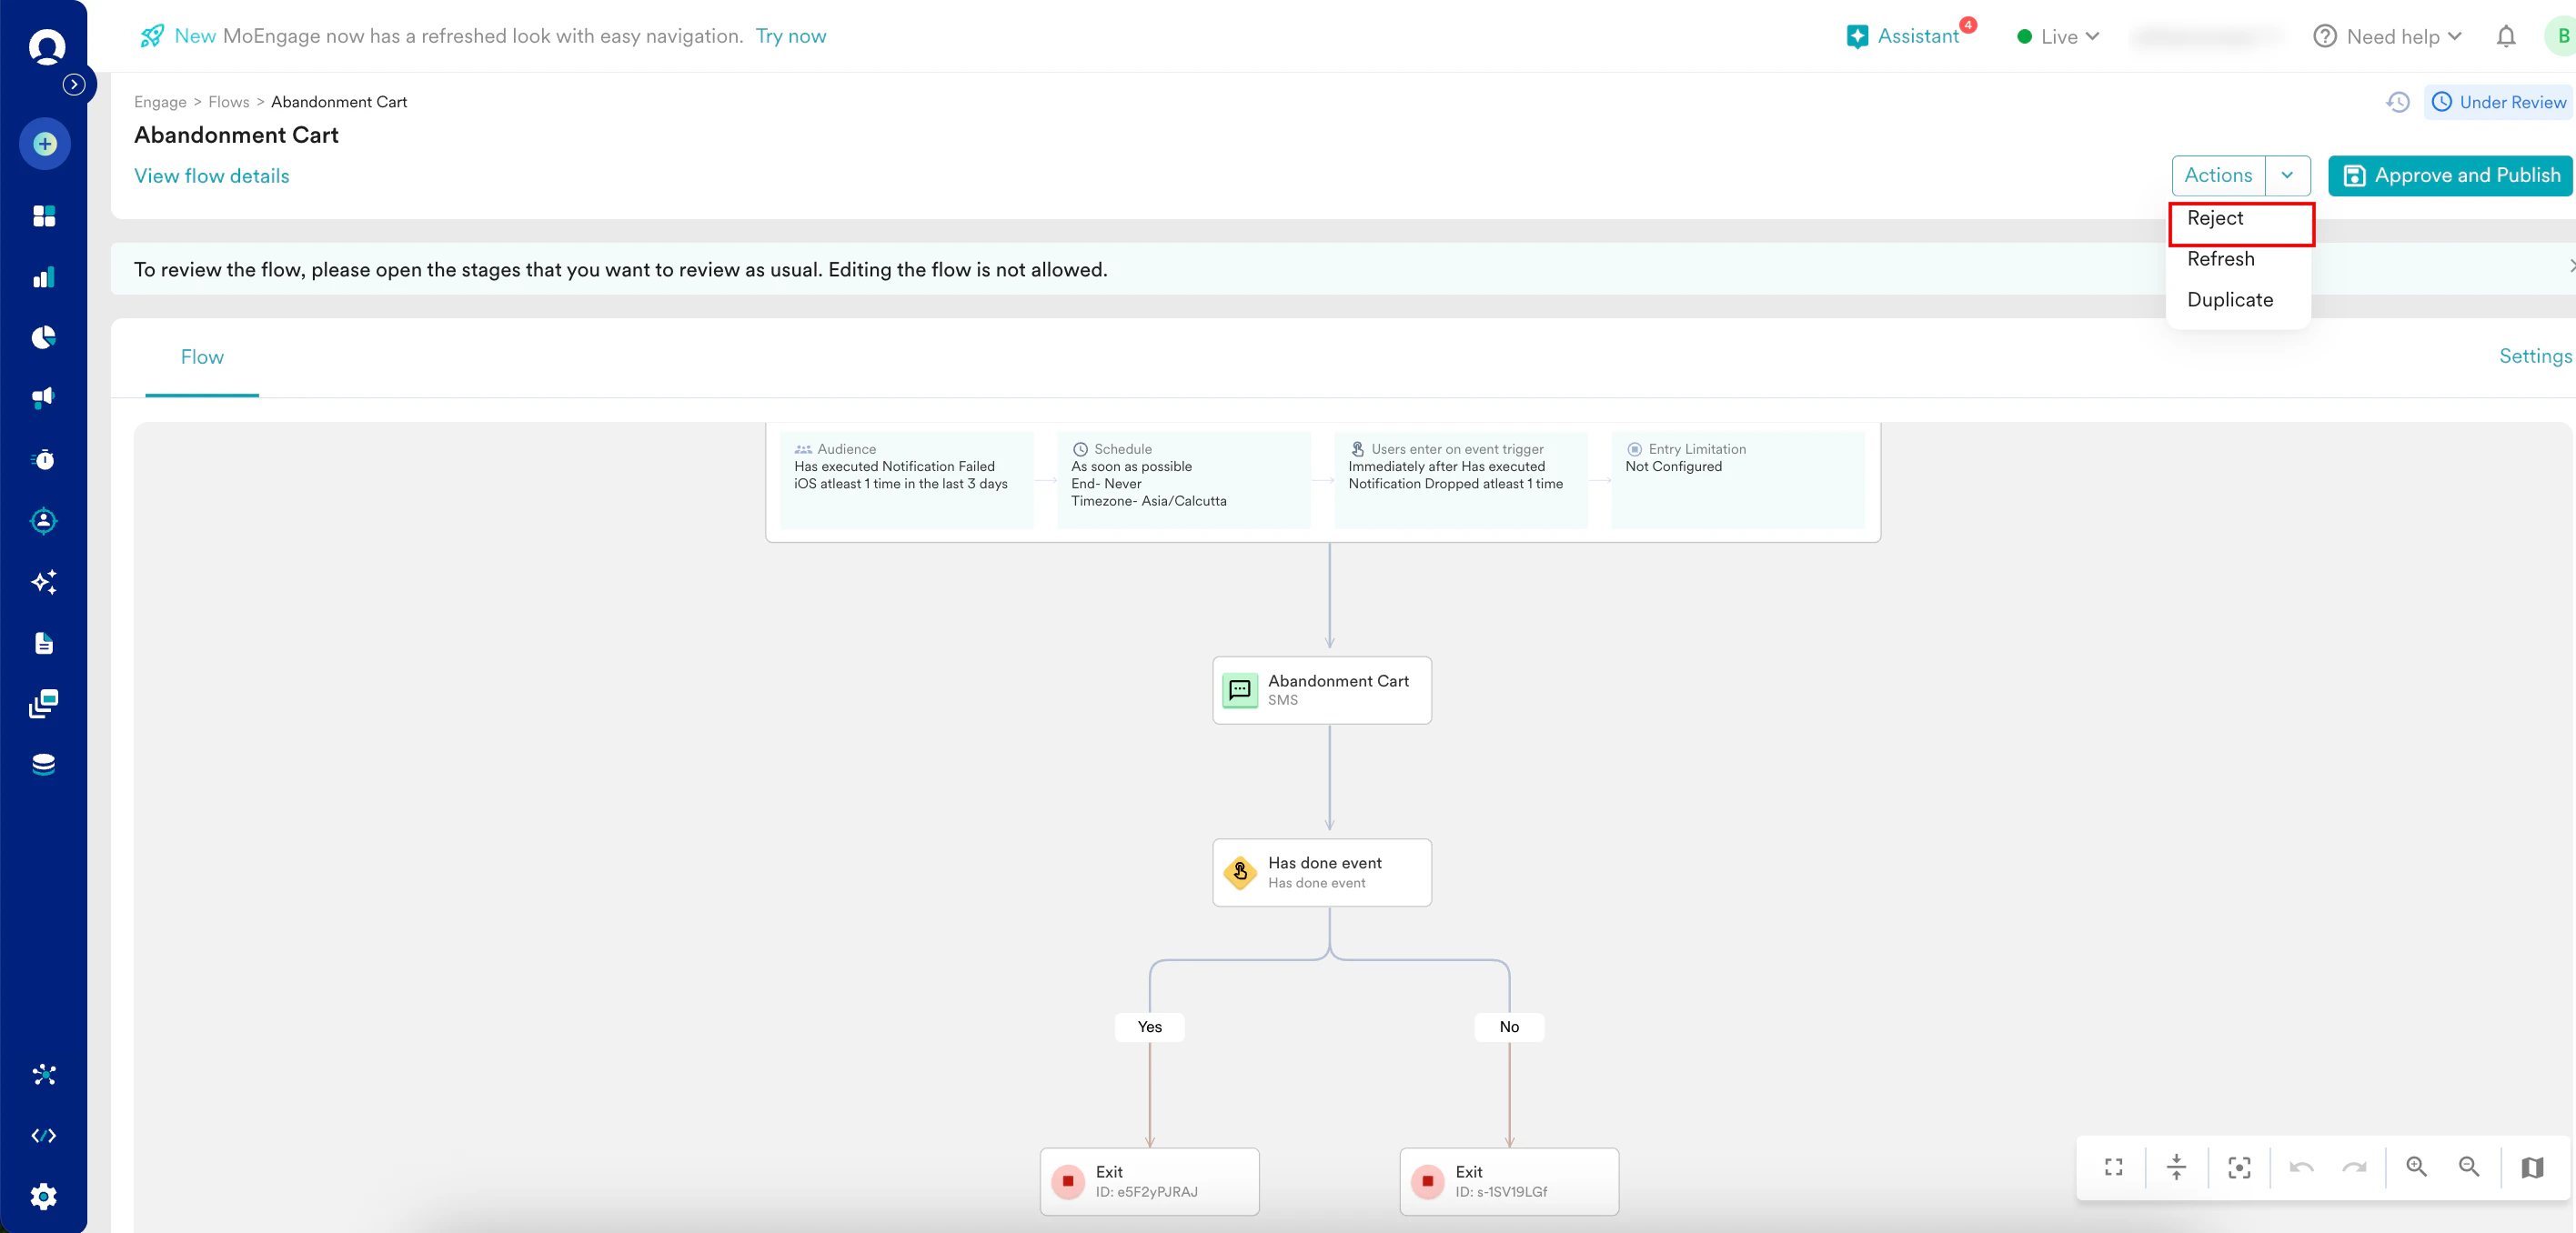
- In the Add your comments here box, you must add comments that explain why the creator needs to make edits.
- Click Reject flow.
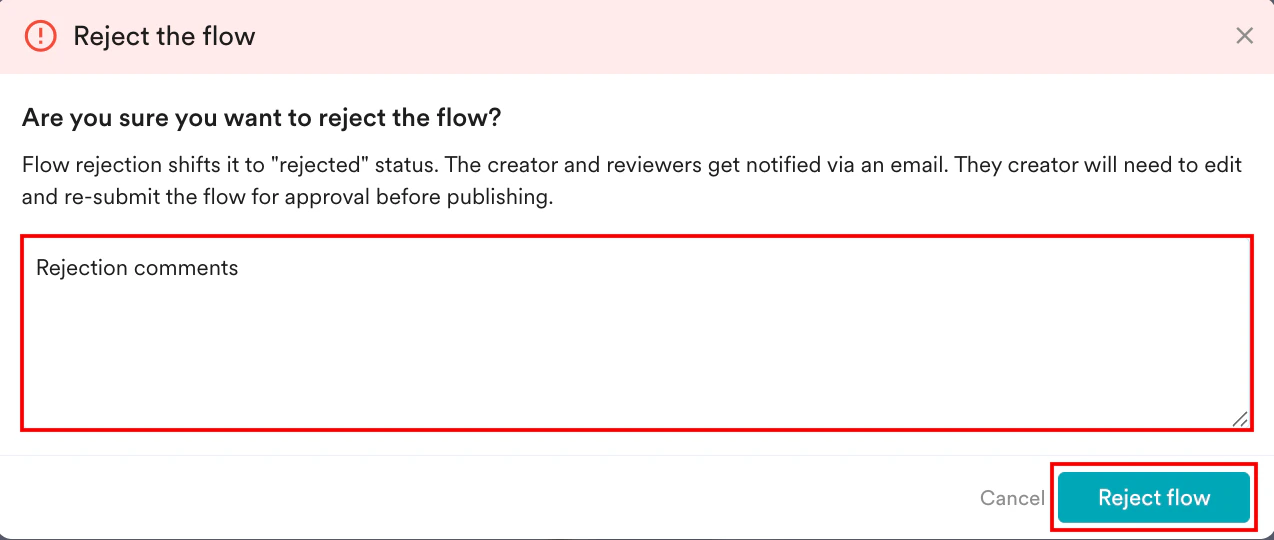
- When a flow is rejected, creators can find the approver’s comments in their email notification and the Flow Audit logs.
- After making the requested changes, MoEngage can resubmit the flow by following the approval process. For more information, refer here.