Integration
Prerequisites
- Follow the steps in Set up MoEngage app on Salesforce to install and configure the MoEngage app from the Salesforce AppExchange.
Scope
| Context | Support status |
|---|---|
| Sync standard Salesforce entities (Contacts, Leads, Accounts, Opportunities, and so on) to MoEngage as users or events | Supported |
| Sync custom Salesforce objects to MoEngage as users or events | Supported |
| Support for all standard Salesforce field types (string, datetime, numeric, formula, object types such as the Salesforce standard geo-location field) | Supported |
| Send historical data sync to MoEngage | Supported |
| Real-time data sync on new record creation or record updates | Supported |
| Create new attributes on MoEngage while setting up the data sync | Supported |
| Sync linked entities (relationships between entities) to MoEngage | Not supported (only the IDs of linked fields are synced; the full linked object is not synced) |
Steps
The integration is divided into two major steps:- Connections: A Connection is the authorization to your MoEngage workspace. You can connect multiple MoEngage workspaces to a single Salesforce instance.
- Syncs: A Sync is a job that runs in real time to send specific data between the two systems. It includes the sync type (MoEngage to Salesforce or Salesforce to MoEngage), the entities to sync, and the data mapping.
Launch the MoEngage app
Click App Launcher, enter MoEngage, and then select MoEngage App.
Step 1: Set up a connection

Enter your MoEngage workspace details
Provide the workspace details.
| Field name | Value |
|---|---|
| Connection Name | Any name for your connection (for example, MoEngage Prod or MoEngage Workspace). |
| Workspace ID | The Workspace ID of your MoEngage account, available at Settings > Account > APIs > Workspace ID. |
| Data Key | The Data API Key of your MoEngage account, available at Settings > Account > APIs > Data Key. |
| MoEngage Data Center | Your MoEngage data center. Read more. |
Step 2: Set up a sync
For this guide, we use the example of syncing Salesforce Contacts to MoEngage as users. Follow a similar process for event syncs.Sync Salesforce Contacts to MoEngage as users


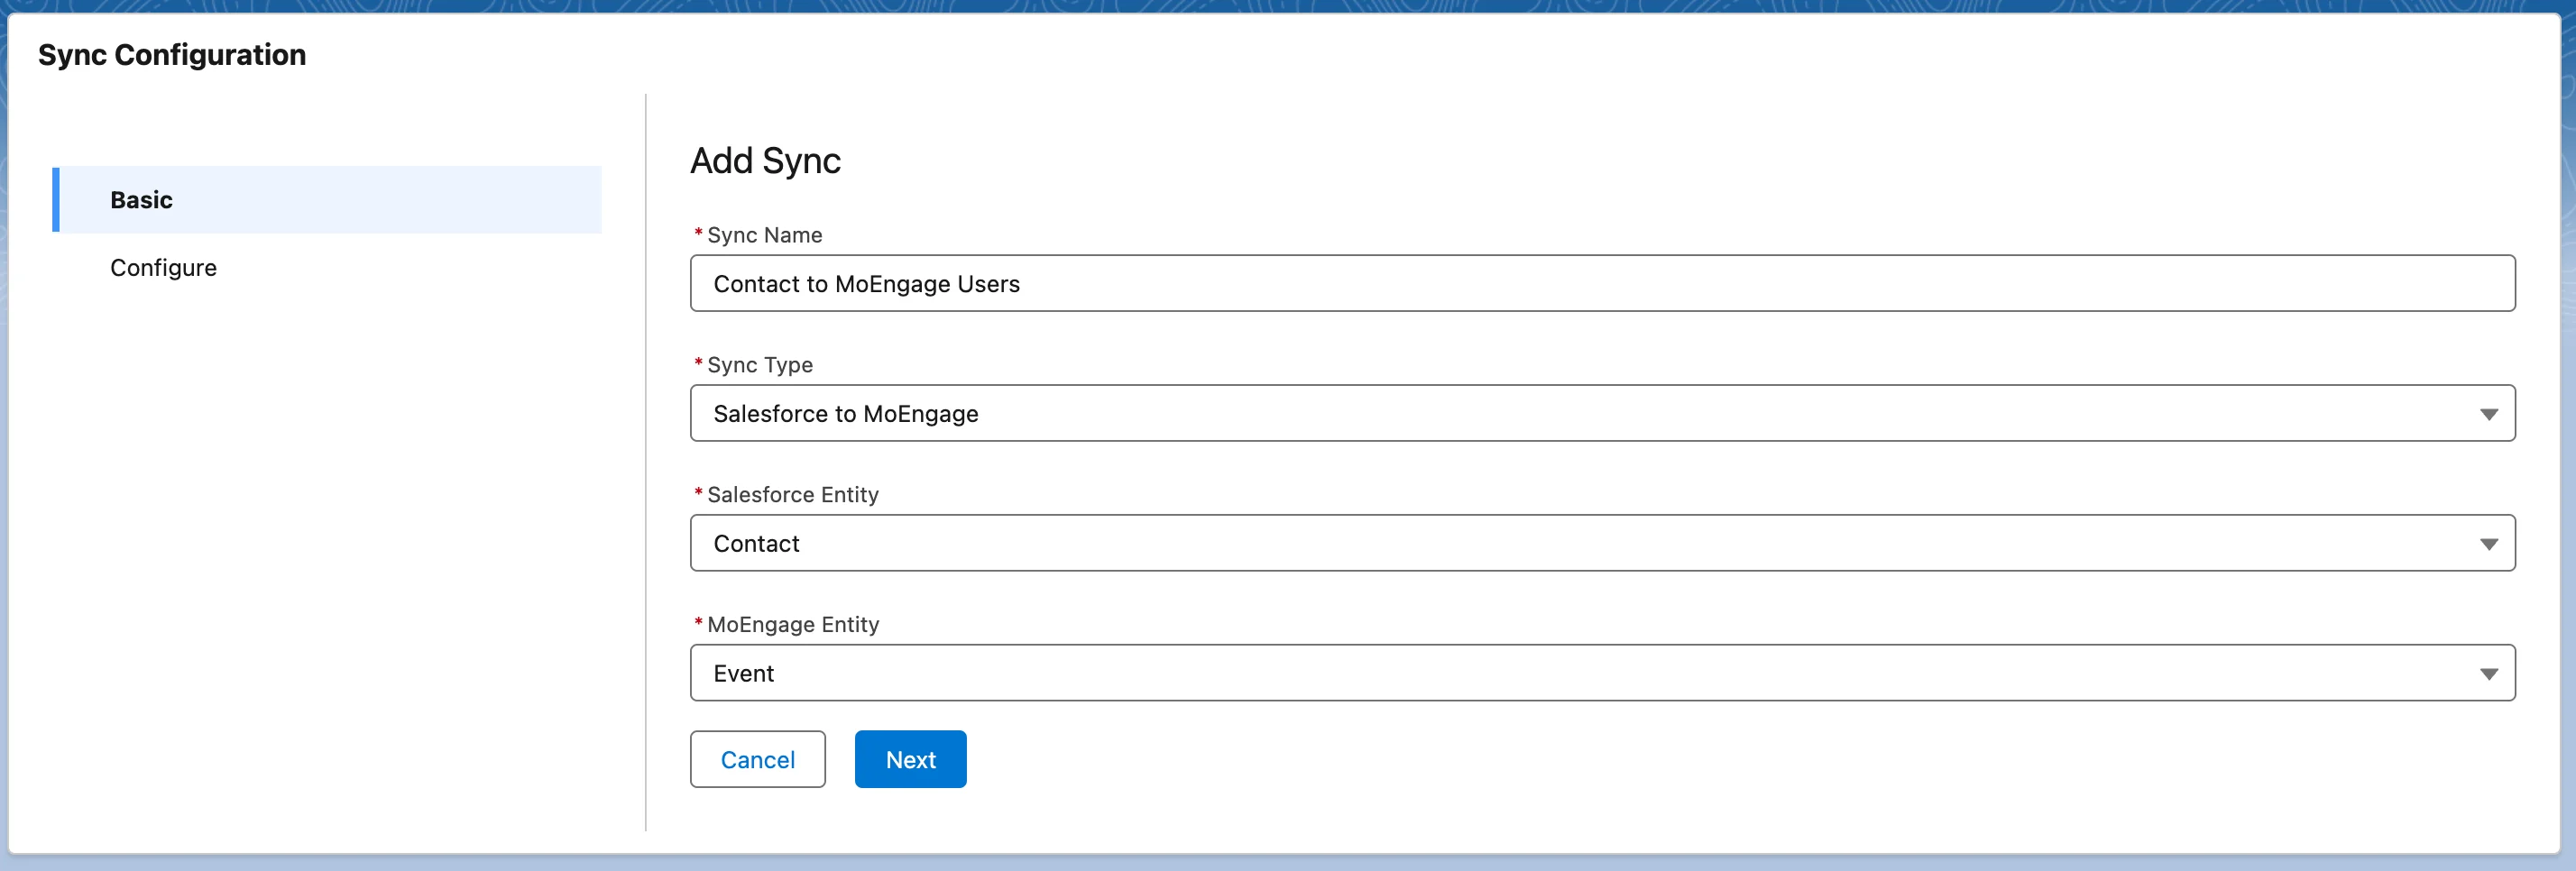
Configure data mapping
Configure the data mapping between the two systems:
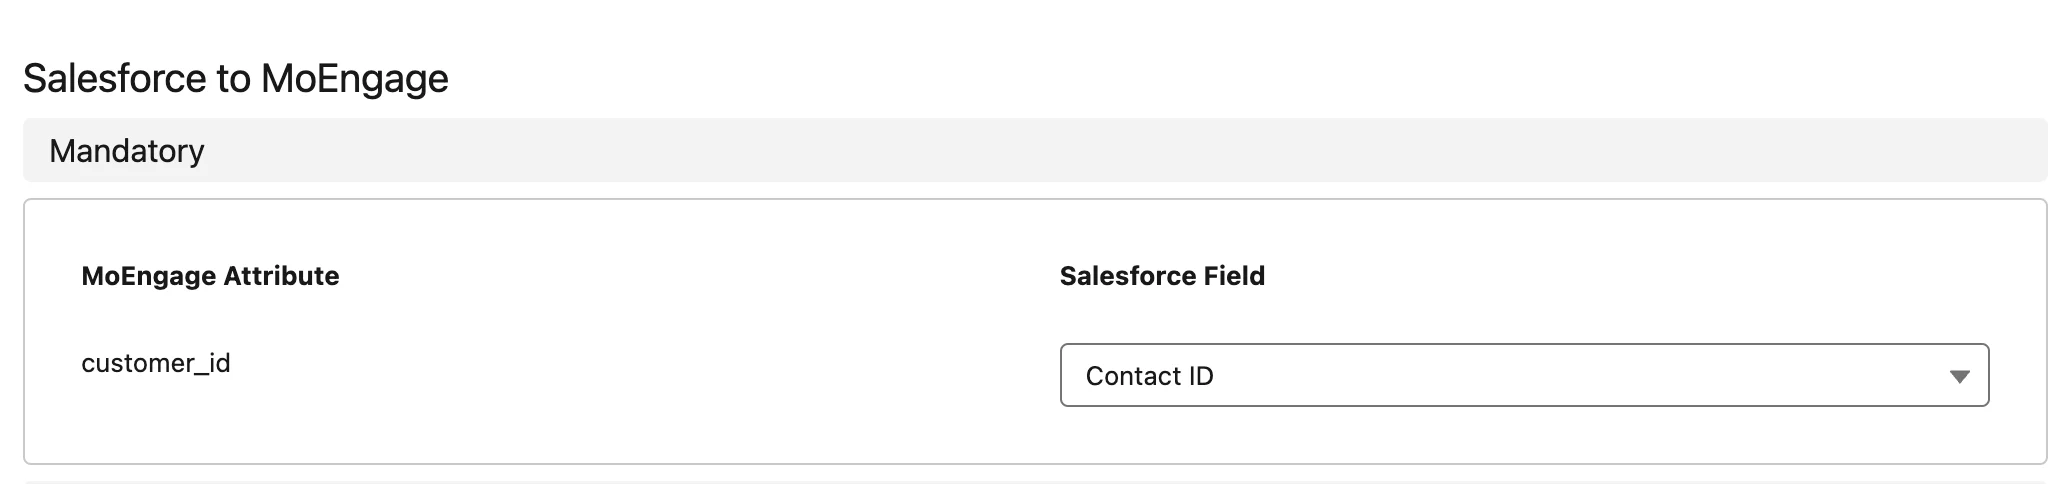
- Define the identifier between the two systems. For MoEngage, the identifier name is Customer ID — it can be mapped to any field on the Contact object.
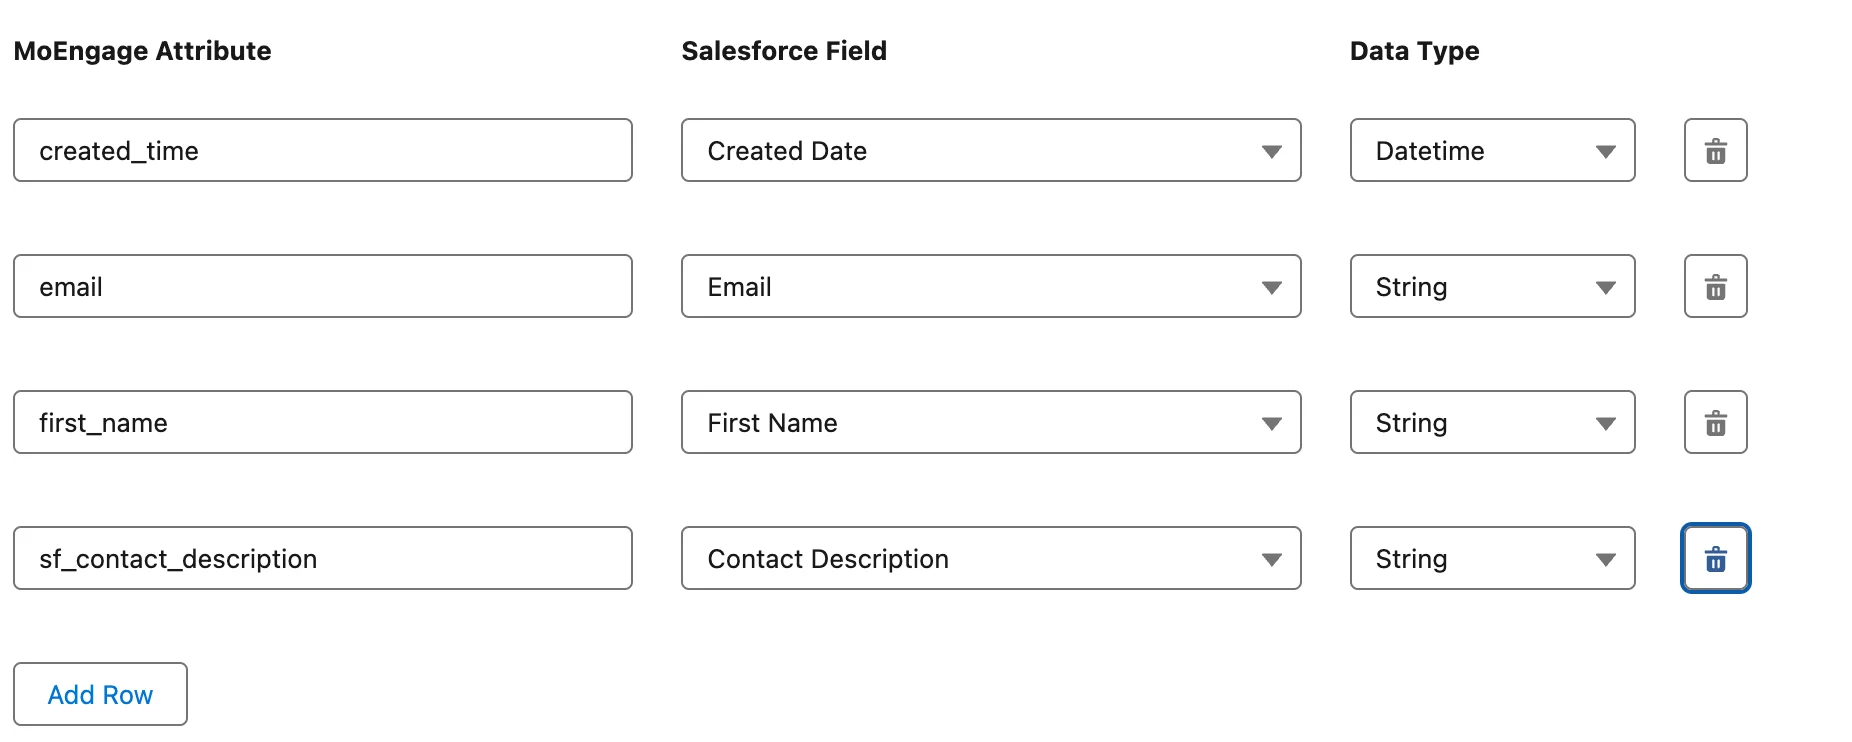
- Set up mappings for other fields. Enter the MoEngage attribute (these appear as user attributes in MoEngage) and select the Salesforce field to map it to.
- Click Save.
If you are setting up a sync for a Salesforce object for the first time, the system asks you to deploy the trigger on Salesforce. Click Deploy to continue.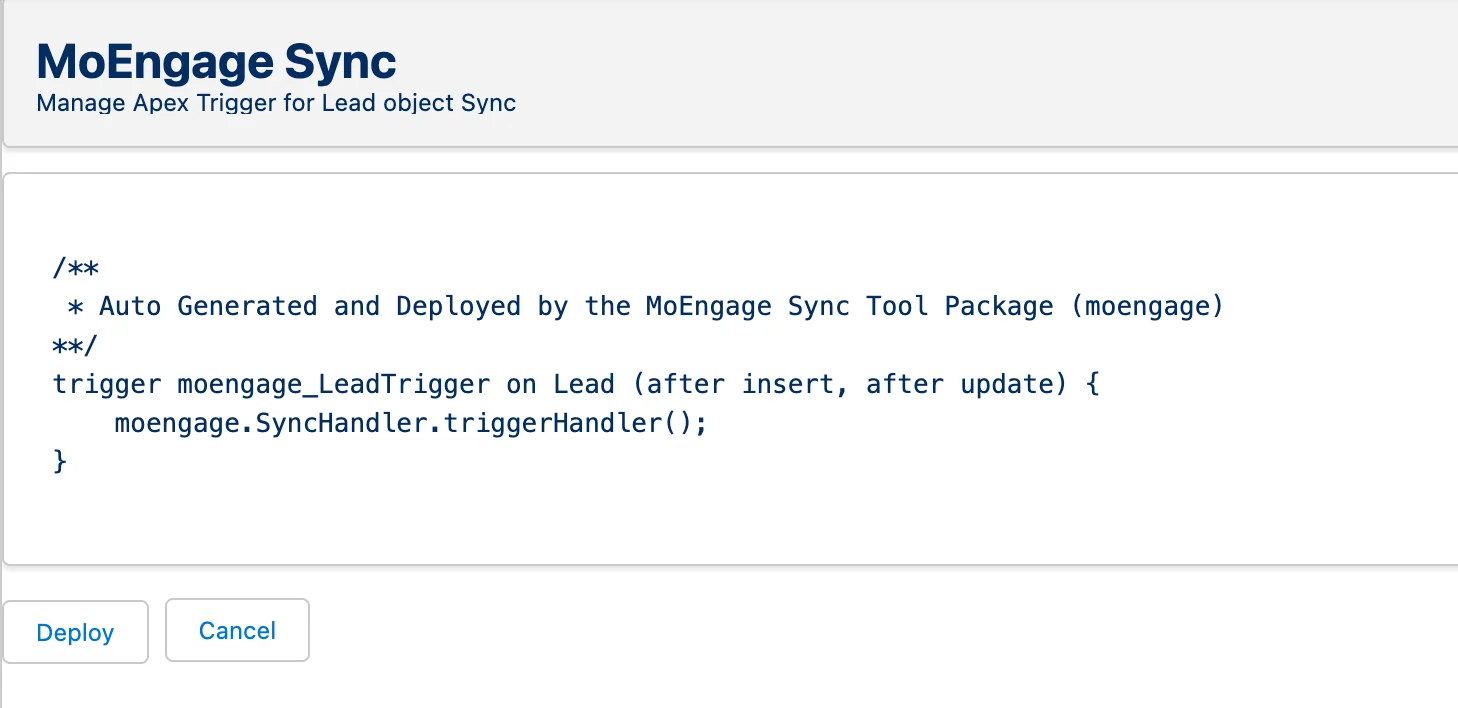
Errors when deploying triggers
If your initial trigger deployment fails, it is often due to custom validation rules on the Salesforce object you are syncing (for example, rules on the Contact or Lead object). To deploy successfully, the system needs to create a test record, and that test record must pass your organization’s validation rules. When the deployment fails, a modal appears asking you to provide test data:
Analyze the snippet
The system pre-populates a code snippet with the minimum required fields for that Salesforce object.
LastName and the correct format of Email, modify the sample line to:
Formula fields
- Salesforce does not detect underlying data changes for mapped formula fields.
- A change only in the formula’s calculated output does not trigger a sync.
Compound fields
- Do not map compound address or location fields (for example,
MailingAddress) directly. - Instead, map their individual components:
MailingStreetMailingCityMailingStateMailingPostalCodeMailingCountry
- This ensures accurate syncing with the corresponding MoEngage attributes.
Step 3: View profiles in MoEngage
Sync real-time updates
By default, new sync configurations are automatically enabled for real-time updates. Any modification to a mapped field on an existing record within the synced Salesforce object triggers an update to MoEngage. To deactivate real-time syncs, click Deactivate next to the sync.Field change detection
- Real-time sync is triggered when a mapped object record is created or when an existing record has at least one mapped field changed.
- Updates to unmapped fields alone do not trigger a sync to MoEngage.
Sync historical data
You can trigger a historic sync of your existing data at any point. This is useful when you want to backfill data in MoEngage.Performing a historic sync

Adjust the batch size (optional)
You can change the batch size depending on your Salesforce settings.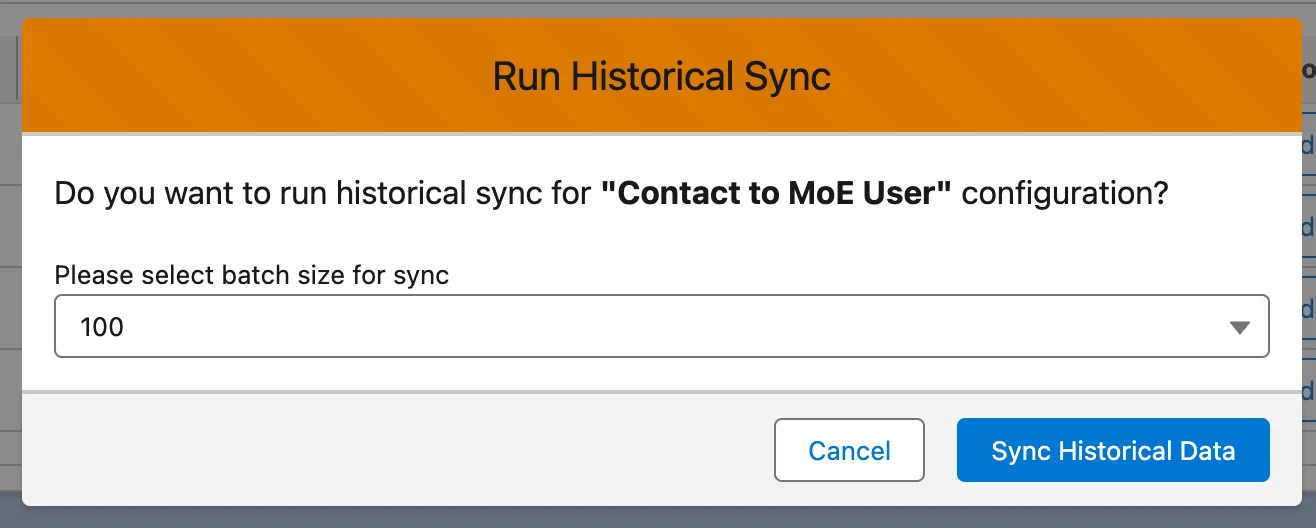
Monitoring the historic sync
After starting a historic sync, track its progress by observing the status displayed next to the sync configuration.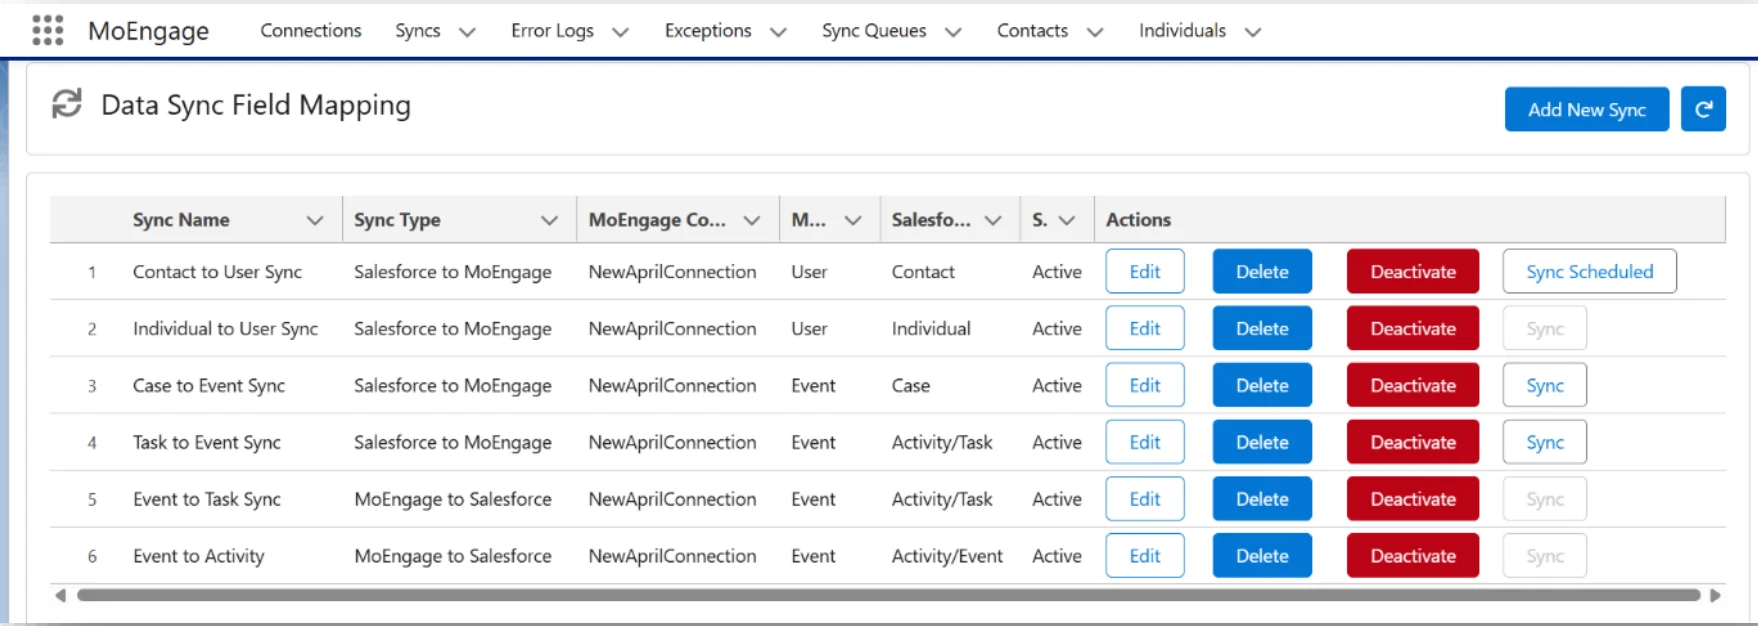
| Status | Description |
|---|---|
| Sync | A historic sync has not yet been performed for this object. The default state before the first sync. |
| Sync Scheduled | The sync has started and is in the queue waiting to be processed by Salesforce. |
| Sync Processing | The sync has started and data is actively being sent to MoEngage. |
| Sync Successful | The process is complete and all records were successfully sent. MoEngage will now process this data. |
| Sync Partial Success | The process is complete, but some records failed to send. Check the error logs for details. |
| Sync Failed | The process is complete, but no records were sent to MoEngage due to a critical error. |
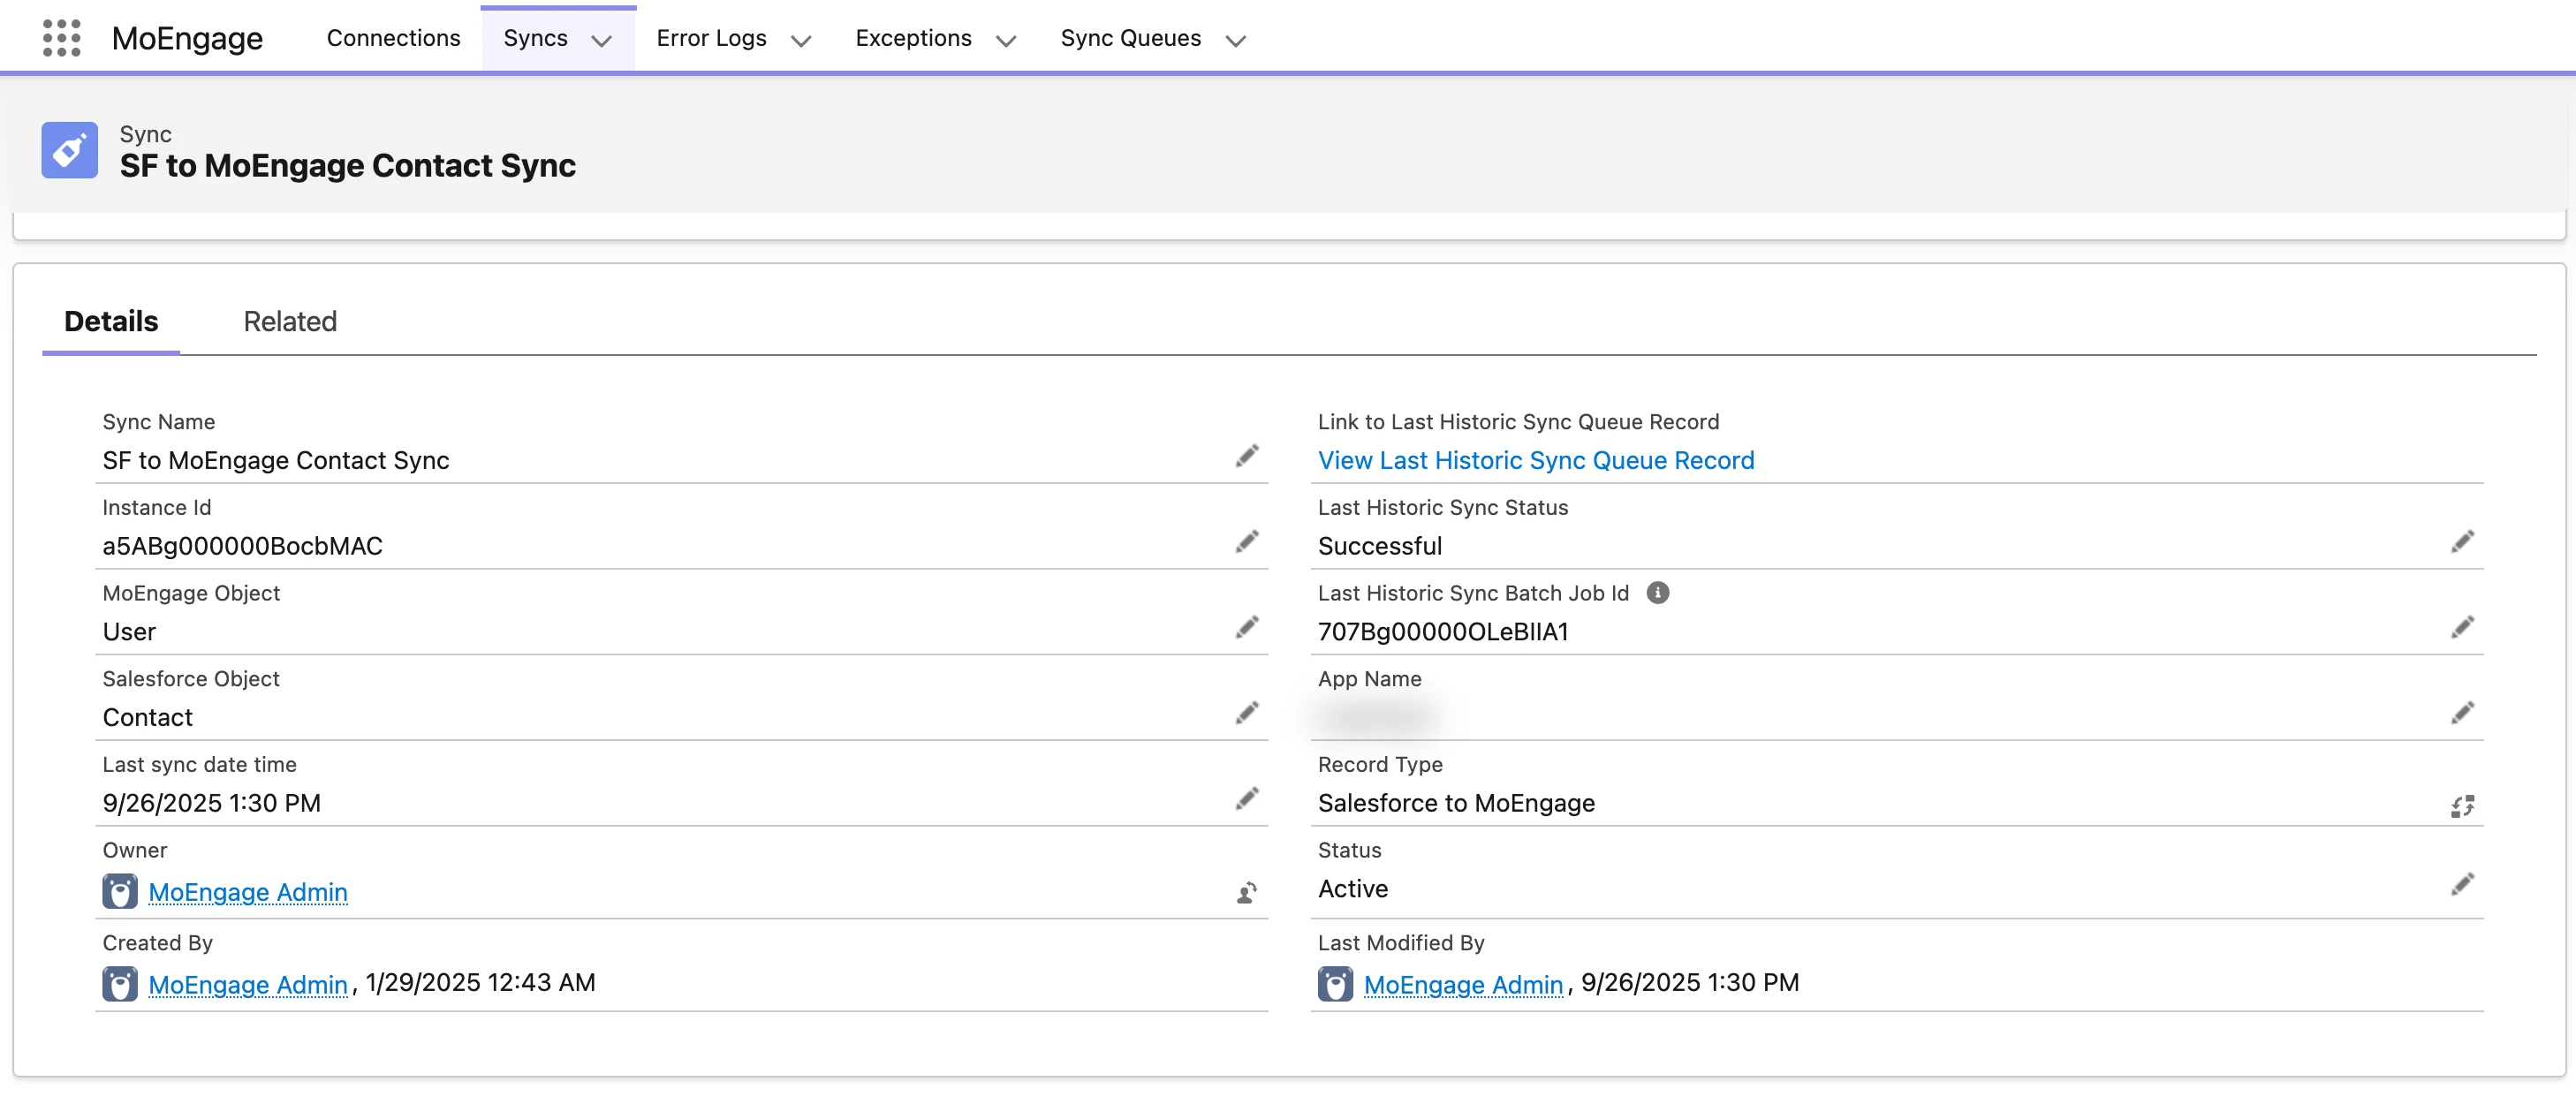
| Field name | Description |
|---|---|
| Last Sync Date Time | The time at which the last historic sync was added. |
| Last Historic Sync Apex Batch Job ID | The Batch Job ID of the Salesforce Apex job. Use this ID to view the real-time progress of how many batches were processed in the last historic sync. |
| Last Historic Sync Batch Raw Job ID | The full Job ID of the Salesforce Apex job generated internally. |
| Last Historic Sync Queue ID | The Sync Queue ID of this historic sync. |
| Last Historic Sync Queue Record | A link to the Sync Queue record for the last historic sync. View related exceptions, failed records, and the overall progress of this sync in detail. |
| Last Historic Sync Status | The status of the most recent sync attempt for this configuration. Transitions: Scheduled → Processing → Successful / Failed / Partial Success. |
Check the Salesforce Apex Flex Queue
Open your Salesforce Apex Flex Queue and ensure the historic sync is not in the Holding state. Search for the Apex class
HistoricalSyncBatch. If you find it in this state, you can reorder the batch to prioritize MoEngage.Verify the batch has started
If your Flex Queue is empty or has no records from the
HistoricalSyncBatch Apex class, the batch has started processing.Check the Apex Jobs Queue
Open the Apex Jobs Queue and find the record submitted by the 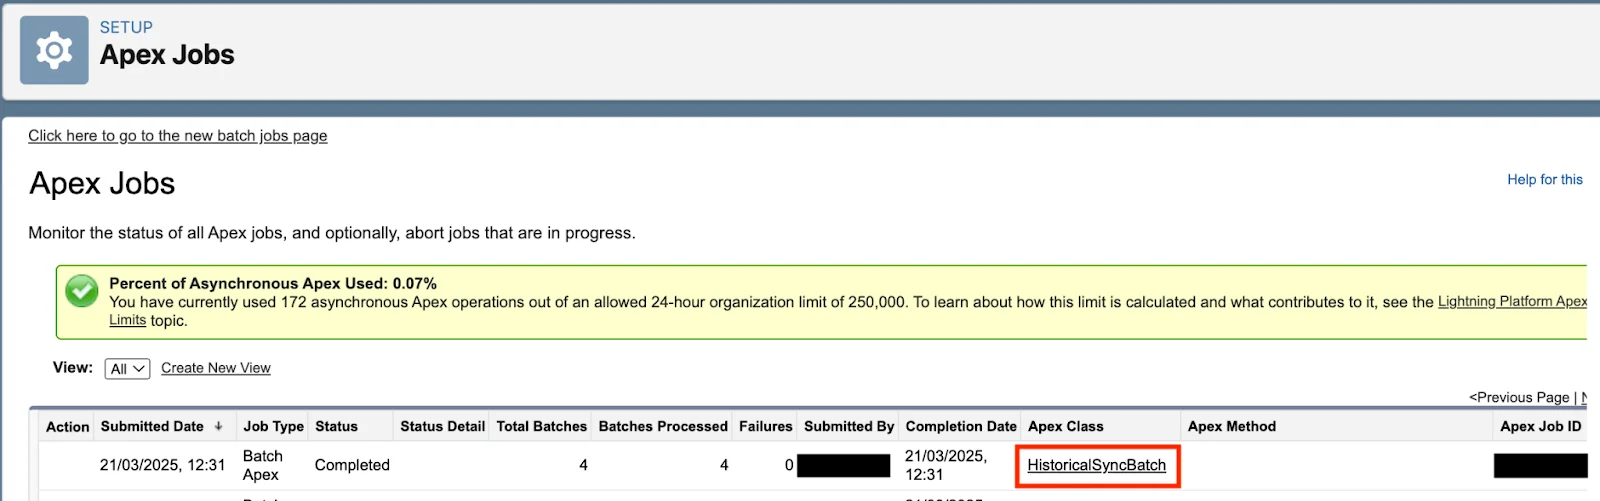
HistoricalSyncBatch Apex class. You can also search using the Last Historic Sync Apex Batch Job ID of the related sync.| Column name | Description |
|---|---|
| Status | Status of the historic sync. Processing means the sync is in progress. Completed means all records have been sent to MoEngage for processing. This does not guarantee full delivery — MoEngage can still reject records based on various factors. |
| Batches Processed | The number of batches sent to MoEngage. If this is less than Total Batches, the sync is in progress. |
| Failures | The number of batches that have failed to be sent to MoEngage. |
| Apex Class | Ensure that this is HistoricalSyncBatch. |
Important points to remember
- One sync per entity type: You can only run one historic sync at a time per MoEngage entity type (one for Users and one for Events).
- Example: Suppose Salesforce Contacts and Leads are both mapped to MoEngage Users, while Salesforce Opportunities and Deals are mapped to MoEngage Events. If you start a sync for Contacts (a User sync), you cannot start another sync for Leads until the first one completes. However, while the Contacts sync is running, you can still start a sync for Opportunities or Deals because they are mapped to a different entity (Events).
- Manual refresh required: The sync status does not update automatically. Click the Refresh icon or manually refresh the page to see the latest status.
- Status of last sync: The status shown always reflects the outcome of the most recent sync attempt for that specific configuration.
- New sync start: You can start a new historic sync only when the status of the most recent sync for that specific configuration is not Sync Scheduled or Sync Processing.
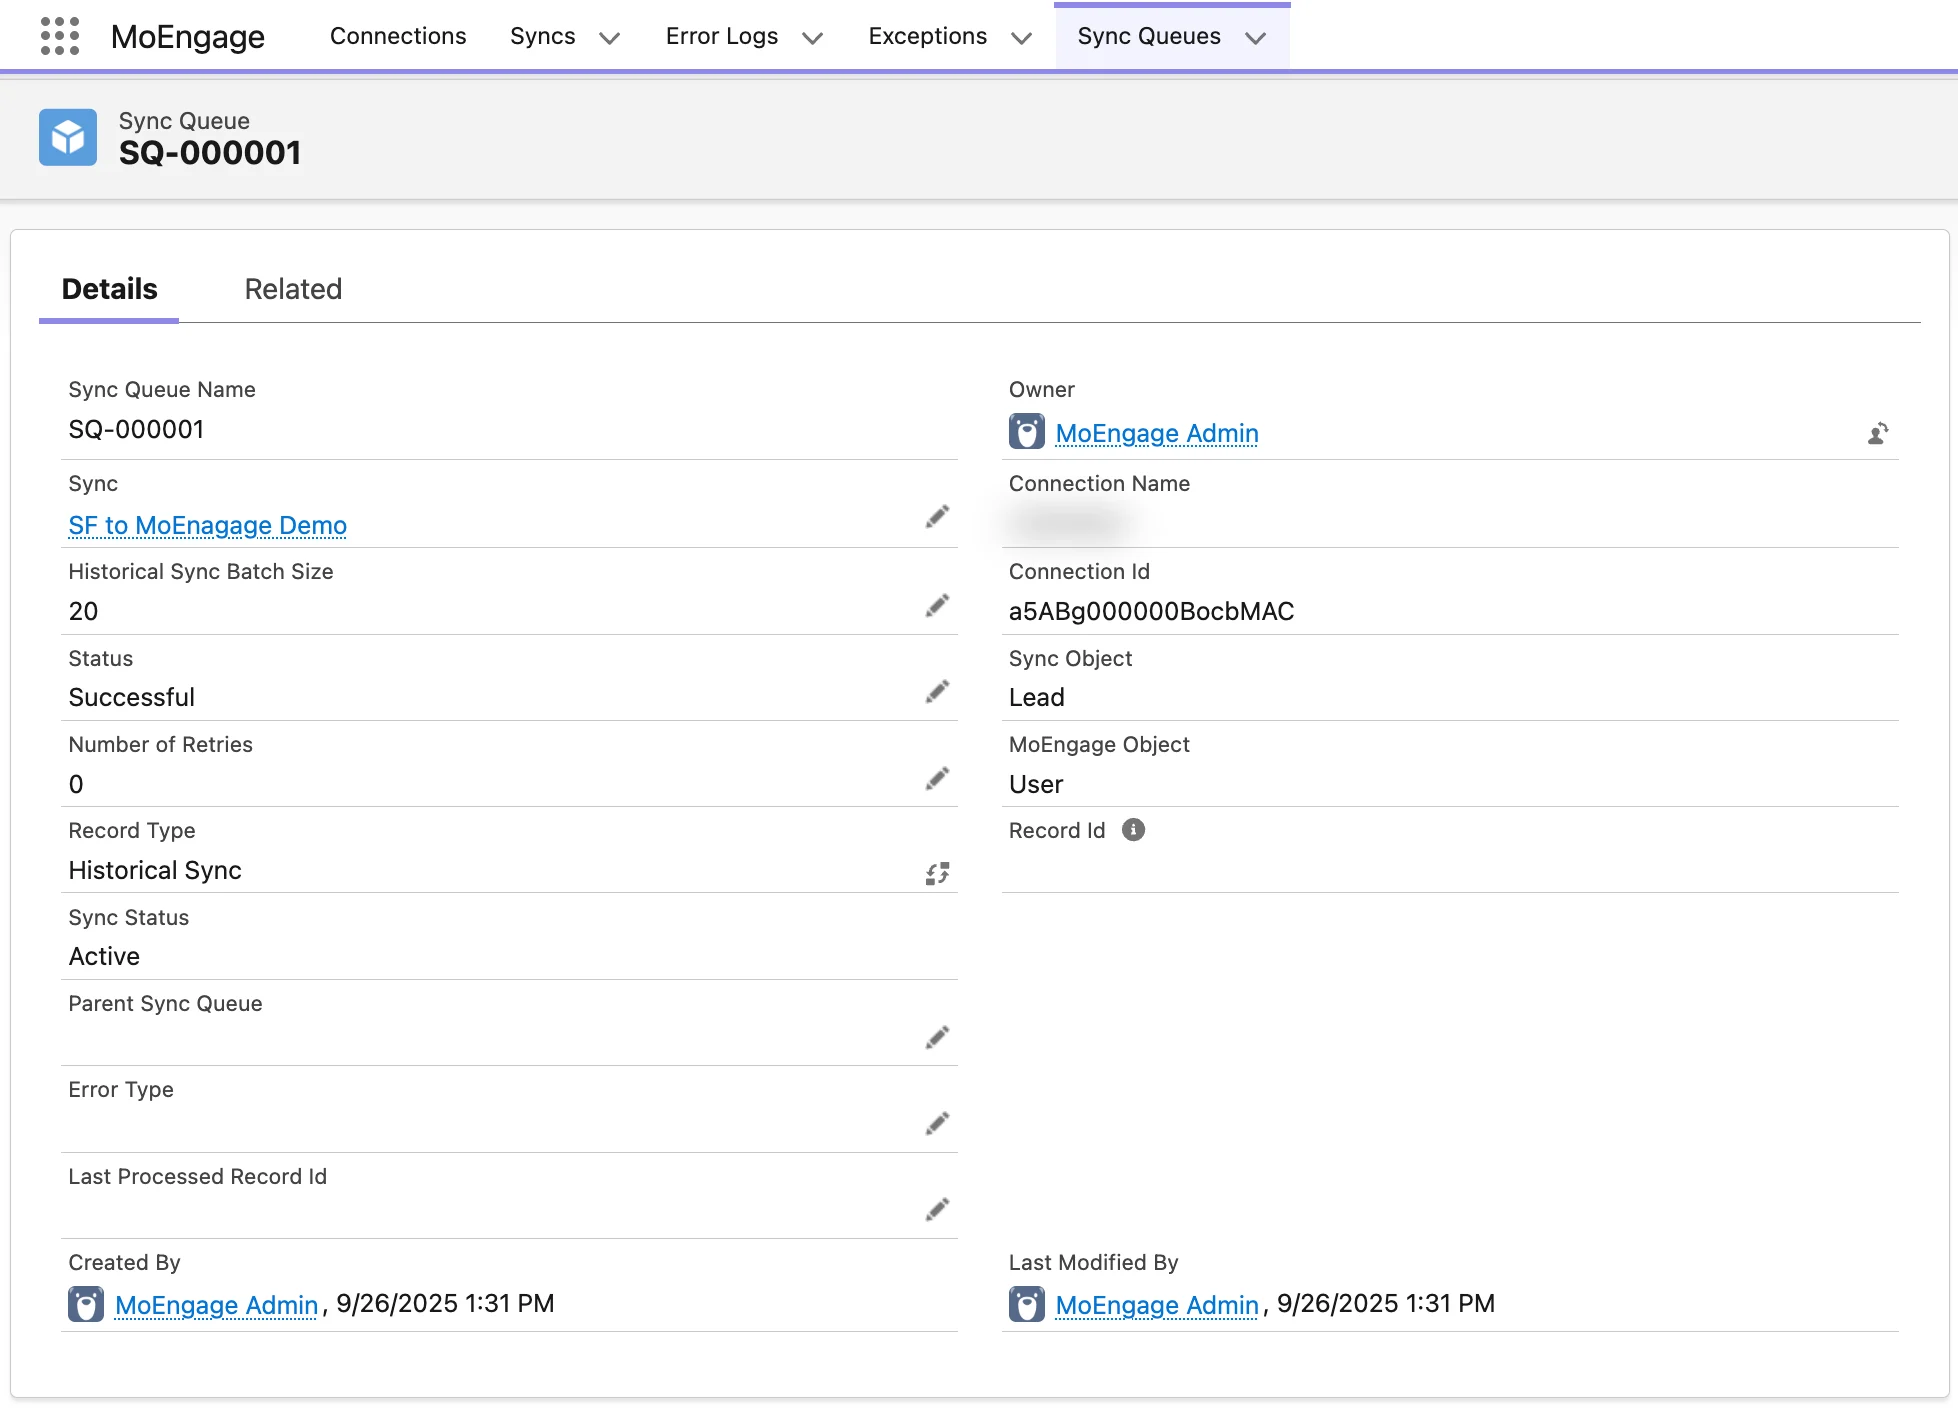
Sync queues
To ensure your data syncs reliably and efficiently, the MoEngage app processes all transfers through an intelligent Sync Queue. This system automatically optimizes performance, minimizes errors, and uses smart logic to retry failed attempts. Every sync (historic or real-time) is managed through this queue. Visit the Sync Queue to monitor the status of all your jobs — from scheduled and active to completed. By default, Sync Queue includes two views: Real Time Syncs and Historical Syncs.Activating Sync Queue views
Activating Sync Queue views
We recommend activating these views to manage your Sync Queue easily. From your Salesforce dashboard:
| Field name | Description |
|---|---|
| Sync | The name of your sync mapping (for example, Leads to MoE Users). |
| Historical Sync Batch Size | The number of records sent to MoEngage per batch. Populated only for historical syncs. |
| Status | The current status of your sync. |
| Number of retries | The number of times Salesforce tried to sync this batch or record. |
| Record Type | The type of sync this was initiated from: Historical Sync or Real-Time Sync. |
| Sync Status | The last known status of the sync configuration. If disabled from the Syncs page, all further syncs will not be processed. |
| Parent Sync Queue | Which sync this record belongs to. Often populated if the sync failed at the first attempt. |
| Error Type | The error type encountered during the sync. |
| Last Processed Record Id | The record ID of the last successfully synced record of a historic sync. Useful for restarting historic syncs from the last successful record. Populated only for historical syncs. |
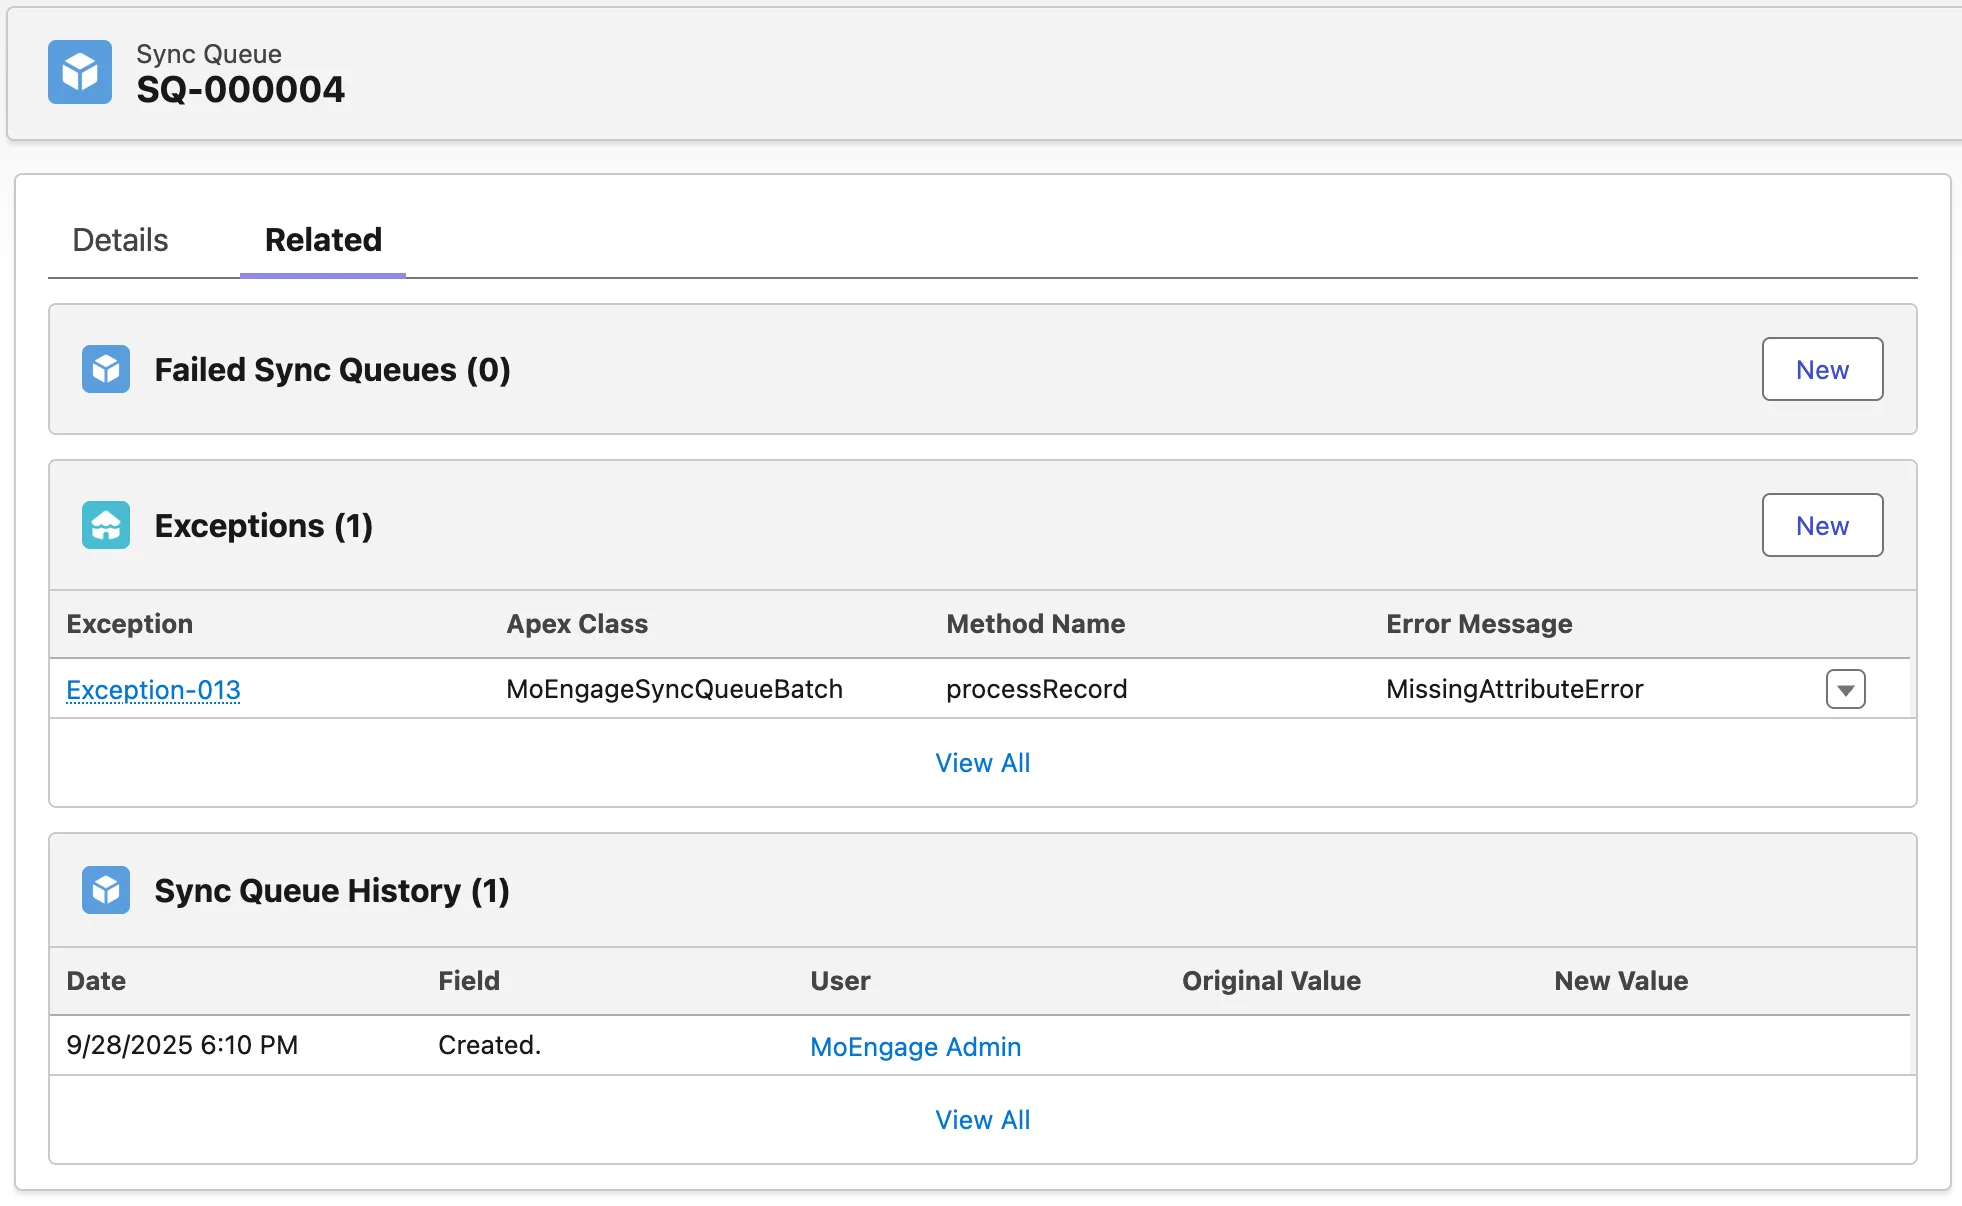
Failed sync queues
These are subsequent Sync Queue records created for records that have failed to previously sync and will be retried in the future.Exceptions
| Field name | Description |
|---|---|
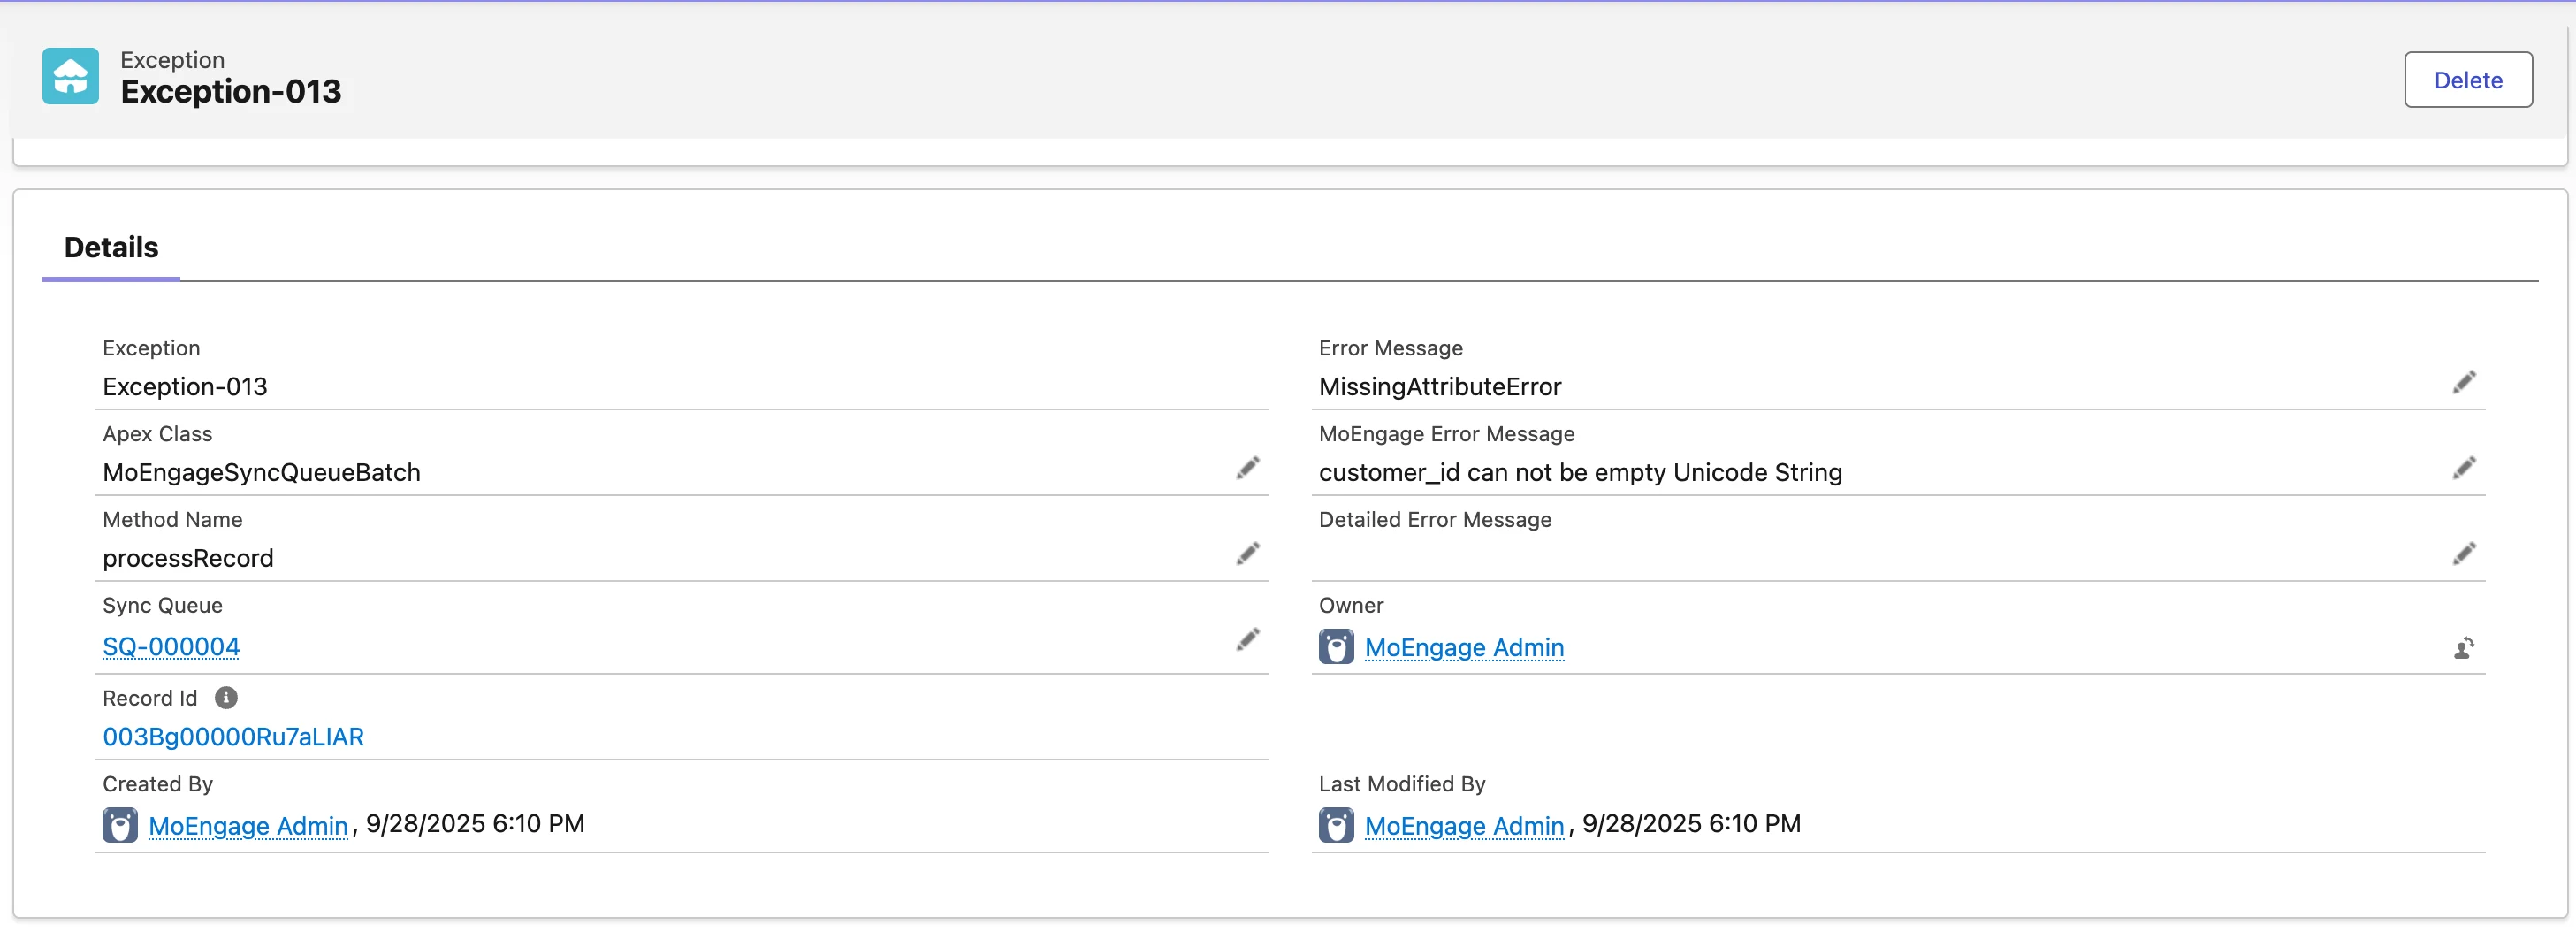
| Exception | The ID of this exception record. |
| Apex Class | Indicates which sync triggered the exception (Real-Time/Historical Sync to MoEngage, or from MoEngage to Salesforce via Streams). |
| Sync Queue | Links to the parent Sync Queue that processed this record. Populated only for syncs from Salesforce to MoEngage. |
| Record Id | The ID of the record (Contact, Lead, and so on) that failed to sync. Click the Record ID to navigate to the corresponding record in Salesforce. |
| Error Message | The error encountered with this exception. |
| MoEngage Error Message | The actual response from MoEngage for this exception. |
| Salesforce Error Message | The error triggered by Salesforce during inbound syncs (MoEngage to Salesforce). |
How real-time sync works
On create
- When a new record is created on an object with active mappings, MoEngage generates one Sync Queue record per active connection for that object.
- For example: if two connections map to Contact, then creating a single Contact record generates two Sync Queue records that are both sent to MoEngage.
On update
- A Sync Queue record is created only if at least one mapped field changes.
- Updates to non-mapped fields do not create Sync Queue records.
Processing
- When a real-time sync is triggered, MoEngage runs a
MoEngageSyncQueueBatchin the background, which picks up pending real-time syncs and processes them together. - The default batch size comes from Sync Queue Batch Size (default:
20). - New records added or updated while a batch is running are processed in the next iteration.
- If the Flex Queue is full, processing is rescheduled using Sync Queue Scheduler Time (default:
5minutes). - The “full” threshold is configurable via Flex Queue Limit (default:
50).
Historical syncs
- A historic sync is added to the Sync Queue as soon as it is scheduled.
- If the Salesforce Flex Queue is full, historical sync jobs are rescheduled after the delay set in Historical Sync Scheduler Time (default:
5minutes).
Processing
- If a few records of the historical sync fail, related exception records and Sync Queue records are created.
- For each historic sync, click on the Sync Queue record and view its failed records and related exceptions. You can also manually trigger a retry if an automatic retry is not possible.
Error handling
Certain errors cause the batch to abort and require different retry approaches:- Authentication Required → Batch aborts; requires manual retry.
- BlockedClient → Batch aborts; requires manual retry.
- Account Suspended → Batch aborts; requires manual retry.
- Unsupported Media Type → Batch aborts; requires manual retry.
- Server Error → Batch aborts but is automatically retried (within retry limits).
Retries
- Each queue item allows up to 4 automatic retry attempts (including the first attempt).
- No automatic retries occur for the following errors (these require user action):
- Account Suspended
- Authentication Required
- BlockedClient
- MissingAttributeError — occurs if the record does not have a value for Customer ID.
- If a payload error occurs, the batch size is halved on each retry until either:
- The batch succeeds, or
- The size reduces to 1.
Manual retry
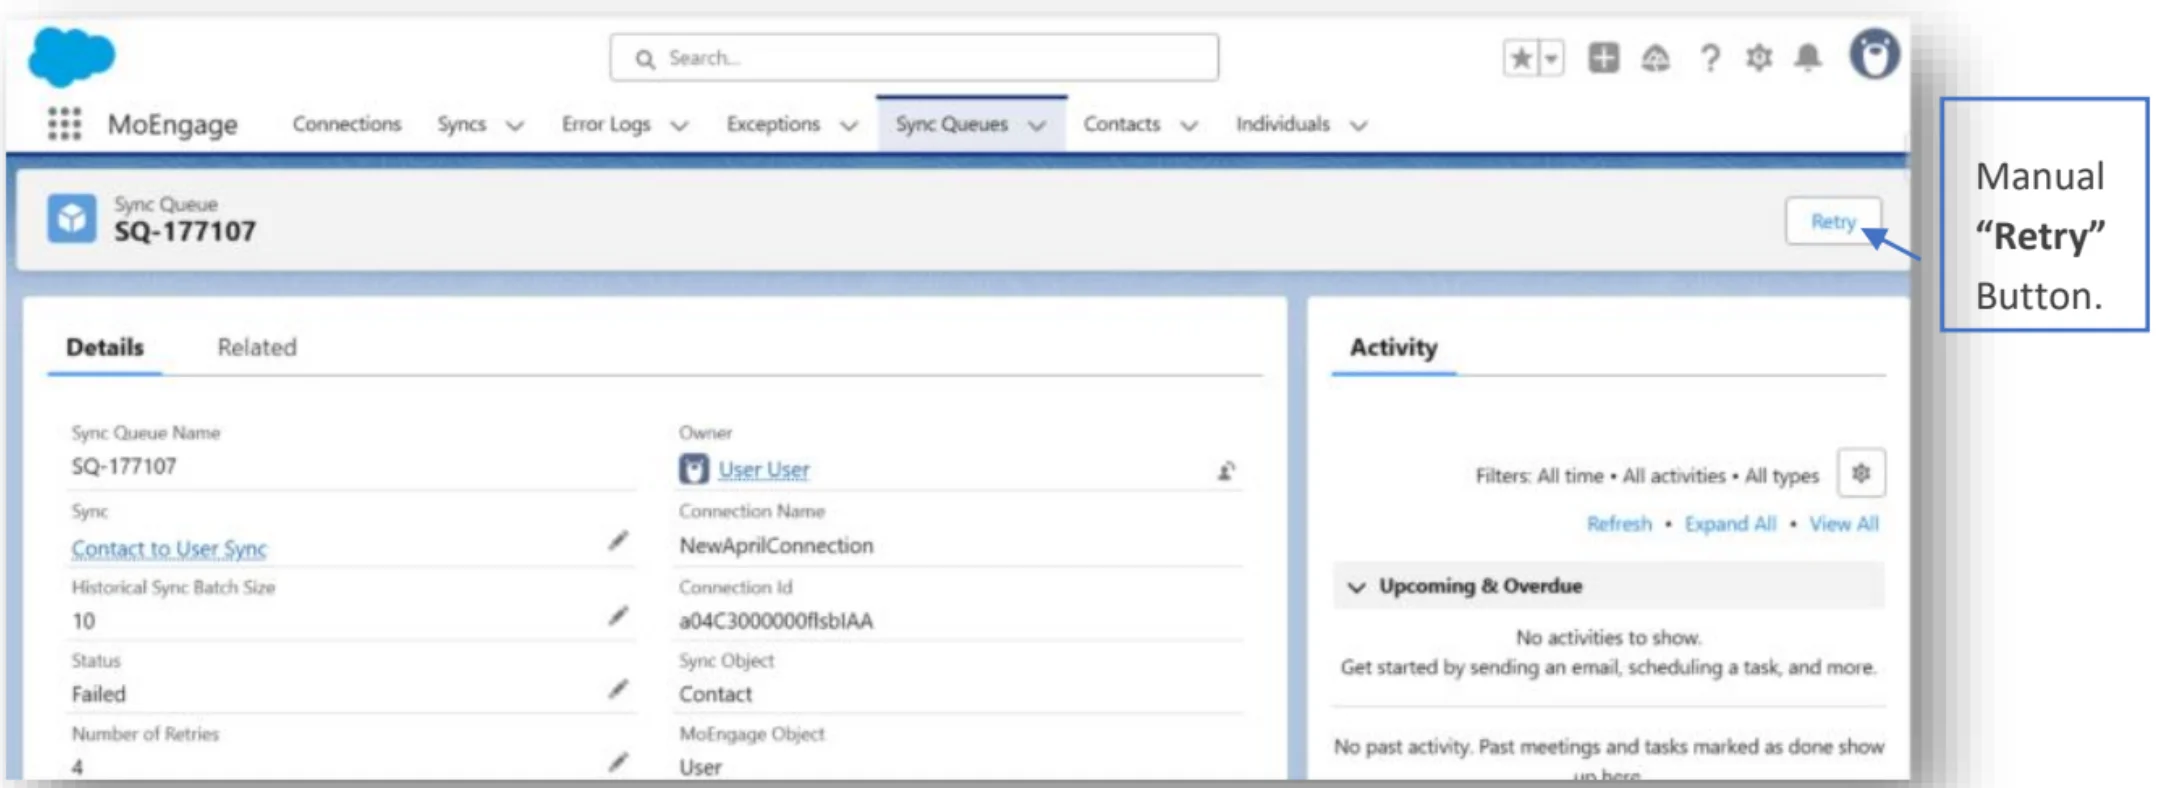
- Manual retry for real-time sync applies only to the current Sync Queue record.
- MoEngage returns a clear success or failure response.
- The Retry button is available only to users with the MoEngage Admin Permission set.
- The Manual Retry option becomes visible when all the following conditions are met:
- Condition A: Status = Failed or Partial Success, Retries ≥ 4, and Sync Status = Active.
- Condition B: Error Type is one of
Account Suspended,Authentication Required,BlockedClient, orMissingAttributeError.
Behavior
- Real-time sync:
- Attempts to sync immediately.
- Updates the record with success or failure.
- Increments the Retries count if it failed.
- Logs an exception if the retry fails.
- Manual retry for real-time syncs works only on the current Sync Queue record and returns a success or failure response.
- Historical sync:
- Schedules the historical batch job.
- Displays a Scheduled response to confirm the action.
Rate-limit behavior
Real-time sync behavior
- Processing for the affected connection or object is paused.
- Syncs automatically resume after the back-off sequence once limits clear.
Historical sync behavior
- The running batch is aborted immediately.
- Back-off retries follow the sequence: 1 → 2 → 4 → 8 → 10 minutes.
- Any new historical syncs for the same connection or object remain in the Scheduled state.
- The retry count for historical syncs is automatically reset to 0 once the configured limits are cleared.
Delete processed syncs
Scheduling
- On install or upgrade, MoEngage automatically schedules the Delete Processed Syncs job to run daily at 1:00 AM.
- You can adjust this schedule under Setup > Scheduled Jobs.
What it does
- Deletes successful Sync Queue records (and their related failed queues and exceptions) that are older than the Record Deletion Interval (default:
7days). - Cleanup is based on the Last Modified Date field.
Admin note: Package install limitation
- If the packaging user does not have full access to run the schedule under the desired context, the job may fail to execute properly.
- Solution: Reschedule the job under an admin user to ensure it runs with proper privileges.
Steps to reschedule the delete job
Steps to reschedule the delete job
From your Salesforce dashboard:
Update the cron expression (optional)
Update the cron expression if needed.
You can change the default values for your Salesforce organization by configuring them in Custom Settings.
Frequently asked questions
Can I apply filters on my data sync?
Can I apply filters on my data sync?
No. Currently, it is not possible to add filters on the data sync. Historical syncs pull in all the records from your Salesforce org. Real-time syncs include all new creates and updates.
How do I enable real-time syncs?
How do I enable real-time syncs?
Real-time syncs are enabled by default as long as your sync is marked Active. To turn off real-time sync, deactivate the sync for that object.
Integration
Prerequisites
- Follow the steps in Set up MoEngage app on Salesforce to install and configure the MoEngage app from the Salesforce AppExchange.
Scope
| Context | Support status |
|---|---|
| Sync standard Salesforce entities (Contacts, Leads, Accounts, Opportunities, and so on) to MoEngage as users or events | Supported |
| Sync custom Salesforce objects to MoEngage as users or events | Supported |
| Support for all standard Salesforce field types (string, datetime, numeric, formula, object types such as the Salesforce standard geo-location field) | Supported |
| Send historical data sync to MoEngage | Supported |
| Real-time data sync on new record creation or record updates | Supported |
| Create new attributes on MoEngage while setting up the data sync | Supported |
| Sync linked entities (relationships between entities) to MoEngage | Not supported (only the IDs of linked fields are synced; the full linked object is not synced) |
Steps
The integration is divided into two major steps:- Connections: A Connection is the authorization to your MoEngage workspace. You can connect multiple MoEngage workspaces to a single Salesforce instance.
- Syncs: A Sync is a job that runs in real time to send specific data between the two systems. It includes the sync type (MoEngage to Salesforce or Salesforce to MoEngage), the entities to sync, and the data mapping.
Launch the MoEngage app
Click App Launcher, enter MoEngage, and then select MoEngage App.Step 1: Set up a connection
Enter your MoEngage workspace details
Provide the workspace details.
| Field name | Value |
|---|---|
| Connection Name | Any name for your connection (for example, MoEngage Prod or MoEngage Workspace). |
| Workspace ID | The Workspace ID of your MoEngage account, available at Settings > Account > APIs > Workspace ID. |
| Data Key | The Data API Key of your MoEngage account, available at Settings > Account > APIs > Data Key. |
| MoEngage Data Center | Your MoEngage data center. Read more. |
Step 2: Set up a sync
For this guide, we use the example of syncing Salesforce Contacts to MoEngage as users. Follow a similar process for event syncs.Sync Salesforce Contacts to MoEngage as users
Configure data mapping
Configure the data mapping between the two systems:
- Define the identifier between the two systems. For MoEngage, the identifier name is Customer ID — it can be mapped to any field on the Contact object.
- Set up mappings for other fields. Enter the MoEngage attribute (these appear as user attributes in MoEngage) and select the Salesforce field to map it to.
- Click Save.
If you are setting up a sync for a Salesforce object for the first time, the system asks you to deploy the trigger on Salesforce. Click Deploy to continue.
Errors when deploying triggers
If your initial trigger deployment fails, it is often due to custom validation rules on the Salesforce object you are syncing (for example, rules on the Contact or Lead object). To deploy successfully, the system needs to create a test record, and that test record must pass your organization’s validation rules. When the deployment fails, a modal appears asking you to provide test data:Analyze the snippet
The system pre-populates a code snippet with the minimum required fields for that Salesforce object.
LastName and the correct format of Email, modify the sample line to:
Formula fields
- Salesforce does not detect underlying data changes for mapped formula fields.
- A change only in the formula’s calculated output does not trigger a sync.
Compound fields
- Do not map compound address or location fields (for example,
MailingAddress) directly. - Instead, map their individual components:
MailingStreetMailingCityMailingStateMailingPostalCodeMailingCountry
- This ensures accurate syncing with the corresponding MoEngage attributes.
Step 3: View profiles in MoEngage
Sync real-time updates
By default, new sync configurations are automatically enabled for real-time updates. Any modification to a mapped field on an existing record within the synced Salesforce object triggers an update to MoEngage. To deactivate real-time syncs, click Deactivate next to the sync.Field change detection
- Real-time sync is triggered when a mapped object record is created or when an existing record has at least one mapped field changed.
- Updates to unmapped fields alone do not trigger a sync to MoEngage.
Sync historical data
You can trigger a historic sync of your existing data at any point. This is useful when you want to backfill data in MoEngage.Performing a historic sync
Adjust the batch size (optional)
You can change the batch size depending on your Salesforce settings.
Monitoring the historic sync
After starting a historic sync, track its progress by observing the status displayed next to the sync configuration.| Status | Description |
|---|---|
| Sync | A historic sync has not yet been performed for this object. The default state before the first sync. |
| Sync Scheduled | The sync has started and is in the queue waiting to be processed by Salesforce. |
| Sync Processing | The sync has started and data is actively being sent to MoEngage. |
| Sync Successful | The process is complete and all records were successfully sent. MoEngage will now process this data. |
| Sync Partial Success | The process is complete, but some records failed to send. Check the error logs for details. |
| Sync Failed | The process is complete, but no records were sent to MoEngage due to a critical error. |
| Field name | Description |
|---|---|
| Last Sync Date Time | The time at which the last historic sync was added. |
| Last Historic Sync Apex Batch Job ID | The Batch Job ID of the Salesforce Apex job. Use this ID to view the real-time progress of how many batches were processed in the last historic sync. |
| Last Historic Sync Batch Raw Job ID | The full Job ID of the Salesforce Apex job generated internally. |
| Last Historic Sync Queue ID | The Sync Queue ID of this historic sync. |
| Last Historic Sync Queue Record | A link to the Sync Queue record for the last historic sync. View related exceptions, failed records, and the overall progress of this sync in detail. |
| Last Historic Sync Status | The status of the most recent sync attempt for this configuration. Transitions: Scheduled → Processing → Successful / Failed / Partial Success. |
Check the Salesforce Apex Flex Queue
Open your Salesforce Apex Flex Queue and ensure the historic sync is not in the Holding state. Search for the Apex class
HistoricalSyncBatch. If you find it in this state, you can reorder the batch to prioritize MoEngage.Verify the batch has started
If your Flex Queue is empty or has no records from the
HistoricalSyncBatch Apex class, the batch has started processing.Check the Apex Jobs Queue
Open the Apex Jobs Queue and find the record submitted by the
HistoricalSyncBatch Apex class. You can also search using the Last Historic Sync Apex Batch Job ID of the related sync.| Column name | Description |
|---|---|
| Status | Status of the historic sync. Processing means the sync is in progress. Completed means all records have been sent to MoEngage for processing. This does not guarantee full delivery — MoEngage can still reject records based on various factors. |
| Batches Processed | The number of batches sent to MoEngage. If this is less than Total Batches, the sync is in progress. |
| Failures | The number of batches that have failed to be sent to MoEngage. |
| Apex Class | Ensure that this is HistoricalSyncBatch. |
Important points to remember
- One sync per entity type: You can only run one historic sync at a time per MoEngage entity type (one for Users and one for Events).
- Example: Suppose Salesforce Contacts and Leads are both mapped to MoEngage Users, while Salesforce Opportunities and Deals are mapped to MoEngage Events. If you start a sync for Contacts (a User sync), you cannot start another sync for Leads until the first one completes. However, while the Contacts sync is running, you can still start a sync for Opportunities or Deals because they are mapped to a different entity (Events).
- Manual refresh required: The sync status does not update automatically. Click the Refresh icon or manually refresh the page to see the latest status.
- Status of last sync: The status shown always reflects the outcome of the most recent sync attempt for that specific configuration.
- New sync start: You can start a new historic sync only when the status of the most recent sync for that specific configuration is not Sync Scheduled or Sync Processing.
Sync queues
To ensure your data syncs reliably and efficiently, the MoEngage app processes all transfers through an intelligent Sync Queue. This system automatically optimizes performance, minimizes errors, and uses smart logic to retry failed attempts. Every sync (historic or real-time) is managed through this queue. Visit the Sync Queue to monitor the status of all your jobs — from scheduled and active to completed. By default, Sync Queue includes two views: Real Time Syncs and Historical Syncs.Activating Sync Queue views
Activating Sync Queue views
We recommend activating these views to manage your Sync Queue easily. From your Salesforce dashboard:
| Field name | Description |
|---|---|
| Sync | The name of your sync mapping (for example, Leads to MoE Users). |
| Historical Sync Batch Size | The number of records sent to MoEngage per batch. Populated only for historical syncs. |
| Status | The current status of your sync. |
| Number of retries | The number of times Salesforce tried to sync this batch or record. |
| Record Type | The type of sync this was initiated from: Historical Sync or Real-Time Sync. |
| Sync Status | The last known status of the sync configuration. If disabled from the Syncs page, all further syncs will not be processed. |
| Parent Sync Queue | Which sync this record belongs to. Often populated if the sync failed at the first attempt. |
| Error Type | The error type encountered during the sync. |
| Last Processed Record Id | The record ID of the last successfully synced record of a historic sync. Useful for restarting historic syncs from the last successful record. Populated only for historical syncs. |
Failed sync queues
These are subsequent Sync Queue records created for records that have failed to previously sync and will be retried in the future.Exceptions
| Field name | Description |
|---|---|
| Exception | The ID of this exception record. |
| Apex Class | Indicates which sync triggered the exception (Real-Time/Historical Sync to MoEngage, or from MoEngage to Salesforce via Streams). |
| Sync Queue | Links to the parent Sync Queue that processed this record. Populated only for syncs from Salesforce to MoEngage. |
| Record Id | The ID of the record (Contact, Lead, and so on) that failed to sync. Click the Record ID to navigate to the corresponding record in Salesforce. |
| Error Message | The error encountered with this exception. |
| MoEngage Error Message | The actual response from MoEngage for this exception. |
| Salesforce Error Message | The error triggered by Salesforce during inbound syncs (MoEngage to Salesforce). |
How real-time sync works
On create
- When a new record is created on an object with active mappings, MoEngage generates one Sync Queue record per active connection for that object.
- For example: if two connections map to Contact, then creating a single Contact record generates two Sync Queue records that are both sent to MoEngage.
On update
- A Sync Queue record is created only if at least one mapped field changes.
- Updates to non-mapped fields do not create Sync Queue records.
Processing
- When a real-time sync is triggered, MoEngage runs a
MoEngageSyncQueueBatchin the background, which picks up pending real-time syncs and processes them together. - The default batch size comes from Sync Queue Batch Size (default:
20). - New records added or updated while a batch is running are processed in the next iteration.
- If the Flex Queue is full, processing is rescheduled using Sync Queue Scheduler Time (default:
5minutes). - The “full” threshold is configurable via Flex Queue Limit (default:
50).
Historical syncs
- A historic sync is added to the Sync Queue as soon as it is scheduled.
- If the Salesforce Flex Queue is full, historical sync jobs are rescheduled after the delay set in Historical Sync Scheduler Time (default:
5minutes).
Processing
- If a few records of the historical sync fail, related exception records and Sync Queue records are created.
- For each historic sync, click on the Sync Queue record and view its failed records and related exceptions. You can also manually trigger a retry if an automatic retry is not possible.
Error handling
Certain errors cause the batch to abort and require different retry approaches:- Authentication Required → Batch aborts; requires manual retry.
- BlockedClient → Batch aborts; requires manual retry.
- Account Suspended → Batch aborts; requires manual retry.
- Unsupported Media Type → Batch aborts; requires manual retry.
- Server Error → Batch aborts but is automatically retried (within retry limits).
Retries
- Each queue item allows up to 4 automatic retry attempts (including the first attempt).
- No automatic retries occur for the following errors (these require user action):
- Account Suspended
- Authentication Required
- BlockedClient
- MissingAttributeError — occurs if the record does not have a value for Customer ID.
- If a payload error occurs, the batch size is halved on each retry until either:
- The batch succeeds, or
- The size reduces to 1.
Manual retry
- Manual retry for real-time sync applies only to the current Sync Queue record.
- MoEngage returns a clear success or failure response.
- The Retry button is available only to users with the MoEngage Admin Permission set.
- The Manual Retry option becomes visible when all the following conditions are met:
- Condition A: Status = Failed or Partial Success, Retries ≥ 4, and Sync Status = Active.
- Condition B: Error Type is one of
Account Suspended,Authentication Required,BlockedClient, orMissingAttributeError.
Behavior
- Real-time sync:
- Attempts to sync immediately.
- Updates the record with success or failure.
- Increments the Retries count if it failed.
- Logs an exception if the retry fails.
- Manual retry for real-time syncs works only on the current Sync Queue record and returns a success or failure response.
- Historical sync:
- Schedules the historical batch job.
- Displays a Scheduled response to confirm the action.
Rate-limit behavior
Real-time sync behavior
- Processing for the affected connection or object is paused.
- Syncs automatically resume after the back-off sequence once limits clear.
Historical sync behavior
- The running batch is aborted immediately.
- Back-off retries follow the sequence: 1 → 2 → 4 → 8 → 10 minutes.
- Any new historical syncs for the same connection or object remain in the Scheduled state.
- The retry count for historical syncs is automatically reset to 0 once the configured limits are cleared.
Delete processed syncs
Scheduling
- On install or upgrade, MoEngage automatically schedules the Delete Processed Syncs job to run daily at 1:00 AM.
- You can adjust this schedule under Setup > Scheduled Jobs.
What it does
- Deletes successful Sync Queue records (and their related failed queues and exceptions) that are older than the Record Deletion Interval (default:
7days). - Cleanup is based on the Last Modified Date field.
Admin note: Package install limitation
- If the packaging user does not have full access to run the schedule under the desired context, the job may fail to execute properly.
- Solution: Reschedule the job under an admin user to ensure it runs with proper privileges.
Steps to reschedule the delete job
Steps to reschedule the delete job
From your Salesforce dashboard:
Update the cron expression (optional)
Update the cron expression if needed.
You can change the default values for your Salesforce organization by configuring them in Custom Settings.
Frequently asked questions
Can I apply filters on my data sync?
Can I apply filters on my data sync?
No. Currently, it is not possible to add filters on the data sync. Historical syncs pull in all the records from your Salesforce org. Real-time syncs include all new creates and updates.
How do I enable real-time syncs?
How do I enable real-time syncs?
Real-time syncs are enabled by default as long as your sync is marked Active. To turn off real-time sync, deactivate the sync for that object.