

Overview
Auxiliary Data lets you import supplementary user information that is only relevant for a specific timeframe and does not need permanent storage, for example, limited-time offers and discounts, weekly contest points, or externally generated recommendations. You import it via file, use it to personalize campaigns for its lifetime, and let it expire automatically.To enable Auxiliary Data for your account, contact your MoEngage Customer Success Manager (CSM) or the MoEngage Support team.
- Primary-key mapping only: You select one column as the primary key. Every other column passes through automatically; there is no per-column mapping.
- All values are stored as String: Auxiliary Data is force-typecast to the String datatype. Object, JSON, and Array types are not supported.
- Configurable expiry: Each import has a retention period, after which the data expires.
Auxiliary Data is available for file-based sources only (S3, SFTP, and CSV). It is not available for data warehouse imports.
Use Cases
Auxiliary Data supports the following use cases:- Dynamic personalization: Upload coupon details, transaction data, survey data, or contest data to tailor communication.
- Targeted engagement: Upload customer segments via file without storing them as permanent primary data.
- Auto-refresh recurring campaigns: Periodically upload changing campaign content for automatic triggering.
- Custom recommendations: Upload recommendations from in-house or external engines.
- Legacy data integration: Ingest data from legacy platforms without complex integrations.
Supported Sources
Auxiliary Data can be imported via S3, SFTP, and CSV (manual upload). For file preparation, see Naming Conventions below.Import Auxiliary Data
Entry point: Data > Data Imports > Import > Auxiliary Data. Select your source (S3, SFTP, or CSV) and click Continue.MoEngage keeps historical logs of Auxiliary CSV files imported in the last 60 days. Files uploaded earlier no longer appear in the import logs, but their data is retained for the configured retention period.
Step 1: Configure Source and Format
Enter an Import name, then provide your source details:- S3
- SFTP
- CSV
For more information, see Set Up a File Import.
Set up PGP encryption
Set up PGP encryption
PGP (Pretty Good Privacy) lets you encrypt sensitive files before importing them. MoEngage supports PGP encryption for S3 and SFTP file imports.Prerequisites:Step 2. Encrypt the file. Encrypt the file with your public key, then upload it to your S3 or SFTP folder. The Step 3. Add the keys in the MoEngage UI. Enter your private key in the Decryption Key field and your passphrase in the Key Passphrase field during import setup.Step 4. Decrypt a file. Decryption requires your private key and its passphrase. In your PGP software, select the encrypted file and enter your passphrase to produce the unencrypted file. Python users can use the python-gnupg package:Step 5. Verify the file’s signature (optional). If you signed the file, add the public signing key on the MoEngage dashboard. MoEngage verifies the signature on the file in your S3 or SFTP folder. When verifying programmatically, a matched signature populates
- PGP key pair: A public key (to encrypt the file) and a private key (to decrypt it). Never share the private key.
- Signing key pair: A public key (to sign the file, required for MoEngage SFTP integration) and a private key (used internally to verify the signature).
gpg --full-generate-key), selecting RSA and a 1024-bit key size.- MoEngage supports file encryption using RSA keys of up to 1024 bits in length. Larger RSA keys, such as 4096-bit, are not supported and fail during decryption. Generate your key pair with a smaller RSA key size.
- Turn off compression during encryption.
--sign option signs the file while encrypting it.status.signature_id:_. The prefix should use letters, numerals, and underscores. The default prefix is aux_data_, for example, aux_data_20220131.csv. Enter the prefix and time format, click Fetch Files, select a file to preview its top 5 rows, then click Next.
- File names must follow the Naming Conventions.
- Column names must not contain spaces.
Step 2: Map Your Data to MoEngage Attributes
Select the column that contains a unique value in each row as the Primary key from the dropdown. Every other column passes through automatically.MoEngage captures the column schema when you create the import, based on the selected file. Subsequent periodic runs ingest only these columns and do not re-read the file’s structure. Any column added to the file after the import is created is ignored. To use new columns, create a new Auxiliary Data import.
Step 3: Import Schedule and Frequency
Choose when and how often the import runs:- One Time: Run as soon as possible, or at a fixed timezone, start date, and send time.
- Periodic: Run on a recurring schedule. Set the timezone, start date, and send time, then choose the periodicity:
Data Action (Retention/Expiry)
Set the Aux data expiry, the retention period after which the data expires. Available values: 1, 2, 7, 15, 30 days, 2 months, 3 months, … up to 1 year, and Infinite retention.- One Time: Choose any retention period.
- Periodic: Set the retention period longer than the import periodicity. For example, with a daily import and a 30-day retention, data imported on day 1 has 29 days of retention left when day 2’s data arrives.
Auxiliary Data is available for Email, SMS, Push, WhatsApp, In-App, Cards, Connectors, and Web Personalization.
Actions on an Auxiliary Data Import
From the Actions icon at the end of an import’s row:- View Details: See past imports, scheduled date and time, file name, status, and successful/failed upload counts.
- Edit: Edit all fields except the import and segment names.
- Duplicate: Duplicate the import.
File Preparation
Prepare your files to meet the following requirements:- File type: CSV. Column names must not contain spaces.
- Naming:
<prefix>_<date time format>.csv, default prefixaux_data_. For supported date-time formats, see Supported Datetime Formats.
Limits
Auxiliary Data imports have the following limits:- File size: Auxiliary Data follows the file-size limit of its source, less than 500 MB per file for S3/SFTP, and less than 150 MB per CSV for manual upload.
- Rows: A single file supports up to your hourly row limit. Files exceeding your hourly row limit are rejected.
To see how much of your hourly and daily import limit you have used, which imports are held back when a limit is reached, and which imports are consuming the most, refer to Check Import Limits.
Import Failure Policy
A failed run is retried automatically up to a maximum retry count. After the last retry, MoEngage marks the run FAILED, and it requires a manual re-trigger. The schedule itself continues independently, so a failed run does not block future scheduled runs.Next Steps
After your import succeeds, use the data to personalize your campaigns:- Personalize Email Campaigns with Auxiliary Data
- Personalize SMS Campaigns with Auxiliary Data
- Personalize Push Campaigns with Auxiliary Data
Run History
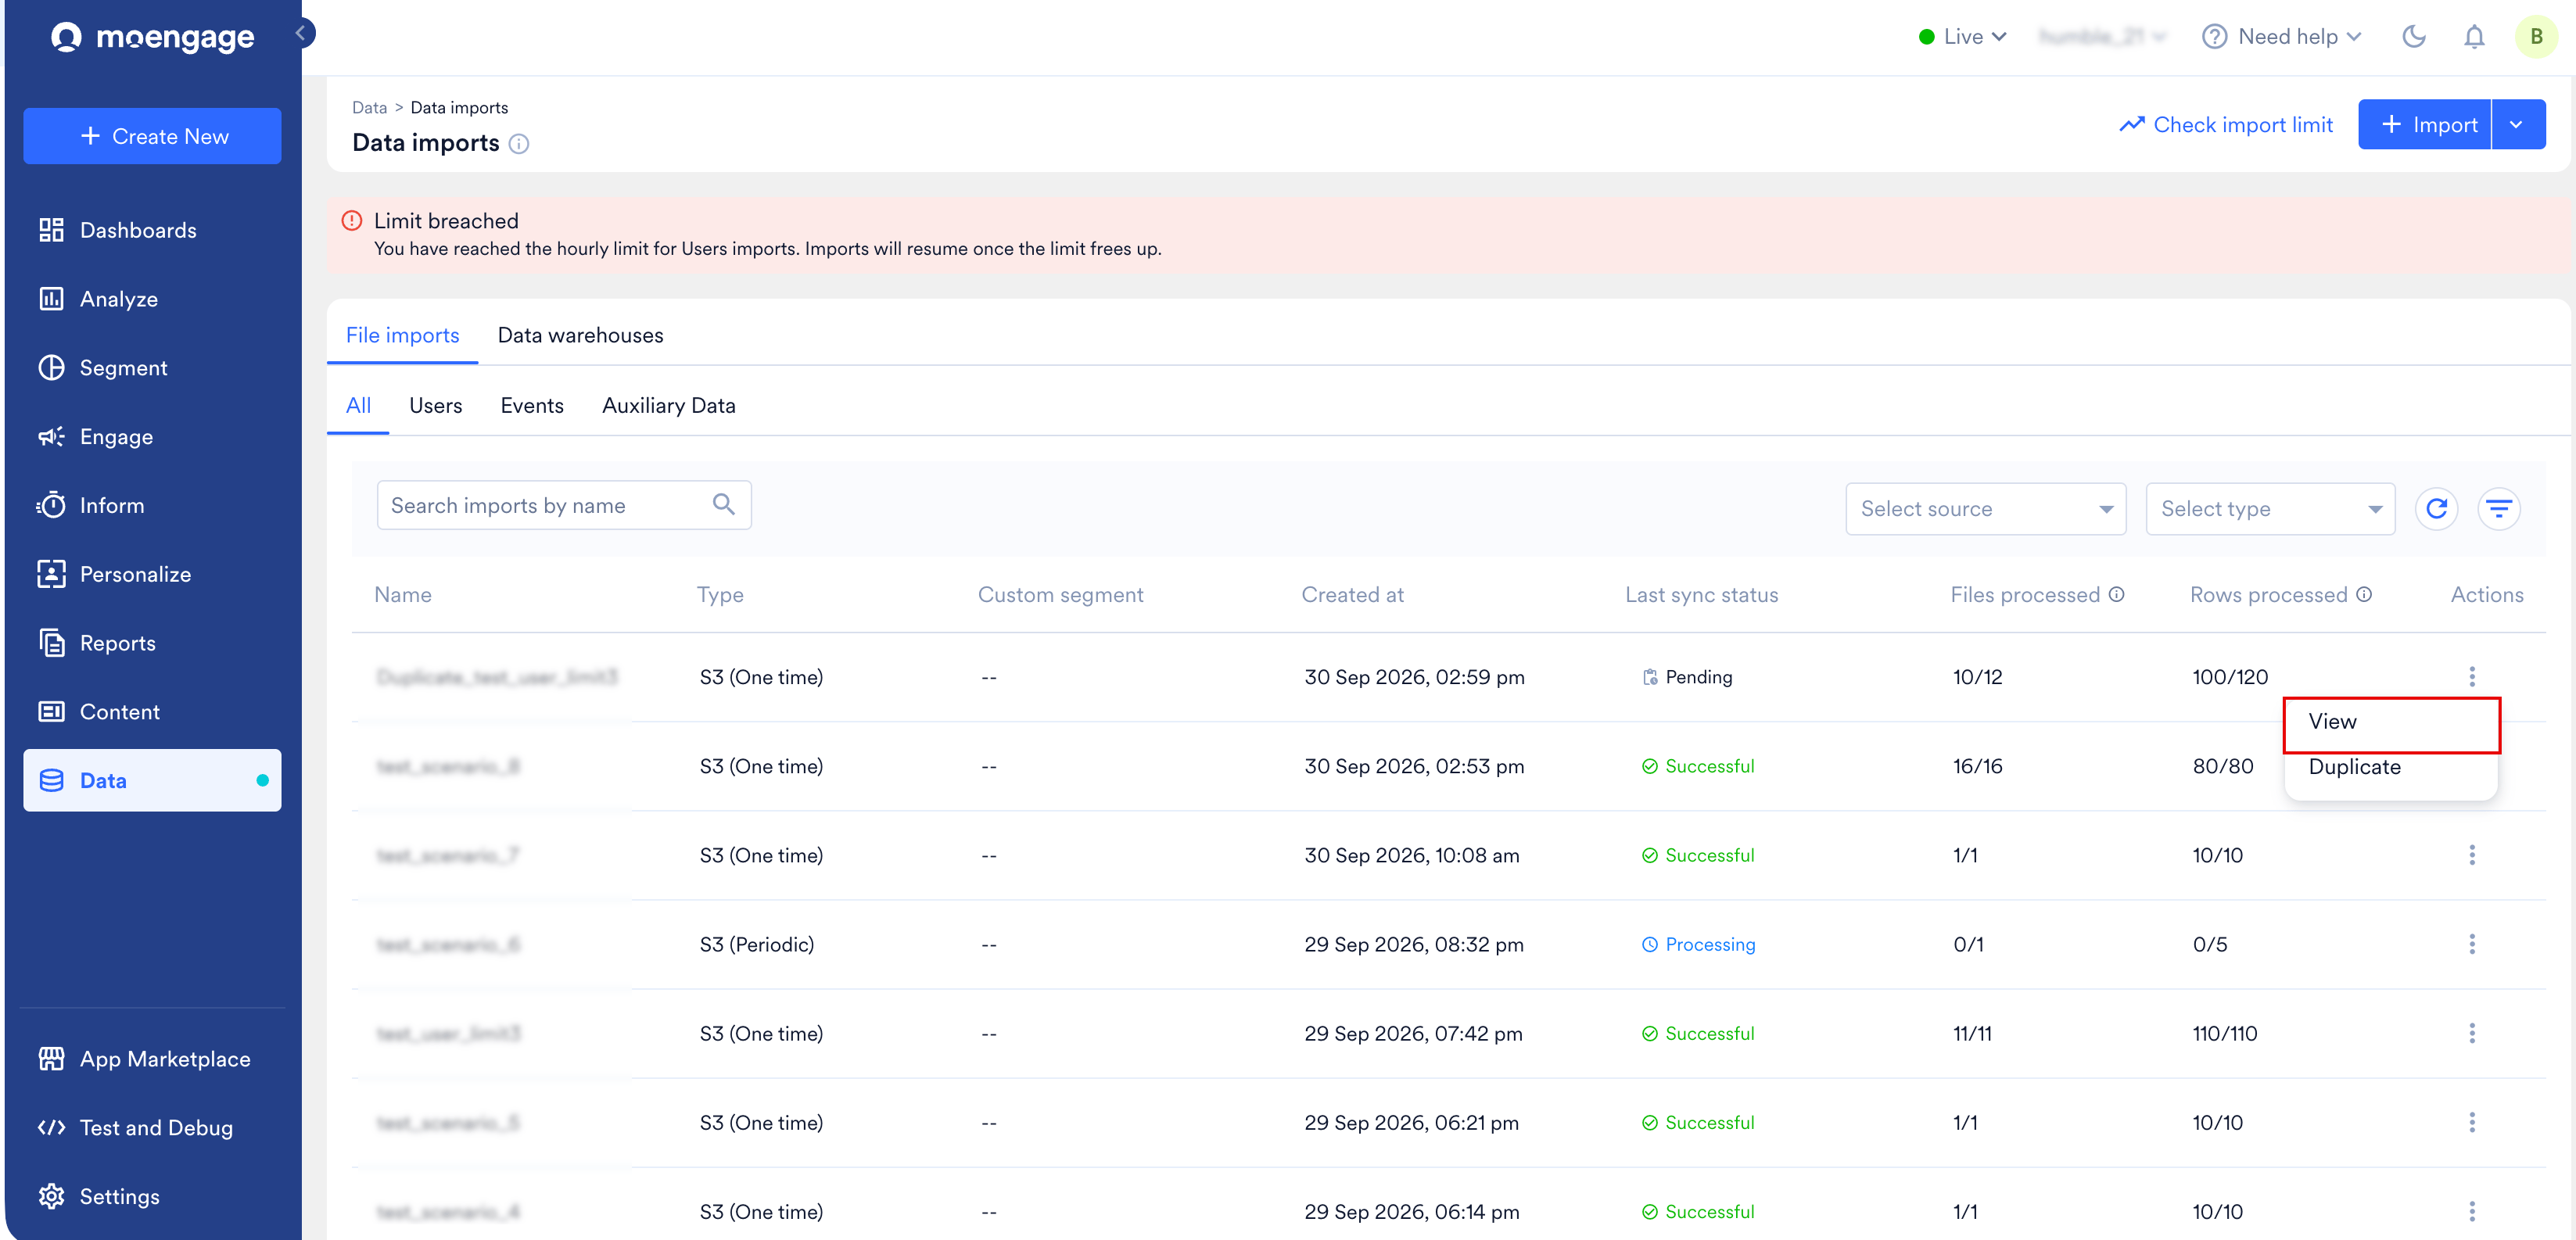
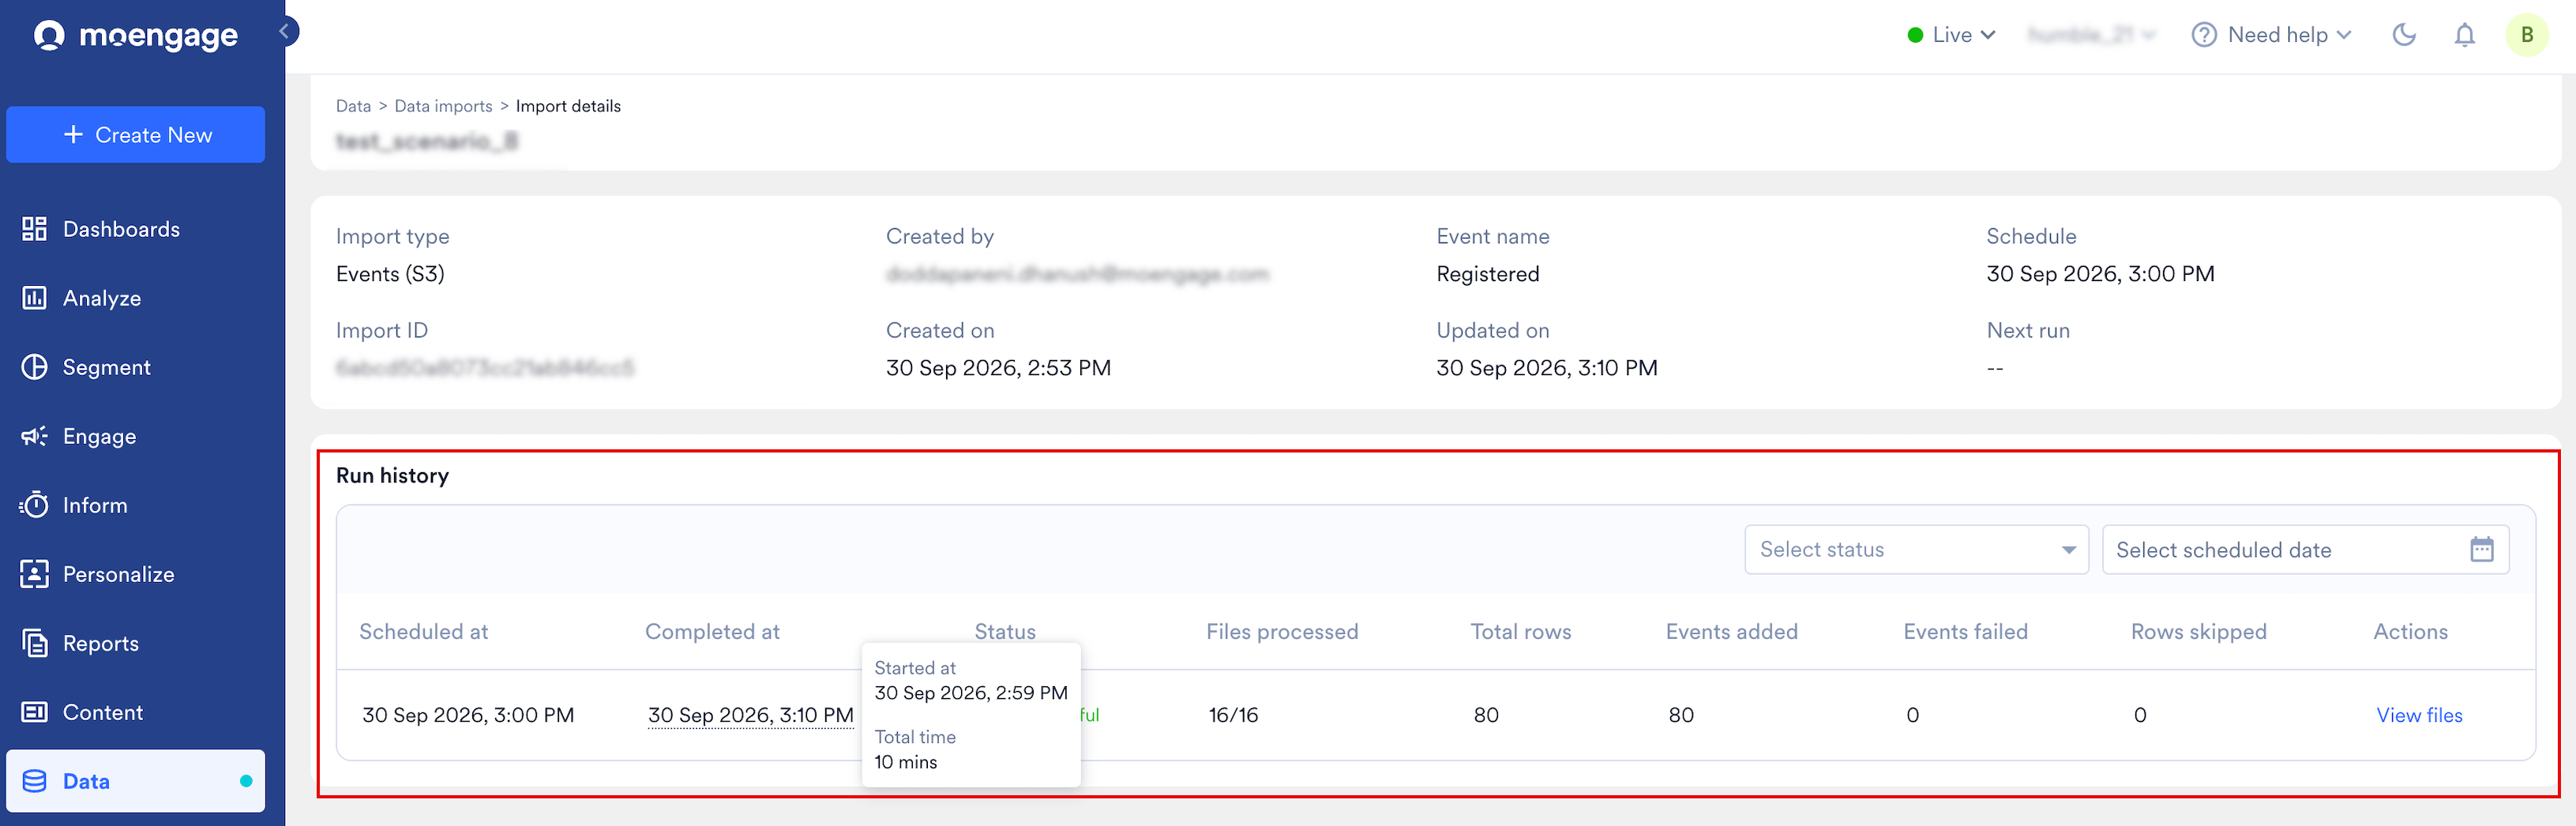
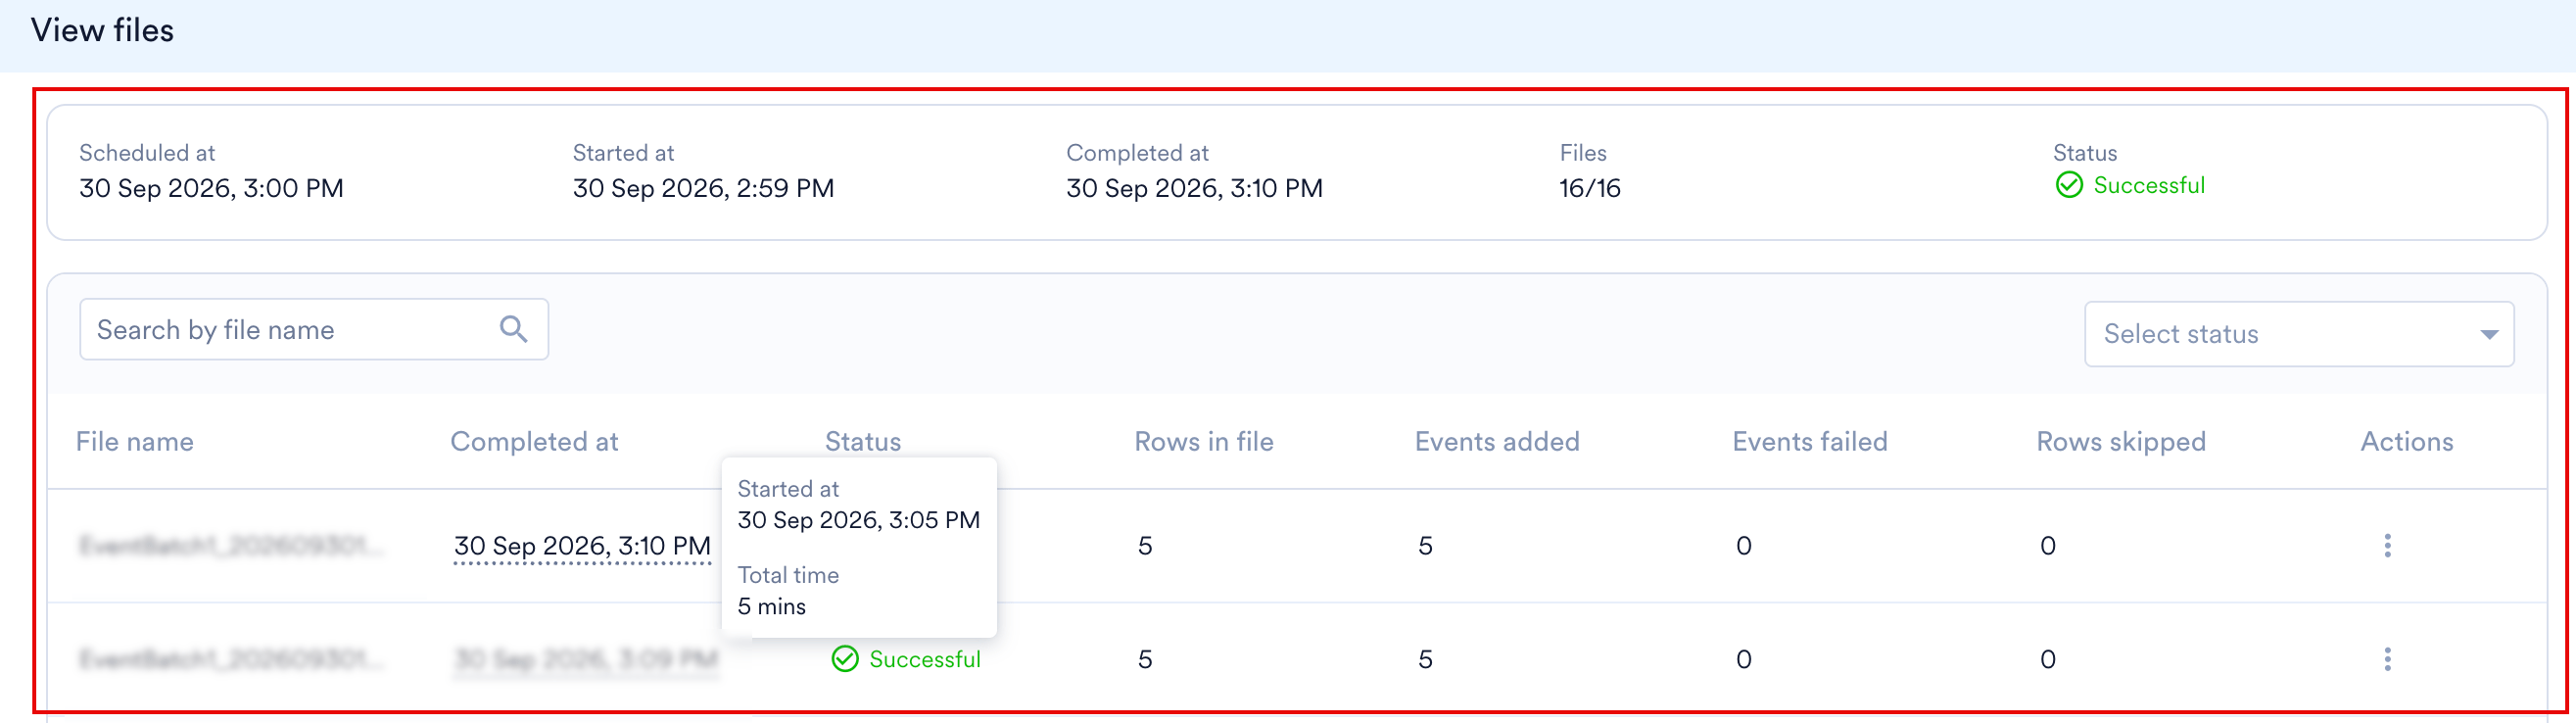
Run history on the import details page lists every run of an import, so you can see when each run was scheduled, when it finished, how long it took, and how each file inside it performed. A one-time import has a single row. A periodic import has one row for each scheduled execution. Run history shows the last two months of runs. To open Run history, perform the following steps:- On the Data imports page, click the kebab menu under Actions for the import.
- Click View.
Manage Your Imports
To monitor your imports, understand import statuses, or trigger a run manually or via API, see How Imports Work on the Imports Overview.Frequently Asked Questions
My imports have failed. How do I check what went wrong?
My imports have failed. How do I check what went wrong?
Click the ellipsis on the right and click View to look up the Import details. Hover over the Failed Status to learn the reason.
What if a scheduled import adds the data into a recently archived segment?
What if a scheduled import adds the data into a recently archived segment?
In such cases, the new data will still be added to the archived segment. You can unarchive the segment as required.
Can an import be stopped while it's running?
Can an import be stopped while it's running?
Once an import process starts, it can’t be stopped midway. This is because the data goes through several steps, and interrupting it could lead to incomplete or inconsistent results. It’s best to let the current import finish.
How can I stop future runs of a scheduled import?
How can I stop future runs of a scheduled import?
Yes, you can stop future scheduled imports from running automatically. To do this, find the import schedule and select the Archive option from the Actions menu on the Data Imports dashboard. This will prevent it from running on its next scheduled time.
What should I do if an import seems stuck or is taking a long time?
What should I do if an import seems stuck or is taking a long time?
If an import appears to be stuck or is taking longer than usual, it’s best to wait. The system has checks in place to handle these situations automatically and retry if necessary. Manually starting the same import again while it’s still processing can cause conflicts and may prevent the original import from completing successfully.