

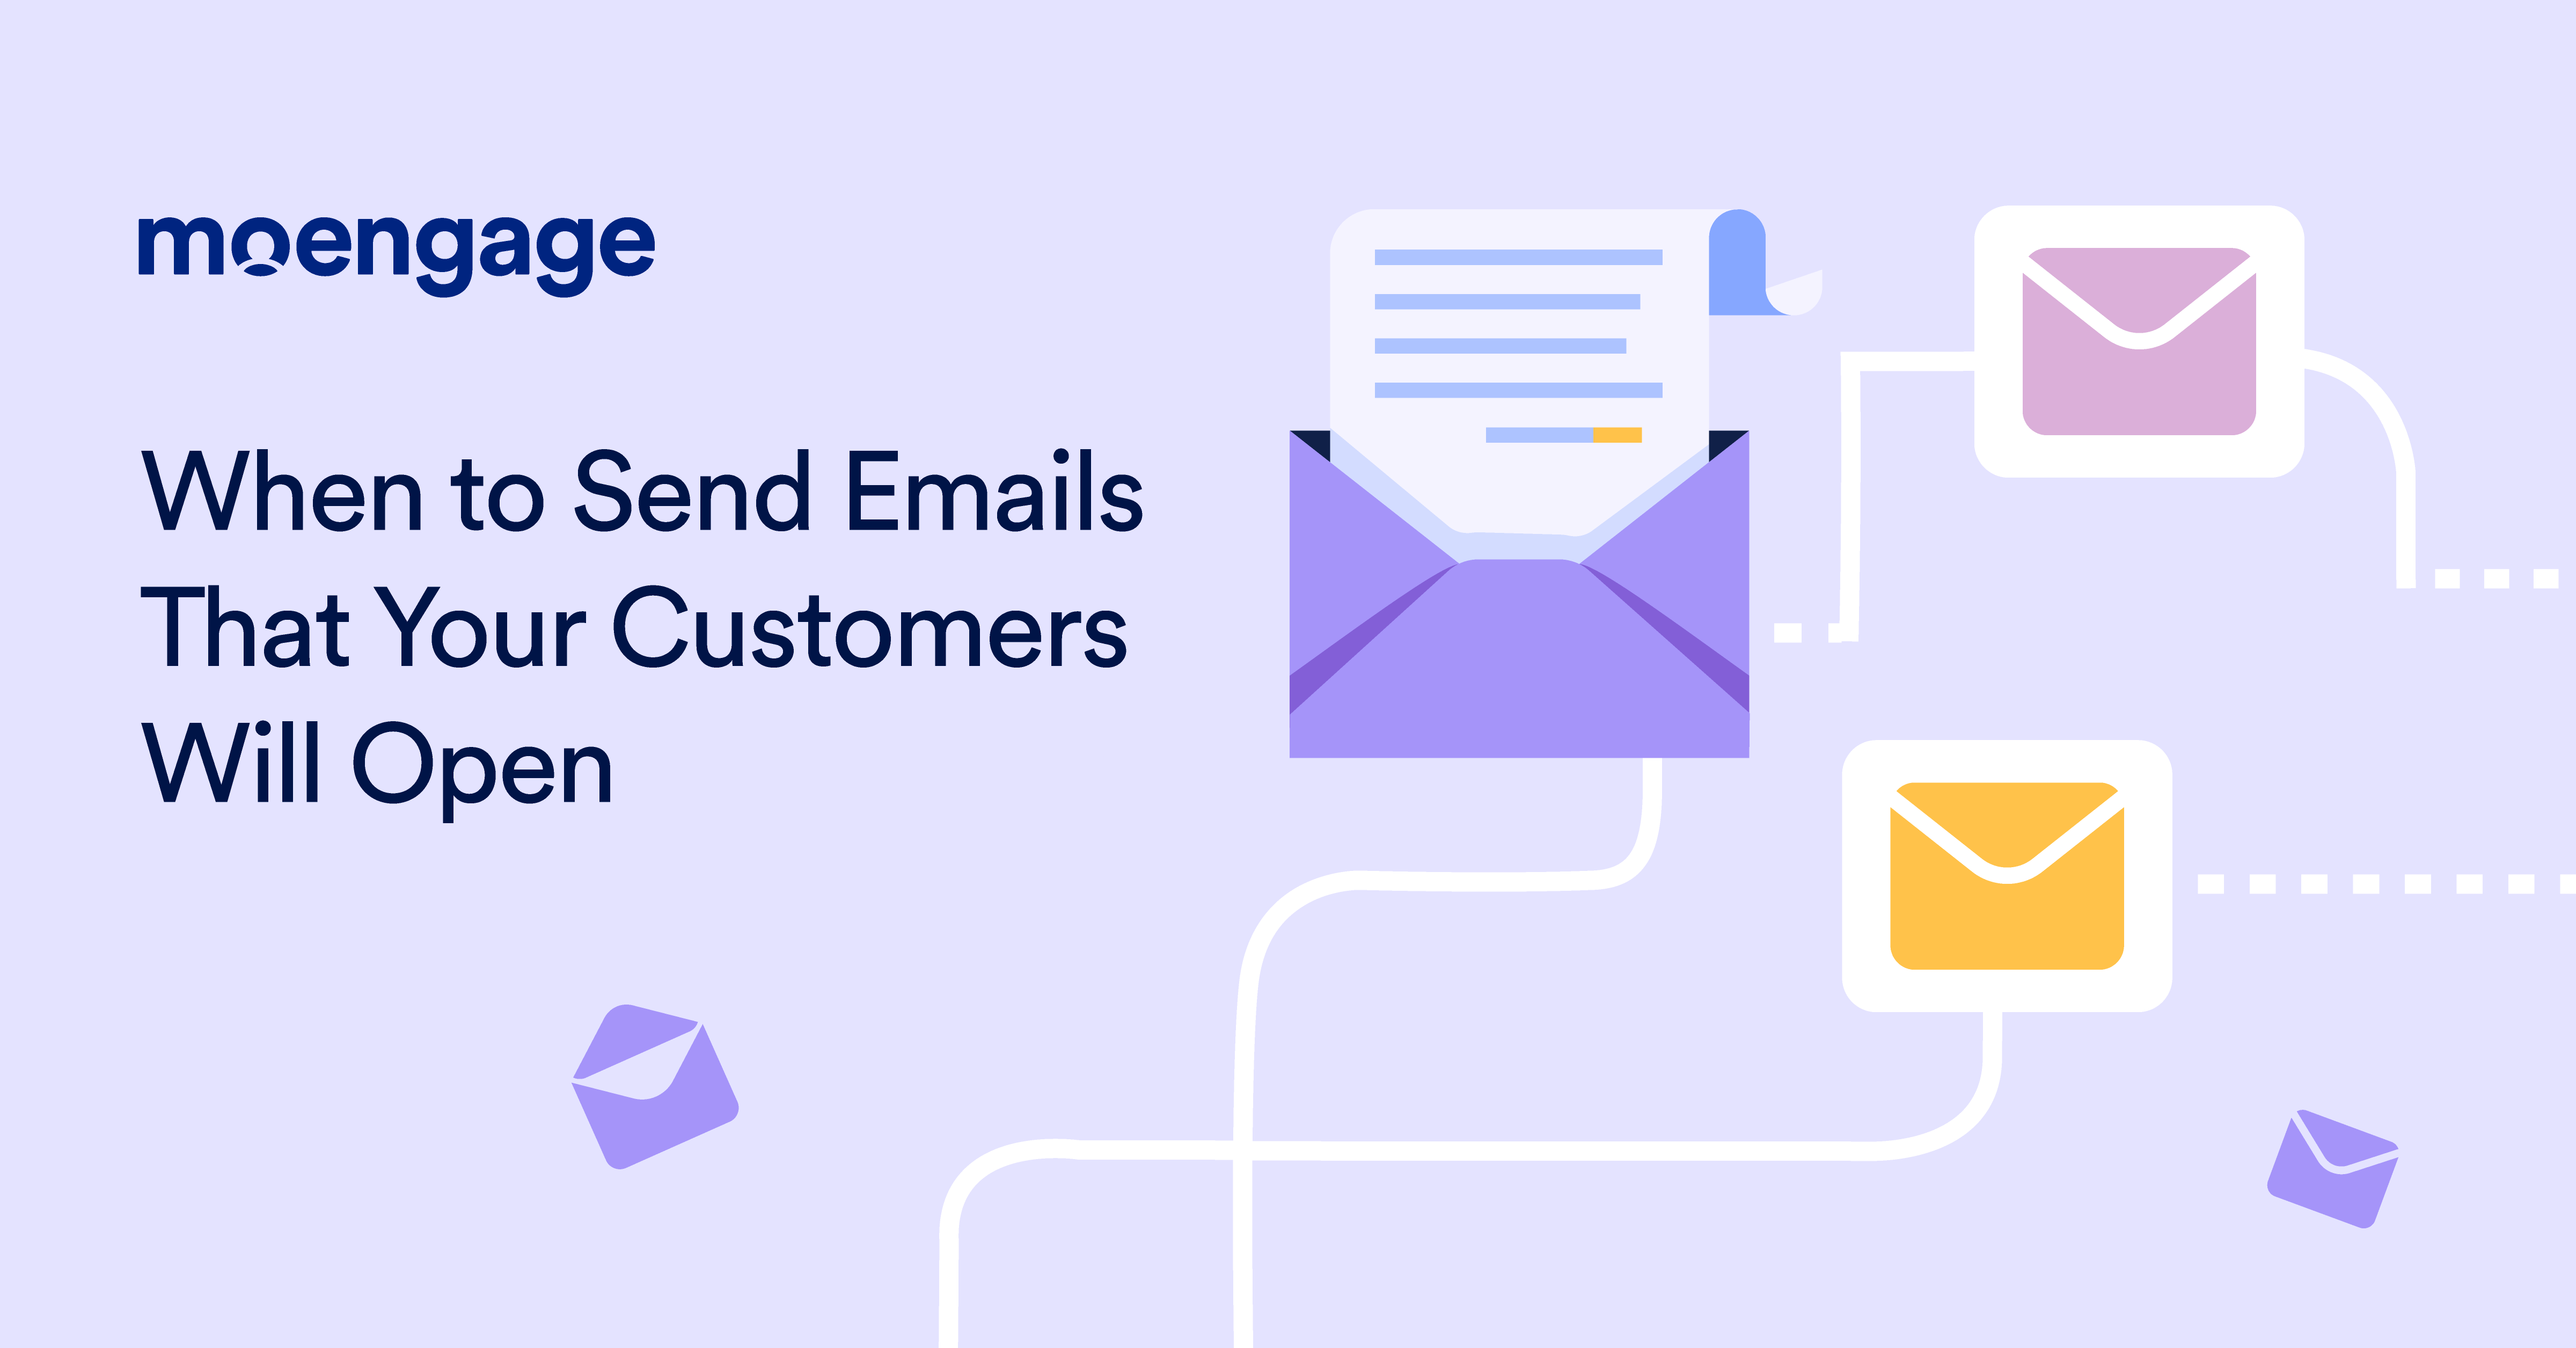
When is the Best Time to Send an Email?
Email provides a direct, two-way communication line to your target audience, which makes it, in a sense, more social than marketing channels like Instagram, Facebook, and TikTok. However, this doesn’t automatically lead to high open rates or email engagement. You need to know when the best time to send an email is and how often you should send them. Without a well-thought-out schedule, you’ll likely overwhelm your customers’ inboxes.
In this post, we’ll discuss email scheduling and cadence best practices, along with the best day and time to send email marketing messages.
Let’s jump in.

What is Email Cadence?
Email cadence is the ideal frequency and most impactful time for your business to send marketing emails to your subscribers. It’s a process that involves experimentation, testing, and adjustments, as you’ll need to understand your subscribers’ preferences and modify your email schedule accordingly.
It matters because it will greatly impact the success of email marketing campaigns, specifically engagement and your relationship with your subscriber list. Send too many emails, and they’ll likely unsubscribe. Get the timing wrong, and you’ll see an impact in your open rates.
The Best Time to Send an Email: By Industry and Day
There isn’t a universal email cadence to replicate, as it varies by industry. That said, the best time to send an email is typically at the start of the workday between 8 a.m. and 11 a.m. on weekdays, with Tuesdays and Thursdays being the most effective days.
This is why it’s crucial that you dig into the averages for your industry, conveniently set out for you in this table based on the data collected. It’s a good place to start, especially if you’re new to email marketing and don’t have your own data yet.
| Industry | Best Day To Send Emails | Best Time To Send Emails |
| Retail and Ecommerce | Monday (for conversions) and Sunday (for opens) | 10:00 a.m. – 11:00 a.m. and again 7:00 p.m. – 9:00 p.m. |
| Financial | Friday (for conversions) and Sunday (for opens) | 8:00 a.m. – 10:00 a.m. and again 2:00 p.m. – 3:00 p.m. |
| Media and entertainment | Thursday (for conversions and opens) | 12:00 p.m. – 2:00 p.m. and again 5:00 p.m. – 7:00 p.m. |
An Ideal Sales Cadence Email Template (by MoEngage)
Once you’ve identified the best time to send emails for your industry, you can plan your email marketing campaign around these times.
We’ve created this sales cadence email template for a hypothetical brand, StrideGo, a subscription-based fitness app, to help you see how this will look in practice. It shows how to plot out your emails so you can balance frequency with the best times to send an email.

From sales to subscriber re-engagement, there are various ways you can tweak this template to match your campaign goal, as the following examples from well-known B2C brands illustrate.
Email Cadence Examples From Top Brands
Some of the best email cadence examples come from brands that have turned email into one of their most effective channels. From limited-time flash sales to regular content updates that help build your brand as a thought leader, here are some ways you can approach email cadence, timing, and content.
1. Grammarly | Flash Sale

Campaign goal: Promote a flash sale
Grammarly’s email campaign serves as a good example of how to strike the right balance between staying top of mind without becoming an annoyance. The first email succinctly links the offer with their subscribers’ pain point, which increases their chance of opening it.
They then wait two days before sending a follow-up email to remind subscribers that the offer will soon end. To capitalize on the powerful effect of urgency, they wait until the day the offer ends to send their final reminder.
What this email campaign does well: Grammarly doesn’t solely rely on the massive discount to drive subscriptions. They take it one step further by linking their software with their potential new subscribers’ pain points. It’s a great example of a customer relationship email.
2. Airbnb | Announcing New Updates
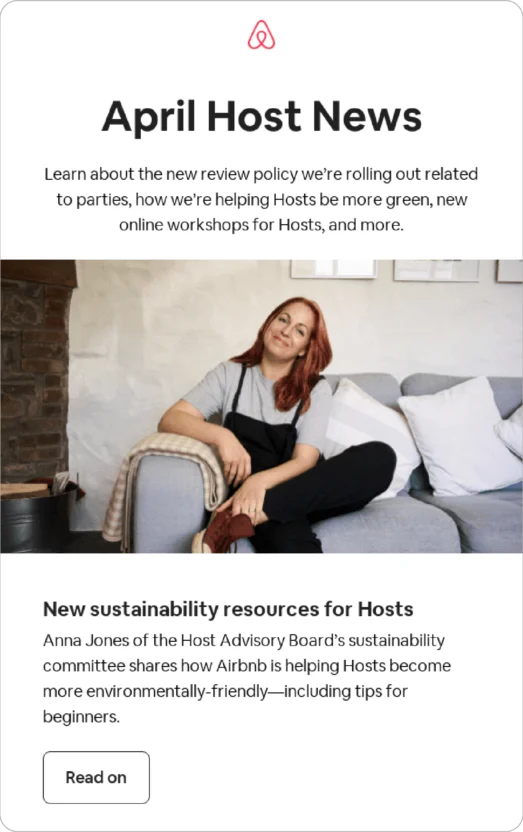
Campaign goal: Highlight new blog content and product updates
Airbnb sends monthly email newsletters that share industry news, product updates, and learning resources. On the surface, it functions as an email newsletter, but it’s also an effective tool for establishing thought leadership. Industry news isn’t as exciting or time-sensitive as sales, so it makes sense for this type of email to be scheduled on a monthly basis only.
What this email campaign does well: The newsletter helps to build brand awareness and encourages product discovery. The strategic placement of several calls to action (CTAs) per email also helps to generate website traffic.
3. McDonald’s | Personalized Updates
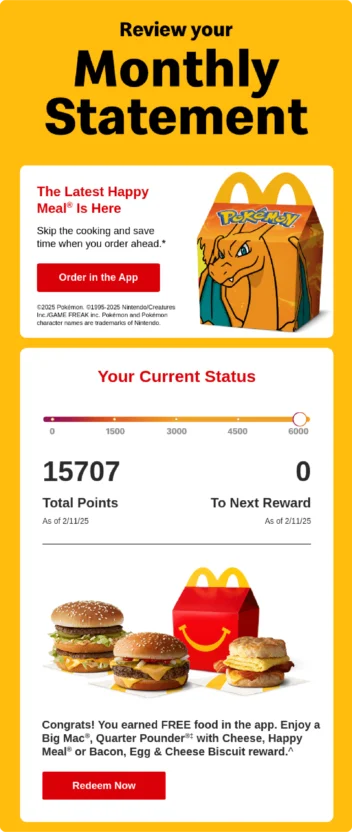
Source: https://reallygoodemails.com/emails/smiles-davis-your-january-account-in-review
Campaign goal: Update customers about their loyalty points
See how they’re proudly announcing their email marketing cadence?
Each month, McDonald’s sends a statement that summarizes loyalty program members’ activity for the past month and current status. It’s an effective tool for engaging their most loyal customers to grow their customer loyalty even further.
What this email campaign does well: The personalized content makes regular diners feel special. Plus, the fact that it visualizes how many points they’re away from a reward, along with the only-once-a-month email cadence, serves as good encouragement to visit McDonald’s more often. How? Well, when customers receive the email once a month stating the reward, it serves as a slight nudge to pay a visit in the hope of winning more rewards!
5 Best Practices for Email Marketing Cadence
Here are five email cadence best practices that will help you drive noteworthy results for you to replicate (and let you get the best use out of your email cadence tool).
1. Create a Customer Journey
Each email marketing campaign should have a specific goal, whether that’s to create brand awareness or drive webinar registrations. Creating and mapping the customer journey will ensure that you know where your target audience typically starts and what type of message they’ll need at which point to move them toward your goal.
If you have clarity on the typical steps your target audience takes and their behavior, your email communication will improve the customer experience. Each message will be relevant and valuable.
2. Segment Your List
Email preferences differ from one segment to the next. For example, your frequent shoppers generally like to receive regular promotional emails with exclusive deals. On the other hand, occasional buyers would rather receive fewer emails and resonate better with educational emails.
Segmenting your email list allows you to send daily emails to those in your most engaged group, while weekly emails are reserved for another group.
3. Personalize Content
One of the most crucial email cadence best practices is content personalization.
In addition to adjusting your email frequency to your segment’s preferences, you should also tailor the actual content so that it’s relevant to specific recipients. Generic content quickly gets ignored, while location-based product recommendations feel useful.
For your email cadence to click, you need recipients to click on the CTAs, and personalized content will encourage engagement. The added benefit of using email personalization is that once your open and click-through rates improve, you can also increase your email frequency.
4. Test and Tweak
Like with virtually anything in life, it takes time before you find your rhythm. The same applies to email cadence. A/B testing will allow you to see if your frequency and timing work and give you the data you need to improve your campaigns.
You can, for example, send specials to half of your frequent shoppers daily, while the other half receive specials only weekly. Alternatively, you can send the whole segment the same email on the same days at the same time, and then experiment with the best time to send an email.
5. Let Subscribers Select Email Preferences
While you still need to do your own rigorous testing, give your email subscribers the option to choose how often they want to receive emails from your brand. It’s as easy as adding a link in your email signature that takes them to a page where they can select which emails they choose to receive.
You can even take it one step further and let them choose the frequency by type of message. For example, they might want to hear about deals weekly, while company news is best served only once a month. This also allows them to change the frequency at a later stage, should their needs change.
Aside from making your job easier, it also gives your subscribers an alternative to unsubscribing from your emails altogether.
Top 3 Email Cadence Software and Tools
There are several great email cadence tools that can automate much of the labor involved in identifying the best time to send an email campaign. Here’s a quick look that highlights the core and unique features of three such software solutions.
1. Best for Cross-Channel Customer Engagement: MoEngage
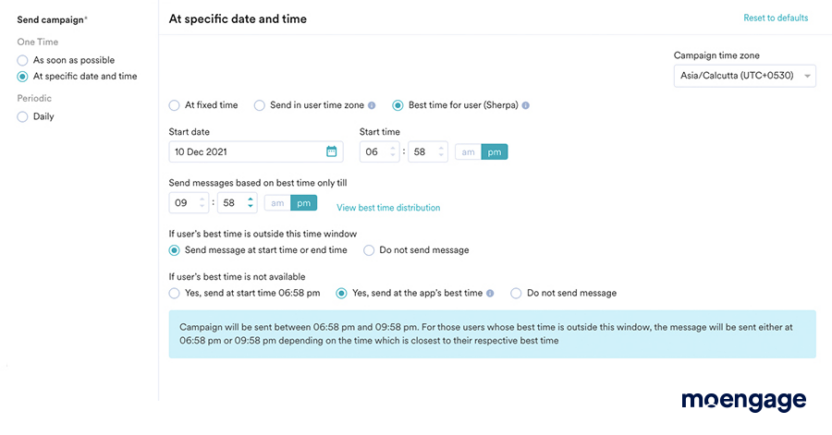
MoEngage’s enterprise-ready, cross-channel customer engagement platform gives your team the data and insight they need to personalize customer experiences. For help specifically with email cadence, you can use it to design relevant emails that match your customers’ preferences and meet them where they’re at in their journey.
What makes it such a unique email cadence tool is its deep focus on customer engagement.
It doesn’t just send emails but also helps you understand the why and when behind engagement. For example, it has a “Best Time to Send” feature that uses advanced data analysis to make sense of historical customer interactions.
How pricing works: MoEngage keeps pricing simple and flexible by offering only two plans (Growth and Enterprise) and dozens of features available to be purchased as add-ons.
What makes it stand out: MoEngage’s impressive predictive capabilities let you tailor your emails to your customers’ next best action, ensuring they receive timely, relevant content time and again.
2. Best for Email Scheduling for Small Businesses: Klaviyo
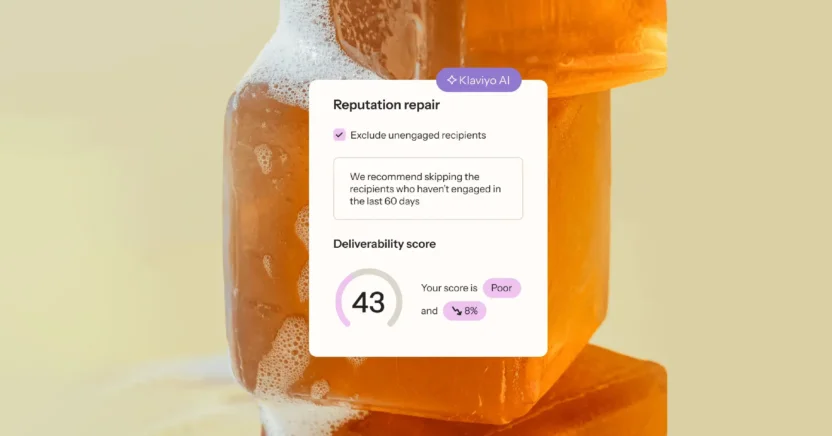
Klaviyo’s marketing automation platform offers tools for email and SMS marketing. With its built-in data platform and drag-and-drop editor, you can easily create customizable templates and send personalized emails.
You can, for example, use data like browsing history, past purchases, and subscription status to send relevant and timely updates. It also has a Smart Send Time feature to help specifically with the best time to send an email.
How pricing works: Plans start at $45 per month based on features and the number of monthly emails you want to send.
What makes it stand out: As it integrates with platforms like Shopify, you can use real-time customer data to personalize your communication.
3. Best for Inbound Marketing: HubSpot

HubSpot is an all-in-one solution that businesses can use to attract and engage their target audience across the entire journey. It offers various hubs (like sales, marketing, and operations) built to work together and integrations with more than 1,000 third-party apps that expand its capabilities even further.
To help with email cadence, you can check out Cadence, a multi-channel sales prospecting tool available in its app marketplace. It will tell you who to email and allow you to automate sequence steps.
How pricing works: Depending on the platform solutions you need, pricing ranges from $15 per month per seat to $4,700 per month per seat for seven seats.
What makes it stand out: HubSpot is built around inbound marketing and combines everything you’ll need for lead nurturing to customer support into one interface.

Manage Your Email Cadence With MoEngage
When you’re creating your email marketing strategy, you should also plan for the best time to send an email. If you send your email at 4 a.m. on a Saturday, it will only be buried with dozens of other emails when your recipients finally make time to check their inbox.
You want to find out at what time your subscribers are most likely going to open their inbox and ensure your email reaches them at this time. In addition to the day and time, you also need to consider the email cadence.
Here’s an idea: why not remove the guesswork altogether? With MoEngage’s Best Time to Send (BTS) feature, you can reach out to your customers at just the right moment. What’s more, MoEngage’s AI engine, Merlin AI, keeps updating the best time to send an email based on changing customer behavior.
Want to see this super-cool feature in action? Schedule a 1:1 demo today.


